Leaderboard


Popular Content
Showing content with the highest reputation on 04/06/18 in all areas
-
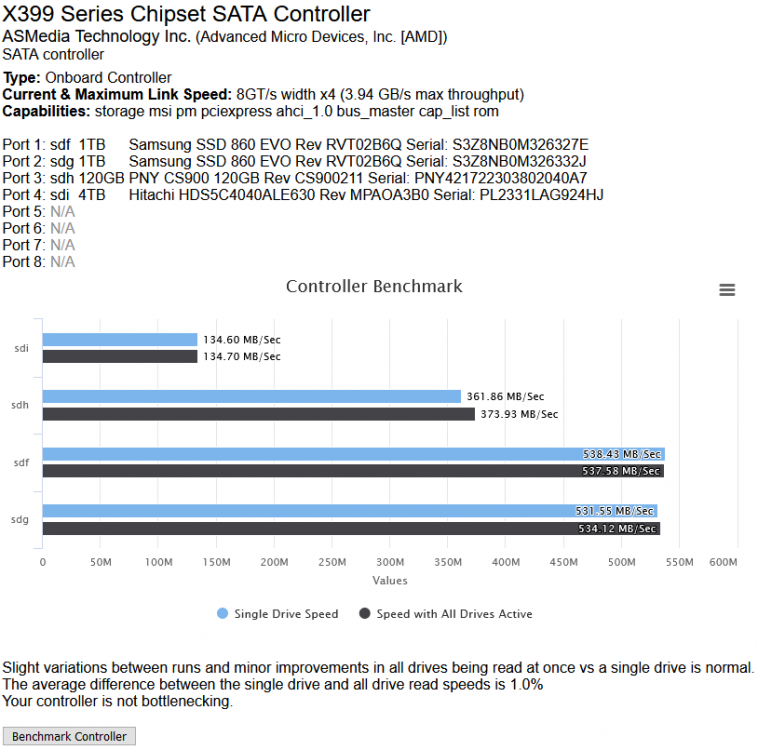
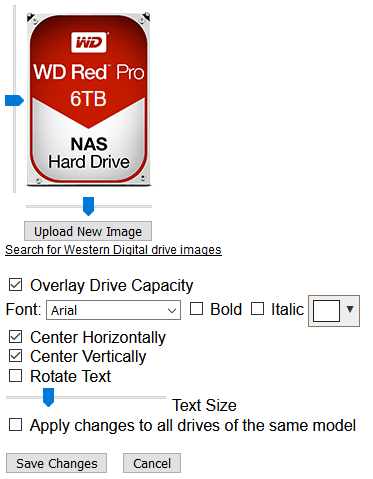
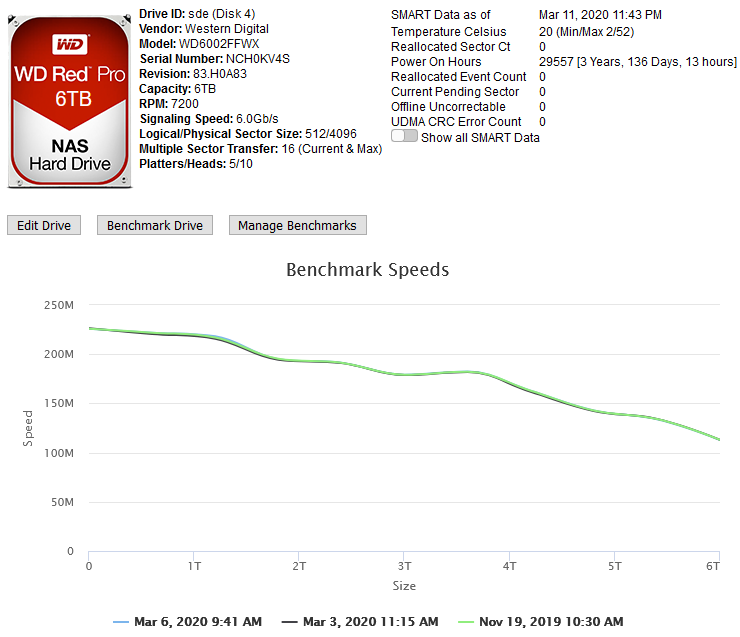
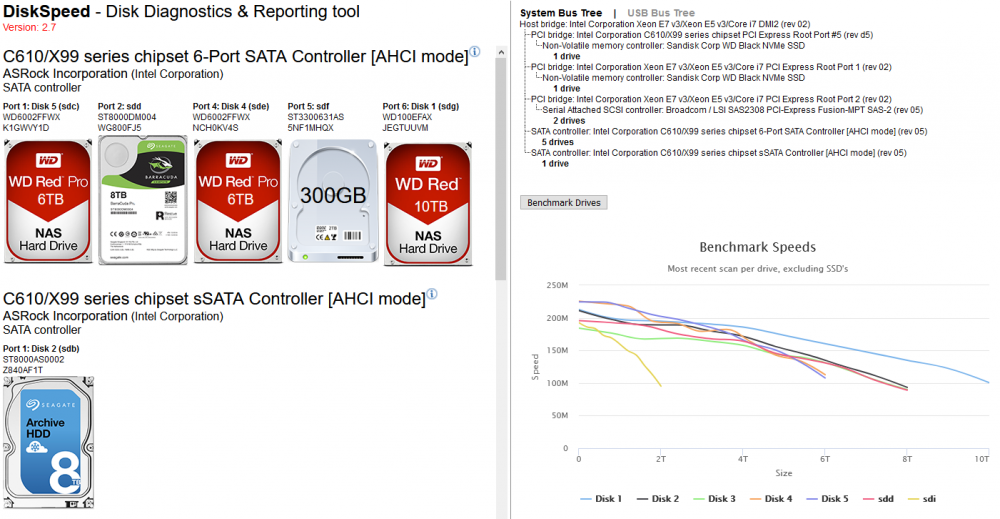
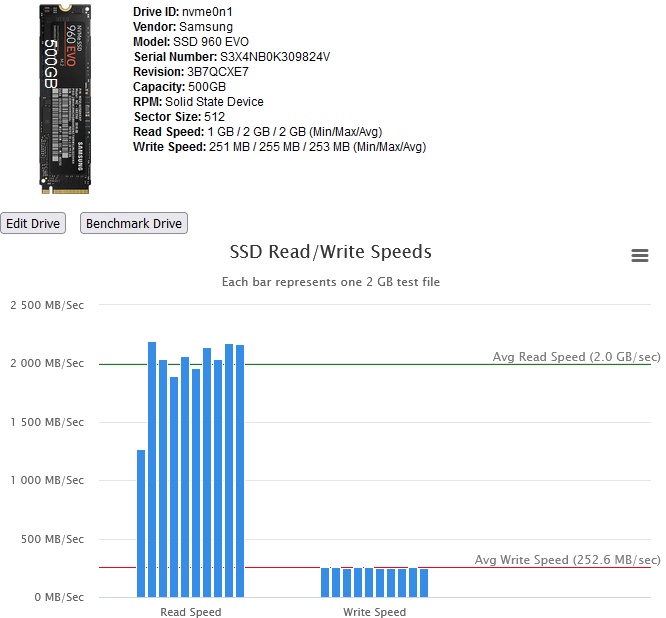
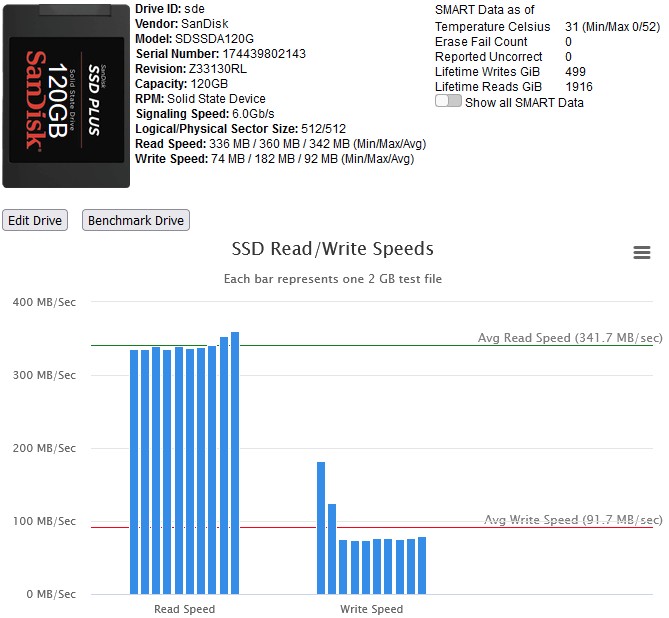
This Docker Application will let you view your storage controllers & the drives attached to them and perform Benchmarks on both. Controller Benchmarks helps to identify if the drives attached to it will potentially exceed the capacity of the controller if they were all fully being read from at the same time (such as during a Parity check). Drive Benchmarks lets you monitor the performance over time to look for desegregation or unexpected slow areas while getting a clean SMART report. Installation Via the Community Application: Search for "DiskSpeed" Manual Installation (The Community Applications plugin is having issues currently, here's a work around for now) Save the attached "my-DiskSpeed.xml" file to your NAS under \\tower\flash\config\plugins\dockerMan\templates-user View the Docker tab in your unRAID Administrator , click on "Add Container" Under "Select a template", pick "my-DiskSpeed" The defaults should work as-is unless you have port 18888 already in use. If so, change the Web Port & WebUI settings to a new port number. The Docker will create a directory called "DiskSpeed" in your appdata directory to hold persistent data. Note: Privileged mode is required so that the application can see the controllers & drives on the host OS. This docker will use up to 512MB of RAM. RAM optimization will happen in a later BETA. Running View the Docker tab in your unRAID Administrator and click on the icon next to "DiskSpeed" and select WebUI. Drive Images As of this December 2022, the Hard Drive Database (HDDB) has 3,000+ drive models in 70+ brands. If you have one or more drives that do not have a predefined image in the HDDB, you have a couple options available - wait for me to add the image which will be displayed after you click "Rescan Controllers" or you can add the drive yourself by editing it and uploading a drive image for it. You can view drive images in the HDDB to see if there's an image that'll fit your drive and optionally upload it so others can benefit. Controller & Drive Identification Issues Some drives, notably SSD's, do not reveal the Vendor correctly or at all. If you view the Drive information and it has the same value for the vendor as the model or an incorrect or missing Vendor, please inform me so that I can manually add the drive to the database or add code to handle it. If you have a controller that is not detected, please notify me. Benchmarking Drives Disk Drives with platters are benchmarked by reading the drive at certain percentages for 15 seconds and averages the speed for each second except for the first 2 seconds which tends to trend high. Since drives can be accessed while testing, if a min/max read speed exceeds a threshold, the test is re-performed with an increasing threshold to account for drives with bad areas. Solid State drives are benchmarked by writing large files to the device and then reading them back. In order to benchmark SSD's, they must be mounted in UNRAID and a mapping configured in the DiskSpeed Docker settings. You must restart the DiskSpeed app after mounting a device for it to be detected. For other Docker installations, an example is -v '/mnt':'/mnt/Host':'rw' if you have all your SSD's mounted under /mnt. You may need more than one volume parameter if they are mounted in different areas. Contributing to the Hard Drive Database If you have a drive that doesn't have information in the Hard Drive Database other than the model or you've performed benchmark tests, a button will be displayed at the bottom of the page labeled "Upload Drive & Benchmark Data to the Hard Drive Database". The HDDB will display information given up by the OS for the drives and the average speed graphs for comparison. Application Errors If you get an error message, please post the error here and the steps you took to cause it to happen. There will be a long string of java diagnostics after the error message (java stack) that you do not need to include, just the error message details. If you can't get past the Scanning Hardware screen, change the URL from http://[ip]:[port]/ScanControllers.cfm to http://[ip]:[port]/isolated/CreateDebugInfo.cfm and hit enter. Note: The unRAID diagnostic file doesn't provide any help. If submitting a diagnostic file, please use the link at the bottom of the controllers in the Diskspeed GUI. Home Screen (click top label to return to this screen) Controller Information Drive Information While the system cache is bypassed when benchmarking, some devices have a built-in cache that ignores cache bypass commands. An initial high write speed that quickly levels out is a sign of such as shown below. Drive Editor my-DiskSpeed.xml
 2 points
 -
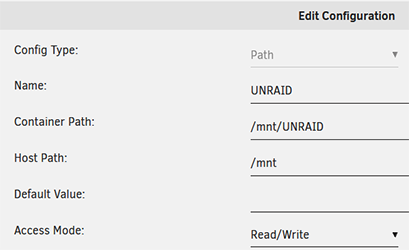
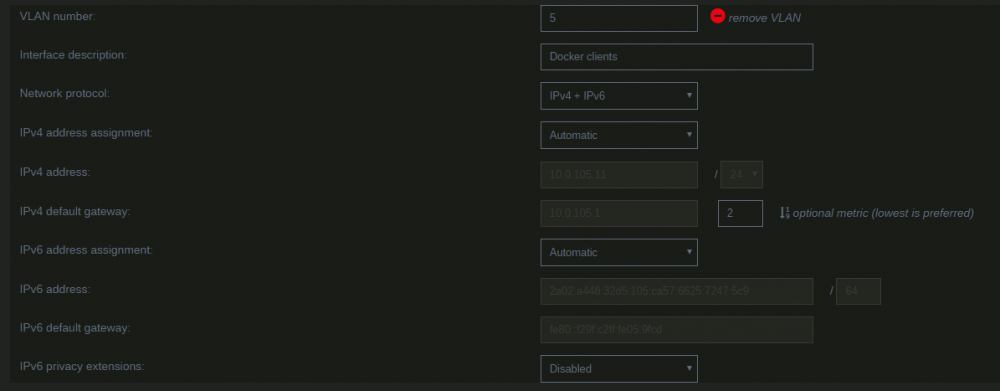
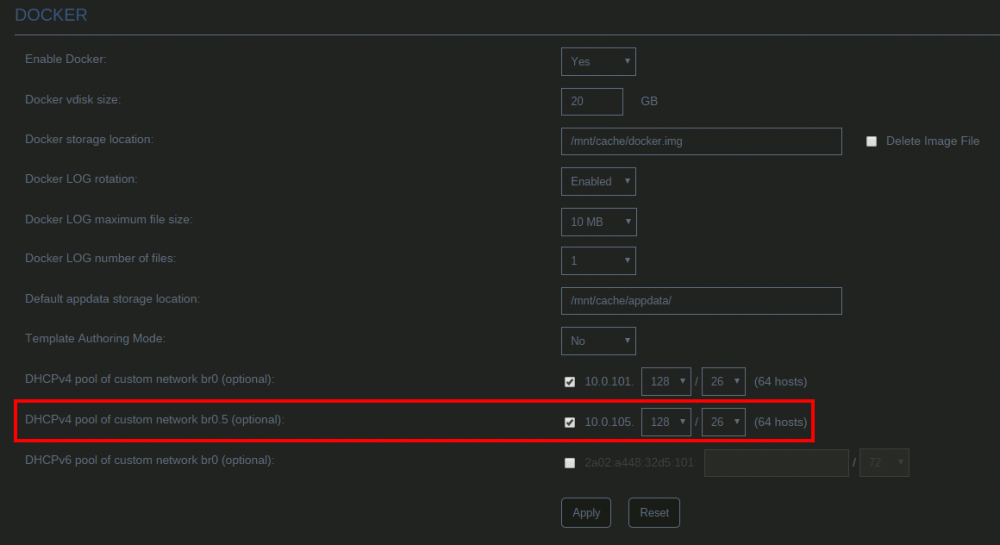
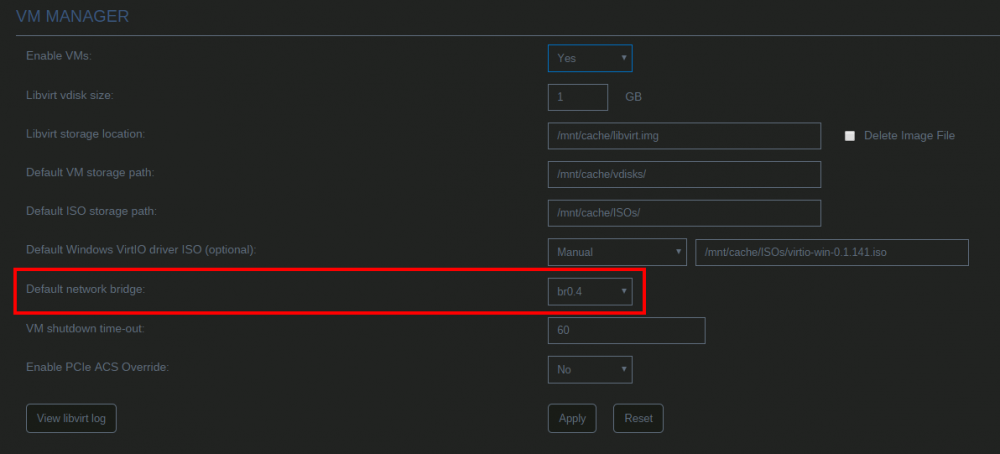
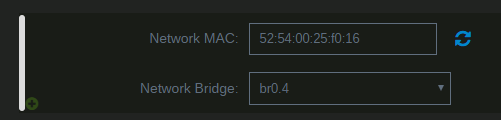
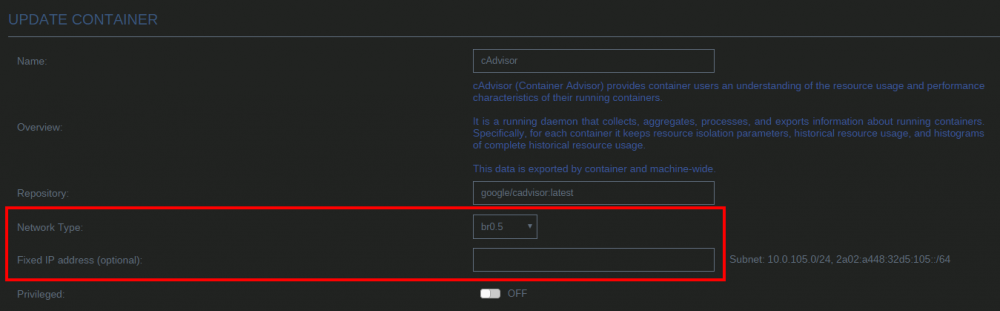
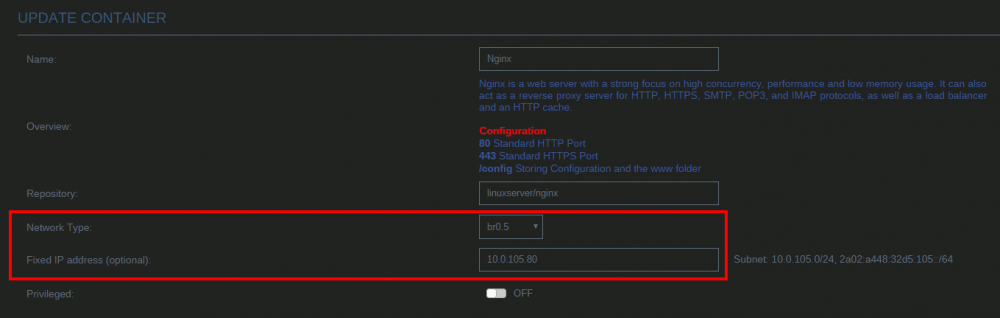
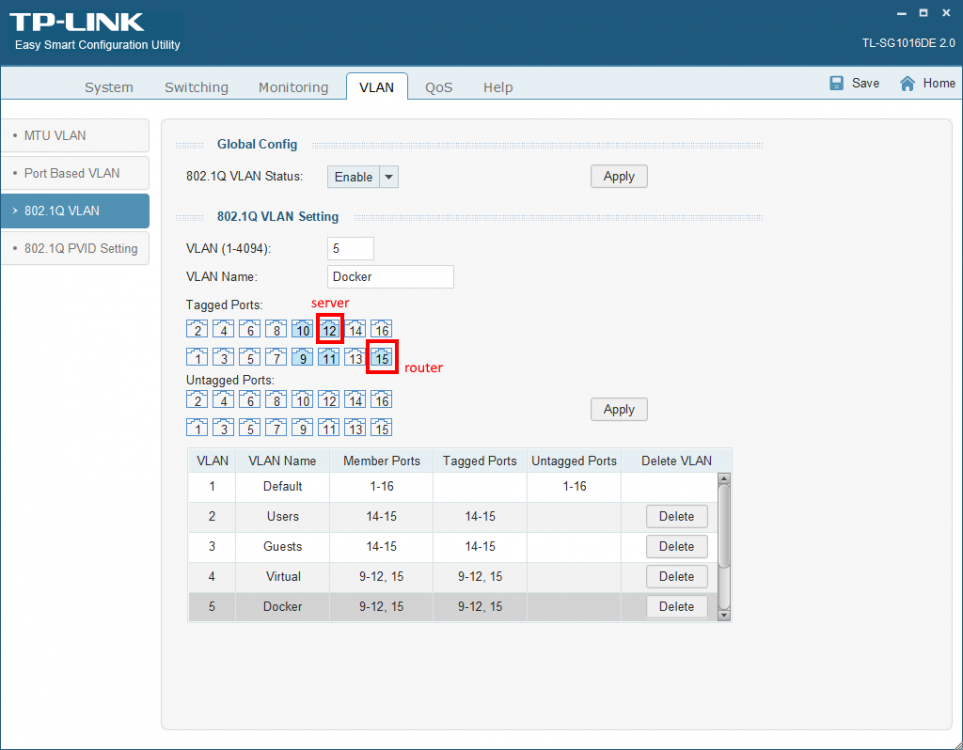
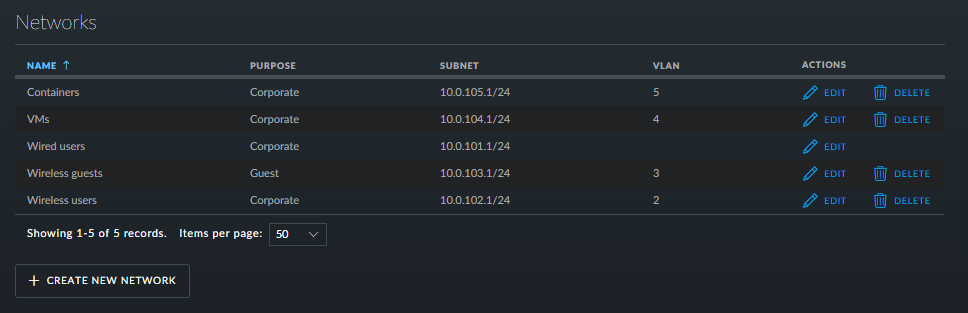
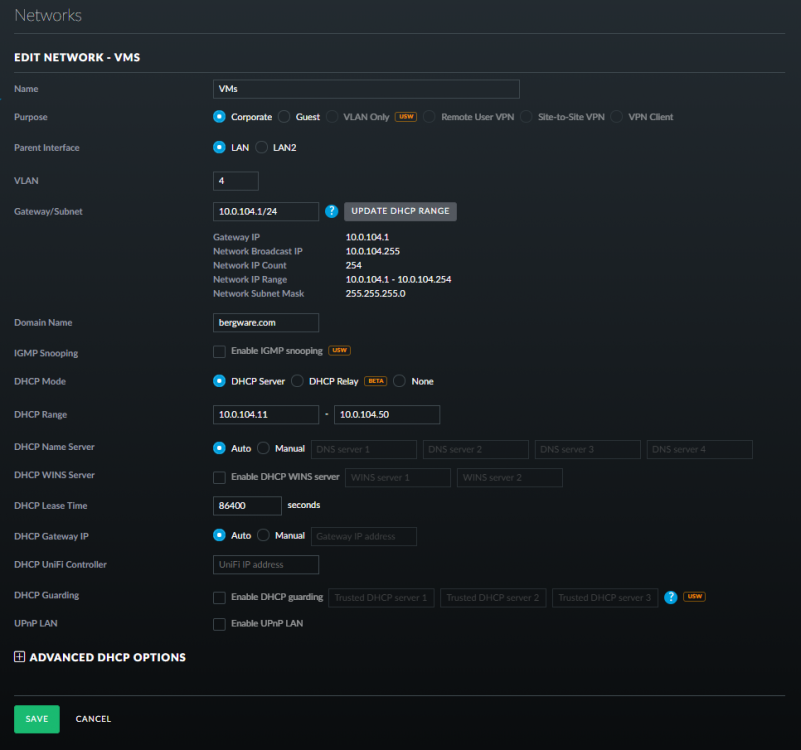
By default unRAID, the VMs and Docker containers all run within the same network. This is a straightforward solution, it does not require any special network setup and for most users this is a suitable solution. Sometimes more isolation is required, for example let VMs and Docker containers run in their own network environment completely separated from the unRAID server. Setting up such an environment needs changes in the unRAID network settings, but also requires your switch and router to have additional network possibilities to support this environment. The example here makes use of VLANs. This is an approach which allows to split your physical cable into two or more logical connections, which can run fully isolated from each other. If your switch does not support VLANs then the same can be achieved by connecting multiple physical ports (this requires however more ports on the unRAID server). The following assingments are done: network 10.0.101.0/24 = unRAID management connection. It runs on the default link (untagged) network 10.0.104.0/24 = isolated network for VMs. It runs on VLAN 4 (tagged) network 10.0.105.0/24 = isolated network for docker containers. It runs on VLAN 5 (tagged) UNRAID NETWORK SETTINGS We start with the main interface. Make sure the bridge function is enabled (this is required for VMs and docker). In this example both IPv4 and IPv6 are used, but this is not mandatory, e.g. IPv4 only is a good starting choice. Here a static IPv4 address is used, but automatic assignment can be used too. In this case it is recommended that your router (DHCP server) always hands out the same IP address to the unRAID server. Lastly enable VLANs for this interface. VM NETWORK SETTINGS VMs will operate on VLAN 4 which corresponds to interface br0.4. Here again IPv4 and IPv6 are enabled, but it may be limited to IPv4 only, without any IP assignment for unRAID itself. On the router DHCP can be configured, which allows VMs to obtain an IP address automatically. DOCKER NETWORK SETTINGS Docker containers operate on VLAN 5 which corresponds to interface br0.5. We need to assign IP addresses on this interface to ensure that Docker "sees" this interface and makes it a choice in the network selection of a container. Assignment can be automatic if you have a DHCP server running on this interface or static otherwise. VM CONFIGURATION We can set interface br0.4 as the default interface for the VMs which we are going to create (existing VMs you'll need to change individually). Here a new VM gets interface br0.4 assigned. DOCKER CONFIGURATION Docker will use its own built-in DHCP server to assign addresses to containers operating on interface br0.5 This DHCP server however isn't aware of any other DHCP servers (your router). Therefor it is recommended to set an IP range to the Docker DHCP server which is outside the range used by your router (if any) and avoid conflicts. This is done in the Docker settings while the service is stopped. When a docker container is created, the network type br0.5 is selected. This lets the container run on the isolated network. IP addresses can be assigned automatically out of the DHCP pool defined earlier. Leave the field "Fixed IP address" empty in this case. Or containers can use a static address. Fill-in the field "Fixed IP address" in this case. This completes the configuration on the unRAID server. Next we have to setup the switch and router to support the new networks we just created on the server. SWITCH CONFIGURATION The switch must be able to assign VLANs to its different ports. Below is a picture of a TP-LINK switch, other brands should have something similar. ROUTER CONFIGURATION The final piece is the router. Remember all connections eventually terminate on the router and this device makes communication between the different networks possible. If you want to allow or deny certain traffic between the networks, firewall rules on the router need to be created. This is however out of scope for this tutorial. Below is an example of a Ubiquiti USG router, again other brands should offer something similar. That's it. All components are configured and able to handle the different communications. Now you need to create VMs and containers which make use of them. Good luck.


 1 point
 -
This support thread and the Docker image arch-rtorrentvpn has now been deprecated, no support or further images will be produced. Overview: Support for Docker image arch-rtorrentvpn in the binhex repo. Application: rTorrent - https://github.com/rakshasa/rtorrent Docker Hub: https://hub.docker.com/r/binhex/arch-rtorrentvpn/ GitHub: https://github.com/binhex/arch-rtorrentvpn Documentation: https://github.com/binhex/documentation If you appreciate my work, then please consider buying me a beer For other Docker support threads and requests, news and Docker template support for the binhex repository please use the "General" thread here1 point
-
I just posted a request on the linuxserver.io forums (you can find it here https://forum.linuxserver.io/thread-585.html) about getting a Minio docker created. I found a blog article discussing the use on Minio and duplicati to mimic Crashplan Home. I will likely be combining duplicati with an Amazon S3 service to get the cloud backup portion taken care of; but that does not cover the Crashplan server I had running locally and was also backing up to. I believe I can get Minio and Duplicati to work together so that it will function the same or very close to how my local crashplan server did. I found a blog article talking about using these 2 apps together here (http://blog.quindorian.org/2017/08/diy-cloud-backup-replacing-crashplan-home-family-diy-style.html/) Thoughts and comments welcome.1 point
-
Probably not shutting down correctly, leave it disable, reboot and run the mover.1 point
-
I concur with @John_M, using "fill-up" is in my opinion always greater than "most-free", once a drive is filled use it as read-only. I'm the owner/developer of unBALANCE, and, in similar fashion to the "fill-up" philosophy, I believe that once you've filled up a drive, don't mess with it. I built unBALANCE because I sometimes failed to do that, probably being an unRAID rookie and all. I believe Freddie's diskmv was built on a similar idea. The thing is, to this day, I have separate folders for movies quality (xvid, dvd, blurip, bluray, uhd), so whenever I find a better version I delete a lesser one. That leaves empty gaps in the drive where the content was deleted, so I've used unBALANCE to figure out how to better allocate space for me. Also, I had tvshows season all over different disks, and whenever I binged, had to wait for spinup, which in retrospect, is it so bad ? Not sure, but millenials' timespan is like zero In any case, along the lines, other scenarios, such as converting filesystems (RFS to XFS), freeing a disk to do encryption came along, and made sense for unBALANCE. I believe the last frontier is in-place encryption .. once that happens, unBALANCE's usage (~4k+ per version), should go way down, I think.1 point
-
Have a look here and see if this solution listed in here helps (if applicable)1 point
-
If you haven't done so already, limit your upload to about 80% of what your connection can handle. If you don't put a cap on your upload it will "overload" your network causing lower download speed and higher ping. This should be done regardless of the client you're using.1 point
-
Sometimes the AMD gets "stuck" and the only way to recover is by powering down the unraid server and starting fresh. This is the case with my R9 370. This usually happens if I force close any VMs. Lately I'm passing through the GPU with the vbios file so I can use OVMF and I'm more careful with my VMs and it's working fine.1 point
-
I'm not sure who PIA is, but, well, that's your business... Thanks mate!1 point
-
Great little app. It would be sweet though if the two halves of the screen were able to scroll separately from each other (so that when I have to scroll down on the left to find a drive and click on it to see it's benchmark, the display doesn't scroll up to the top)1 point
-
1 point
-
Sorry! Tom is limetech. See his reply in the thread that 1812 linked.1 point
-
I do have a unifi switch and by default it trunks all vlans to all ports. I'll take some screenshots to illustrate where i'm at **edit** I basically nuked all the routes and started from scratch and now, at least the containers, seem to work. It's possible that my USG didn't get all the config changes as it sometimes starts to provision before finishing the changes. I forced a provision which may have helped also. Anyway, this is a super cool feature and i'm glad to have it working. Now I just need to work backwards to open up all the ports I need for my containers then slap a big DENY ALL at the end of the list to limit the docker vlan from accessing my main LAN. I ended up taking all those screenshots anyway so I might compile a unifi specific guide for users looking to do this and how to harden the stack as all vlans are wide open by default. Thanks!1 point
-
I have a theory on why some users may be having this issue, if anyone wants to try and post if there was an improvement please do. Currently fstrim on btrfs is only trimming the unallocated space, this is apparently a bug but it's been like this for some time, for some users with a large slack on the filesystem this will be a very small area of the SSD leaving all unused but allocated space untrimmed, this can lead to very poor performance, so first check for slack on the filesystem, i.e., the difference between the allocated and used space, on the main page click on cache and look at the "btrfs filesystem show" section, e.g.,: Label: none uuid: cea535d2-33f9-4cf2-9ff0-0b51826d48a1 Total devices 1 FS bytes used 265.61GiB devid 1 size 476.94GiB used 427.03GiB path /dev/nvme0n1p1 In this case there's about 161GiB of slack, 476.94GiB is the total device size, 427.03GiB are allocated but only 265.61GiB are in use, since only unallocated space is trimmed, fstrim will only trim 49.9GiB (476.94-427.03) so most free space will remain untrimmed, to fix this run a full balance to reclaim all allocated but unused space, on the console type: btrfs balance start --full-balance /mnt/cache This will take some time, in the end it should look like this: Label: none uuid: cea535d2-33f9-4cf2-9ff0-0b51826d48a1 Total devices 1 FS bytes used 265.68GiB devid 1 size 476.94GiB used 266.03GiB path /dev/nvme0n1p1 Now slack space is less than 1GiB, so fstrim will work on practically all unused space, trim you pool: fstrim -v /mnt/cache And check if performance improves.1 point
-
Yes - you just need to fold back the metal tabs separating the 5.25" slots with a long neck C-clamp. Very easy to do.1 point
-
Yes you certainly can. You can use --include or --exclude. So try first using rclone ls to test For example rclone ls --include *.jpg secure: will just list the jpegs in that rclone mount. once you have tested use that with rclone sync, move, copy etc Have a read here for details http://rclone.org/filtering/1 point