Leaderboard


Popular Content
Showing content with the highest reputation on 08/17/18 in all areas
-
Apache Guacamole is a clientless remote desktop gateway. It supports standard protocols like VNC, RDP, SSH, and Telnet. This docker primarily has a MariaDB (MySQL) database built-in for authentication and configuration. It also has support for LDAP authentication and configuration as well as Duo two-factor authentication. For general usage of Apache Guacamole the full manual is located here: https://guacamole.apache.org/doc/gug/ The different authentication methods can be enabled or disabled through the template. MySQL is the default authentication and configuration method. Template Options OPT_MYSQL: Y(default) / N OPT_MYSQL_EXTENSION: Y / N(default) OPT_SQLSERVER: Y / N(default) OPT_LDAP: Y / N(default) OPT_DUO: Y / N(default) OPT_CAS: Y / N(default) OPT_OPENID: Y / N(default) OPT_TOTP: Y / N(default) OPT_QUICKCONNECT: Y / N(default) Note: MySQL, SQL Server, and LDAP cannot be used at the same time. Duo two-factor can be used with MySQL, SQL Server, or LDAP authentication. Microsoft SQL Server Authentication/Configuration For SQL Server support modify your guacamole.properties file as follows: Create a database on your SQL Server Execute the SQL scripts found in the sqlserver-schema folder on the new database you created. Comment the MySQL properties. Uncomment the SQL Server properties. Modify SQL Server properties to match your configuration. Further instructions can be found here: https://guacamole.apache.org/doc/gug/jdbc-auth.html#jdbc-auth-sqlserver LDAP Authentication/Configuration For LDAP authentication modify your guacamole.properties file as follows: Comment the MySQL properties. Uncomment the LDAP properties. Modify LDAP properties to match your configuration. Further instructions can be found here: https://guacamole.apache.org/doc/gug/ldap-auth.html Duo Two-Factor Authentication For Duo two-factor authentication uncomment the Duo properties in your guacamole.properties and follow these instructions: https://guacamole.apache.org/doc/gug/duo-auth.html#guac-duo-config 4/4/2017 Upgraded to Apache Guacamole 0.9.12-incubating. Upgraded MySQL Java Connector to 5.1.41. 8/2/2017 Upgraded to Apache Guacamole 0.9.13-incubating. Upgraded MySQL Java Connector to 5.1.43. Database schema upgrades to 0.9.13. 8/4/2017 Added all optional libraries for guacd to enable all features. Got rid of log warning by moving the offending symbolic link creation from firstrun.sh to Dockerfile. 8/7/2017 Upgraded to phusion/baseimage 0.9.22. Upgraded to MariaDB 10.2. Upgraded to Tomcat 8. 12/16/2017 Added Powerline fonts to support Oh My Zsh agnoster theme. 1/24/2018 Upgraded to Apache Guacamole 0.9.14. Upgraded MySQL Java Connector to 5.1.45 Added Microsoft SQL Server JDBC 6.2.2 driver. Converted to multi-stage Docker to reduce size. Ability to downgrade using a tag (e.g. jasonbean/guacamole:0.9.13) 6/7/2018 Added GhostScript to allow remote printing. 6/8/2018 Changed location of Tomcat catalina.out log file /config/guacamole/log to improve troubleshooting. Attempt to mitigate a file permissions problem by always setting 755 permissions on container start. 6/11/2018 Fixed creation of /config/guacamole/log folder so that it will exist when Tomcat is started. Corrected a regression error introduced when switching to a multi-stage build. 6/12/2018 Modified unRAID template to make this a privileged container so that Tomcat will run correctly. Added more logging messages and ensure that the database doesn't get created when the guacamole.properties file doesn't exist. Modified so that all Tomcat logs get placed in guacamole/log directory. 8/18/2018 tyler43636 submitted pull request to add the tzdata package to correct for the RTC being set to the local time rather than UTC. 9/24/2018 Modified the firstrun.sh script so that the MySQL schema files are copied to /config when OPT_MYSQL is set "Y" in case someone wants to use an external MySQL or MariaDB database. 1/10/2019 Upgraded to Apache Guacamole 1.0.0. BIG UPGRADE! Thanks to the Guacamole team my build process has been greatly improved. Now uses the Debian base container just like the guacd Docker container from Apache. Retooled entire run process to use tini/supervisor to manage services. Added version that comes without MariaDB so that container size is halved if you have an external database source or use the default authentication. 2/23/2020 Upgraded to Apache Guacamole 1.1.0. Changed to debian:stable-slim base container to shave off some size. No database schema changes. 7/5/2020 Upgraded to Apache Guacamole 1.2.0. Fixed problem with OpenID extension so that it would load before all other auth extensions. No database schema changes. 11/29/2020 Added -s argument to tini to make sure it can subreap if not PID 1. 12/6/2020 Implemented PUID and PGID environment variables to run tasks in non-root and match nobody user in file system. Cleaned up code to improve maintainability. 12/14/2020 Fixed regression to restore OPT_MYSQL_EXTENSION. 1/9/2021 Upgraded to Apache Guacamole 1.3.0. 5/30/2021 Merged changes from Sean to add logrotate to prevent Catalina log from growing forever. 1/12/2022 Upgraded to Apache Guacamole 1.4.0. Changed to install latest version of Tomcat directly from Apache since the Debian Buster repository contains an old version. 11/11/2022 Updated MariaDB install process. Cleaned up code. New build to update Tomcat. 3/18/2023 Correct how mysqld loads so that it shuts down correctly. 3/21/2023 Upgraded to Apache Guacamole 1.5.0. 3/24/2023 Added missing dependency for guacd. 4/14/2023 Upgraded to Apache Guacamole 1.5.1. Removed privileged from template. Changed to OpenJDK 11 to fix OpenID. 5/26/2023 Upgraded to Apache Guacamole 1.5.2. Implmented client log level. Simplified Dockerfile. 8/4/2023 Upgraded to Apache Guacamole 1.5.3. 1/10/2023 Upgrade to Apache Guacamole 1.5.4. Simplify versioning.1 point
-
And yes, once the VM is set up and running, the host OS (unraid) will continue to function as usual while you are using the VM.1 point
-
I think you have that the wrong way round. You have a PC You install unraid as the base OS You then install windows/your OS of choice as a VM. You don't install windows as the base OS and then run unraid as a VM on it1 point
-
Your question is very unclear. If you are asking whether or not you can run some other OS as a VM under unRAID then the answer is yes. Have you started the array? User shares don't exist until the array is started.1 point
-
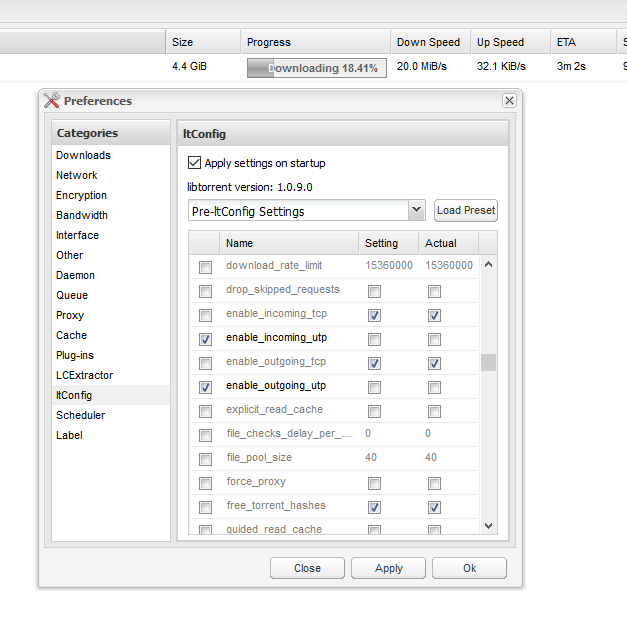
So...I found a comment on reddit: Followed this guy's explanation and voila: Not sure if this does more bad than good, but it seems to work. Anyone with experience with this kind of tinkering to libtorrent?
 1 point
 -
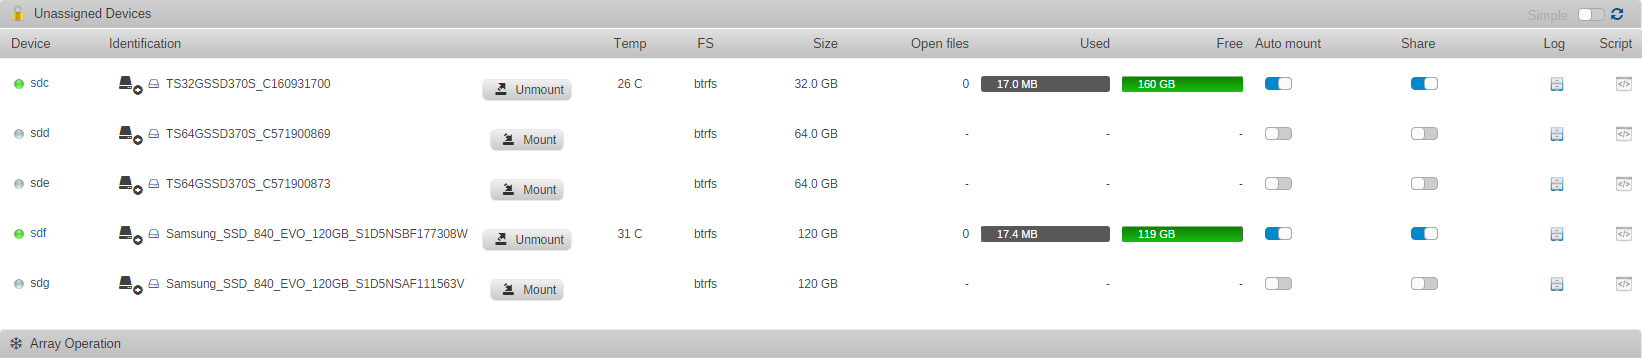
It's Alive.... Thanks working correctly now, shows all six drives.1 point
-
1 point
-
You are not paying me anything for all the development hours which I and Limetech put in unRAID. In that respective $59 is tiny.1 point
-
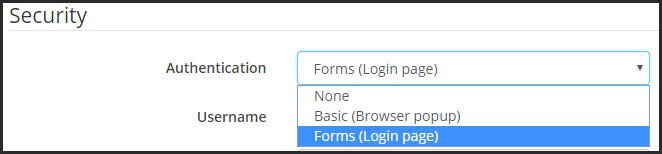
+1. Maybe unRaid can have an option to login with basic http authentication or a forms login page. Sonarr has this option.
 1 point
 -
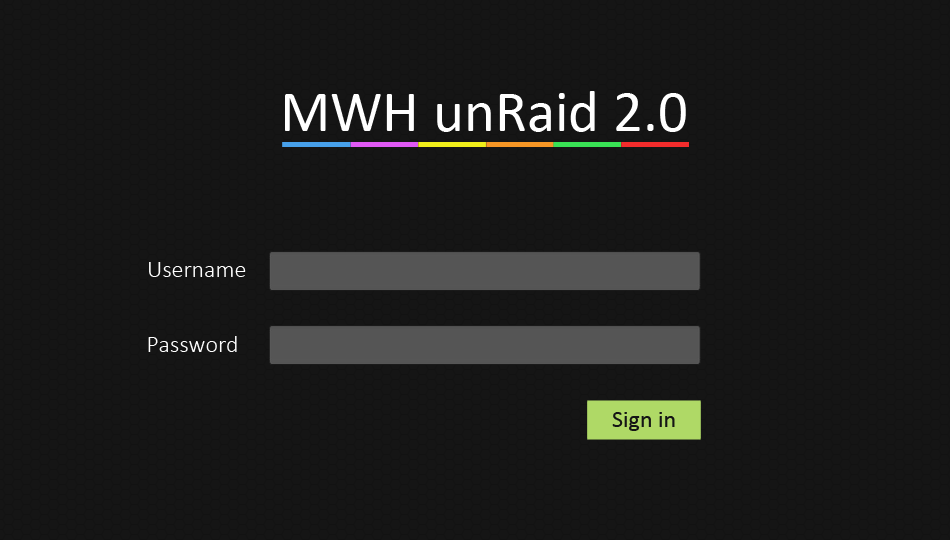
I'm all for something like this, if you can makes changes to the login page to make it your own. Changeable background and logo would probably be the only thing needed. I made a quick example of how it could look.
 1 point
 -
MULTIPLE CACHE POOLS i wish1 point
-
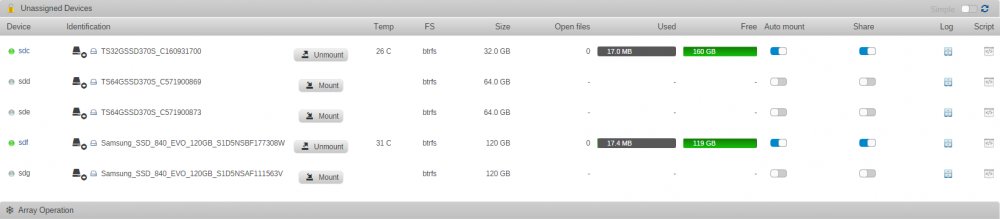
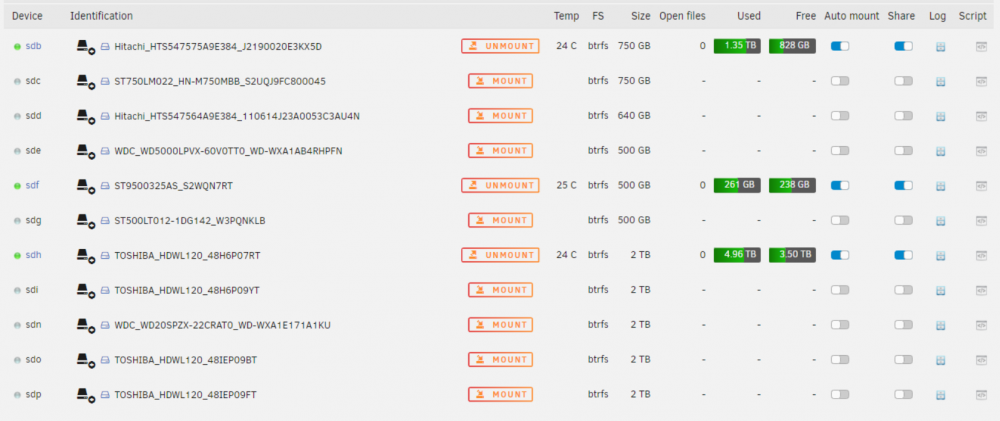
Can I manually create and use multiple btrfs pools? Multiple cache pools are supported since v6.9, but for some use cases this can still be useful, you can also use multiple btrfs pools with the help of the Unassigned Devices plugin. There are some limitations and most operations creating and maintaining the pool will need to be made using the command line, so if you're not comfortable with that wait for LT to add the feature. If you want to use the now, here's how: -If you don't have yet install the Unassigned Devices plugin. -Better to start with clean/wiped devices, so wipe them or delete any existing partitions. -Using UD format the 1st device using btrfs, choose the mount point name and optionally activate auto mount and share -Using UD mount the 1st device, for this example it will be mounted at /mnt/disks/yourpoolpath -Using UD format the 2nd device using btrfs, no need to change the mount point name, and leave auto mount and share disable. -Now on the console/SSH add the device to the pool by typing: btrfs dev add -f /dev/sdX1 /mnt/disks/yourpoolpath Replace X with correct identifier, note the 1 in the end to specify the partition (for NVMe devices add p1, e.g. /dev/nvme0n1p1) -Device will be added and you will see the extra space on the 1st disk free space graph, whole pool will be accessible in the original mount point, in this example: /mnt/disks/yourpoolpath -By default the disk is added in single profile mode, i.e., it will extend the existing volume, you can change that to other profiles, like raid0, raid1, etc, e.g., to change to raid1 type: btrfs balance start -dconvert=raid1 -mconvert=raid1 /mnt/disks/yourpoolpath See here for the other available modes. -If you want to add more devices to that pool just repeat the process above Notes -Only mount the first device with UD, all other members will mount together despite nothing being shown on UD's GUI, same to unmount, just unmount the 1st device to unmount the pool. -It appears that if you mount the pool using the 1st device used/free space are correctly reported by UD, unlike if you mount using e.g. the 2nd device, still for some configurations the space might be incorrectly reported, you can always check it using the command line: btrfs fi usage /mnt/disks/yourpoolpath -You can have as many unassigned pools as you want, example how it looks on UD: sdb+sdc+sdd+sde are part of a raid5 pool, sdf+sdg are part of raid1 pool, sdh+sdi+sdn+sdo+sdp are another raid5 pool, note that UD sorts the devices by identifier (sdX), so if sdp was part of the first pool it would still appear last, UD doesn't reorder the devices based on if they are part of a specific pool. You can also see some of the limitations, i.e., no temperature is shown for the secondary pools members, though you can see temps for all devices on the dashboard page, still it allows to easily use multiple pools until LT adds multiple cache pools to Unraid. Remove a device: -to remove a device from a pool type (assuming there's enough free space): btrfs dev del /dev/sdX1 /mnt/disks/yourpoolpath Replace X with correct identifier, note the 1 in the end Note that you can't go below the used profile minimum number of devices, i.e., you can't remove a device from a 2 device raid1 pool, you can convert it to single profile first and then remove the device, to convert to single use: btrfs balance start -f -dconvert=single -mconvert=single /mnt/disks/yourpoolpath Then remove the device normally like above. Replace a device: To replace a device from a pool (if you have enough ports to have both old and new devices connected simultaneously): You need to partition the new device, to do that format it using the UD plugin, you can use any filesystem, then type: btrfs replace start -f /dev/sdX1 /dev/sdY1 /mnt/disks/yourpoolpath Replace X with source, Y with target, note the 1 in the end of both, you can check replacement progress with: btrfs replace status /mnt/disks/yourpoolpath If the new device is larger you need to resize it to use all available capacity, you can do that with: btrfs fi resize X:max /mnt/disks/yourpoolpath Replace X with the correct devid, you can find that with: btrfs fi show /mnt/disks/yourpoolpath
 1 point