Leaderboard


Popular Content
Showing content with the highest reputation on 01/15/19 in all areas
-
Tom M's idea. Not sure when this will be added, but we want this to happen...1 point
-
I really suggest watching some videos on youtube. You cant do it easier. https://www.youtube.com/channel/UCZDfnUn74N0WeAPvMqTOrtA Some things are slightly outdated, but still more or less valid.1 point
-
Could the plugin version be incompatible with the version of Deluge that you're running? I recently ran into the problem of a pluggin/egg file (Copy Completed) not installing via Web GUI and the version that SpaceInvaderOne had was one version newer than the one I pulled from the Deluge site/forums. Not sure if this will help solve the issue, but try making your changes to the preferences using the Web GUI and Apply/OK them. Next, go Connection Manager > Disconnect > Reconnect > Stop Daemon > Start Daemon Stop/Start the Deluge docker I was running into an issue of the Plugin's settings were not being saved after stopping and starting the Deluge docker. Doing this, seemed to help me and I got the idea from here. Initially, I thought it might be a permissions issue as this was showing up in my log: WARNING: file 'credentials.conf' is group or others accessible So, I deleted the perms.txt file thinking that would solve the issue. I also, understood not to run the New Permissions (Located under Tools > New Permissions) on the /appdata directory as it will have a negative impact on any Docker containers — so, I didn't run New Permissions.1 point
-
1 point
-
To avoid broken communication for Unraid itself, it is recommended to NOT set pi-hole as DNS server for Unraid, but use a different DNS server instead.1 point
-
This is a little unclear. Do you intend to use the NVME disk as cache like I suggested? Or do you mean the 500GB would be cache as you originally stated. If you want to save the NVME separate from cache and strictly for a VM that can be done with the Unassigned Devices plugin. You can configure a media share and make it use whichever disks you want. Same for a downloads share. You can have shares use multiple disks if you want. This is how Unraid allows shares to span disks. The folders for the share can be on more than one disk, but any particular file is contained completely on one disk. Parity is not a backup and has none of your files. Parity PLUS ALL other disks in the array allow the data for a missing disk to be calculated. This is similar in some respects to how RAID systems use parity, but in Unraid there is no striping and the disks are independent, so parity is completely on one disk, but the other disks supply the rest of the bits for the parity calculation. And parity is not a substitute for backups. You must have another copy of anything important and irreplaceable, preferably on another system. There are plenty of ways to lose data that parity cannot help with, including simple user error. Have you browsed the Product pages on the website? It might give you a better idea how things work. Also the Overview in the Wiki: https://wiki.unraid.net/UnRAID_6/Overview Studying some of these will help you ask better questions.1 point
-
Notifications with a warning importance (orange) indicate events where nothing is wrong, but may need your attention. Notifications with an alert importance (red) indicate events which need immediate action / checking.1 point
-
You have a share, anonymized name 'D-------s'. It is set to cache-no, but all of its contents are on cache. Assuming you want it on the array, and to never use cache, set it to cache-yes, run mover, when mover finishes, set it back to cache-no. You have a share, anonymized name 'd-----s'. It is set to cache-prefer, and all of its contents are on cache. That is fine if that is your intention. I only mention it because it isn't one of the shares that Unraid creates as cache-prefer. You have a share, anonymized name 'D----r'. It is set to cache-yes, and some of its contents are currently on cache. Those will be moved to the array when mover runs. This is also fine if that is your intention. Your appdata share is set to cache-prefer, and it is all on cache. Some people prefer to make this cache-only but it should be fine like that if you don't ever fill up cache and you don't refer to cache specifically in your container mappings. Your system share is set to cache-prefer, and some of it is on the array. Mover can't move any open files, so to get this moved to cache, you will have to disable docker service (Settings - Docker) and VM Service (Settings - VM Manager), run mover, then when it is done re-enable services. Your share named 'VM Storage' is cache-yes and all on the array currently. Keep in mind mover won't move open files. If you make a new file in this share, it will be written to cache, and it can't be moved to the array if the file is open by a VM for example. All of your other shares look fine. They are cache-no and have no files on cache.1 point
-
I miss testing the RC of upcoming releases. Did I miss an announcement regarding why there hasn't been any lately?1 point
-
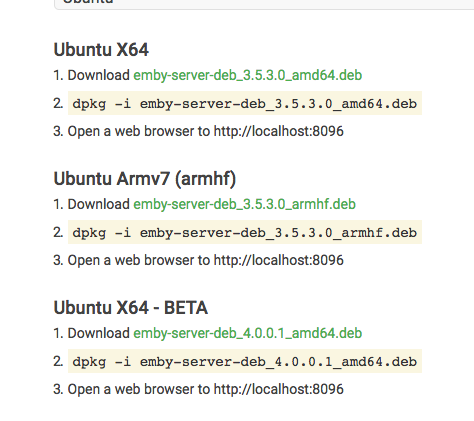
ok that has changed then, i had a look at the downloads page and it was marked as beta, in any case the new image wont be built until arch linux repo has updated, fyi here is the link:- https://www.archlinux.org/packages/community/any/emby-server/ Looks like its still the case on the emby downloads page, note the BETA next to the download for 4.0.0.1 in the screenshot below:-
 1 point
 -
Not correct. Emby 4.0 has been released. Docker images is already updated https://emby.media/announcing-emby-server-40.html1 point
-
when its released as stable, its currently in beta.1 point
-
And next time grab the diags after the disk gets disabled and before rebooting, so we can see what happened.1 point
-
UnRAID will disable any disk (and stop using it) if a write to it fails. Often this due to an external factor (e.g. cabling, power) and the disk itself is fine. You need to rebuild the disk to remove the ‘disabled’ state. If you think the disk is fine then you can rebuild back to the same drive to bring it back inline with the emulated state.1 point
-
China Ruskies USA (Actually, some farmer in Wichita, KS) Are you teleporting and/or trying to give user's access to your machine? Or (more likely), you've forwarded 443 from your router to directly to the server and/or have the server sitting in a DMZ. Don't do this. Use a VPN instead or the Let'sEncrypt / nginx Proxy Manager containers to accomplish what you're trying to do. Also, according to your top screenshot, bash is using 3002% of the CPU, and that is probably all related to the above, and nothing to do with your containers.1 point
-
So... I honestly I haven't looked at this for more than a few months since it has been working for my needs and my personal life has been rather busy. However, I did start working on (and am planning to eventually finish) some updates to this script as well as a version that works with btrfs snapshots. Things have slowed down a little lately, so I've started getting back into these kind of projects. I will take another look at the vdisk skipping, plus I'm working on adding the ability to parse the vdisk names directly from the xml file as well as a few other things. Unfortunately I don't have a firm timeline right now, but I expect to be able to devote a decent amount of time over the next month or so. -JTok1 point
-
Wow! Amazing write up! Thank you. 👍 That was way more than I expected, and I understood quite a bit at the first attempt. I shall definitely read a few times and have a think whether to tackle something similar. Right now, it's academic (no Kindle available) but I am sure I could solve that pretty quicky. The threads that you linked to are also very valuable as an insight into how this kind of approach can evolve. Thanks again.1 point
-
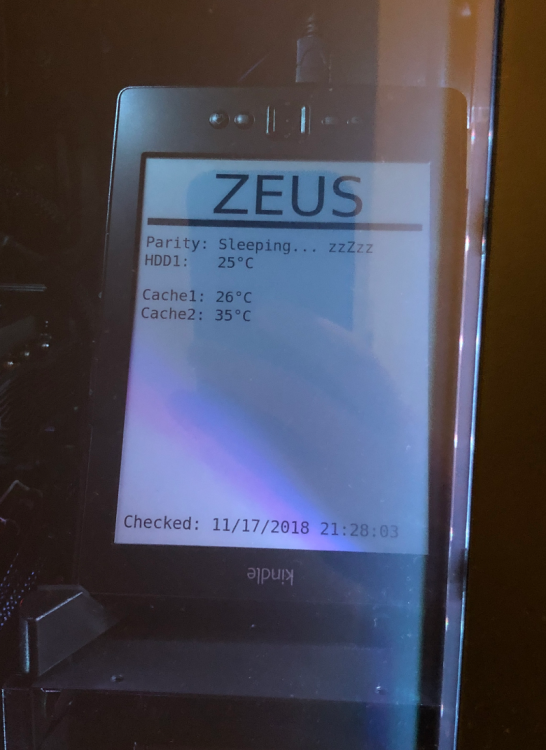
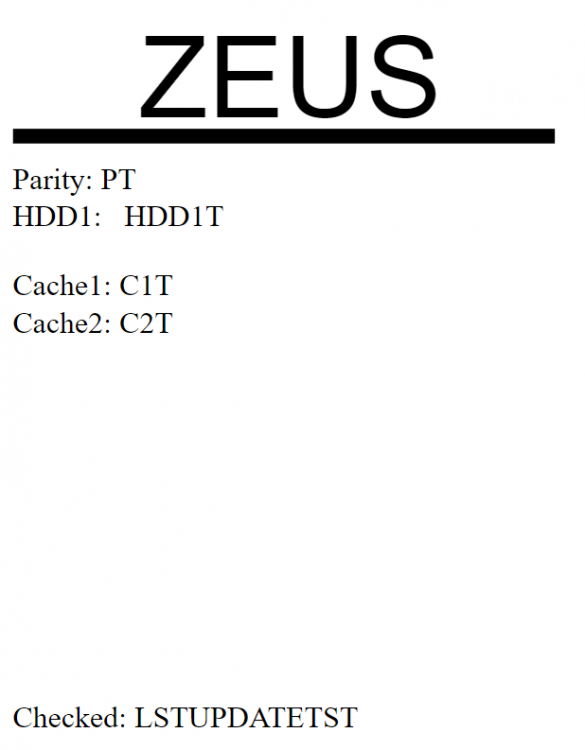
I, eh... well... *blushes* Thanks for your kind words! Both of you! Sure, a small writeup wouldn't be tooo hard, I guess... The Kindle Well, the Kindle being used is nothing too spectacular, but it was the part that consumed almost half of the time for the whole project. It's a 4th Gen Kindle, which, as you might already have guessed from the name, runs the Firmware 4.x (don't know the exact version number). For prepping the Kindle, I followed several online tutorials - most of it was taken out of this tutorial at galacticstudios. The author did a great work here. However, as outlined in the last paragraph, the writer also hit a roadblock when trying to register the cron job. I had the same issue, so at the end I had to head over to the mobileread thread, where I got everything to setup a USB-Network. Luckily, as you might remember, my thin client already runs on linux, so no problems here with crude Windows drivers. I could then ssh into the Kindle itself as root, and add the cronjob there. On the now-rooted Kindle, I installed Kite, an alternative launcher for the Kindle, which allows you to run basically everything that can run under Linux. What I also took from the first link, was the script, which fetches the image from the server: #!/bin/sh rm -f /mnt/us/weather.png read url </mnt/us/weatherurl if wget $url -O /mnt/us/weather.png 2>/mnt/us/documents/recentweatherlog.txt; then eips -c eips -c eips -g /mnt/us/weather.png else cat /mnt/us/recentweatherlog.txt >>/mnt/us/documents/weatherlog.txt eips -c eips -c eips -g /mnt/us/weather-image-error.png fi eips is the program on the kindle, which is used to display images (which are in a really special format) on the display. The script reads the url from a text-file, then tries to wget the image from a server, and stores it on the kindle. Also, logging is performed, and an error image has been provided, in case something fails. This basically rounds up the Kindle setup. The Server Yeah, well - it's a bit ugly. I wanted to make it a bit more cleaner, but sometimes life happens, and you don't have time to finish stuff the way you want it. But it's working for now, and I'm sure I'll get back to it some day. As you can see in the image from the first post, the Kindle only displays text. So, I thought it should be pretty straight forward: Design a template svg file, replace the placeholders with the actual content, convert it to a png, and push it to a webserver somewhere on the network. Well... no. First, I created a template SVG file in my favourite SVG editor, inkscape. It looks like this: Then, because I'm a C# coder all day, I wrote a .NET Core application, which can run under Windows and Linux alike (big bonus for developing in Visual Studio, and then deploying to a Linux Docker). It reads like this: using System; using Renci.SshNet; /* reference needed: Renci.SshNet.dll */ using System.IO; namespace Distat.Cli { class Program { static void Main(string[] args) { Console.WriteLine("Booting Launchpad..."); //smartctl -a /dev/sde | grep -m 1 -i Temperature_Celsius | awk '{print $10}' string[] drives = new string[]{ "sdf", "sdd", "sde", "sdc" }; string[] placeholders = new string[]{ "PT", "HDD1T", "C1T", "C2T" }; string svgContent = File.ReadAllText(@"./template/kindle-600-800.svg"); if (String.IsNullOrWhiteSpace(svgContent)) Console.WriteLine("Not loaded..."); ConnectionInfo ConnNfo = new ConnectionInfo("192.168.178.51",22,"root", new AuthenticationMethod[]{ // Pasword based Authentication new PasswordAuthenticationMethod("root","****************") } ); //svgContent = svgContent.Replace("PT", "31").Replace("LSTUPDATETST", DateTime.Now.ToString()); for(int i = 0; i < placeholders.Length; i++){ try{ using (var sshclient = new SshClient(ConnNfo)){ sshclient.Connect(); using(var cmd = sshclient.CreateCommand(String.Format("smartctl -a --nocheck standby -i /dev/{0} | grep -m 1 -i Temperature_Celsius | awk '{{print $10}}'", drives[i]))) { cmd.Execute(); string result = cmd.Result; if (String.IsNullOrWhiteSpace(result)) result = "Sleeping... zzZzz"; else result = result.Replace(System.Environment.NewLine, "") + "°C"; Console.WriteLine("Command>" + cmd.CommandText); Console.WriteLine("Return Value = {0}", result); svgContent = svgContent.Replace(placeholders[i], result); } sshclient.Disconnect(); } } catch { } } svgContent = svgContent.Replace("LSTUPDATETST", DateTime.Now.ToString()); Directory.CreateDirectory("./output/"); if (File.Exists("./output/kindle.png")) File.Delete("./output/kindle.png"); if (File.Exists("./output/kindle.svg")) File.Delete("./output/kindle.svg"); File.WriteAllText("./output/kindle.svg", svgContent); "rsvg-convert --width 600 --height 800 --background-color white -o ./output/kindle.png ./output/kindle.svg".Bash(); "convert ./output/kindle.png -rotate -180 ./output/kindle.png".Bash(); "pngcrush -c 0 -ow ./output/kindle.png".Bash(); using (var sshsftp = new SftpClient(ConnNfo)){ sshsftp.Connect(); sshsftp.UploadFile(new MemoryStream(File.ReadAllBytes("./output/kindle.png")), "/mnt/user/appdata/apache-www/imgs.png"); sshsftp.Disconnect(); } } } } So I guess I have to explain a few parts: Everything is hardcoded. Yes. I admit. I have another EPaper sitting in our house, which waits for being allowed to display some info. Maybe next year. Let's walk through the code: string[] drives = new string[]{ "sdf", "sdd", "sde", "sdc" }; string[] placeholders = new string[]{ "PT", "HDD1T", "C1T", "C2T" }; string svgContent = File.ReadAllText(@"./template/kindle-600-800.svg"); I defined an array with all the drives that are available in the server, and another array, which holds the placeholder. Out of pure lazyness, these share the same indices. ;) The next line reads all the content from the template svg into a simple string. for(int i = 0; i < placeholders.Length; i++){ try { using (var sshclient = new SshClient(ConnNfo)) { sshclient.Connect(); using(var cmd = sshclient.CreateCommand(String.Format("smartctl -a --nocheck standby -i /dev/{0} | grep -m 1 -i Temperature_Celsius | awk '{{print $10}}'", drives[i]))) { cmd.Execute(); string result = cmd.Result; if (String.IsNullOrWhiteSpace(result)) result = "Sleeping... zzZzz"; else result = result.Replace(System.Environment.NewLine, "") + "°C"; Console.WriteLine("Command>" + cmd.CommandText); Console.WriteLine("Return Value = {0}", result); svgContent = svgContent.Replace(placeholders[i], result); } sshclient.Disconnect(); } } catch { } } Here, most of the magic happens. Using the awesome ssh.net library, I connect to the unraid machine via SSH, and run several commands on it (Note: Don't do that.) Nice detail: The --nocheck standby flags doesn't wake up the drive. So it stays idle, although the cron job is updating the data every 7 minutes. I then simply replace the placeholders with the real data (Note: My daily production code doesn't look like this.^^). File.WriteAllText("./output/kindle.svg", svgContent); "rsvg-convert --width 600 --height 800 --background-color white -o ./output/kindle.png ./output/kindle.svg".Bash(); "convert ./output/kindle.png -rotate -180 ./output/kindle.png".Bash(); "pngcrush -c 0 -ow ./output/kindle.png".Bash(); using (var sshsftp = new SftpClient(ConnNfo)){ sshsftp.Connect(); sshsftp.UploadFile(new MemoryStream(File.ReadAllBytes("./output/kindle.png")), "/mnt/user/appdata/apache-www/imgs.png"); sshsftp.Disconnect(); } Afterwards, everything is written to a new file, called kindle.svg. The ssh library also provides a simple "Bash()" - Extension to strings, with which I can run commands on a local machine. I use rsvg-convert, convert and pngcrush: rsvg-convert: Does the heavy lifting from svg to png. Had some headache to get it running. convert: Rotates the output. As you can see in the picture, the Kindle is placed upside down. This is for the power cord. pngcrush: Does the conversion to a "Kindle"-friendly, grayscale png format. Took some time to find the right format for the png. Finally, the image gets uploaded to the Unraid server. On the Unraid server itself are two Docker containers running, that belong to this project: Apache-PHP: The easiest to use apache server I could find. Works like a charme, and provides the image to the Kindle Gogs: My go-to git repository. I use it to pull the source code to the server, and then build everything into a docker container. The aforementioned docker container is then run via cron every 10 minutes: #!/bin/bash while timeout -k 10 8 docker run --rm distat; [ $? = 124 ] do sleep 2 # Pause before retry done Yes, sometimes the "smartctl" - command doesn't return, and I haven't had the time to look into it. So I give the whole container a 10 second timeout. "Distat" is the name of the project - "Display Statistics". It should grow into sth. bigger, but I haven't had the time for it yet. I guess I missed some bits and pieces, but I'm also a little bit sick at the moment, so my mind might not work as expected.^^ One more thing... I almost forgot - there is one thing left: The power supply. One part of the hack is to change the Kindle to an "always on" kind of display. That's not how the kindle works out of the box. It normally goes to sleep, which also means that the wifi gets disconnected. So I had to turn this off. This means, the Kindle needs to be attached to a 5V PSU all the time. I did this by splicing up a Micro USB cable, soldering a Fan-Connector at the other end, and then put a 5V/12V - Fan - Molex splitter in between. Now, the Kindle never switches off, because the server runs 24/7. Conclusion That's pretty much all that is to say about the project. It was fun, and I'm really looking into making it more mature - like growing it into a "home-assistant" for information displays through out the household. Don't know if that's realistic, but... Well, that's what dreams are for. Thanks for reading. :)
 1 point
 -
Just what I was thinking. While it's definitely a bit of a hack, as far as I understand your description, the end result is highly effective and a credit to your capabilities. If you ever consider writing that up in more detail for those of us with smaller brains, it would certainly be of interest.1 point
-
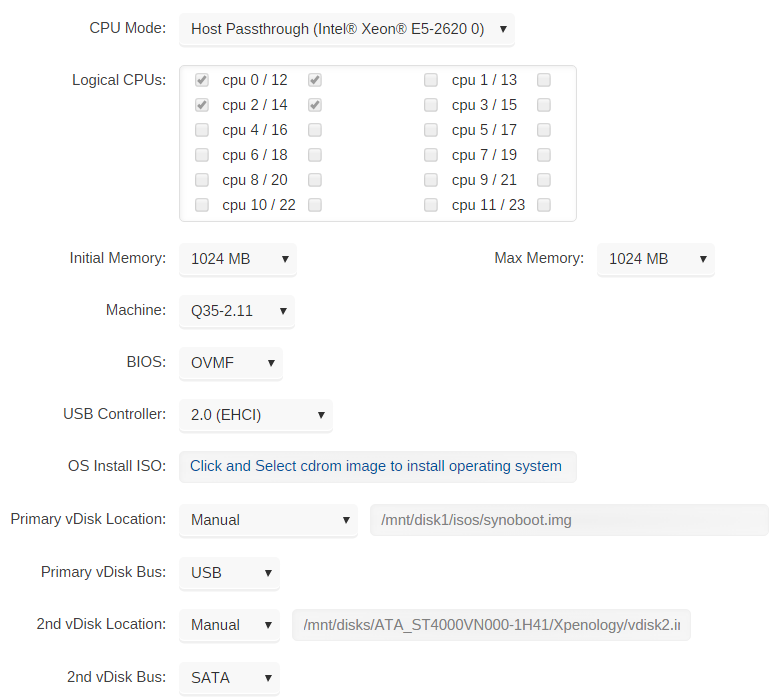
Hey guys, I was able to get this working. I've put together a quick and dirty "guide" below: Here is a screenshot of my config: The synoboot.img is downloaded from here: https://mega.nz/#F!BtFQ2DgC!JgomNP3X8V9EuwxL4TXbng!R4VmQbaC I can't remember which one I used, but I believe it was 1.02b for the ds3617. If you guys have trouble, I can upload the one I'm specifically using. Unfortunately it's just named synoboot.img, so it's hard to differentiate them. At this point, I had trouble accessing the webGUI for DSM, so I had to edit the VM XML and insert the following at the bottom: <interface type='bridge'> <mac address='52:54:00:23:2d:dc'/> <source bridge='br0'/> <model type='e1000'/> <address type='pci' domain='0x0000' bus='0x05' slot='0x00' function='0x0'/> </interface> I'm a noob when it comes to XML configs, so I have no idea why this worked, but I was just following the advice from earlier in this thread. I had to change bus='0x05' to bus='0x07' or else it wouldn't let me save the xml edits. At this point I could access the DSM webGUI and it was waiting for me to set it up. From here on out, you can probably just follow a normal Xpenology guide. I manually loaded DSM_DS3615xs_15284.pat to install DSM (https://archive.synology.com/download/DSM/release/6.1.7/15284/). It warned me that it would wipe my disks, but obviously it only had the virtual disk that it could access. That's it In the end it was pretty easy. I have been running this for a couple weeks now with no issues at all. Much thanks to the people that were helping in this thread earlier. I would've never been able to get this working without their advice.
 1 point
 -
Thank you sir, I actually can now find this in the web assistant now although im getting a message of Failed to format the disk. (35) when trying to install from the PAT file. I cannot change the bus to 02 or the slot to 01 either comes up with an error although i have managed to chang ethe type to e1000 Confused as to why i cannot format the Vdisk tho ? This is my disk config <devices> <emulator>/usr/local/sbin/qemu</emulator> <disk type='file' device='disk'> <driver name='qemu' type='raw' cache='writeback'/> <source file='/mnt/user/isos/New folder/synoboot.img'/> <target dev='hdc' bus='usb'/> <boot order='1'/> <address type='usb' bus='0' port='1'/> </disk> <disk type='file' device='disk'> <driver name='qemu' type='raw' cache='writeback'/> <source file='/mnt/user/domains/Linux/vdisk2.img'/> <target dev='hdd' bus='sata'/> <address type='drive' controller='0' bus='0' target='0' unit='3'/> </disk>1 point
-
Just saw this thread and I would like to share my previous experience. (I installed it months ago and dont remember all the details, hope it can help) - Linux VM - I assigned 1 core (2 threads) to the VM - Q35-2.11 (Q35-2.9 works too) - OVMF - put the synoboot.img to you primary vdisk location, USB Bus - another disk (either vdisk or actual disk) in 2nd vdisk location, SATA Bus - go to XML view and edit the network line <interface type='bridge'> <mac address='XX:XX:XX:XX:XX:XX'/> <source bridge='br0'/> <model type='e1000'/> <address type='pci' domain='0x0000' bus='0x02' slot='0x01' function='0x0'/> </interface> Please see if the information above help.1 point
-
HA! I figured something out. I was a little apprehensive about having to use the command line. I was poking around in Krusader and saw that I could browse to a given folder and then open a terminal window at that spot, which I did. Now in the same directory as the RAR file I didn't need to mess with a lengthy absolute or relative reference to point to the file. So I just tried 'unrar e name.of.torrent.rar' and voila, it worked. Not quite as easy as a GUI because the torrent names are a pain to type, but doable.1 point