Leaderboard


Popular Content
Showing content with the highest reputation on 01/28/19 in Posts
-
It's very difficult to ascertain the tone of forum posts. I'm sure you've noticed most forums and sites tend to devolve very quickly into nastiness, and sometimes people think that's happening here. We work very very hard at making this a friendly place, especially for new-comers. All our mods and key contributors are very patient and helpful, even when asked the same thing over and over. I'm 99% sure no rudeness was intended.2 points
-
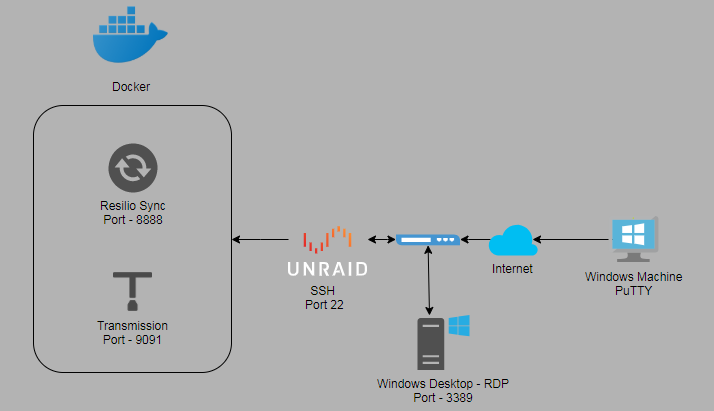
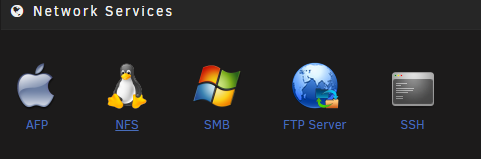
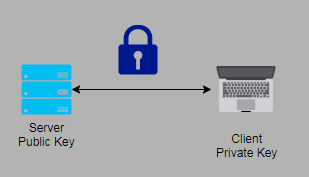
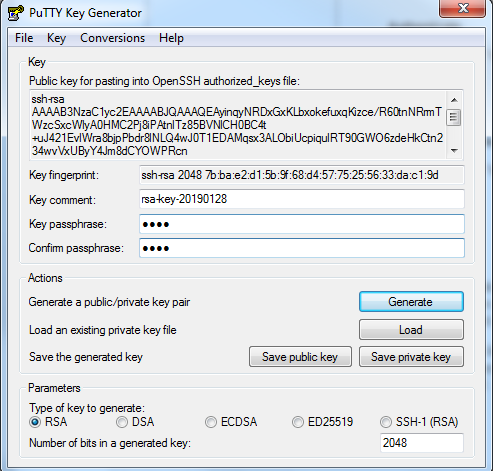
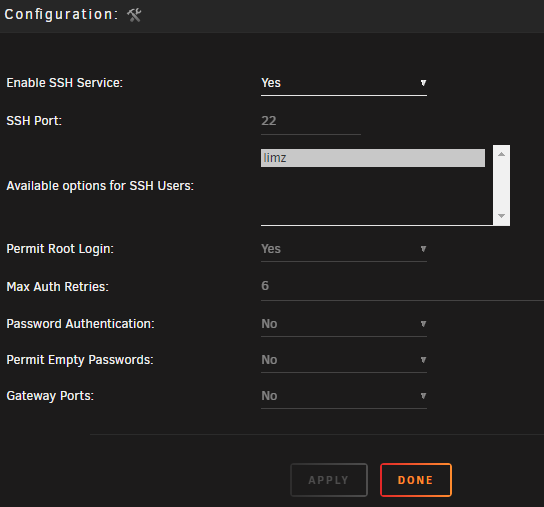
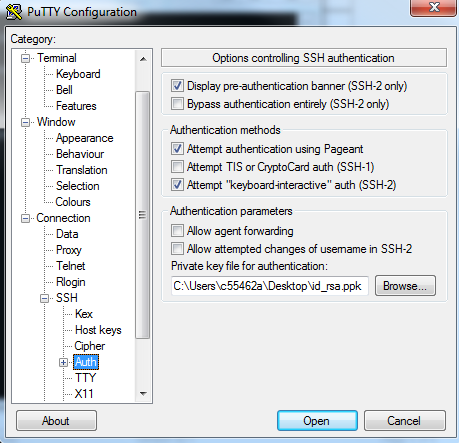
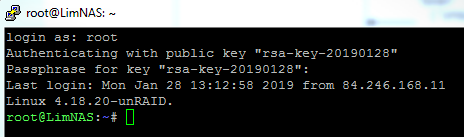
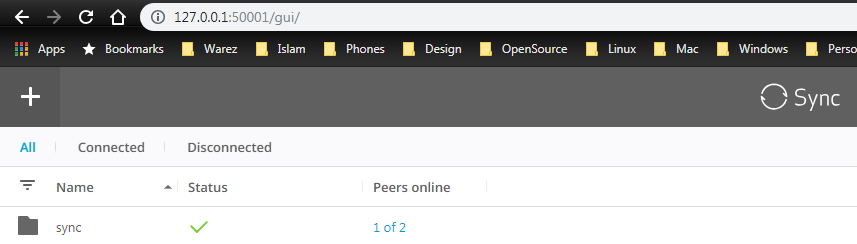
I've seen bits of this covered in other posts but haven't found one PuTTY specific. (Or maye I should get my eyes checked). Never the less there are many reasons you want to use a Key Pair to access your unRAID server via SSH compared to using just a username and password. This is especially true if you'd like to access your server via the internet. Another benefit to doing this is the use of Tunnels. Using SSH you can tunnel into just about anything. Take this example below. If you wanted to Access unRAID via SSH, the Windows Desktop, or any of your containers you would need to go into your router and forward all their ports, for each of the services you wanted to access. So not only will SSH give you get secure access to your unRAID server, but you will also be able to tunnel into any of the containers on your unRAID box, or any machine on your home network for that matter. All traffic sent over this connection will also be encrypted given you another layer of security! Be warned, that leaving port 22 opened on your router without disabling password authentication is not a good idea. Many hackers scan WAN IP addresses and if they find famously opened ports they will continuously try accessing SSH via root and a bunch of different passwords. First things first you will need to Forward Port 22 on your router to your unRAID server. All this does is, if you would like to access your unRAID box over the internet. You will send a request to your Router's WAN IP Address or Dynamic DNS address (Out of scope of this article but covered here). When the SSH Request hits your router, your router will forward that request onto your unRAID server. 1. Get DocGyver's SSH Config Tool This will make starting and stopping the SSH Daemon as well as tweaking your SSH Settings a breeze. When you're ready head over to Community Apps and search for "SSH Config Tool". Once installed you can Access the Config Tool under Settings > Network Services > SSH 2. Get PuTTYGen and Generate your Keys A key pair is made up of a Private Key and a Public Key. The public key pretty much be given to anyone as its well, public. However make sure that your private key is safe and do not distribute it. This is admittedly an over simplification, but basically your Public Key will be put onto your unRAID box and the Private Key will be kept on your machine. When you try to access your server over SSH, your Server will match the Public Key against the Private Key. If it's a match it will let you in. If you need to access more than one server, all you need to do is put your Public Key on said server and you can use the same Machine / Private Key to access it. After you Donwload PuTTY and PuTTYGen launch PuTTYGen and click on Generate. You will be requested to move your mouse cursor over the window to generate some randomness Enter a Key Passphrase and Confirm Passphrase (This protects your Private Key in case someone gets their hands on it) Click Save Private Key, and choose a destination (Name it id_rsa.ppk for extra points) [optional] Click Save Public Key, and choose a destination (Name it id_rsa.pub for extra points) Here's where the first problem comes in. For some reason PuTTY doesn't save the Public Key in the correct format so just taking it from the saved file and putting it on the server won't work. Leave this window open for now we'll come back to it. 3. Put your Public Key onto unRAID and Persist it SSH into your unRAID box using PuTTY as normal and type the following: nano /root/.ssh/authorized_keys Now go back to your PuTTYGen window and select all the text in the Public key for pasting into Open SSH authorized_keys file Section. Press Ctrl + C to copy the key to your clipboard Go back to your PuTTY window and right click into the window (this will paste the key into the correct file which is in the Nano editor) Press Ctrl +X to exit Press Y to save the file Give the file and directory the correct permissions by typing: chmod 600 /root/.ssh/authorized_keys chmod 700 /root/.ssh If you have more than one machine that you'd like to grant access you can put their Public Keys in the same file. However, Make sure each one is on the next line! One problem here is that on reboot this file will be lost so we must persist it! To do that let's first copy the authorized key file somewhere where it can be retrieved. cp /root/.ssh/authorized_keys /boot/config/ssh/ Now open your Go file (which runs on boot by typing) nano /boot/config/go This file runs whenever your unRAID server boots up after we make these changes it will ensure that your authorized_keys file is restored even after you restart your server. Paste the following in the end of the file mkdir /root/.ssh chmod 700 /root/.ssh cp /boot/config/ssh/authorized_keys /root/.ssh/ chmod 600 /root/.ssh/authorized_keys 4. Turn off SSH Password Authentication Open your unRAID UI and head over to the SSH Config Tool we downloaded above. If you need to make a change you must first Set Enable SSH Service to No. Once disabled make the following changes: Password Authentication = No Click Apply and Re-Enable your SSH Service. If you try to access your unRAID server using username and password now your unRAID server should refuse. Good! Let's fix that. 5. Add your Private Key to PuTTY. Open PuTTY, type your Host Name, choose a Save Sessions name and click save. A seved session will ensure that we don't have to keep typing your IP Address, as well as save the location of your private key file. In the tree on the left navigate to Connection > SSH > Auth. Click on Browse and find the Private Key file we generated earlier. In the tree on the left navigate to Session Click Save And that's pretty much it. Now try to login via SSH. unRAID will ask you which user you'd like to login as, you should type root. unRAID will ask you for the passphrase for your Private Key File (which we created earlier) It will let you in! 6. Tunnel like a champ So you've accessed your unRAID box via the internet. And you'd like to access the web UI on one of your containers. Or maybe you'd like to access another device on your network. Well using a simple Tunnel, you can do just that. In our example diagram above we see we have a Resilio Sync Docker Container with the WebUI port of 8888. To Create a Tunnel to that container and access its UI via the internet: Open PuTTY and Load your Session that we saved above. Navigate to Connection > SSH > Tunnels Choose an arbitrary Source Port (I like to start at 50001 to avoid conflict) Choose a destination (in our case IP_ADDRESS_OF_UNRAID:PORT) In the tree on the left navigate to Session Click Save At this point you may have to close your SSH Session and reopen it again. Once that's done, open your favourite browser (Which should be anything other than Edge or Internet Explorer) and in the web address type: http://127.0.0.1:50001 What's basically happening here is that we're sending a request to our Local machine, on por 50001. Which is the port we have open for our SSH Tunnel. PuTTY then redirects that request via the SSH connection to the destination we specified above which is our Resilio Sync Docker Container. And just like that. You've got yourself a Tunnel. No fancy port forwarding needed. Nice and secure over an encrypted line. Give yourself a cookie. So give it a shot. Many companies use this approach to accessing services in their network and is sometimes referred to as a Bastion Host or Jump Box. I've covered it a little more in depth on one my articles here. Thanks to everyone on this post for all the guidance in getting this setup. Happy Secure Shelling!
 1 point
 -
Is anybody using docker compose? Are there any plans to integrate it with unRAID?1 point
-
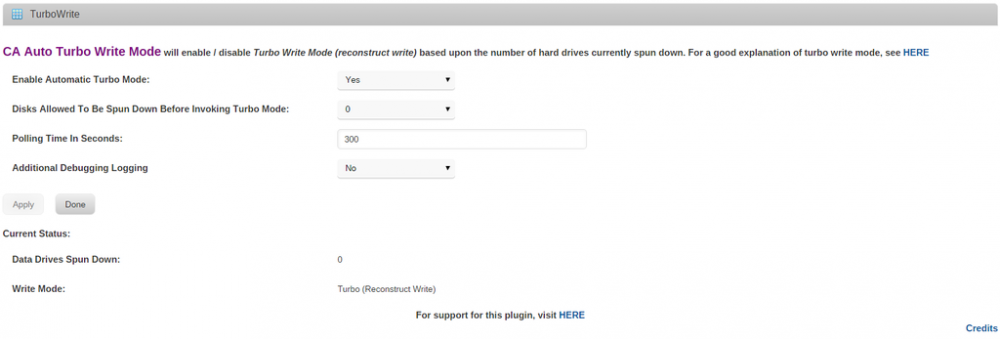
CA Auto Turbo Write Mode A simple plugin which will automatically enable or disable Turbo Write Mode (aka reconstruct write mode) based upon the number of drives which are currently spinning. Turbo Write Mode can significantly increase the write speed to your protected array (my system it doubles it). See This Post for a discussion about it. Note that unRaid's setting of Automatic does not enable / disable turbo mode based upon the number of drives spinning. unRaid's setting of "Automatic" simply disables turbo write mode. CA Auto Turbo Mode also has a feature where you can enable or disable Turbo Mode on a set schedule. For instance to always to have it enabled when mover runs, etc. Full help text is available within the plugin Install it via the Apps tab (Community Applications). Either search for turbo or you can also find it within the Additional CA Modules section CA Auto Turbo Mode also has a feature where you can enable or disable Turbo Mode on a set schedule. For instance to always to have it enabled when mover runs, etc.
 1 point
 -
Hey guys! I found a new music docker on CA called Funkwhale. Seems perfect for my needs but I can't seem to import my music folder to it. I use the github instructions, https://github.com/thetarkus/docker-funkwhale, and get stuck at the last part. it says "manage.py import_files: error: unrecognized arguments: -6103-4661-b33b-7b9a4ec06fe1" I take away that I then get "CommandError: Invalid library id" Any ideas?! @thetarkus is the builder of the docker. I can't seem to find him here either. Any help would be greatly appreciated! Figured it out... I left the $ sign in....1 point
-
I was wanting to do GPU Hardware Acceleration with a Plex Docker but unRAID doesn't appear to have the drivers for the GPUs loaded. would be nice to have the option to install the drivers so the dockers could use them.1 point
-
Simply awesome, thanks for doing this!1 point
-
I fix this if I got time soon.... you can always DL the latest package and install it from the extra folder? Not sure if I shall priorities this? need to work and earn money1 point
-
Not sure what's going on then. Granted, I'm not familiar with Sab but to me it looks like that part is working?1 point
-
Shoot, I meant to point to the post that started the CF the LAST time somebody started using the unreleased project and asking for support. I was trying to give some background. If this fresh batch of folks had actually read back a page or two, all their questions would have been answered instead of posting the same stuff over again.1 point
-
I thought about those. Those vdisks are ultimately on one of the others though. And you probably shouldn't mess with them anyway.1 point
-
For completeness, /var/lib/docker is the docker.img contents Can't remember OTOH where the libvirt.img is mounted (somewhere in /etc)1 point
-
/boot is the flash drive /mnt/cache is the cache pool /mnt/disk# is a numbered disk /mnt/disks is where Unassigned Devices are mounted by the plugin. /mnt/user is the user shares, which are created by combining the top folders across all disks. /mnt/user0 is the user shares excluding anything on cache That is the complete list of persistent storage, unless you create some other mount from the command line. Every other path is in RAM. The Unraid OS is in RAM and all the usual linux OS folders are in RAM. The Unraid OS is unpacked fresh from the archives on flash into RAM at each boot. Then settings from the webUI, which are stored on flash, are applied.1 point
-
If you are asking what I think you are, the answer is no. Perhaps more clarity in the question would help.1 point
-
Just add "docker exec FileBot" before your command: docker exec FileBot /opt/filebot/filebot -script fn:amc --action move -non-strict "/storage/media/plex data/downloadtemp/media/" --conflict skip -non-strict --log-file amc.log --def movieFormat="/storage/media/movies/{ny}/{ny}" --def seriesFormat="/storage/media/tv/{n}/{'Season '+s}/{n} - {s00e00} - {t}" --def unsorted=y music=n artwork=n --def clean=y --def excludeList=/config/amc-exclude-list.txt --def deleteAfterExtract=y1 point
-
Yes. Generally speaking, anything not in /boot ,/mnt/diskX, or /mnt/cache exists only in RAM. There are complications to that statement, but in general it follows.1 point
-
No. If the space is shared by unraid, you can only connect to it as a shared resource. If you allocate space as local storage in your VM, unraid can't share it. Only one OS at a time can use space as truly local. You could share space from the VM and mount it into unraid in the Unassigned devices plugin, but it can't participate in unraid's user share system.1 point
-
License limits only matter at array start, you can plug in other drives after the array is started without issue.1 point
-
I think the DVD drive may count. I know it did at one time but maybe that is detected separately now and not counted. I'm not sure. The flash drive doesn't count. I'm not seeing anything and running out of ideas. Have you done a memtest? I guess you could redo the flash drive just to see if it made any difference. Copy config folder to PC, prepare flash as new install, copy config folder back.1 point
-
You can edit the docker so that the repository is changed from emby/embyserver:latest to emby/embyserver:3.5.3.0 (which is the previous stable version)1 point
-
Ok, fixed the problem. There was a missing package in the requirements file, so it wasn't working. The author also added a new section in the config.ini file. This is optional, however, it will log a an exception to the console if you don't have it. [LOGGING] # Valid Options: critical, error, warning, info, debug Level = info1 point
-
This happened to me. Go to the let's encrypt folder, then to the proxy folder and find the configuration for nextcloud subdomain. There's an option that clearly puts the limit for download and upload. I set it to a high number. Also check in the options for the nextcloud i believe there's a setting for maximum size uploads. Sent from my Pixel 2 XL using Tapatalk1 point
-
It's not: FWVersion(20.00.00.00) There are known issues with this firmware, you should update to 20.00.07.00, though not likely to fix the CRC errors, if it's not cables/backplane it's likely the controller.1 point
-
I've had a look over the thread and I got to say, nobody has been rude or dismissive, I think you're being overly sensitive. I am the first to admit I can be rude and dismissive to people when they're rude or ungrateful, but I don't think I'm guilty of that here. I don't really know what you've taken issue with, but it would be very wise to remember that all three of us that have replied her are volunteers and not employees. I think you need to work on not being so sensitive. If you've read back through my 9700+ posts I suspect you'd find the vast majority of them are helpful, so whilst I have heard your opinion I am going to disagree with it. And as for @Squid and @trurl I would say the above could equally applied to them.1 point
-
Your system share is showing it has files on disk1 so it could be your docker image is there instead of on cache. If you enabled docker before installing a cache disk this is likely. You can see which disks a share is using by going to the Shares page and clicking Compute... for the share. Go to Settings and disable the docker and VM services, run mover, then check to see if system share still has any files on disk1.1 point
-
were you able to get it to import flac files? I imported all my mp3 but the majority of my music is flac. I keep getting traceback errors EDIT: for flac evidently you need to change the command to this docker exec -it Funkwhale /usr/bin/python3 /app/api/manage.py import_files da8bd97b-3c3f-4e7b-92cb-6ba45721837b "/music/**/**/*.flac" --in-place --async --recursive1 point
-
Using a network share as a Time Machine destination is problematic, even using Apple's own Time Capsule. An external hard disk plugged into the USB port of your Mac is much faster and much more reliable. The weakness is in the use of the sparse bundle disk image. A sparse bundle consists of a containing folder, a few database files, a plist that stores the current state of the image and nested subfolders containing many many thousands of small (8 MiB) 'band' files. An image file has to be used in order to recreate the necessary HPFS+J file system that Time Machine requires to support hard linked folders on network storage, while using many small files to create the image rather than one huge monolithic file allows updates to be made at a usable speed. But sparse bundles have shown themselves to be fragile and often Time Machine will detect a problem, spend a long time checking the image for consistency and then give up, prompting the user that it needs to start over from scratch, losing all the previous backups. Because there's a disk image on a file server a double mount is involved. First the Mac has to mount the network share, then it has to mount the sparse bundle disk image. Once that is done it treats the disk image exactly as it would a locally connected hard disk that you have dedicated to Time Machine use. Sparse bundles grow by writing more band files so you have the opportunity to specify the maximum size of the image. If you don't it will eventually grow until it fills up all the space available on the share. If you still want to do it, here's what I'd do. First create a user on your Unraid server that's only going to be used for Time Machine. Let's call that user 'tm'. Set a password. Now enable user shares, disable disk shares and create a new user share. Let's call it 'TMBackups'. Include just one disk and set Use cache disk to No. You can set Minimum Free Space quite low (e.g. 10 MB) since the largest files in the share will be the 8 MiB band files. Allocation method and split level are irrelevant if your user share is restricted to a single disk. Under SMB Security Settings for the share, turn Export off. Under NFS Security Settings, confirm that Export is off. Under AFP Security Settings, turn Export on. If you want to restrict the size occupied by your Time Machine backups do so here. Even if you want it to be able to use all the disk it's worth setting a limit so that it doesn't become totally full. I fill up my Unraid disks but I like to leave about 10 GB free. Set Security to Private and give your new user 'tm' exclusive read/write access. Consider moving the Volume dbpath away from its default location (the root of the share) to somewhere faster, where it's less likely to get damaged. The Volume database is the .AppleDB folder that can be found in the root of an AFP share. It too is fragile and benefits from fast storage. I moved mine onto my cache pool by entering the path /mnt/user/system/AppleDB (i.e. a subfolder of the pre-existing Unraid 'system' share, which by default is of type cache:prefer). This will improve both the speed and reliability of AFP shares, so do it to any other user shares you have that are exported via AFP. The system will automatically create a sub-folder named for the share, so in this example the .AppleDB folder gets moved from the root of the share and placed in a folder called /mnt/user/system/AppleDB/TMBackups. Now that the user share is set up, go to your Mac. Open a Finder window and in the left-hand pane under Shared, find Tower-AFP and click it. In the right hand pane make sure you connect as user 'tm', not as your regular macOS user and not as Guest. You'll need to enter the password associated with tm's account on your server. Check the box to store the credentials on your keyring. The TMBackups share should be displayed in the Finder window. Mount it. Now open Time Machine Preferences and click "Add or remove backup disk". Under Available Disks you will see "TMBackups on Tower-AFP.local". Choose it. If Time Machine ever asks you to provide credentials then enter those for the 'tm' user, not your regular macOS user. Enter a name for the disk image (say, "Unraid TM Backups") and do not choose the encryption option, and let Time Machine create the sparse bundle image, mount it and write out the initial full backup, which will take a long time. Once it has completed, Time Machine should unmount the Unraid TM Backups image but it will probably leave the TMBackups share mounted, since you mounted it manually in the first place. You can unmount it manually or leave it until you reboot your Mac. From then on, each time Time Machine runs it will automatically mount the user share (keeping it hidden), automatically mount the sparse bundle image, perform the backup and tidy up after itself, then it will unmount the image then unmount the share, all without your interaction. The use of a dedicated 'tm' account offers a degree of security but if you want your backups to be encrypted then use unRAID's encrypted whole disk file system, not the encryption option offered by Time Machine.1 point
-
+1 To group countainers and docker-compose import1 point
-
Just when you think you've got it all figured out... there is an additional factor to consider. Noise immunity. This is from one spec sheet of a disk I found in a quick search. Notice the wide allowance for the actual supply voltages Typically +/- 5%. However, also notice the inability to handle noise on the power supply lines. Less than 100mV peak-to-peak. On a 12 volt line, this means the regulation of the voltage must be better than 1%. You can have a supply with plenty of capacity and poor high frequency regulation, and you'll get random errors. I really like the engineering/marketing double-talk in "Note 2" Note 2. In case of fluctuations in the DC power (spikes, momentary shut off, etc.), the data being recorded or to be recorded from buffer memory are not assured. In other words, if there is ripple and noise on the supply lines greater than that allowed (1% or greater), the data being recorded or read "may not be assured" Translated to English ... "may not be assured" = "may produce random results" It is easy to see how adding one more drive to a system may still be within the wattage limits, but result in random errors. The instruments used on the xbitlabs site to measure current samples several times per second. I doubt if they gave the true "instantaneous" peak current. To do that you need an oscilloscope, not a digital ammeter. How many of the power supplies even give the ripple ratings. I found a few, and they said 120mV p-p. Not as good as what the disk manufacturer said was needed. Does anybody else not wonder why we see people with multi-disk arrays see errors start when their array size starts to grow? Joe L.1 point