Leaderboard


Popular Content
Showing content with the highest reputation on 02/02/19 in all areas
-
Let's start with my setup: Motherboard: ASUS X470-F Gaming (Socket AM4) CPU: AMD Ryzen 7 2700X (does not have integrated graphics) Memory: 32GB Storage: 2 x 512GB NVME SSDs (no RAID) GPU0 (top PCIE slot): EVGA GTX 1050 GPU1 (secondary PCIE slot): EVGA GTX 1080Ti Hybrid Network: Single onboard gigabit nic Everyone's got something different, but the above it working for me just fine. Here are the hurdles I faced during this journey: * My Native Instruments Komplete Audio 6 would panic and reset itself in a Windows 10 guest. - To fix this, I had to look at my IOMMU groups and find a USB controller that doesn't share the same IOMMU group as anything else important, then "stub" it to keep the Unraid underlying OS from claiming it during boot. * As a result of the above, I became limited in which USB ports I could use for VMs - But, to be fair, I can now unplug/replug anything I want on the Windows 10 guest. That's the benefit of binding an entire USB controller. * I found I was completely unable to pass through my primary graphics card to a Linux guest. - To fix this, I had to stub the card, AND - and this is the most important bit - I had to disable EFI frame buffering (or something like that). These bits are all done in the Unraid kernel startup line. * My Linux guest had stuttery, demonic audio over HDMI and video would lag when audio was playing. - To fix this, I had to enable some intel sound options inside the Linux guest, which I found amusing since nothing in my machine is Intel (something about the virt layer needing this). Let's dig into each. USB audio interface runs terribly when passed through This happens because of the emulation layer. The only way will be to find out which USB controller can be stubbed. To figure out which one, get on Unraid and open a terminal and run: lspci | grep USB Take note of the IDs there, then run: for iommu_group in $(find /sys/kernel/iommu_groups/ -maxdepth 1 -mindepth 1 -type d);do echo "IOMMU group $(basename "$iommu_group")"; for device in $(\ls -1 "$iommu_group"/devices/); do if [[ -e "$iommu_group"/devices/"$device"/reset ]]; then echo -n "[RESET]"; fi; echo -n $'\t';lspci -nns "$device"; done; done In this big list you're looking for something like this: IOMMU group 20 0b:00.3 USB controller [0c03]: Advanced Micro Devices, Inc. [AMD] USB 3.0 Host controller [1022:145f] Notice how this USB controller is the ONLY device in this IOMMU group (which just so happens to be group 20 on my machine). This means that we should be able to completely isolate it from the Unraid host OS so we can let the VM claim it completely and without question. To stub it, we modify the kernel startup line. You can either use terminal and modify /boot/syslinux/syslinux.cfg or you can use the Unraid web UI and go to Main -> click "Flash" under 'Boot Device' -> then edit the 'Unraid OS' section under 'Syslinux Configuration' Here's what it looks like when I stub ONLY the above USB controller: kernel /bzimage append initrd=/bzroot vfio-pci.ids=1022:145f Save that change, then reboot Unraid. You can now edit your VM and at the bottom, uncheck the USB devices and instead pass through the USB hub itself. That should fix it. I can't pass through my GPU in the top slot because Unraid is using it Correct, but we can be aggressive about it and do it anyway. Start by finding the device IDs using lspci: root@funraid:~# lspci | grep VGA -A1 09:00.0 VGA compatible controller: NVIDIA Corporation GP107 [GeForce GTX 1050 3GB] (rev a1) 09:00.1 Audio device: NVIDIA Corporation GP107GL High Definition Audio Controller (rev a1) 0a:00.0 VGA compatible controller: NVIDIA Corporation GP102 [GeForce GTX 1080 Ti] (rev a1) 0a:00.1 Audio device: NVIDIA Corporation GP102 HDMI Audio Controller (rev a1) Above, you can see that my GTX 1050 and its associated audio interface are on 09:00.(0|1) So now I need to find out the device IDs: root@funraid:~# lspci -n | grep 09:00. 09:00.0 0300: 10de:1c83 (rev a1) 09:00.1 0403: 10de:0fb9 (rev a1) Awesome. Let's stub those, too... but remember! We need to also disable EFI frame buffering (I think that's what it's called). This means that when you boot Unraid next, you WILL NOT have any console output after the main bootloader (the blue screen) completes - your main GPU that you're passing through (in this case, my GTX 1050) will appear to freeze at that bootloader. If you see the OS even remotely start to boot, you didn't do this right. In addition to the USB hub, we'll also stub the GPU and its audio interface and disable EFI FB: kernel /bzimage append initrd=/bzroot vfio-pci.ids=1022:145f,10de:1c83,10de:0fb9 video=efifb:off Save that and reboot Unraid, and all will be well. You might - and this is very unlikely, but - you might need to supply a VGA bios from techpowerup for your card, or worst case put the card you are trying to use here into PCIE slot 2 and dump its BIOS from the Unraid OS, but I really don't think you'll have to. My Linux guest has demonic, stuttery audio and video when trying to play videos and audio is coming over HDMI through my nVidia card. Me too, and I dug for a bit and found out that I can simply give the Linux guest a modprobe line to clear up this behavior. Inside of the Linux guest's OS (NOT UNRAID!), create a conf file in /etc/modprobe.d/... and use the EXACT same data I use below. Here's mine: [root@archer ~]# cat /etc/modprobe.d/snd-hda-intel.conf options snd-hda-intel enable_msi=1 That's it. Literally one line. Yeah, you have to type that in word for word. Don't worry, I know, you're not running anything Intel - but trust me, it works. Save that and reboot the Linux guest OS. Everything should be in order. I really hope this all helps someone. Thanks! :o)2 points
-
I tried a fresh install and could reproduce the issue, so that may not work, what you could try is pinning an earlier container and see if that works. try linuxserver/gazee:89 and work back.1 point
-
Please stop pinging me, like everything else we release, when we release it, there will be a support post. You installed a plugin from a GitHub repo, doesn't mean it's finished. Sent from my Mi A1 using Tapatalk1 point
-
Run the make_bootable.bat file again. (Remember to do so as an Administrator!) Try to boot again. If that does not work, be sure to actually check your BIOS to make absolutely sure that nothing has changed there. Look on the 'Splash Screen' for a key which will bring up a boot menu. If that does not work, you can reformat the drive and install the Unraid again (Be sure that the drive is labeled UNRAID ) and copy back the config directory from the backup that you made earlier. Use that drive to boot.1 point
-
Yes, but it will take getting a bit more information from you. First, pull the drive from the server. Put it in your PC and make a backup copy of your flash drive to your PC. (Hopefully,, you will be able to read all of it.) If not try to get a copy of the config folder/directory. Second, try to do a chkdsk on the flash drive. If it finds and 'fixes' something, try to boot again. If it does not boot, connect a monitor to the server and see where it stops. You might want to take a photo of what is there. Be sure that the photo is sharp, non-blurry and with a flash spot where there is text. Also, tell us about your server. How many data drives, parity drives and cache drives? Any unassigned drives? All this info will allow us to outline a course to recovery.1 point
-
No longer true. I'm releasing a new version that will not show any remote mounted shares and the local recycle bin will not remove any files from the remote share recycle bins. Only the local server will be able to manage the shares originating on that server. Changes: - The 'Shares' tab has been re-organized and you can click the table headers and sort the entries - for example the trash can sizes and share names. - You can stop the recycle bin and still manage files in the .Recycle.Bin folders. - Added additional help text. - Only local mounted shares will be included in the recycle bin size calculations and file browsing. - Empty and purge now only work with the shares that have the recycle bin enabled. All other shares with .Recycle.Bin folders are left alone.1 point
-
just to update from above I now have this awesome little thing scheduled every day but an update on Kids TV it started at 892GB and is now at a baby size of 414GB with 5k ish episodes.1 point
-
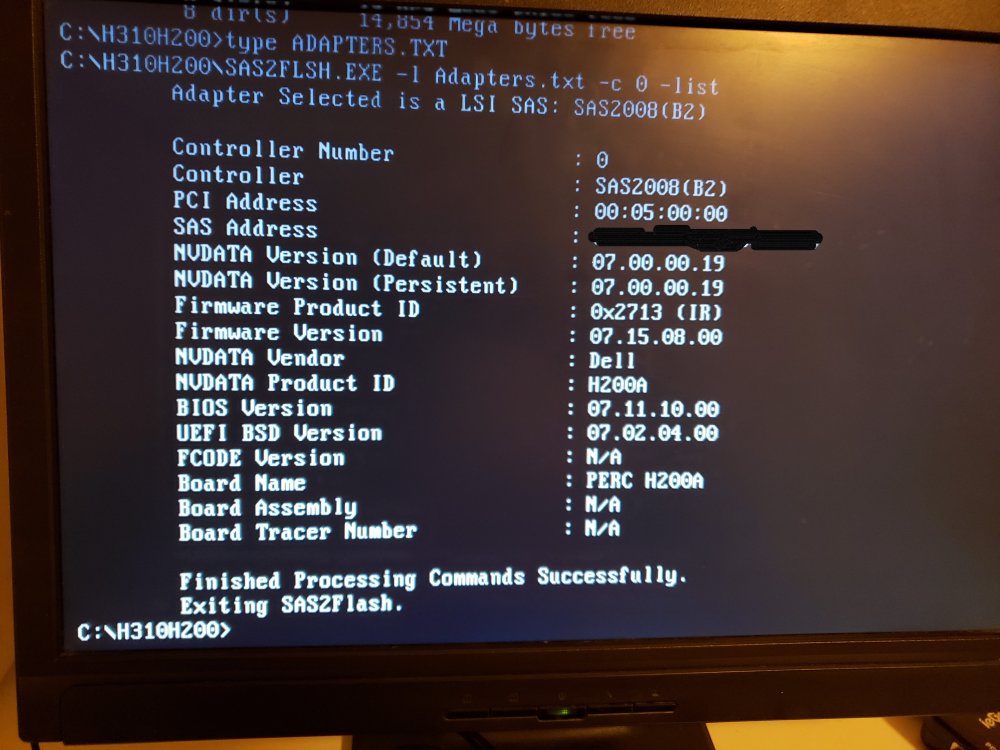
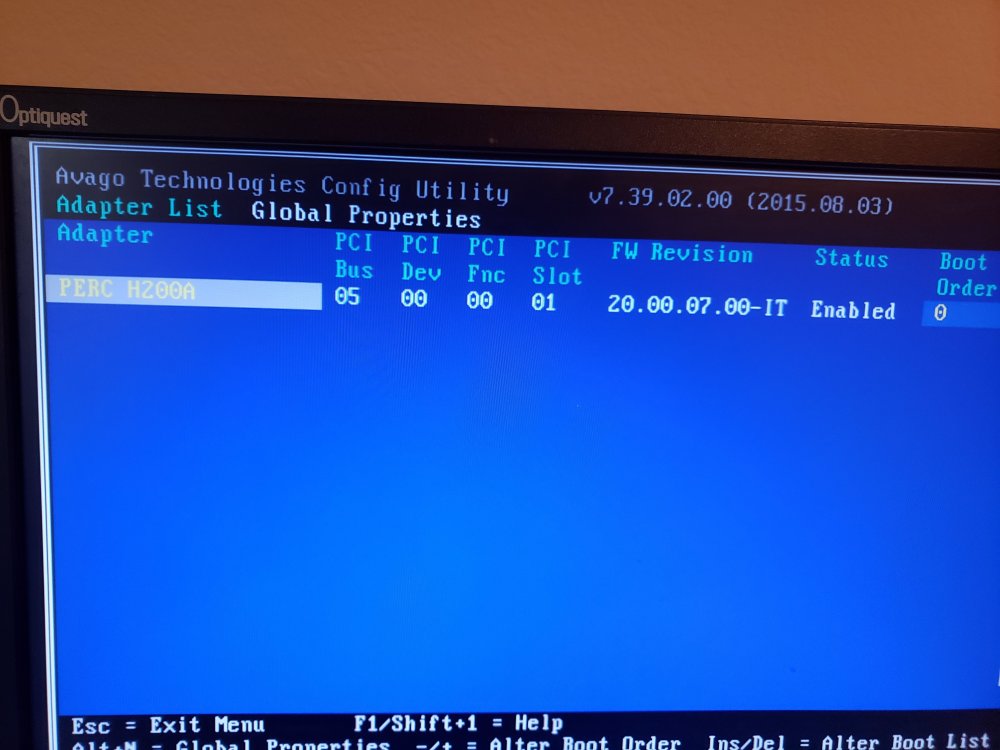
Ok, great news! After around a day of messing with things, and playing with @Fireball3's instructions, I was able to cross-flash the Dell H200A to the LSI IT firmware version 20. All of the instructions worked seamlessly (huge thanks to @Fireball3 and all other folks who contributed - you are all awesome!). The only hiccup I faced was the 2.bat step in the instructions, where we are trying to save the original Serial Boot ROM of the original H200A firmware. After @Fireball3 confirmed that I can ignore Megarec.exe tool hanging, I still managed to save the original firmware and flash contents using the SAS2FLSH.exe tool. Here's a snapshot of my H200A listing using SAS2FLSH *before* I flashed the firmware: As you can see it has the IR firmware. After following the instructions, I first flashed the Dell IT firmware, then I moved to LSI IT firmware version 7 and from there, I flashed LSI IT firmware version 20. I didn't flash the mptsas2.rom (BIOS) at first, but I didn't know how to confirm if the H200A was still working or not. So, I reflashed the firmware along with mptsas2.rom, and I was able to see the H200A listed in that BIOS. After this, I plugged into two 4 TB hard drives, and I was able to see them being listed. I also briefly booted ubuntu, and it was able to see the 4 TB drive. The next step is to try booting with UNRAID. Here's a snapshot from the BIOS utility which shows the H200A flashed with the IT version: For reference, I did have to purchase these SAS cables to work with the H200A on my Dell R710: https://www.amazon.com/gp/product/B07CKXFKHT/ref=oh_aui_search_asin_title?ie=UTF8&psc=1 (not sure if amazon links are allowed in UNRAID). If not, please let me know and I can delete the link. So, overall, it was much smoother than I expected. I was able to flash the H200A from *within the Dell R710* itself, and I did NOT need a UEFI shell, etc...Phew...what a relief! Once again, thanks everyone, specifically to @Fireball3!!!
 1 point
 -
For anyone who's having issues with openvpn on unraid 6.7 rc, switch it to run in bridge networking, remove the INTERFACE variable setting or set it to eth0 (default) and map the ports 943 and 9443 for tcp and 1194 for udp1 point
-
I was looking for a way to add a few more sata ports to a mITX build, the on-board chipset only has x6 and if the nvme slot is occupied by a sata device then one of the sata ports is disabled. Would this card work for me... I haven't been able to find any specific information on it, not sure if it acts as its own controller and would pass through as pci-e or if it would still be using the on-board sata controller. m.2 sata expansion card1 point
-
Good to hear! Easy to forget some mandatory stuff when things are installed by other plugins1 point
-
Yes that disk is failing NOW as it says in the SMART. You are accessing the emulated disk. The emulated disk is the data from the parity calculation that allows the disk to be rebuilt. Unraid will not access a disabled disk. It is instead reading parity PLUS ALL the other disks to calculate the data for the disabled disk. Not only are those files unprotected, but your entire array is since with single parity, you can only tolerate that single disabled disk.1 point
-
My reason for mentioning Unassigned Devices is to mount the drive with the backup, copy it onto the current usb and reboot. That way you don't have to start from a fresh install, all your disk assignments and everything will be back. Sure you could just mount the drive from command line but its the easier GUI solution.1 point
-
It seems that jellyfin saves files in a /tmp directory not /config. So changing that parameter in the docker file should fix it1 point
-
Well, the E-21xxG processors are actually cheaper than the i7/i9 counterparts...but if I'm reading your post correctly you have a MB that will support some generation of those...that's a really hard call to make man. On the cooling, those processors use grease for the TIM...thus the delidding madness of the past few years. With a good air cooler and not over-clocking them you should be fine...I have a D-15 and the E-2176G (which is basically a i7-8700k re-branded and tweaked) and I never get much above 50C. If I hammer it (go out of my way to do so) then I spike up into the low 60s, I'm sure a stress test would push it into the 70s with ease...but I can't see it going higher than that. Just go for quality air cooling and you should be fine with the i7, I've no experience with the i9, but believe it should be the same...however if someone who's run one contradicts me...believe them!1 point
-
If you need to open port 2202, you are not reverse Proxying the container. All traffic should go over 443 then.1 point
-
Check out this awesome introduction video produced by @SpaceInvaderOne:1 point