Leaderboard


Popular Content
Showing content with the highest reputation on 04/28/19 in all areas
-
Summary: Support Thread for ich777 Gameserver Dockers (CounterStrike: Source & ConterStrike: GO, TeamFortress 2, ArmA III,... - complete list in the second post) Application: SteamCMD DockerHub: https://hub.docker.com/r/ich777/steamcmd All dockers are easy to set up and are highly customizable, all dockers are tested with the standard configuration (port forwarding,...) if the are reachable and show up in the server list form the "outside". The default password for the gameservers if enabled is: Docker It there is a admin password the default password is: adminDocker Please read the discription of each docker and the variables that you install (some dockers need special variables to run). The Steam Username and Password is only needed in templates where the two fields are marked as requirde with the red * Created a Steam Group: https://steamcommunity.com/groups/dockersforunraid If you like my work, please consider making a donation
 1 point
 -
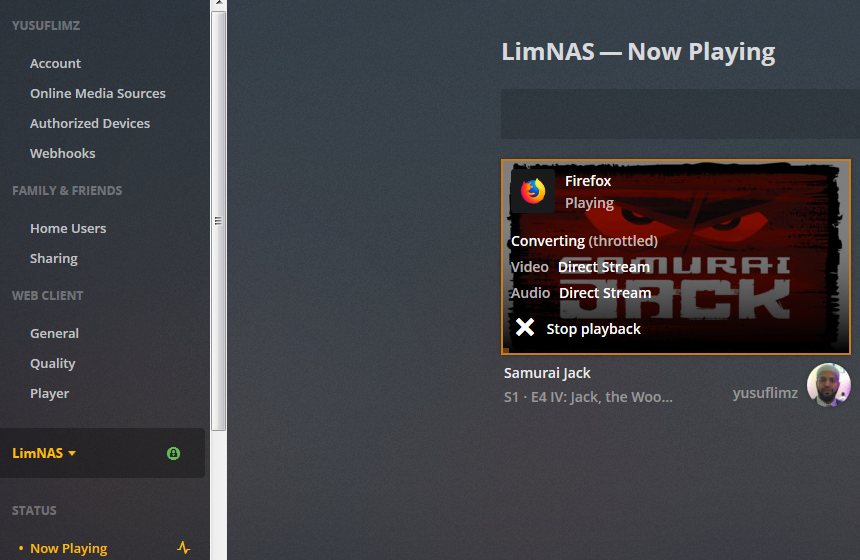
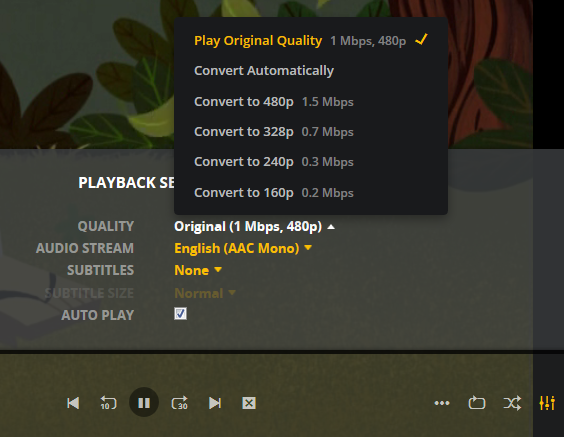
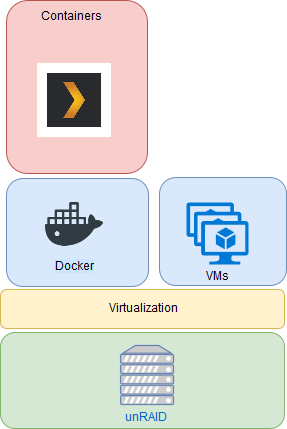
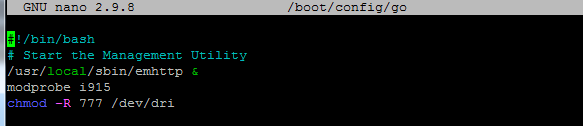
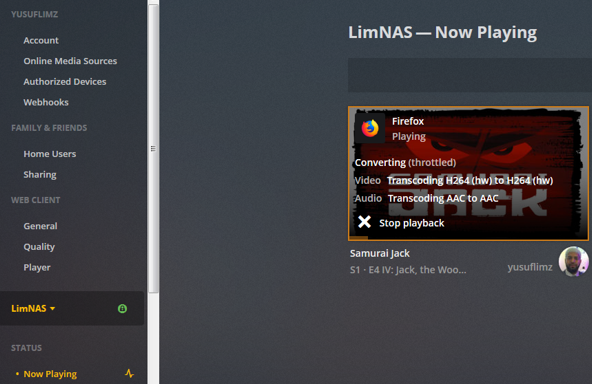
***Update*** : Apologies, it seems like there was an update to the Unraid forums which removed the carriage returns in my code blocks. This was causing people to get errors when typing commands verbatim. I've fixed the code blocks below and all should be Plexing perfectly now Y =========== Granted this has been covered in a few other posts but I just wanted to have it with a little bit of layout and structure. Special thanks to [mention=9167]Hoopster[/mention] whose post(s) I took this from. What is Plex Hardware Acceleration? When streaming media from Plex, a few things are happening. Plex will check against the device trying to play the media: Media is stored in a compatible file container Media is encoded in a compatible bitrate Media is encoded with compatible codecs Media is a compatible resolution Bandwith is sufficient If all of the above is met, Plex will Direct Play or send the media directly to the client without being changed. This is great in most cases as there will be very little if any overhead on your CPU. This should be okay in most cases, but you may be accessing Plex remotely or on a device that is having difficulty with the source media. You could either manually convert each file or get Plex to transcode the file on the fly into another format to be played. A simple example: Your source file is stored in 1080p. You're away from home and you have a crappy internet connection. Playing the file in 1080p is taking up too much bandwith so to get a better experience you can watch your media in glorious 240p without stuttering / buffering on your little mobile device by getting Plex to transcode the file first. This is because a 240p file will require considerably less bandwith compared to a 1080p file. The issue is that depending on which format your transcoding from and to, this can absolutely pin all your CPU cores at 100% which means you're gonna have a bad time. Fortunately Intel CPUs have a little thing called Quick Sync which is their native hardware encoding and decoding core. This can dramatically reduce the CPU overhead required for transcoding and Plex can leverage this using their Hardware Acceleration feature. How Do I Know If I'm Transcoding? You're able to see how media is being served by playing a first something on a device. Log into Plex and go to Settings > Status > Now Playing As you can see this file is being direct played, so there's no transcoding happening. If you see (throttled) it's a good sign. It just means is that your Plex Media Server is able to perform the transcode faster than is necessary. To initiate some transcoding, go to where your media is playing. Click on Settings > Quality > Show All > Choose a Quality that isn't the Default one If you head back to the Now Playing section in Plex you will see that the stream is now being Transcoded. I have Quick Sync enabled hence the "(hw)" which stands for, you guessed it, Hardware. "(hw)" will not be shown if Quick Sync isn't being used in transcoding. PreRequisites 1. A Plex Pass - If you require Plex Hardware Acceleration Test to see if your system is capable before buying a Plex Pass. 2. Intel CPU that has Quick Sync Capability - Search for your CPU using Intel ARK 3. Compatible Motherboard You will need to enable iGPU on your motherboard BIOS In some cases this may require you to have the HDMI output plugged in and connected to a monitor in order for it to be active. If you find that this is the case on your setup you can buy a dummy HDMI doo-dad that tricks your unRAID box into thinking that something is plugged in. Some machines like the HP MicroServer Gen8 have iLO / IPMI which allows the server to be monitored / managed remotely. Unfortunately this means that the server has 2 GPUs and ALL GPU output from the server passed through the ancient Matrox GPU. So as far as any OS is concerned even though the Intel CPU supports Quick Sync, the Matrox one doesn't. =/ you'd have better luck using the new unRAID Nvidia Plugin. Check Your Setup If your config meets all of the above requirements, give these commands a shot, you should know straight away if you can use Hardware Acceleration. Login to your unRAID box using the GUI and open a terminal window. Or SSH into your box if that's your thing. Type: cd /dev/dri ls If you see an output like the one above your unRAID box has its Quick Sync enabled. The two items were interested in specifically are card0 and renderD128. If you can't see it not to worry type this: modprobe i915 There should be no return or errors in the output. Now again run: cd /dev/dri ls You should see the expected items ie. card0 and renderD128 Give your Container Access Lastly we need to give our container access to the Quick Sync device. I am going to passively aggressively mention that they are indeed called containers and not dockers. Dockers are manufacturers of boots and pants company and have nothing to do with virtualization or software development, yet. Okay rant over. We need to do this because the Docker host and its underlying containers don't have access to anything on unRAID unless you give it to them. This is done via Paths, Ports, Variables, Labels or in this case Devices. We want to provide our Plex container with access to one of the devices on our unRAID box. We need to change the relevant permissions on our Quick Sync Device which we do by typing into the terminal window: chmod -R 777 /dev/dri Once that's done Head over to the Docker Tab, click on the your Plex container. Scroll to the bottom click on Add another Path, Port, Variable Select Device from the drop down Enter the following: Name: /dev/dri Value: /dev/dri Click Save followed by Apply. Log Back into Plex and navigate to Settings > Transcoder. Click on the button to SHOW ADVANCED Enable "Use hardware acceleration where available". You can now do the same test we did above by playing a stream, changing it's Quality to something that isn't its original format and Checking the Now Playing section to see if Hardware Acceleration is enabled. If you see "(hw)" congrats! You're using Quick Sync and Hardware acceleration [emoji4] Persist your config On Reboot unRAID will not run those commands again unless we put it in our go file. So when ready type into terminal: nano /boot/config/go Add the following lines to the bottom of the go file modprobe i915 chmod -R 777 /dev/dri Press Ctrl X, followed by Y to save your go file. And you should be golden!


 1 point
 -
Looks optimal to me, max bandwidth is enough (or close enough) for the the current number of disks, and their max speed. No impact without disks, with disks it would share the bandwidth of the other link, so if in the future you use that backplane for array disks it would be better to connect it to a different HBA.1 point
-
Just to follow up on this, emulation flag has been enabled in Unraid (at least on version 6.6.6 that I am running now, not sure where it got changed) so we can now run dockers like this 7dtd server and other steamcmd servers. - For setup, I went into apps. Bottom left in settings I made sure to enable DockerHub. Went back to apps, did a search for "7dtd" (which reveals no results, but also a link to dockerhub). Once clicked on the link it shows me various versions of it, I used the one from didstopia. - This brings up the docker setup menu. I went to the dockerfile and looked up the folder, ports and variables I need to set. I set up a path for /steamcmd/7dtd to a folder on my cache drive. Set up all the ports, and set up all the variables (in case I need to change them in the future they will be ready). See below for an example (though the variables aren't shown in this view). Note that you don't need to add "" as part of the keys, just type in the stuff and it adds it automatically. - I set up port forwarding on my router for 26900 thru 26902 to my unraid server. - The docker was started the first time for it to build and download all the files though it promptly crashed (using A17.2). Stopped the container. - Had to log in thru telnet to the server. Go to my 7dtd folder on the cache and navigate to the server_data folder. This is where the real serverconfig.xml is stored (ignore the one in the main 7dtd folder). I had to "chmod 777 serverconfig.xml" in order to make changes. - Then I navigated to my folder thru SMB and found this serverconfig.xml file and opened it using Notepad++ (not the regular notepad). I had to delete the complete lines for ZombiesRun and BlockDurabilityModifier. This is critical, I tried to comment them out but didn't do it right, took me a while to find out that I just needed to completely wipe it out to make sure I was doing it right. - I went ahead and altered the files to my preferred settings, and I added some of the new setting for A17.2. See this. - After this it was able to start, and I was able to log in. I hope this helps anyone that may be wanting to add 7dtd or other similar dedicated server dockers to their unraid. I found help all across this forum and others (some of which are linked), but also the good Docker FAQ here in the forums helped quite a bit. Update: There is now a proper docker maintained by ich777, its what I use now and he made it very easy to install!
 1 point
 -
We have had nothing but problems with ADATA branded drives. It is definitely not anything Unraid is doing. They are just a cheap brand with very poor reliability. Sent from my Pixel 3 XL using Tapatalk1 point
-
Just as a hint 8x or 16x doenst make a noticable difference for GPU.1 point
-
I did the face recognition separately because it seems to load a lot into the docker and for those not using it can save some docker space. This sucker is getting a bit bloated. Just a heads up. If you set the INSTALL_HOOK to "1" and run the docker, and then set the INSTALL_FACE to "1" and restart the docker, the face recognition won't load. It's best to set both to "1" and then run the docker the first time. You can reset this by forcing a re-load of the docker with both set and it will load everything.1 point
-
Hey @CHBMB, just wanted to say thanks for the template. Unraid has been my first docker experience so I've actually had a lot of fun learning basic things like how to take that xml and turn it into a working container. I've finally managed to sort it out and I have openldap and phpldapadmin talking to each other happily. Next step is integrating with the lsio letsencrypt container and eventually SSO. So thanks again!1 point
-
Having just considered moving from standard software RAID to unRAID, this is what I would suggest... Assuming that you don't already have an easy to access backup. Get a good deal on a WD 8 or 10TB external drive (Easy Store or My Book). Copy the data to that and verify that it's good. Build your new pool without a parity drive. Copy the data from the external to the new pool, and verify the data. Shuck the 8 or 10TB drive, and install it as your parity drive. Now you have the new pool/system set up, and plenty of room for easy expansion since your parity drive is now much larger. Keep your old 4TB parity drive as a spare in case a drive fails.1 point
-
Just add a sheduled task, insert "system" in the "run as" field and point the task to a batch file with the simple command net use z: /delete and net use z: \\servername\sharedfolder /user:username password Then select "run at system startup" (or similar, I do not have an English version) and you are done. Taken from stackoverflow http:// https://stackoverflow.com/questions/182750/map-a-network-drive-to-be-used-by-a-service#comment25569654_4763324 Sent from my iPhone using Tapatalk1 point
-
Nice tutorial! I just created a Windows VM and use regular Backblaze (unlimited storage, $50 a year) client on it to back my stuff up. Map a drive(s) to the share(s) necessary on your unRAID box via a service account (so the Backblaze client will be able to process them like a system drive), selected what i wanted to back up, done. Backups, restores, etc, all easy peasy, even from the Backblaze web interface.1 point
-
After a ton of Google-fu I was able to resolve my problem. TL;DR Write cache on drive was disabled found an page called How to Disable or Enable Write Caching in Linux. The artical covers both ata and scsi drives which i needed as SAS drive are scsi and are a total different beast. root@Thor:/etc# sdparm -g WCE /dev/sdd /dev/sdd: HGST HUS726040ALS214 MS00 WCE 0 [cha: y, def: 0, sav: 0] This shows that the write cache disabled root@Thor:/etc# sdparm --set=WCE /dev/sdd /dev/sdd: HGST HUS726040ALS214 MS00 This enables it and my writes returned to the expected speeds root@Thor:/etc# sdparm -g WCE /dev/sdd /dev/sdd: HGST HUS726040ALS214 MS00 WCE 1 [cha: y, def: 0, sav: 0] confirms the write cache has been set Now I'm not total sure why the write cache was disabled under unraid, bug or feature? While doing my googling there was a mention of a kernel bug a few years ago that if system ram was more then 8G it disables the write cache. My current system has a little more then 8G so maybe?1 point