Leaderboard


Popular Content
Showing content with the highest reputation on 06/08/19 in all areas
-
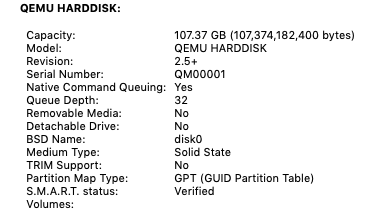
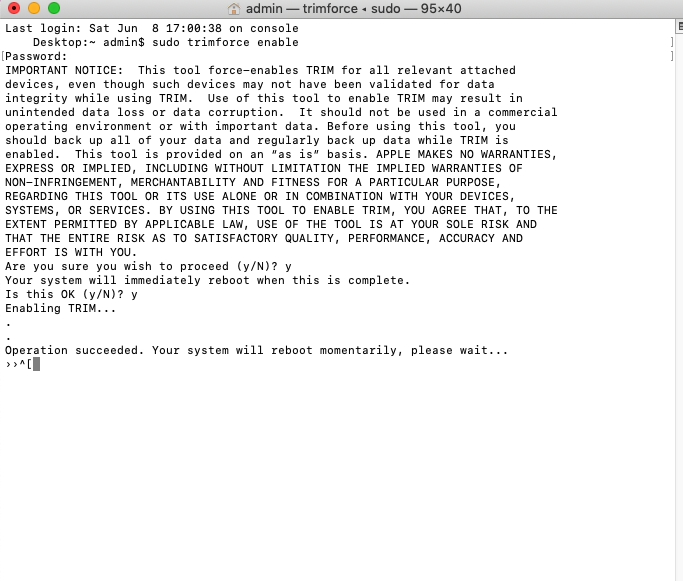
Tested on High Sierra and Mojave I've been looking off and on about how to enable trim support on a disk image in osx. Had a few more minutes today and found it on the Internet (https://serverfault.com/questions/876467/how-to-add-virtual-storage-as-ssd-in-kvm) Issue: QEMU disks in osx are presented to the OS in a manner which interprets them as a rotational disk, as shown under About This Mac>System Report>SATA/SATA EXPRESS. Even after forcing trim on all disks via terminal, trim does not work, or even show it as an option. The result is the OS slows over time and disk images bloat. To correct: FOR 6.9.2 and below (if you're worried about potential loss of data, borking a working vm, or other world ending scenarios, make a backup before doing this, and proceed at your own risk.) With the VM shutdown, edit xml settings, changing the disk image info from <disk type='file' device='disk'> <driver name='qemu' type='raw' cache='writeback'/> <source file='/mnt/disks/K/G/vdisk.img'/> <target dev='hda' bus='sata'/> <address type='drive' controller='0' bus='0' target='0' unit='0'/> to <disk type='file' device='disk'> <driver name='qemu' type='raw' cache='none' io='native' discard='unmap'/> <source file='/mnt/disks/K/G/vdisk.img'/> <target dev='hda' bus='sata'/> <address type='drive' controller='0' bus='0' target='0' unit='0'/> with the changes only happening on the second line. (note: it may be possible to leave cache on write back and not use the io native setting, but I didn't experiment much, just followed working directions on the link) make this change for any disk images you have that the vm uses. next scroll to the bottom of the xml and add the following in the QEMU arguments <qemu:commandline> <qemu:arg value='-set'/> <qemu:arg value='device.sata0-0-0.rotation_rate=1'/> </qemu:commandline> any other arguments you have will also still need to be included. I do not know if order matters, but mine is at the end of the arguments list. if you have any other drives, add an additional copy of the argument (both lines) and modify the "device.sata0-0-0.rotat...." accordingly to match your address type listed at the top with the disk image(s). If you only have one, then you can leave it as is, assuming you didn't change the address. If you did this correctly, the vm will boot normally. But this time will display: Recognized as an SSD but no trim support. To fix this, you must force trim on all drives. To do this, go to terminal and enter: sudo trimforce enable It will then give you some text that makes it seem like your computer will eat itself. The OS will then sit for a short bit, after which time it will reboot itself. After it restarts, to verify trim support is now enabled, go back to About This Mac>System Report>SATA/SATA EXPRESS. 6.10.0 RC1 and up Enjoy!

 1 point
 -
Yup Sent via telekinesis1 point
-
Change the default boot option to be MEMTEST. 👿1 point
-
To be honest, I don't know what has or is going entirely I noticed that a NIC that I was using to assign a static IP was reporting as disconnected which explains why the IP assignment wasn't working properly. Since putting that in place having the NAT rule disabled Plex works fine. I went back and enabled it which then didn't have any issues. I've tried restarting and everything seems stable. I think I'm just going to disable the NAT rule since it clearly works without it (for now at least). I hope this helps someone in the future. Cheers Dal19801 point
-
Automated port scans. VPN server hosted on your router or similar is a better option.1 point
-
The plugin looks at the Unraid settings to connect via either SSL or not. You have SSL set to 'yes' or 'auto'. Could you try setting Unraid SSL to no, then stop/start the plugin ? It should work this way.1 point
-
I used to have a USG. Hated it, literally threw it in the trash. This was in the early days of the USG when it could do very little, and half of what it did do it did wrong. I acquiesce that it is MUCH better now. I've been using Untangle for years, and wouldn't switch back now. Fast, granular control, decent reporting, and most importantly has been working 24/7/365 for years with little interaction (other than self induced things like new rules, etc).1 point
-
Do the following to let docker rebuild the networks rm /var/lib/docker/network/files/local-kv.db /etc/rc.d/rc.docker restart1 point
-
For anyone who cares, I think I fixed this! I think it may be due to nginx not working with Websockets by default. I added these lines to the site config: proxy_set_header Upgrade $http_upgrade; proxy_set_header Connection "Upgrade"; And it worked. E.g., this is the location settings for my unRAID proxy: location / { auth_basic "Restricted"; auth_basic_user_file /config/nginx/.htpasswd; include /config/nginx/proxy.conf; proxy_set_header Host $host; proxy_set_header X-Real-IP $remote_addr; proxy_set_header X-Forwarded-For $proxy_add_x_forwarded_for; proxy_set_header X-Forwarded-Proto $scheme; proxy_pass http://192.168.1.106:8080; proxy_set_header Upgrade $http_upgrade; proxy_set_header Connection "Upgrade"; } And now the CPU stats update in real time! Fingers crossed this is the fix.1 point