Leaderboard


Popular Content
Showing content with the highest reputation on 07/19/19 in Posts
-
Attached is a debugged version of this script modified by me. I've eliminated almost all of the extraneous echo calls. Many of the block outputs have been replaced with heredocs. All of the references to md_write_limit have either been commented out or removed outright. All legacy command substitution has been replaced with modern command substitution The script locates mdcmd on it's own. https://paste.ee/p/wcwWV3 points
-
So following on from the next cloud video, here is a tutorial that shows how to set up and configure a reverse proxy on unRAID It uses the linuxserver's excellent docker container Letsencrypt with NGINX. You will see how to use both our own domain with the proxy as well as just using duckdns subdomains. The video covers using both subdomains and subfolders. It also goes through setting up next cloud with the reverse proxy. Hope its useful Heres what to do if your isp blocks port 80 and you cant use http authentication to create your certificates. Also how to make a wildcard certificate.1 point
-
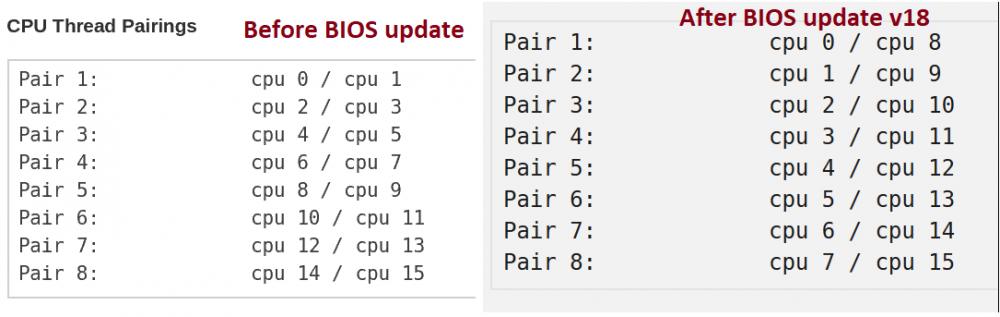
UPDATE - Solution It looks like AGESA AMD BIOS version 1.0.0.4 Patch B (1004 B) fixes the Nvidia pass-through D3 errors for folks with x470 and x370 Ryzen AMD motherboards. This patch was introduced in late November 2019 to AMD motherboards. Mobos confirmed working after updating to this BIOS version: * Asus Prime X470 Pro + 3900x * MSI B450 Gaming AC * MSI x470 Gaming M7 AC + 2700x * X370 Taichi + ryzen 3900x * Gigabyte AX-370 * Asus x470-F with 2700x and 3900x * ... Check your motherboard manufacturer's website to see if the latest BIOS includes this version, test it out, and report back. ---------- UPDATE - As of August 2019, it looks like AMD Tech Support addressed this issue. Unsure how long it will take to roll out to your mobo manufacturer: However, it people are reporting to this AMD Tech Support thread that the 1003 ABB BIOS update alone is not fixing the issue and may also require a Linux kernel update. Temporary "fix" for this issue - Downgrade your motherboard BIOS to the last version that worked! Use the utilities below. Check for a BIOS version before March 2019, and look in the change log before they upgraded for the Ryzen 3000 CPUs. Asus downgrade utility Afuefix64 from overclock.net MSI downgrade utility Flash Tool at MSI forums Asrock downgrade utility AFUWIN Tool ----------------- Motherboards and CPUs reported affected so far on this thread: 3x Asus PRIME X470-Pro, (1201 broken) 3x Asus ROG STRIX X370-F Gaming, with Ryzen 5 2600X, 2x AMD Ryzen 7 1700 (BIOS 4207 worked, 4801 broken) 1x MSI x470 Gaming M7 AC (good at v7B77v14 BIOS) with Ryzen 2700x 1x MSI B450 gaming carbon Ac with ryzen 2600 1x Asus B450-F Gaming (good at BIOS 2008) w/ ryzen 2600 1x Asus Crosshair Hero VI (x370) - Bios 6903 failed; 6808 is lastest tested and "working" 1x Asrock x370 Taichi with Ryzen 2700 (good at P5.10, broken at P5.60) 1x Asus ROG STRIX B350-F Gaming motherboard with Ryzen 1700 (broken at BIOS version 5008) 1x x570 board with Ryzen 2600 ------------------- Original post- A BIOS update broke my Win10 gaming VM. I updated my MSI x470 Gaming M7 AC mobo from 7B77v14 to 7B77v18 (I must have missed a few). After I saw this I updated Unraid to 6.6.7 to no avail. The error is a double-whammy. I now get a couple errors: vfio: Cannot reset device 0000:1f:00.3, depends on group 20 vfio: Unable to power on device, stuck in D3 I can fix the first by removing the calls to my Audio card (which is 1f:00.3), but I am left with the "stuck in D3" error. And after I unsuccessfully try to start the Win10 VM I have tried to reboot Unraid, but it hangs after the shut down procedure and requires a hard-reset to bring the system back up. The BIOS update did do something funny: It re-assigned all my CPU pin pairings, so I had to fix that in both the PIN assignments on the VM and in my append isolcpus code (attached that shot). However, as far as I see, it did not change any of the IOMMU groups, vfio-pci.ids, or device numbers. Through my searching, the only references to the Stuck in D3 are related to graphics card pass-through, which I am using. However, it has worked without a hitch until this mobo BIOS update, so I am not sure what has changed for me to tackle. I wouldn't think the mobo upgrade would affect that. What can I try to fix this D3 error? What else can I provide to better assist with this? Attached my Win10 VM XML, and put some other specs below. Note- I have some Ubuntu VMs that are working just fine after the update--after re-assigning the CPU pin pairings. Of course, I do not pass through GPUs or any devices to these instances. Thanks for reading! I appreciate the help. Raid OS 6.6.7 Mobo - MSI x470 Gaming M7 AC, latest BIOS v18 (March 7, 2019) CPU - Ryzen 2700x GPU - EVGA 1070 FTW vm-win10-xml-20190316.xml
 1 point
 -
It would really be better if you let that thread support that user and not hijack it for your support. Maybe they are similar but that remains to be seen. Lets look at his diagnostics on his thread and not get them mixed up with your diagnostics on his thread. If it turns out that there is useful information between the threads we can link to them.1 point
-
It is, and to close the loop for anyone else who might have a similar issue in the future: I had an invisible character in my path string. A unicode string for a zero-width non-breaking space:  ...that I somehow managed to get into the field through copy/pasting the path from this forum (which goes to show you should be very careful when copy/pasting from the web). You'd never know the unicode was there by looking at the path in the web panel - it was only by checking the XML files themselves that I was able to see the problem. Deleted the stray unicode, deleted the clusterfiles folder, restarted the dockers, and they recreated the clusterfiles folder with a valid path, and everything worked! If @bubo hadn't requested to see the XML files, I never would have spotted the problem. Thanks!1 point
-
Thanks - those did not work because it was not even being recognized as LUKS. Thankfully I ended up fixing the issue. For whatever reason, when unRAID failed to mount the drive as cache, it overwrote the first 6 bytes of the LUKS header with zeroes. Thankfully, these bytes of the LUKS header are standard, so I used a hex editor and dd to correct them. Hopefully, these commands might help someone else encountering the same situation in the future: dd if=/dev/nvme1n1p1 of=/mnt/user/share/broken_header.bin bs=512 count=1 root@Tower:~# dd if=/dev/nvme1n1p1 bs=48 count=1 | hexdump -C 1+0 records in 1+0 records out 48 bytes copied, 0.0134741 s, 38.0 kB/s 00000000 00 00 00 00 00 00 00 01 61 65 73 00 00 00 00 00 |........aes.....| 00000010 00 00 00 00 00 00 00 00 00 00 00 00 00 00 00 00 |................| 00000020 00 00 00 00 00 00 00 00 78 74 73 2d 70 6c 61 69 |........xts-plai| root@Tower:~# dd if=/dev/sdl1 bs=48 count=1 | hexdump -C 1+0 records in 1+0 records out 48 bytes copied, 0.00186538 s, 25.7 kB/s 00000000 4c 55 4b 53 ba be 00 01 61 65 73 00 00 00 00 00 |LUKS....aes.....| 00000010 00 00 00 00 00 00 00 00 00 00 00 00 00 00 00 00 |................| 00000020 00 00 00 00 00 00 00 00 78 74 73 2d 70 6c 61 69 |........xts-plai| After fixing with a hex editor, using the bytes from sdl1 above: dd if=/mnt/user/share/fixed_header.bin of=/dev/nvme1n1p1 bs=512 count=11 point
-
I'm currently on a backup of 2 TB with almost 400k files (370k)..... I thought backing up my cache drive would be a good idea, whilst forgetting that Plex appdata is huge of small files. Currently also getting the limit exceeded error. So I'm pretty sure rclone doesn't count folders as objects, but Gdrive does.1 point
-
It was OK to do this. A format is just a form of write operation and the parity build process can handle writes occurring to the array while it is running. Such writes will slow down the parity rebuild process (and the write operation) but in the case of a format this would only be by a matter of minutes but larger writes have more impact. There is also the fact that if a data drive fails while building the initial parity the contents of the write could be lost. No harm is done. The reason is all about failure of a data drive while attempting to build the new parity. If the following conditions are met: The old parity drive is kept intact. No data is written to the array while attempting to build parity on the new drive. then these is a process (albeit a little tricky) where the old parity drive can be used in conjunction with the 'good' data drives to rebuild the data on the failed data drive. It is basically a risk/elapsed time trade-off and the recommended process minimizes risk at the cost of increasing elapsed time. This is only done if you already have parity fully built. It is not required if you are in the process of building initial parity (or have no parity disk). This is because you were running the parity build process. In such a case whatever is already on the disk is automatically included in the parity calculations so it is not a requirement that the disk contain only zeroes.1 point
-
The forum may be mucking it up for us, let me post a link from a sane paste site. https://paste.ee/p/wcwWV Some quick notes for the curious for some decisions: Each call of echo actually eats CPU and I/O scheduler time, even the ones that only write to the screen. It's better to produce many lines of output with a single echo or cat statement generally than to use many. I left some of these in just to avoid frustration with implementing a single echo that did the same thing. In some places I've opted to use cat. This happens in two circumstances: 1.) Where there's identations. A CR escaped echo `echo "\` prints identations literally. You could use a heredoc with echo, but it can be unpredictable depending on what implementation of echo is present on the target machine. It's easier, and safer in this circumstance to use `cat` 2.) Where there's bash sentinel characters `*` for similar reasons as above, if you use a cr escaped echo to print a block that contains a bash sentinel, it will expand those sentinels. To work around this, you can temporarily turn off this processing, and then turn it back on with `set -f` and `set +f` respectively. This is 3 separate calls to do what a single cat handles with no problem. cat can be measurably slower in certain circumstances, but its generally negligible, especially since we've reduced the number of calls 3 fold. You'll also notice I use two different heredoc sentinels with cat, `<< EOF` and `<<-EOF` the former includes whitespace to the left of any text, and requires that terminating EOF sentinel to rest on the first character and be the only character on the entire line at the end of the heredoc. While the latter truncates anything whitespace located to the left of the terminating EOF sentinel, and allows whitespace to preceed the terminating EOF sentinel. In this manner I can retain identation on appropriate text blocks without including it in the resulting output. The other changes are not preferential but agreed upon by most of the industry as "proper syntax" ( `$()` for command substitution in lieu of ``, double quotes around variables to prevent globbing, etc.) I didn't bother messing with the logic as I wanted the script to retain its original functionality, and just have more longevity. Currently no errors should be output during a FULLAUTO run, from my test earlier today. If you run into an error message ping me here and I'll see what I can do for now. I don't plan on adopting this project, just don't like seeing hard work lost or error messages on my terminal windows. (I suppose I could just wrap everything with a 2>/dev/null) PS: I've been very ill, so I've made a substantial number of typographical errors in my notes and comments in the script. The script runs okay, as I had to test it - but trust me, it didn't run the first time I tried after making all of the changes. Not even close. Hopefully my brain starts to pick up speed again over the next several days.1 point
-
As Jon has said - there are a lot of ways to do this. However I'd like to say what I did and how I did it. This was going from 1.5 tb drives to 3tb drives - so it's old info, take it with a grain of salt (and it's been like 6 years) New server, new drives. Ran PreClear on all new drives. 3x Read/Write - basically ensuring the new drives are good. I then did a unraid format / import on all disks. Once all disks passed that I then inserted one of the old disks at a time, copying them to whichever drive I wanted. I did this via SSH/Telnet via MidnightCommander. After all disks (in my case it was 8) I did a rebuild array. (which IIRC rebuilds parity based on the data disks info) I have since added a 2nd parity drive - and all seems well. YMMV - but that's what I did. And a side note - get another drive for dual parity. It's well worth it. One thing to keep in mind - if you do it this way all of your data is unprotected until it's finished - it's dangerous.1 point
-
For a introduction to S.M.A.R.T, you can start here: https://en.wikipedia.org/wiki/S.M.A.R.T. As you read, you will find out that the system is not really that great of a predictor. But it can indicate if a disk is starting to show some indication that it might be getting ready to fail. Usually when a disk has failed catastrophically, you can't get a SMART report from it. Remember that the SMART is controlled by the disk manufacturers. They don't want to provide any information in such a fashion that would prompt a consumer to RMA a disk that might continue to function for months to years before it catastrophically fails. Years of Unraid user experience has shown that certain parameters are really useful to determining disk health and those should be monitored. You can find those attributes by going to Settings >>> Disk Settings >>> Global SMART Settings1 point
-
I'd love this so I could put my steam library on unRAID and access over 10gbe. Won't work on a network share as some things need to be run as admin.1 point