Leaderboard


Popular Content
Showing content with the highest reputation on 07/21/19 in all areas
-
I'm trying to take another look at DVB/Nvidia integration no ETA at the moment.2 points
-
Well f off and fork your own. Been running my install since we released without a problem. I got no time for comments like this and am going to treat it with the contempt it deserves. All the code is open source feel free to make a pull request, however, I've yet to see a single person make a comment of this nature actually do so, and I'm not expecting you to be the first. Sent from my Mi A1 using Tapatalk2 points
-
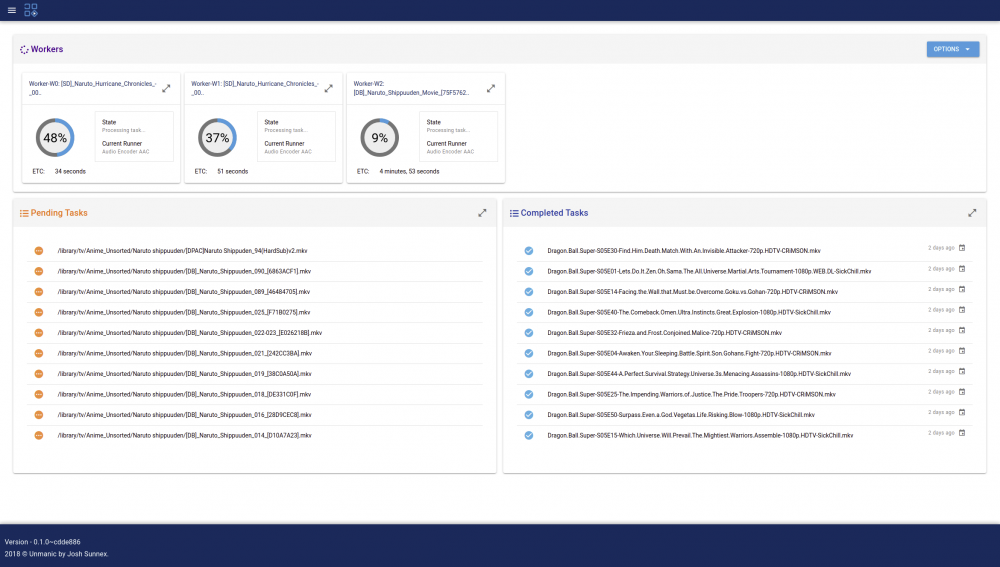
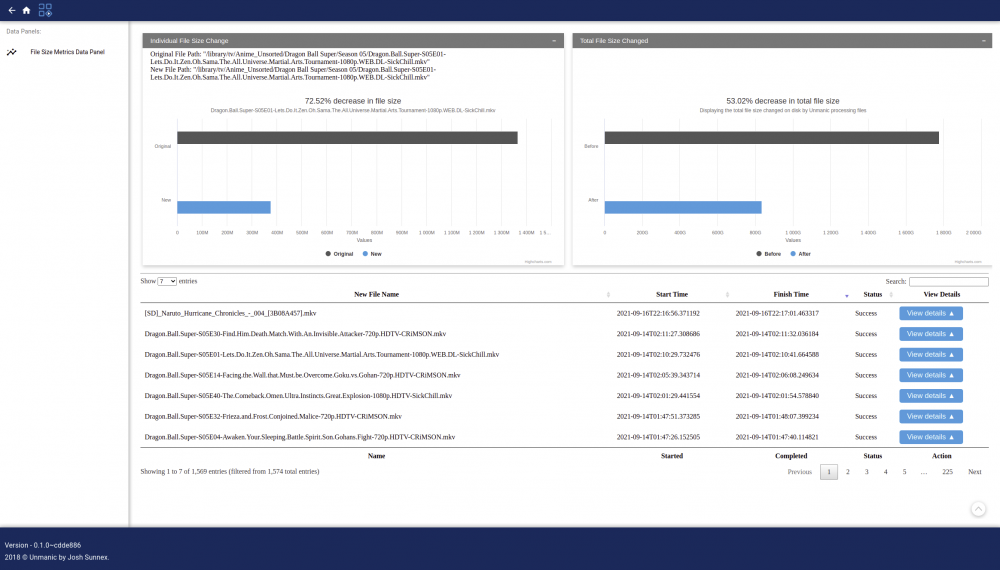
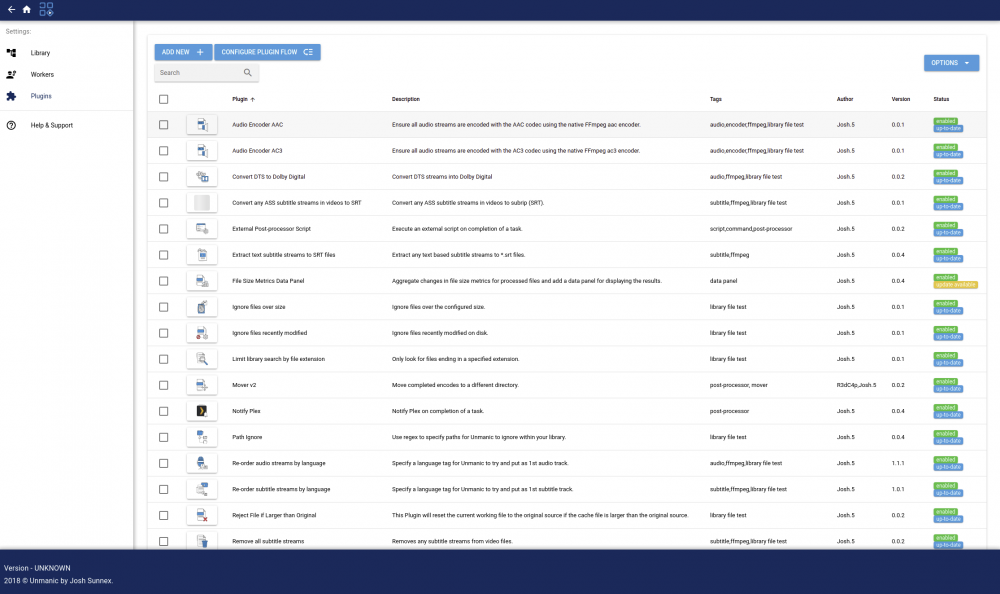
Application Name: Unmanic - Library Optimiser Application Site: https://unmanic.app/ Docker Hub: https://hub.docker.com/r/josh5/unmanic/ Github: https://github.com/Unmanic/unmanic/ Documentation: https://docs.unmanic.app/ Discord: https://unmanic.app/discord Description: Unmanic is a simple tool for optimising your file library. You can use it to convert your files into a single, uniform format, manage file movements based on timestamps, or execute custom commands against a file based on its file size. Simply configure Unmanic pointing it at your library and let it automatically manage that library for you. Unmanic provides you with the following main functions: A scheduler built in to scan your whole library for files that do not conform to your configured presets. Files found with incorrect formats are then queued for conversion. A folder watchdog. When a video file is modified or a new file is added in your library, Unmanic is able to check that video against your configured video presets. Like the first function, if this video is not formatted correctly it is added to a queue for conversion. A handler to manage running multiple file manipulation tasks at a time. A Web UI to easily configure, manage and monitor the progress of your library optimisation. You choose how you want your library to be. Unmanic can be used to: Modify and/or trans-code video or audio files into a uniform format using FFmpeg Move files from one location to another after a configured period of time Execute FileBot to automatically batch rename files in your library Extract ZIP files (or compress files to .{zip,tar,etc}) Resize or auto-rotate images Correct missing data in music files Run any custom command against files matching a certain extension or above a configured file size The Docker container is currently based linuxserver.io Ubuntu focal image. Video Guide: Screenshots: (Dashboard) (File metrics) (installed plugins) Setup Guide: Unmanic Documentation - Installation on Unraid Thanks To/Credits Special thanks to: linuxserver.io (For their work with Docker base images): https://www.linuxserver.io/ Cpt. Chaz (For providing me with some updated graphics and his awesome work on YouTube): https://forums.unraid.net/profile/96222-cpt-chaz/

 1 point
 -
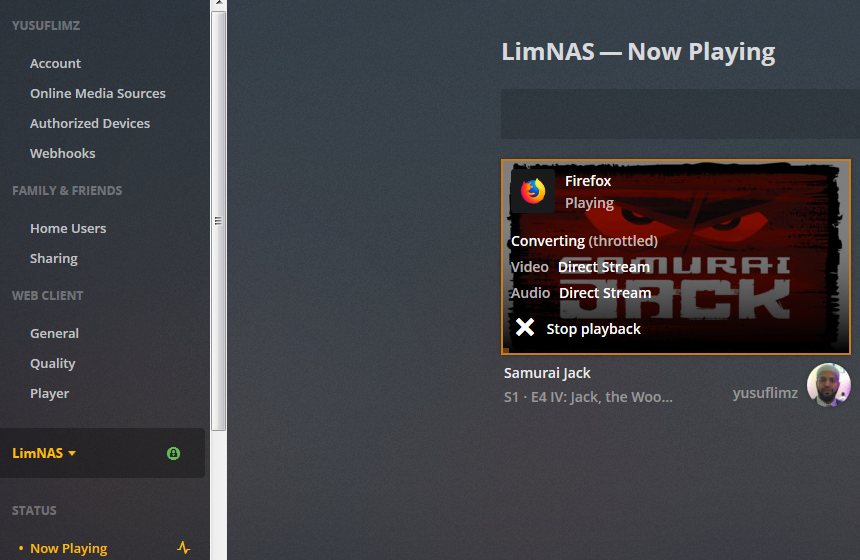
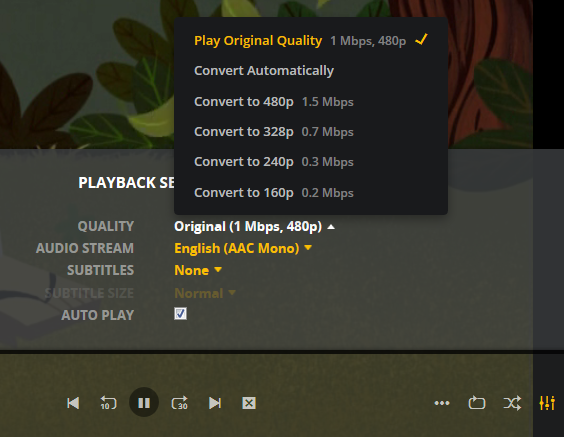
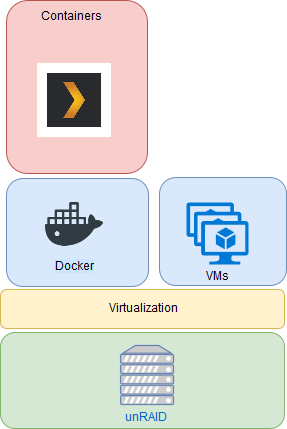
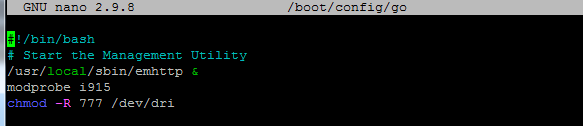
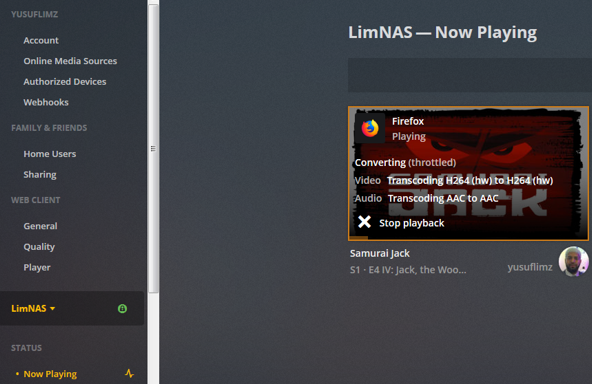
***Update*** : Apologies, it seems like there was an update to the Unraid forums which removed the carriage returns in my code blocks. This was causing people to get errors when typing commands verbatim. I've fixed the code blocks below and all should be Plexing perfectly now Y =========== Granted this has been covered in a few other posts but I just wanted to have it with a little bit of layout and structure. Special thanks to [mention=9167]Hoopster[/mention] whose post(s) I took this from. What is Plex Hardware Acceleration? When streaming media from Plex, a few things are happening. Plex will check against the device trying to play the media: Media is stored in a compatible file container Media is encoded in a compatible bitrate Media is encoded with compatible codecs Media is a compatible resolution Bandwith is sufficient If all of the above is met, Plex will Direct Play or send the media directly to the client without being changed. This is great in most cases as there will be very little if any overhead on your CPU. This should be okay in most cases, but you may be accessing Plex remotely or on a device that is having difficulty with the source media. You could either manually convert each file or get Plex to transcode the file on the fly into another format to be played. A simple example: Your source file is stored in 1080p. You're away from home and you have a crappy internet connection. Playing the file in 1080p is taking up too much bandwith so to get a better experience you can watch your media in glorious 240p without stuttering / buffering on your little mobile device by getting Plex to transcode the file first. This is because a 240p file will require considerably less bandwith compared to a 1080p file. The issue is that depending on which format your transcoding from and to, this can absolutely pin all your CPU cores at 100% which means you're gonna have a bad time. Fortunately Intel CPUs have a little thing called Quick Sync which is their native hardware encoding and decoding core. This can dramatically reduce the CPU overhead required for transcoding and Plex can leverage this using their Hardware Acceleration feature. How Do I Know If I'm Transcoding? You're able to see how media is being served by playing a first something on a device. Log into Plex and go to Settings > Status > Now Playing As you can see this file is being direct played, so there's no transcoding happening. If you see (throttled) it's a good sign. It just means is that your Plex Media Server is able to perform the transcode faster than is necessary. To initiate some transcoding, go to where your media is playing. Click on Settings > Quality > Show All > Choose a Quality that isn't the Default one If you head back to the Now Playing section in Plex you will see that the stream is now being Transcoded. I have Quick Sync enabled hence the "(hw)" which stands for, you guessed it, Hardware. "(hw)" will not be shown if Quick Sync isn't being used in transcoding. PreRequisites 1. A Plex Pass - If you require Plex Hardware Acceleration Test to see if your system is capable before buying a Plex Pass. 2. Intel CPU that has Quick Sync Capability - Search for your CPU using Intel ARK 3. Compatible Motherboard You will need to enable iGPU on your motherboard BIOS In some cases this may require you to have the HDMI output plugged in and connected to a monitor in order for it to be active. If you find that this is the case on your setup you can buy a dummy HDMI doo-dad that tricks your unRAID box into thinking that something is plugged in. Some machines like the HP MicroServer Gen8 have iLO / IPMI which allows the server to be monitored / managed remotely. Unfortunately this means that the server has 2 GPUs and ALL GPU output from the server passed through the ancient Matrox GPU. So as far as any OS is concerned even though the Intel CPU supports Quick Sync, the Matrox one doesn't. =/ you'd have better luck using the new unRAID Nvidia Plugin. Check Your Setup If your config meets all of the above requirements, give these commands a shot, you should know straight away if you can use Hardware Acceleration. Login to your unRAID box using the GUI and open a terminal window. Or SSH into your box if that's your thing. Type: cd /dev/dri ls If you see an output like the one above your unRAID box has its Quick Sync enabled. The two items were interested in specifically are card0 and renderD128. If you can't see it not to worry type this: modprobe i915 There should be no return or errors in the output. Now again run: cd /dev/dri ls You should see the expected items ie. card0 and renderD128 Give your Container Access Lastly we need to give our container access to the Quick Sync device. I am going to passively aggressively mention that they are indeed called containers and not dockers. Dockers are manufacturers of boots and pants company and have nothing to do with virtualization or software development, yet. Okay rant over. We need to do this because the Docker host and its underlying containers don't have access to anything on unRAID unless you give it to them. This is done via Paths, Ports, Variables, Labels or in this case Devices. We want to provide our Plex container with access to one of the devices on our unRAID box. We need to change the relevant permissions on our Quick Sync Device which we do by typing into the terminal window: chmod -R 777 /dev/dri Once that's done Head over to the Docker Tab, click on the your Plex container. Scroll to the bottom click on Add another Path, Port, Variable Select Device from the drop down Enter the following: Name: /dev/dri Value: /dev/dri Click Save followed by Apply. Log Back into Plex and navigate to Settings > Transcoder. Click on the button to SHOW ADVANCED Enable "Use hardware acceleration where available". You can now do the same test we did above by playing a stream, changing it's Quality to something that isn't its original format and Checking the Now Playing section to see if Hardware Acceleration is enabled. If you see "(hw)" congrats! You're using Quick Sync and Hardware acceleration [emoji4] Persist your config On Reboot unRAID will not run those commands again unless we put it in our go file. So when ready type into terminal: nano /boot/config/go Add the following lines to the bottom of the go file modprobe i915 chmod -R 777 /dev/dri Press Ctrl X, followed by Y to save your go file. And you should be golden!


 1 point
 -
Application Name: Jackett Application Site: https://github.com/Jackett/Jackett Docker Hub: https://hub.docker.com/r/linuxserver/jackett/ Github: https://github.com/linuxserver/docker-jackett Please post any questions/issues relating to this docker you have in this thread. If you are not using Unraid (and you should be!) then please do not post here, instead head to linuxserver.io to see how to get support.1 point
-
Also, your appdata, domains, and system shares are cache-prefer, which is correct, but they have no data on cache and all their data on the array. Which is not surprising since cache isn't mounted. Go to Settings - VM Manager and disable VMs. Do you actually have any VMs? Leave them disabled until you resolve your capacity problems. Go to Settings - Docker and disable dockers, then delete the docker image. Leave them disabled and deleted until you resolve your capacity problems. Probably you will have to reformat cache. No doubt the reason for its corruption is because you filled it up. Why did you let all your disks all fill up? (Why didn't it occur to you that this was the cause of all your problems?)1 point
-
There is something missing from your steps to fix it. A Share is simply the amalgamation of the top level folders with that name on all drives so manually creating such a folder would not break things. What COULD break things is creating a folder where the name is spelt the same but the case is not. This is because Linux uses a case sensitive file system but the share names exposed by Samba are not. In the case of there being folders on the disks that are spelt the same but have different case Samba will end up choosing one of them and ignoring the other.1 point
-
You're only supposed to rename the files, not move them to different folders. Documentation is pretty clear on that.1 point
-
Dynamix cache dirs. The CPU usage does drop on that after time, but to be honest, you're always going to be best off excluding the appdata share in particular and only having your media shares included in it's list.1 point
-
Are you using a Shield to test playback by any chance? The best way to test I have found is using a wired PC with the PMP app https://www.plex.tv/media-server-downloads/#plex-app @Kaizac Try emptying the trash on your drives if you are getting the limit exceeded error rclone delete remotename: --fast-list --drive-trashed-only --drive-use-trash=false -v --transfers 50 Add "--dry-run" flag if you want to test drive first May also be useful to dedupe, particularly video files. rclone dedupe skip remotename: -v --drive-use-trash=false --no-traverse --transfers=50 And remove empty directories rclone rmdirs remotename: -v --drive-use-trash=false --fast-list --transfers=50 AGAIN --dry-run If you want to see what it will do first.1 point
-
have you tried making a new install? anytime I had lag issues, if I created a fresh install, it would typically eliminate it (or at least eliminate it as a source)1 point
-
Fundamentally we're volunteers, so if you think something needs doing, feel free to step up and contribute rather than say something is a joke. Yes, I do hear comments like that all too often and I treat them all in the same way. When people pay my mortgage and feed my family for the stuff we do then they have the right to complain, because we then we have a customer/client relationship. But when people are using something, for free, made by us in our spare time, I reserve the right to use whatever language I see fit, as our relationship is most certainly not a customer/client one, essentially we have no obligation to do anything. One person saying something as non-specific as "PHP is a joke" does not a problem make, and is not something I'm going to waste any more time with. Sent from my Mi A1 using Tapatalk1 point
-
Really all Nvidia gpus are good to go. A cheap card with reasonable performance I really like the GTX 1050ti and use on in one of my servers. You can pick them up real cheap especially a used one.1 point
-
Its a pain when you get an error 127 when a GPU doesnt reset correctly and you have to reboot the host. So heres how to easlily reset a GPU (AMD or Nvidia) without restarting the server.1 point
-
Not good, as you found out. Purchasing a battery backup and configure it so the server shuts down cleanly. Do you have status emails sent to you periodically? Do you have diagnostics from before this event? Screenshot of array? Anything? The picture you posted seems to show 2 parity drives, problem is with parity2, disk order matters if you need to keep parity valid with reassignments.1 point
-
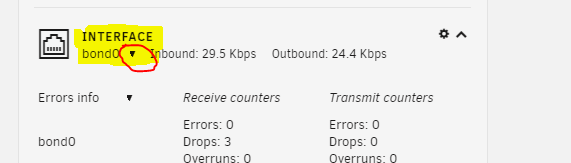
Went to /boot/config/ - Deleted network.cfg and rebooted ...did not appear to work. I then did the same thing to network-rules.cfg and rebooted with not change again. I then hit the little down arrow next to bond0 and picked eth1...errors instantly disapperared. Went back to bond0 and it seems to be staying error free. Thank you for your help Benson.
 1 point
 -
how can i launch terraria server with mods?1 point
-
Brother you need to get a donate button going Sent from my SM-N960U using Tapatalk1 point
-
I've done a lot of searching both here and elsewhere, but seem to be getting confused as to what will work, and if the whole idea is a good one or not. My HP Microserver is full (4 x HDD and 1 x SSD for cache). I'd like to add a 4 bay (or even 2 bay) external drive box. It appears that in the past SATA (plus using a port multiplier aware port) was the way to go, but I understand UnRAID 6.2 supports USB3. There are a load of cheap boxes available here in the UK, such as the IcyBox that appear to do the job. Some examples are: https://www.amazon.co.uk/Icybox-IB-3664SU3-External-Enclosure-3-5-Inch/dp/B013J7ZRMQ/ref=sr_1_1 https://www.amazon.co.uk/Hornettek-Enterprise-Quad-Hard-Drive/dp/B00CYFM520/ref=pd_sbs_147_1 Can anyone clarify if they work, and if there is a particular recommendation? As the Microserver is a budget box, I'm not looking to spend thousands to extend it. I would be really (really!) grateful for some help1 point
-
A stupid easy way to have this happen is to have a local terminal (or ssh) logged in with the current working directory set to /mnt/disk1 or /mnt/cache But you can try and figure out what's holding it up via lsof /mnt/disk1 lsof /mnt/cache1 point
-
Open device manager You will see your unknown devices. Right click the unknown device and select "update driver". Select "Browse my computer for the driver software" Click browse Select the CDROM Drive virtio-win-x.x Then click next. Windows will scan the entire device for the location of the best-suited driver. It should find a RedHat network adapter driver, follow the prompts and you're in business. ** I never bothered to locate the actual subfolder of the driver on the virtio-win-1-1 image, I just let windows do it for me. ** Hope this helps.1 point