Leaderboard


Popular Content
Showing content with the highest reputation on 07/31/19 in all areas
-
Overview: Support for Docker image arch-urbackup in the binhex repo. Application: UrBackup - https://www.urbackup.org/ Docker Hub: https://hub.docker.com/r/binhex/arch-urbackup/ GitHub: https://github.com/binhex/arch-urbackup Documentation: https://github.com/binhex/documentation If you appreciate my work, then please consider buying me a beer For other Docker support threads and requests, news and Docker template support for the binhex repository please use the "General" thread here1 point
-
UPDATE - July 12, 2011 - I created a Wiki article to allow us to pull everthing together. To add you review, go Here, click the link down under the heading "Benchmarks..." and contribute!! Update - March 2015 - http://lime-technology.com/forum/index.php?topic=12405.msg359211#msg359211 - Looks like SM is now including blanking panels installed in the trays. Very nice. I am looking at 4 of the more popular 5x3 cages used. The Icy Dock MB455SFP-B, the Norco SS-500, the SuperMicro CSE-M35T-1 and the iStarUSA BPU-350. If you would like any additional pics or information on the units, please PM me and I will try and accommodate. For anyone wanting to go to the main gallery and look at all the pics, please go Here. THE REVIEW First off, please be aware that I am not a professional reviewer. What I have documented are things I have observed and experienced working with all four units and my own opinions. Hopefully this and the pictures will help you make that critical decision. SuperMicro Initial Thoughts: -Packaging is adequate -Well built, solid cage, all metal except for fan assembly -Bit flimsy drive trays -Included manual is pretty good -Drive LED cables included, nice addition -Super easy to remove and replace fan, 92mm, standard 4 pin connector -Straight forward hookup for power and SATA cables -Had to look inside slots to figure out which slot corresponded to which port on the back -Lots of screws and includes SATA cables -Trays slid in and out nicely, smooth Inside: -Looks like cooling would be good, four air cutouts in the rear Installation: -As many have complained, this unit is a really tight fit, more so in some case then others, but very tight -Screw holes line up ok -Mounting drive into the drive cage is straight forward. Has the standard four screws along each of the rails. You just have to balance things a bit while you get it screwed in. -Installing power and SATA cables into this unit is pretty easy. You will need to install the SATA cables in a specific order and remove them in a specific order as it can get a little cramped. LED (as observed): -Doesn’t look to be a “powered” on LED for drives. Just activity LED’s Overall Thoughts: I like this unit. It is a server class unit and you can tell. The all aluminum cage makes it a nice heat sink. The drive cages themselves were nice to work with. The ability to replace the fan on the rear without removing the entire unit and being able to use a standard 92mm fan without splicing in some custom connector is a nice bonus. As some have mentioned though, putting this into your case itself though can be a real test of strength. This unit is an extremely tight fit. I tested this on three different cases and had the same result. One thing to be aware of, this is the longest drive cage of the four I looked at. In a standard mid-tower case with an ATX motherboard the fan will overhang the motherboard but just a fraction, but enough to block SATA ports that might be right there on the edge or some other components. Care will be needed as to where you place the unit in your case under these circumstances. In fan testing, a lot of people have complained about the noise of the fan. My stock unit though is actually quite quiet, considering. Once the sides are on and with all the other case fans, I could not hear it. Maybe SM has started using a different fan? You do get some excellent air flow though with this 92mm fan. At the current price, this unit provides for good value for the dollar in my opinion. Has a lot going for it, overall positive experience other than needing a lot of force to push it into the case. ICY Dock Initial Thoughts: -Packaging similar to all others -Unit complete “shrink” wrapped for some reason -Included screws but no SATA cables -Manual was good, was able to align slots to ports on the rear -Cage is sturdy and light, short -More use of plastic then the SuperMicro or Norco -Sticker on the cage itself with all connector details, nice addition -Straight forward power plugs on the rear -Fan is removable but not easily replaceable, custom 2 cable soldered to connector, 80mm -Drive trays pretty flimsy, almost feel like plastic -Trays are not very easy to slide in and out. Inside: -Looks likes cooling might be an issue, not much in the rear to promote airflow Installation: -Slides into the case nicely, even a bit lose -Screw holes line up ok -Mounting a drive in the drive cage on this unit is tedious. When you pull out the drive cage, you then have to remove this plastic spacer unit that is installed. They have to have that as the rails are so flimsy. Put the drive in, they provide 3 holes per rail that all line up. Like the SuperMicro, bit of a balancing act to get the drives screwed in. I just cannot get over the feeling of how flimsy these drive trays are. -Installing the power and SATA cables was ok, but a bit cramped. Depending on where this unit is mounted and what is around it, could quickly become a hassle do to the layout. The molex connectors, the way they are mounted, seem to have a bit of play to them. I worry swapping cables a few too many times on this one could cause one to snap off. LED (as observed): -Has “powered” on LED’s. -Has activity LED’s Overall Thoughts: This is a nice drive cage. From the front is does go well with most cases. The rear of it is well laid out and very easy to plug in power, SATA and away you go. Bit more plastic used on this one then say a SuperMicro unit. The drive trays themselves seemed pretty flimsy. Nice locking mechanism in the front, but found the tray could stick a bit when sliding in and out. The rails on the drive cages are aluminum but seem to be a very low grade, almost plastic feel to them. Unit is a great fit in the case, pops right in with no issues at all. Not the shortest unit of them all, but about ¾” shorter than the longest, the SuperMicro. Will fit in a mid-tower case with an ATX motherboard nicely. The fan on this unit is really nice and quiet. Has excellent exhaust capabilities, but as pointed out above, I would be a bit concerned with airflow as there is not much opening on the back plane to allow air to flow through the unit. Watch those 7200RPM drives closely. If the fan ever dies, the current one in there is a two cable on that is soldered to the fan assembly. Bit of pain if you ever needed to replace. I did try and “remove” the fan once installed in a case and everything all hooked up. This was next to impossible as you need to tilt it back a ways to get these two little hooks off. I ended up breaking one off in the process. With my Corsair power supply, the Molex power plugs have these little tabs, as seen on this page. Because the power plug is directly above some of the SATA ports, I could not use the Corsair plug and had to use a splitter with a standard plug. At the current price this unit almost places itself out of reach. In comparison to the SuperMicro or the Norco, it is a pretty pricey solution and cannot really be recommended. iStarUSA Initial Thoughts: -Packaging similar to all the others -Another unit wrapped in plastic, but not shrink wrapped -Locking tabs on the drive trays. If not locked, with a very small piece, can pop open very easily. Just trying to lock one, I popped open the tray -Individual power on for drives, but pencil or paper clip needed to get at the switch -Solid drive cages -Includes bunch of screws and SATA cables, but they were the locking type, which can be an issue on some motherboards -Well built, solid cage. -Plastic on the front frame similar to the Icy Dock unit -Trays slid in and out really nice and smooth -The fan is 80mm, required to remove the entire back frame to replace it. Not easy to get at and has a custom 3 pin connector -Manual was ok, was able to align slots to ports on the rear -The drive cage handles are plastic and have very limited airflow not perforated like all the other models. May restrict airflow -SATA 15 pin and Molex 4 pin power connectors on the back. Various sources indicate you can use both types at same time, yet I have also heard to only use one type or the other. Website FAQ seems to indicate to only use the two SATA power plugs or the three Molex connectors Inside: -Looks like the cooling will be ok, four large cutouts in the rear Installation: -Slides into the case nicely, like the Icy Dock, a bit loose even -Screw holes line up ok -Installing a drive into the drive cage is a breeze. It uses four screws into the underside of the drive, so no need to balance the drive on its side while you get the screws in. Quick and easy. -With the drive tray having and underside against the drive, should help pull heat away. -Installation of power and SATA cables on this one is pretty easy. All feels solid. Because of the fan design and somewhat recessed, it did make it easier to get at the plugs. LED (as observed): -Has a “powered” on LED, but a little mis-leading. Once you power on through the switch, that LED comes on. -Does not seem to be an activity LED Overall Thoughts: Here you have the smallest unit of them all, a solid aluminum body, again with the front plastic molding. This unit does look pretty sharp from the front. Drive trays themselves are nice and sturdy with a great slide action. The trigger though to “unlock” the drive arm is super light, can pop it open pretty easy and the little locking piece was somewhat awkward with meaty fingers. Individual power on and off for the drives, could be considered a nice add, or a nuisance, just depends on your point of view. This unit fits in very nicely into the case, much like the Icy Dock, a bit loose even. Coming in at an 1 and 3/8” shorter than the Supermicro unit, you should have no problems fitting this into your case with all the components. The fan on this unit, with my not so technical evaluation, was as loud as the SuperMicro one, if not a wee bit more. Interestingly, fan only comes on if at least one drive is powered up. Has decent exhaust. As mentioned above, I would be worried about long term cooling on the drives. The drive cages handles are plastic and look to be perforated from a distance. But on closer inspection, there is a solid piece of plastic on the front. Essentially the entire front of the unit is sealed. The only way air can be drawn in, is through the little cracks of space between drive cages. Replacing the fan is a hassle. You will need to remove the entire cage from the case, to get the rear back cover off, careful though, the fan will still be connected to the cage’s main body through the power cable. A custom three pin connector. Get ready to splice cables. The unit is ok value for the money and you have to know what you are getting into. For those that cannot fit a SuperMicro, this is an equivalently priced model, but with some drawbacks as I pointed out. Norco Initial Thoughts: -Packaging, a lot of info on the outside box, similar interior to the rest -Well built, solid case, bit heavier than the others -Solid drive cages, slid in and out nicely, plastic edging to help the slid -No manual -Screws only for the HDD mounting, no SATA cables included -Straight forward hook up for power -Need to remove the entire back plate to access/replace fan. It is an 80mm fan with a standard 4 pin fan connector. -There are various jumpers but again, can only access one the back plate is removed. -Had to go to website and print out a picture there to be able to figure out which slots aligned to the back ports, no labeling on the rear either Inside: -Looks like the cooling be pretty good. Each drive slot is its own chamber, each with a cutout at the rear for air flow Installation: -Slides into the case ok, a nice snug fit. -Problem with screw alignment could only get screws on one side of cage to align. -The Norco is pretty unique when it comes to mounting the drive in the drive cage. You put the drive in, but what was impressive was the number of screw holes they provide to secure the drive, both on the side rails and underside. So if you have a drive with some stripped screw mounts or something, you will have lots of options. -With the drive tray having and underside against the drive, should help pull heat away -Installing power and SATA cables on this unit was a breeze. The fact that you didn’t have to work around a fan assembly made it really nice. LED (as observed): -Has a “powered” on LED -Activity LED seems a little off. Worked on one drive, not on the other… Overall Thoughts The Norco, a rock solid beast of a cage. Like the SuperMicro, the entire unit is all aluminum. The drive trays are good quality with some plastic slides attached to them to help with removal and inserting them. I have to say though; this unit was a pain to figure out. No manual and nothing on the rear of the unit indicating anything. I have no way of knowing which SATA port on the back corresponded to which cage. If you went to the product page on the website, it was right there. Why they couldn’t include something is strange, and made for a bit of a frustrating experience to start with. Unit slides into the case nicely. Very snug, but not too tight fit. This unit is only ¾” shorter than the SuperMicro unit, so just enough clearance to fit in that mid-tower build with the ATX motherboard. But when trying this on my cage, I could only get the left side screws or the right side screws to line up, but not both. Very weird. On another case it was a bit better, but not by much. Some sort of alignment issue. The fan on this unit was loud. Not quite as loud as the iStarUSA, but you will notice it. But, this fan is moving a lot of air. This was the only one where I could feel the intake air across my hand at the front. What’s more, the interior of the unit is separated into 5 zones with metal sheets, isolating each drive. Makes for really good airflow along the drives. I also think this will help bleed off heat. Each tray also has a metal slide on the inside that allows you to close it off if no drive is installed in that bay. Like a couple of the other units, you will need to remove the entire cage to replace the fan. You have to pull the entire back plate off to get at it. But it is a standard 80mm fan with support for a 3 or 4 pin connector. You also need to remove this plate to get at any of the jumpers. This unit is excellent value for the money. Cheaper than the others reviewed and with some excellent pros to its credit. Just know going into it the documentation is nonexistent and replacing the fan is not as easy as say a SuperMicro unit. Final Points: One thing I did not get into until now is screws. Yes, they all come with them and they are all pretty much custom. Don’t lose them or even mix them up. They are all various depths and different size flat heads. The Norco does not come with any screws for mounting it to the cage, so I had to search through my collection for some that fit and were also short enough. This may be a problem if you do not have a vast supply of screws. And like some have mentioned, I had a heck of a time getting this mounted in a Antec 1200, screw alignment. I managed to get three on the back of the unit on each side to work, but did take some pushing and prodding. After mounting all four units, one thing I noticed, although not as long as the SuperMicro, the Norco may cause some issues with cable management. The entire unit is one big block. Whereas all the other units had a fan assembly at the rear that is somewhat smaller than the main unit itself. The Norco can cover up some of those routing holes added into motherboards for hiding cables. One thing to keep in mind in your build is cable hookup once everything is in. This may need some planning as once you have a couple of cages installed, some power cables run, getting your fingers/hands in there to hook up things can get really tight to almost impossible. The only unit where this would not be a factor was if you have multiple Norco units. As mentioned, with the full size cage incorporating all the components, having three or four of these installed will not hinder your cable hookup. This was the best one to work with in that regard. But the trade off is no easy access to the fan or the jumpers. Note, one thing I do is fill all the empty drive cages with rigid foam. As most of these drive cages do not have any type of solution to block air flow when not in use, exception being the Norco, I do not want those empty slots messing with air flow. I get that spongy grey foam you see in a lot of packaging and cut it to fit the drive cage and just slide it in. Makes an ultra-light filler piece. Pictures on a following post... UPDATE May 2011 - Temperatures At the request of forum members I am running a series of preclears on 5 drives within a cage to gauge temperature management. I am running 5 preclears simultaneously. I will post results for each test. All tests are done with 7200RPM, Seagate drives. 1 x 1TB, 3 x 500GB and 1 x 320GB. Test #1 - iStarUSA Unit is running with all defaults. Ambient temperature here in the room is 21C. Starting temps on all drives range from 29C to 31C. During the preclear sessions all temperatures remained about 31C with the occasional spike to 32C. Very good temperature management. Test #2 - Norco Unit is running with all defaults. Ambient temperature here in the room is 21C. Starting temps on all drives range from 27C to 30C. During the preclear sessions all temperatures remained between 29 as the high for one drive to 32C for the hotest drive. Very good temperature management. istar_preclear_results.txt norco_precleat_results.txt1 point
-
We include a lowly Atom D510 @ 1.66GHz for all testing and writing to encrypted volumes works just fine - perhaps a bit slower but certainly no hangs or time-outs.1 point
-
I get why encryption can be desirable, but is it necessary for this specific server? If so, then a CPU upgrade is in order.1 point
-
hey folks, when do u plan to update qemu to 4.0? ty1 point
-
once you have the above done then any files/folders created will be for that user, you can check this via a quick ssh to the host, go to the config folder and issue command ls -al to see permissions set, they should be for the user you defined.1 point
-
no its:- docker exec -u nobody -it <name of container> whoami if you are changing the account after having created the config files then you will need to also delete the file /config/perms.txt and restart the container, this will then reset permissions for the new puid/pgid values.1 point
-
yes, by changing the PUID and PGID values for the user account you want to use. thats because by default the account used for docker exec is user 'root'. one thing to note here is that the account NAME that the process inside the container runs as does NOT change, it will always be user 'nobody' however the UID and GID are changed for that account to match whatever the user defined the values for PUID and PGID. this is one of my docker images and i can confirm all the images i produce include PUID and PGID to allow you to change the account.1 point
-
Understood about actual backups - thank you! Just waiting, hardware is slowly trickling in. Won't have everything required until mid next week. Really just need to dig in and have at it. Can't wait until I have something new and shiny. Thanks ddr!1 point
-
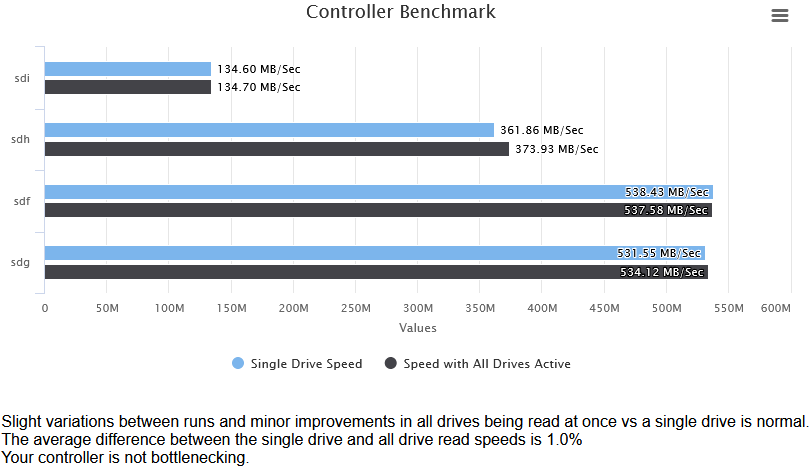
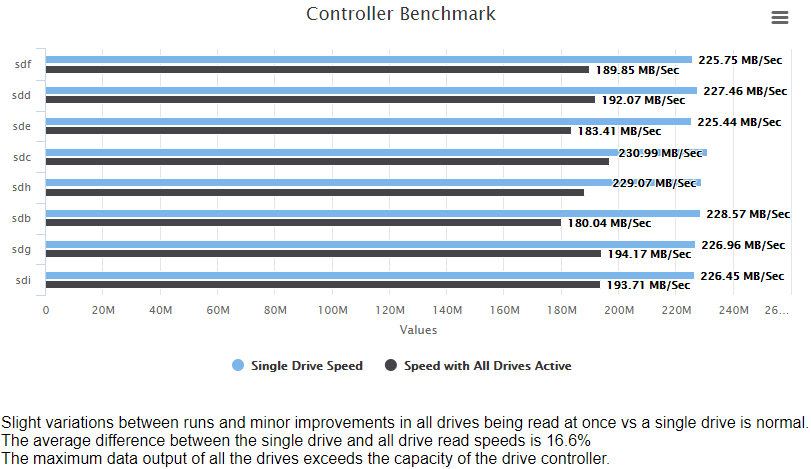
I'm taking this application out of BETA status. Version 2.0 has been released. Release 2.0 Added progress bars to the drive benchmarking Rewrote the Controller Benchmark to better test multi-drive performance Disabled drive activity monitor until cosmetic issues with rotated drive images is resolved Redesigned how the application aborts disk scans if the page is refreshed or otherwise left the page doing the scan For the Controller Benchmark, the application performs a read of each drive attached to the controller in sequence for 15 seconds each. Then all drives are read simultaneously for 15 seconds. If the sum of the percentage difference between all of the drives exceeds 5%, your controller bandwidth is likely being saturated and you're not getting the full possible performance (such as during a Parity check). This can help you plan your drive to controller assignment. Example of a Controller's bandwidth not being saturated: Here's my main rig with 8 WD Red Pro 6TB's attached and saturating the controller
 1 point
 -
All of his dockers get's auto updated as soon as it is available, just give it a few hours if its not already updated.1 point
-
Please don't make RDP directly accessible from the Internet. Please don't!!! There were a couple flaws in the RDP protocol the past months and I have the feeling this won't be the last ones. https://www.bleepingcomputer.com/news/security/microsoft-warns-users-again-to-patch-wormable-bluekeep-flaw/1 point
-
We have this implemented for 6.8 release.1 point
-
OK I got it working, honestly not sure how it was working before; the only port forwarded is 443. I changed Validation to duckdns, added DUCKDNSTOKEN variable, and added wildcard to subdomains. All good now, thanks very much!1 point
-
This happens when you change the name of the VM. The primary vdisk location is set to auto and is still looking for the "oldname.img". You will need to manually select the correct img file.1 point
-
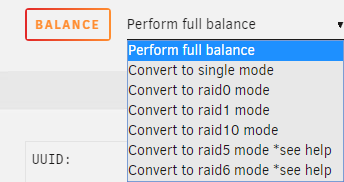
Can I change my btrfs pool to RAID0 or other modes? Yes, for now it can only be manually changed, new config will stick after a reboot, but note that changing the pool using the WebGUI, e.g., adding a device, will return cache pool to default RAID1 mode (note: starting with unRAID v6.3.3 cache pool profile in use will be maintained when a new device is added using the WebGUI, except when another device is added to a single device cache, in that case it will create a raid1 pool), you can add, replace or remove a device and maintain the profile in use following the appropriate procedure on the FAQ (remove only if it does not go below the minimum number of devices required for that specific profile). It's normal to get a "Cache pool BTRFS too many profiles" warning during the conversion, just acknowledge it. These are the available modes (enter these commands on the cache page balance window e click balance**, note if the command doesn't work type it instead of using copy/past from the forum, sometimes extra characters are pasted and the balance won't work) ** Since v6.8.3 you can chose the profile you want from the drop-down window and it's not possible to type a custom command: All the command below can still be used on the console: Single: requires 1 device only, it's also the only way of using all space from different size devices, btrfs's way of doing a JBOD spanned volume, no performance gains vs single disk or RAID1 btrfs balance start -dconvert=single -mconvert=raid1 /mnt/cache RAID0: requires 2 device, best performance, no redundancy, if used with different size devices only 2 x capacity of smallest device will be available, even if reported space is larger. btrfs balance start -dconvert=raid0 -mconvert=raid1 /mnt/cache RAID1: default, requires at least 2 devices, to use full capacity of a 2 device pool they all need to be the same size. btrfs balance start -dconvert=raid1 -mconvert=raid1 /mnt/cache RAID10: requires at least 4 devices, to use full capacity of a 4 device pool they all need to be the same size. btrfs balance start -dconvert=raid10 -mconvert=raid10 /mnt/cache RAID5/6 still has some issues and should be used with care, though most serious issues have been fixed on current kernel at this of this edit 4.14.x RAID5: requires at least 3 devices. btrfs balance start -dconvert=raid5 -mconvert=raid1 /mnt/cache RAID6: requires at least 4 devices. btrfs balance start -dconvert=raid6 -mconvert=raid1 /mnt/cache Note about raid6**: because metadata is raid1 it can only handle 1 missing device, but it can still help with a URE on a second disk during a replace, since metadata uses a very small portion of the drive, you can use raid5/6 for metadata but it's currently not recommended because of the write hole issue, it can for example blowup the entire filesystem after an unclean shutdown. ** Starting with Unraid v6.9-beta1 btrfs includes support for raid1 with 3 and 4 copies, raid1c3 and raidc4, so you can use raid1c3 for metadata to have the same redundancy as raid6 for data (but note that the pool won't mount if you downgrade to an earlier release before converting back to a supported profile on the older kernel): btrfs balance start -dconvert=raid6 -mconvert=raid1c3 /mnt/cache Obs: -d refers to the data, -m to the metadata, metadata should be left redundant, i.e., you can have a RAID0 pool with RAID1 metadata, metadata takes up very little space and the added protection can be valuable. When changing pool mode confirm that when the balance is done data is all in the new selected mode, check "btrfs filesystem df"on the cache page, this is how a RAID10 pool should look like: If there is more than one data mode displayed, do the balance again with the mode you want, for some unRAID releases and the included btrfs-tools, eg, v6.1 and v6.2 it's normal needing to run the balance twice.
 1 point