Leaderboard


Popular Content
Showing content with the highest reputation on 08/25/19 in all areas
-
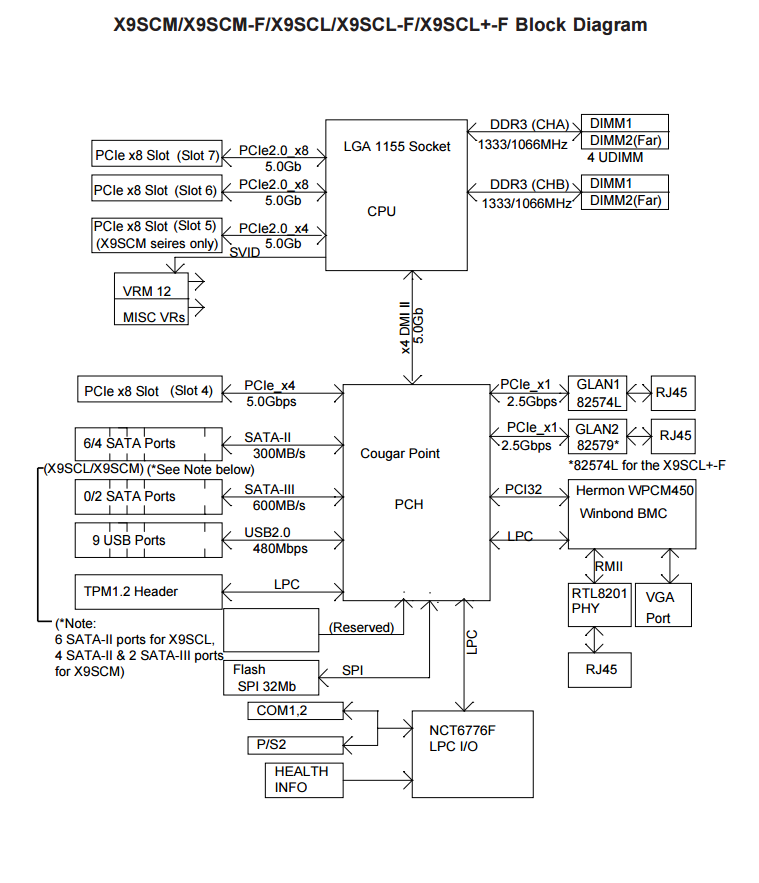
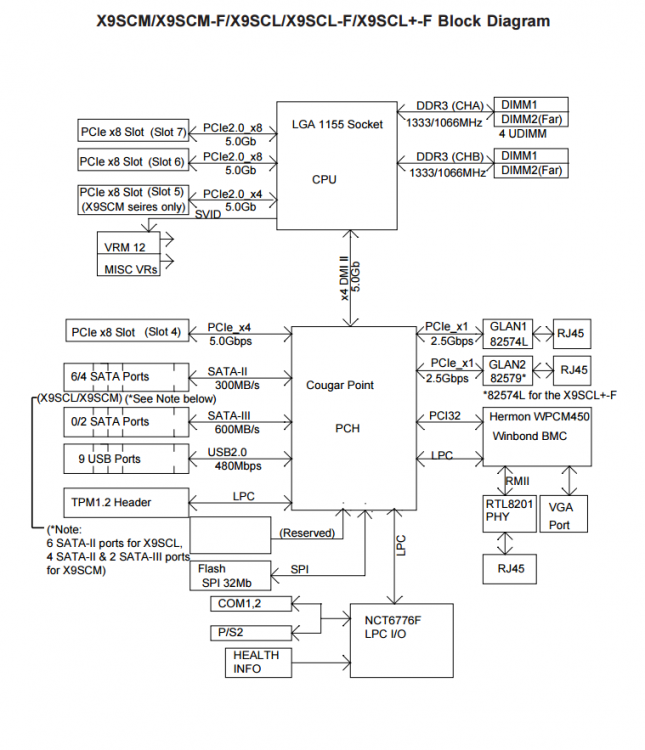
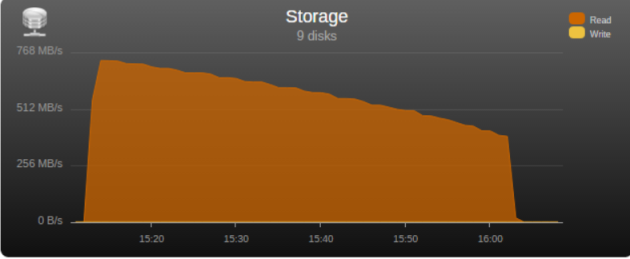
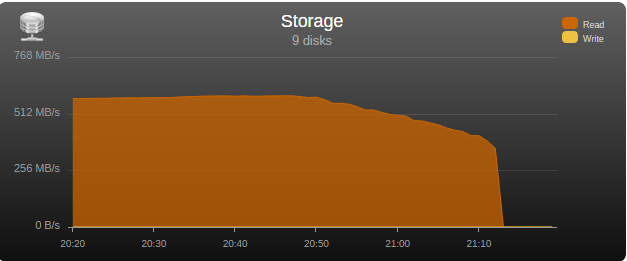
I had the opportunity to test the “real word” bandwidth of some commonly used controllers in the community, so I’m posting my results in the hopes that it may help some users choose a controller and others understand what may be limiting their parity check/sync speed. Note that these tests are only relevant for those operations, normal read/writes to the array are usually limited by hard disk or network speed. Next to each controller is its maximum theoretical throughput and my results depending on the number of disks connected, result is observed parity/read check speed using a fast SSD only array with Unraid V6 Values in green are the measured controller power consumption with all ports in use. 2 Port Controllers SIL 3132 PCIe gen1 x1 (250MB/s) 1 x 125MB/s 2 x 80MB/s Asmedia ASM1061 PCIe gen2 x1 (500MB/s) - e.g., SYBA SY-PEX40039 and other similar cards 1 x 375MB/s 2 x 206MB/s JMicron JMB582 PCIe gen3 x1 (985MB/s) - e.g., SYBA SI-PEX40148 and other similar cards 1 x 570MB/s 2 x 450MB/s 4 Port Controllers SIL 3114 PCI (133MB/s) 1 x 105MB/s 2 x 63.5MB/s 3 x 42.5MB/s 4 x 32MB/s Adaptec AAR-1430SA PCIe gen1 x4 (1000MB/s) 4 x 210MB/s Marvell 9215 PCIe gen2 x1 (500MB/s) - 2w - e.g., SYBA SI-PEX40064 and other similar cards (possible issues with virtualization) 2 x 200MB/s 3 x 140MB/s 4 x 100MB/s Marvell 9230 PCIe gen2 x2 (1000MB/s) - 2w - e.g., SYBA SI-PEX40057 and other similar cards (possible issues with virtualization) 2 x 375MB/s 3 x 255MB/s 4 x 204MB/s IBM H1110 PCIe gen2 x4 (2000MB/s) - LSI 2004 chipset, results should be the same as for an LSI 9211-4i and other similar controllers 2 x 570MB/s 3 x 500MB/s 4 x 375MB/s Asmedia ASM1064 PCIe gen3 x1 (985MB/s) - e.g., SYBA SI-PEX40156 and other similar cards 2 x 450MB/s 3 x 300MB/s 4 x 225MB/s Asmedia ASM1164 PCIe gen3 x2 (1970MB/s) - NOTE - not actually tested, performance inferred from the ASM1166 with up to 4 devices 2 x 565MB/s 3 x 565MB/s 4 x 445MB/s 5 and 6 Port Controllers JMicron JMB585 PCIe gen3 x2 (1970MB/s) - 2w - e.g., SYBA SI-PEX40139 and other similar cards 2 x 570MB/s 3 x 565MB/s 4 x 440MB/s 5 x 350MB/s Asmedia ASM1166 PCIe gen3 x2 (1970MB/s) - 2w 2 x 565MB/s 3 x 565MB/s 4 x 445MB/s 5 x 355MB/s 6 x 300MB/s 8 Port Controllers Supermicro AOC-SAT2-MV8 PCI-X (1067MB/s) 4 x 220MB/s (167MB/s*) 5 x 177.5MB/s (135MB/s*) 6 x 147.5MB/s (115MB/s*) 7 x 127MB/s (97MB/s*) 8 x 112MB/s (84MB/s*) * PCI-X 100Mhz slot (800MB/S) Supermicro AOC-SASLP-MV8 PCIe gen1 x4 (1000MB/s) - 6w 4 x 140MB/s 5 x 117MB/s 6 x 105MB/s 7 x 90MB/s 8 x 80MB/s Supermicro AOC-SAS2LP-MV8 PCIe gen2 x8 (4000MB/s) - 6w 4 x 340MB/s 6 x 345MB/s 8 x 320MB/s (205MB/s*, 200MB/s**) * PCIe gen2 x4 (2000MB/s) ** PCIe gen1 x8 (2000MB/s) LSI 9211-8i PCIe gen2 x8 (4000MB/s) - 6w – LSI 2008 chipset 4 x 565MB/s 6 x 465MB/s 8 x 330MB/s (190MB/s*, 185MB/s**) * PCIe gen2 x4 (2000MB/s) ** PCIe gen1 x8 (2000MB/s) LSI 9207-8i PCIe gen3 x8 (4800MB/s) - 9w - LSI 2308 chipset 8 x 565MB/s LSI 9300-8i PCIe gen3 x8 (4800MB/s with the SATA3 devices used for this test) - LSI 3008 chipset 8 x 565MB/s (425MB/s*, 380MB/s**) * PCIe gen3 x4 (3940MB/s) ** PCIe gen2 x8 (4000MB/s) SAS Expanders HP 6Gb (3Gb SATA) SAS Expander - 11w Single Link with LSI 9211-8i (1200MB/s*) 8 x 137.5MB/s 12 x 92.5MB/s 16 x 70MB/s 20 x 55MB/s 24 x 47.5MB/s Dual Link with LSI 9211-8i (2400MB/s*) 12 x 182.5MB/s 16 x 140MB/s 20 x 110MB/s 24 x 95MB/s * Half 6GB bandwidth because it only links @ 3Gb with SATA disks Intel® SAS2 Expander RES2SV240 - 10w Single Link with LSI 9211-8i (2400MB/s) 8 x 275MB/s 12 x 185MB/s 16 x 140MB/s (112MB/s*) 20 x 110MB/s (92MB/s*) * Avoid using slower linking speed disks with expanders, as it will bring total speed down, in this example 4 of the SSDs were SATA2, instead of all SATA3. Dual Link with LSI 9211-8i (4000MB/s) 12 x 235MB/s 16 x 185MB/s Dual Link with LSI 9207-8i (4800MB/s) 16 x 275MB/s LSI SAS3 expander (included on a Supermicro BPN-SAS3-826EL1 backplane) Single Link with LSI 9300-8i (tested with SATA3 devices, max usable bandwidth would be 2200MB/s, but with LSI's Databolt technology we can get almost SAS3 speeds) 8 x 500MB/s 12 x 340MB/s Dual Link with LSI 9300-8i (*) 10 x 510MB/s 12 x 460MB/s * tested with SATA3 devices, max usable bandwidth would be 4400MB/s, but with LSI's Databolt technology we can closer to SAS3 speeds, with SAS3 devices limit here would be the PCIe link, which should be around 6600-7000MB/s usable. HP 12G SAS3 EXPANDER (761879-001) Single Link with LSI 9300-8i (2400MB/s*) 8 x 270MB/s 12 x 180MB/s 16 x 135MB/s 20 x 110MB/s 24 x 90MB/s Dual Link with LSI 9300-8i (4800MB/s*) 10 x 420MB/s 12 x 360MB/s 16 x 270MB/s 20 x 220MB/s 24 x 180MB/s * tested with SATA3 devices, no Databolt or equivalent technology, at least not with an LSI HBA, with SAS3 devices limit here would be the around 4400MB/s with single link, and the PCIe slot with dual link, which should be around 6600-7000MB/s usable. Intel® SAS3 Expander RES3TV360 Single Link with LSI 9308-8i (*) 8 x 490MB/s 12 x 330MB/s 16 x 245MB/s 20 x 170MB/s 24 x 130MB/s 28 x 105MB/s Dual Link with LSI 9308-8i (*) 12 x 505MB/s 16 x 380MB/s 20 x 300MB/s 24 x 230MB/s 28 x 195MB/s * tested with SATA3 devices, PMC expander chip includes similar functionality to LSI's Databolt, with SAS3 devices limit here would be the around 4400MB/s with single link, and the PCIe slot with dual link, which should be around 6600-7000MB/s usable. Note: these results were after updating the expander firmware to latest available at this time (B057), it was noticeably slower with the older firmware that came with it. Sata 2 vs Sata 3 I see many times on the forum users asking if changing to Sata 3 controllers or disks would improve their speed, Sata 2 has enough bandwidth (between 265 and 275MB/s according to my tests) for the fastest disks currently on the market, if buying a new board or controller you should buy sata 3 for the future, but except for SSD use there’s no gain in changing your Sata 2 setup to Sata 3. Single vs. Dual Channel RAM In arrays with many disks, and especially with low “horsepower” CPUs, memory bandwidth can also have a big effect on parity check speed, obviously this will only make a difference if you’re not hitting a controller bottleneck, two examples with 24 drive arrays: Asus A88X-M PLUS with AMD A4-6300 dual core @ 3.7Ghz Single Channel – 99.1MB/s Dual Channel - 132.9MB/s Supermicro X9SCL-F with Intel G1620 dual core @ 2.7Ghz Single Channel – 131.8MB/s Dual Channel – 184.0MB/s DMI There is another bus that can be a bottleneck for Intel based boards, much more so than Sata 2, the DMI that connects the south bridge or PCH to the CPU. Socket 775, 1156 and 1366 use DMI 1.0, socket 1155, 1150 and 2011 use DMI 2.0, socket 1151 uses DMI 3.0 DMI 1.0 (1000MB/s) 4 x 180MB/s 5 x 140MB/s 6 x 120MB/s 8 x 100MB/s 10 x 85MB/s DMI 2.0 (2000MB/s) 4 x 270MB/s (Sata2 limit) 6 x 240MB/s 8 x 195MB/s 9 x 170MB/s 10 x 145MB/s 12 x 115MB/s 14 x 110MB/s DMI 3.0 (3940MB/s) 6 x 330MB/s (Onboard SATA only*) 10 X 297.5MB/s 12 x 250MB/s 16 X 185MB/s *Despite being DMI 3.0** , Skylake, Kaby Lake, Coffee Lake, Comet Lake and Alder Lake chipsets have a max combined bandwidth of approximately 2GB/s for the onboard SATA ports. **Except low end H110 and H310 chipsets which are only DMI 2.0, Z690 is DMI 4.0 and not yet tested by me, but except same result as the other Alder Lake chipsets. DMI 1.0 can be a bottleneck using only the onboard Sata ports, DMI 2.0 can limit users with all onboard ports used plus an additional controller onboard or on a PCIe slot that shares the DMI bus, in most home market boards only the graphics slot connects directly to CPU, all other slots go through the DMI (more top of the line boards, usually with SLI support, have at least 2 slots), server boards usually have 2 or 3 slots connected directly to the CPU, you should always use these slots first. You can see below the diagram for my X9SCL-F test server board, for the DMI 2.0 tests I used the 6 onboard ports plus one Adaptec 1430SA on PCIe slot 4. UMI (2000MB/s) - Used on most AMD APUs, equivalent to intel DMI 2.0 6 x 203MB/s 7 x 173MB/s 8 x 152MB/s Ryzen link - PCIe 3.0 x4 (3940MB/s) 6 x 467MB/s (Onboard SATA only) I think there are no big surprises and most results make sense and are in line with what I expected, exception maybe for the SASLP that should have the same bandwidth of the Adaptec 1430SA and is clearly slower, can limit a parity check with only 4 disks. I expect some variations in the results from other users due to different hardware and/or tunnable settings, but would be surprised if there are big differences, reply here if you can get a significant better speed with a specific controller. How to check and improve your parity check speed System Stats from Dynamix V6 Plugins is usually an easy way to find out if a parity check is bus limited, after the check finishes look at the storage graph, on an unlimited system it should start at a higher speed and gradually slow down as it goes to the disks slower inner tracks, on a limited system the graph will be flat at the beginning or totally flat for a worst-case scenario. See screenshots below for examples (arrays with mixed disk sizes will have speed jumps at the end of each one, but principle is the same). If you are not bus limited but still find your speed low, there’s a couple things worth trying: Diskspeed - your parity check speed can’t be faster than your slowest disk, a big advantage of Unraid is the possibility to mix different size disks, but this can lead to have an assortment of disk models and sizes, use this to find your slowest disks and when it’s time to upgrade replace these first. Tunables Tester - on some systems can increase the average speed 10 to 20Mb/s or more, on others makes little or no difference. That’s all I can think of, all suggestions welcome.
 1 point
 -
Hi, First of all, I want to thank everyone in this community working on making unRAID such an awesome product. I just had a disk fail on me 2 days ago and I swapped it for a brand new one with almost no downtime at all, the GUI made me feel safe during the whole process of rebuilding the disk from parity and I really appreciate knowing my data is very safe in the future (with backups too just in case ;-)). My question is regarding silent data corruption, also known as bit-rot. I've read a little bit about it on the unRAID forums and over r/unraid on Reddit and did notice the existence of the Dynamix File Integrity plugin below. However, while this plugin, well configured, will help me detecting any potential issue, it doesn't fix the issues. Two years ago, someone was asking a similar question (https://www.reddit.com/r/DataHoarder/comments/537ys9/unraid_users_how_do_you_handle_disk_encryption/), and I see comments saying the devs at LT were considering adding some sort of protection against bit-rot, because if well integrated it could be fixed on-the-fly thanks to the parity disks. Years later I don't see many discussions regarding this and I'm sure it's an important subject to a lot of us data hoarders. Am I missing something or do we still have in 2019 to address this issue completely manually (ie. by restoring backups when it happens and hope the backup isn't corrupted and is up-to-date enough)? If there is anything about this coming soon in unRAID that I'm unaware of, I'd definitely like to hear about it!1 point
-
Are there any recent guides to setup a network boot server on UnRAID? It would be pretty useful to set it up so I could boot any PC on my network with a recovery tool or install a different OS without needing to make a new USB drive. I found some guides or threads that looked good, but they are very out of date:1 point
-
Unraid 6.8 is a kernel version? -just kidding, as always expect news soon(tm)1 point
-
I would assume that you would mean by this to simply boot up using the 'Safe Mode' option in the boot menu. To the OP: This is a test to see if there is a hardware problem or some sort of issue with a plugin or Docker App. If it works in the Safe Mode, the likelihood of a hardware problem is virtually zero.1 point
-
Assuming you are using the same version of Plex in both dockers and the same mappings, the functionality should be the same. You will only be changing the container. I have never used pre-roll before though. Wasn’t even aware of it before your post. I would suggest testing with the new docker. Shutdown the old docker but don’t delete it. Install the new docker with the same mappings and see what happens. Several people have posted that they were able to switch without any issues.1 point
-
Try it without plugins or dockers and see if it works that way.1 point
-
Two simple ways to boot your VM: Use PlopKexec, boot from its ISO image, and have your flash drive available to the VM. The boot code will detect the USB drive and continue boot from it. Adds a few extra seconds to be boot time but might be worth it in simplicity. This is the method I'm using now. Create a small boot drive on your Unraid VM, format it as FAT, copy the content of the USB drive to it and then run the "make bootable" bat script from it to make that drive bootable. You will still need to have the flash drive available to the VM. This method shaves a few seconds from boot time but needs a bit of fiddling, and, most importantly, each time Unraid is updated, you will need to manually copy the updated files to the boot virtual drive or your system won't boot the next time around. None of these methods involve a downloaded, pre-cooked VMDK. You just create a VM and provision it with these elements. You will also need to provision it with your array drives, but this is discussed extensively in other posts. Hope this helps.1 point
-
You could use http://ip-address and let it redirect, or use http://tower and let it redirect, or if you have a DNS server, use http://tower.domain.com and let it redirect. Or, without redirection, use https://<some long hex>.unraid.net I save the last one as a browser bookmark for quick access. Just avoid using https://ip-address and https://tower because of the certificate mismatch, as Cameron explained.1 point
-
Hi @Nick_J glad that its working. One quick thing that you can try too is check if write cache is enabled on the drives. On the webui you will see each disk has an id ie sdb sde sdf etc For each disk use this command. Example here is for my disk sdb hdparm -W /dev/sdb If it doesn't say write-caching on for the drive as above. You can enable it by using command hdparm -W 1 /dev/sdb
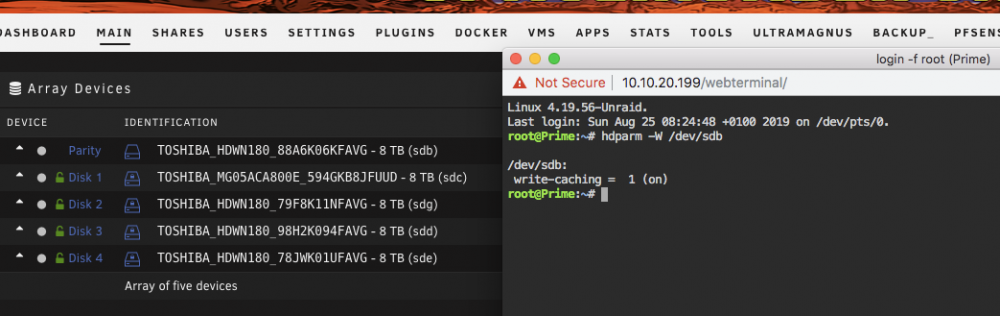 1 point
 -
You can set separate host paths for each. IE /mnt/users/movies/4k, /mnt/users/movies/anime, etc. Map each one to a custom container path (plex_4k, plex_anime, etc). I think this will let you set custom libraries within the app. Never tried it though.1 point
-
That is correct. At this time, the built in Mod Manager for ARK doesn't work right (this is an ARK Dev issue, and the only known fix involves Symlinking folders and running the executable from a specific directory). One thing to be aware of is that ARK Mods require you to start ARK once after you finish the download, to finish the extraction and installation of the Mod. If you do not start ARK once after the Mod download, and wait for it to finish "Installing Mod(s)" (seen in the lower right corner of the menu), then the files you copy over will be incomplete. Also, be aware that if you have Mods on the server and the Mod updates, the server will not be visible to any clients that have the updated Mod until you are able to update the Mod on the server. Updating the server Mod involves the same steps as installing it (download, start ARK, wait for the install to finish, copy files)1 point
-
This slightly on the slow side, but not excessively so. If you do not mind all your disks spinning you might want to look at what performance you get using Turbo Write mode. There is an associated plugin to help automate when Turbo Write mode should be used if you do not want to control it manually.1 point
-
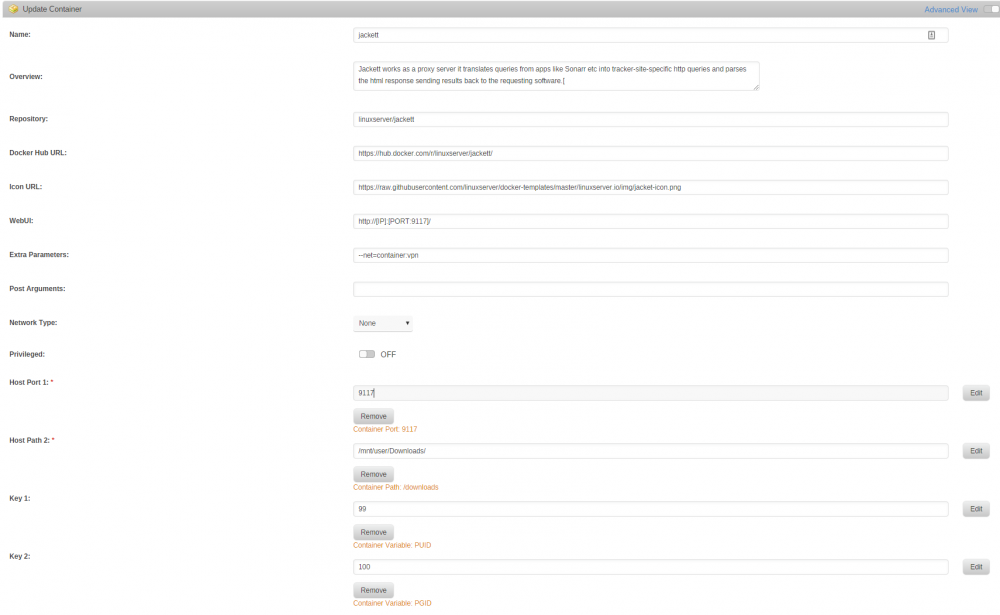
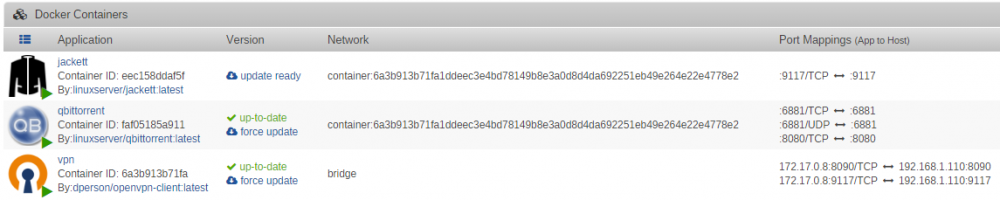
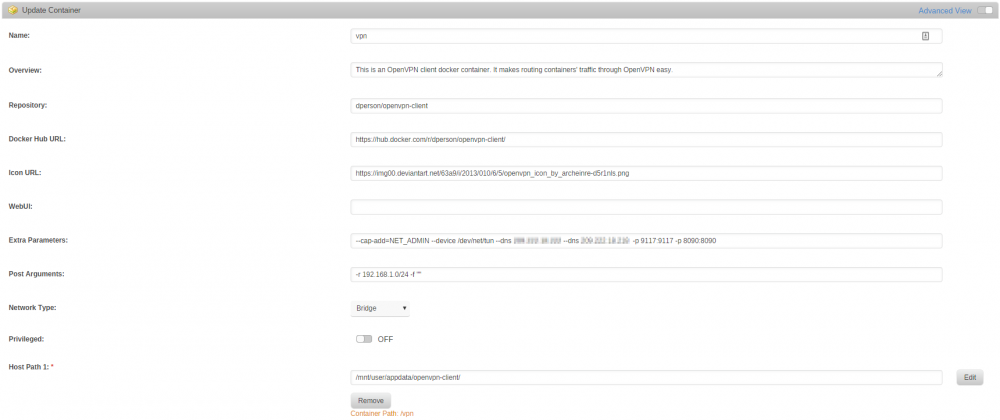
Would be great to be able to specify a different docker container for the "Network Type" natively, where a docker container is using: --cap-add=NET_ADMIN --device /dev/net/tun A use case for this is as follows: I have a VPN Client Docker (dperson/openvpn-client) [called "vpn"] that's permanently connected to my VPN provider (PIA in my case) I then have 2 dockers which tunnel their network through that container (jackett and qbittorrent) At present I have come up with a bit of a hack after lots of messing around where I set the 2 dependent containers Network Types to "None", then add into "Extra Parameters": --net=container:vpn Hopefully this could include a UI update that would use the containers name instead of the UID too I know what I have done is probably massively hacky, but I couldn't get it to work how I desired any other way. I did not want the VPN at the server level, as that interferes with things like Plex remove services, etc. And hey, I'm a developer; sometimes the solution is just "I need to get this to work, It don't need to be pretty".
 1 point
 -
There is currently no option to enable this. Is this somehow achievable in the current release?1 point
-
The disks will all come back in the same order as they were before. All your docker containers will run as if nothing ever changed. But it never hurts to make a note or print a screenshot. VMs I can't comment on Sent from my SM-T560NU using Tapatalk1 point