Leaderboard


.thumb.jpg.0c644260dacbdbc011d7ad8ba9a1c10a.jpg)

Popular Content
Showing content with the highest reputation on 09/19/19 in all areas
-
Sneak peak, Unraid 6.8. The image is a custom "case image" I uploaded.
 3 points
 -
2 points
-
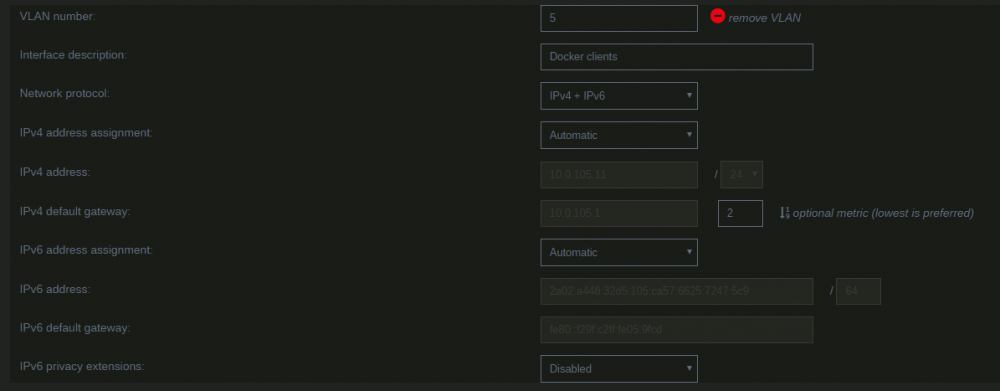
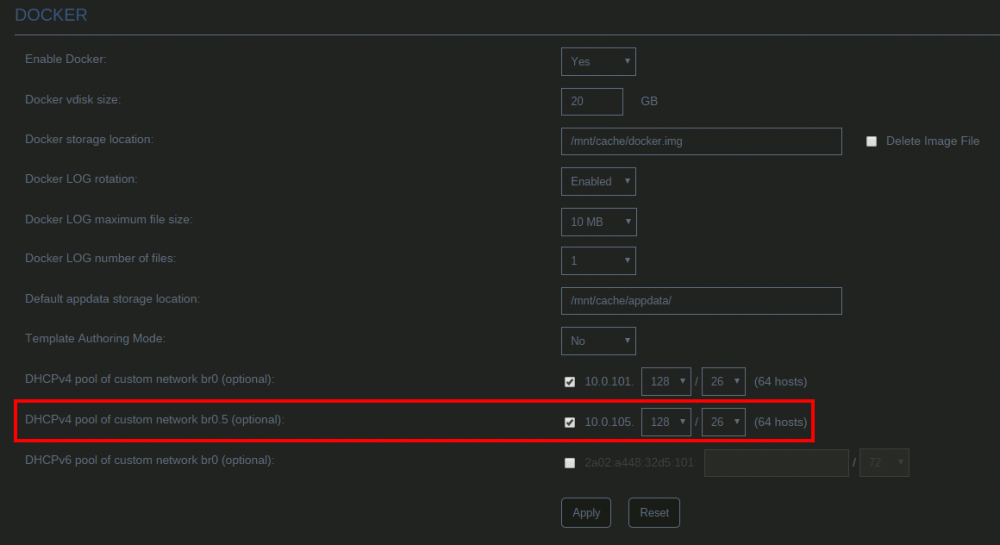
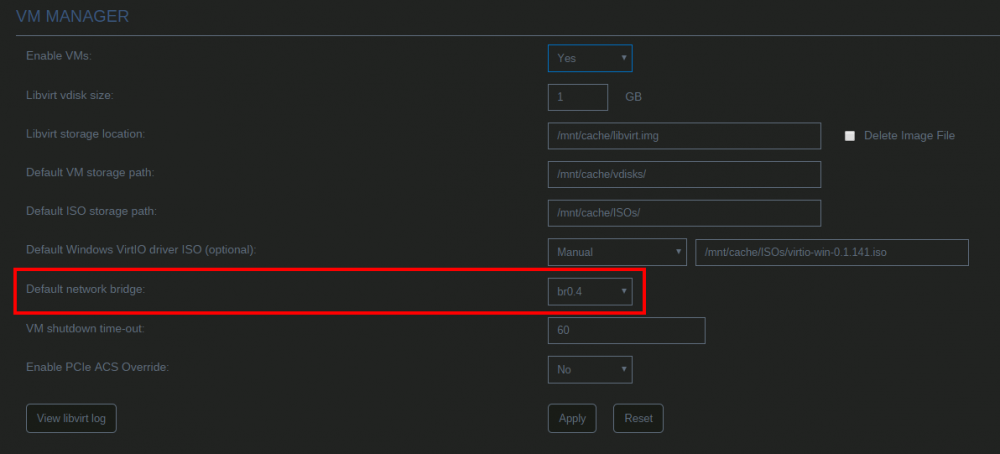
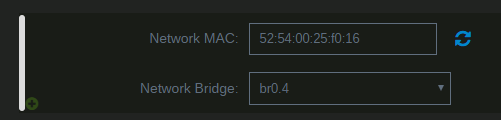
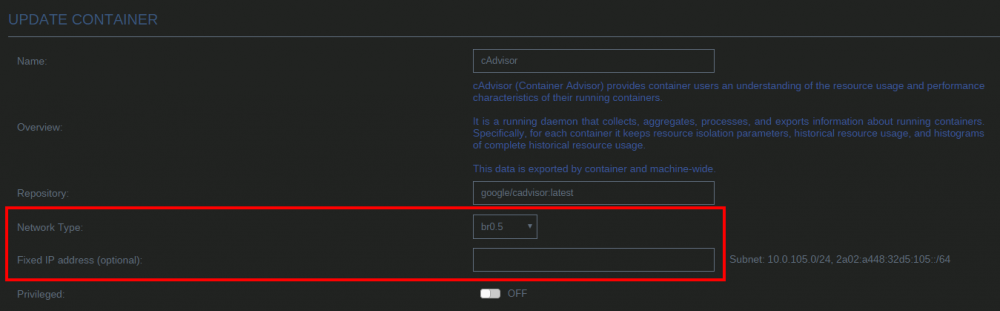
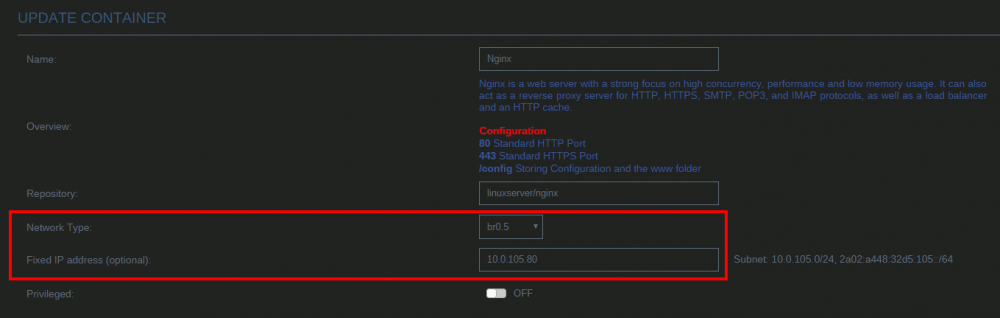
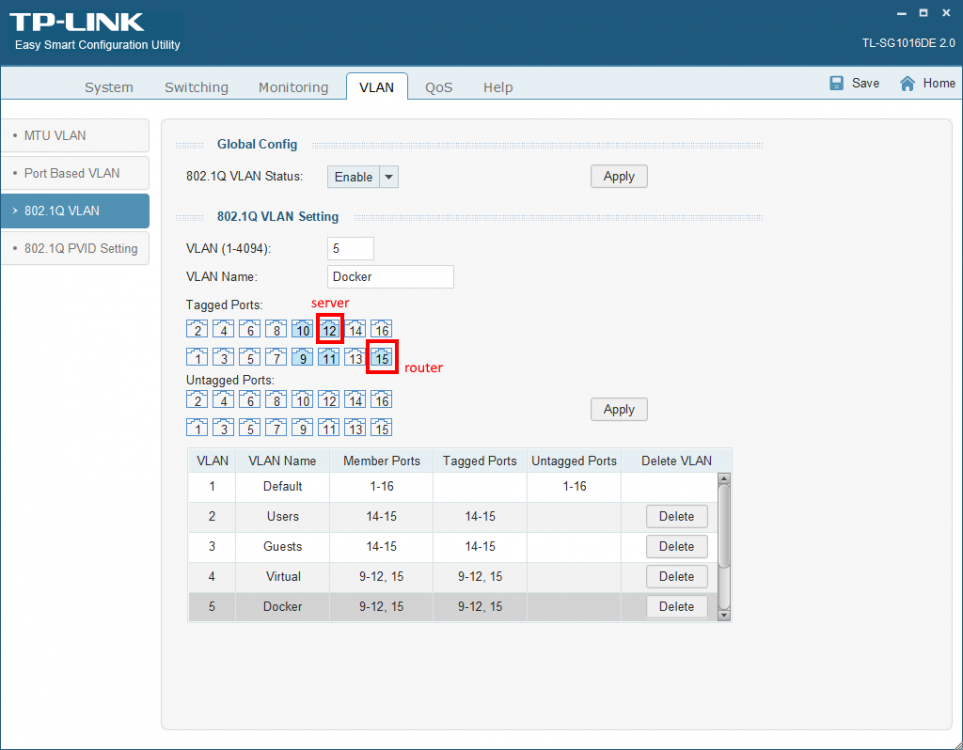
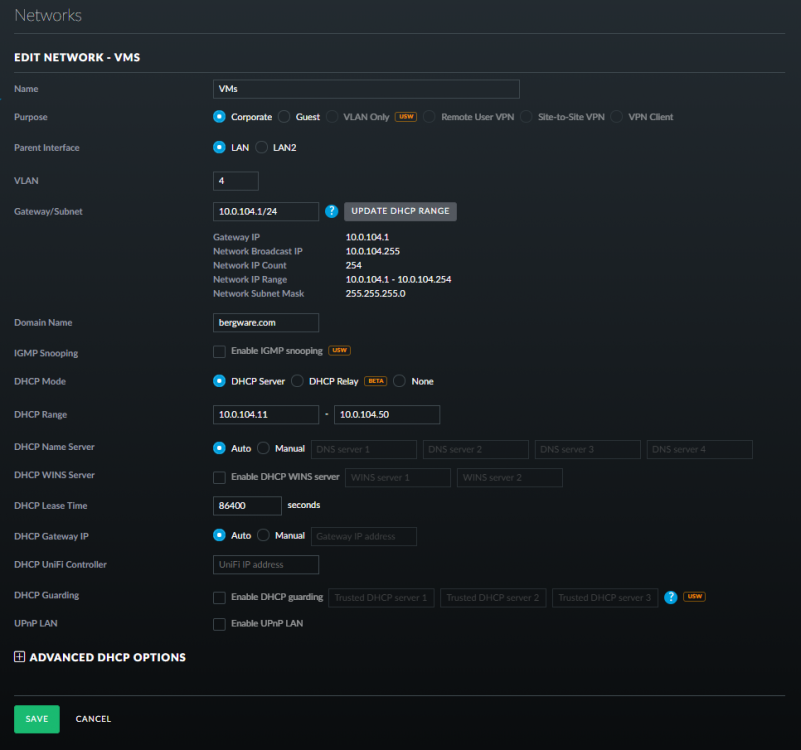
By default unRAID, the VMs and Docker containers all run within the same network. This is a straightforward solution, it does not require any special network setup and for most users this is a suitable solution. Sometimes more isolation is required, for example let VMs and Docker containers run in their own network environment completely separated from the unRAID server. Setting up such an environment needs changes in the unRAID network settings, but also requires your switch and router to have additional network possibilities to support this environment. The example here makes use of VLANs. This is an approach which allows to split your physical cable into two or more logical connections, which can run fully isolated from each other. If your switch does not support VLANs then the same can be achieved by connecting multiple physical ports (this requires however more ports on the unRAID server). The following assingments are done: network 10.0.101.0/24 = unRAID management connection. It runs on the default link (untagged) network 10.0.104.0/24 = isolated network for VMs. It runs on VLAN 4 (tagged) network 10.0.105.0/24 = isolated network for docker containers. It runs on VLAN 5 (tagged) UNRAID NETWORK SETTINGS We start with the main interface. Make sure the bridge function is enabled (this is required for VMs and docker). In this example both IPv4 and IPv6 are used, but this is not mandatory, e.g. IPv4 only is a good starting choice. Here a static IPv4 address is used, but automatic assignment can be used too. In this case it is recommended that your router (DHCP server) always hands out the same IP address to the unRAID server. Lastly enable VLANs for this interface. VM NETWORK SETTINGS VMs will operate on VLAN 4 which corresponds to interface br0.4. Here again IPv4 and IPv6 are enabled, but it may be limited to IPv4 only, without any IP assignment for unRAID itself. On the router DHCP can be configured, which allows VMs to obtain an IP address automatically. DOCKER NETWORK SETTINGS Docker containers operate on VLAN 5 which corresponds to interface br0.5. We need to assign IP addresses on this interface to ensure that Docker "sees" this interface and makes it a choice in the network selection of a container. Assignment can be automatic if you have a DHCP server running on this interface or static otherwise. VM CONFIGURATION We can set interface br0.4 as the default interface for the VMs which we are going to create (existing VMs you'll need to change individually). Here a new VM gets interface br0.4 assigned. DOCKER CONFIGURATION Docker will use its own built-in DHCP server to assign addresses to containers operating on interface br0.5 This DHCP server however isn't aware of any other DHCP servers (your router). Therefor it is recommended to set an IP range to the Docker DHCP server which is outside the range used by your router (if any) and avoid conflicts. This is done in the Docker settings while the service is stopped. When a docker container is created, the network type br0.5 is selected. This lets the container run on the isolated network. IP addresses can be assigned automatically out of the DHCP pool defined earlier. Leave the field "Fixed IP address" empty in this case. Or containers can use a static address. Fill-in the field "Fixed IP address" in this case. This completes the configuration on the unRAID server. Next we have to setup the switch and router to support the new networks we just created on the server. SWITCH CONFIGURATION The switch must be able to assign VLANs to its different ports. Below is a picture of a TP-LINK switch, other brands should have something similar. ROUTER CONFIGURATION The final piece is the router. Remember all connections eventually terminate on the router and this device makes communication between the different networks possible. If you want to allow or deny certain traffic between the networks, firewall rules on the router need to be created. This is however out of scope for this tutorial. Below is an example of a Ubiquiti USG router, again other brands should offer something similar. That's it. All components are configured and able to handle the different communications. Now you need to create VMs and containers which make use of them. Good luck.


 1 point
 -
Catalina Mojave and HighSierra - new video 28 october 2019 MOJAVE 10.14 . (Update 24 October 2018) _______________________________________________________________________________________ OLDER VIDEOS ABOUT MacOS VMs _______________________________________________________________________________________ High Sierra 10.13 (Update 24 September 2017) So now High Sierra is here its time for a new video. Things are a lot better for OSX VMs now. Since qemu 2.9 we don't need to use a patched clover. We can pass through the CPU frequency to the guest from the XML. This video although for High Sierra will also work for Sierra HOW TO INSTALL HIGH SIERRA OR SIERRA ON UNRAID CREATING INSTALL MEDIA (Update 24 September 2017) Video guide here >>>>> https://www.youtube.com/watch?v=BFPiK1Ggbks INCREASING PERFORMANCE IN AN OSX VM . (march 2018) Advanced techniques for hardware passthrough etc. (Update March 2017) This video is about advanced OSX VM techniques in KVM with unRAID. You will see how to pass through physical devices to a KVM osx sierra VM such as GPU, sound and USB. You will learn to what hardware that you can use and how to edit the XML template to add the hardware. You will learn how to use a Nvidia GPU in Sierra by installing the Nvidia web drivers. You will see how to get your HDMI sound working using an HDMI audio kext. I will quickly run through using virt-manager to avoid manual edits then discuss common osx VM problems. Note if using High Sierra as of 24 September 2017 Nvidia have not released web drivers for this OS so we cant have them working in 10.13 (but soon we should) Advanced OSX VM techniques in unRAID. Get everything working!1 point
-
I run them in both my unraid servers as well. China 10GTek ones from Amazon, haven't had any issues. Let me know if I can pull any info for you. Unifi 10Gb backbones via SFP+ (over copper). Brain fart..... I run SuperMicro cards now based on Intel 82599. I USED to run the 10GTek cards....1 point
-
thank you sir! Time to watch Library = Movies Days = 748 Library = TV Shows Days = 3203 Library = other videos(view by folder) Days = 24 a cool 10.9 years . I might need to retire sooner than i thought1 point
-
You never have to pre-clear disks - that is purely voluntary! Some people like to deliberately do it to stress test new drives but that is their decision. writing zeroes to the portion of the parity disk Beyond the largest current data drive simplifies greatly the process for later adding larger data disks as it means Unraid does not need to do anything to the parity drive at that point. I agree that potentially a different approach could perhaps be used but that is the current decision that Limetech have made. I think they assume that you soon will be getting data drives of the size of the parity disk(s).1 point
-
Try this http://thinlinx.com/. I'm running VM Win10 on unRaid which is in the basement and use rPi as a thin client. Works perfect.1 point
-
You can just upgrade/replace the two efi files (EFI/CLOVER/CLOVERX64.efi and EFI/BOOT/BOOTX64.efi, they are the same file) which download from github instead of install whole directory by pkg or iso.1 point
-
I found out what was the problem with my attempts to update clover without success, I'm sharing it here, maybe it will be of some help for other people. My problem was that clover hanged at "scan entries": thanks to Leoyzen who shared its working EFI folder I could find out that my EFI folder structure was wrong. To update clover I always downloaded the iso image from sourceforge, made my modifications, mounted the EFI folder inside osx and copied the new updated efi folder. Somewhere in the past the folder structure of clover changed, more into details folder CLOVER/drivers64UEFI changed into CLOVER/drivers/UEFI. So I maintained the new folder structure inside my efi folder (CLOVER/drivers/UEFI) : the error is here, CLOVER/drivers/UEFI is not the correct structure, CLOVER/drivers64UEFI is the correct one! The scan entries error was because no driver was loaded and clover couldn't find any hd to boot from! With the new folder structure I'm able to update clover without problems; v.5089 works for me on mojave. Thanks again Leoyzen!1 point
-
I so want to know when it comes out... Wireguard and Login page is what i'm waiting on!1 point
-
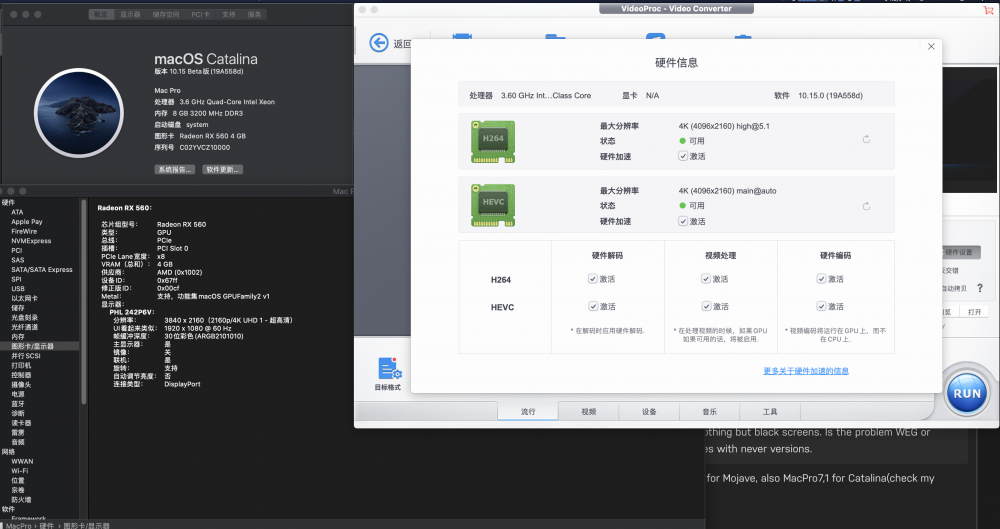
Here U are, those files attached are my clover files for Catalina and Mojave as nearly bare metal VM, both works for VNC or Real Monitor with Graphics passthrough: Something should notice: * Catalina: MacPro7,1(which iMacPro1,1 not works for me it get reboot cyclely with "x86_topo_lock error") * Mojave: iMacPro1,1 ** It do not need any kext to make function work ** Both files contains OOB patch (for AMD RX560/570/580 patch to make hardware acceralation(HEVC & H264) work also to avoid black screen (make graphics in acpi gfx0 position should avoid this)) and Clover as new as possible (v5058, the latest wont boot for me). Remember you should change SMBios UUID to avoid conflict. Using this then you can get an OOB Hackintosh(Mojave or Catalona) works like charm. As I explained above, you should take some patches from clover to make iMacPro1,1 work for Mojave, also MacPro7,1 for Catalina(check my clover.plist). mojave.clover.qcow2 catalina.clover.qcow2 Edit: some steps to make rx560/570/580 works natively in mojave and catalina to support hevc/h264 hardware acceraltion without IGPU: change your SMBios to iMacPro1,1(mojave) or MacPro7,1(Catalina) select ACPI --> Add DTGP in clover:add some method in acpi for later use. select ACPI --> FixDisplay: in order to change your grahpic to gfx0 select KernalAndDriverPathes --> Black Screen Patch Vega 56/64, RX580 etc. (c)Pike R. Alpha: fix blackscreen issues (Optional)If not work, then add LILU/WEG to you kexts directory. Here are some screen shots about my VM: Geekbench 5 with 4 cores/ 8 threads of my 3700x:
 1 point
 -
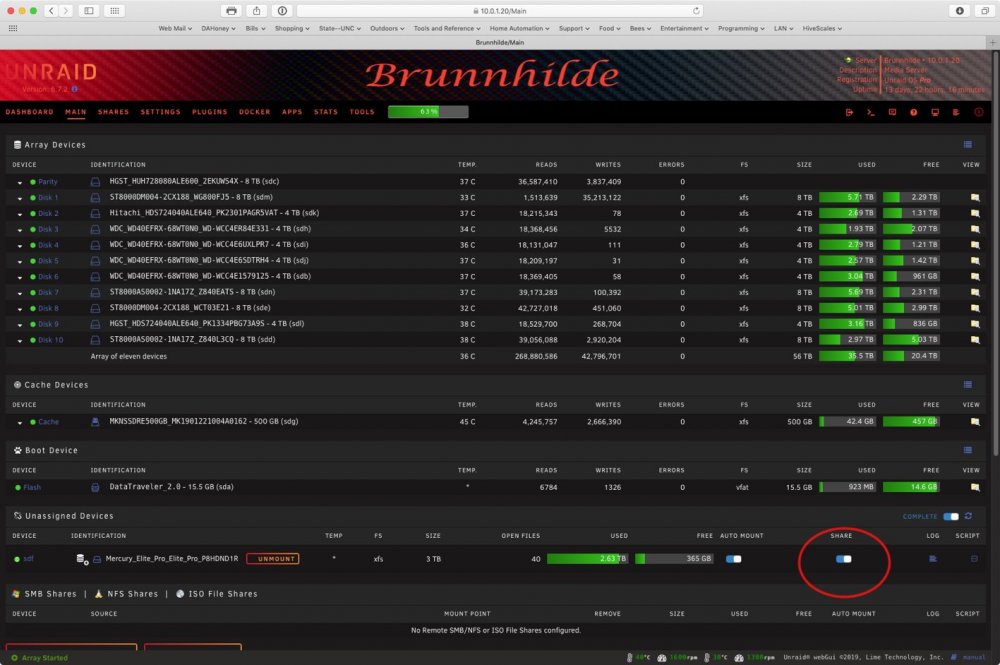
The “share” switch on the main tab.
 1 point
 -
I've got a new 8TB drive on its way and I'll be using the docker version as soon as it gets here. I'll post back and let you know. I understand and get the point of the docker vs potentially breaking the plug-in, but, even though I grew up in the DOS days and used *nix in the 90s, I've gotten lazy and do like the GUIness of the plug-in. I'll live. Oh, and welcome back!1 point
-
I made a typo instead of "-a" (add) you should use "-u" (update)1 point
-
Volume mapping is pretty basic to understanding how to configure dockers, and if you understand it you are most of the way to being able to use dockers without relying on other people. I think people are perhaps confused by the word "map". It is a little like a road map or google maps or the other common uses of the word map many people are familiar with, but it is more general in meaning. It is more like the meaning it has in mathematics, or in this case, information theory. A map is simply a correspondence. Just as a place on a road map corresponds to a place in the real world, the docker volume mappings are a correspondence between paths within the docker container, which the container application sees, and the paths in the docker host (Unraid). The other piece to this puzzle is where the user shares are actually stored in Unraid. If you have a user share named Movies, the path to that storage is /mnt/user/Movies. So, for example, with the plex docker, you could have a container volume (path) at /movies, and map that to the host path that corresponds to your Movies user share, /mnt/user/Movies. The plex application would see those files in that user share in /movies. Here is a link to the Docker FAQ with a lot more information: https://forums.unraid.net/topic/57181-real-docker-faq/1 point
-
Yes. -rc4 doesn't fix the issue, during testing was fooled by caching. Thought I accounted for that but it was late at night. The Linux block layer has undergone significant changes in last few releases, and I've had to do a lot of re-learnin'.1 point
-
You've got your cache minimum free setting to be 20TB. When entering in pure numerals, its in "K" You probably want to just enter in 20GB. Press the "?" to bring up help on the Global Share Settings1 point
-
We may have got to the bottom of this. Please try new version 6.7.3-rc3 available on next branch.1 point
-
go into your bios set primary display as the geforce 2101 point
-
I am so happy to see that support of password managers is actually coming that I don't care what it looks like!!!! 😁1 point
-
Well, root can access eveything and modify everything and that's ok. At the moment, I have 3 VM working on my server (mac, linux & windows) and they are used by more than one user. We are programmers and sometimes we crash the OS that need to rebooted from the webGUI. I would like to give access to only VM management to certains users instead of giving them root access. This could be extended to about every tab in the webGUI.1 point
-
As long as both network cards follow GB specs, crossover cables aren't necessary. Auto-MDIX is part of the GB spec, so the cards will figure out automatically what pairs to use. Real question is what is the end goal, because writing to a parity protected array with current common hardware can't even saturate 1 GB connection.1 point
-
Explorer Window (\\server-name or \\192.168.xxx.xxx) Right click on Quick Access and pin current folder to Quick Access1 point