Leaderboard


Popular Content
Showing content with the highest reputation on 09/25/19 in all areas
-
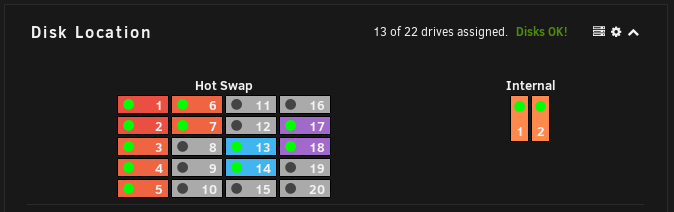
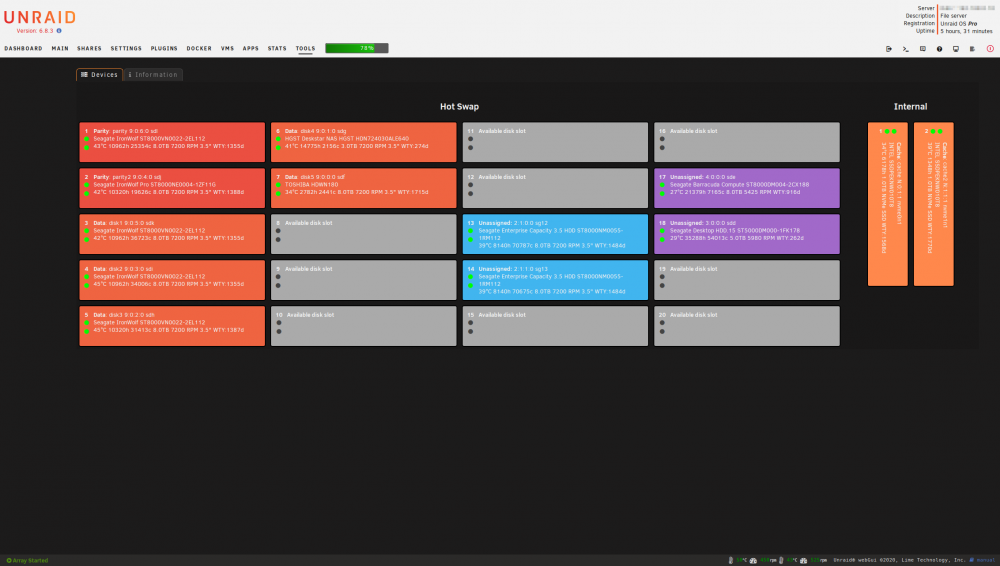
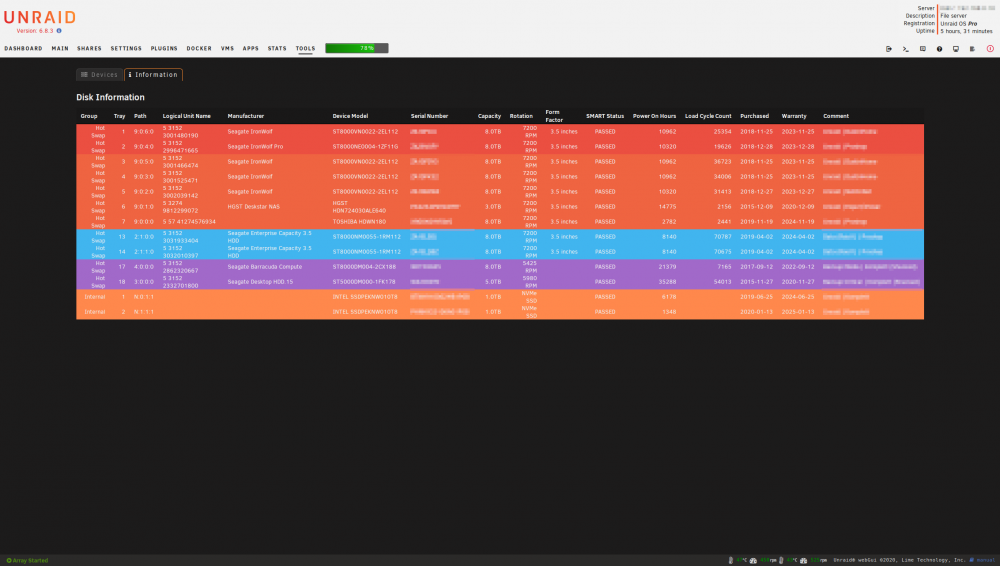
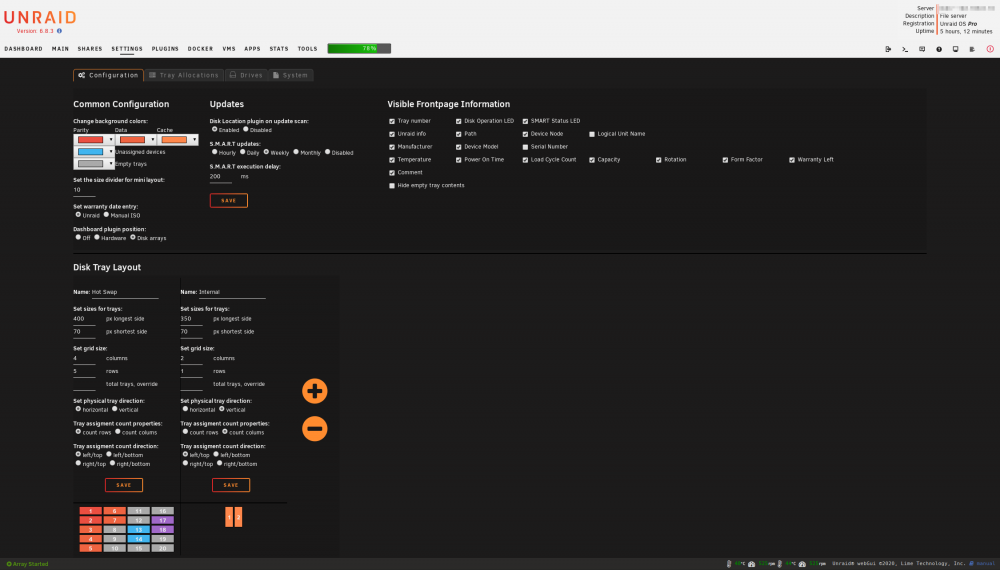
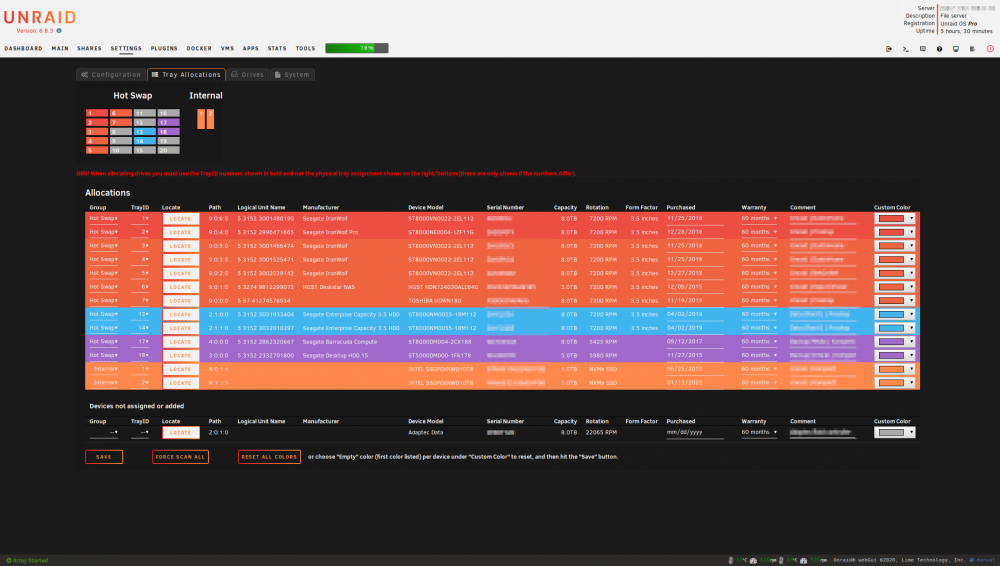
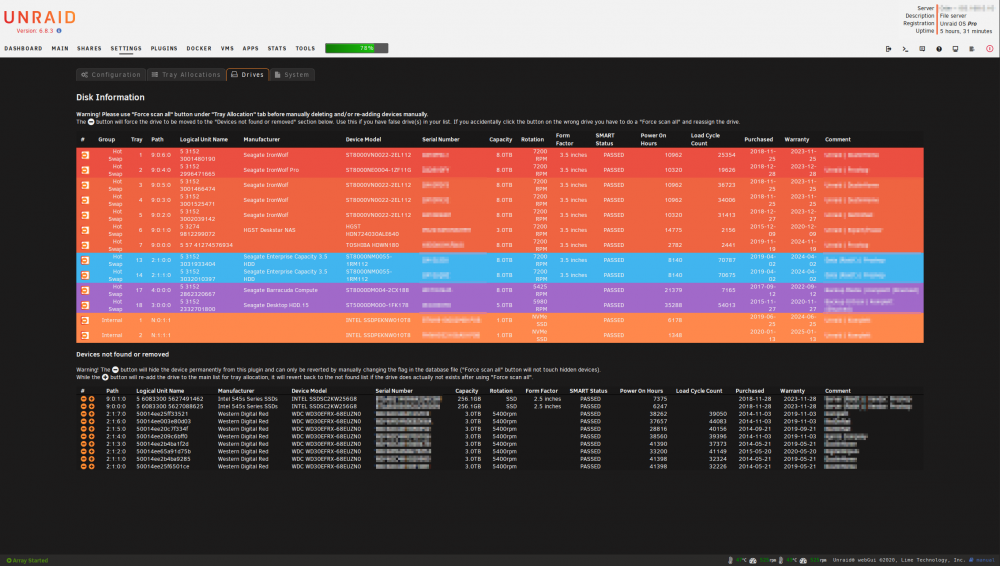
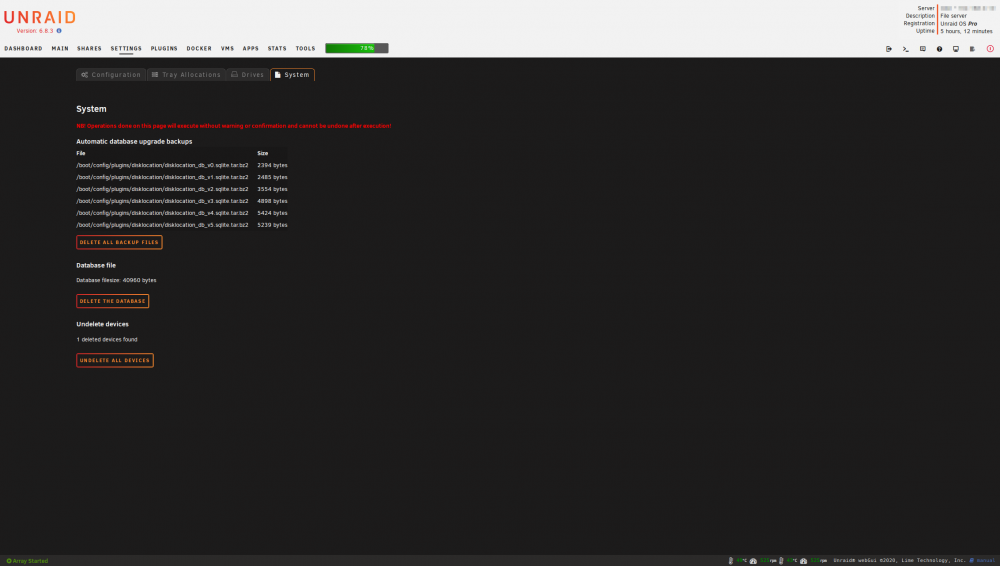
Disk Location is a different disk tray layout plugin which uses the harddisk path to locate the drives. It supports only drives found by the SCSI Generic drivers, which is usually SATA and nVME including devices attached to hardware storage/raid cards. This also include a handy "Locate" function which help you allocate the tray from where the disk is installed in, if you have hotswap trays with their own HD-activity LED (or made your own custom ones). This might not work on SSD's or maybe even some other types of harddrives. You can change the direction of the trays horizontal and vertical as well as the numbering direction of the trays, make some override to add more storage "not included in the hotswap tray area", change the background colors of the different type of storage (unraid, unassigned and empty), and more. Doing changes will not delete or clear any configuration and values are mainly stored based upon serial number and model name of the harddisk. For more information and help, use the inline Help function from Unraid (this will solve most of the questions asked): It might take some time to install and update the plugin as it goes trough all your drives, more you have, longer it will take. For me it takes about 5-10 seconds with 15 harddisks, but upto 30-60 seconds if they need to wake up from standby. The plugin is primarily developed for the current stable Unraid branch and might lag a bit behind for new releases with new functions. Disk Location will be installed under "Settings" (as of Unraid 6.12 and onwards). Download plugin using this link here: https://raw.githubusercontent.com/olehj/disklocation/master/disklocation-master.plg Or install it via "Community Applications" plugin, search for "Disk Location" under "Apps" For unstable development build, check next post. Screenshots: Please report bugs and feature requests at github: https://github.com/olehj/disklocation

 1 point
 -
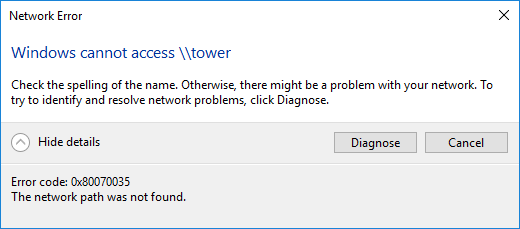
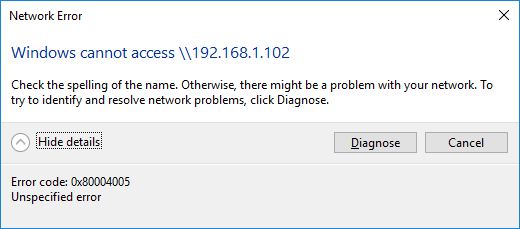
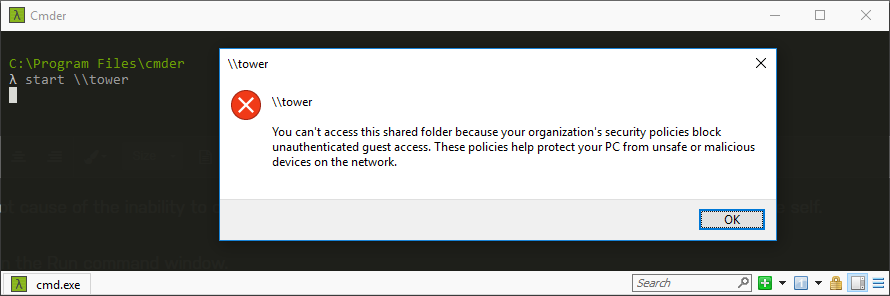
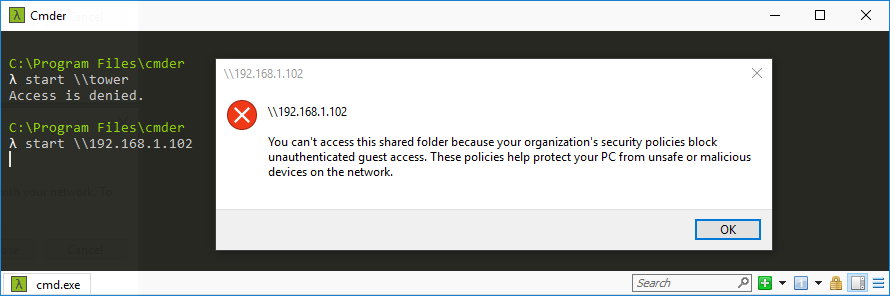
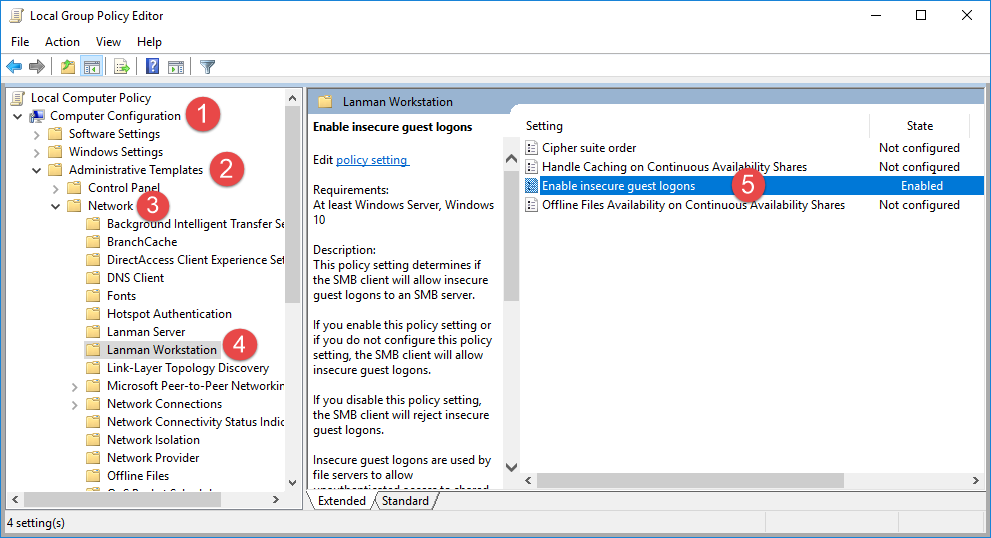
Tons of posts related to Windows 10 and SMB as the root cause of the inability to connect to unRaid that were fruitless so I'm recording this easy fix for my future self. If you cannot access your unRaid shares via DNS name ( \\tower ) and/or via ip address ( \\192.168.x.y ) then try this. These steps do NOT require you to enable SMB 1.0; which is insecure. Directions: Press the Windows key + R shortcut to open the Run command window. Type in gpedit.msc and press OK. Select Computer Configuration -> Administrative Templates -> Network -> Lanman Workstation and double click Enable insecure guest logons and set it to Enabled. Now attempt to access \\tower Related Errors: Windows cannot access \\tower Windows cannot access \\192.168.1.102 You can't access this shared folder because your organization's security policies block unauthenticated guest access. These policies help protect your PC from unsafe or malicious devices on the network.
 1 point
 -
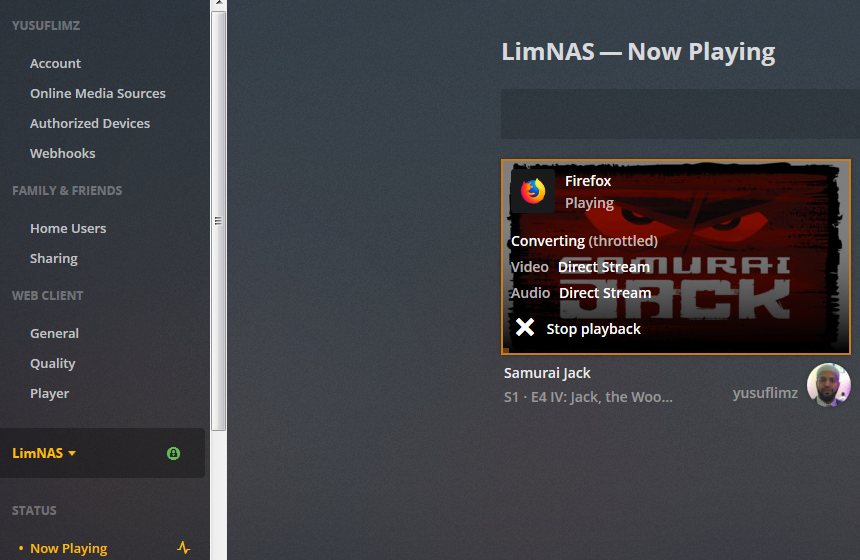
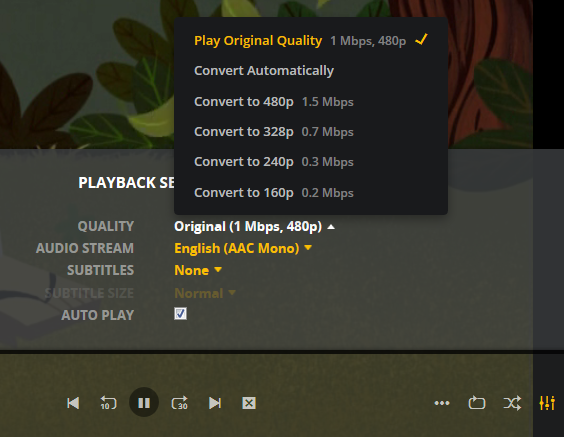
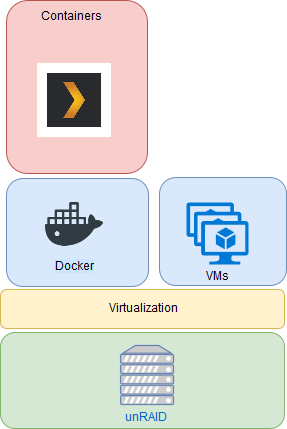
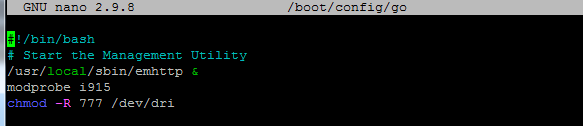
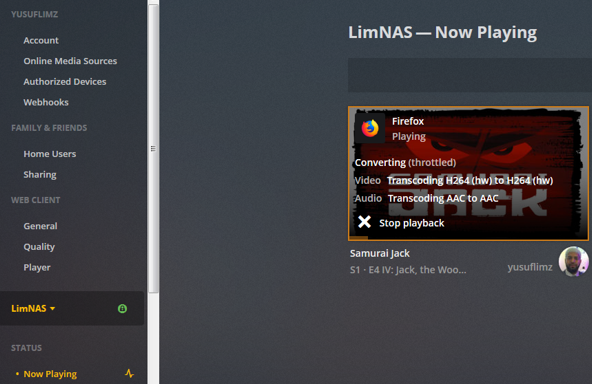
***Update*** : Apologies, it seems like there was an update to the Unraid forums which removed the carriage returns in my code blocks. This was causing people to get errors when typing commands verbatim. I've fixed the code blocks below and all should be Plexing perfectly now Y =========== Granted this has been covered in a few other posts but I just wanted to have it with a little bit of layout and structure. Special thanks to [mention=9167]Hoopster[/mention] whose post(s) I took this from. What is Plex Hardware Acceleration? When streaming media from Plex, a few things are happening. Plex will check against the device trying to play the media: Media is stored in a compatible file container Media is encoded in a compatible bitrate Media is encoded with compatible codecs Media is a compatible resolution Bandwith is sufficient If all of the above is met, Plex will Direct Play or send the media directly to the client without being changed. This is great in most cases as there will be very little if any overhead on your CPU. This should be okay in most cases, but you may be accessing Plex remotely or on a device that is having difficulty with the source media. You could either manually convert each file or get Plex to transcode the file on the fly into another format to be played. A simple example: Your source file is stored in 1080p. You're away from home and you have a crappy internet connection. Playing the file in 1080p is taking up too much bandwith so to get a better experience you can watch your media in glorious 240p without stuttering / buffering on your little mobile device by getting Plex to transcode the file first. This is because a 240p file will require considerably less bandwith compared to a 1080p file. The issue is that depending on which format your transcoding from and to, this can absolutely pin all your CPU cores at 100% which means you're gonna have a bad time. Fortunately Intel CPUs have a little thing called Quick Sync which is their native hardware encoding and decoding core. This can dramatically reduce the CPU overhead required for transcoding and Plex can leverage this using their Hardware Acceleration feature. How Do I Know If I'm Transcoding? You're able to see how media is being served by playing a first something on a device. Log into Plex and go to Settings > Status > Now Playing As you can see this file is being direct played, so there's no transcoding happening. If you see (throttled) it's a good sign. It just means is that your Plex Media Server is able to perform the transcode faster than is necessary. To initiate some transcoding, go to where your media is playing. Click on Settings > Quality > Show All > Choose a Quality that isn't the Default one If you head back to the Now Playing section in Plex you will see that the stream is now being Transcoded. I have Quick Sync enabled hence the "(hw)" which stands for, you guessed it, Hardware. "(hw)" will not be shown if Quick Sync isn't being used in transcoding. PreRequisites 1. A Plex Pass - If you require Plex Hardware Acceleration Test to see if your system is capable before buying a Plex Pass. 2. Intel CPU that has Quick Sync Capability - Search for your CPU using Intel ARK 3. Compatible Motherboard You will need to enable iGPU on your motherboard BIOS In some cases this may require you to have the HDMI output plugged in and connected to a monitor in order for it to be active. If you find that this is the case on your setup you can buy a dummy HDMI doo-dad that tricks your unRAID box into thinking that something is plugged in. Some machines like the HP MicroServer Gen8 have iLO / IPMI which allows the server to be monitored / managed remotely. Unfortunately this means that the server has 2 GPUs and ALL GPU output from the server passed through the ancient Matrox GPU. So as far as any OS is concerned even though the Intel CPU supports Quick Sync, the Matrox one doesn't. =/ you'd have better luck using the new unRAID Nvidia Plugin. Check Your Setup If your config meets all of the above requirements, give these commands a shot, you should know straight away if you can use Hardware Acceleration. Login to your unRAID box using the GUI and open a terminal window. Or SSH into your box if that's your thing. Type: cd /dev/dri ls If you see an output like the one above your unRAID box has its Quick Sync enabled. The two items were interested in specifically are card0 and renderD128. If you can't see it not to worry type this: modprobe i915 There should be no return or errors in the output. Now again run: cd /dev/dri ls You should see the expected items ie. card0 and renderD128 Give your Container Access Lastly we need to give our container access to the Quick Sync device. I am going to passively aggressively mention that they are indeed called containers and not dockers. Dockers are manufacturers of boots and pants company and have nothing to do with virtualization or software development, yet. Okay rant over. We need to do this because the Docker host and its underlying containers don't have access to anything on unRAID unless you give it to them. This is done via Paths, Ports, Variables, Labels or in this case Devices. We want to provide our Plex container with access to one of the devices on our unRAID box. We need to change the relevant permissions on our Quick Sync Device which we do by typing into the terminal window: chmod -R 777 /dev/dri Once that's done Head over to the Docker Tab, click on the your Plex container. Scroll to the bottom click on Add another Path, Port, Variable Select Device from the drop down Enter the following: Name: /dev/dri Value: /dev/dri Click Save followed by Apply. Log Back into Plex and navigate to Settings > Transcoder. Click on the button to SHOW ADVANCED Enable "Use hardware acceleration where available". You can now do the same test we did above by playing a stream, changing it's Quality to something that isn't its original format and Checking the Now Playing section to see if Hardware Acceleration is enabled. If you see "(hw)" congrats! You're using Quick Sync and Hardware acceleration [emoji4] Persist your config On Reboot unRAID will not run those commands again unless we put it in our go file. So when ready type into terminal: nano /boot/config/go Add the following lines to the bottom of the go file modprobe i915 chmod -R 777 /dev/dri Press Ctrl X, followed by Y to save your go file. And you should be golden!


 1 point
 -
Hello all, I saw that this is the place that "new users to introduce themselves", so I thought I'd say hi. After the odd bit of data loss (not hugely important files), I thought I'd try unraid and do the job properly. I'll probably go over to the STORAGE DEVICES AND CONTROLLERS area of the forum and see if anyone has the patience to advise on how best to make my current system (if you could call it that) better. Thanks in advance! Chris, UK1 point
-
Basically it's a Real Device Mapping feature of VMware, essentially creating a dummy vmdk that "describes" the real device, and allocating that vmdk to the VM. Several guides exist as to how to do that, requires a bit of CLI fiddling but quite straightforward. Look here or here. And yes, you can pass through "devices" (such as PCI bus entities) but not single ports of a device (such as a single port on a SATA controller).1 point
-
This last one will need to be passed as an RDM, no? On the mobo.1 point
-
I think I’m the only one who passes through a USB controller for the license on USB, but actually boots off a vmdk. Everyone else seems to prefer PLOP.1 point
-
Let me begin by saying this is not considered a Supported Configuration by Limetech and by this community. This means that if you have an issue, practically any issue, when you post here for help you will likely be asked to first reproduce it on bare metal. If you don't (or can't) your issue might be classified as "something to do with virtualization". I just want you to be aware of this. That being said, this is my configuration (running under ESXi), for the most part it is rock solid and I like it. To your questions (some of my answers will be redundant with the good folks above but here goes anyway): None that I can detect. Your processor and mobo must support VT-x and VT-d but once they do, performance is very close to real iron. There are two good ways of doing it: 1. Pass a SAS controller through to the VM, and let it handle all drives. If all the drives on the controller go to Unraid, this would be the way to go. If OTOH you have some drives on this controller that are datastores or are used by other VMs, read on... 2. Use the "vmkfstools -z" method to create RDMs for each of your drives. Then, assign those RDMs to your Unraid VM. Don't believe stuff you read about RDMs not being good for you - they work perfectly well for me... One very bad way of doing it, as others have mentioned, is to create v drives in datastores. So don't do that 🙂 If you use one of the two ways above to pass your drives to Unraid, then it should be reasonably straightforward and painless to move back and forth. Be very sure to map the drives to locations - you might need to "new config" each time around due to different naming. To mitigate fear, do a fire drill! Would get you fluent on these things and prevent panic. Dunno. I use the server headless (not even using its onboard GPU - all via IPMI). Not sure why you'd want to pass a GPU to Unraid (unless I misunderstood the question). I'm currently struggling with passing thru a PERC H330 off of eBay. It'll just been a few failed attempts and I'm pretty sure I'll figure it out but moral is - Murphy is still going strong. Use openVMTools_compiled from @StevenD (thank you man!!) off of Community Applications. Yup. That'd be a good way to do it yes. Probably. I don't pass through much so I don't really deal with them. I'm not sure I understand what you're getting at here. You're not planning to run VMs under a virtualized Unraid are you? Dockers yes, VMs no. See my opening statement. It is not a minuscule thing. As I said, I opted for this setup in spite of that, but you need to consider it. Good luck!!1 point
-
Thanks Spencer! 👍1 point
-
Welcome to the community Chris!1 point
-
1 - Are there performance impacts doing this, if so what? None 2 - Is there a trick to setting up shares in ESXi for the unRAID disks? You need to pass through a controller or two and access the disks directly. You do NOT want to set up disks on a datastore. 3 - Is it difficult to migrate to a bare metal unRAID instance from unRAID on ESXi? (ya know... after the panic sets in) I can boot my unRAID either baremetal or under ESXi. This is important as you will get zero support from Limetech and others running virtualized. 6 - Is there a version of Open-VMware-Tools for the latest version of unRAID 6.7.2? Yes. However, there are problems with 6.7. I recommend 6.6.7. 7 - Are the custom Open-VMware-Tools available in the Community Applications? Yes. It was recently added to CA. I try to release an updated version of Open-VM-Tools within a couple of days of a new unRAID release. Search for "openVMTools_compiled" 10 - Is viewing and managing VMs on unRAID as easy as using VM Remote Client (VMRC) and VMware vCenter Server Appliance (vCSA)? I wouldnt run VMs on a virtualized unRAID. I use a few Dockers, but no VMs.1 point
-
I have updated the wiki to address this shortcoming. Quite honestly it's surprising that in all the years of operating since we put in the GUI boot mode, this is the first time someone wasn't able to identify the login parameters. Still an oversight on our part though: https://wiki.unraid.net/UnRAID_6/Getting_Started#Connecting_to_the_Unraid_webGui1 point
-
Hi adminmat, I started using unRAID back in 2008 on bare metal and moved it over to ESXi in 2013 and it has been rock solid. My ESXi server is a SuperMicro X9SCM-F with a Xeon E3-1230v2 and 32GB RAM. I have a dedicated LSI 9201-16i that I pass through to unRAID to manage 16 drives just for unRAID, and a separate LSI 9201-16i for drives that ESXi manages for VMs. As for your questions: 1 - Are there performance impacts doing this, if so what? I am using unRAID just to store files; I am not using it for docker or running other VMs in unRAID. I have not noticed any performance issues. 2 - Is there a trick to setting up shares in ESXi for the unRAID disks? I pass through a dedicated LSI 9201-16i to the unRAID VM and manage all unRAID drives on it. 3 - Is it difficult to migrate to a bare metal unRAID instance from unRAID on ESXi? (ya know... after the panic sets in) It was very easy. I pulled the original unRAID drives out of their dedicated server and plugged them into the dedicated LSI-9201-16i for unRAID on the ESXi server and started unRAID on ESXi. 4 - Are there issues with GPU pass-through when unRAID is on ESXi? I just have the GPU on the motherboard and have not run into any issues. I run the system headless. 5 - Are there other pass-through issues? There have been some performance issues in the past with passing through the unRAID USB drive. If I remember correctly it had to do with an upgrade moving to 6.0 and some of the config data didn’t get setup properly. Once fixed I have not had any issues. 6 - Is there a version of Open-VMware-Tools for the latest version of unRAID 6.7.2? I am currently running unRAID 6.7.2 and I have the OpenVMTools plugin installed and it appears to be working properly. 7 - Are the custom Open-VMware-Tools available in the Community Applications? It is available as an unRAID plugin. 8 - Do I just use two separate, physical USB drives for boot? One for ESXi and second passed through to unRAID (PlopKExec)? Yes, that is how my system is setup and I also use PlopKExec for speed and simplicity. I originally started with Plop, but it was rather slow to boot. At some point I moved to the pre-built VMDK unRAID guest drive model that only reads the USB drive for the key; much faster than plop, but it made upgrading unRAID more difficult. After a couple of years of that I migrated to PlopExec, which boots just as fast and makes upgrading unRAID a breeze. 9 - Does running on ESXi make managing IOMMU groups any different than unRAID on bare metal? (this part scares me) I don’t manage unRAID drives in ESXi. I pass through the controller and then manage unRAID drives in unRAID; faster, cleaner and easier. 10 - Is viewing and managing VMs on unRAID as easy as using VM Remote Client (VMRC) and VMware vCenter Server Appliance (vCSA)? I don’t run any VMs on unRIAD; I still use ESXi to run all of my VMs. You could run VMs in unRAID but then you are running through 2 hypervisors, which I would expect to impact performance. 11 - Anything I'm missing? (bonus question😉) If you are still unsure and have not read the ATLAS thread, I suggest that you review it.1 point
-
The plex errors come from the wrong crypto library installed. Remove the DevPack plugin, it installs the wrong version.1 point
-
Hi, here is a link to the always helpful Sapceinvader Ones video tutorial. Sent from my iPhone using Tapatalk1 point
-
In addition to what @jonathanm explains, server grade hardware usually runs in remote data centers and has provisioning of remote access (IPMI. iLO) to have access to the system without a local screen and keyboard attached. This maybe a 'feature' you like to have, but when everything is in the same room - including yourself - it is of lesser importance.1 point
-
Server grade hardware is designed to be error free and reliable while running 24/7/365. Since unraid users have all different usage patterns and expectations, no single answer is correct for everyone. If you want to build a machine once and not touch the hardware for 5+ years leaving it on the whole time, you need server grade stuff. If you want to have more than a few drives running constantly you need server grade. Data loss is much more likely as a result of user error or failure to stay alert for warnings that unraid will give you through the notification system. Desktop or server grade doesn't make much difference if the hardware stays healthy. Unraid disk redundancy only covers drive failure. You need a backup in place to guard against accidental deletion, corruption, and a whole bunch of other risks that unraid can't cover. If you said I can either build a single server grade system and have no money left over for offline backup drives, or I can build a desktop system and have full backups, I'll recommend the scenario with backup drives every time. Obviously the ideal setup is server grade with full backup offsite, but that's for you to decide how valuable your data is to you.1 point
-
I think this list needs to be updated for 2019. There's some real nice cases here in the original list but none of them are made anymore. I'm looking for a mid-tower chocked full of 9 5.25's and can't find any of them.1 point
-
this is a bug in deluge which sadly persists to deluge v2.0, in short plugins do not stay enabled, see Q4 here for how to work around it:- https://github.com/binhex/documentation/blob/master/docker/faq/delugevpn.md applying those changes using itconfig will not compromise anything, you are still protected from ip leakage via the use of iptables.1 point
-
I found that it is clover which breaks vmxnet3 and virtio-net, maybe during clover devices initializing. After hotplug the ethernet devices after clover initialization, I've got a much better throughput performance: 1. virtio-net works(works properly) and get 20Gb/s+ performance(before won't work, osx can't get correct mac address after clover handled the devices) 2. vmxnet3 works properly and get 4Gb/s+ performance (before only 100Mb/s+ and quiet buggy) I will try to find the specific issues where the clover break. Maybe we are closed to get a much more efficient ethernet option which works property Steps to make virtio-net work: 1. do not add virtio-net in vm xnl 2. boot vm, when in clover boot selection section, go to 3 3. [IMPORTANT] virsh attach-device --live Catalina /boot/config/ethernet-virtio.xml 4. [IMPORTANT] add clover boot args: keepsyms=1 debug=0x100 the ethernet-virtio.xml looks like this: <interface type='bridge'> <mac address='52:54:00:d6:ac:37'/> <source bridge='br0.100'/> <model type='virtio'/> </interface>1 point
-
When you click on the Benchmark all drives button, uncheck "Check all drives" and only check "Disk 1". Set the checkbox for "Disable SpeedGap detection". SpeedGap is logic that checks the high & low speeds of each test iteration. If it's over a given threshold (starting at 45MB), it considers the drive having been accessed and retries with a slightly larger threshold - and it will repeat ad nauseum.1 point
-
Hi I scratched my head on this for a while, there was a solution, essentially unraid doesn't release the Primary GPU for use by a VM: First test with the following commands via ssh with your VM off: echo 0 > /sys/class/vtconsole/vtcon0/bind echo 0 > /sys/class/vtconsole/vtcon1/bind echo efi-framebuffer.0 > /sys/bus/platform/drivers/efi-framebuffer/unbind Then try to boot your vm with the gpu passed through. if it boots successfully you had the same issue as me. Then install user scripts from community applications and set this to run as a little script when the array starts. even works with auto starting VMs.1 point
-
I can't be the only one, I got stuck on cd /dev/drils. Looks like your code blocks are removing the return carriages. Once I figured out what was going on, it worked like a charm. Thanks.
 1 point
 -
https://forums.unraid.net/topic/53520-support-linuxserverio-ombi/?do=findComment&comment=7713171 point
-
Go to settings for your Nextcloud docker. Change repository from "linuxserver/nextcloud" to "linuxserver/nextcloud:16.0.1-ls22" That downgrades your docker. Next step would be to update Nextcloud from the nextcloud admin GUI. Do it step by step. Worked great for me!1 point
-
I had this issue as well recently, I found the only way to get rid of them was to go the actual disk where the files reside and delete them from there, so /mnt/diskx/Films/ instead of /mnt/user/Films/. When I did this I was able to delete the files successfully. Good luck1 point


.thumb.jpg.0c644260dacbdbc011d7ad8ba9a1c10a.jpg)