Leaderboard


Popular Content
Showing content with the highest reputation on 10/07/19 in Posts
-
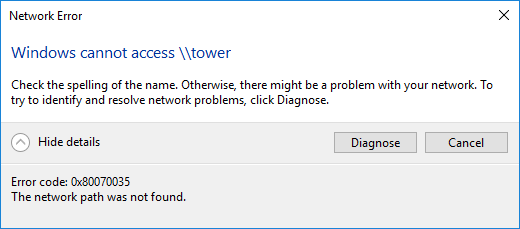
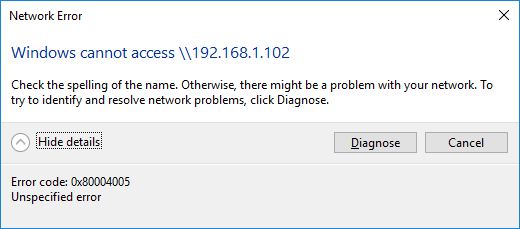
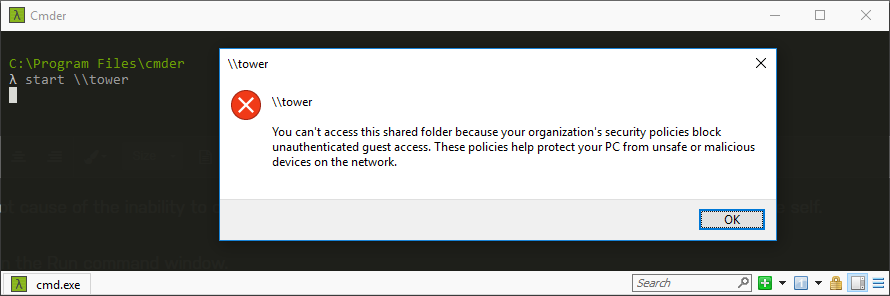
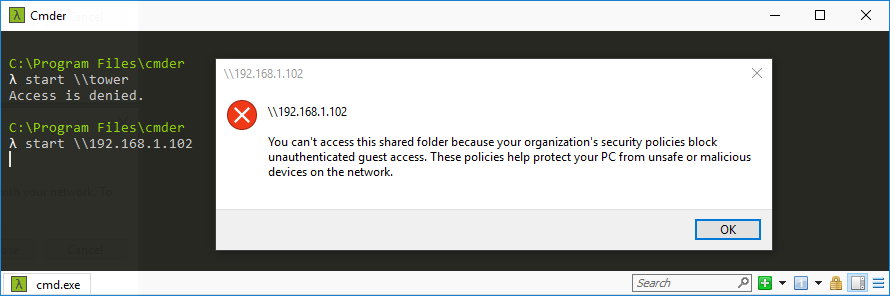
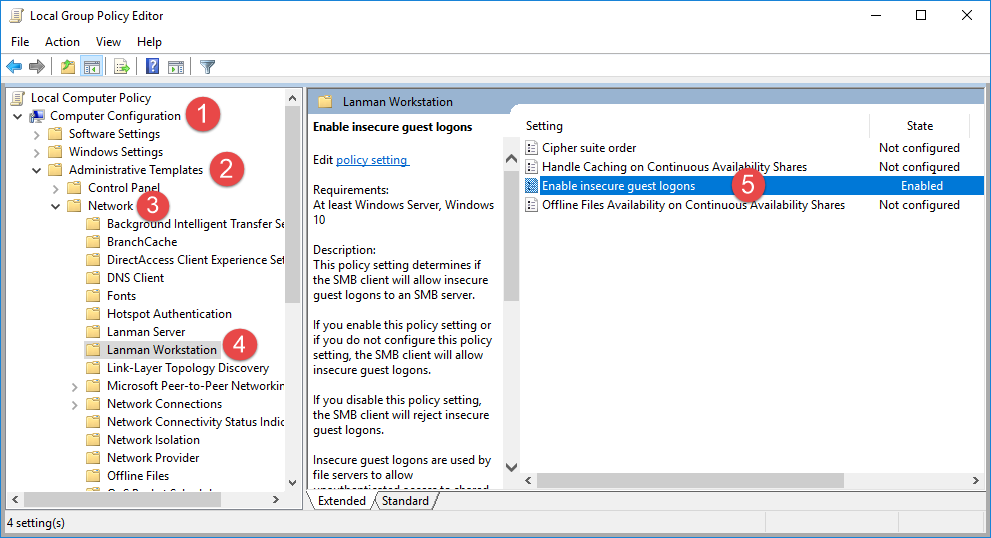
Tons of posts related to Windows 10 and SMB as the root cause of the inability to connect to unRaid that were fruitless so I'm recording this easy fix for my future self. If you cannot access your unRaid shares via DNS name ( \\tower ) and/or via ip address ( \\192.168.x.y ) then try this. These steps do NOT require you to enable SMB 1.0; which is insecure. Directions: Press the Windows key + R shortcut to open the Run command window. Type in gpedit.msc and press OK. Select Computer Configuration -> Administrative Templates -> Network -> Lanman Workstation and double click Enable insecure guest logons and set it to Enabled. Now attempt to access \\tower Related Errors: Windows cannot access \\tower Windows cannot access \\192.168.1.102 You can't access this shared folder because your organization's security policies block unauthenticated guest access. These policies help protect your PC from unsafe or malicious devices on the network.
 1 point
 -
Here you go, I will take a look at the other Norcos tomorrow!

 1 point
 -
If you've made a backup of the appdata, then restore it. All of the settings for the templates though are on the flash drive, and will be restore-able via Apps - Previous Apps1 point
-
I recommend everyone updates as I've been having a few problems with radarr which updating rclone to 1.49.5 seems to have fixed1 point
-
If you have another license then in is possible to run a second instance of Unraid in a VM and pass the additional drives to it. That is how I actually run an Unraid test environment on my main Unraid server. Whether that would be better than having a second server depends on whether you want to save money and are not too demanding on what you want from the second Unraid instance.1 point
-
How about a Norco 4220. Thanks1 point
-
Because you set it to be 60GB in Settings - Docker. Not a problem in and by itself, but most users only require 20GB. In order to lower it, Settings - Docker - Disable the service Delete the image Change the image size to be 20GB Restart the image Apps - Previous Apps, check off all of your apps you want and hit install1 point
-
And, any attribute which is listed as FAILING NOW1 point
-
Because manufactures can't be bothered to be consistent with how they use and format SMART, reading the reports is a cross between analysis and divination. If you come across something that looks off to you, attach the report and ask for help interpreting it.1 point
-
Yes, just a screen shot of the main tab in the web UI before you make any changes. I used "working config" to mean a known good state of everything, sorry for the confusion. Also, the parity check before and after as mentioned by @jonathanm is critical.1 point
-
Parity check before and after the operation is completed. In either case anything other than 0 errors is an immediate show stopper. Also, check the smart reports on all drives before and after.1 point
-
Yep, those are the basic steps. I would also recommend saving a screen shot of your working config before you make any changes and probably backing up your flash drive (always a good idea) before doing anything, just in case. Have you precleared the new drive? This isn't needed from a formatting standpoint, since it will be the parity drive, but it's a good stress test on a new drive. Also, you are right about #6, when you restart things, unraid will need to rebuild parity onto the new drive.1 point
-
If you passthrough an NVME the best choice is to passthrough the entire controller and not the by-id. Check my config at the bottom you can find an entry "boot order 1". This is the controller for the NVME. Also using SCSI for the other SSD can give you slightly lower latency and less overhead. I think there is also a SpaceInvader video about how to passthrough an NVME controller. Also you can see in my configs a couple tweaks especialy for TR4 where the CPU is reported as Epyc to make the OS aware of the real amount of L2 and L3 cache of the CPU. Another note, you have set the emulatorpin to cores from node0. I've got better results having it set to the node the cores i'am giving to the VM. <?xml version='1.0' encoding='UTF-8'?> <domain type='kvm' id='1' xmlns:qemu='http://libvirt.org/schemas/domain/qemu/1.0'> <name>01_W10</name> <uuid>ab84a67e-428e-36f9-5a88-3c02ffe6f93a</uuid> <metadata> <vmtemplate xmlns="unraid" name="Windows 10" icon="windows.png" os="windows10"/> </metadata> <memory unit='KiB'>16777216</memory> <currentMemory unit='KiB'>16777216</currentMemory> <memoryBacking> <nosharepages/> </memoryBacking> <vcpu placement='static'>14</vcpu> <iothreads>1</iothreads> <cputune> <vcpupin vcpu='0' cpuset='9'/> <vcpupin vcpu='1' cpuset='25'/> <vcpupin vcpu='2' cpuset='10'/> <vcpupin vcpu='3' cpuset='26'/> <vcpupin vcpu='4' cpuset='11'/> <vcpupin vcpu='5' cpuset='27'/> <vcpupin vcpu='6' cpuset='12'/> <vcpupin vcpu='7' cpuset='28'/> <vcpupin vcpu='8' cpuset='13'/> <vcpupin vcpu='9' cpuset='29'/> <vcpupin vcpu='10' cpuset='14'/> <vcpupin vcpu='11' cpuset='30'/> <vcpupin vcpu='12' cpuset='15'/> <vcpupin vcpu='13' cpuset='31'/> <emulatorpin cpuset='8,24'/> <iothreadpin iothread='1' cpuset='8,24'/> </cputune> <numatune> <memory mode='strict' nodeset='1'/> </numatune> <resource> <partition>/machine</partition> </resource> <os> <type arch='x86_64' machine='pc-q35-3.1'>hvm</type> <loader readonly='yes' type='pflash'>/usr/share/qemu/ovmf-x64/OVMF_CODE-pure-efi.fd</loader> <nvram>/etc/libvirt/qemu/nvram/ab84a67e-428e-36f9-5a88-3c02ffe6f93a_VARS-pure-efi.fd</nvram> </os> <features> <acpi/> <apic/> <hyperv> <relaxed state='on'/> <vapic state='on'/> <spinlocks state='on' retries='8191'/> <vpindex state='on'/> <synic state='on'/> <stimer state='on'/> <reset state='on'/> <vendor_id state='on' value='none'/> </hyperv> </features> <cpu mode='custom' match='exact' check='full'> <model fallback='forbid'>EPYC</model> <topology sockets='1' cores='7' threads='2'/> <cache level='3' mode='emulate'/> <feature policy='require' name='topoext'/> <feature policy='disable' name='monitor'/> <feature policy='require' name='hypervisor'/> <feature policy='disable' name='svm'/> <feature policy='disable' name='x2apic'/> </cpu> <clock offset='localtime'> <timer name='hypervclock' present='yes'/> <timer name='hpet' present='no'/> </clock> <on_poweroff>destroy</on_poweroff> <on_reboot>restart</on_reboot> <on_crash>restart</on_crash> <devices> <emulator>/usr/local/sbin/qemu</emulator> <disk type='block' device='disk'> <driver name='qemu' type='raw' cache='none' io='threads' discard='unmap'/> <source dev='/dev/disk/by-id/ata-Samsung_SSD_850_EVO_1TB_S2RFNX0J606029L'/> <backingStore/> <target dev='hdc' bus='scsi'/> <boot order='3'/> <alias name='scsi0-0-0-2'/> <address type='drive' controller='0' bus='0' target='0' unit='2'/> </disk> <disk type='file' device='cdrom'> <driver name='qemu' type='raw'/> <source file='/mnt/user/isos/Linux/pop-os_19.04_amd64_nvidia_4.iso'/> <backingStore/> <target dev='hdb' bus='sata'/> <readonly/> <boot order='2'/> <alias name='sata0-0-1'/> <address type='drive' controller='0' bus='0' target='0' unit='1'/> </disk> <controller type='scsi' index='0' model='virtio-scsi'> <alias name='scsi0'/> <address type='pci' domain='0x0000' bus='0x02' slot='0x00' function='0x0'/> </controller> <controller type='sata' index='0'> <alias name='ide'/> <address type='pci' domain='0x0000' bus='0x00' slot='0x1f' function='0x2'/> </controller> <controller type='pci' index='0' model='pcie-root'> <alias name='pcie.0'/> </controller> <controller type='pci' index='1' model='pcie-root-port'> <model name='pcie-root-port'/> <target chassis='1' port='0x10'/> <alias name='pci.1'/> <address type='pci' domain='0x0000' bus='0x00' slot='0x02' function='0x0' multifunction='on'/> </controller> <controller type='pci' index='2' model='pcie-root-port'> <model name='pcie-root-port'/> <target chassis='2' port='0x11'/> <alias name='pci.2'/> <address type='pci' domain='0x0000' bus='0x00' slot='0x02' function='0x1'/> </controller> <controller type='pci' index='3' model='pcie-root-port'> <model name='pcie-root-port'/> <target chassis='3' port='0x12'/> <alias name='pci.3'/> <address type='pci' domain='0x0000' bus='0x00' slot='0x02' function='0x2'/> </controller> <controller type='pci' index='4' model='pcie-root-port'> <model name='pcie-root-port'/> <target chassis='4' port='0x13'/> <alias name='pci.4'/> <address type='pci' domain='0x0000' bus='0x00' slot='0x02' function='0x3'/> </controller> <controller type='pci' index='5' model='pcie-root-port'> <model name='pcie-root-port'/> <target chassis='5' port='0x14'/> <alias name='pci.5'/> <address type='pci' domain='0x0000' bus='0x00' slot='0x02' function='0x4'/> </controller> <controller type='pci' index='6' model='pcie-root-port'> <model name='pcie-root-port'/> <target chassis='6' port='0x15'/> <alias name='pci.6'/> <address type='pci' domain='0x0000' bus='0x00' slot='0x02' function='0x5'/> </controller> <controller type='pci' index='7' model='pcie-root-port'> <model name='pcie-root-port'/> <target chassis='7' port='0x16'/> <alias name='pci.7'/> <address type='pci' domain='0x0000' bus='0x00' slot='0x02' function='0x6'/> </controller> <controller type='pci' index='8' model='pcie-root-port'> <model name='pcie-root-port'/> <target chassis='8' port='0x8'/> <alias name='pci.8'/> <address type='pci' domain='0x0000' bus='0x00' slot='0x01' function='0x0'/> </controller> <controller type='virtio-serial' index='0'> <alias name='virtio-serial0'/> <address type='pci' domain='0x0000' bus='0x03' slot='0x00' function='0x0'/> </controller> <controller type='usb' index='0' model='nec-xhci' ports='15'> <alias name='usb'/> <address type='pci' domain='0x0000' bus='0x00' slot='0x07' function='0x0'/> </controller> <interface type='bridge'> <mac address='52:54:00:65:2d:ab'/> <source bridge='br0'/> <target dev='vnet0'/> <model type='virtio'/> <alias name='net0'/> <address type='pci' domain='0x0000' bus='0x01' slot='0x00' function='0x0'/> </interface> <serial type='pty'> <source path='/dev/pts/0'/> <target type='isa-serial' port='0'> <model name='isa-serial'/> </target> <alias name='serial0'/> </serial> <console type='pty' tty='/dev/pts/0'> <source path='/dev/pts/0'/> <target type='serial' port='0'/> <alias name='serial0'/> </console> <channel type='unix'> <source mode='bind' path='/var/lib/libvirt/qemu/channel/target/domain-1-01_W10/org.qemu.guest_agent.0'/> <target type='virtio' name='org.qemu.guest_agent.0' state='disconnected'/> <alias name='channel0'/> <address type='virtio-serial' controller='0' bus='0' port='1'/> </channel> <input type='tablet' bus='usb'> <alias name='input0'/> <address type='usb' bus='0' port='3'/> </input> <input type='mouse' bus='ps2'> <alias name='input1'/> </input> <input type='keyboard' bus='ps2'> <alias name='input2'/> </input> <hostdev mode='subsystem' type='pci' managed='yes'> <driver name='vfio'/> <source> <address domain='0x0000' bus='0x43' slot='0x00' function='0x0'/> </source> <alias name='hostdev0'/> <rom file='/mnt/user/Backup/vbios/Strix1080ti/AsusStrix1080TI_dump_edit.rom'/> <address type='pci' domain='0x0000' bus='0x04' slot='0x00' function='0x0'/> </hostdev> <hostdev mode='subsystem' type='pci' managed='yes'> <driver name='vfio'/> <source> <address domain='0x0000' bus='0x43' slot='0x00' function='0x1'/> </source> <alias name='hostdev1'/> <address type='pci' domain='0x0000' bus='0x05' slot='0x00' function='0x0'/> </hostdev> <hostdev mode='subsystem' type='pci' managed='yes'> <driver name='vfio'/> <source> <address domain='0x0000' bus='0x0a' slot='0x00' function='0x3'/> </source> <alias name='hostdev2'/> <address type='pci' domain='0x0000' bus='0x06' slot='0x00' function='0x0'/> </hostdev> <hostdev mode='subsystem' type='pci' managed='yes'> <driver name='vfio'/> <source> <address domain='0x0000' bus='0x41' slot='0x00' function='0x0'/> </source> <boot order='1'/> <alias name='hostdev3'/> <address type='pci' domain='0x0000' bus='0x07' slot='0x00' function='0x0'/> </hostdev> <hostdev mode='subsystem' type='pci' managed='yes'> <driver name='vfio'/> <source> <address domain='0x0000' bus='0x07' slot='0x00' function='0x0'/> </source> <alias name='hostdev4'/> <address type='pci' domain='0x0000' bus='0x08' slot='0x00' function='0x0'/> </hostdev> <hostdev mode='subsystem' type='usb' managed='no'> <source> <vendor id='0x046d'/> <product id='0xc246'/> <address bus='5' device='2'/> </source> <alias name='hostdev5'/> <address type='usb' bus='0' port='1'/> </hostdev> <hostdev mode='subsystem' type='usb' managed='no'> <source> <vendor id='0x1b1c'/> <product id='0x1b50'/> <address bus='5' device='3'/> </source> <alias name='hostdev6'/> <address type='usb' bus='0' port='2'/> </hostdev> <memballoon model='none'/> </devices> <seclabel type='dynamic' model='dac' relabel='yes'> <label>+0:+100</label> <imagelabel>+0:+100</imagelabel> </seclabel> <qemu:commandline> <qemu:arg value='-global'/> <qemu:arg value='pcie-root-port.speed=8'/> <qemu:arg value='-global'/> <qemu:arg value='pcie-root-port.width=16'/> </qemu:commandline> </domain>1 point
-
No problem, nice if it all works now. Sorry but i'm not really familar with 7DtD but if it will be an public available update it will also update the dockers if you restart them. If it's a beta release you have to specify it at the AppID but im not sure how this works for 7DtD but i think it must be something like this: '294420 -beta latest_experimental' and also don't forget to set 'Validate' to 'true' if you update to experimental builds.1 point
-
These could all be caused by a bad connection. But could be a bad disk of course. Rebuilding to a spare is actually the best way even if the original is still good, since it keeps the original as a backup in case of problems. Looks like it's having problems communicating with multiple disks. Reseat controller, check connections, both ends, including power. Power splitters are also a good suspect with multiple disk problems. The filesystem problems might not be real if it can't read all the disks to calculate the rebuild. Maybe it will clear up if you get all the disks connected again.1 point
-
The additional shares (that I am aware of) are appdata and CommunityApplicationsAppdataBackup neither of which are 'exported' via NFS or SMB and normally not seen unless one goes looking for them. (There may also be some other shares for VM's that I am not aware of...) If you are absolutely sure that you have no new drives or other drive assignments, you could restore the backup. However, I would make a copy of the present flash drive before I did that! I would also edit the config/disk.cfg file and change the line startArray="yes" to startArray="no" as this will prevent any possible disk writing until you have had time to make a sanity check to see that the disks are assigned as you expect.1 point
-
As long as there was only one drive showing as unformattted that will be the parity drive. Make a note of Its serial number. You now use Tools->New Config to put the array back into the state where you can assign drives. This time when you go to the Main tab assign the drives as you want them (including the parity drive now that you know which one it is). When you start the array it will start to rebuild the parity drive based on the current data drives.1 point
-
I would assume that the ssd is the cache drive. (ssd are not recommended for array drives.) Assign all of the hard drives as data drives. (Do not assign the ssd.) Start the array. You should have one drive that is not formatted. Do not format that drive! See if you can get the backup of the flash drive off of the array. Use it to rebuilt the flash drive. Btw, you can make a backup of your flash easily. Main >>> Boot Device Click on the 'Flash' under the "Device" column. In the Flash Device Settings section/tab, you will find a FLASH BACKUP button. It will make a backup of the flash drive and store it in your bowser's Download directory/folder. Of course, you do have to remember to do it... EDIT: IF this all works out for you, I would do a correcting parity check to make sure parity is sync'ed to the data drives.1 point
-
Dynamix trim plugin will trim all devices with trim support.1 point
-
install user.script, schedule running fstrim -a -v should be enough1 point
-
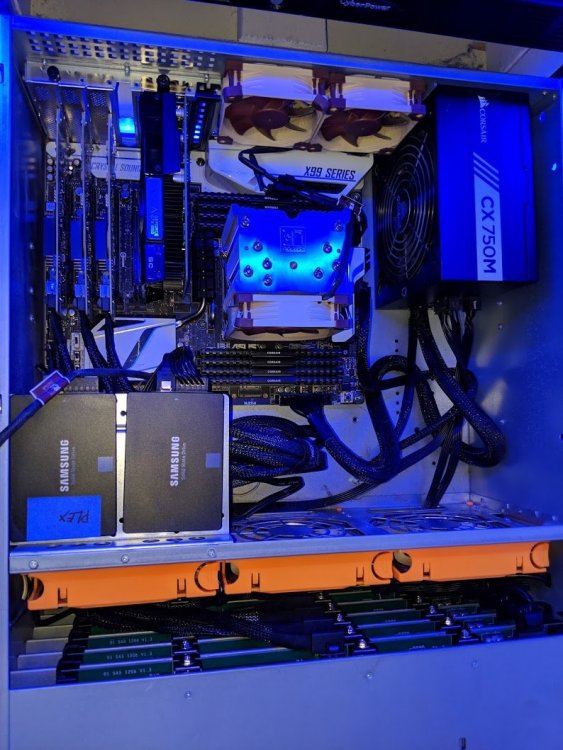
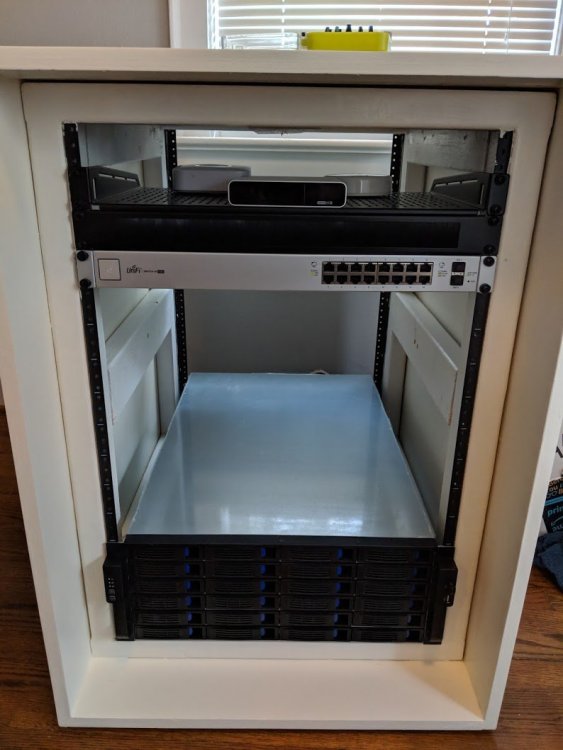
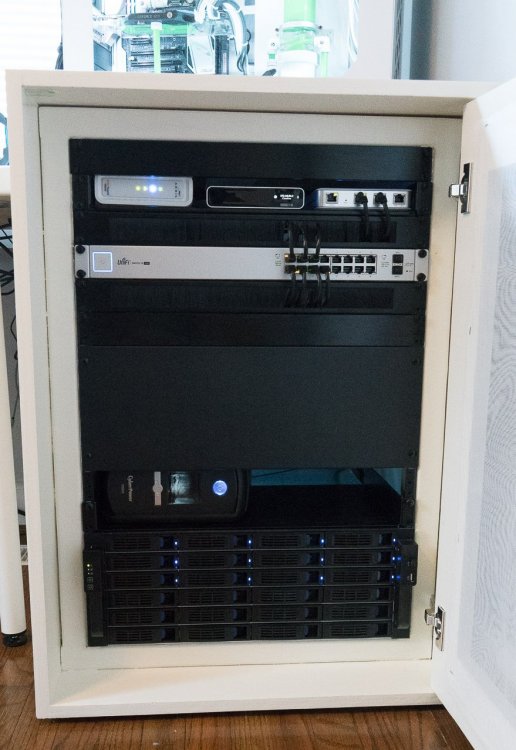
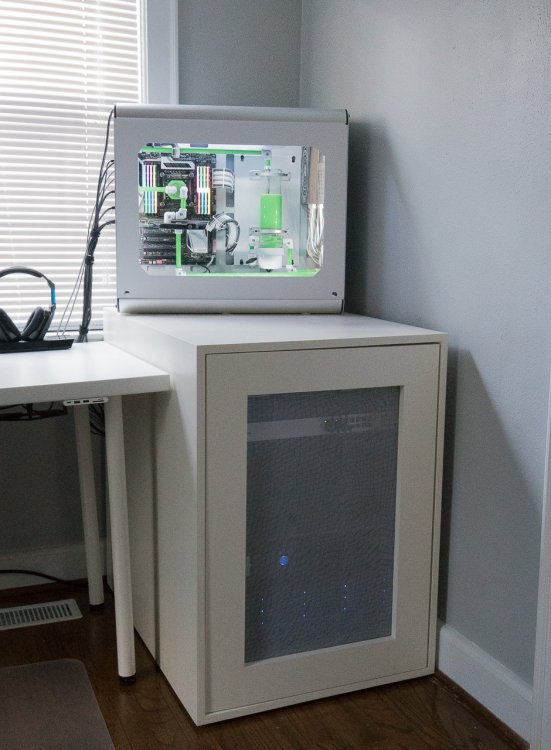
Norco 4224 case 9x 6TB 6x 4TB 2x 500GB SSD 1x 1TB SSD Intel® Core™ i7-5820K Asus X99-DELUXE 32 GB DDR4 Nvidia P2000 3x LSI 9211-8i This has been updated a little since these pictures were taken. I'll update here when I take new pictures.
 1 point
 -
maybe this:1 point