Leaderboard


Popular Content
Showing content with the highest reputation on 10/28/19 in all areas
-
There is a known issue with v6.8 where parity syncs can be slower than before, mostly but not limited to faster and/or very wide arrays. Although this isn't an urgent issue by any means this thread is meant to make it easier for LT to track the problem, also to have a better idea of how many users are affected and if there is a typical server configuration where the slowdown starts to be more noticeable. This issue results from changes made to the md driver and tunables to fix the "writes starve reads" problem with v6.7 and based on my testing there's a general slowdown fo the max possible speed for any array size, but since most servers will be disk/controller limited those shouldn't noticed any slowdown, users with very fast and/or wide arrays can notice it. This is from my test server using only SSDs: You can see parity check speed with v6.8 is always slower independent of array size, in fact v6.7.2 is faster with dual parity than v6.8.0 with single parity, there's one curious exception, a read check (no parity) with 8 or 12 devices where v6.8.0 is noticeably faster, all results are consistent on repeat testing (+/- 5MB/s). Since most servers are disk/controller limited I ran another test this time always using one slower SSD with a max read speed of 220MB/s (with single parity): So in a typical HDD array where disks are limited from 150 to 200MB/s the user would only start noticing the issue with more than 20 devices or so. I'm limited by the hardware I can test on but to try and rule it out as much as possible, mostly the disk controllers, I also did some tests using 2 old SAS2LP controllers (also single parity): I can only connect up to 16 devices on both controllers (parity is on an Intel onboard SATA port), but the trend seems clear, though interestingly it's faster than before with 8 devices, this can be because the tunables used with v6.7.2 are more tuned for the LSI or the new code just works better with the SAS2LP and few devices. Now for some real world examples, I have two 30 disks servers, on the first one parity check started at 200MB/s (disk limited), now it starts at 150MB/s, on the second server, which uses older hardware and slower disks parity check started at 140MB/s (also disk limited) and slows down just a little with v6.8 to 130MB/s, speed remains unchanged for all my other servers, mostly between 10 to 14 disks. Anyone having the same issue please post here together with a general server description, mainly CPU, board, controller and disk types used, or post the diagnostics which contains all the info we need to see the hardware used, note that if there is a slowdown it should be more evident at the start of the parity check, which should be the max speed, average speed will likely not suffer as much, so try to compare parity check start speed after a minute or so so it can stabilize, make sure nothing else is using the array, or do a quick test in maintenance mode so you can be certain nothing else is. Also note, that anyone using default or not optimized tunables with 6.7 might even notice a performance improvement due to the new code which attempts to auto configure the tunables for best performance.2 points
-
I just connected to the server, and checked it again. No corruption of the databases. I had the server up all weekend (minus a short period where I shut down the entire system to move it to another room). No issues at all. We watched a couple of TV shows from Plex, and I saw that several new shows and files were added over the weekend. Yes....md_restrict 1 is where it is set right now. The system has not stayed stable for this long since the update from 6.6.7.2 points
-
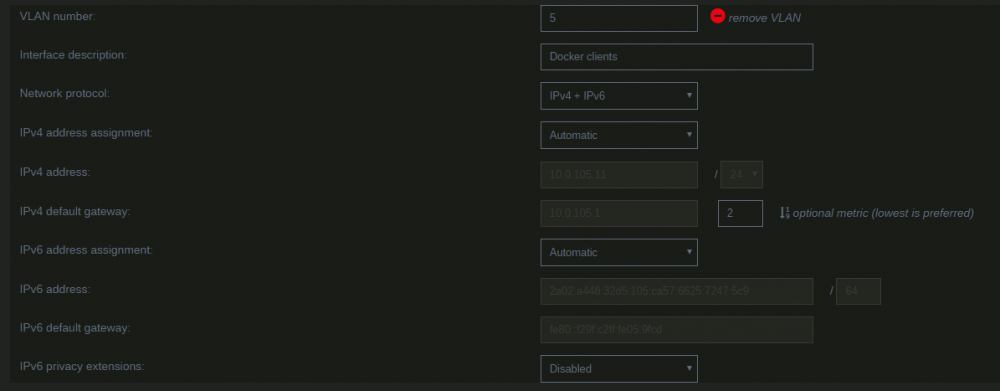
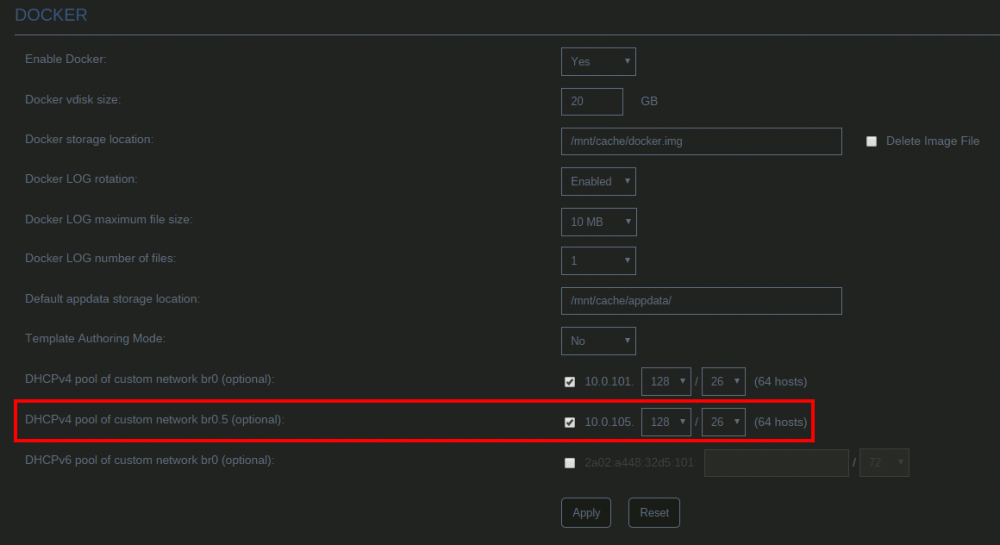
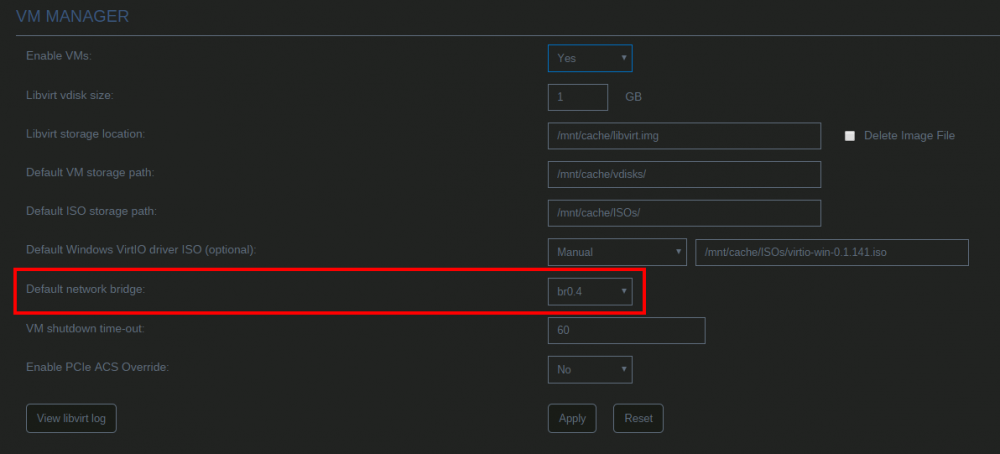
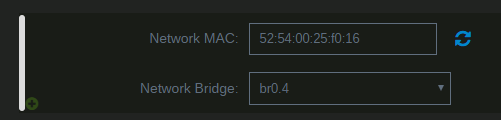
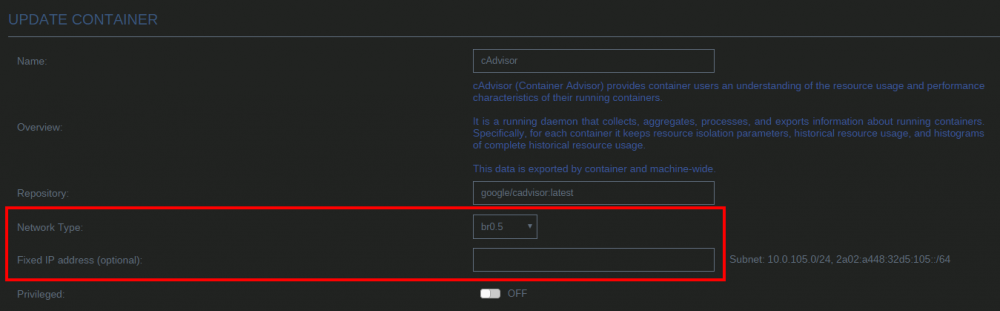
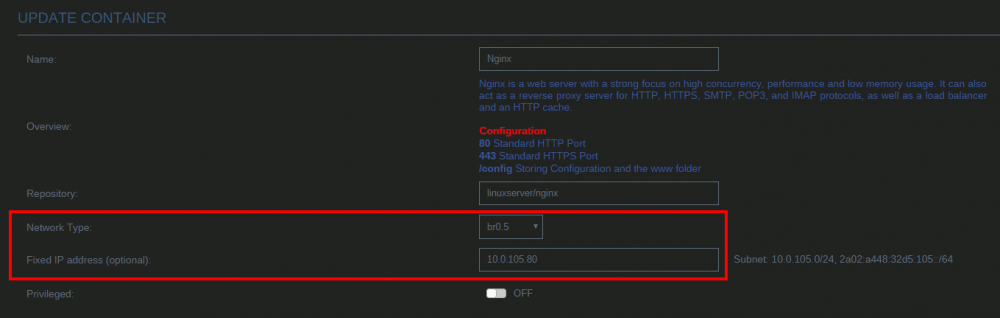
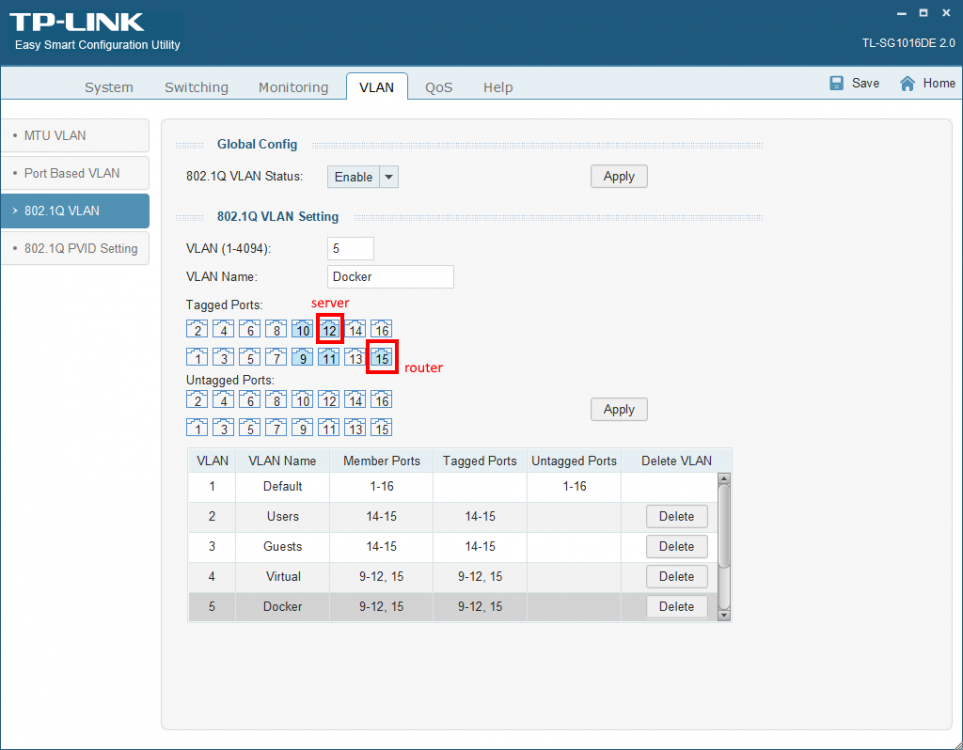
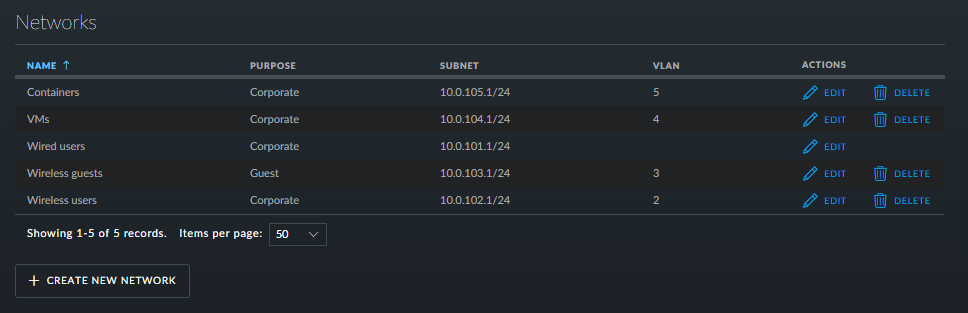
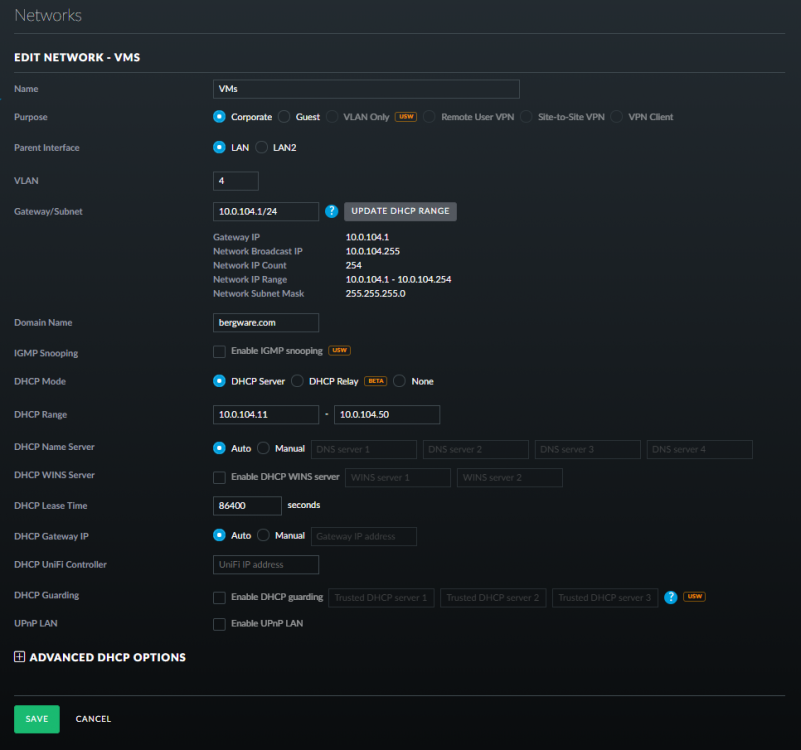
By default unRAID, the VMs and Docker containers all run within the same network. This is a straightforward solution, it does not require any special network setup and for most users this is a suitable solution. Sometimes more isolation is required, for example let VMs and Docker containers run in their own network environment completely separated from the unRAID server. Setting up such an environment needs changes in the unRAID network settings, but also requires your switch and router to have additional network possibilities to support this environment. The example here makes use of VLANs. This is an approach which allows to split your physical cable into two or more logical connections, which can run fully isolated from each other. If your switch does not support VLANs then the same can be achieved by connecting multiple physical ports (this requires however more ports on the unRAID server). The following assingments are done: network 10.0.101.0/24 = unRAID management connection. It runs on the default link (untagged) network 10.0.104.0/24 = isolated network for VMs. It runs on VLAN 4 (tagged) network 10.0.105.0/24 = isolated network for docker containers. It runs on VLAN 5 (tagged) UNRAID NETWORK SETTINGS We start with the main interface. Make sure the bridge function is enabled (this is required for VMs and docker). In this example both IPv4 and IPv6 are used, but this is not mandatory, e.g. IPv4 only is a good starting choice. Here a static IPv4 address is used, but automatic assignment can be used too. In this case it is recommended that your router (DHCP server) always hands out the same IP address to the unRAID server. Lastly enable VLANs for this interface. VM NETWORK SETTINGS VMs will operate on VLAN 4 which corresponds to interface br0.4. Here again IPv4 and IPv6 are enabled, but it may be limited to IPv4 only, without any IP assignment for unRAID itself. On the router DHCP can be configured, which allows VMs to obtain an IP address automatically. DOCKER NETWORK SETTINGS Docker containers operate on VLAN 5 which corresponds to interface br0.5. We need to assign IP addresses on this interface to ensure that Docker "sees" this interface and makes it a choice in the network selection of a container. Assignment can be automatic if you have a DHCP server running on this interface or static otherwise. VM CONFIGURATION We can set interface br0.4 as the default interface for the VMs which we are going to create (existing VMs you'll need to change individually). Here a new VM gets interface br0.4 assigned. DOCKER CONFIGURATION Docker will use its own built-in DHCP server to assign addresses to containers operating on interface br0.5 This DHCP server however isn't aware of any other DHCP servers (your router). Therefor it is recommended to set an IP range to the Docker DHCP server which is outside the range used by your router (if any) and avoid conflicts. This is done in the Docker settings while the service is stopped. When a docker container is created, the network type br0.5 is selected. This lets the container run on the isolated network. IP addresses can be assigned automatically out of the DHCP pool defined earlier. Leave the field "Fixed IP address" empty in this case. Or containers can use a static address. Fill-in the field "Fixed IP address" in this case. This completes the configuration on the unRAID server. Next we have to setup the switch and router to support the new networks we just created on the server. SWITCH CONFIGURATION The switch must be able to assign VLANs to its different ports. Below is a picture of a TP-LINK switch, other brands should have something similar. ROUTER CONFIGURATION The final piece is the router. Remember all connections eventually terminate on the router and this device makes communication between the different networks possible. If you want to allow or deny certain traffic between the networks, firewall rules on the router need to be created. This is however out of scope for this tutorial. Below is an example of a Ubiquiti USG router, again other brands should offer something similar. That's it. All components are configured and able to handle the different communications. Now you need to create VMs and containers which make use of them. Good luck.


 1 point
 -
I will be encrypting my drives using the GUI. I noticed that there are several encrypted file system options to choose from. (xfs - encrypted, btrfs - encrypted, etc.) What is the optimal system to go with here?1 point
-
Make a change to the schedule, then revert the change and apply. Should be fixed. There was a rc in either 6.6 or 6.7 that messed up the schedule.1 point
-
To those who are experiencing the black screen issue: I've solved the mystery for my own scenario, and it might help you out. Since this docker containers sets up a VM automatically, it might cause you some issues. For instance, the VM could choose a wrong network bridge - it did in my scenario. And for some reason, changing the GUI settings for the VM broke the VM. The icon for my VM was changed and I was facing the black screen issue. But if I installed the Macinabox container without changing any settings, an error showed saying that it couldn't use the network bridge (br0 in this example) as a network adapter. That got me thinking: could I change the settings in the XML and hopefully not brake the VM? It turned out; yes. I changed the network setting for the VM in the XML file from br0 to br4 (since I use br4 in my case) - and now it's installing again!1 point
-
I agree, but what can I say; we are talking about Synology. 🤷♂️ I was dumbfounded when they even added Docker support, as they always seem to like to keep things proprietary with little to no option to customize things. I will keep my mouth shut now, as I don't want to jinx it. It's working, that's what matters, right? *coughs*1 point
-
On the "hard disk drives" menu you need to select the flash drive to be the 1st disk, after that it will appear on the boot menu.1 point
-
If you have only one cache drive the default is XFS but you can choose BTRFS if you want. If you intend adding one or more drives to you cache pool in the future you might want to choose BTRFS now. At one time, single-disk BTRFS was considered to be less reliable in the event of an unexpected power outage but I don't think that's an issue any more. The checksums allow the Web GUI to offer a scrub option for BTRFS volumes. Advanced users also make use of BTRFS's snapshot facility but at the moment it's only available via the command line. After much experimenting and changing I've settled on using XFS on magnetic disks and BTRFS on SSDs.1 point
-
@chris_netsmart I have been running now for a while since this post after disabling the DLNA server, with no issues. It looks like there might have been an issue with it. I've not needed to re-enable it so cannot confirm if updates have resolved it.1 point
-
You might struggle there, as part of the underlying philosophy of Radarr is that it is in control of your library. Because it's primary function is to put files into your library as it finds them, write access is assumed. Are you doing this as you have a share that you want it to be aware of, but do not want it to change (that is, you've got the files as you want them)? If so, you might have to set it to set it to Read/Write and import the titles as "Not Monitored". I've got mine set up like that for one share, but can't remember how I did it. Somebody else may better answer this, but I've got a feeling that when you import titles into Radarr using the bulk import facility, all titles are set to "Not Monitored". That way, Radarr will never touch them unless you ask it to manually. As a side-note, you'll need to mount your "/data" as RW/Slave, if you haven't already.1 point
-
XFS is simpler and more mature. It suits most people's needs. BTRFS is newer and more sophisticated, offering advanced features, like checksums and RAID. The RAID feature is why it's used for cache pools of more than one disk. ReiserFS is obsolete and no longer maintained. As a simple rule of thumb, if you need to ask then your best option is to accept the defaults.1 point
-
Check filesystem on disks 5 and 6. Disk 8 is more serious, since the partition isn't valid, you can try unassigning it and starting the array, Unraid should recreate the partition, if the emulated disk mounts correctly and contents look correct you can rebuild on top, if it doesn't post new diags.1 point
-
SSDs are not recommended in the parity array. They can't be trimmed, they can only be written as fast as parity, and there is some question whether some implementations will invalidate parity.1 point
-
All attached storage devices (except the boot drive) count regardless of whether they are being used by Unraid or not.1 point
-
yes, your device count is 71 point
-
Absolutely not. Here's how it works. There are two ways to specify an encryption key: Using a passphrase. In this case what you type is exactly what will be used for the key, without any newline at the end (because did you type a newline? No). The max length for a passphrase is 512 bytes (characters). As specified in the Help, "It is highly advisable to only use the 95 printable characters from the first 128 characters of the ASCII table." A passphrase is meant to be some kind of string that you commit to memory and type in following server reboot. Use a keyfile. Whatever contents are in this file are what is used for the key. The max length used from a keyfile is 8192 bytes. Since contents are in a file, each byte can take on any value. Often one would use a file with random binary data. If the specified file is greater than 8192 in length, only the first 8192 bytes comprise the key. If you use a passphrase, whatever you typed is not stored in a file, though it is kept in memory. If you use a keyfile, then file uploaded data is written to /root/keyfile and it stays there for as long as sever has power. There is a button in webGUI that lets you delete the file if you want. But then each time you Start array you will have to upload file again, and then presumably delete again. Using a keyfile lets you specify a far stronger key, but onus is on you to delete the file.1 point
-
Thanks... haha this was by FAR the easiest solution. Worked great. Can confirm the newly generated default site conf looks like it has the fixes in place! EDIT: Although after doing this now I'm getting one small error on the security check page. The "Referrer-Policy" HTTP header is not set to "no-referrer", "no-referrer-when-downgrade", "strict-origin", "strict-origin-when-cross-origin" or "same-origin". But as H2O_King89 noted above, this is an easy fix. I just commented out line #21 on the newly generated config!1 point
-
comment out the line 38 with #1 point
-
Is there a way to salvage the database and rebuild it? How can I try this? https://support.plex.tv/articles/201100678-repair-a-corrupt-database/?_ga=2.158357434.1477259291.1572050764-45369178.1571561051 I'm not sure how to execute these commands.1 point
-
Do you like this for an icon? I think its appropriate.
 1 point
 -
09 Dec 2020 Basic usage instructions. Macinabox needs the following other apps to be installed. CA User Scripts (macinabox will inject a user script. This is what fixes the xml after edits made in the Unraid VM manager) Custom VM icons (install this if you want the custom icons for macOS in your vm) Install the new macinabox. 1. In the template select the OS which you want to install 2. Choose auto (default) or manual install. (manual install will just put the install media and opencore into your iso share) 3. Choose a vdisk size for the vm 4. In VM Images: Here you must put the VM image location (this path will put the vdisk in for the vm) 5. In VM Images again : re enter the same location as above. Here its stored as a variable. This will be used when macinabox generate the xml template. 6. In Isos Share Location: Here you must put the location of your iso share. Macinabox will put named install media and opencore here. 7. In Isos Share Location Again: Again this must be the same as above. Here its stored as a variable. Macinabox will use this when it genarates the template. 8. Download method. Leave as default unless for some reason method 1 doesnt work 9. Run mode. Choose between macinabox_with_virtmanager or virtmanager only. ( When I started rewriting macinabox i was going to only use virtmanager to make changes to the xml. However I thought it much easier and better to be able to use the Unraid vm manager to add a gpu cores ram etc, then have macinabox fix the xml afterwards. I deceided to leave vitmanager in anyway, in case its needed. For example there is a bug in Unraid 6.9.beta (including beta 35.) When you have any vm that uses vnc graphics then you change that to a passed through gpu it adds the gpu as a second gpu leaving the vnc in place. This was also a major reason i left virtmanger in macinabox. For situations like this its nice to have another tool. I show all of this in the video guide. ) After the container starts it will download the install media and put it in the iso share. Big Sur seems to take alot longer than the other macOS versions. So to know when its finished goto userscripts and run the macinabox notify script (in background) a message will pop up on the unraid webui when its finished. At this point you can run the macinabox helper script. It will check to see if there is a new autoinstall ready to install then it will install the custom xml template into the VM tab. Goto the vm tab now and run the vm This will boot up into the Opencore bootloader and then the install media. Install macOS as normal. After install you can change the vm in the Unraid VM Manager. Add cores ram gpu etc if you want. Then go back to the macinabox helper script. Put in the name of the vm at the top of the script and then run the script. It will add back all the custom xml to the vm and its ready to run. Hope you guys like this new macinabox1 point
-
Hello - I was having an issue were all my docker containers were saying update ready. I was using PI Hole and when I switched to google DNS it returned to normal. Also my plex server was not recognizable to anyone anymore even on LAN. thanks for the tip and sorry for the necro. Hope this helps someone else!1 point
-
Made a short vid on 6.8.01 point
-
Its a bug...look here. Soon to be fixed in 6.8.1 point
-
Thanks for all the tips and advice everyone, drives should be arriving early tomorrow then I will start changing them out one by one. Then I will have a look at the UnBalance Plugin, or I might just order 2 more drives and just to a full 6 drive replacement.1 point


(Small).thumb.png.b884b0484e848c502a315fc27b995f59.png)