Leaderboard


Popular Content
Showing content with the highest reputation on 12/30/19 in all areas
-
Hi, this is mostly a WIP thread, but as of the first post it does work up to my relatively limited testing. I plan on expanding this to a fully featured plugin, but this script is a working foundation, and I'd like to make this available to people to play with asap. Bottom Line Up Front: This script only works on your btrfs-formatted array drives. By default, it will keep 8760 snapshots (1 year of hourly snapshots), this value can be adjusted by changing the MAX_SNAPS variable in the script. This script does not handle cache drives, but would be trivial to extend to do so - I just think it is a bad idea. Detection of this is minimal but present. Running this script for the first time will remove and recreate all of your existing array shares (moved to temporary path, original path converted to subvolume, moved back), no data should be lost, but I have only tested this with my own data and configuration, and cannot account for all edge cases and I absolutely cannot be held accountable for your data if it is lost. No script is provided to revert these changes. Goals: I wanted to have delta snapshot recovery as part of my NAS feature set. FreeNAS is appealing, but I dislike FreeBSD's ecosystem (weird problems with bhyve, don't really need ZFS performance improvements), tried ProxMox and didn't care for it, didn't want to roll my own (likely debian-based) setup, very much like unRAID's GUI and asynchronous drive upgrade process, and wasn't interested in the crazy ZFS-on-unRAID frankenstein config by Wendell at L1T. I noted that unRAID can be configured to use BTRFS, and in theory it should be able to do this, given enough scripting to keep everything in sync. I also want to leverage unRAID's GUI as heavily as possible, and do as little command-line work on the regular as possible. Adding a new drive, creating a new share, etc, should all be possible through the GUI, and this setup should automagically adjust. Step 1) Adjust your Settings -> SMB -> SMB Extras field to include the following line. This will publish your snapshots to windows SMB clients as 'previous versions'. vfs objects = shadow_copy2 Notes: This config does work at the global scope (where adding it to extras puts it by default), and will apply to all of your shares. You just don't get to configure any of the other options for this feature. Unfortunately, duplicating the UnRAID team's work to build share configs on the fly is outside of my ambition, so I'm willing to live with that compromise. This is going to get us into an interesting situation, where the only place samba seems to be able to find our snapshots directory is at '/mnt/user/.snapshots'. The directory needs to be created on each storage device and then let unraid aggregate it later, so we are going to do it in the script so we can handle new drives and new shares correctly. Step 2) Install the CA Userscripts Plugin. Details of this step are outside the scope of this post. Step 3) Settings -> User Scripts. Add New Script. Click on script name to edit it. Add the following code to the script. Adjust MAX_SNAPS to your preference. Schedule it as you desire. Adjust EXCLUDE to your preference. Random Notes: This provides some, but minimal protection from ransomware and bit-rot. In particular, ransomware which understands a linux system and actually gets access to the server could purge snapshots. Edit 1/6/20: Added options to exclude some shares from being snapshotted. -e\--exclude <Comma seperated list of shortnames> #!/bin/bash #description=This script implements incremental snapshots on btrfs array drives. #arrayStarted=true #argumentDescription= -n|--number <MAXIMUM NUMBER OF SNAPSHOTS TO RETAIL> #argumentDefault=-s 8760 shopt -s nullglob #make empty directories not freak out date=$(TZ=GMT date +@GMT-%Y.%m.%d-%H.%M.%S) #standardized datestamp MAX_SNAPS=8760 EXCLUDE= is_btrfs_subvolume() { local dir=$1 [ "$(stat -f --format="%T" "$dir")" == "btrfs" ] || return 1 inode="$(stat --format="%i" "$dir")" case "$inode" in 2|256) return 0;; *) return 1;; esac } POSITIONAL=() while [[ $# -gt 0 ]] do key="$1" case $key in -n|--number) MAX_SNAPS="$2" shift # past argument shift # past value ;; -e|--exclude) EXCLUDE="$2" shift # past argument shift # past value ;; *) POSITIONAL+=("$1") # save it in an array for later shift # past argument ;; esac done set -- "${POSITIONAL[@]}" # restore positional parameters #ADJUST MAX_SNAPS to prevent off-by-1 MAX_SNAPS=$((MAX_SNAPS+1)) #Tokenize exclude list declare -A excludes for token in ${EXCLUDE//,/ }; do excludes[$token]=1 done #iterate over all disks on array for disk in /mnt/disk*[0-9]* ; do #examine disk for btrfs-formatting (MOSTLY UNTESTED) if is_btrfs_subvolume $disk ; then #check for .snapshots directory prior to generating snapshot if [ -d "$disk" ]; then if [ ! -d "$disk/.snapshots/" ] ; then mkdir -v $disk/.snapshots fi if [ ! -d "$disk/.snapshots/$date/" ] ; then mkdir -v $disk/.snapshots/$date fi fi #iterate over shares present on disk for share in ${disk}/* ; do #test for exclusion if [ ! -n "${excludes[$(basename $share)]}" ]; then #echo "Examining $share on $disk" is_btrfs_subvolume $share if [ ! "$?" -eq 0 ]; then #echo "$share is likely not a subvolume" mv -v ${share} ${share}_TEMP btrfs subvolume create $share cp -avT --reflink=always ${share}_TEMP $share rm -vrf ${share}_TEMP fi #make new snap btrfs subvolume snap -r ${share} /mnt/$(basename $disk)/.snapshots/${date}/$(basename $share) else echo "$share is on the exclusion list. Skipping..." fi done #find old snaps echo "Found $(find ${disk}/.snapshots/ -maxdepth 1 -mindepth 1 | sort -nr | tail -n +$MAX_SNAPS | wc -l) old snaps" for snap in $(find ${disk}/.snapshots/ -maxdepth 1 -mindepth 1 | sort -nr | tail -n +$MAX_SNAPS); do for share_snap in ${snap}/*; do btrfs subvolume delete $share_snap done rm -rfv $snap done fi done2 points
-
Unassigned Devices Plugin Unassigned Devices (UD) includes a lot of functionality and has become a bit complex. Please read the first and second post. You will find answers to most of your questions. Note: You will need to install the Unassigned Devices Plus (UD+) plugin to enable HFS+ and APFS (Apple file formats) and exFAT (flash larger than 64MB) disk mounting, and to enable 'Destructive Mode' for formatting of some UD supported disk formats. UD and UD+ are available in Community Applications (CA). Hover your mouse over any active area on the UD page and a tool tip will show you what clicking that area does. UD supports all Unraid native disk formats. You will need to install the 'Unassigned Devices Plus' plugin to mount HFS+, APFS and exFAT file formats. UD has a destructive mode that allows deleting disk partitions and formatting disks. If Destructive Mode is not turned on in the UD Settings, you WILL NOT be able to format a disk. Go the the Settings page and scroll to the bottom to see the UD settings. To format a disk: Destructive Mode must be enabled. You will need to install the 'Unassigned Devices Plus' plugin to enable Destructive Mode. UD Plus will install the 'parted' package needed for formatting and deleting partitions. Disk must have all partitions removed. Unmount the disk, click on the '+' icon next to the serial number, and click on all red-X to delete partitions. You can also click on the red-X next to the disk serial number to delete all partitions. A precelared disk will have a partition without a file system and will show a grayed 'Mount' button. You can assign this disk directly to the array and Unraid will see the disk as 'pre-cleared' and will not clear it again. If you want to format the disk for use in UD, you need to first click on the red-X on the preclear status line to remove the preclear stats and then remove all partitions by clicking on the red-X icon next to the serial number and then you'll be able to format the disk. There are different operations in various active areas (especially the disk serial number) based on whether or not the disk drive is mounted. If the disk is not mounted, click on the '+' icon by the serial number, click on the partition name, you will get a pop-up dialog to change the mount point name. This will now become the mount point and the share name when the disk is shared. In order to share any UD device, sharing needs to be enabled in the UD Settings and the switch turned on to share the particular device. SSD disks formatted with xfs, btrfs, or ext4 will be mounted with 'discard' if the "Mount SSDs with 'discard' option?" is set to "Yes". This includes encrypted disks. Reiserfs does not support discard. This enables TRIM on SSD devices. If you have the trim plugin installed, it is recommended to not mount SSD disks with discard. Disks formatted XFS or BTRFS will be partitioned compatible with the array disks and can be installed in the array without a re-format. SSD devices are now partitioned with a 1MiB offset as of Unraid 6.9 Beta 25 and cannot be installed as a cache or pool device on earlier versions. Because of security issues with samba, the mounting of remote SMB shares with CIFS has become more complicated. The default protocol is now SMB3 and not SMB1; the default security is now ntlmv2 and not ntlm. UD will try to mount SMB shares with SMB3, then SMB2, and then SMB1 to try to get the mount to use the most secure protocol it supports and the ntlmv2 protocol. If you have an older server that only supports SMB v1, you need to update that server so it will support SMB v2 or v3. SMB v1 is being phased out and will probably eventually be removed from samba. You will not be able to mount a remote SMB share using SMBv1 if NetBIOS is disabled in Unraid. It is recommended to disable NetBIOS on Unraid servers. Note: UD disks add to the total disks allowed by the Unraid license you have purchased except for a Pro license. See here for details. Unassigned Devices allows you to mount and share disk drives that are not managed as part of the array. Some users are mounting a drive specifically for Dockers and/or VMs rather than having them on a cache or array drive. You can also mount a UNC share on another system (SMB or NFS) and have it show in the Unraid shares when browsing the Unraid shares with Windows. This is called Remote Share Mount. The UNC path is mounted locally and shared as a \\Tower share that can be accessed by SMB or NFS. Access to Unassigned Devices shares defaults to Public with everyone having read/write access. User access can be enabled in the Unassigned Devices Settings. Access can be enabled by user for read/write, read only, or no access to Unassigned Devices shares. Installing the plugin You can install the plugin from the Community Applications (Apps tab); Remote Mounted Shares You can remote mount SMB and NFS shares. SMB shares are accessed through \\Tower\share. There are several special cases of remote mounting SMB shares. Windows. You have to provide user login credentials to be able to show the shares with the 'Load Shares' button. Even if the shares are not password protected, Windows insists on login credentials. Domains. You can remote mount shares on a domain by specifying a domain. It is preferred to use the server name and not the IP address. Let UD search for the servers and then make a selection, then load shares and make a selection. This is much less error prone than manually entering the information. Unless you use a static IP address on the server, it can change making the remote mount fail. Note: With NetBIOS disabled on a remote server or computer on your LAN, UD may only be able to look up the server and show its IP address because the name cannot be resolved. It is recommended that you type in the name of your other server or computer instead of using the IP address. UD will make an adjustment so the name can be resolved when mounting the remote share. UD also keeps the IP current if it is changed by a DHCP server. When a USB device is plugged in or mounted an event is initiated to run a user defined script. This is useful for backing up files from the server initiated by plugging in the USB device or copying pictures from a camera to the array. Scripts are created unique for each device. You can also setup one script to run whenever any device is plugged in or mounted. Mount Points and Shares There seems to be a lot of confusion over a mount point vs. a share. The mount point is where the device is mounted locally on Unraid. A share makes the mount point available in Windows at '\\Tower' as a browseable folder. When disk devices and ISO Mounts are mounted, they are mounted at /mnt/disks/. They are not a part of the Unraid array and are not mounted at /mnt/disk/ which is for Unraid disk drives. As an example, you have a device named 'MyDisk'. When it is mounted, it is accessed locally at /mnt/disks/MyDisk. If you want to use 'MyDisk' in a Docker Container or VM, you would refer to it by '/mnt/disks/MyDisk'. It is not automatically shared at '\\Tower\MyDisk' unless you enable sharing the device. To share 'MyDrisk', you would turn on the 'Share' switch for the drive and 'MyDisk' would be shared at '\\Tower\MyDisk'. The share 'MyDisk' is not accessed at /mnt/user/MyDisk' because it is not an Unraid user share. When remote shares are mounted, they are mounted at /mnt/remotes/. They are not a part of the Unraid array and are not mounted at /mnt/disk/ which is for Unraid disk drives. As an example, you have a share named 'MyShare'. When it is mounted, it is accessed locally at /mnt/remotes/MyShare. If you want to use 'MyShare' in a Docker Container or VM, you would refer to it by '/mnt/remotes/MyShare'. It is not automatically shared at '\\Tower\MyDisk' unless you enable sharing the device. To share 'MyShare', you would turn on the 'Share' switch for the remote share and 'MyShare' would be shared at '\\Tower\MyShare'. The share 'MyShare is not accessed at /mnt/user/MyShare' because it is not an Unraid user share. If you are using the legacy mapping of remote shares at /mnt/disks/ for your Docker Containers or VMs, and it is not practical to remap them in your Docker Containers or VMs, you can set a legacy mapping option in UD Settings that will put symlinks in /mnt/disks/ to the remote shares in mnt/remotes/. When you map to the /mnt/disks/MyShare be sure to have a trailing '/' on the mapping so the symlink will be treated as a directory and not a file. Mount points and shares are two separate things. Partitions and Formatting If you turn on the destructive mode in the Unassigned Devices Settings, you will be able to delete partitions and format disks. It is defaulted off as a safety measure. Scripts Here is an example script that will back up a Pictures share to a USB drive when plugged in. The USB drive is unmounted once the script completes so you just plug in the drive, wait for it to be completed, and then unplug the drive. The beeps in the script will make speaker sounds if you have a speaker to let you know when the drive is plugged in, when the backup has started, and when the backup has finished and the drive unmounted. The nice thing about this script is that all you have to do is plugin the drive and wait for it to finish. You will also be notified when it is done if you have turned on Unraid notifications. Set the drive to auto mount. Set the script to run in the background. If you mount and unmount the drive from the Unassigned Devices gui, the drive will mount and unmount but the script will not run because it has detected the 'OWNER' as 'user' and will skip the backup. #!/bin/bash PATH=/usr/local/sbin:/usr/sbin:/sbin:/usr/local/bin:/usr/bin:/bin ## Available variables: # ACTION - if mounting, ADD; if unmounting, UNMOUNT; if unmounted, REMOVE; if error, ERROR_MOUNT, ERROR_UNMOUNT # DEVICE - partition device, e.g. /dev/sda1 # UD_DEVICE - unassigned devX designation # SERIAL - disk serial number # LABEL - partition label # LUKS - if the device is encrypted, this is the partition device, e.g. /dev/sda1 # FSTYPE - partition filesystem # MOUNTPOINT - where the partition is mounted # OWNER - "udev" if executed by UDEV, otherwise "user" # PROG_NAME - program name of this script # LOGFILE - log file for this script case $ACTION in 'ADD' ) # # Beep that the device is plugged in. # beep -l 200 -f 600 -n -l 200 -f 800 sleep 2 if mountpoint -q $MOUNTPOINT; then if [ $OWNER = "udev" ] then beep -l 100 -f 2000 -n -l 150 -f 3000 beep -l 100 -f 2000 -n -l 150 -f 3000 logger Started -t$PROG_NAME echo "Started: `date`" > $LOGFILE logger Pictures share -t$PROG_NAME rsync -a -v /mnt/user/Pictures $MOUNTPOINT/ 2>&1 >> $LOGFILE logger Syncing -t$PROG_NAME sync -f $MOUNTPOINT beep -l 100 -f 2000 -n -l 150 -f 3000 beep -l 100 -f 2000 -n -l 150 -f 3000 beep -r 5 -l 100 -f 2000 logger Unmounting PicturesBackup -t$PROG_NAME /usr/local/sbin/rc.unassigned umount $DEVICE echo "Completed: `date`" >> $LOGFILE logger Pictures Backup drive can be removed -t$PROG_NAME /usr/local/emhttp/webGui/scripts/notify -e "Unraid Server Notice" -s "Server Backup" -d "Pictures Backup completed" -i "normal" fi else logger Pictures Backup Drive Not Mounted -t$PROG_NAME fi ;; 'REMOVE' ) # # Beep that the device is unmounted. # beep -l 200 -f 800 -n -l 200 -f 600 ;; 'ERROR_MOUNT' ) /usr/local/emhttp/webGui/scripts/notify -e "Unraid Server Notice" -s "Server Backup" -d "Could not mount Pictures Backup" -i "normal" ;; 'ERROR_UNMOUNT' ) /usr/local/emhttp/webGui/scripts/notify -e "Unraid Server Notice" -s "Server Backup" -d "Could not unmount Pictures Backup" -i "normal" ;; esac Here is a nice UD script for importing photos from a camera/memory card into the array: Photo Script Thanks to ljm42. Cron Task A better way of running cron scripts is the 'User Scripts' plugin. You can set up a script to run at a particular time to perform disk operations. It is best to leave the device mounted so the script can access the drive. This is a simple way to set up a cron task to run a script to copy files to a backup. This method is a little cumbersome, but does work well. You will need to set up your drive to auto mount and it has to be left mounted. You can use the default script or the following one if you want beeps when the drive is mounted and unmounted. Set the drive to auto mount. he drive has to stay mounted for the script to work. Set the script to run in the background. #!/bin/bash PATH=/usr/local/sbin:/usr/sbin:/sbin:/usr/local/bin:/usr/bin:/bin ## Available variables: # ACTION - if mounting, ADD; if unmounting, UNMOUNT; if unmounted, REMOVE; if error, ERROR_MOUNT, ERROR_UNMOUNT # DEVICE - partition device, e.g. /dev/sda1 # UD_DEVICE - unassigned devX designation # SERIAL - disk serial number # LABEL - partition label # LUKS - if the device is encrypted, this is the partition device, e.g. /dev/sda1 # FSTYPE - partition filesystem # MOUNTPOINT - where the partition is mounted # OWNER - "udev" if executed by UDEV, otherwise "user" # PROG_NAME - program name of this script # LOGFILE - log file for this script case $ACTION in 'ADD' ) # # Beep that the device is plugged in. # beep -l 200 -f 600 -n -l 200 -f 800 ;; 'REMOVE' ) # # Beep that the device is unmounted. # beep -l 200 -f 800 -n -l 200 -f 600 ;; esac Now set up a cron file in the /flash/config/plugins/dynamix/ directory. Name the file 'custom.cron' (or a name of your own choosing.cron) with the following contents. This will set up a cron task to run at 4:30 AM every day. It runs a script in the /boot/custom/ directory called DailyBackup. # Custom cron scripts: 30 4 * * * /boot/custom/DailyBackup &> /dev/null Sample Daily Backup script #!/bin/bash # # Perform daily backup. # MOUNTPOINT=/mnt/disks/DailyBackup PROG_NAME=DailyBackup logger Started -t$PROG_NAME if mountpoint -q $MOUNTPOINT; then logger Pictures share -t$PROG_NAME rsync -a -v /mnt/user/Pictures $MOUNTPOINT/ 2>&1 logger Completed -t$PROG_NAME /usr/local/emhttp/webGui/scripts/notify -e "Unraid Server Notice" -s "Server Backup" -d "Daily Backup completed" -i "normal" else logger Daily Backup Drive Not Mounted -t$PROG_NAME fi After you have copied your cron file to the dynamix directory you will have to load the cron file manually one time to get it started. Unraid will manage the cron file after that and insert it into the crontab for you. Use the following command to load the cron file the first time. /usr/local/sbin/update_cron Encrypted Dsks You can format a xfs or btrfs encrypted disk with UD that is compatible with the array. The disk is created with the array password/passphrase. You must have at least one encrypted disk in the array. Unraid 6.8 and greater only. You can format an encrypted disk for use outside the array without having an encrypted array. The disk password is entered when the disk is formatted. You need to set the disk password in UD settings so the disk will mount. Unraid 6.8 and greater only. A disk encrypted with a different password than the array can be mounted with a disk password set in the UD settings. A different password can be set for each disk. Pooling Disks You can create multiple pools with UD, with some limitations, details here. Starting with Unraid 6.9, there is a 'Pool' feature that should be used for pooling disks. Click on the 'Help' button on the main menu bar of Unraid to get some additional help. If you hover your mouse over an active area on the gui, you will see tool tips that will help you understand the operation of the active area. Verify you have the latest version installed and check the syslog for information if you are having any issues. Many questions can be answered by reading this post and checking the syslog. Root Share You can create a root share in UD and collect all your shares in /mnt/user/ into one named root share. The root share is then accessible at /Tower/rootshare. There are some advantages and disadvantages to this approach: You control the root share permissions in UD Security settings. You may increase your risk of a malware attack by having all your shares accessible on one root share. Use secure passowrds! Addon Mount Folder UD adds the folder '/mnt/addons' where you can mount anything you need mounted. A protected mount is added to '/mnt/addons' so a misconfigured app cannot fill the rootfs and crash the system. FCP will ignore this mount folder so you won't see any warnings. If you mount something at '/mnt/addons' before UD is installed, you will see a reboot message over the banner. If this is the case, you need to delay your mount until after UD installs. Mount Button Indicators Disks In order to point out to users normal operation and situations that may prevent UD from operating on a disk device properly, the 'Mount' button will show some greyed out text that indicates status on the disk. If the text shows with the not symbol, the disk is in an error conndition. 'MOUNT' or 'UNMOUNT' - when the 'Mount' button shows either of these grayed out, the 'Disable Mount Button' switch is on. This situation lets UD do auto mount and unmount, but operator actions are not permitted. Theere are occasions when these indicators are grayed out because of disk drive issues. 'PASSED' - This indicates the 'Passed Through' switch is set. This is used to tell UD that a VM or Docker Container is using the disk and for UD to not manage the disk in any way. 'PRECLEAR' - The UD Preclear or binhex Preclear Docker is preclearing the disk. 'POOL' - This is used to indicate that a disk is part of a BTRFS pool. 'PARTITION' - This will show when a disk is detected that has a file system but no partition. UD cannot mount a disk in this situation. If it is a disk introduced to UD that you want to use in UD, you can clear the disk and reformat it for use with UD. 'ARRAY' - This indicates that a disk has not been detected by Unraid as an Unassigned Device and UD thinks the disk is a part of the array. This generally happens when an array disk drops from the array. 'UDEV' - UD has detected that the disk format reported by udev does not match the format as reported by lsblk. This can sometimes be rectified by clicking on the double arrows on the UD UI to refresh the udev data in UD. 'REBOOT' - This shows when UD has detected a disk was probably removed before being unmounted and then re-installed. The best way to clear this up is to reboot. If this happens because of several disks having the same mount point, unmount the disk with this mount point and change mount points on all disks to be unique. Remote Shares 'MOUNT' or 'UNMOUNT' - when the 'Mount' button shows either of these grayed out, the remote sever is off-line. When these indicators are grayed out on an ISO mount, the iso file is not available.1 point
-
⚠️ NOTICE: I currently do not have the time to do more than maintain this project for myself at the moment. I will eventually do more work on it as my life permits, but for now development will be sporadic at best. I am more happy to add someone else to the project to maintain it, or even accept some PRs as that is much easier for me to find time for Mod note: this plugin has multiple known issues, use with care. This is a beta version of a plugin I am working on to replace the unraid-vmbackup script I have been maintaining here and here. It is based off the latest version of the script (v1.3.1), and I will be maintaining both for now as there are some use-cases for the script that the plugin cannot currently replace. This is provided as-is with no guarantees. That said, and without further ado, the current version of the plugin can be found here: https://github.com/JTok/unraid.vmbackup/tree/v0.2.7 -JTok Feel free to buy me a beer (or two 😋)1 point
-
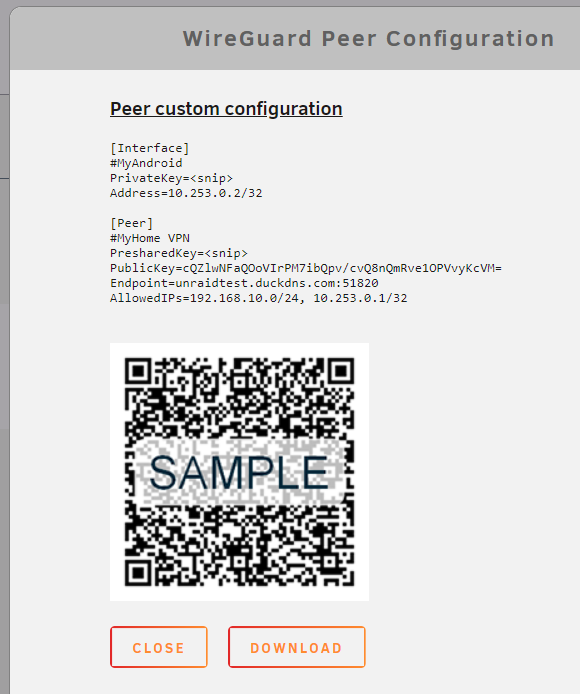
Note: this community guide is offered in the hope that it is helpful, but comes with no warranty/guarantee/etc. Follow at your own risk. What can you do with WireGuard? Let's walk through each of the connection types: Remote access to server: Use your phone or computer to remotely access your Unraid server, including: Unraid administration via the webgui Access dockers, VMs, and network shares as though you were physically connected to the network Remote access to LAN: Builds on "Remote access to server", allowing you to access your entire LAN as well. Server to server access: Allows two Unraid servers to connect to each other. LAN to LAN access: Builds on "Server to server access", allowing two entire networks to communicate. (see this guide) Server hub & spoke access: Builds on "Remote access to server", except that all of the VPN clients can connect to each other as well. Note that all traffic passes through the server. LAN hub & spoke access: Builds on "Server hub & spoke access", allowing you to access your entire LAN as well. VPN tunneled access: Route traffic for specific Dockers and VMs through a commercial WireGuard VPN provider (see this guide) Remote tunneled access: Securely access the Internet from untrusted networks by routing all of your traffic through the VPN and out Unraid's Internet connection In this guide we will walk through how to setup WireGuard so that your trusted devices can VPN into your home network to access Unraid and the other systems on your network. Prerequisites You must be running Unraid 6.8-6.9 with the Dynamix WireGuard plugin from Community Apps or Unraid 6.10+ (which has the plugin built in). Understand that giving someone VPN access to your LAN is just like giving them physical access to your LAN, except they have it 24x7 when you aren't around to supervise. Only give access to people and devices that you trust, and make certain that the configuration details (particularly the private keys) are not passed around insecurely. Regardless of the "connection type" you choose, assume that anyone who gets access to this configuration information will be able to get full access to your network. This guide works great for simple networks. But if you have Dockers with custom IPs or VMs with strict networking requirements, please see the "Complex Networks" section below. Unraid will automatically configure your WireGuard clients to connect to Unraid using your current public IP address, which will work until that IP address changes. To future-proof the setup, you can use Dynamic DNS instead. There are many ways to do this, probably the easiest is described in this 2 minute video from SpaceInvaderOne If your router has UPnP enabled, Unraid will be able to automatically forward the port for you. If not, you will need to know how to configure your router to forward a port. You will need to install WireGuard on a client system. It is available for many operating systems: https://www.wireguard.com/install/ Android or iOS make good first systems, because you can get all the details via QR code. Setting up the Unraid side of the VPN tunnel If UPnP is enabled on your router and you want to use it in Unraid, go to Settings -> Management Access and confirm "Use UPnP" is set to Yes On Unraid 6.8, go to Settings -> VPN Manager Give the VPN Tunnel a name, such as "MyHome VPN" Press "Generate Keypair". This will generate a set of public and private keys for Unraid. Take care not to inadvertently share the private key with anyone (such as in a screenshot like this) By default the local endpoint will be configured with your current public IP address. If you chose to setup DDNS earlier, change the IP address to the DDNS address. Unraid will recommend a port to use. You typically won't need to change this unless you already have WireGuard running elsewhere on your network. Hit Apply If Unraid detects that your router supports UPnP, it will automatically setup port forwarding for you: If you see a note that says "configure your router for port forwarding..." you will need to login to your router and setup the port forward as directed by the note: Some tips for setting up the port forward in your router: Both the external (source) and internal (target/local) ports should be the set to the value Unraid provides. If your router interface asks you to put in a range, use the same port for both the starting and ending values. Be sure to specify that it is a UDP port and not a TCP port. For the internal (target/local) address, use the IP address of your Unraid system shown in the note. Google can help you find instructions for your specific router, i.e. "how to port forward Asus RT-AC68U" Note that after hitting Apply, the public and private keys are removed from view. If you ever need to access them, click the "key" icon on the right hand side. Similarly, you can access other advanced setting by pressing the "down chevron" on the right hand side. They are beyond the scope of this guide, but you can turn on help to see what they do. In the upper right corner of the page, change the Inactive slider to Active to start WireGuard. You can optionally set the tunnel to Autostart when Unraid boots. Defining a Peer (client) Click "Add Peer" Give it a name, such as "MyAndroid" For the initial connection type, choose "Remote access to LAN". This will give your device access to Unraid and other items on your network (there are some caveats to this covered below) Click "Generate Keypair" to generate public and private keys for the client. The private key will be given to the client / peer, but take care not to share it with anyone else (such as in a screenshot like this) For an additional layer of security, click "Generate Key" to generate a preshared key. Again, this should only be shared with this client / peer. Click Apply. Note: Technically, the peer should generate these keys and not give the private key to Unraid. You are welcome to do that, but it is less convenient as the config files Unraid generates will not be complete and you will have to finish configuring the client manually. Configuring a Peer (client) Click the "eye" icon to view the peer configuration. If the button is not clickable, you need to apply or reset your unsaved changes first. If you are setting up a mobile device, choose the "Create from QR code" option in the mobile app and take a picture of the QR code. Give it a name and make the connection. The VPN tunnel starts almost instantaneously, once it is up you can open a browser and connect to Unraid or another system on your network. Be careful not to share screenshots of the QR code with anyone, or they will be able to use it to access your VPN. If you are setting up another type of device, download the file and transfer it to the remote computer via trusted email or dropbox, etc. Then unzip it and load the configuration into the client. Protect this file, anyone who has access to it will be able to access your VPN. Complex Networks The instructions above should work out of the box for simple networks. With "Use NAT" defaulted to Yes, all network traffic on Unraid uses Unraid's IP, and that works fine if you have a simple setup. However, if you have Dockers with custom IPs or VMs with strict networking requirements, you'll need to make a few changes: In the WireGuard tunnel config, set "Use NAT" to No In your router, add a static route that lets your network access the WireGuard "Local tunnel network pool" through the IP address of your Unraid system. For instance, for the default pool of 10.253.0.0/24 you should add this static route: Destination Network: 10.253.0.0/24 (aka 10.253.0.0 with subnet 255.255.255.0) Gateway / Next Hop: <IP address of your Unraid system> Distance: 1 (your router may not have this option) If you use pfSense, you may also need to check the box for "Static route filtering - bypass firewall rules for traffic on the same interface". See this. If you have Dockers with custom IPs then on the Docker settings page, set "Host access to custom networks" to "Enabled". see this: https://forums.unraid.net/topic/84229-dynamix-wireguard-vpn/page/8/?tab=comments#comment-808801 There are some configurations you'll want to avoid, here is how a few key settings interact: With "Use NAT" = Yes and "Host access to custom networks" = disabled (static route optional) server and dockers on bridge/host - accessible! VMs and other systems on LAN - accessible! dockers with custom IP - NOT accessible (this is the "simple network" setup assumed by the guide above) With "Use NAT" = Yes and "Host access to custom networks" = enabled (static route optional) server and dockers on bridge/host - accessible! VMs and other systems on LAN - NOT accessible dockers with custom IP - NOT accessible (avoid this config) With "Use NAT" = No and no static route server and dockers on bridge/host - accessible! VMs and other systems on LAN - NOT accessible dockers with custom IP - NOT accessible (avoid this, if "Use NAT" = No, you really need to add a static route in your router) With "Use NAT" = No and "Host access to custom networks" = disabled and static route server and dockers on bridge/host - accessible! VMs and other systems on LAN - accessible! dockers with custom IP - NOT accessible (You've come this far, just set "Host access to custom networks" to enabled you're set) With "Use NAT" = No and "Host access to custom networks" = enabled and static route server and dockers on bridge/host - accessible! VMs and other systems on LAN - accessible! dockers with custom IP - accessible! (woohoo! the recommended setup for complex networks) About DNS Everything discussed so far should work if you access the devices by IP address or with a Fully Qualified Domain Name such as yourpersonalhash.unraid.net. Short names such as "tower" probably won't work, nor any DNS entries managed by the router. To get those to work over the tunnel, return to the VPN Manager page in Unraid, switch from Basic to Advanced mode, and add the IP address of your desired DNS server into the "Peer DNS Server" field (don't forget to put the updated config file on the client after saving it!) You may want to use the IP address of the router on the LAN you are connecting to, or you could use a globally available IP like 8.8.8.8 ** "WireGuard" and the "WireGuard" logo are registered trademarks of Jason A. Donenfeld.


 1 point
 -
I've spent the last 2 days trying to learn everything I can how to setup GNS3 on Unraid VM. Get a drink, this could take a while. Shutdown all of your VMs. Yes, this is needed. Install User Scripts if you don't have it already. Once installed, go to settings > User Scripts Add 2 new scripts - One "Enable Nested VMs" and another one, "Disable Nested VMs" Go here and grab the snippets for these. if you have AMD cpu, you'll need to adjust the scripts. Read the snippets, takes 2 seconds to adjust for AMD. Once done, run the Enable Nested VMs script via RUN IN BACKGROUND. It'll take about 5-10 seconds to run. click show log to verify that it was successful. Look for... Nested vms are enabled for intel cpus Script Finished blah blah blah Warning - if you have a Windows VM and AV on it, turning on these nesting settings can cause issues. My suggestion, turn off the AV for the vm. Download the GNS3 VMware workstation VM. (Yes, I know other posts have said download the virtual box one, but just humor me) Open the zip, extra the OVA file. Using Winrar or 7zip, open the OVA file, and extract the .vmdk files rename and remove any spaces out of the name of the vmdk files Login via ssh to your unraid box. I use mobaXterm to make this process easier as you'll need to get the domains folder and upload the .vmdk files we just extracted. path to the domains share Open your unraid gui and start creating an Ubuntu vm. Change your initial memory to whatever you think is best. I used 4096 for my box. Machine - Q35-2.12 Bios - SeaBIOS leave the rest the default. Make sure your Network Bridge is set (your VM needs an interface) Click Create, but do not start it. This will create the folder under the domains share. open the newly created folder in SSH (mine was GNS3), and then upload/scp files to this folder. Once these have been uploaded, we HAVE to convert them to raw. Yes, unraid does support vmdk, but in my experience over the past 48 hours has shown me, that not all things work the way they should. use these commands to convert them. Obviously, adjust your file names to what your files are named. qemu-img convert -f vmdk -O raw GNS3VM-disk1.vmdk GNS3VM-disk001.img qemu-img convert -f vmdk -O raw GNS3VM-disk2.vmdk GNS3VM-disk002.img This WILL expand the files... ALOT. Mine expanded to 117Gbits from 339MB. Thanks GNS3 for over killing the vmdk space :eyeroll: delete the other .img file that was created when you created the vm. Back in the Unraid gui, edit the newly created GNS3 vm. Primary vDisk Location - change to manual - path to your newly created disk001.img is (mine ended up being /mnt/user/domains/GNS3/GNS3VM-disk001.img) Add another vDisk location - change to manual - repeat - (/mnt/user/domains/GNS3/GNS3VM-disk002.img) Change BOTH of these to SATA. If you leave this as VirtIO, the vm will start to boot, but won't finish booting (the lizard will never get the bug) Once you change to SATA, save the changes and boot the vm, and connect to it via the VNC console. You might see an Ubuntu screen first, press enter and continue the boot. Voila! GNS3 vm has booted. However, it's might be complaining about KVM support (Nested Virtualization). Did you do Step 3? If GNS3 isn't complaining about KVM and it showing "KVM support available: True" then you're set to setup the network portion. Configure the network as you see fit. I personally statically assign all my vms, but if you have DHCP on your bridged network, it'll already have an IP. Finish that drink! P.S. Attached is my XML for this VM if you need to break it down for some reason. You'll need to reconfigure the GNS3 client app to use the VM. Open GNS3, edit, preferences, server, un-tick Enable local server, enter the IP of your GNS3 vm. I had to uncheck auth, but too tired to experiment anymore. Done. NOTE: If you've created any specific devices from templates... you'll probably have to recreate those as the devices you've saved were pointing a local VM (VMWare Workstation or Virtual Box). As a MIkrotik guy, this made me sad as I had 10 versions of RouterOS saved which had to be recreated. GNS3_XML.xml1 point
-
Clarifying that in the proxy conf. Thanks for the heads up: https://github.com/linuxserver/reverse-proxy-confs/pull/1081 point
-
Since bitwarden and bitwardenrs are 2 different things, perhaps adding the bitwardenrs.subdomain.conf.sample would be a better idea.1 point
-
Yes, no need to disable the disks, just remove and install new one, then select it from the drop-down box. No.1 point
-
Simplest to just always Go to Tools - Diagnostics and attach the complete Diagnostics zip file to your NEXT post.1 point
-
Update 2019.12.30 Happy new year! Commit #119 - MINOR ISSUE/BUG: Fixed dropdown list in "Tray Allocations" to show all custom colors. Only "Empty color" can be now chosen for resetting to default colors, for simplicity. @ICDeadPpl: this should simplify it for you1 point
-
Run iperf to check max lan bandwidth, issue is probably related to the powerline adapters.1 point
-
Install UD then install UD+ for the additional features it provides.1 point
-
Good catch, I'll have to add that to the readme in GitHub. Thanks.1 point
-
I personally just add the SMB shares via external storages. This is so that the user permissions on each share gets respected.1 point
-
I have split your posts from the other thread into this one. Please only use one thread for a particular issue. It is impossible to coordinate responses when you have multiple threads going. That is why crossposting has been considered a bad thing on message boards since before the World Wide Web.1 point
-
Never ever put your unraid server directly on the internet. That's what WireGuard or other VPN setups are for. Before you do anything, make sure you wont be exposing your server directly to the internet. Typical setups are using your own router where you can make adjustments to settings and then have your PC(s) and Server(s) setup to use DHCP from the router. If you want static ip addresses, that is accomplished by setting up Static DHCP entries on the router to map from MAC Address to IPV4.1 point
-
Noting ijuarez's comment directly above your own, a static IP address is often the best bet for your server. Unless your old router was running on (for example) a 192.168.1.x network and the new one is all 10.x.x.x, you may want to consider leaving the server where it was. But, it is your server.1 point
-
Favorite thing: has made it easy to DIY my server (mostly thanks to the awesome community) What I hope to see: UI improvements and responsiveness (for mobile)1 point
-
Love how many different services I can run on a single box. In 2020 I would love to see a mobile responsive web UI for easier administration from my phone. Happy to lend a helping hand to make that happen.1 point
-
I don't use your VM Backup App yet, but i've made a small donation all the same. Have a beer/coffee (or two?) on me Thanks for your hard work.1 point
-
I love the ability to add one drive at a time in unraid, and a feature I’d love to see is a native and secure remote access solution for outside the home.1 point
-
It’s a toss up between what I like most: 1: LimeTech is responsive to the community 2: the community is a fantastic support apparatus the thing I’d like to see added actually demonstrates the first point because it is going to be added: multiple cache polls! (Maybe I should say all ssd array instead?)1 point
-
You may find you'll end up using that memory if you spin up a few VMs etc. You can use your cache for VM image files and add an SSD later if you like. Ive started passing through entire SSD drives to my VMs, but I don'tr think it makes a whole lot of difference to performance. Just make sure you don't put the image files on the array.1 point
-
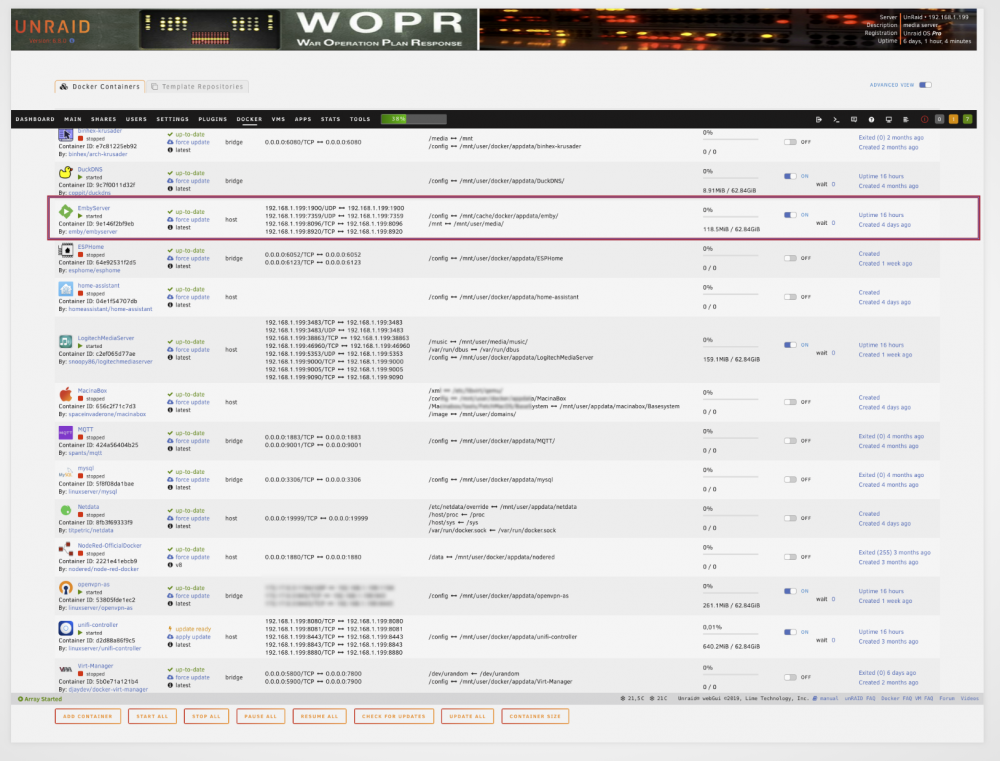
So, here's a few grabs of various metrics when I'm simultaneous streaming one 1080P movie and another 4K movie to different clients Thats with the load described above running as well. One caveat, it's entirely possible my clients are set to direct stream rather than transcode. Hope that helps. If you need any further information, testing or opinion, please don't hesitate to ask, I'll try my best to respond, time permitting., or someone else might chip in.

 1 point
 -
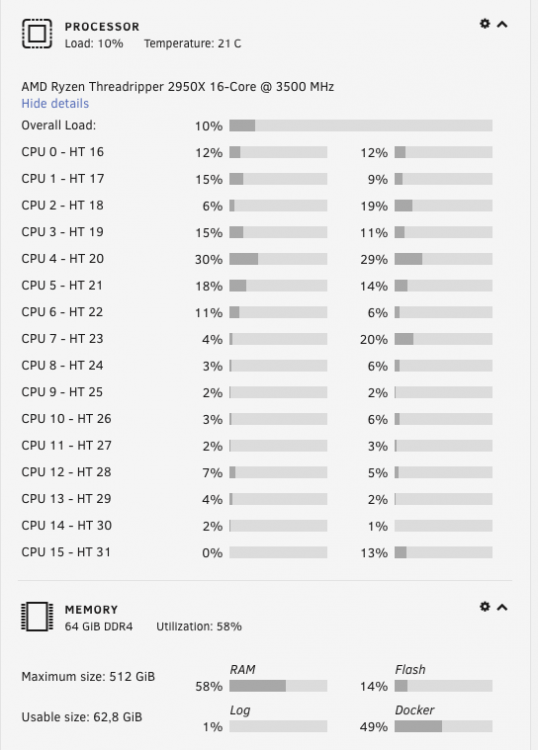
It would help if you could provide more information. How many simultaneous clients will access your Emby server? What kind of content will you be serving (audio only, SD video , HD video , UHD video)? Will you be using PVR capabilities or any other add ons? What transcoding expectations do you have? Will you be doing anything else with the server while expecting Emby to do its thing? Maybe with a bit more info, someone could help. All of the above will dictae any recommendations. I run Emby server and can have up to 2x simultaneous clients accessing anything up to UHD video. As it happens, I use the Emby plug-in for Kodi as my front end. The Emby Server runs in a Docker for me on a Threadripper 2950X system with 64GB RAM. The system handles handles 2x OSX VMs @ 16GB each, a couple of 8GB headless Win10 VMs and a bunch of other dockers. All of these run and can be in various states of use when Emby is accessed, so at worst, it's got to live in 16GB which it shares with the OS and other Dockers. The EmbyServer docker sits at ˜100MB memory when idle. I haven't measured its activity when accessed by clients but I will and report back for you. OK?
 1 point
 -
This still works. Instead of docker exec -it nextcloud bash you can use command docker-shell and you will get list of all Docker containers. Press corresponding number next to Nextcloud Docker and you will access Nextcloud shell. All other commands are still the same for this version of NC.1 point
-
This worked! I tried a few options, but found that PCIe ACS override being set to Multi function worked for me. Thanks for the help!1 point
-
Try the different options for ACS Override, like go through all 4 options, start with Disabled, Downstream, Multi-Function and Both. See if one of those settings get you a different result. (You're currently on Downstream) (Located in Settings --> VM Manager --> Advanced View)1 point
-
You made a typical new user mistake. You split 16GB RAM per VM and forget that Unraid itself needs memory to run. Cut it to 12GB / VM and then see if you can run both at the same time. Then slowly increase RAM until things crash then dial it back a little.1 point
-
No the method hasn't changed. You just need to move the line that says "menu default" to the section you want to be the "menu default".1 point
-
USB Card roundup for Windows 10 and High Sierra Virtual Machine Use 1st Card - AUKEY 4 Ports PCI-E To USB 3.0 Expansion Card Chipset: VL805 Findings: Got an error in my syslog during boot and card was unable to be used either natively in Linux or passed through to Windows or OSX VM 2nd Card - Anker Uspeed PCI-E to USB 3.0 2-Port Express Card Chipset: VL805 Findings: Got an error in my syslog during boot and card was unable to be used either natively in Linux or passed through to Windows or OSX VM 3rd Card - Sienoc USB3.0 7Port PCI Express Card Chipset: - Renesas D720201 Findings: Worked natively in Linux or passed through to Windows, but not detected by OSX VM 4th Card - Inateck KTU3FR-5O2I Chipset: Fresco FL1100 Findings: Worked natively in Linux, and worked beautifully in Windows or OSX VMs, able to use my hardware KVM switch with either, but unable to power my server off with the card plugged in, as soon as it powered off, it powered on again. @aptalca has had the same issue with a Fresco FL1100 card and we both have Supermicro motherboards. 5th Card - ORICO USB3.0 4 Port PCI Express to USB3.0 Host Controller Card (PME-4U) Chipset: Fresco FL1100 Findings: Worked natively in Linux, and worked beautifully in Windows or OSX VMs, able to use my hardware KVM switch with either, but unable to power my server off with the card plugged in, as soon as it powered off, it powered on again. @aptalca has had the same issue with a Fresco FL1100 card and we both have Supermicro motherboards. I ordered this one to try and exclude the possibility it was an inherent Inateck fault, but after testing this one, I think we can conclude there is an issue with the FL1100 chipset and Supermicro boards. 6th Card - KALEA-INFORMATIQUE Controller Card PCI Express (PCI-E) to 3.1 USB Chipset: Asmedia ASM1142 Findings: Success!! Works in Windows 10, works in OSX natively both, without installing extra drivers, allows my server to powerdown and stay down. Other possibilities: Well I'm running out of chipsets to try, only thing I could consider is an expensive Sonnet card which uses the Fresco FL1100 chipset but had four controllers on the card which can in theory be split amongst VMs so one controller to each VM. I don't hold out much hope this will actually work well given it's got four of the damned chips that won't let me powerdown in the first place. One other thing I did try was using the Renesas based chipset to boot from and passed through my native USB ports, that didn't work well. Not sure why, but I might investigate that a bit more if I have no other options. Conclusion If youi've got a Supermicro motherboard, then Asmedia ASM1142 based USB cards are the way to go, for any other motherboard, then either the Asmedia ASM1142 chipset or the more common Fresco Logic FL1100 based cards would be fine, but if you notice that you have issues with powering down, the card may well be the culprit and try an Asmedia card instead. It's been..... emotional1 point
-
I thought this might be a good FAQ entry, so created it: What is "Boot GUI mode", and how do I change to it? Feel free to edit it, or suggest changes.1 point
-
Those files are system activities from the dynamix system stats/activities addon. If you're going to run that you need at least 384 meg log filesystem. Theres posts and threads in the forums here that gives instructions on how to make it larger. Typically this is handled in modifying your go file.1 point