Leaderboard


Popular Content
Showing content with the highest reputation on 01/08/20 in Posts
-
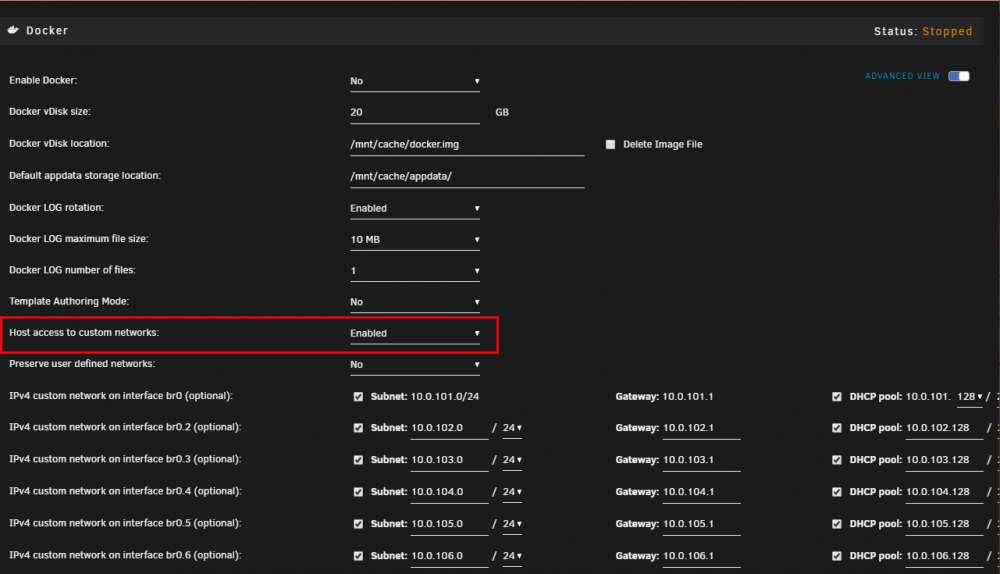
With Unraid containers may have either fixed addresses or dynamic addresses when used on a custom (macvlan) network. To ensure that "any" container can be accessed by the host, I took the approach as described in the blog, and modified it to the needs for Unraid. Instead of defining a subnet associated with the DHCP pool for containers, the complete macvlan subnet is split in two smaller subnets, e.g. a 1 x /24 becomes 2 x /25 and these subnets are used to set up a "shim" network which allows the host (Unraid) to access any container in the associated macvlan network. To make use of this feature it is a simple matter of enabling it in the Docker settings page (new setting which defaults to "disabled"). Now I can ping the container "Pi-hole" with (fixed) address 10.0.101.100 on custom network br0 root@vesta:/# ping 10.0.101.100 PING 10.0.101.100 (10.0.101.100) 56(84) bytes of data. 64 bytes from 10.0.101.100: icmp_seq=1 ttl=64 time=0.096 ms 64 bytes from 10.0.101.100: icmp_seq=2 ttl=64 time=0.040 ms 64 bytes from 10.0.101.100: icmp_seq=3 ttl=64 time=0.032 ms 64 bytes from 10.0.101.100: icmp_seq=4 ttl=64 time=0.020 ms And I can ping the container "Tautulli" with (dynamic) address 10.0.101.128 on custom network br0 root@vesta:/# ping 10.0.101.128 PING 10.0.101.128 (10.0.101.128) 56(84) bytes of data. 64 bytes from 10.0.101.128: icmp_seq=1 ttl=64 time=0.111 ms 64 bytes from 10.0.101.128: icmp_seq=2 ttl=64 time=0.032 ms 64 bytes from 10.0.101.128: icmp_seq=3 ttl=64 time=0.026 ms 64 bytes from 10.0.101.128: icmp_seq=4 ttl=64 time=0.024 ms There is ONE CAVEAT ... When remotely accessing a container on a custom network over a WireGuard tunnel, you MUST define a route on your router (gateway) which points back to the tunnel on the server. E.g. route 10.253.0.0/24 ==> 192.168.1.2 (Unraid server) This is required because it is not possible to use NAT between a custom network and a WG tunnel, since everything is handled internally on the server and never leaves the physical interface, hence NAT is never in the picture here.
 2 points
 -
Pulseway is a great tool that allows you to remotely monitor servers from iOS, Android, and the web. I mainly use it on iOS for the notifications about loss of network, high CPU usage or my server being shutdown. It was one of the few things I missed when I switched my server to unRAID. Luckily, I figured out how to get it installed and working. Here's the steps I took: 1. Download the Pulseway Agent for Slackware from Pulseway's website 2. Copy the pulseway_x64.txz to /boot/extra (this is also the flash smb share so flash/extra) 3. Create a new folder,pulseway, in the /boot directory 4. Reboot unRAID 5. SSH into server and copy config.xml.sample to config.xml: cp /etc/pulseway/config.xml.sample /etc/pulseway/config.xml 6. Edit the config.xml file you just copied, you'll need to add your Pulseway username/password and setup any notifications you want to receive (change the Enabled flag from False to True). I enabled Network interface monitoring (change interface name to br0) as well as WhenOffline, HighCpuUsage and MemoryLow notifications. 7. Start Pulseway service: /etc/rc.d/rc.pulseway start 8. Copy the id file generated by Pulseway to the /boot/pulseway directory (if you don't do this, the server will show up as a new machine in Pulseway every time unRAID boots): cp /var/pulseway/pulseway.id /boot/pulseway/pulseway.id 9. Copy your config file to /boot/pulseway cp /etc/pulseway/config.xml /boot/pulseway/config.xml 10. Add the following lines to /boot/config/go cp /boot/pulseway/config.xml /etc/pulseway/config.xml cp /boot/pulseway/pulseway.id /var/pulseway/pulseway.id /etc/rc.d/rc.pulseway start 11. Reboot unRAID and make sure everything works! Explanation: unRAID's OS is stored in RAM so any changes you make do not persist after a reboot/shutdown. That's why we need to move everything to the /boot drive (the flash drive unRAID boots from). On startup, we're installing Pulseway, copying the config and id files to their respective locations and then starting the service. Troubleshooting: If the Pulseway service fails to start, you can look in the syslog for clues as to why: cat /var/log/syslog | grep pulseway Typically, the problem is a misconfigured config.xml file Changelog 1/19/2021: Removed unneeded symlink commands1 point
-
I've created the first beta of a web-based array capacity calculator. I have no idea if such a thing already exists, but as a coder, I don't mind just making one myself. unraid.category5.tv <-- Click that link to launch the calculator. The system allows you to enter up to 21 drive capacities (based on the "fake" capacity shown by your drive manufacturer on the label - eg. 500 GB) and will tell you how much data storage space you'll have on your unRAID array. Currently, Parity is forced. However, as Parity is in fact optional for unRAID, I will inevitably add an ability to remove Parity. The calculator supports addition of a cache drive, and does all the math to give you real numbers with regards to your potential capacity (not the fake manufacturer numbers). While seasoned unRAID users understand the capacity, I thought this would be a great tool for people who are curious about unRAID, as it shows how much capacity you'll get (in reality) if you build an array with whatever hard drive specifications you provide. Hope you all enjoy. If you have feature requests, just let me know. I'm also perfectly happy to share the code if someone wants to play with it, although I'll keep hosting the "official" program at the url listed above, indefinitely. Regards, Robbie1 point
-
Is there a way to display temperature of gpus in our servers using a plugin like Dynamix System Temperature.1 point
-
Intent: This guide will take you through the process of passing through an entire PCI USB Controller instead of doing it individually. One benefit is that USB will be plug n play on your virtual machines. Also, I have found that if you pass through USB devices separately the device name could change which will cause the VM to not start, but if you pass through the entire controller you will avoid this. Warning!!!: Please be VERY careful when doing this. You do NOT want to pass through your unRAID USB by mistake. unRAID needs the USB present to function properly. Prerequisites: Working VM CPU and Bios that supports VT-d USB device (a spare USB Flash drive will work) Motherboard Manual or paper for notes Guide: 1. SSH into unRAID 2. Find out how many USB controllers your server has available lspci | grep USB Notice that my server has 3 USB controllers 3. Now would be a great time to pull out the Motherboard Manual to take notes on (see mine below). What we are going to do is plug in an USB flash drive in to each spare USB slot to figure out the controller. 4. First lets figure out which USB bus unRAID is on. lsusb Note that my unRAID USB is on bus 002 (figure out which USB that relates to on your motherboard manual and write that down). **THIS MEANS I SHOULD NOT PASS THROUGH BUS 002!!!** 5. Now take a spare USB flash drive that is preferably a different manufacture than your unRAID USB (this will make it easier to identify). Plug it into a spare USB slot and type lsusb into your ssh session and write down which "Bus 00#" the spare USB drive appears on. Repeat this step this for all your USB slots. 6. Now you should have identified every USB slot's bus number, so lets figure out which PCI Number the bus belongs to (for me I have 3 USB controllers (Bus 001, 002, & 003). Replace the USB# with your bus number example: bus 001 = usb1 in the below code readlink /sys/bus/usb/devices/usb1 readlink /sys/bus/usb/devices/usb2 readlink /sys/bus/usb/devices/usb3 7. We have just figured out the USB controller device number (In my server all Bus 001 USB slots are part of 0000:00:1a.0) 8. Now lets make sure that this USB controller doesn't have any other device in its IOMMU Groups Go to your unRAID gui -> Tools -> System Devices -> IOMMU Groups 9. Match the group with the device number. As you can see below, mine is part of group 5 and that is the only device on group 5. If you have more than one device in the same group you will most likly have to pass them through to your VM as well, YMMV /sys/kernel/iommu_groups/5/devices/0000:00:1a.0 As of unRAID 6.1 this step is no longer needed. unRAID does this for you automatically. 10. Now lets add that device number to the vfio-pci driver. Open your "go" file under config on your unRAID flash drive and add this line: /usr/local/sbin/vfio-bind 0000:00:1a.0 and then type the same code into your SSH session to make it active or reboot your server. 11. You can either do step 11.a or 11.b [11.b is the easier option] 11.a Now lets add that to your Windows 8 VM XML to passthrough: <domain type='kvm' id='2' xmlns:qemu='http://libvirt.org/schemas/domain/qemu/1.0'> <name>Windows-8-Nvidia</name> <uuid>cc411d70-4463-4db7-bf36-d364c0cdaa9d</uuid> <memory unit='KiB'>4194304</memory> <currentMemory unit='KiB'>4194304</currentMemory> <memoryBacking> <nosharepages/> <locked/> </memoryBacking> <vcpu placement='static'>2</vcpu> <resource> <partition>/machine</partition> </resource> <os> <type arch='x86_64' machine='pc-q35-2.1'>hvm</type> <boot dev='hd'/> <bootmenu enable='no'/> </os> <features> <acpi/> <apic/> <pae/> </features> <cpu mode='host-passthrough'> <topology sockets='2' cores='2' threads='1'/> </cpu> <clock offset='localtime'/> <on_poweroff>destroy</on_poweroff> <on_reboot>restart</on_reboot> <on_crash>destroy</on_crash> <devices> <emulator>/usr/bin/qemu-system-x86_64</emulator> <disk type='file' device='disk'> <driver name='qemu' type='raw'/> <source file='/mnt/vmdisk/vm_images/default/windows8.img'/> <backingStore/> <target dev='hda' bus='virtio'/> <alias name='virtio-disk0'/> <address type='pci' domain='0x0000' bus='0x02' slot='0x05' function='0x0'/> </disk> <controller type='scsi' index='0' model='virtio-scsi'> <alias name='scsi0'/> <address type='pci' domain='0x0000' bus='0x02' slot='0x03' function='0x0'/> </controller> <controller type='usb' index='0' model='ich9-ehci1'> <alias name='usb0'/> <address type='pci' domain='0x0000' bus='0x02' slot='0x01' function='0x7'/> </controller> <controller type='usb' index='0' model='ich9-uhci1'> <alias name='usb0'/> <master startport='0'/> <address type='pci' domain='0x0000' bus='0x02' slot='0x01' function='0x0' multifunction='on'/> </controller> <controller type='usb' index='0' model='ich9-uhci2'> <alias name='usb0'/> <master startport='2'/> <address type='pci' domain='0x0000' bus='0x02' slot='0x01' function='0x1'/> </controller> <controller type='usb' index='0' model='ich9-uhci3'> <alias name='usb0'/> <master startport='4'/> <address type='pci' domain='0x0000' bus='0x02' slot='0x01' function='0x2'/> </controller> <controller type='sata' index='0'> <alias name='sata0'/> <address type='pci' domain='0x0000' bus='0x00' slot='0x1f' function='0x2'/> </controller> <controller type='pci' index='0' model='pcie-root'> <alias name='pcie.0'/> </controller> <controller type='pci' index='1' model='dmi-to-pci-bridge'> <alias name='pci.1'/> <address type='pci' domain='0x0000' bus='0x00' slot='0x1e' function='0x0'/> </controller> <controller type='pci' index='2' model='pci-bridge'> <alias name='pci.2'/> <address type='pci' domain='0x0000' bus='0x01' slot='0x01' function='0x0'/> </controller> <interface type='bridge'> <mac address='52:54:00:00:00:04'/> <source bridge='br0'/> <target dev='vnet0'/> <model type='virtio'/> <alias name='net0'/> <address type='pci' domain='0x0000' bus='0x02' slot='0x02' function='0x0'/> </interface> <input type='tablet' bus='usb'> <alias name='input0'/> </input> <memballoon model='virtio'> <alias name='balloon0'/> <address type='pci' domain='0x0000' bus='0x02' slot='0x04' function='0x0'/> </memballoon> </devices> <qemu:commandline> <qemu:arg value='-device'/> <qemu:arg value='ioh3420,bus=pcie.0,addr=1c.0,multifunction=on,port=1,chassis=1,id=root.1'/> <qemu:arg value='-device'/> <qemu:arg value='vfio-pci,host=01:00.0,bus=root.1,addr=00.0,multifunction=on,x-vga=on'/> <qemu:arg value='-device'/> <qemu:arg value='vfio-pci,host=00:1a.0,bus=root.1,addr=00.1'/> </qemu:commandline> </domain> This part of the code is needed no matter what and you shouldn't have to change anything (see Hint #1 for more details): <qemu:commandline> <qemu:arg value='-device'/> <qemu:arg value='ioh3420,bus=pcie.0,addr=1c.0,multifunction=on,port=1,chassis=1,id=root.1'/> This part is my graphics card (yours will be different): <qemu:arg value='-device'/> <qemu:arg value='vfio-pci,host=01:00.0,bus=root.1,addr=00.0,multifunction=on,x-vga=on'/> This part is the code for the USB controller passthrough: <qemu:arg value='-device'/> <qemu:arg value='vfio-pci,host=00:1a.0,bus=root.1,addr=00.1'/> </qemu:commandline> HINT: #1 You MUST add the following right after <gemu:commandline> AND then you put in your code for the USB controller <qemu:arg value='-device'/> <qemu:arg value='ioh3420,bus=pcie.0,addr=1c.0,multifunction=on,port=1,chassis=1,id=root.1'/> Then add your USB code so when its all said and done it should look like this if you are only passing through an USB controller without a graphics card (if you are passing through a graphics card as well see my config in step 11 for that example): <qemu:arg value='-device'/> <qemu:arg value='ioh3420,bus=pcie.0,addr=1c.0,multifunction=on,port=1,chassis=1,id=root.1'/ <qemu:arg value='-device'/> <qemu:arg value='vfio-pci,host=00:1a.0,bus=root.1,addr=00.0'/> #2 If you are only passing through a USB controller and nothing else (GPU, etc.) then you need to modify your "addr=" part to "addr=00.0" Every PCI device you passthrough gets its own addr=00.# and it starts at 0. In my above code my GPU is 00.0 and my USB controller is 00.1 11.b Using Hostdev instead of the qemu:arg author=saarg link=topic=36768.msg430843#msg430843 date=1451775451 For me it's much easier to use the hostdev tag instead of the qemu:arg. It's just too much trouble with it when you don't know what you are doing. So for passing through a PCI(e) device with the hostdev tag this is the starting code: <hostdev mode='subsystem' type='pci' managed='yes'> <driver name='vfio'/> <source> <address domain='0x0000' bus='0x00' slot='0x00' function='0x0'/> </source> </hostdev> You then have to modify some parts of it to get it to work. The good thing is that you do not have to care about which bus and address it's supposed to have in the VM. You only need to find out the host PCI address. The part you change is bus, slot and function. In your case it's 00:14.0. Let's brake it down. 00 is the bus. You simply exchange the two numbers after the 0x. 14 is the slot. Same method as above. 0 is the function. Her it's also the same method as above. So in your case the full device tag would be like this: <hostdev mode='subsystem' type='pci' managed='yes'> <driver name='vfio'/> <source> <address domain='0x0000' bus='0x00' slot='0x14' function='0x0'/> </source> </hostdev> After you start the VM you will see that there are some lines added to the tag, but those you don't have to care about. They get created automatically. If you copy a host device tag to pass through a new device, be sure to remove the two lines created after the </source> tag, as they are specific to that VM. <alias name='hostdev2'/> <address type='pci' domain='0x0000' bus='0x00' slot='0x08' function='0x0'/> 12. All done. What if you only have 1 bus... To my knowledge there are two paths; I will post what JonP posted HERE below (I revised what Jon said a bit to make sense in this thread): The Easy Path The Time Consuming Path1 point
-
To install this release, navigate to Tools/Update OS and select the Next branch. This release fixes an issue with entering encryption passphrase via webGUI. In addition, we updated libvirt and qemu to latest versions where bugs which caused us to revert to previous versions appear to be fixed. For these reasons, I want to have a brief pre-release for wider testing before publishing to stable branch. Bugs: If you discover a bug or other issue in this release, please open a Stable Releases Bug Report. Version 6.8.1-rc1 2020-01-06 Base distro: kernel_firmware: version 20191118_e8a0f4c (with additional Intel BT firmware) libvirt: version 5.10.0 php: version 7.3.13 (CVE-2019-11044 CVE-2019-11045 CVE-2019-11046 CVE-2019-11047 CVE-2019-11049 CVE-2019-11050) qemu: version 4.2.0 samba: version 4.11.4 wireguard-tools: version 1.0.20191226 Linux kernel: version 4.19.93 CONFIG_THUNDERBOLT: Thunderbolt support CONFIG_INTEL_WMI_THUNDERBOLT: Intel WMI thunderbolt force power driver CONFIG_THUNDERBOLT_NET: Networking over Thunderbolt cable oot: Highpoint rr3740a: version v1.19.0_19_04_04 oot: Highpoint r750: version v1.2.11-18_06_26 [restored] oot: wireguard: version 0.0.20191226 Management: add cache-busting params for noVNC url assets fix cryptsetup passphrase truncation network: disable IPv6 for an interface when its settings is "IPv4 only". webgui: Management page: fixed typos in help text webgui: VM settings: fixed Apply button sometimes not working webgui: Dashboard: display CPU load full width when no HT webgui: Docker: show 'up-to-date' when status is unknown webgui: Fixed: handle race condition when updating share access rights in Edit User webgui: Docker: allow to set container port for custom bridge networks webgui: Better support for custom themes (not perfect yet) webgui: Dashboard: adjusted table positioning webgui: Add user name and user description verification webgui: Edit User: fix share access assignments webgui: Management page: remove UPnP conditional setting webgui: Escape shell arg when logging csrf mismatch1 point
-
This setting has no effect when talking to custom (macvlan) networks, but it is used when talking to other devices in your LAN network. With NAT enabled, all other devices in your LAN "think" they are talking to the server instead of the WG tunnel and hence don't require additional routing. Yes, I need to make that clearer in the WG configuration page. Not done yet.1 point
-
Use the "Brave" browser1 point
-
This was discussed recently on the support thread you should have been using all along instead of creating this new thread. You can go directly to the correct support thread for any of your dockers by clicking on its icon in the Unraid webUI and selecting Support. Here is a link to the relevant portion of that thread that was recently posted: https://forums.unraid.net/topic/40463-support-linuxserverio-plex-media-server/?do=findComment&comment=807818 You can read the posts leading up to that post also for some context. Not sure how much of it applies to you, but the main thing it illustrates is that you have database corruption as demonstrated by the logs shown in that post.1 point
-
I don't believe this is the case. If you have IOMMU set up correctly, the two (or more) devices should split out into distinct groups. We'll soon find out as I'll be purchasing the hardware in the coming weeks - keep an eye on my blog as I'll be writing up details there. Its great to hear your experience has been good so far. I've been using unRaid since v4.x and find these forums some of the most civil and helpful around.1 point
-
"vers=v1.0" in the mount command (on Linux, i don't know how it handled in windows)1 point
-
I have managed to pass through my nics by editing the hostdev address type like described here: Maybe you could try this.1 point
-
I have not managed to get it sorted yet, but you could try this. If you have any luck post your results. Good luck1 point
-
ownCloud documentation: https://doc.owncloud.com/server/10.2/admin_manual/installation/apps/mediaviewer/1 point
-
I bet a beer the answer is Soon™. 😅1 point
-
I've been messing with this for a while and have had a few ideas and experiments. (there are, of course, commercially available solutions, but where's the fun in that?) The main challenge is getting controller and power to the external system. One of the first attempts I had was utilising an external chassis not for additional drives but for PCI/PCIe expansion as I was running out of slots. One of the best investments I've made for my system is a Startech Expansion System which converts a single x1 PCIe into 2x PCIe slots and 2x PCI slots. I have a blog post here that discusses externalising this to a secondary chassis (having cannibalised the internals of the unit and mounted it in an external case); https://mediaserver8.blogspot.com/2014/09/thinking-outside-box.html I no longer use the unit in this way as I've updated my main system chassis and now have the room to internalise this expansion again, but the principle is a sound one. You can see how a like this, or similar, could be used to get the controller relocated to the external system,. (Magma make PCI/PCIe expansion systems as well, but they are expensive) I have another post here that outlines how this externalised solution was leveraged to include hard drives via either a PCIe adapter in the expansion unit or a simple SATA backplate to which I can run cables from the main system. (forgive the spaghetti cabling, this was proof of concept stuff!) The above is all old, but offers insights into some thinking and directions. My current X9 case has lots of space for expanding drives, but if I ever run out, I could re-deploy do something similar. Though I'd likely do it via a SAS expander for my LSI controller. The other challenge is power. You could run one or more cables from you PSU to the external chassis, but an altogether better solution would be to include a dedicated PSU. You could link this to your main system using a power supply sync module. This will allow your secondary PSU to power up when you sieth on your main system. With these solutions, you're going to have at least two if not more cables connecting your two systems. The much more expansive commercial solutions are, of course, much tidier. Connect up a thunderbolt cable and you're done. However, with SIY, you can spend all the saved cash on drives! Also, if you look at stackable cases, you can make everything very neat by running the cables internally. Just some food for thought!1 point
-
If there's no data there you can do a new config and re-sync parity: https://wiki.unraid.net/Shrink_array1 point
-
I assume your referring to migrating bitwarden. Yes you can remove your existing container, don't delete your appdata. Then add the new one from CA and point it to your existing appdata. This worked for me anyway!1 point
-
If you have a good and current backup of your flash drive, you can always get everything back by preparing a new install to the same or different flash drive, and copy the config folder from your backup. Everything about your configuration is in that config folder.1 point
-
You can install the NerdPack Gui. Once installed, install the sg3_utils software. When thats done, issue the following: This scans the bus and reports back ALL devices connected. Identify the drive you want to convert / format. # sg_scan -i /dev/sg8: scsi6 channel=0 id=7 lun=0 NETAPP X287_S15K5288A15 NA00 [rmb=0 cmdq=1 pqual=0 pdev=0x0] /dev/sg9: scsi6 channel=0 id=8 lun=0 NETAPP X287_S15K5288A15 NA00 [rmb=0 cmdq=1 pqual=0 pdev=0x0] For this example, we will select the first drive. # sg_format --format --size=512 /dev/sg8 NETAPP X287_S15K5288A15 NA00 peripheral_type: disk [0x0] Mode Sense (block descriptor) data, prior to changes: Number of blocks=573653847 [0x22314357] Block size=520 [0x208] A FORMAT will commence in 10 seconds ALL data on /dev/sg8 will be DESTROYED Press control-C to abort Now sit back and wait until it is complete - will take some time. If you want to do multiple drives from the same box, you can either install screen (using the NerdPack GUI) and do them each individually AND log out of your computer or do them all on the same screen and simply lock it. Have fun.1 point
-
I'll look into port share. It sounds like it might be useful1 point
-
@limetech I've just re-read your release plan as I was confused with this release not being in the kernel 5 series. I now understand that has been flagged for 6.9 rather than 6.8.1. Indicatively, can you advise if 6.9 is intended to be a more distant target e.g. 1+ years or something sooner? Thanks.1 point
-
The normal recommendations are a USB2 drive and if possible use a USB2 port as they seem to be more reliable, and Unraid gains no perceptible performance gain from USB3 as it runs from RAM. 16GB is plenty of space.1 point
-
Posting this just incase anybody else comes here looking for a solution to this. I ran into this issue this evening when trying to pass through a pcie usb card. The reason this happened was that I had the items plugged into the usb hub previously passed through, but when you reboot the server after altering your system file, they are still in the xml. I fixed this by doing the following: 1. Remove the usb items from the card and place them into another slot. 2. Reload the vm template. 3. Uncheck the previously loaded items. 4. Save the template. 5. Re-enable your newly configured card 6. Save the template again.1 point
-
@smittyuk Glad I could give something back. The `paperless` image referenced in the official CA template is BTW outdated (also mentioned by @spacecops). The project is now driven by its community (See: https://github.com/the-paperless-project/paperless/issues/470). Use the up-to-date image `thepaperlessproject/paperless` instead. I already proposed the change for the docker template in the UnRaid repository. Change should be on the way. In the meantime you can just stop your container and replace the image and click apply.1 point
-
With the information from this thread I successfully installed paperless today on my unRaid server. Thanks to @speedyg213 for the wrap-up. Let me briefly summarize the steps to install paperless with the new paperless CA template from 9th Nov 2019. I decided to use NFS mounts also for the consumer folder. So I had to adapt the commands slightly: 1. Create a NFS share with subfolder (e.g. media/ consume/ and data/) 2. Install paperless as web server from CA 2.1. Configure the NFS mounts for media/ consume/ and data/ created in step 1 2.2 Define PAPERLESS_OCR_LANGUAGES (in my case: "eng deu") 3. Login to the paperless container via the unRaid web-interface and issue the following command: "./manage.py createsuperuser". Follow the instructions to create the paperless user 4. Install paperless as consumer service in order to process documents in your /consume folder 4.1 Go to the docker UI, click add container and select the paperless template 4.2 Rename the container to "paperless-consumer" 4.3 Remove the port 4.4 Change the parameter "postargument" to "document_consumer --no-inotify --loop-time 60". This will start the consumer service with a 60 seconds time loop. It also disables the inotify feature, which does not work with consumer/ folders represented as NFS shares. Now you should be also to place a document in your /consume folder of your NFS share and recognize it being imported to paperless. Have a nice weekend everybody! Questions are welcome. ----- Edit ---- I also want to share my scanning workflow with Paperless and Nextcloud with you guys (See https://blog.kilian.io/paperless/ as reference). With the app ScannerPro, I can upload my scanned files to a Nextcloud folder via WebDav. This folder functions as paperless consume folder and grabs the files and imports them to paperless. Following steps required for the setup: 1. Mount the paperless /consume folder in the Nextcloud docker container via unRaids Docker template editor 2. Enable the external storage app as Nextcloud admin. The app can be found in the apps dropdown hidden in disabled apps. 3. Add the mounted consume/ folder as local storage for your Nextcloud user with name paperless-consume (Settings -> External Storage) 4. Configure the Nextcloud paperless-consume folder as WebDav target in your scan app1 point
-
I'm sorry to hear that and I hope someone can help you out. My issue has completely stopped, and I have been lucky to not encounter any issues at all since my update to v6.8.0.1 point
-
When I get a chance to compile it, I'll update1 point
-
8 arms, 2 tentacles
 1 point
 -
For those still having issues, download the latest version of Pulseway for Slackware. As of Pulseway 6.1, they added support for newer libssl, which seems to have fixed issues. May have to update your symlinks, as well.1 point
-
From your last screenshot, scroll down to see the "storage" folder.1 point
-
Yes they are. You are welcome!1 point
-
1 point
-
Just thought i'd give a quick update, in case anyone else in the future hits this issue... After reading about the kernel issue, I first tried updating my BIOS as my motherboard shipped with a pretty old version. This didn't make any difference. From the description of the kernel issue, it talks about it only happening when Spread Spectrum is enabled, for which my motherboard supported being manually disabled. After I did this though, I unfortunately still found that the clock would drift. There is however a linked (dupe) issue here which suggested another workaround: https://bugzilla.kernel.org/show_bug.cgi?id=198137 I was able to follow these steps, and resolve the clock drift: /etc/rc.d/rc.ntpd stop sudo adjtimex -p ** The tick parameter shows set to 10000 sudo adjtimex -c ** Shows a correct tick value of 10400 (ie.. +4% adjustment) audo adjtimex --tick 10400 sudo adjtimex -p ** Now checking the command-line "date" to the wall clock shows no appreciable drift over a few minutes. /etc/rc.d/rc.ntpd start My server has been running the full day without any noticeable drift. I'm sure that after i reboot, it may lose the adjtimex value and if so, i'll have to look at how to add it to my /config/go. Will keep an eye out for Unraid updates which include any kernel patches for this bug, and test them.1 point