Leaderboard


Popular Content
Showing content with the highest reputation on 02/15/20 in all areas
-
Something else I wanted to add, as long as we're talking about security measures in the pipe: we are looking at integrating various 2-Factor solutions directly in Unraid OS, such as google authenticator.5 points
-
Please make 2FA an optional feature. My server is not exposed to the Internet so there's really no need for extra security. It would be a massive pain in the backside having to grab my phone just to check if a docker has crashed.3 points
-
Wow. You would have either just installed Fix Common Problems, or just updated from unRaid 6.5, or been ignoring this message from FCP for quite a while, as it was previously marked as being incompatible, and has quite a number of side effects (which you're noticing) on unRaid 6.6+ Either way, you solution is to delete /config/plugins/advanced.buttons.plg from the flash drive and then reboot the server2 points
-
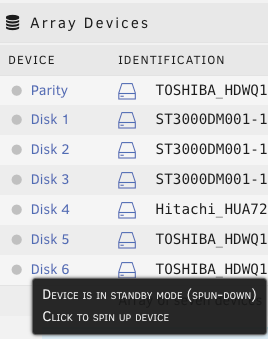
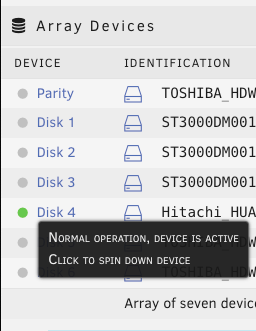
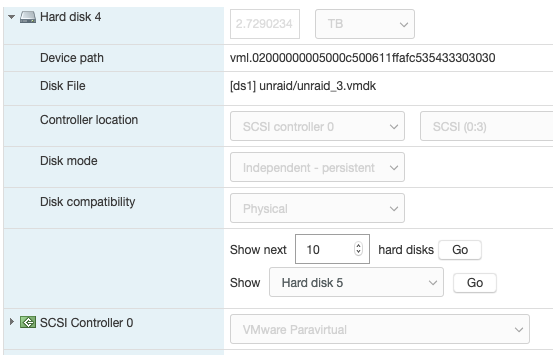
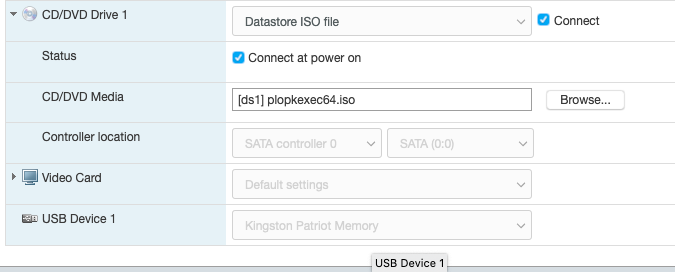
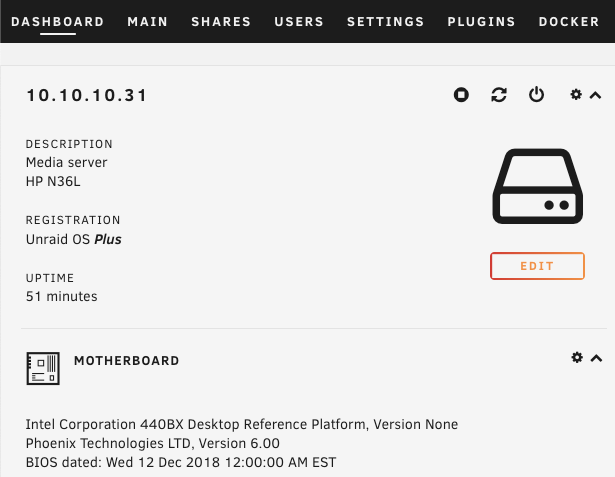
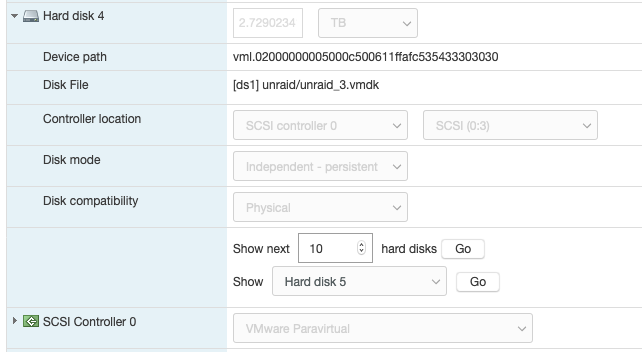
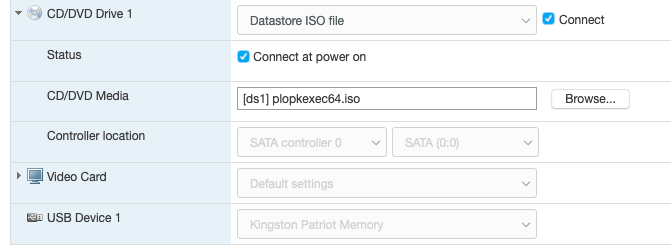
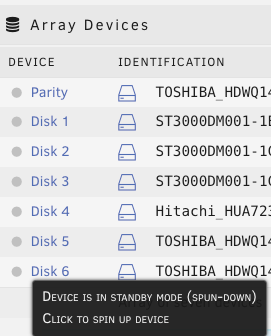
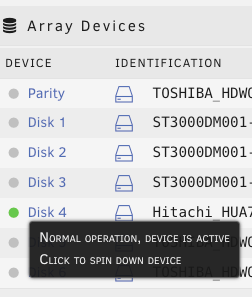
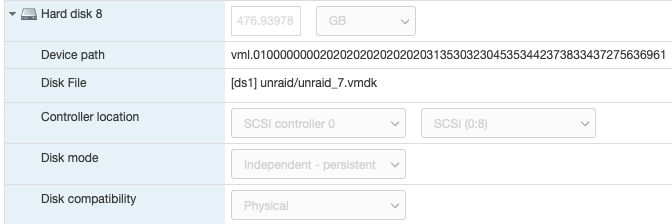
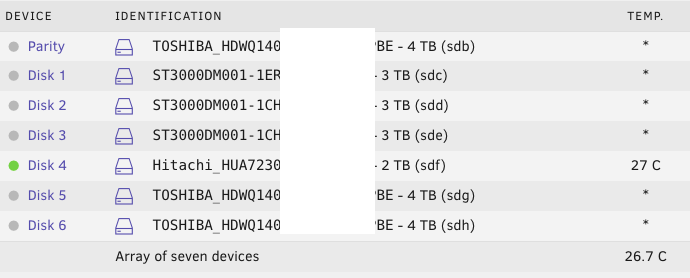
Just wanted to share my recent experience migrating from physical server to ESXi for unraid. It took me quite significant time gathering and reading tips/documents on the internet before making the move. My hesitation was whether unraid really need "hw-passthrough" or "disk RDM" is sufficient. From what I have experienced .. as long your CPU support virtualization then it is enough to jump on the virtualization wagon. I hope this will help others that wanted to move to ESXi and does not want to upgrade their Motherboard to passthrough/iommu capable. Physical setup: Unraid v6.8.1 Motherboard M5A78L-M-PLUS-USB3 CPU AMD FX8320E LSI 9207-8i [in hba/IT mode] 1x SSD for cache disk 7x HDD Powersupply 380W unraid license on 4GB usb stick New ESXi setup: ESXi v6.7-U3 - reuse all the hw from above Motherboard M5A78L-M-PLUS-USB3 have to add Realtek ethernet driver [https://vibsdepot.v-front.de/wiki/index.php/List_of_currently_available_ESXi_packages] I cannot passthru LSI 9207-8i as the motherboard does not support iommu Verify that in unraid vm settings, SCSI Controller 0 = "VMware Paravirtual" - this is important so the HDD Serial Number can be passthru to unraid (otherwise you will need to rebuilt your parity disk) 7x HDD connect to LSI 9207-81 and configure them as RDM directly from ESXi a. esxi > VM > Edit Settings > Add harddisk > New Raw disk > b. on the "Hard disk" setting .. configure: Controller location = "SCSI Controller 0" and Disk Compatibility = Physical and Disk Mode = "Independent - persistent" for the Cache drive - SSD, I connect it to the motherboard SATA port. There is a known issue with LSI 9207-8i not supporting TRIM (unless LSI downgraded to fw P16). use this link to passthrough the indvidual SSD drive to unraid as RDM - [https://gist.github.com/Hengjie/1520114890bebe8f805d337af4b3a064]. I cannot use the method i use for the HDD. use plopkexec iso to boot unraid via the usb stick (so I can keep the license) - download here https://www.plop.at/en/plopkexec/download.html - choose "all precompiled versions, 32/64 bit, EFI, ISO." extract the tar and copy the iso to your ESXi datastore. back to the VM edit settings > CD/DVD Drive 1 > Datastore ISO file > CD/DVD Media = plopkexec64.iso also set your VM to boot to BIOS and change the boot device to CD/DVD passthrough your unraid usb stick by adding a new USB device download unraid specific vmwaretool from appspace "openVMTools_compiled" after you have successfully boot your unraid Result: after reboot, plopkexec will auto search for usb device and boot from it if you use SCSI Paravirtual, the disks will reallign as the serial numbers got passthru as-is as before remember to install "openVMTools_compiled" upgraded unraid to v6.8.2 and it finished successfully on unraid Main page, SMART and spin up/down are reflected correctly. I am glad I made the change to ESXi .. a better use of the FX8320 cpu ==== Some screenshot of the configuration ==== HDD RDM and SCSI controller setting: SSD rdm: Plopkexec and USB stick passthru: Unraid dashboard: Disk spun down: Disk spun up: Temp work for the HDD on LSI: Though Temp is not working for cache SSD that passthrough via MB sata port:

 2 points
 -
I just purchased the following combo: ASRock E3C246D4U motherboard (best current price - $280 @ Newegg) Intel Xeon E-2288G CPU (best current price $600 but the E-2278G is in stock @ Provantage for $483) 64GB (2x32GB) ECC UDIMM DDR4 RAM (very hard to find and prices have shot up recently, best in stock price ($496 - 2x $248) Samsung 256GB NVMe SSD (best price $70 @ Newegg) Total price at retail - $1329 with an E-2278G, $1446 with the E-2288G For $1099 it was a steal of a deal (see link in previous post, he has one combo left as of this post). It should already have the BIOS for iGPU support simultaneous with the HTML5 IPMI. Should be in late next week. I'll let you know how it goes.1 point
-
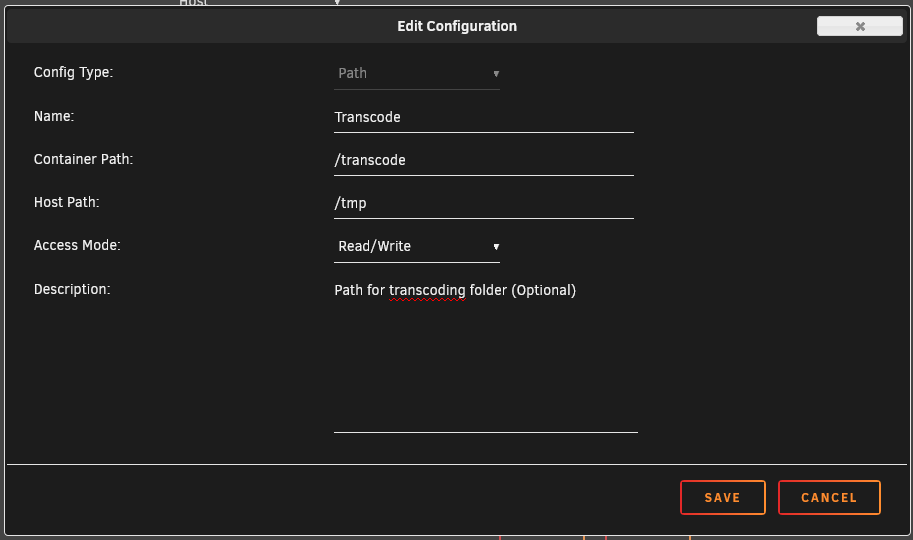
Unassigned disks need to be mounted in RW/Slave mode; /tmp does not. You probably never changed this setting in the docker edit screen configuration of the volume mapping and still have access mode set to RW/Slave instead of Read/Write.
 1 point
 -
I just updated to 6.8.2 from 6.8.1 and the server is booting up to some unknown IP Address of 169.264.246.72. My network is in the 10.168.192.x range so I don't know where it is getting the IP address instead of from my DHCP. This means I cannot access the server via GUI. I am using IPMI remote console to access the console.1 point
-
+1 for Authy. I learnt this lesson when I got a new device and had to transfer my Google Auth settings across. You can't with google Auth! As an aside, for the not so tech savvy that this appliance seems to be aimed at, having two factor and at least 'highly recommending' it when people insist on exposing unraid to the internet, would be a very good improvement.1 point
-
Turn on the help menu and you’ll see that notifications and fan control must both be stopped before you can change settings for network control via ipmi. You should also know that this isn’t needed if you are accessing a board on the local host.1 point
-
This is a solid feature and I can attest to the importance of it. TOTP can be used with Google Auth, but I would strongly recommend Authy as it allows backing up the seeds and encrypting it. There is also multi-device support. Can we have TOTP for SSH as well? https://github.com/google/google-authenticator-libpam . NOTE: This will obviously have impact on 'not-so-tech-savvy-users', but those who sleep in tinfoil hats, will definitely appreciate it.1 point
-
In case anyone else has these same issues in the future, the changes discussed above seems to have done the trick. My system has been running stable for a week now, no signs of any problems. To sum it up, what I did was follow the suggestions by the user Marshy in the thread linked above: - Set the RAM speed to 2666Mhz - Disable global c-states - Set Power Supply Idle Control to Typical I'm guessing the latter two didn't have anything to do with the ECC errors, but a lot of people seems to be reporting better system stability with those settings.1 point
-
Your idea about XFS repair is probably not going to help. Rebuilding the disk from the correct parity and other disks assigned as they were the last time parity was correct is going to be the best hope. It might be useful to use one of those new disks for the rebuild though and keep the original disk2 in reserve in case anything can be recovered from it. Give us a while to study this new information and see what we can come up with.1 point
-
Disk1 is mounting correctly on the diags posted, you do have a corrupt docker image, you need to re-create it.1 point
-
Don't worry I brought my stash with me 💥1 point
-
I think I'll run some iperf tests and post back here. I must be able to get an iperf docker and reconfigure it to different bridge networks to test it.1 point
-
While nothing is going to be blazingly fast copying from disk to disk, this method is definitely faster than working with the krusader container. Also, copying is going to be significantly faster than moving, because copying only involves writing to 1 disk + parity, moving involves writing to 2 disks and the thrashing involved as parity has to update for both written disks. Plus, when you copy, you can remove the smaller disks with the data intact as a good backup in case something happens.1 point
-
Maybe I'm old school, but I've used midnight commander and screen to do stuff like this several times in the past and it works great.1 point
-
This is typically caused by windows brain dead behaviour. Once access is granted, no attempts to use updated credentials will be made, despite windows asking for new credentials. So, you MUST access the most restrictive share first, if windows opens a public share first it's game over. Try setting ALL your shares to private, to force windows to use the correct credentials initially.1 point
-
I would always run xfs_repair without the -L option first, and only destroy the journal if xfs_repair tells you that there's no other option. You got a corrupt file system and fixed it. It happens occasionally even if you're careful. The best way to try to avoid it happening again is to avoid unclean shutdowns so, if you haven't got one already, consider getting a UPS.1 point
-
I haven't "danced" around anything, sorry if it appears like that. How does this apply in an Unraid server environment? Yes this is something we're looking at. why? why? There is only one user: root You can set file permissions however you want using standard linux command line tools. Again, what are you trying to accomplish? We do have plans to introduce the idea of multiple admin users with various roles they can take on within the Management Utility. For example, maybe you create a user named "Larry" who only has access to the Shares page with ability to browse shares only they have access to. However this functionality is not high on the list of features we want/need to implement. Earlier you were confused by my term "appliance". What this means is the server has a single user that can manage the box. If you don't have the root user password, all you can do is access shares on the network that you have permission for, and access Docker webUI's - but most of these have their own login mechanism. Things like the flash share exported by default, new shares public by default, telnet enabled by default, SMBv1 enabled by default, etc. are all simplifications to reduce frustration by new users. Nothing more frustrating that creating a share and then getting "You do not have permission..." when trying to browse your new share. We are trying to reduce the swearing and kicking of dogs by new users just trying to use the server. Eventually everyone needs to be more security conscious - and in that spirit we are working on "wizards" that will guide a user to setting up the correct settings for their needs. I hope this starts to answer some questions and sorry if I came across flippant to your concerns, but trust me, security is a foremost concern and to have someone imply otherwise ticks me off to be honest.1 point
-
Uhm... I feel like you are evading the question. With the tunnel vision of "Running as non-root would not have prevented this vulnerability" then yes the attacker would still have been able to bypass your authentication, and do arbitrary code execution. The big issue is that since the server is running as root, well he basically have unrestricted root/superuser access. Had the process been in a group with less permissions, further exploiting and privilege escalation would be needed to pwn the server... Throwing the core UNIX discretionary access control, and its extensions out the window is mind-boggling at best. "Unraid is an appliance" what does that even mean in this context? Regarding the blog post, it aids getting the best out of the current state of unraid security. It does nothing in addressing the essence of the original request; Namely is limetech ever going to implement DAC, MAC, SELinux, sudo, and file permissions, etc. - or should we move to another Linux implementation that does? I hate to do this, but it's done with tough love and in the interest of the average Unraid user. 3 years ago, you said "We take security very seriously" in a response to "I guess spending time adding eye-candy and stuff like that is more profitable than mundane security stuff, which is a very short-sighted approach." You have now hired a full-time web developer, with design and marketing experience. While arguably nothing has been done to effectively improve security at the core.1 point
-
I'm in the admin panel and can't get it it to send me an email invite. My email is gmail and I've tried numerous settings but I never get an email.1 point
-
I just resolved my issue. From the dockers console I ran the following commands which allowed me to login. /usr/local/openvpn_as/scripts/sacli --key "vpn.server.daemon.enable" --value "false" ConfigPut /usr/local/openvpn_as/scripts/sacli --key "vpn.daemon.0.listen.protocol" --value "tcp" ConfigPut /usr/local/openvpn_as/scripts/sacli --key "vpn.server.port_share.enable" --value "true" ConfigPut /usr/local/openvpn_as/scripts/sacli start1 point
-
Yes, my Cisco SG350 switch supports 802.3ad. It has always worked prior to 6.8.1 and it is working now after I ran the command inet restart after the server boots. Starting with 6.8.1, I started having problems with the server not acquiring an IP address during boot. Actually with 6.8.1, it happened the first reboot after updating. Then it worked when I rebooted the server again. Now with 6.8.2, the server does not obtain an IP address during the boot process at all. Could it be a timing issue and the boot process does not allow enough time to obtain an IP address before defaulting to the 169.x.x.x? Something starting with 6.8.1 that is giving me this problem. I would rather not have to change the bonding protocol because I do not want to mess with my switch LAG configuration since my current bonding setup has been working flawlessly for years.1 point
-
I am trying to set up open vpn for the first time but whenever i try and access the WebUI it says the site cannot be reached. I am following space invader ones tuorial and followed his steps but cannot get it to open. Anything im missing1 point
-
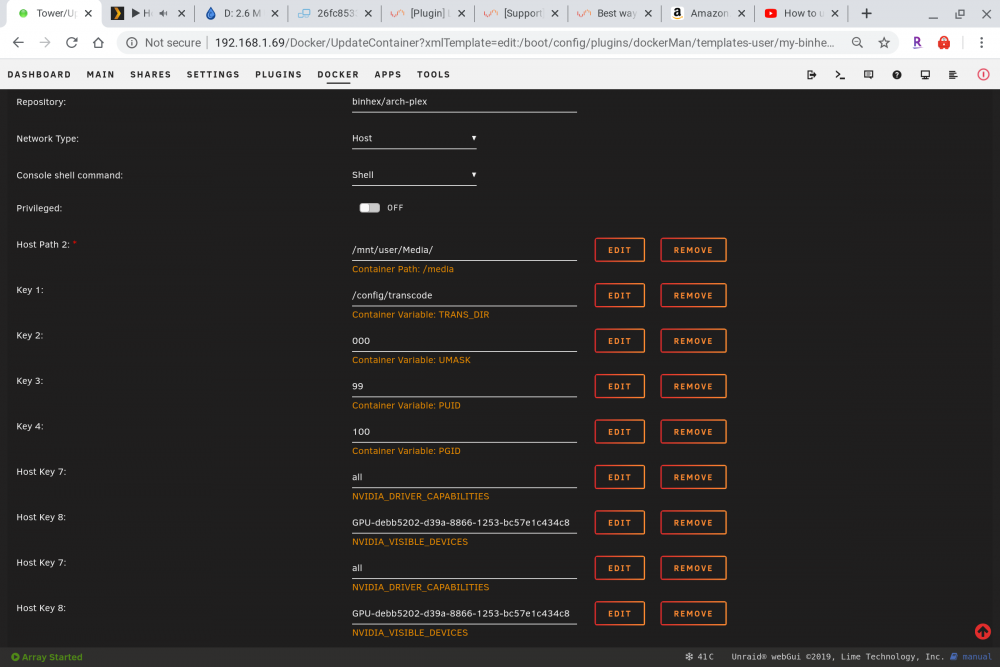
For those who may be experiencing the same issue with the binhex container, I have found a solution. For some dumb reason that I can't explain, you have to enter both variable twice. I added them both twice and now it works. Thinking maybe I messed up the first time, I deleted the first set of variables, leaving only one set. After doing that, the hardware transcoding stopped working again. Then I added back the second identical set of variables, and it works again. I can't explain it, but there it is.... Edit: Ignore the above post. It was pointed out to me that there may be a hidden space from copy/paste. After examining the run command I found that to be the case. Re-did it by typing instead of copy/paste and now it works as expected.
 1 point
 -
You're welcome. Make sure this area of your config.php looks like this. 'trusted_domains' => array ( 0 => 'unRAIDIP:NextcloudPort', 1 => 'nextcloud.server.com', ), 'trusted_proxies' => array('unRAIDIP'), 'forwarded_for_headers' => array('HTTP_X_FORWARDED_FOR'), 'dbtype' => 'mysql', 'version' => '18.0.0.10', 'overwrite.cli.url' => 'https://nextcloud.server.com', 'overwritehost' => 'nextcloud.server.com', 'overwriteprotocol' => 'https',1 point
-
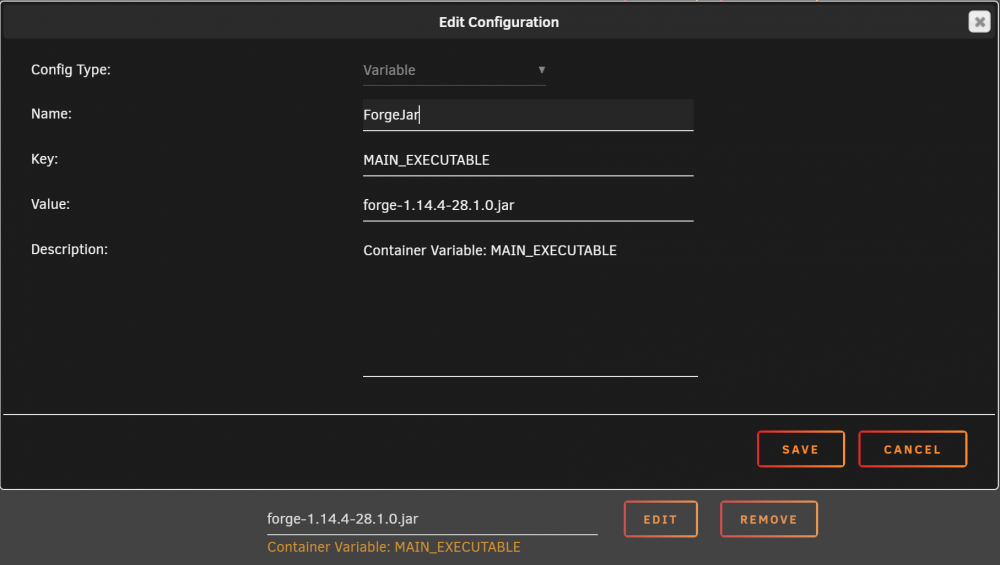
I started understanding how to put this all together and wanted to throw some info out there for those that need it. First of all, I would recommend that if you are going to use the Vanilla version of MC (what binhex has provided) make sure the docker not running browse out to your appdata\binhex-minecraftserver\minecraft folder edit the server.properties file with notepad++ (I'm using Windows for all of this) Change the following settings if you like: difficulty=[easy|hard] gamemode=[creative|adventure|survival] force-gamemode=[true|false] level-name=world <=== This is the folder name all your game data is saved into motd=Logon Message <=== Message displayed when you log into the server from a MC client Now, if you are like me, you want to use Forge or Bukkit. In this case create a folder on your C:\ drive called "Minecraft" download the minecraft server file from HERE, and place it into C:\Minecraft (believe it's called 'minecraft_server.1.14.4.jar') double-click the file, and wait for a minute as it downloads some MC server files. When it stops, edit the EULA.txt file, and change the line inside from false to true eula=true Double-click on the minecraft_server.1.14.4.jar file again and wait for it to finish type in "/stop". This will kill the minecraft server. Download forge for the version of MC server you just downloaded (You want the INSTALLER button in the recommended box on the site) Place this file (forge-1.14.4-28.1.0.jar) in C:\Minecraft Double click on this file. Select SERVER and change the path to C:\Minecraft Let it perform its magic Once finished, again, shut it down with "/stop" Now copy the contents of C:\Minecraft to appdata\binhex-minecraftserver\minecraft Delete the file appdata\binhex-minecraftserver\perms.txt (this will restore the default permissions to the files you copied over) In Unraid, edit the docker and create a new variable Click SAVE and then APPLY/DONE Fire up the docker This will use the forge jar file within the docker container, instead of the vanilla jar file. From this point, if you want to add resource packs or mods, you can download them and install into the "mods" or "resourcepacks" folder as necessary. These folders may need to be created. A good mod to verify that your server is working is FastLeafDecay-Mod-1.14.4.jar. You can find it HERE. Chop a tree down and it should dissolve a lot quicker than normal. I would also recommend adding one or two mods at a time and testing. Let me know if you'd like more details on the above.
 1 point
 -
if anyone have the resolve "/.well-known/caldav warning here is how i fix it go to you letsencrypt nginx folder sites-config and add this lines location = /.well-known/carddav { return 301 $scheme://$host/remote.php/dav; } location = /.well-known/caldav { return 301 $scheme://$host/remote.php/dav; } hope this can help anyone with this problem1 point
-
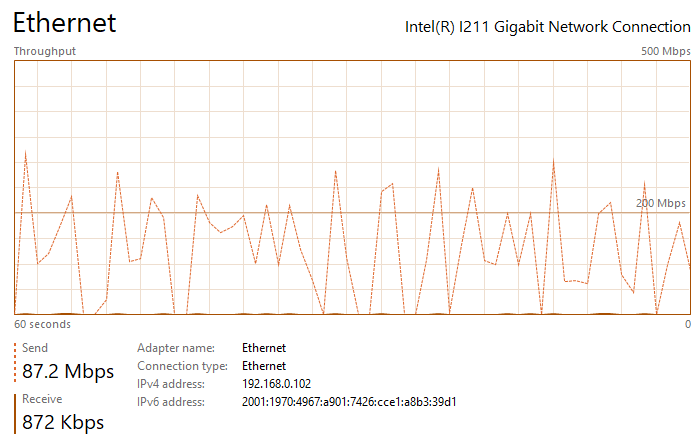
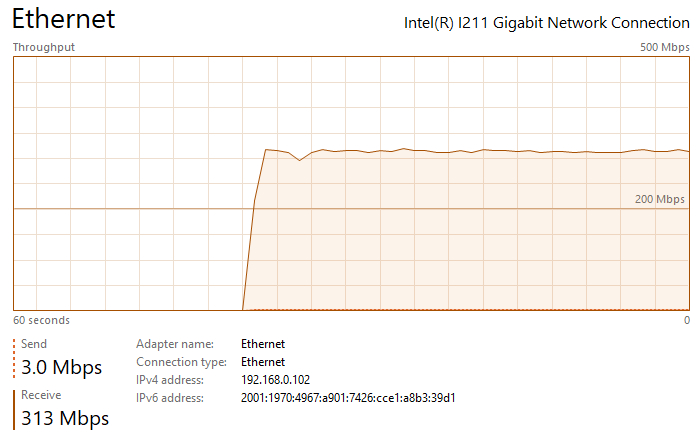
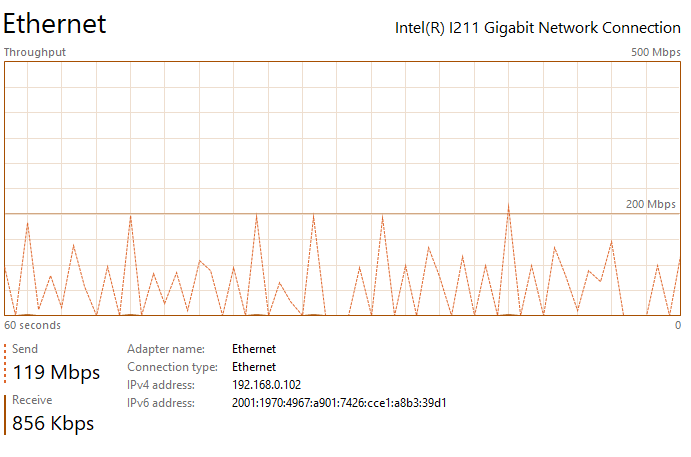
Thanks for the suggestion ufo56. I had actually tried implementing all of your suggestions a few days ago, but the Redis changes crashed NextCloud and caused an "Internal Error" message in the docker UI (I realized my mistake and noted it below). This time I went back and added your changes individually. All testing was done on an gigabit LAN either uploading to my nextcloud share, which writes to a SSD cache, or downloading to an SSD: The upload baseline is the following, I see peaks up to 200 - 260 mbps (~30 MB/s) during upload, but transfer is not very steady, so the overall speed isn't great. See the attached image network performance image below "Nextcloud Upload Before Changes.png". Pretty slow for SSD to SSD transfer over gbit connection. The download baseline is better, I see rather consistent transfer speeds of ~310 mbps (~38 MB/s). First I changed the proxy.conf file by adding or changing the following lines in \appdata\letsencrypt\nginx. I then restarted the LetsEncrypt and NextCloud dockers. After making this change, I saw no noticeable difference in file transfer speed and it had the same bursty behavior as illustrated in the image I referenced above. Next I implemented the php-fpm changes. I did this by adding the following lines to the end of the www2.conf file in /appdata/nextcloud/php, hopefully that was the correct place and manner to make the change. I then restarted the NextCloud docker. After making this change, I saw no noticeable difference in file transfer speed and it had the same bursty behavior as illustrated in the image I referenced above. Next I implemented the changes in php.ini. I did this by adding the following lines to the end of the php-local.ini file in /appdata/nextcloud/php, hopefully that was the correct place and manner to make the change. I then restarted the NextCloud docker. After making this change, I saw no noticeable difference in file transfer speed and it had the same bursty behavior as illustrated in the image I referenced above. Next I enabled the Redis cache. After installing RedisI made those changes in the config.php file in \appdata\nextcloud\www\nextcloud\config. A mistake I was making previously was that you must replace IP with your server IP. For some reason I thought it would automatically grab the IP. This error was causing the Internal Server Error issue I had earlier. I then restarted the NextCloud docker. With all of these changes in place, nothing has changed and I'm still seeing the bursty upload behavior. I am also noticing that the peak burst upload speeds fall off over time. After transferring a few GB, speeds have fallen by about 50%. See attached "Nextcloud Upload After Changes Steady State.png". If I pause, wait a couple seconds, and then resume, the transfer is restored to "full speed" again, see attached "Nextcloud Upload After Changes Pause and Restart.png". So there appears there may be two issues: My max download speed appears to be limited to ~310 mbps (~38 MB/s) My max upload speed is similarly limited, but it also bursty, with an average transfer speed between 100 and 150 mbps (~12 - 18 MB/s) Any additional thoughts would be greatly appreciated. Nextcloud Upload Before Changes.png Nextcloud Download After Changes.png Nextcloud Upload After Changes Steady State.png Nextcloud Upload After Changes Pause and Restart.png
 1 point
 -
I had this issue as well recently, I found the only way to get rid of them was to go the actual disk where the files reside and delete them from there, so /mnt/diskx/Films/ instead of /mnt/user/Films/. When I did this I was able to delete the files successfully. Good luck1 point