Leaderboard


Popular Content
Showing content with the highest reputation on 05/18/20 in all areas
-
Do we have an ETA on when unRAID will support NFSv4+? I've seen this request come up multiple times on here, and it looks like at one point, Tom even "tentatively" committed to trying to "get this into the next -rc release": Unfortunately, that was over 3 years ago. Do we have any updates on this? I believe adding support for more recent NFS versions is important because it is likely to resolve many of the problems we see with NFS here on the forum (especially the NFS "stale file handle" errors). I think that's why we also keep seeing this request come up over and over again. I understand where Tom is coming from when he says, "Seriously, what is the advantage of NFS over SMB?": The majority of the time, for the majority of users, I would recommend SMB. It's pretty fantastic as it exists today but, there are times when NFS is the better tool for the job. Particularly when the clients are Linux-based machines; NFS offers much better support for Unix operations (i.e. when you're backing up files to an unRAID share and it contains symbolic links). NFS also offers better performance with smaller files (i.e. those short, random-R/W-like file operations). Rereading my post, I hope this request doesn't come off as overly aggressive. That's certainly not the intent. I just wanted to provide some background on the request and advocate for continued NFS support on unRAID. NFS is still an important feature of unRAID. Thank you in advance for your consideration! -TorqueWrench3 points
-
Is anybody using docker compose? Are there any plans to integrate it with unRAID?1 point
-
OS: unRAID 6.4.0-rc10b Pro License CPU: Intel Xeon E3-1240 v3 $152 used eBay Motherboard: SUPERMICRO MBD-X10SLL-F uATX Server Motherboard LGA 1150 $109 used eBay RAM (24GB): Crucial 16GB ECC (2 x 8GB) and HYNIX 8GB (4GB x 2) UNBUFFERED ECC SERVER 240-Pin DDR3 SDRAM 1600 (PC3L 12800E) $176 from old build & $41 used eBay Case: Silverstone Case Storage Series CS380 $125 Drive Cage(s): Ultra Quadruple 4 X 2.5″ to 5.25″ SATA SSD Hot Swap Drive Bay Enclosure $20 Power Supply: Corsair SF600 $109 + Cable Mod extension cables $30 SATA Expansion Card: LSI LOGIC SAS 9207-8i Storage Controller LSI00301 $65 new eBay Cables: 2 x Monoprice 0.5m 30AWG Internal Mini SAS 36pin (SFF-8087) Male w/ Latch to SATA 7pin Female (x4) Forward Breakout Cable $9/ea Fans: 2 x Noctua NF-F12 120mm PWM $20/ea 2 x ENERMAX T.B. Silence UCTB12P 120mm PWM $15/ea UPS: Tripp Lite 1200VA Smart UPS Battery Back Up, 700W Rack-Mount, AVR, 2U (SMART1200LCD) $177 Parity Drive: 2 x 4TB Toshiba MD04ACA400 Data Drives: 2 x 4TB Western Digital WD40EZRX, 4TB Seagate ST4000DM000, 4TB Seagate ST4000VN008, 2 TB Western Digital WD20EZRX Cache Drive: 2 x Corsair Force 120GB SSD $70/ea Total Array Capacity: 18TB Total cost w/o drives or UPS= $915 Primary Use: Media Storage and backup Power Consumption: will update when done This isn't really a new build but a consolidation and upgrade. I'm combining my main server and my backup server with a few new parts. My 2nd ASRock C2750-D4I was starting have problems with sensors missing in the BIOS and IPMI e.g. 3v, 5v, 12v and MB temp. So I plan to RMA then sell it. Then use the Supermicro board. Since the SM is a uATX, I needed a new case. I also needed a SATA card and a new processor since the G3220 wouldn't be adequate. Idle Power: 41 watts1 point
-
Not sure where to start with this. Running 6.8.0 and noticing "stale file handle" errors in my Linux boxes which have mounts to Unraid via SMB / CIFS. The stale file handles happen over time, not clear what triggers them. I see a few threads re: NFS and issues with mover, but these errors are on SMB shares. Multiple shares, multiple boxes (Ubuntu, Debian). Each share has Cache set to "yes". Each Linux box has Unraid shares mounted in fstab. If I notice the stale file handle errors I can "umount /path/to/share" and then "mount -a" to restore the connection, but it's only a matter of time before they break again. Thoughts?1 point
-
Puhh, I am glad it worked! No worries, have fun "home site'ing"!1 point
-
If you go to 10.10.7.4:8085 in your browser what happens, WP installation screen? or? Forget about the proxy!1 point
-
Let me get a few under my belt, so we can start w some candy.1 point
-
Server to Server native backup/sync i have 3 unraid servers this would make my life so much better1 point
-
That is the uefi shell, check again all, because it's still not able to boot into mac os.1 point
-
I apologize i think i forgot to put the persistence will update the template now can you try removing the :3306 and leave it as IP only because it default to 3306 The commands should be run on mariadb and like TeCH-Guruz said adminer might help becuase is webui1 point
-
disk location1 point
-
I can't see nothing wrong in that logs and in the xml, you should provide the bootloader log to understand what is stopping the machine to start.1 point
-
Loop2 is the docker image and it's corrupt, you need to re-create it, cache filesystem itself looks fine for now, there are a few old corruption errors but those should not increase anymore if the RAM problem was solved, you can see here to clear the errors and continue monitoring it.1 point
-
Update Add new expansion button Add docker preview Thanks again @hernandito for the visuals, tried my best to make it look like it If you think something looks of please tell me and i will try to fix it A few extra things I could make the old button not take the extra space like this (looks a bit odd) Another thing is that if you have a few folders it starts to take a while to change the same setting on all of them. Maybe i should add a way to change the same setting on multiple folders

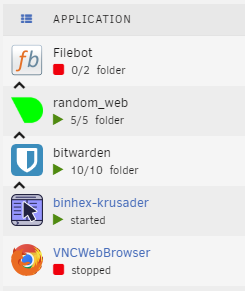 1 point
 -
Check your xml, you don't have any custom qemu:args required to boot mac os. I also suggest to delete the cpu topology from the xml for the first boot and to switch network to vmxnet3 or better e1000-82545em.1 point
-
Off topic, but not AAA either (they are also single cell). Possibly MN21, MN23, MN27 - there are others too. https://en.wikipedia.org/wiki/A23_battery#/media/File:A23-open-closed.jpg1 point
-
Good info, thanks. I just know them as 3/16 and 1/4 inch types. They were probably not AA - you would not get the correct voltage. AA are single cell. But the smaller cylindrical types used for some remote control devices (older car entry, garage door remotes, etc) are commonly 12 volts are are made of a series stack of cells. I've used Tayna 2 or 3 times, both for UPS and for other hobby stuff. Never had any problems.1 point
-
In the latest release of UD, I've added a 'Share' switch to the remote mounts (SMB and NFS). This allows you to mount a remote share and not have it shared again on Unraid. I'm not sure why you'd want to do this other than having a local mount point for the remote share. If it were me, I'd access the remote share through SMB or NFS directly and not through a local mount point. CIFS mounts really struggle when there are networking issues.1 point
-
It probably needs a small patch to just copy the pgs. I'll look into it at some point this month1 point
-
@axeman The mount script creates the appdata/other/rclone folder. Feel free to create them yourself. For your mount remote id and secret. Use a access API you likely already have created for that. That's used to mount the drive. (Theoretically you could auth with a sa.json but let's not over complicate the setup 😝). No need for additional ids/secrets for the SAs. When an upload is ran, your .json service files will be referenced for credentials and the client id/secret will be ignored ( ie: you upload with a new unique user that has a clean quota limit -- 750gb per service account/day). You can also define a custom location for the accounts if you want. It's just cleaner to keep it all in the other/rclone folder.1 point
-
Dunno if you figured it out yet but I had the same problem and it seems this update cleared the saved passwords for some. What I ended doing was going to the super page and logging in using the admin/password from the docker creation page. My old account was still there so I just typed in the same password again and that got it working. I had some additional users in the admin page that I had to delete and add again since I didn't see anywhere I could update the password.1 point
-
Awesome addition to the Plex Plugins library! To be honest, I was kinda hoping this was on the Server Dashboard rather than it's own dashboard tab or that you could see that something was indeed playing in the tab so you knew to click on it. That being said for anyone not using Tautulli this will work awesome for them! Putting this on the revisit list. Thanks. Edit: Hands Down - This has now become one of my favorite Dashboard applications! \m/1 point
-
1. Yes, the path to your file is the same from your client computer. Unraid knows where the file really is behind the scenes, and will serve it from wherever it is, cache or array. 2. Mover will not move a file if it's in use. It'll just skip it.1 point
-
Thought I'd expand on this as it took some time for me to figure out what changes were needed in the shinobi container, and it might help out someone else: Created a mariadb database as follows: CREATE USER ‘shinobi’ IDENTIFIED by ‘password’; CREATE DATABASE IF NOT EXISTS shinobi; GRANT ALL PRIVILAGES ON shinobi.* TO ‘shinobi’ IDENTIFIED BY ‘password’; now you can edit the shinobipro container and make the following changes based on the new mariadb database created above: MYSQL_USER: shinobi MYSQL_DATABASE: shinobi MYSQL_HOST: IP address of unraid maria db database location, change it to: /mnt/user/appdata/mariadb/databases/shinobi/ MYSQL_PASSWORD: password1 point
-
This looks really nice! Normally I use tautulli and recently I got the idea of using plex dash. But having this in handy is really cool.1 point
-
Ill think you find it running much smoother in a container, instead having a full blown Operating system you use the minimal one in the container. The WP container is the the official container in the docker hub https://hub.docker.com/_/wordpress, very smart guys maintaining it. My site is getting high scores when bench-marking the site even thought my unraid server is a 10 year old HP micro server with 8MB ram. Ok my site is not a high traffic site but I am really impressed of the performance and love the setup, can fire up a copy or a new site in minutes and toss them away when I am done with them. Sold? Kru-x1 point
-
Hi Sjored, Using a docker is less hassle then you think, it's dead easy to use and really versatile, like eating a cake with out have to make it first :-), might take a little bit to get your head around how to make a docker container if needed but it is not that complicated. This docker has PHP Version: 7.3.6 MySQL Version: 5.5.5 Web Server Info: Apache/2.4.25 (Debian) As for the libs, WP has all the libraries that it needs and most of them as per your list above. If you for some reason need another one you have to ad them and to your own container. Not often I have needed though, but I have used some external libraries and have both made my own docker container and used some in my plugin. WP updates just like normal, under the update tab! Hope it helps, Kru-x1 point
-
+1 I think very basic functions should be added to the "view" function of shares and disks of the web UI. For example: Properties = Show amount of Files and Dirs + Total Size Create Folder = Opens dialog to create a folder with Name XYZ Delete '/Movies' = Opens a dialog with a warning "This deletes '/Movies' with all its contents" Copy '/Movies' to... = Opens a dialog with two dropdowns. 1st dropdown contains the list of shares and disks and 2nd updates to the folder structure of the selected share/disk. The dialog should contain a checkbox to allow "move" instead of "copy" as well. Create ZIP = Creates a ZIP of the directory (not visible in example) Upload = Upload a file through the browser (not visible in example) I think this should be sufficient for the most users.
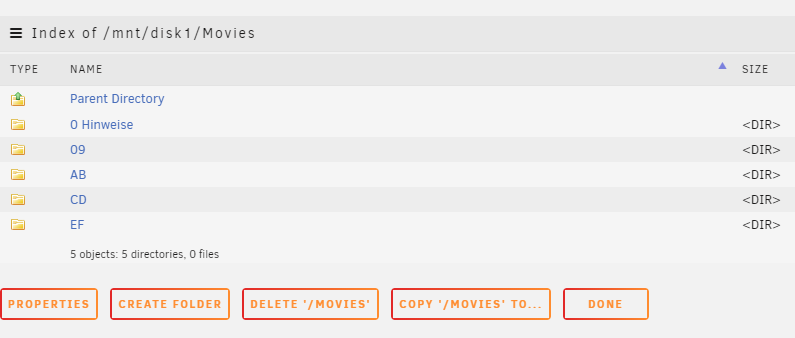 1 point
 -
I spent multiple weekends trying to problem solve my unraid system. So I'm glad it took you 10mn to read the topic, but it took me a few hours to do the benchmarks, test and confirm. Each windows reboot require a system reboot as I have a 5700XT. This fixed my latency issues but made somehow my realtek sound card crash (the windows audio service consummes 15% of the CPU, and freeze the windows audio settings). It still works in bare metal on the same SSD, no problem. Don't you think I went through some other topics already? As of today I just spent a straight 12 hours on problem solving unraid. Did your 2150 posts took you 10 minutes too? Don't you think I can rightfully express my regrets on not checking this topic twice, without having you trying to make yourself shine over me calling myself lazy ? Thanks for your forum contribution, thumbs down for your behaviour. 👎1 point
-
Updated January 4, 2020: This is nearly a "build your own theme" plugin. It started as a custom version of the "black" theme to be easier on your eyes, now you can adjust a bunch of values from the Dark Theme settings page. Below is a screenshot of the default "Dark Theme" appearance, as well as the settings page with which values you can currently modify. To install, search for "Dark Theme" on Community Application!
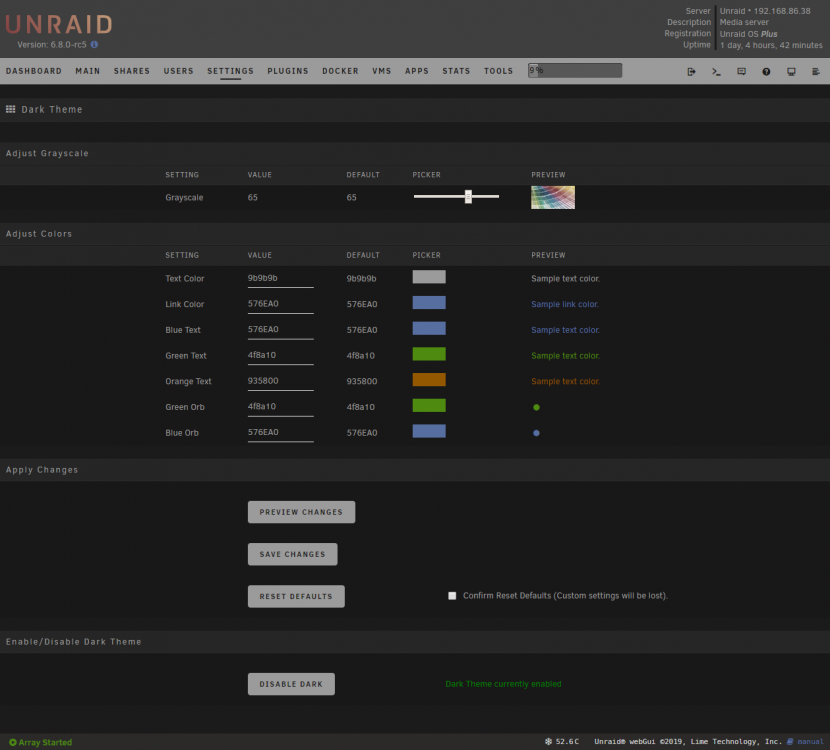 1 point
 -
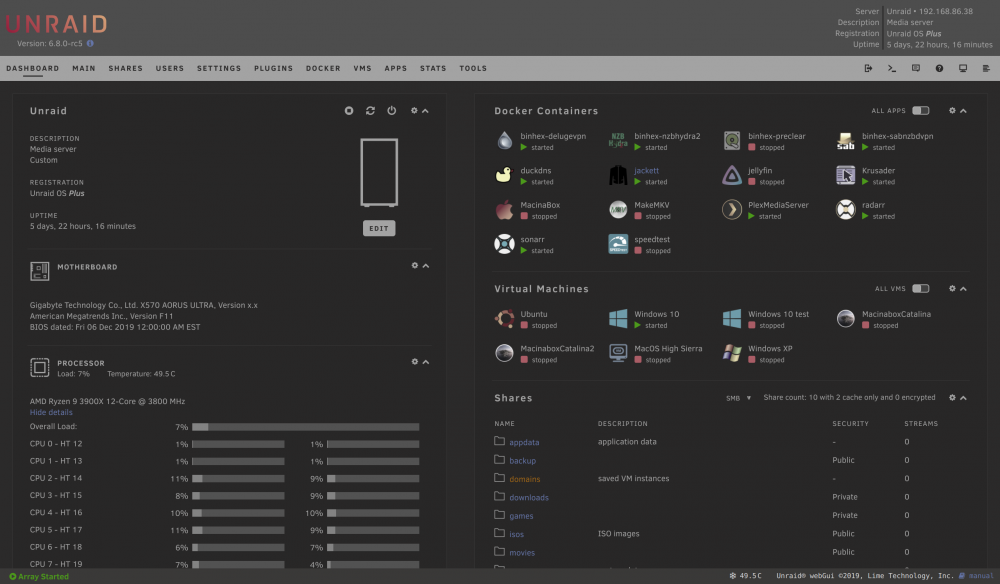
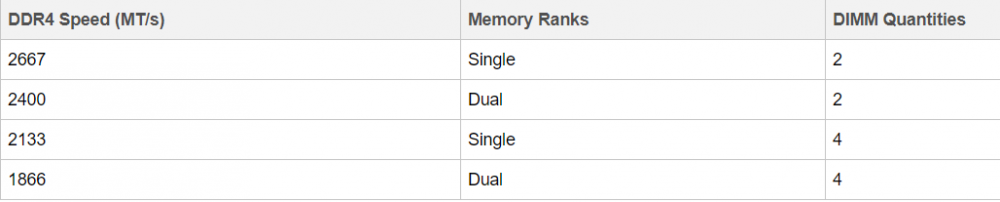
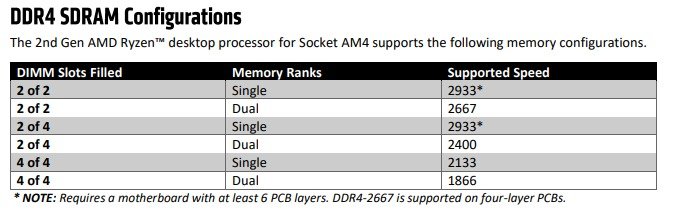
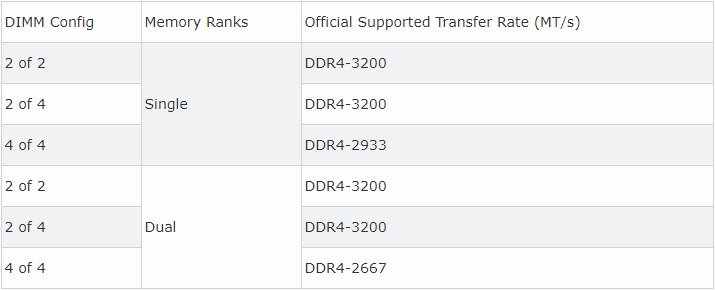
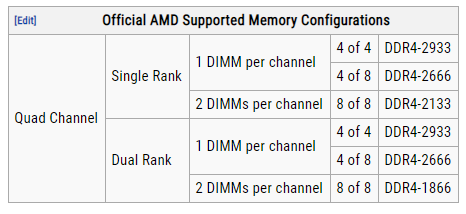
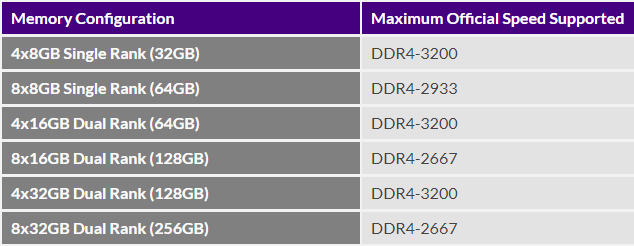
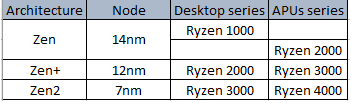
What can I do to keep my Ryzen based server from crashing/locking up with Unraid? Ryzen on Linux can lock up due to issues with c-states, and while this should mostly affect 1st gen Ryzen there are reports that 2nd and even 3rd gen can be affected in some cases, make sure bios is up to date, then look for "Power Supply Idle Control" (or similar) and set it to "typical current idle" (or similar). If there's no such setting in the BIOS try instead to disable C-States globally, also note that there have been some reports that with some boards the setting above is not enough and only completely disabling C-States brings stability. Also many of those servers seem to be running overclocked RAM, this is known to cause stability issues and even data corruption on some Ryzen/Threadripper systems, even if no errors are detected during memtest, server and overclock don't go well together, respect max RAM speed according to config and CPU listed on the tables below. Note: Ryzen based APUs don't follow the same generation convention compared to regular desktop CPUs and are generally one generation behind, so for example Ryzen 3200G is a 2nd Gen CPU: 1st gen Ryzen: 2nd gen Ryzen: 3rd gen (3xxx) and Zen3 (5xxx) Ryzen : Threadripper 1st Gen: Threadripper 2nd Gen: Threadripper 3rd Gen:

 1 point
 -
I found the source of the noise. It is the Enermax fan on the bottom! It is the only fan in all of the swapping around that I never changed. It is close enough to the drive cage fans that I could not tell it was the culprit. I now have it unplugged and the Noctuas on the drive cage connected to the MB fan header. I have configured the fans in BIOS to run full speed and the noise is much reduced by simply unplugging the Enermax. I am running another parity check now and we'll see what temps I get with cage fans on full speed. I have reconfigured to the standard "push" configuration. UPDATE: Stopped Parity check after 1 hour 15 minutes; parity drive temp was 41C, data drives were at 38-40C. Full speed fans kept the temps down even without the bottom intake fan and the noise level is back to where it was in the Lian-Li case; quieter than the other computers in the room. If I need an intake fan on the bottom, I will be replacing the Enermax, it's definitely the noisiest fan in the case. BIOS fan control is based on either MB or CPU temps which don't fluctuate much during parity checks. I want to control the drive cage fan speed based on drive temps so, I'll check on options for doing that.1 point
-
@dmacias I just bought the same case and have the Corsair SFX power supply as well. I see you had to get cable extenders as the PSU cables that come with these SFX PSUs are very short. Was the SATA cable long enough to reach the drives in the upper 5.25" bays? The manual for the CS380 recommends that two different PSU cables be used to connect power to the hot-swap drive cages. If I recall correctly, the PSU does not have enough PSU-side connectrors for a SATA cable and two 4-pin peripheral cables. Do you power the drives cages with two connectors on one cable or did you find a way to connect two separate cables to the drive cage? I can't even find a 4-pin peripheral cable for the PSU without buying a full set. I will be moving components from a much more compact Lian-Li PC-Q25 case in which cable lengths are not an issue to the CS380. Thanks for the detail you provided in this post. Even though I will still be using my current Mini-ITX MB, I need the flexibility to move to other MB form factors for future upgrades and the CS380 is still a relatively small case that provides a lot of flexibility and expandability options.1 point
-
Silverstone CS380 I was looking at getting a 4U rack mount case for a future rack. But most reviews for the sub $200 4U cases listed cons I wasn't willing to accept. Size, airflow, available parts, quality etc. Since I was already familiar with the DS380 and it's easily solvable airflow issues, I decided to get the CS380 for $125. It seemed to have a better design with the fans directly on the drive cage. However the reviews still complain about high drive temps. It's my belief that most don't control the fans properly or try control the fans in the bios. It doesn't make sense to try and cool hard drives with smart fan settings in the bios. It will never work unless your system temp is high enough all the time. First off I should say I like the case and would buy it again. But it seems like they took another case and threw in the hot swap cage from the DS380 and added a locking door. And Silverstone seems to think the laws of physics don't apply inside their cases. The DS380 had the whole length of the case open between the drive cage and the side fans. At Silverstone air is not supposed to flow through the path of least resistance. It is magically supposed to flow through the drive cage. Also it's supposed to flow through solid plastic too. The CS380 has the same solid plastic cutout for large graphics cards but it's upside down in the wrong spot for a graphics card. These pictures are with my ASRock C2750. Still waiting on parts so I can use the Supermicro board. Besides the big gaping hole, there's a 1" lip underneath the fans along the backplane side. I used duct tape to seal the backplane so air goes through and doesn't just blow out. I also drilled holes into the plastic piece behind the upper drive cage fan. I'll have to get some better pictures with the fans off. The cage fans and the side panel are offset. Some have suggested making a fan shroud to extend to the intake. I don't think that will be necessary. I ran a parity check for an hour and only the Toshiba parity drive #2 in the 2nd hot swap from the top reached 37C. The rest were 33C and below. I will swap Toshiba parity #1 in top tray and try again to see if its the drive or the bay or drive. This was running my IPMI fan control plugin with a high threshold of 40C and a low of 25C. I installed the LSI 9207-8i and inverted the drives so the two parity drives are on the bottom and the drives go in order 1 - 5 upwards after that. I ran a complete parity check and the one Toshiba drive reached 40C. The rest were under 37C. I was using the IPMI fan control with a high threshold of 40C and a low of 25C. Having now swapped the Toshiba 2nd parity drive from the 2nd from the top tray to the 2nd from the bottom tray there is no difference in temp. The drive just runs hotter than the others. At the left side of the fans you can see where the duct tape is filling the holes. Across the middle of the upper fan is the removable plastic graphics card piece discussed earlier. And if you look closely you can see the holes I drilled across it just above the drive tray guide. On the bottom of the case there is a removable dust screen. There are holes for two 120mm fans. The power supply covers one fan location. This isn't bad since I positioned the power supply fan-down. It's able to pull air from outside the case. Two of the holes of the other 120mm fan location are covered by part of the drive cage. It's a thin piece of metal that serves no purpose. I plan to cut it off and install a fan to pull in air from beneath the case. It should fit fine and still allow access to the bottom sata port on the backplane. I removed the drive cage then cut about an inch of the top part in picture. I then folded it over so it will sit under the cage when installed. Here it is with the cage installed but no fan and no lip covering the holes. I also installed in the LSI 9207-8i and forward breakout cables. This is with the fan installed. There's just enough room to snap in the bottom sata cable. I now have an intake fan on the bottom of the case. The side of the case has a mesh dust filter but it's held in by four push pins. So you have to take off the side panel then remove the pins which is tedious. I removed the mesh and used the magnets from a failed 2.5" drive and some electrical tape to make a removable filter. This could be moved inside the panel if the looks aren't appealing but I don't care, it's in a closet. Also while you could possibly install two 120mm fans on the side panel itself, they would be right on top of the hard drive cage fans. The sides come out bit which allows for all the cables to be fed under the motherboard. Here's a look at the right side of the case to show some possibilities for cable management. I know it looks like the drive cage is flush with the side but there an inch or two gap where the air from the fans on the other side can flow out. I routed all the front cables to circumvent the drive cage. I ran the Noctua's with the included extension cables above the cage and up under the motherboard. I was able to run the main power cable all the way under. I have the 4-pin extra power tied off for now. The ASRock doesn't need it but the SM will. The front has usb ports but you can't close the door with a nub in it. There is room between the back of the door and the front. So I took my dremel to the inside of the door to allow me to close it with my unRAID usb stick in it. Also you can see the front power disable switch there. Its a nice feature. You can lock the power button on the outside so you have to unlock it to power it on or off. Great for kids or animals. That bright blue light is very attractive. I added a fan to the LSI 9207-8i. I used the rubber pieces from a Noctua and wedged them into the heat sink. Its a high rpm 50mm fan. I modded a 3-pin to 4-pin molex connector to use 5v instead of 12v. So its quiet now. A few other thought's. The drive trays for the CS380 are the same as the trays for the DS380. However they have three screw holes on the side instead of just two. They are plastic but are durable. I had no problems with the DS380. You do have to push them in all the way and make sure the tabs on each side snap in. The CS380 is the same 8" width as the DS380 but its about 5" taller and 5" deeper. Another nice feature is both sides come with thumb screws that don't have to be completely unscrewed to remove the panels. They screw into the panel and will stay put (loosely) when the panel is removed. Meaning you won't drop them on the ground or behind something.1 point