Leaderboard


Popular Content
Showing content with the highest reputation on 07/07/20 in all areas
-
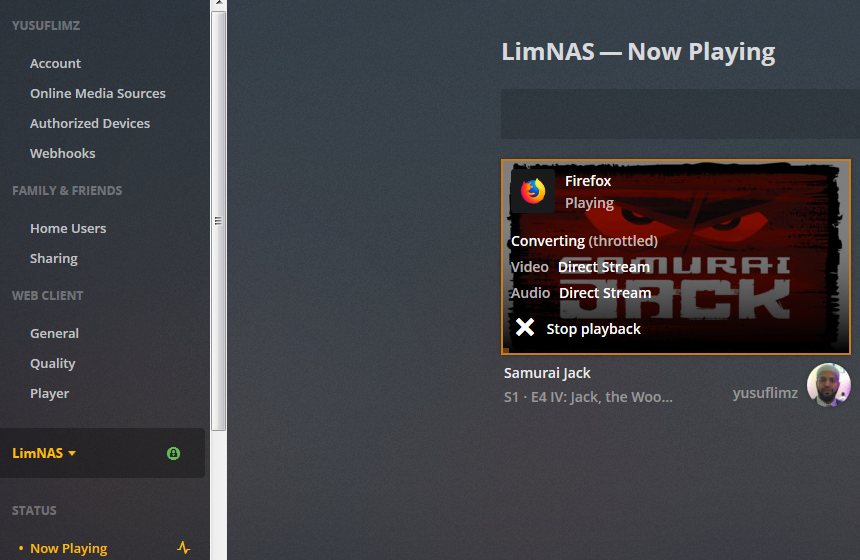
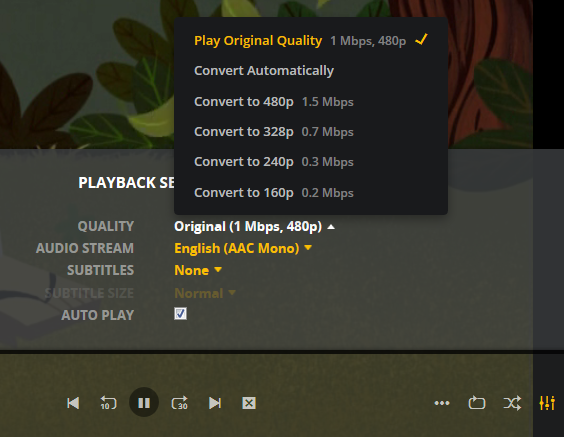
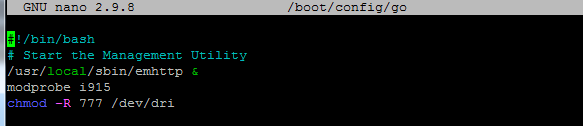
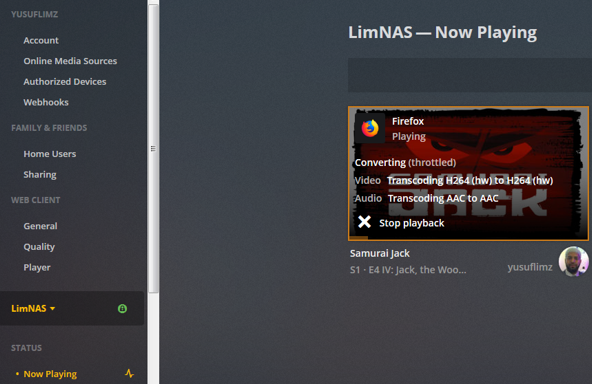
***Update*** : Apologies, it seems like there was an update to the Unraid forums which removed the carriage returns in my code blocks. This was causing people to get errors when typing commands verbatim. I've fixed the code blocks below and all should be Plexing perfectly now Y =========== Granted this has been covered in a few other posts but I just wanted to have it with a little bit of layout and structure. Special thanks to [mention=9167]Hoopster[/mention] whose post(s) I took this from. What is Plex Hardware Acceleration? When streaming media from Plex, a few things are happening. Plex will check against the device trying to play the media: Media is stored in a compatible file container Media is encoded in a compatible bitrate Media is encoded with compatible codecs Media is a compatible resolution Bandwith is sufficient If all of the above is met, Plex will Direct Play or send the media directly to the client without being changed. This is great in most cases as there will be very little if any overhead on your CPU. This should be okay in most cases, but you may be accessing Plex remotely or on a device that is having difficulty with the source media. You could either manually convert each file or get Plex to transcode the file on the fly into another format to be played. A simple example: Your source file is stored in 1080p. You're away from home and you have a crappy internet connection. Playing the file in 1080p is taking up too much bandwith so to get a better experience you can watch your media in glorious 240p without stuttering / buffering on your little mobile device by getting Plex to transcode the file first. This is because a 240p file will require considerably less bandwith compared to a 1080p file. The issue is that depending on which format your transcoding from and to, this can absolutely pin all your CPU cores at 100% which means you're gonna have a bad time. Fortunately Intel CPUs have a little thing called Quick Sync which is their native hardware encoding and decoding core. This can dramatically reduce the CPU overhead required for transcoding and Plex can leverage this using their Hardware Acceleration feature. How Do I Know If I'm Transcoding? You're able to see how media is being served by playing a first something on a device. Log into Plex and go to Settings > Status > Now Playing As you can see this file is being direct played, so there's no transcoding happening. If you see (throttled) it's a good sign. It just means is that your Plex Media Server is able to perform the transcode faster than is necessary. To initiate some transcoding, go to where your media is playing. Click on Settings > Quality > Show All > Choose a Quality that isn't the Default one If you head back to the Now Playing section in Plex you will see that the stream is now being Transcoded. I have Quick Sync enabled hence the "(hw)" which stands for, you guessed it, Hardware. "(hw)" will not be shown if Quick Sync isn't being used in transcoding. PreRequisites 1. A Plex Pass - If you require Plex Hardware Acceleration Test to see if your system is capable before buying a Plex Pass. 2. Intel CPU that has Quick Sync Capability - Search for your CPU using Intel ARK 3. Compatible Motherboard You will need to enable iGPU on your motherboard BIOS In some cases this may require you to have the HDMI output plugged in and connected to a monitor in order for it to be active. If you find that this is the case on your setup you can buy a dummy HDMI doo-dad that tricks your unRAID box into thinking that something is plugged in. Some machines like the HP MicroServer Gen8 have iLO / IPMI which allows the server to be monitored / managed remotely. Unfortunately this means that the server has 2 GPUs and ALL GPU output from the server passed through the ancient Matrox GPU. So as far as any OS is concerned even though the Intel CPU supports Quick Sync, the Matrox one doesn't. =/ you'd have better luck using the new unRAID Nvidia Plugin. Check Your Setup If your config meets all of the above requirements, give these commands a shot, you should know straight away if you can use Hardware Acceleration. Login to your unRAID box using the GUI and open a terminal window. Or SSH into your box if that's your thing. Type: cd /dev/dri ls If you see an output like the one above your unRAID box has its Quick Sync enabled. The two items were interested in specifically are card0 and renderD128. If you can't see it not to worry type this: modprobe i915 There should be no return or errors in the output. Now again run: cd /dev/dri ls You should see the expected items ie. card0 and renderD128 Give your Container Access Lastly we need to give our container access to the Quick Sync device. I am going to passively aggressively mention that they are indeed called containers and not dockers. Dockers are manufacturers of boots and pants company and have nothing to do with virtualization or software development, yet. Okay rant over. We need to do this because the Docker host and its underlying containers don't have access to anything on unRAID unless you give it to them. This is done via Paths, Ports, Variables, Labels or in this case Devices. We want to provide our Plex container with access to one of the devices on our unRAID box. We need to change the relevant permissions on our Quick Sync Device which we do by typing into the terminal window: chmod -R 777 /dev/dri Once that's done Head over to the Docker Tab, click on the your Plex container. Scroll to the bottom click on Add another Path, Port, Variable Select Device from the drop down Enter the following: Name: /dev/dri Value: /dev/dri Click Save followed by Apply. Log Back into Plex and navigate to Settings > Transcoder. Click on the button to SHOW ADVANCED Enable "Use hardware acceleration where available". You can now do the same test we did above by playing a stream, changing it's Quality to something that isn't its original format and Checking the Now Playing section to see if Hardware Acceleration is enabled. If you see "(hw)" congrats! You're using Quick Sync and Hardware acceleration [emoji4] Persist your config On Reboot unRAID will not run those commands again unless we put it in our go file. So when ready type into terminal: nano /boot/config/go Add the following lines to the bottom of the go file modprobe i915 chmod -R 777 /dev/dri Press Ctrl X, followed by Y to save your go file. And you should be golden!


 1 point
 -
------------------------------ Dear paperless user, paperless hasn't received a lot of updates and bug fixes in the past. Even pull requests are not merged for some time now. Though, paperless runs rocks solid and gets the job done! For some time now, there is a well-maintained fork of paperless out there. It's called paperless-ng and I'm happy to announce that paperless-ng is officially available via Unraids community application store (CA store). Go check it out! ---------------------------- Overview: Support for Docker paperless template in the selfhosters/unRAID-CA-templates repository. Docker Hub: https://hub.docker.com/r/thepaperlessproject/paperless/ Documentation: https://paperless.readthedocs.io/en/latest/ This is the official Paperless Docker support thread. Feel free to ask questions and share information or your experience. I try to update this main post regularly and also incorporate your shares. I also started to contribute features to the Paperless project. You are welcome to help to improve Paperless too as it is a community-driven project. You might also find this old question about Paperless helpful: https://forums.unraid.net/topic/71733-help-with-paperless-dockerhub-unraid/ 1. How to Install Paperless uses a two container setup: (1) a webserver serving your files via the browser and (2) a consumer service that checks for new files in the input directory, doing the parsing and importing the documents to the database. Because unRaid does not support docker-compose, you need to create those two containers from the same template with manual adjustments: 1. Create a "Paperless" share on your array with subfolders for media, consume, and export 2. Install the Paperless webserver 2.1 From the Apps tab, search for "Paperless" 2.2 Configure the Media, Consumption, and Export paths to point at the folders you created in step 1 2.3 Accept the defaults for the remaining variables or adjust as needed. As you get more familiar with Paperless, you may wish to add additional variables that are defined here: https://github.com/the-paperless-project/paperless/blob/master/paperless.conf.example 2.4 Hit Apply to start the container. 3. Create the Paperless superuser 3.1 From the Unraid Docker UI, click the Paperless icon and choose Console. At the prompt, type "./manage.py createsuperuser". Follow the instructions to create the paperless user 4. Install paperless as consumer service to process documents in your /consume folder 4.1 From the Unraid Docker UI, click Add Container and select the paperless template from the [ User templates ] section 4.2 Rename the container to "paperless-consumer" 4.3 Remove the port to avoid port conflicts with the webserver 4.4 Switch to Advanced mode and change the "Post Arguments" parameter to "document_consumer". If you are using NFS, also add "--loop-time 60 --no-inotify" (See FAQ) Now, you should be able to place a document in your /consume folder of your "Paperless" share and recognize it being imported to paperless. 2. Paperless Scan Workflows 2.1 WebDav Scan App with Nextcloud I also want to share my scanning workflow with Paperless and Nextcloud (See https://blog.kilian.io/paperless/ as reference). With the app ScannerPro, I can upload my scanned files to a Nextcloud folder via WebDav from my mobile device. This folder functions as Paperless consume folder and grabs the files and imports them to Paperless. Following steps required for the setup: 1. Mount the paperless /consume folder in the Nextcloud docker container via unRaids Docker template editor 2. Enable the external storage app as Nextcloud admin. The app can be found in the apps dropdown hidden in disabled apps. 3. Add the mounted consume/ folder as local storage for your Nextcloud user with name paperless-consume (Settings -> External Storage) 4. Configure the Nextcloud paperless-consume folder as WebDav target in your scan app 3. FAQ 3.1 Why does the consumer not pick up my files? The consumer service uses `inotify` to detect new documents in the consume folder. This subsystem, however, does not support NFS shares. Thus, you need to start your consumer with "Post Arguments" defined as `document_consumer --no-inotify --loop-time 60`. The document file type might not be supported. Check the consumer logs using the unRaid docker section for warnings and issues. 3.2 How to customize Paperless? All variables from paperless.conf.example can be passed as Docker environment variable to the container. 3.3 What scanner do you use for your paperless home? Paperless user recommendations iPhone with ScannerPro App; one time purchase (@T0a) 3.4 Can I use Paperless on a mobile device? There is a mobile app in pretty early development stage1 point
-
Unraiders.....Assemble!1 point
-
Hi there, i upgraded from Unraid v6.8.3 to v6.9.0-beta22 for testing. After that upgrade all my Shares disappeard in GUI under Shares. In the Server log i get errors like: emhttpd: error: get_filesystem_status, 6475: Operation not supported (95): getxattr: /mnt/user/... Those errors appear also for new Shares, never created before. I have no custom mounts under "/usr/mnt" and i have not modified any files. I can get it working again, if i create a share with the same name as before and than reboot. After that all shares are back again. But if i reboot several times they disappear again and i have to redo this procedure again. The SMBD log has no errors or stacktraces. Currently i have it working, but it could go to the "no shares" state again on reboot. If this happens again, i will provide a diagnostics.zip here... Greetings Dark thebeast-diagnostics-20200706-2101-shares-visible.zip1 point
-
It gives worst results than virtio-net for me1 point
-
Are you saying you can be bribed? 😛1 point
-
So what's in it for me to NOT vote for FreeNAS!? 🤔1 point
-
Perfecto. Any other questions about context, please don't hesitate to reach out.1 point
-
Thanks, I can understand a small bit of spanish so I can use it to clarify some translations thanks to the similarities with italian. I think I've found the repo: https://github.com/unraid/lang-es_ES1 point
-
Note that I found a performance penalty with virtio-net. I can't get above 200MB/s over the network between VM and disk share. That's ok with SATA SSD but is rather slow compared to the usual GB/s I get with my NVMe. Instead of using virtio-net, I keep the type as virtio but change the machine type to Q35-5.0 (which is available with 6.9.0 beta). Haven't had those GSO error since while still doing GB/s to cache.1 point
-
You misunderstood backup and RAID concepts. RAID is about the method that is used to store data. e.g. RAID-0: stripe data across multiple drives RAID-1: mirror data across multiple drives RAID-5: stripe data + 1 parity block RAID-6: stripe data + 2 parity blocks Unraid: no striping, parity block is on a dedicated drive etc. A backup is a redundant independent copy of your data i.e. it's about the nature of the data. Redundant means you don't access (i.e. use) the backup data as part of your business-as-usual activities, outside of the window which you restore from / update the backup. Independent means the backup can be used on its own without needing all or part of the original data Copy means there are multiple instances of the data (i.e. the backup is NOT the original). You can store a backup on a RAID array, just as you can store the original version of the data on a RAID-array. RAID provides resilience to failure but on its own is not a backup because none of the RAID implementation, including non-standard RAID (e.g. Unraid) can satisfy all 3 criteria of being a backup. RAID-0: fail all 3 RAID-1: fail (1) RAID-5: fail (2), (3) RAID-6: fail (2), (3) So RAID is like having a spare wheel for your car; a backup is like having another car all together.1 point
-
Did you change the network bridge type in your WIndows VM from virtio to virtio-net?1 point
-
Start watching at about 15:10 in the video...1 point
-
Main difference it that on the array you have individual data drives each with its own filesystem protected by one or two parity disks, each pool is one btrfs filesystem that can be or not redundant, you can use any of the available btrfs profiles, depending on the number of devices.1 point
-
Yes, this is an old issue, not related to this release, it appears to be a fuse issue that happens when a file is removed and then moved, I believe it happens mostly when using for example a media processing docker.1 point
-
1. its a click of the button but be sure to backup your usb drive first. 2. as the usb is just used to boot you can use any drive realy as usb2 drives are fast enough for booting. 3. no hot swapping is not an option but with the party disks a failier will not need imitate shut down. 4. i dought it as its a amd is phasing it out. 5. zfs locks you into your current config you cannot add or subtract drives. unless you need the speed from it stay with the standard unraid config. 6. zfs is zfs and has its own faill over mecs and is the same no matter what os you use. 7. it depends on how many drives you are wanting to add. if your going past the 10-12 drive mark you will want a mini sas controler that has it mode. otherwise a sata addon card will work. 8. you can setup notifications in the system to let you know of any issue. 9. your docker info is saved either on your cache or spinning rust depending on how you set it up. so if you backup your thumb drive and it fails everything will still be their from the backup drive. the dockers are usally not effected by a system update just make sure you update your plugins and dockers before the system update.1 point
-
When using Fill-up allocation, or even just when you have disks that are very full, it is especially important to understand the Minimum Free setting. Unraid has no way to know how large a file will become when it chooses a disk for it. If a disk has more than Minimum, the disk can be chosen, even if the file won't fit. You should set Minimum Free to larger than the largest file you expect to write to the share.1 point
-
You've installed windows as a MBR volume, so convert it to GPT. Lookup mbr2gpt conversion.1 point
-
Great, thanks for that.1 point
-
You can but performance will be degraded if you do so until parity rebuild completes so you do not want to write any significant amount.1 point
-
And do not use that old 4TB data drive for anything else until everything is back up and running to your satisfaction!!! (That drive is an insurance policy.)1 point
-
The instructions in this thread have to do with getting transcoding working with the iGPU in certain Intel CPUs. You don't have that hardware. Since you are using a Ryzen CPU and P2000 discrete Nvidia CPU you will need to use the unRAID Nvidia special unRAID build and plugin as documented in this thread: The P2000 is one of the preferred Nvidia GPUs for transcoding purposes with the build and plugin mentioned above.1 point
-
Okay, I found a workaround for me that lets me use VM's, dockers and I don't have to go into bios to disable IOMMU which disables virtualization (Thanks Dell!) Boot option: iommu=soft and you can use the USB device on Dell R410. Confirmed the card working newer hardware correctly with unRAID so it was a host hardware problem all along. I don't need IOMMU isolation so desperately for PCIE passthrough on my machine but it would have been nice but this should work also because I can still run dockers & VM's.1 point
-
Can you access the webUI from the server itself if you boot in GUI mode?1 point
-
Is your 4TB drive failing or questionable, or are you just wanting to upsize? Parity swap isn't necessary for healthy disks, you can just replace parity, then after parity is rebuilt, just replace the data disk with the former parity disk and let it rebuild. You might still want to do it the parity swap way, but just be aware that your array is offline during the parity copy part of the procedure, since parity cannot be allowed to change while it is being copied.1 point
-
The latest changes in Samba are causing issues with looking up servers and shares. i.e. NetBios and Windows Discovery. UD does the best it can to search for servers and shares, but using the IP address of the remote server seems to be the most reliable.1 point
-
I put it on the Intel controller, ran the fstrim command and didn't have any issues.1 point
-
I have this on one of my drives as well, pretty sure it is just a leftover partition from windows formatting. Don't worry about it. I reformatted the drive for use in the array and everything is working fine with a single partition.1 point
-
We added the vendor driver to upcoming 6.9.0-beta231 point
-
Totally disagree. It is all about user experience and having a tool available, which makes it extremely easy to set up Unraid the first time is very beneficial. This is also acknowledged by reviewers, who praise the easiness of Unraid installations.1 point
-
Sorry for delay, below is my config: Hope it helps
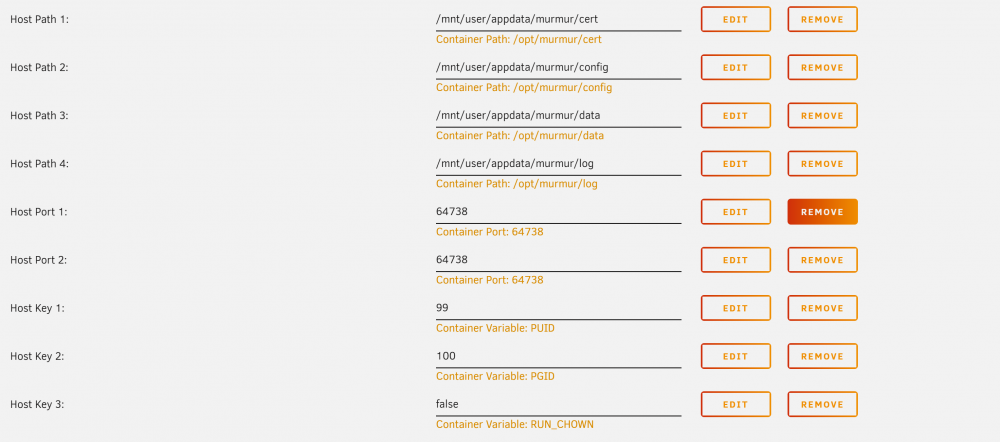 1 point
 -
1 point
-
Anyone happen to know if there's a writeup or container coming up for Authelia? I noticed some config files were added.1 point
-
FYI you can run both the web server and consumer in a single docker container by using a bash script: #! /bin/bash /sbin/docker-entrypoint.sh document_consumer & /sbin/docker-entrypoint.sh runserver 0.0.0.0:8000 --insecure --noreload & wait save this file into a volume that's mounted in the container. i just put this in the appdata directory. then turn on advanced view and override the entry point, e.g. --entrypoint /usr/src/paperless/data/entry.sh clear out the 'post arguments', since you're doing that in the bash script now.1 point
-
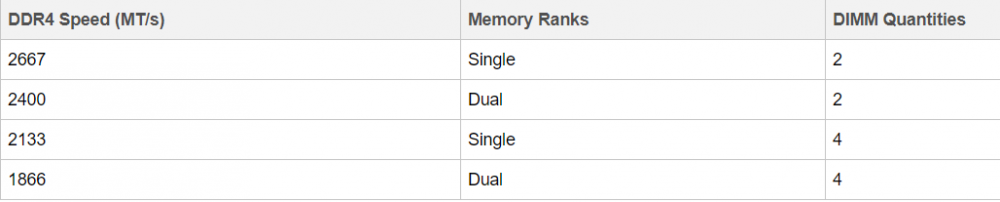
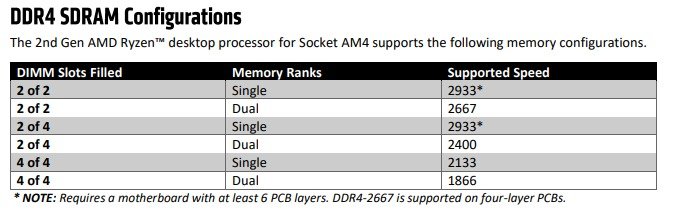
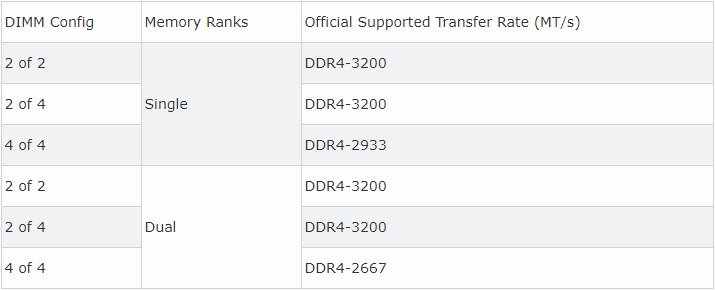
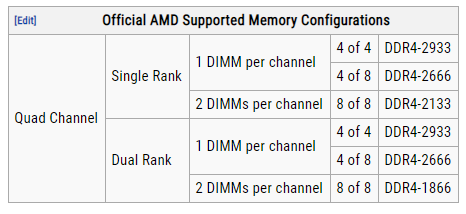
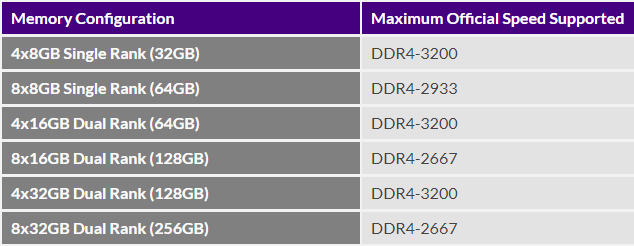
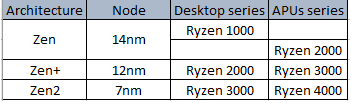
What can I do to keep my Ryzen based server from crashing/locking up with Unraid? Ryzen on Linux can lock up due to issues with c-states, and while this should mostly affect 1st gen Ryzen there are reports that 2nd and even 3rd gen can be affected in some cases, make sure bios is up to date, then look for "Power Supply Idle Control" (or similar) and set it to "typical current idle" (or similar). If there's no such setting in the BIOS try instead to disable C-States globally, also note that there have been some reports that with some boards the setting above is not enough and only completely disabling C-States brings stability. Also many of those servers seem to be running overclocked RAM, this is known to cause stability issues and even data corruption on some Ryzen/Threadripper systems, even if no errors are detected during memtest, server and overclock don't go well together, respect max RAM speed according to config and CPU listed on the tables below. Note: Ryzen based APUs don't follow the same generation convention compared to regular desktop CPUs and are generally one generation behind, so for example Ryzen 3200G is a 2nd Gen CPU: 1st gen Ryzen: 2nd gen Ryzen: 3rd gen (3xxx) and Zen3 (5xxx) Ryzen : Threadripper 1st Gen: Threadripper 2nd Gen: Threadripper 3rd Gen:

 1 point