Leaderboard


Popular Content
Showing content with the highest reputation on 09/21/20 in all areas
-
OK guys, multi remote endpoint support is now in for this image please pull down the new image (this change will be rolled out to all my vpn images shortly). What this means is that the image will now loop through the entire list, for example, pia port forward enabled endpoints, all you need to do is edit your ovpn config file and add the remote endpoints at the top and sort into the order you want them to be tried, an example pia ovpn file is below (mine):- remote ca-toronto.privateinternetaccess.com 1198 udp remote ca-montreal.privateinternetaccess.com 1198 udp remote ca-vancouver.privateinternetaccess.com 1198 udp remote de-berlin.privateinternetaccess.com 1198 udp remote de-frankfurt.privateinternetaccess.com 1198 udp remote france.privateinternetaccess.com 1198 udp remote czech.privateinternetaccess.com 1198 udp remote spain.privateinternetaccess.com 1198 udp remote ro.privateinternetaccess.com 1198 udp client dev tun resolv-retry infinite nobind persist-key # -----faster GCM----- cipher aes-128-gcm auth sha256 ncp-disable # -----faster GCM----- tls-client remote-cert-tls server auth-user-pass credentials.conf comp-lzo verb 1 crl-verify crl.rsa.2048.pem ca ca.rsa.2048.crt disable-occ I did look at multi ovpn file support, but this is easier to do and as openvpn supports multi remote lines, it felt like the most logical approach. note:- Due to ns lookup for all remote lines, and potential failure and subsequent try of the next remote line, time to initialisation of the app may take longer. p.s. I dont want to talk about how difficult this was to shoe horn in, i need to lie down in a dark room now and not think about bash for a while :-), any issues let me know!.5 points
-
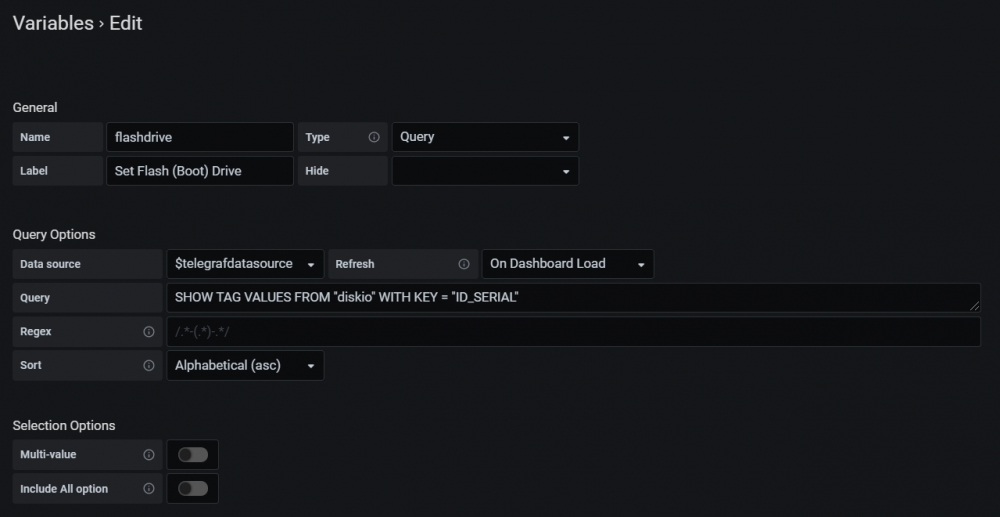
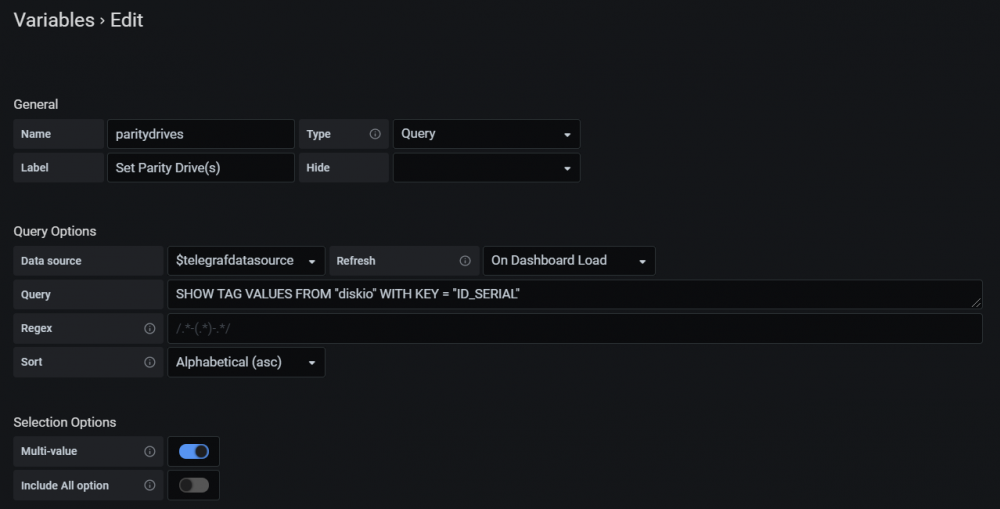
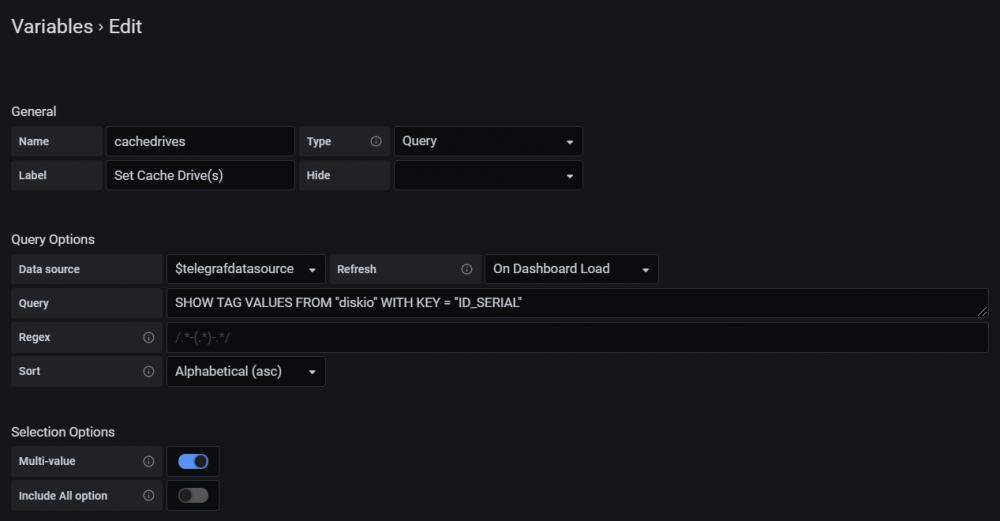
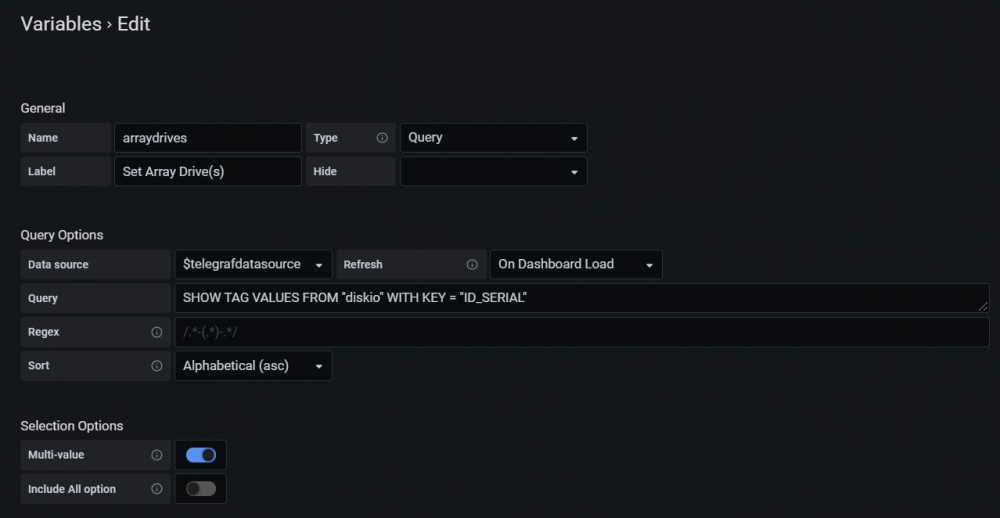
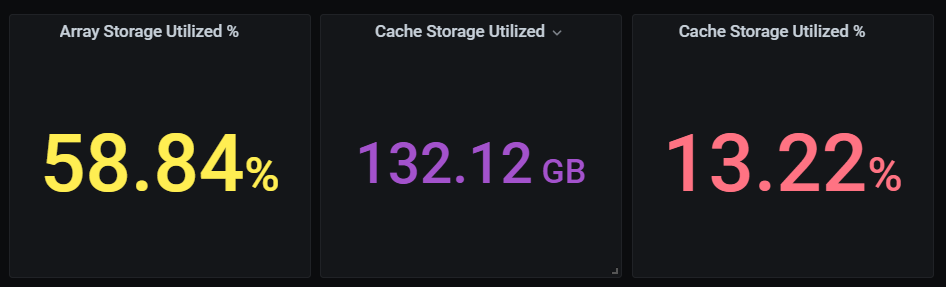
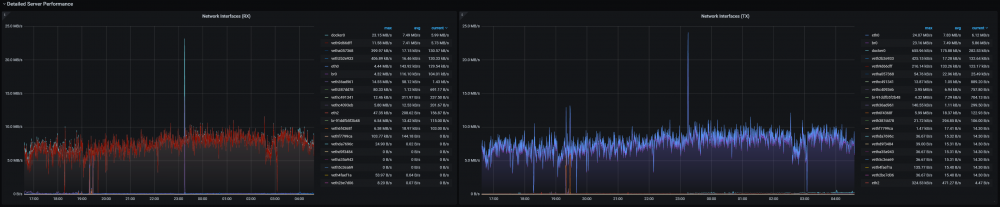
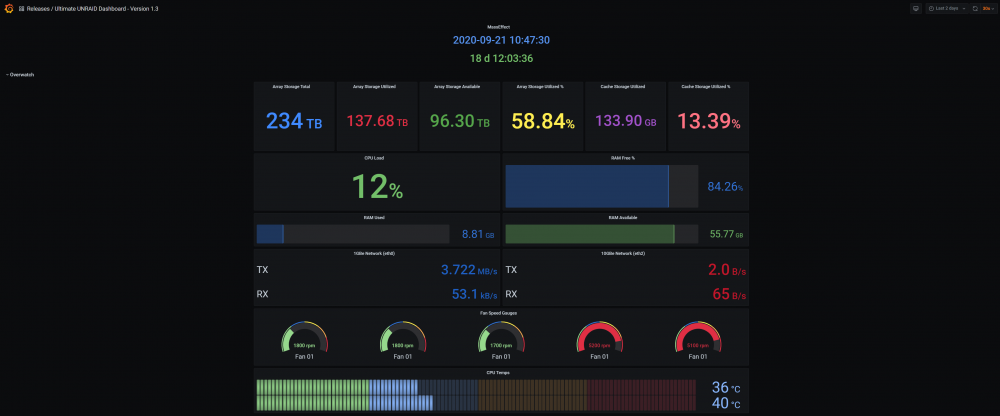
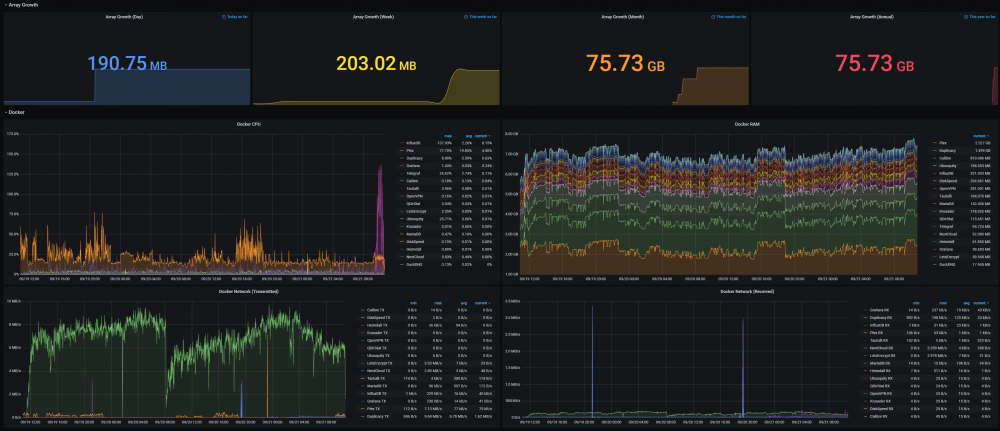
VERSION 1.3 IS FINALLY HERE! After many many hours, little sleep, and just short of a metric crap-ton of edits/revisions/code changes/code merges, I have finally finished development on UUD version 1.3. This is a HUGE update and should make everyone's lives much easier trying to adapt this to their own UNRAID server. The dashboard is now extremely dynamic. I have removed hard coding throughout and implemented REGEX where possible. If it can't work for EVERYONE's server, I rewrote the code so it could. I wanted to give a HUGE shout-out to @GilbN for his continued help, support, and coding on this dashboard. He has been extremely helpful, especially with the dynamics (REGEX and Global Dashboard Variables). Without further ado... Core Changes: This Release is Related to Bug Fixes, Code Cleanup, Adding More Dynamic Ability For a Vast Range of Users/Configurations, and Continued Fine Tuning Added/Modified Dashboard Variables (See Below) to Support Wide Range of Users/Architecture/Use Cases Implemented REGEX Throughout Dashboard When and Where Possible Re-Wrote All Code Using Serial Numbers Where Possible (DiskIO, S.M.A.R.T. Device Temperatures, etc.) You Can Now Set Value Mappings on These Serials Numbers to Forever Label Drives by Drive Number! See Panel Descriptions For Usage Requires Additional Setup: There is a Way to Make Drive Order/Mapping Permanent by Using the Serial Number of the Drive Add the Following Path to the Telegraf Docker Then Edit telegraf.conf > [[inputs.diskio]] > Add device_tags = ["ID_SERIAL"] > Use ID_SERIAL Flag in Grafana This Means That Upon Booting, You Don't Have to Worry About SD* Mounts Changing You Could Override the Serial Number With "DISK01" etc. So the Serials Would Never Show Unless You Want Them To Fan Speed Gauges: Added Regex to Extract Fans From IPMI Sensors List Updated Drive Temperatures (Celsius) Panel to Display All Drive Temps Including Flash (Boot) Updated Docker CPU to Use New Variable Name "cputhreads" Instead of "cpucores" (Deprecated) Changed All Array Share Queries to Use Path = "/mnt/user0" Instead of Device = "sfhs" (Provides More Accurate/Consistent Results) Changed/Ensured All Panel Reference Query IDs to Be In Order by Appearance/Alphabetical (Query 1 = A, Query 2 = B, etc.) Changed All References and Code Involving Dual Assets to 1/2 As Opposed to 0/1 Not Treating as an Array - Example: CPU 00/CPU 01 Becomes CPU 01/CPU 02 Updated Code In Drive S.M.A.R.T. Health Summary Panel to Use Current Standards/Nomenclature Bug Fixes: UPS - Cost This Year Resolved Calculation Error Where Proper Daily Growth Was Not Enumerating Grammatical Errors Throughout Dashboard New Panels/Graphs Array Storage Utilized % Displays Percentage of Array Usage Cache Storage Utilized Displays Usage in GB of Cache Drive(s) Cache Storage Utilized % Displays Percentage of Cache Drive(s) Usage Network Interfaces (TX) Uses REGEX | Includes All Networks Interfaces (NICs, Bridges, Docker, & Virtual) Network Interfaces (RX) Uses REGEX | Includes All Networks Interfaces (NICs, Bridges, Docker, & Virtual) UI Changes: Moved Uptime Clock Panel Above "Overwatch" Section Changed Uptime Clock Panel to Transparent Style Moved Array/Disk Stat Panels to Very Top of Dashboard Renamed Panels Fan Speeds > Fan Speed Gauges Disk Storage > Array Disk Storage Drive S.M.A.R.T. Health > Drive S.M.A.R.T. Health Overview Drive Temperatures > Drive Temperatures (Celsius) CPU 00 > CPU 01 CPU 01 > CPU 02 UPS Load vs Time Left > UPS Load Vs. Time Left This Year's Cost > Cost This Year Dashboard Variables: Modified CPU Cores Variable Name to Match Label: cpucores > cputhreads Modified UPS Variables to Have "UPS" Prefix in Name kwhprice > upskwhprice maxwatt > upsmaxwatt Added Flash (Boot) Drive Variable Uses Serial Numbers. This way it will NEVER CHANGE. Set it once and forget it! (Requires New Dependency - See Above) Usage: Select Single Flash (Boot Drive) Added Parity Drive(s) Variable Uses Serial Numbers. This way they will NEVER CHANGE. Set it once and forget it! (Requires New Dependency - See Above) Usage: Select 1 or More Parity Drives Added Cache Drive(s) Variable Uses Serial Numbers. This way they will NEVER CHANGE. Set it once and forget it! (Requires New Dependency - See Above) Usage: Select 1 or More Cache Drives Added Array Drive(s) Variable Uses Serial Numbers. This way they will NEVER CHANGE. Set it once and forget it! (Requires New Dependency - See Above) Usage: Select 1 or More Array Drives (Not Flash, Not Parity, & Not Cache) Added Descriptions To Following Panels: Fan Speed Gauges Note: Uses REGEX to Parse Fan Names From IPMI Sensor List! Array Growth (Week) Note: Query Options > Min Interval - Must Match on Week/Month/Year (Set to 2h [2 Hours] by Default For Performance Reasons Array Growth (Month) Note: Query Options > Min Interval - Must Match on Week/Month/Year (Set to 2h [2 Hours] by Default For Performance Reasons) Array Growth (Annual) Note: Query Options > Min Interval - Must Match on Week/Month/Year (Set to 2h [2 Hours] by Default For Performance Reasons) Docker CPU Note: Uses Variable Flash I/O (Read & Write) Note: Uses Variable Cache I/O (Read & Write) Note: Uses Variable Array I/O (Read) Note: Uses Variables | Use Overrides > Display Name to Dynamically Name Serial Number (Field Name) to Drive Number Array I/O (Write) Note: Uses Variables | Use Overrides > Display Name to Dynamically Name Serial Number (Field Name) to Drive Number Drive S.M.A.R.T. Health Overview Note: Uses REGEX Drive Temperatures (Celsius) User Overrides > Display Name to Dynamically Name Serial Number (Field Name) to Drive Number Network Interfaces (RX) Note: Uses REGEX | Includes All Networks Interfaces (NICs, Bridges, Docker, & Virtual) Network Interfaces (TX) Note: Uses REGEX | Includes All Networks Interfaces (NICs, Bridges, Docker, & Virtual) CPU 01 Note: Uses REGEX To Find Cores in CPU 01. Change REGEX According to Your Number of Cores! Example: CPU 01 Has 8 Cores (16 With HyperThreading) - The REGEX For Cores 0-15 is "/cpu(1[6-9]|2[0-9]|3[01])|cpu-total/" CPU 02 Note: Uses REGEX To Find Cores in CPU 02. Change REGEX According to Your Number of Cores! Example: CPU 02 Has 8 Cores (16 With HyperThreading) - The REGEX For Cores 16-31 is "/cpu(1[6-9]|2[0-9]|3[01])/" CPU 01 Core Load Note: Uses REGEX To Find Cores in CPU 01. Change REGEX According to Your Number of Cores! Example: CPU 01 Has 8 Cores (16 With HyperThreading) - The REGEX For Cores 0-15 is "/cpu(1[6-9]|2[0-9]|3[01])|cpu-total/" CPU 02 Core Load Note: Uses REGEX To Find Cores in CPU 02. Change REGEX According to Your Number of Cores! Example: CPU 02 Has 8 Cores (16 With HyperThreading) - The REGEX For Cores 16-31 is "/cpu(1[6-9]|2[0-9]|3[01])/" IPMI Fan Speeds Note: Uses REGEX to Parse Fan Names From IPMI Sensor List! UPS Load % Note: Uses Variables Current Load kWh Note: Uses Variables Average UPS Load Note: Uses Variables Current UPS Load Note: Uses Variables UPS Load Vs. Time Left Note: Uses Variables Estimated Yearly Cost Note: Uses Variables | Adjust Field Unit For Your Set UPS Currency Variable As Required! Actual Cost This Year Note: Uses Variables | Adjust Field Unit For Your Set UPS Currency Variable As Required! Average Daily Cost Note: Uses Variables | Adjust Field Unit For Your Set UPS Currency Variable As Required! See Post Number 1 For the New JSON File! Alright, I'm finally heading to bed. Let me know if you run into any issues. Thanks guys. I hope you ENJOY! 😁


 4 points
 -
https://github.com/atribe/unRAID-docker/pull/7 Merged. Template should be updated in around 1 hour.3 points
-
Sure, I'm sharing the EFI folder, qcow2 image and config.plist, so you are able to compare as you want. opencorebasic.qcow2: https://workupload.com/file/8beayNFHFvF EFI folder: https://workupload.com/file/4Qh8vsvGfaN config.plist: attached here. This is a basic EFI: - debug EFI - no audio specified address - loads only openruntime and hfspluslegacy (no opencanopy) - picker: builtin - no content inside Resources folder (icons, labels, etc) - no agpm injected - target 67 --> log to file - boot args: -v debug=0x100 keepsyms=1 - prev-lang:kbd en:0 (ZW46MA==) - SIP disabled - Injections: x86PlatformPlugin, EC, usb power properties, AppleLPC - Patches: algrey - cpu_topology_sort -disable _x86_validate_topology, algrey - cpuid_set_cpufamily - force CPUFAMILY_INTEL_PENRYN Kexts: lilu (debug): updated to commit 94a467f virtualsmc (debug): updated to commit eda655b whatevergreen (debug): updated to commit 65fc496 applealc (debug): updated to commit 88ed1dd applemcereporterdisabler: you need this for dual socket Change these data in the config.plist SMBIOS: iMacPro 1,1, SN C02VW8Z6HX87, system uuid EB08885A-CC13-4460-A45B-4609BF68A5AD, ROM 83691d68a5ad (g2kdaKWt), MLB C02752404J9JG368C Let us know if it works, my vm boots without problems config.plist2 points
-
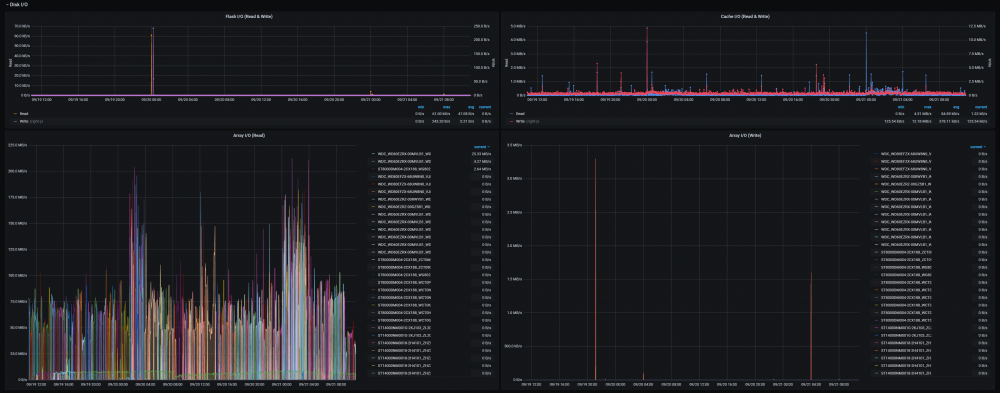
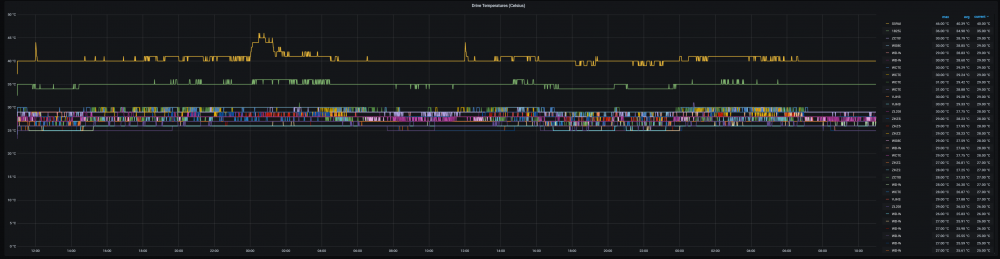
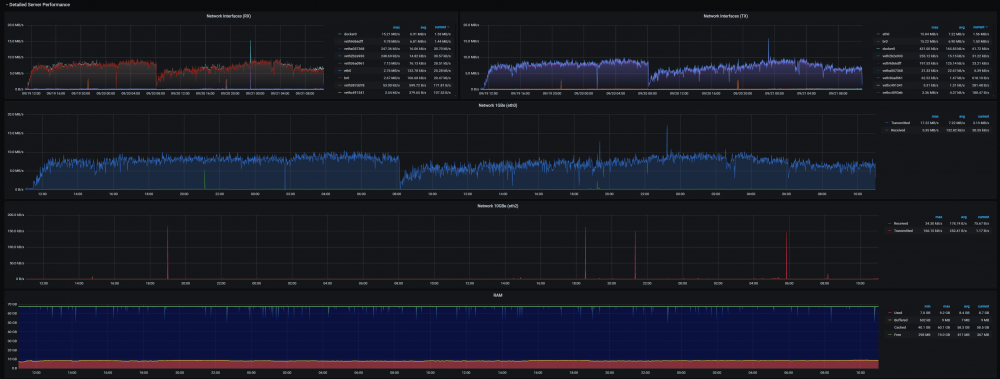
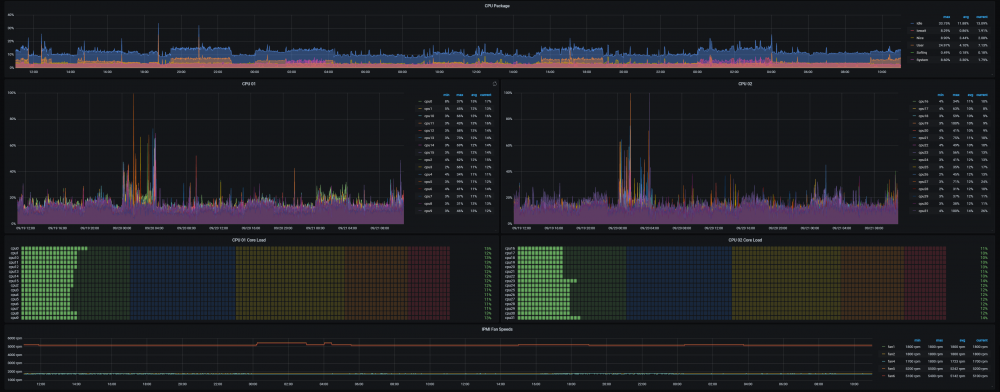
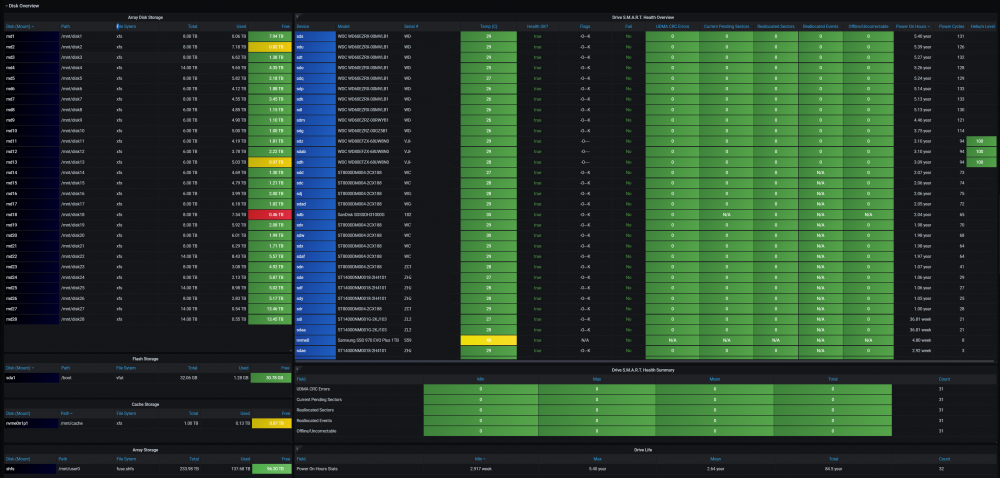
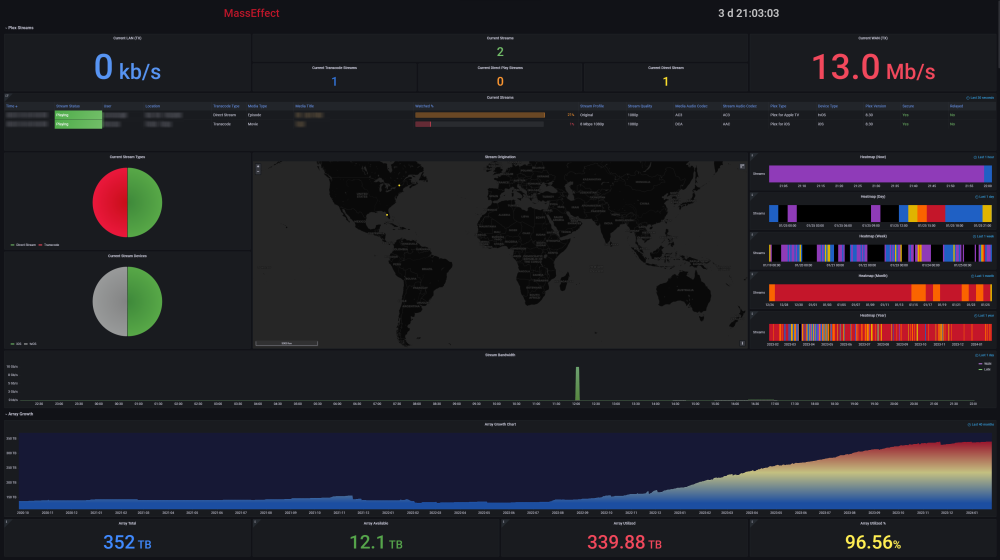
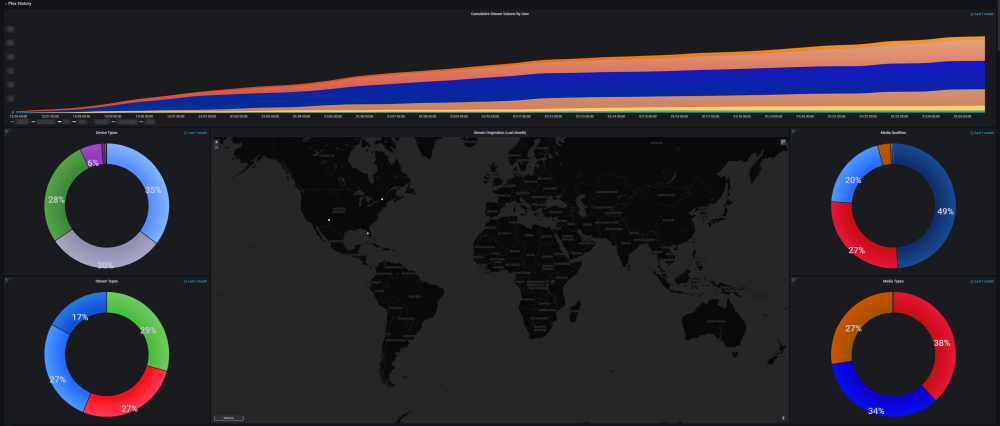
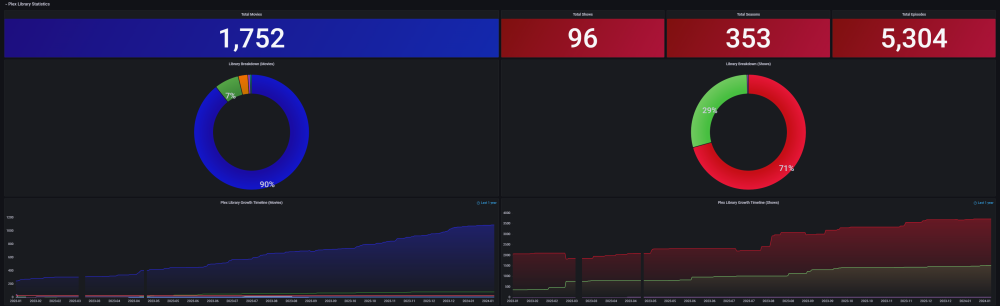
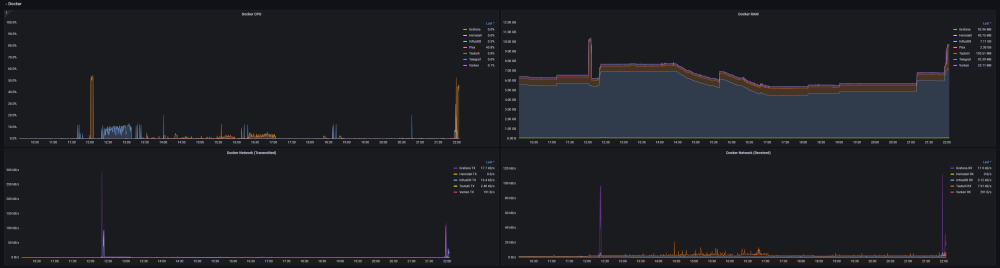
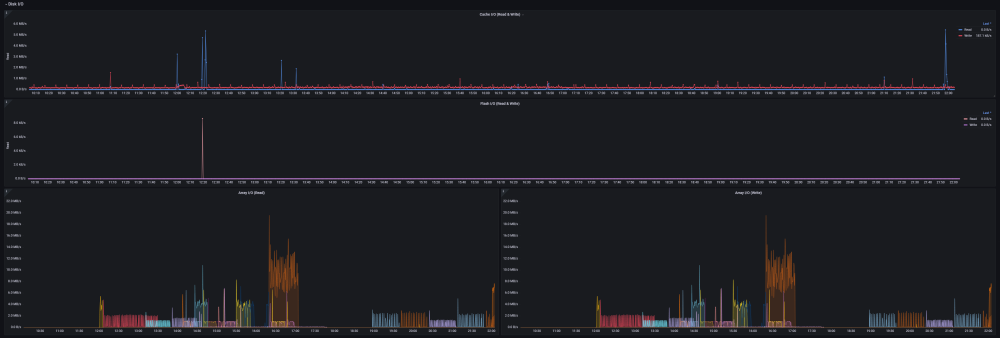
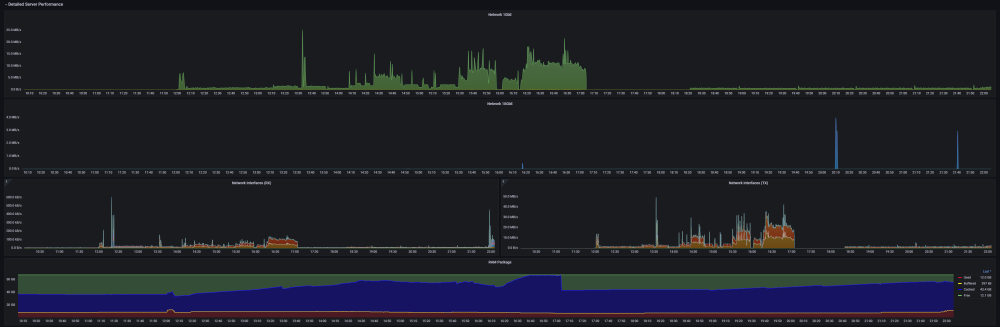
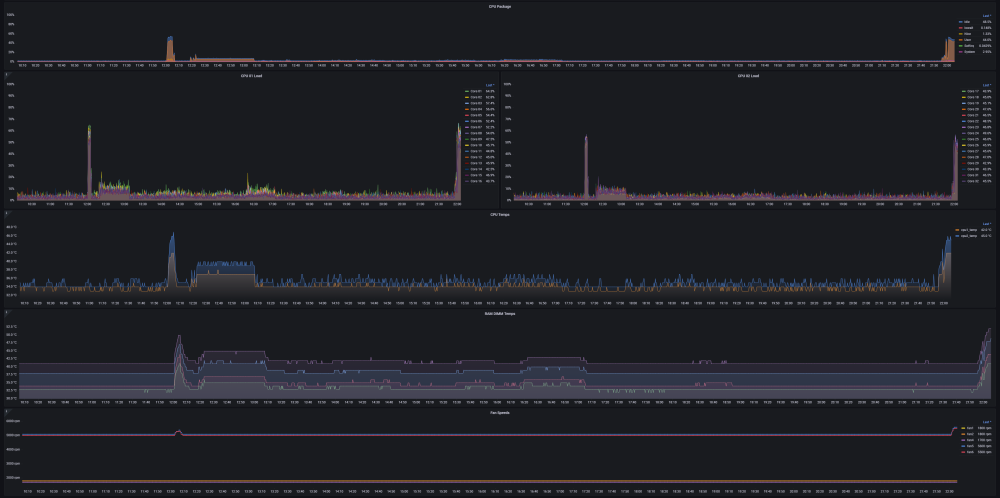
Per @SpencerJ request, here are updated pictures of UUD Version 1.3 Notes: These are Very High Resolution Screenshots on a 4K Monitor. Click For Full Screen Detail Serial Numbers Are Redacted When I get some time, I'll perform the serial number to drive number mappings using overrides, and will share those screenshots.

 2 points
 -
Nice! Can you post a screenshot or two of the updated Dashboard? I'll be sure to share this on our social media/monthly newsletter.2 points
-
Nice! I'm going to make a PR on the Telegraf template to have the new path added by default.2 points
-
Ultimate UNRAID Dashboard (UUD) Current Release: UUD 1.7 (2024-03-30) UUD NEWS: 2024-03-30: UUD Version 1.7 is Released 2022-06-19: The UUD Forum Topic Reaches 200,000 Views! 👀👀👀 2022-04-17: The UUD Tops 5,000 Unique Downloads 💾💾💾 🎉 2021-05-26: The UUD Forum Topic Reaches 1,000 Replies! 2021-04-17: The UUD Forum Topic Reaches 100,000 Views! 👀👀 2021-03-26: The UUD Tops 2,500 Unique Downloads 💾💾 🎉 2021-03-23: UUD 1.6 is Featured Again in the "Best of the Forum" Blog 🥇🥇 2021-03-21: The UUD Forum Topic Reaches 75,000 Views! 👀 2021-03-20: UUD Version 1.6 is Released 2021-01-19: The UUD Forum Topic Reaches 50,000 Views! 👀 2021-01-11: The UUD Tops 1,000 Unique Downloads 💾 🎉 2021-01-07: UUD is Featured as the FIRST "Best of the Forum" Blog 🥇 2021-01-06: UUD Donations Site is Created 2020-12-31: UUD Version 1.5 is Released 2020-10-09: UUD Version 1.4 is Released 2020-09-28: The UUD is Featured in the Official UNRAID Monthly Newsletter (September 2020)! 2020-09-21: UUD Version 1.3 is Released 2020-09-14: UUD Version 1.2 is Released 2020-09-12: UUD Version 1.1 is Released 2020-09-11: The UUD is Born and Version 1.0 is Released Overview: Welcome to the OFFICIAL UUD forum topic. The UUD is my attempt to develop the Ultimate Grafana/Telegraf/InfluxDB/Plex/Tautulli/Varken dashboard. This entire endeavor started when one of our fellow users @hermy65 posed a simple, but complex question in another forum topic (see post #3). I decided to give it a shot, as I am an IT professional, specifically in enterprise data warehouse/SQL server. After a few days of hard work, UUD version 1.0 was released. We are currently on Version 1.6, and the project is in active development. If you are a Grafana developer, or have had experience building dashboards/panels for UNRAID, please let me know. I would love to collaborate. Version 1.7 Screenshots (Click the Images as They are Very High Resolution): Disclaimer: This is based on my 30 Drive UNRAID Array. So this shows an example of a fully maxed out UNRAID setup with max drives, dual CPUs, Dual NICs, etc. You will/may need to adjust panels & queries to accommodate your individual UNRAID/PLEX architecture. I have spent many hours custom coding new functionality and features based on that original template. Much has been learned and I am excited to see how far this can go in the future. Thanks again! Developers: Primary Developer: @falconexe (USA) UUD Creator | Active Development | Panels | Database Queries | Integration | Look & Feel | GUI | Refinement | Support Developer/Colleague: @GilbN (Europe) Dashboard Examples | Back-end | Dynamics | REGEX | Support | Tutorials Contributors: @hermy65 @atribe @Roxedus @SpencerJ @testdasi @ChatNoir @MammothJerk @FreeMan @danktankk @Dazog @MrLondon @LTM @mattekure @ptchernegovski @caplam @RockDawg @corgan @jbartlett @Hoopster @LTM @skaterpunk0187 @valiente @Agent531C @JudMeherg @Jturner @1471 Dependencies (Last Updated On 2021-03-20) Docker - InfluxDB Docker - Telegraf Docker Network Type: HOST (Otherwise You May Not Get All Server Metrics) 👉 Create Telegraf Configuration File 👈 (DO THIS FIRST!) Create and Place a File into Directory "mnt/user/appdata/YOUR_TELEGRAF_FOLDER" Enable and Install Telegraf Plugins Telegraf Plugin - [[inputs.net]] Enable in telegraf.config Telegraf Plugin - [[inputs.docker]] Enable in telegraf.config Telegraf Plugin - [[inputs.diskio]] Enable in telegraf.config To Use Static Drive Serial Numbers in Grafana (For DiskIO Queries) Do the Following: Edit telegraf.conf > [[inputs.diskio]] > Add device_tags = ["ID_SERIAL"] > Use ID_SERIAL Flag in Grafana Now Upon Booting, You Don't Have to Worry About SD* Mounts Changing (So Your Graphs Don't Get Messed Up!) You Can Also Set Overrides on the Query Fields to Map the Serial Number to a Common Disk Name Like "DISK01" etc. Telegraf Plugin - [[inputs.smart]] Enable in telegraf.config Also Enable "attributes = true" Bash Into Telegraf Docker and Run "apk add smartmontools" Telegraf Plugin - [[inputs.ipmi_sensor]] Enable in telegraf.config Bash Into Telegraf Docker and Run "apk add ipmitool" Telegraf Plugin - [[inputs.apcupsd]] Enable in telegraf.config Telegraf Docker Config Add New Path (NOTE: This path has now been merged into Atribe's Telegraf Docker Image. (Thanks @GilbN & @atribe) Post Arguments "/bin/sh -c 'apk update && apk upgrade && apk add ipmitool && apk add smartmontools && telegraf'" Docker - Grafana Grafana Plugins Pie Chart Panel Run Following Command in Docker: grafana-cli plugins install grafana-piechart-panel World Map Run Following Command in Docker: grafana-cli plugins install grafana-worldmap-panel JSON API Run Following Command in Docker: grafana-cli plugins install marcusolsson-json-datasource Dynamic Image Panel Run Following Command in Docker: grafana-cli plugins install dalvany-image-panel Docker - Tautulli Docker - Varken CA Plugin: IPMI Tools License: GeoLite2 (Free) NON SERVER HARDWARE (If You Cannot Use "IPMI" and Need to Use "Sensors") As an alternate to IPMI to monitor CPU/System/Aux Temps, you can try the Sensors Plugin. Telegraf Plugin - [[inputs.sensors]] Enable in the Telegraf Config (Uncomment It) Bash into the Telegraf Docker and Execute "apk add lm_sensors" Stop All 3 Dockers (Grafana > Telegraf > InfluxDB) If You Want to Keep This Plugin in Perpetuity, You Will Need to Modify Your Telegraf Docker Post Arguments (Adding lm_sensors): "/bin/sh -c 'apk update && apk upgrade && apk add ipmitool && apk add smartmontools && apk add lm_sensors && telegraf'" Start All 3 Dockers (InfluxDB > Telegraf > Grafana) Dashboard Variables (Update These For Your Server): I haven't been this geeked out about my UNRAID server in a very long time. This is the cherry on top for my UNRAID experience going back to 2014 when I built my first server. Thanks everyone! VERSION 1.7 (Current) Ultimate UNRAID Dashboard - Version 1.7 - 2024-03-30 (falconexe).json @SpencerJ


 1 point
 -
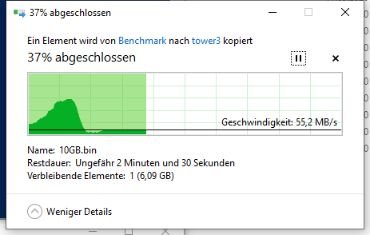
Hello Unraid Community, I made a beginners guide/tutorial to install/setup Unraid (It was using v6.6.6). I cover the following topics: USB Key - 18:00 BIOS - 3:42 Disk Array - 4:56 Parity Check - 10:30 Format Drives - 11:03 Single Share - 11:38 PSA - 21:11 Security - 22:11 Share per Media Type - 28:43 APC UPS - 40:36 10 Gigabits/Second Transfer Test - 43:11 Share Troubleshooting - 44:41 I hope it helps those looking for some initial direction to get started and be inspired to continue their Unraid journey. How to Install & Configure an Unraid NAS - Beginners Guide1 point
-
Can be added a 2 stage factor security for the root account? Like a Microsoft authentication or google or other things. Event using the same thing for user login1 point
-
Hahaha I know how you feel. I'm relatively new here myself, but you'll soon start picking bits up. You've made a great start with Sonarr and following Spaceinvaderone's tutorial, so what I'd recommend is keep a copy of the files you have edited so that you can refer back to "what works", and build from there. I've just recently finished reading this entire SWAG thread, I'd genuinely advise you to do the same in your spare time, there is a heap of useful information here and will put you in good standing to tackle your next unraid adventure. 👍 All the best.1 point
-
I suppose it is browser cache like you said....on my phone when I use a incognito window it opened right up to the sonarr login. Dukes of Hazard takes me back! It feels like looking through a old photo album of the past. Love it! This stuff is a lot to chew through for someone who hasnt done much more with a computer than email, browsing, Word docs, saving pictures lol. I'm in WAY over my head, but the forum and SI videos has been a HUGE help....slowly fighting my way through it all, seeing that login screen is like a light at the end of the tunnel lol.....or maybe like the pile of dirt that I'm fixing to ramp 100' off of LOL I appreciate you checking it out for me! Thanks!1 point
-
Confirmed - works now thanks!1 point
-
!!!!!! FANTASTIC !!!!!! And of course , after changing just the SMBIOS and dropping it in, it boots without a problem . Grrrr . Steam out of my ears and headdesking now why i could not find it myself hahaha. But as your typical IT nurd its hard to give up and ask for help. Tnx bro, super appreciated. When i get some time next weekend i will try and figure out what i missed. Surely its one stupid seemingly unimportant flag as it always is hahahaha.1 point
-
Thanks, confirmed it's a bug:1 point
-
Wow! Yeah, I’ll post it here now. I’m honored! Thanks.1 point
-
Good to know. That was my plan going into it. I was not sure if it would cause other concerns. I suppose I will backup all directories as well as take a copy of my docker.img and move it to a safe place, in case I need to restore back if I run into any concerns.1 point
-
Test the failregex on the command line fail2ban-regex /bitwarden/bitwarden.log /config/fail2ban/filter.d/bitwardenrs.local1 point
-
The bitwarden filter that comes with fail2ban is not for bitwarden_rs. You need to create a new file, and use the correct failregex. This is the filter I use. As noted you have to call it something else than bitwarden.conf, i called it bitwarden_rs.conf1 point
-
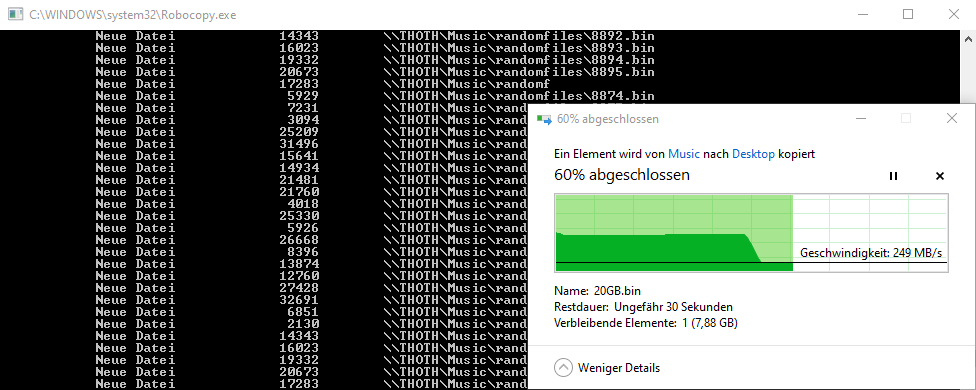
@ptr727 (and all other users) I have a theory regarding this problem. I guess its the same thing that causes different transfers speeds for different unraid users with 10G connections. Unraid uses a "layer" for all user shares with the process "shfs". This process is single-threaded and by that limited through the performance of a single cpu core/thread. You are using the E3-1270 v3 and it reaches 7131 passmark points. As your CPU uses hyperthreading I'm not sure if the shfs process is able to use the maximum of a single core or splits the load. If its using 8 different thread, one has only ≈891 passmark points. Since a few days I'm using the i3-8100 and with its 6152 passmark points its weaker than yours, but as it has only 4 cores/threads its core performance is guaranteed at ≈1538 points. Since I have this CPU I'm able to max out 10G and have much better SMB performance. I would be nice if we could test my theory. At first you need to create many random files on your servers cache (replace the two "Music" with one of your share names): # create random files on unraid server mkdir /mnt/cache/Music/randomfiles for n in {1..10000}; do dd status=none if=/dev/urandom of=/mnt/cache/Music/randomfiles/$( printf %03d "$n" ).bin bs=1 count=$(( RANDOM + 1024 )) done Then you create a single 10GB file on the cache (again replace "Music"): dd if=/dev/urandom iflag=fullblock of=/mnt/cache/Music/20GB.bin bs=1GiB count=20 Now you use your Windows Client to download the file "20GB.bin" through the Windows Explorer. While the download is running you open in Windows the command line (cmd) and execute the following (replace "tower" against your servers name and "Music" against your sharename): start robocopy \\tower\Music\randomfiles\ C:\randomfiles\ /E /ZB /R:10 /W:5 /TBD /IS /IT /NP /MT:128 This happened as long I had the Atom C3758 (≈584 core passmark points😞 And this with my new i3-8100: Finally you could retry this test after you disabled Hyperthreading in the BIOS. By that we could be sure how relevant it is or not.
 1 point
 -
All the data has been copied over. XFS is really responsive and acts almost imediately when a write is requested unlike Reiserfs. I should have done this much earlier! Thanks all.1 point
-
You need to let it finish, if you stop a rebuild and replace the rebuilding disk with a larger one it will only be rebuilt with the size of the original one, in this case 1TB, after a reboot that disk will be detected as its original size, making you rebuild it again.1 point
-
You have to post exactly what you have done.1 point
-
No, some expanders can be powered either way, it won't affect performance.1 point
-
No it’s on the same one (I update both tdarr and tdarr_aio even though they’re the same). Just make sure to pull the latest haveagitgat/tdarr_aio container (unraid should do that automatically when you check for updates)1 point
-
If it's from the same repo (e.g. "steefdebruijn/docker-roonserver") then no diff. What he did was just to create Unraid template for the docker so the necessary mappings are visible.1 point
-
Is it mean that now works.

 1 point
 -
Had the same issue, you need to edit that line and replace "-f16" with "-f14". Install works great after this edit. Github probably modified its HTML.1 point
-
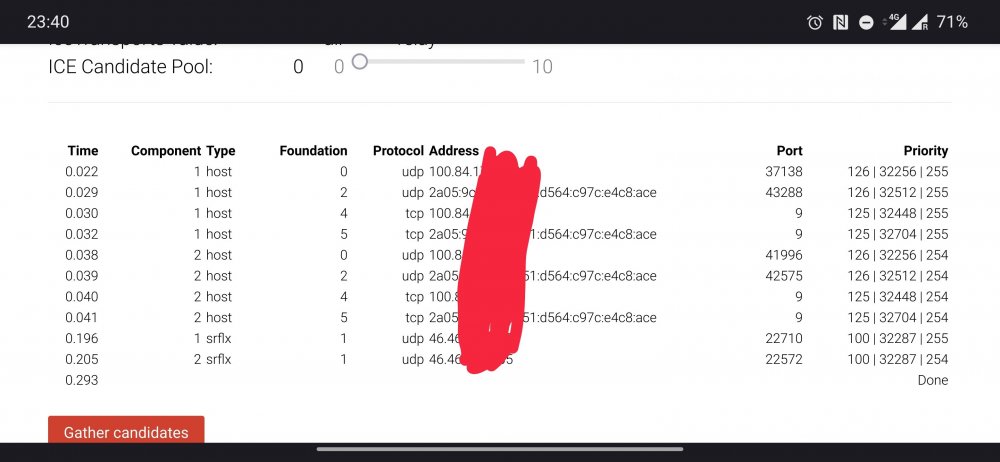
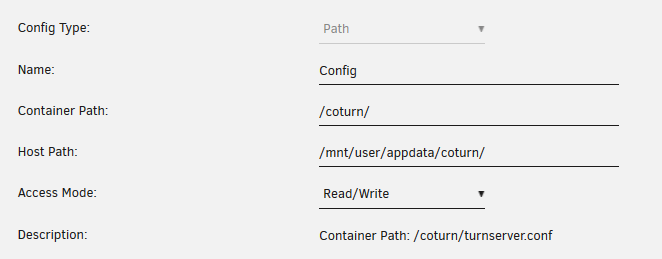
Hi, I got this working. This is what I've done. 1. Edit container settings and change configuration path to look like this (you point to the directory, not to the file, that was my problem) 2. With windows or whatever edit a file named turnserver.conf with this content (It is a simple config, you only have to change the secret and the domain name) listening-port=3478 fingerprint use-auth-secret static-auth-secret=yourdesiredsecret realm=your.domain.com total-quota=100 bps-capacity=0 stale-nonce no-multicast-peers 3. With krusader copy the turnserver.conf you just created to /mnt/user/appdata/coturn/ 4. Forward the ports in the router as OP says 5. Restart the container 6. In nextcloud add the servername:port and secret and TCP only Now click to test and must be successful. BTW @xthursdayx thanks for you work

 1 point
 -
OK guys, multi remote endpoint support is now in for this image please pull down the new image (this change will be rolled out to all my vpn images shortly). What this means is that the image will now loop through the entire list, for example, pia port forward enabled endpoints, all you need to do is edit your ovpn config file and add the remote endpoints at the top and sort into the order you want them to be tried, an example pia ovpn file is below (mine):- remote ca-toronto.privateinternetaccess.com 1198 udp remote ca-montreal.privateinternetaccess.com 1198 udp remote ca-vancouver.privateinternetaccess.com 1198 udp remote de-berlin.privateinternetaccess.com 1198 udp remote de-frankfurt.privateinternetaccess.com 1198 udp remote france.privateinternetaccess.com 1198 udp remote czech.privateinternetaccess.com 1198 udp remote spain.privateinternetaccess.com 1198 udp remote ro.privateinternetaccess.com 1198 udp client dev tun resolv-retry infinite nobind persist-key # -----faster GCM----- cipher aes-128-gcm auth sha256 ncp-disable # -----faster GCM----- tls-client remote-cert-tls server auth-user-pass credentials.conf comp-lzo verb 1 crl-verify crl.rsa.2048.pem ca ca.rsa.2048.crt disable-occ I did look at multi ovpn file support, but this is easier to do and as openvpn supports multi remote lines, it felt like the most logical approach. note:- Due to ns lookup for all remote lines, and potential failure and subsequent try of the next remote line, time to initialisation of the app may take longer. p.s. I dont want to talk about how difficult this was to shoe horn in, i need to lie down in a dark room now and not think about bash for a while :-), any issues let me know!.1 point
-
wow, this is what i was coming here for too! my scripts are starting to stack up, would love to be able to organize them in a folder type structure. i.e. array scripts, backup scripts, VM scripts, etc. Goes without saying, Squid, great plugin for sure.1 point
-
Yes no raid or passthrough. Edit : Seems you say disk passthrough, but I org. means controller passthrough to client OS.1 point
-
- Mainboard already have SAS 3008 controller, no reason to add extra controller. - SAS blackplane only can connect to SAS controller, it won't work will any SATA controller. - Disk on SAS blackplane can't divide in different set, all ( 12 disks ) will under same controller by one or two cable. - You quote SAS disk, you need to know Unraid not support spin down it. - Just opposite, if Unraid are host OS, no passthrough need. If you concern this, you need carefully check the noise level of those hardware, most people like change to SQ series PSU.1 point
-
Single CPU and standard mainboard gives you more options if your needs change. A 2U server will still be quite noisy, have a search for 'quiet down supermicro 2u server' for tips. People seem to change the center fans, fit a 2U active cooler to the CPU etc. 1/2) I don't think sharing the card will work well and having two instances of plex is likely fraught with issues. The card will only do 2-3 steams due to Nvidia 'segmentation' unless you get into patching files. For now I would let the CPU handle the transcoding and find you're way around unraid. If you need to, you can add a second GPU later, a cheap 2GB GT1050 would be fine for some GPU transcode offload. Keep in mind this chassis only supports half height cards though so you need to buy carefully. 3) You want unraid to boot the the inbuilt VGA. Unraid presents as text only console and for most people the configuration is then done through the web interface from another machine. Booting the the onboad VGA keeps the 1650 free for VM's etc. without VGA BIOS passthrough etc. 4) The motherboard you spec has a built in LSI SAS controller. I would expect this is connected to the SAS backplane. You need to check with the Vendor. it needs to be in Pass through / HBA mode and not RAID mode. This may require it to be reflashed in IT mode. 5) VM's etc should either run off Cache or a dedicated SSD for performance. Will 480GB give you enough space? You can add more later. I'd connect these to the motherboard directly and find somewhere inside the case to mount them. This avoids the issue that TRIM doesn't work with some LSI cards (not sure on the integrated version) and keeps your main slots free for drives. You could even use a half height PCI-E card that takes M.2 drives. Easy to update later so get whatever you need to get started. Not every directory needs caching. E.g. my documents directory has infrequent small writes so I cache it. Copying lots of Media files I to the Movies folder, I don't, it does straight to the array. 6) There are options, I like it simple so I have the VM's on a seperate drive. Will probably add a second VM drive later. A couple others. For a homelab I'd be quite happy with used drives, nothing critical that can't be rebuilt or recovered. However for mass storage of data in an array, setting up with a lot of drives that could be 3-5 years old is asking for failures. Drives wear out and they don't get an easy life in a data center. If you are going with the old drives, I'd configure double parity, but keep in mind that if you need to rebuid a drive, then all drives in the array will need to be 100% reliable for 12+ hours of full speed read to rebuild a 4TB drive. Regardless of the above I would suggest you configure now with at least 8TB parity drive(s) then as your needs grow, you can drop in bigger drives without having to replace parity. Over the next few years likely 4TB drives will be more expensive per TB as they are less commonly used. You also don't need to add at 12 drives to the array at once. You can setup the array with half a dozen drives and then add drives in at your leisure. I prefer not to have spindles racking up hours for no good reason so aim for 20-30% free space. You can pre-clear the drives then it only take a couple of minutes to stop the array, add the cleared drive and restart.1 point
-
Is there a reason you are buying a dual CPU server with a pair of low spec CPU's? A single E5-2660 V3 CPU is 10C 20T and really cheap these days ~$80 -100 Dual CPU's are often less efficient and than and single CPU and comprimise memory , PCI-E config etc. + the space and noise of a 2U server. Personally if you need/want a Xeon I'd look at the CPU above in a standard ATX workstation board such as Supermicro X10SRA-F Using a standard tower case and standard ATX powersupply. You can make it nearly silent and still have a good range of expansion options.1 point
-
For anyone else having trouble accessing the web client of the EAPController, I found a setting (I think it was under the network settings) that allowed the Ethernet connection to be bridged. As soon as I changed this setting, I was able to access the controller's webpage1 point
-
This suggests some confusion about how cache works in Unraid. Data is written to cache for cache-yes and cache-prefer shares. Cache-yes shares are moved from cache to array when mover runs, and cache-prefer shares are moved array to cache when mover runs. Other than that, there is no "pulling" data "that's not in the cache yet". If the data is already on the array, it won't ever go to cache unless it is in a cache-prefer share and mover moves it there.1 point
-
Logpath should point to bitwarden logs. You need to map that folder in letsencrypt1 point
-
This docker is not secure as is for outside access. Digging around so far I found that logging was not enabled so I enabled it on the template under advanced, then extra parameters -e LOG_FILE=/data/bitwarden.log -e LOG_LEVEL=warn -e EXTENDED_LOGGING=true and now it logs into the /data/bitwarden.log file. Now I cant execute fail2ban so maybe its not installed either because its not where the link you send shows it to be. I am not that familiar with docker honestly so I wouldnt know where to begin with that. I love this app and thanks for getting it for us worst case scenario I can have it log to letsencrypt and configure a jail for it in there.1 point
-
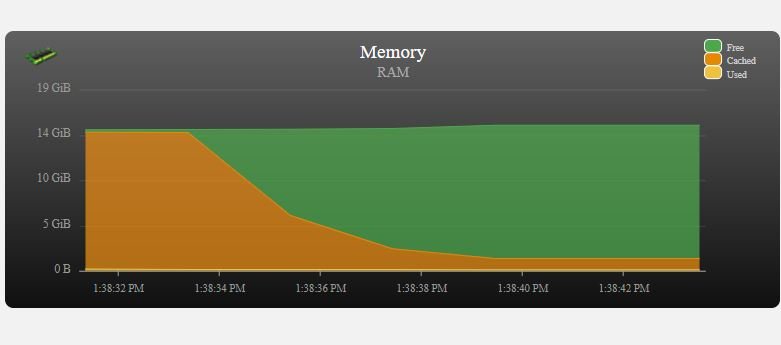
In case anyone wanted to know. I was worried about unraid using up all the ram for caching. It kept the cache for over 10 hours until I stopped the array and restarted it. Once I did that, I captured the graph showing that unraid removed most of the cache in about 8 seconds. did this on unraid version 6.8.0-rc7
 1 point
 -
Thank you to all who submitted questions. This interview is now LIVE here: https://unraid.net/blog/spaceinvader-one-interview Let us know what you think of the interview. Also, huge thanks to @SpaceInvaderOne for taking the time to do this!1 point
-
Did a lot of research today on this.. So far I have found that the Red Hat network driver causes a lot of latency spikes for some reason. Disabling it and using a usb Ethernet. causes at least substantially less latency to occur.1 point
-
Cached RAM just means that the OS will keep recently used file data in memory in case some program will request the same data again. The OS always strives to use as much of the available (but unused) RAM for cache so as not to waste excess RAM in the machine. So adding 4 GB more RAM will not increase the free RAM. It will just increase the amount of RAM used for caching of file data. Your 600 MB of free RAM is just the result of the actual memory consumption jumping a bit up/down as different processes runs. And when memory is released it ends up as free - until some other program needs it or until the OS will repurpose it as cache. If a program needs more than your 600 MB of memory, then the OS will instantly throw away some cached data and hand over to the program. So you aren't lacking RAM in the system.1 point
-
That's exactly what I said. If you want these advanced features, they are ALL currently available by using VM's or dockers. No need to add them to the core OS.1 point
-
Normally all file operations for a NAS would be handled in the client desktop, not the local OS. At what point do you draw the line between maintaining a light resource NAS and a fully featured desktop OS? Since unRAID runs purely in RAM, all these add ons increase the required RAM footprint considerably, and detract from the core duty of being a NAS. I'd rather the core features stay lightweight, and if you have the extra resources, it would be better to spin up a "management" VM or dockers with all the file managers, viewers and editors that you desire.1 point
-
I use these two command: The first one is suited to files and the second to folders. Only the files and folders that have wrong permissions are fixed, saving some time.1 point


-Reddit.thumb.png.bd61cce15378879038978fc5fc1e2daf.png)


