Leaderboard


Popular Content
Showing content with the highest reputation on 09/24/20 in all areas
-
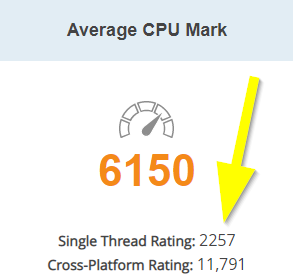
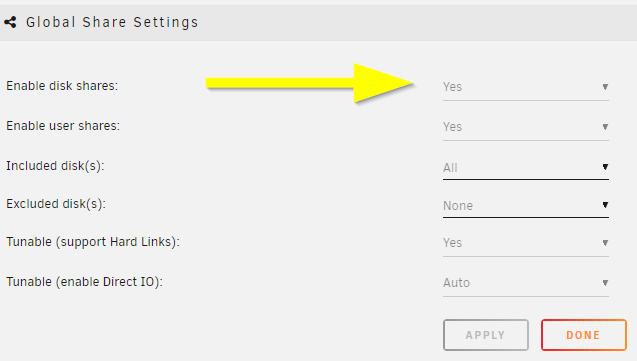
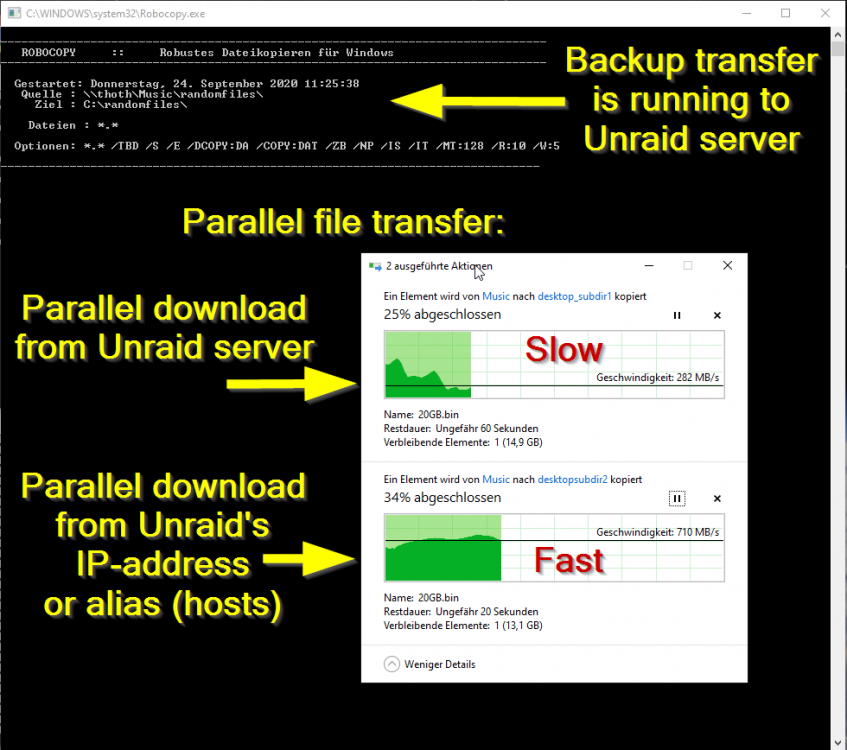
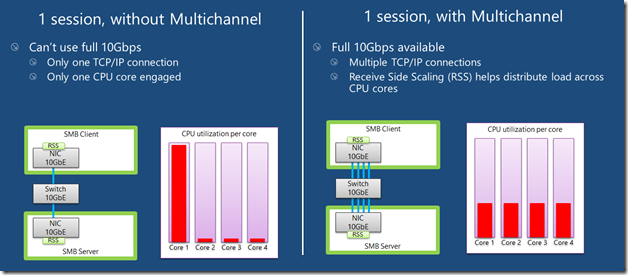
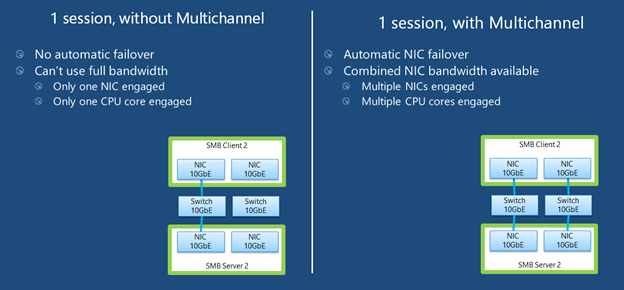
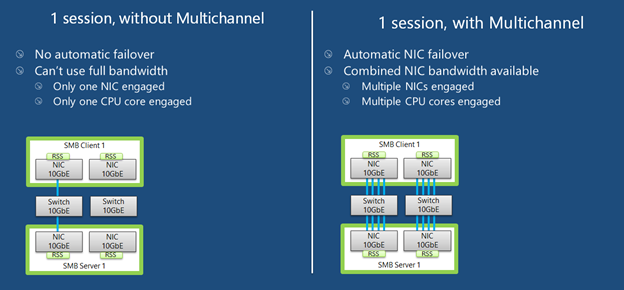
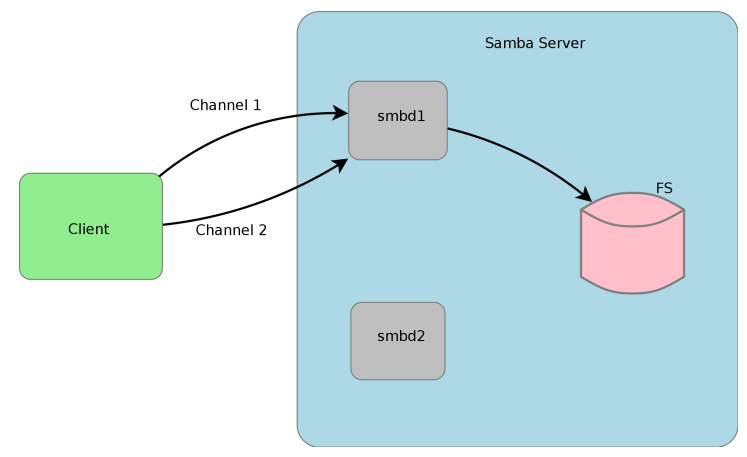
I'm using Unraid for a while now and collected some experience to boost the SMB transfer speeds: Donate? 🤗 1.) Choose the right CPU The most important part is to understand that SMB is single-threaded. This means SMB uses only one CPU core to transfer a file. This is valid for the server and the client. Usually this is not a problem as SMB does not fully utilize a CPU core (except of real low powered CPUs). But Unraid adds, because of the ability to split shares across multiple disks, an additional process called SHFS and its load raises proportional to the transfer speed, which could overload your CPU core. So the most important part is, to choose the right CPU. At the moment I'm using an i3-8100 which has 4 cores and 2257 single thread passmark points: And since I have this single thread power I'm able to use the full bandwith of my 10G network adapter which was not possible with my previous Intel Atom C3758 (857 points) although both have comparable total performance. I even was not able to reach 1G speeds while a parallel Windows Backup was running (see next section to bypass this limitation). Now I'm able to transfer thousands of small files and parallely transfer a huge file with 250 MB/s. With this experience I suggest a CPU that has around 1400 single thread passmark points to fully utilize a 1G ethernet port. As an example: The smallest CPU I would suggest for Unraid is an Intel Pentium Silver J5040. P.S. Passmark has a list sorted by single thread performance for desktop CPUs and server CPUs. 2.) Bypass single-thread limitation The single-thread limitation of SMB and SHFS can be bypassed through opening multiple connections to your server. This means connecting to "different" servers. The easiest way to accomplish that, is to use the ip-address of your server as a "second" server while using the same user login: \\tower\sharename -> best option for user access through file explorer as it is automatically displayed \\10.0.0.2\sharename -> best option for backup softwares, you could map it as a network drive If you need more connections, you can add multiple entries to your windows hosts file (Win+R and execute "notepad c:\windows\system32\drivers\etc\hosts"): 10.0.0.2 tower2 10.0.0.2 tower3 Results If you now download a file from your Unraid server through \\10.0.0.2 while a backup is running on \\tower, it will reach the maximum speed while a download from \\tower is massively throttled: 3.) Bypass Unraid's SHFS process If you enable access directly to the cache disk and upload a file to //tower/cache, this will bypass the SHFS process. Beware: Do not move/copy files between the cache disk and shares as this could cause data loss! The eligible user account will be able to see all cached files, even those from other users. Temporary Solution or "For Admins only" As Admin or for a short test you could enable "disk shares" under Settings -> Global Share Settings: By that all users can access all array and cache disks as SMB shares. As you don't want that, your first step is to click on each Disk in the WebGUI > Shares and forbid user access, except for the cache disk, which gets read/write access only for your "admin" account. Beware: Do not create folders in the root of the cache disk as this will create new SMB Shares Safer Permanent Solution Use this explanation. Results In this thread you can see the huge difference between copying to a cached share or copying directly to the cache disk. 4.) Enable SMB Multichannel + RSS SMB Multichannel is a feature of SMB3 that allows splitting file transfers across multiple NICs (Multichannel) and create multiple TCP connection depending on the amount of CPU Cores (RSS) since Windows 8. This will raise your throughput depending on your amount of NICs, NIC bandwidth, CPU and used settings: This feature is experimental SMB Multichannel is considered experimental since its release with Samba 4.4. The main bug for this state is resolved in Samba 4.13. The Samba developers plan to resolve all bugs with 4.14. Unraid 6.8.3 contains Samba 4.11. This means you use Multichannel on your own risk! Multichannel for Multiple NICs Lets say your mainboard has four 1G NICs and your Client has a 2.5G NIC. Without Multichannel the transfer speed is limited to 1G (117,5 MByte/s). But if you enable Multichannel it will split the file transfer across the four 1G NICs boosting your transfer speed to 2.5G (294 MByte/s): Additionally it uses multiple CPU Cores which is useful to avoid overloading smaller CPUs. To enable Multichannel you need to open the Unraid Webterminal and enter the following (the file is usually empty, so do not wonder): nano /boot/config/smb-extra.conf And add the following to it: server multi channel support = yes Press "Enter+X" and confirm with "Y" and "Enter" to save the file. Then restart the Samba service with this command: samba restart Eventually you need to reboot your Windows Client, but finally its enabled and should work. Multichannel + RSS for Single and Multiple NICs But what happens if you're server has only one NIC. Now Multichannel is not able to split something, but it has a sub-feature called RSS which is able to split file transfers across multiple TCP connections with a single NIC: Of course this feature works with multiple NICs, too: But this requires RSS capability on both sides. You need to check your servers NIC by opening the Unraid Webterminal and entering this command (could be obsolete with Samba 4.13 as they built-in an RSS autodetection ) egrep 'CPU|eth*' /proc/interrupts It must return multiple lines (each for one CPU core) like this: egrep 'CPU|eth0' /proc/interrupts CPU0 CPU1 CPU2 CPU3 129: 29144060 0 0 0 IR-PCI-MSI 524288-edge eth0 131: 0 25511547 0 0 IR-PCI-MSI 524289-edge eth0 132: 0 0 40776464 0 IR-PCI-MSI 524290-edge eth0 134: 0 0 0 17121614 IR-PCI-MSI 524291-edge eth0 Now you can check your Windows 8 / Windows 10 client by opening Powershell as Admin and enter this command: Get-SmbClientNetworkInterface It must return "True" for "RSS Capable": Interface Index RSS Capable RDMA Capable Speed IpAddresses Friendly Name --------------- ----------- ------------ ----- ----------- ------------- 11 True False 10 Gbps {10.0.0.10} Ethernet 3 Now, after you are sure that RSS is supported on your server, you can enable Multichannel + RSS by opening the Unraid Webterminal and enter the following (the file is usually empty, so do not wonder): nano /boot/config/smb-extra.conf Add the following and change 10.10.10.10 to your Unraid servers IP and speed to "10000000000" for 10G adapter or to "1000000000" for a 1G adapter: server multi channel support = yes interfaces = "10.10.10.10;capability=RSS,speed=10000000000" If you are using multiple NICs the syntax looks like this (add RSS capability only for supporting NICs!): interfaces = "10.10.10.10;capability=RSS,speed=10000000000" "10.10.10.11;capability=RSS,speed=10000000000" Press "Enter+X" and confirm with "Y" and "Enter" to save the file. Now restart the SMB service: samba restart Does it work? After rebooting your Windows Client (seems to be a must), download a file from your server (so connection is established) and now you can check if Multichannel + RSS works by opening Windows Powershell as Admin and enter this command: Get-SmbMultichannelConnection -IncludeNotSelected It must return a line similar to this (a returned line = Multichannel works) and if you want to benefit from RSS then "Client RSS Cabable" must be "True": Server Name Selected Client IP Server IP Client Interface Index Server Interface Index Client RSS Capable Client RDMA Capable ----------- -------- --------- --------- ---------------------- ---------------------- ------------------ ------------------- tower True 10.10.10.100 10.10.10.10 11 13 True False In Linux you can verify RSS through this command which returns one open TCP connection per CPU core (in this case we see 4 connections as my client has only 4 CPU cores, altough my server has 6): netstat -tnp | grep smb tcp 0 0 192.168.178.8:445 192.168.178.88:55975 ESTABLISHED 3195/smbd tcp 0 0 192.168.178.8:445 192.168.178.88:55977 ESTABLISHED 3195/smbd tcp 0 0 192.168.178.8:445 192.168.178.88:55976 ESTABLISHED 3195/smbd tcp 0 0 192.168.178.8:445 192.168.178.88:55974 ESTABLISHED 3195/smbd Note: Sadly Samba does not create multiple smbd processes, which means we still need a CPU with high single thread performance to benefit from RSS. This is even mentioned in the presentation: If you are interested in test results, look here. 5.) smb.conf Settings Tuning I did massive testing with a huge amount of smb.conf settings provided by the following websites and really NOTHING resulted in a noticable speed gain: https://wiki.samba.org/index.php/Performance_Tuning https://wiki.samba.org/index.php/Linux_Performance https://wiki.samba.org/index.php/Server-Side_Copy https://www.samba.org/~ab/output/htmldocs/Samba3-HOWTO/speed.html https://www.samba.org/samba/docs/current/man-html/smb.conf.5.html https://lists.samba.org/archive/samba-technical/attachments/20140519/642160aa/attachment.pdf https://www.samba.org/samba/docs/Samba-HOWTO-Collection.pdf https://www.samba.org/samba/docs/current/man-html/ (search for "vfs") https://lists.samba.org/archive/samba/2016-September/202697.html https://codeinsecurity.wordpress.com/2020/05/18/setting-up-smb-multi-channel-between-freenas-or-any-bsd-linux-and-windows-for-20gbps-transfers/ https://www.snia.org/sites/default/files/SDC/2019/presentations/SMB/Metzmacher_Stefan_Samba_Async_VFS_Future.pdf https://www.heise.de/newsticker/meldung/Samba-4-12-beschleunigt-Verschluesselung-und-Datentransfer-4677717.html I would say the recent Samba versions are already optimized by default. 6.) Choose a proper SSD for your cache You could use Unraid without an SSD, but if you want fast SMB transfers an SSD is absolutely required. Else you are limted to slow parity writes and/or through your slow HDD. But many SSDs on the market are not "compatible" for using it as an Unraid SSD Cache. DRAM Many cheap models do not have a DRAM Cache. This small buffer is used to collect very small files or random writes before they are finally written to the SSD and/or is used to have a high speed area for the file mapping-table. In Short, you need DRAM Cache in your SSD. No exception. SLC Cache While DRAM is only absent in cheap SSDs, SLC Cache can miss in different price ranges. Some cheap models use a small SLC cache to "fake" their technical data. Some mid-range models use a big SLC Cache to raise durability and speed if installed in a client pc. And some high-end models do not have an SLC Cache, as their flash cells are fast enough without it. Finally you are not interested in SLC Cache. You are only interested in continuous write speeds (see "Verify Continuous Writing Speed") Determine the Required Writing Speed But before you are able to select the right SSD model you need to determine your minimum required transfer speed. This should be simple. How many ethernet ports do you want to use or do you plan to install a faster network adapter? Lets say you have two 5G ports. With SMB Multichannel its possible to use them in sum and as you plan to install a 10G card in your client you could use 10G in total. Now we can calculate: 10G * 117.5 MByte/s (real throughput per 1G ethernet) = 1175 MByte/s and by that we have two options: buy one M.2 NVMe (assuming your motherboard has such a slot) with a minimum writing speed of 1175 MByte/s buy two or more SATA SSDs and use them in a RAID0, each with a minimum writing speed of 550 MByte/s Verify Continuous Writing Speed of the SSD As an existing "SLC Cache" hides the real transfer speed you need to invest some time to check if your desired SSD model has an SLC cache and how much the SSD throttles after its full. A solution could be to search for "review slc cache" in combination with the model name. Using the image search could be helpful as well (maybe you see a graph with a falling line). If you do not find anything, use Youtube. Many people out there test their new ssd by simply copying a huge amount of files on it. Note: CrystalDiskMark, AS SSD, etc Benchmarks are useless as they only test a really small amount of data (which fits into the fast cache). Durability You could look for the "TBW" value of the SSD, but finally you won't be able to kill the SSD inside the warranty as long your very first filling of your unraid server is done without the SSD Cache. As an example a 1TB Samsung 970 EVO has a TBW of 600 and if your server has a total size of 100TB you would waste 100TBW on your first fill for nothing. If you plan to use Plex, think about using the RAM as your transcoding storage which would save a huge amount of writes to your SSD. Conclusion: Optimize your writings instead of buying an expensive SSD. NAS SSD Do not buy "special" NAS SSDs. They do not offer any benefits compared to the high-end consumer models, but cost more. 7.) More RAM More RAM means more caching and as RAM is even faster than the fastest SSDs, this adds additional boost to your SMB transfers. I recommend installing two identical (or more depening on the amount of slots) RAM modules to benefit from "Dual Channel" speeds. RAM frequency is not as important as RAM size. Read Cache for Downloads If you download a file twice, the second download does not read the file from your disk, instead it uses your RAM only. The same happens if you're loading covers of your MP3s or Movies or if Windows is generating thumbnails of your photo collection. More RAM means more files in your cache. The read cache uses by default 100% of your free RAM. Write Cache for Uploads Linux uses by default 20% of your free RAM to cache writes, before they are written to the disk. You can use the Tips and Tweaks Plugin to change this value or add this to your Go file (with the Config Editor Plugin) sysctl vm.dirty_ratio=20 But before changing this value, you need to be sure to understand the consequences: Never use your NAS without an UPS if you use write caching as this could cause huge data loss! The bigger the write cache, the smaller the read cache (so using 100% of your RAM as write cache is not a good idea!) If you upload files to your server, they are 30 seconds later written to your disk (vm.dirty_expire_centisecs) Without SSD Cache: If your upload size is generally higher than your write cache size, it starts to cleanup the cache and in parallel write the transfer to your HDD(s) which could result in slow SMB transfers. Either you raise your cache size, so its never filled up, or you consider totally disabling the write cache. With SSD Cache: SSDs love parallel transfers (read #6 of this Guide), so a huge writing cache or even full cache is not a problem. But which dirty_ratio value should you set? This is something you need to determine by yourself as its completely individual: At first you need to think about the highest RAM usage that is possible. Like active VMs, Ramdisks, Docker containers, etc. By that you get the smallest amount of free RAM of your server: Total RAM size - Reserved RAM through VMs - Used RAM through Docker Containers - Ramdisks = Free RAM Now the harder part: Determine how much RAM is needed for your read cache. Do not forget that VMs, Docker Containers, Processes etc load files from disks and they are all cached as well. I thought about this and came to this command that counts hot files: find /mnt/cache -type f -amin -86400 ! -size +1G -exec du -bc {} + | grep total$ | cut -f1 | awk '{ total += $1 }; END { print total }' | numfmt --to=iec-i --suffix=B It counts the size of all files on your SSD cache that are accessed in the last 24 hours (86400 seconds) The maximum file size is 1GiB to exclude VM images, docker containers, etc This works only if you hopefully use your cache for your hot shares like appdata, system, etc Of course you could repeat this command on several days to check how it fluctuates. This command must be executed after the mover has finished its work This command isn't perfect as it does not count hot files inside a VM image Now we can calculate: 100 / Total RAM x (Free RAM - Command Result) = vm.dirty_ratio If your calculated "vm.dirty_ratio" is lower than 5% (or even negative), you should lower it to 5 and buy more RAM. between 5% and 20%, set it accordingly, but you should consider buying more RAM. between 20% and 90%, set it accordingly If your calculated "vm.dirty_ratio" is higher than 90%, you are probably not using your SSD cache for hot shares (as you should) or your RAM is huge as hell (congratulation ^^). I suggest not to set a value higher than 90. Of course you need to recalcuate this value if you add more VMs or Docker Containers. #8 Disable haveged Unraid does not trust the randomness of linux and uses haveged instead. By that all encryptions processes on the server use haveged which produces extra load. If you don't need it, disable it through your Go file (CA Config Editor) as follows: # ------------------------------------------------- # disable haveged as we trust /dev/random # https://forums.unraid.net/topic/79616-haveged-daemon/?tab=comments#comment-903452 # ------------------------------------------------- /etc/rc.d/rc.haveged stop
.png.9a4f708867a76b362eeaac6a578d6d21.png)
 2 points
 -
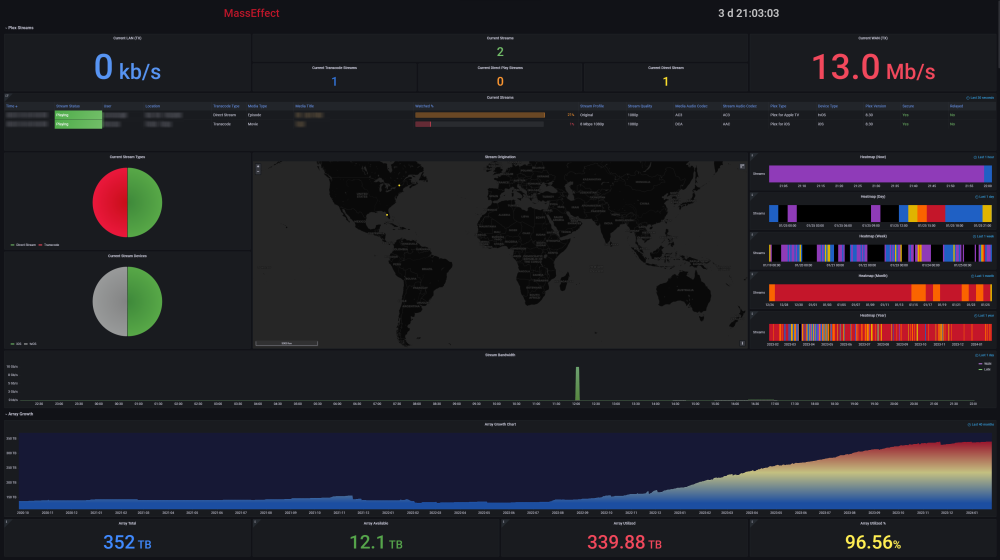
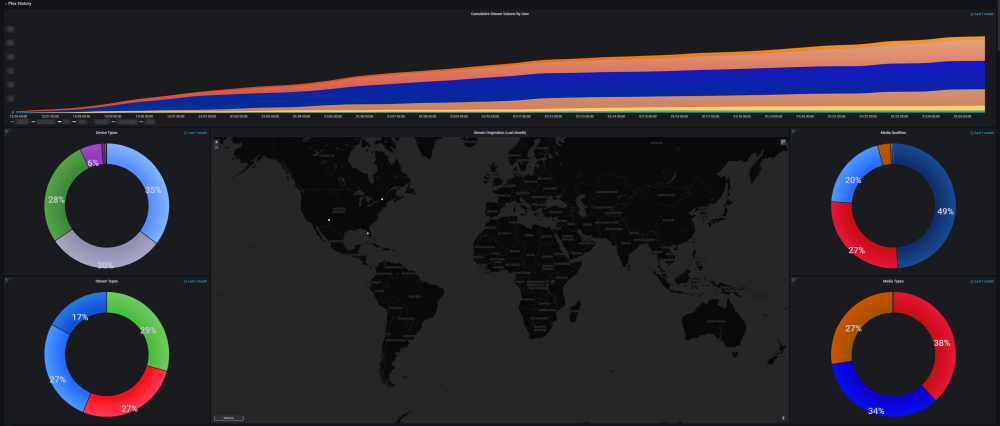
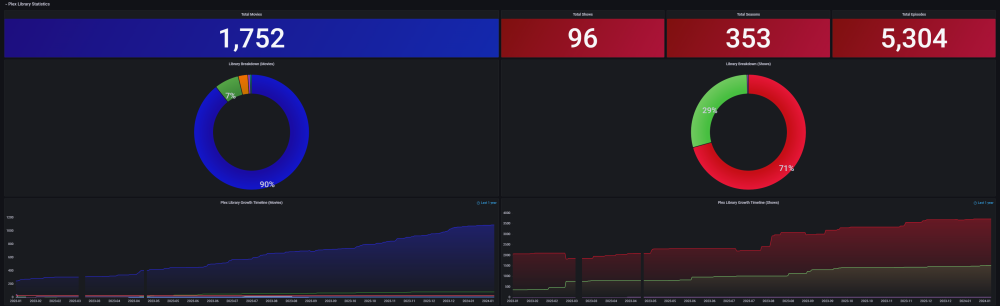
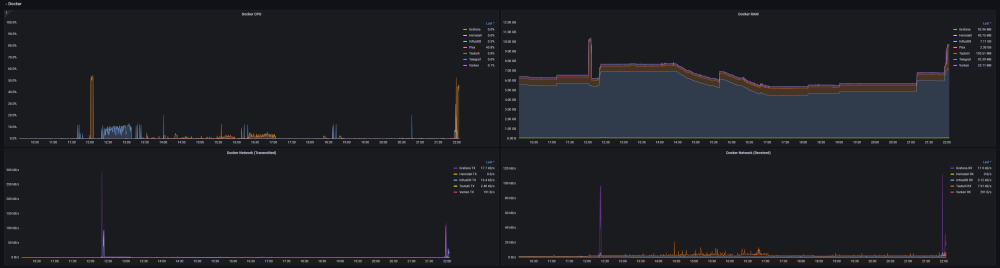
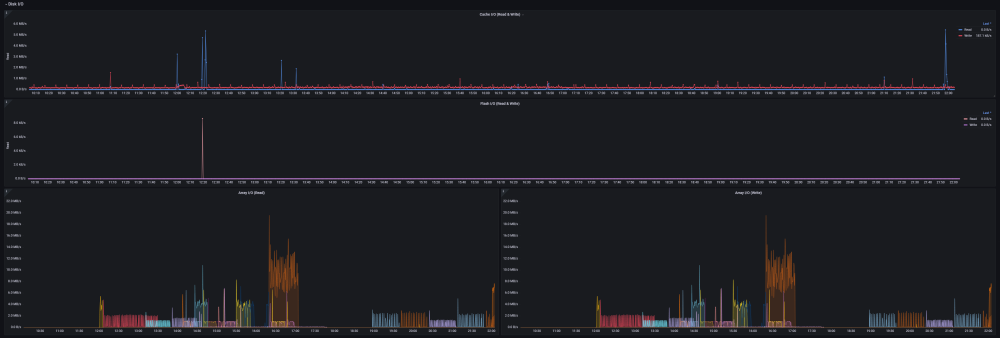
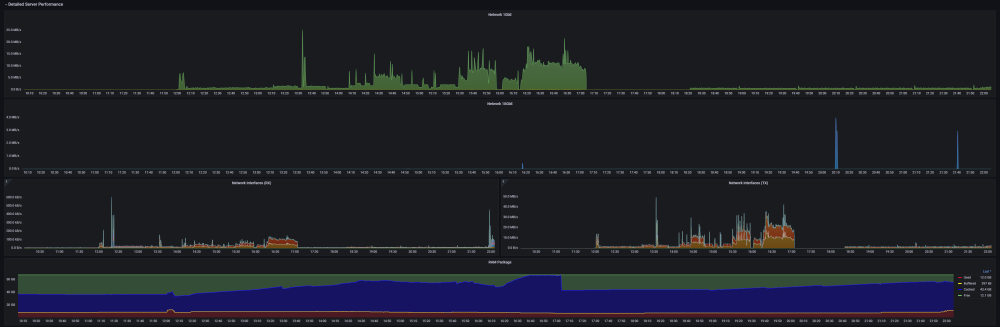
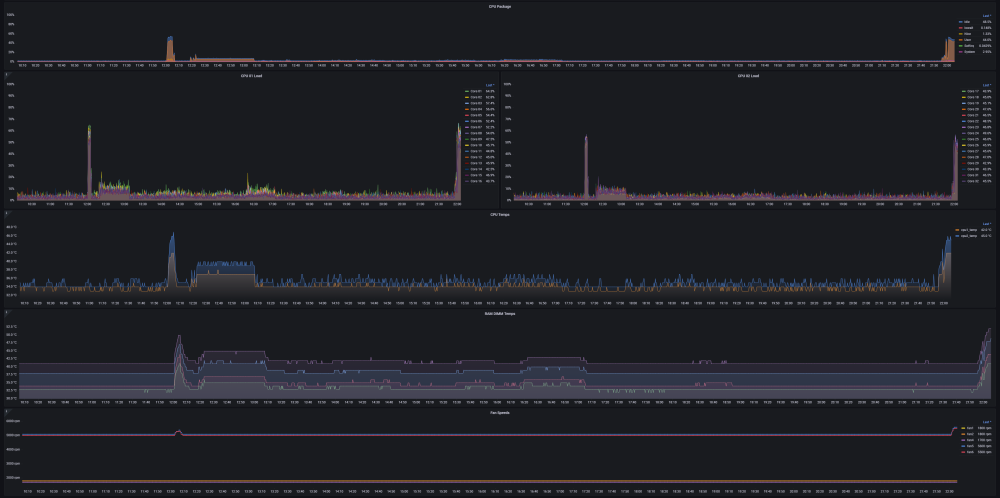
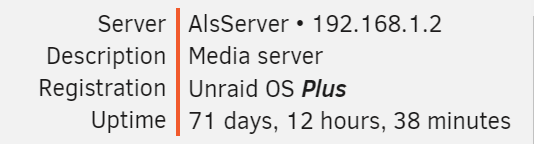
Ultimate UNRAID Dashboard (UUD) Current Release: UUD 1.7 (2024-03-30) UUD NEWS: 2024-03-30: UUD Version 1.7 is Released 2022-06-19: The UUD Forum Topic Reaches 200,000 Views! 👀👀👀 2022-04-17: The UUD Tops 5,000 Unique Downloads 💾💾💾 🎉 2021-05-26: The UUD Forum Topic Reaches 1,000 Replies! 2021-04-17: The UUD Forum Topic Reaches 100,000 Views! 👀👀 2021-03-26: The UUD Tops 2,500 Unique Downloads 💾💾 🎉 2021-03-23: UUD 1.6 is Featured Again in the "Best of the Forum" Blog 🥇🥇 2021-03-21: The UUD Forum Topic Reaches 75,000 Views! 👀 2021-03-20: UUD Version 1.6 is Released 2021-01-19: The UUD Forum Topic Reaches 50,000 Views! 👀 2021-01-11: The UUD Tops 1,000 Unique Downloads 💾 🎉 2021-01-07: UUD is Featured as the FIRST "Best of the Forum" Blog 🥇 2021-01-06: UUD Donations Site is Created 2020-12-31: UUD Version 1.5 is Released 2020-10-09: UUD Version 1.4 is Released 2020-09-28: The UUD is Featured in the Official UNRAID Monthly Newsletter (September 2020)! 2020-09-21: UUD Version 1.3 is Released 2020-09-14: UUD Version 1.2 is Released 2020-09-12: UUD Version 1.1 is Released 2020-09-11: The UUD is Born and Version 1.0 is Released Overview: Welcome to the OFFICIAL UUD forum topic. The UUD is my attempt to develop the Ultimate Grafana/Telegraf/InfluxDB/Plex/Tautulli/Varken dashboard. This entire endeavor started when one of our fellow users @hermy65 posed a simple, but complex question in another forum topic (see post #3). I decided to give it a shot, as I am an IT professional, specifically in enterprise data warehouse/SQL server. After a few days of hard work, UUD version 1.0 was released. We are currently on Version 1.6, and the project is in active development. If you are a Grafana developer, or have had experience building dashboards/panels for UNRAID, please let me know. I would love to collaborate. Version 1.7 Screenshots (Click the Images as They are Very High Resolution): Disclaimer: This is based on my 30 Drive UNRAID Array. So this shows an example of a fully maxed out UNRAID setup with max drives, dual CPUs, Dual NICs, etc. You will/may need to adjust panels & queries to accommodate your individual UNRAID/PLEX architecture. I have spent many hours custom coding new functionality and features based on that original template. Much has been learned and I am excited to see how far this can go in the future. Thanks again! Developers: Primary Developer: @falconexe (USA) UUD Creator | Active Development | Panels | Database Queries | Integration | Look & Feel | GUI | Refinement | Support Developer/Colleague: @GilbN (Europe) Dashboard Examples | Back-end | Dynamics | REGEX | Support | Tutorials Contributors: @hermy65 @atribe @Roxedus @SpencerJ @testdasi @ChatNoir @MammothJerk @FreeMan @danktankk @Dazog @MrLondon @LTM @mattekure @ptchernegovski @caplam @RockDawg @corgan @jbartlett @Hoopster @LTM @skaterpunk0187 @valiente @Agent531C @JudMeherg @Jturner @1471 Dependencies (Last Updated On 2021-03-20) Docker - InfluxDB Docker - Telegraf Docker Network Type: HOST (Otherwise You May Not Get All Server Metrics) 👉 Create Telegraf Configuration File 👈 (DO THIS FIRST!) Create and Place a File into Directory "mnt/user/appdata/YOUR_TELEGRAF_FOLDER" Enable and Install Telegraf Plugins Telegraf Plugin - [[inputs.net]] Enable in telegraf.config Telegraf Plugin - [[inputs.docker]] Enable in telegraf.config Telegraf Plugin - [[inputs.diskio]] Enable in telegraf.config To Use Static Drive Serial Numbers in Grafana (For DiskIO Queries) Do the Following: Edit telegraf.conf > [[inputs.diskio]] > Add device_tags = ["ID_SERIAL"] > Use ID_SERIAL Flag in Grafana Now Upon Booting, You Don't Have to Worry About SD* Mounts Changing (So Your Graphs Don't Get Messed Up!) You Can Also Set Overrides on the Query Fields to Map the Serial Number to a Common Disk Name Like "DISK01" etc. Telegraf Plugin - [[inputs.smart]] Enable in telegraf.config Also Enable "attributes = true" Bash Into Telegraf Docker and Run "apk add smartmontools" Telegraf Plugin - [[inputs.ipmi_sensor]] Enable in telegraf.config Bash Into Telegraf Docker and Run "apk add ipmitool" Telegraf Plugin - [[inputs.apcupsd]] Enable in telegraf.config Telegraf Docker Config Add New Path (NOTE: This path has now been merged into Atribe's Telegraf Docker Image. (Thanks @GilbN & @atribe) Post Arguments "/bin/sh -c 'apk update && apk upgrade && apk add ipmitool && apk add smartmontools && telegraf'" Docker - Grafana Grafana Plugins Pie Chart Panel Run Following Command in Docker: grafana-cli plugins install grafana-piechart-panel World Map Run Following Command in Docker: grafana-cli plugins install grafana-worldmap-panel JSON API Run Following Command in Docker: grafana-cli plugins install marcusolsson-json-datasource Dynamic Image Panel Run Following Command in Docker: grafana-cli plugins install dalvany-image-panel Docker - Tautulli Docker - Varken CA Plugin: IPMI Tools License: GeoLite2 (Free) NON SERVER HARDWARE (If You Cannot Use "IPMI" and Need to Use "Sensors") As an alternate to IPMI to monitor CPU/System/Aux Temps, you can try the Sensors Plugin. Telegraf Plugin - [[inputs.sensors]] Enable in the Telegraf Config (Uncomment It) Bash into the Telegraf Docker and Execute "apk add lm_sensors" Stop All 3 Dockers (Grafana > Telegraf > InfluxDB) If You Want to Keep This Plugin in Perpetuity, You Will Need to Modify Your Telegraf Docker Post Arguments (Adding lm_sensors): "/bin/sh -c 'apk update && apk upgrade && apk add ipmitool && apk add smartmontools && apk add lm_sensors && telegraf'" Start All 3 Dockers (InfluxDB > Telegraf > Grafana) Dashboard Variables (Update These For Your Server): I haven't been this geeked out about my UNRAID server in a very long time. This is the cherry on top for my UNRAID experience going back to 2014 when I built my first server. Thanks everyone! VERSION 1.7 (Current) Ultimate UNRAID Dashboard - Version 1.7 - 2024-03-30 (falconexe).json @SpencerJ


 1 point
 -
Application Name: Snapdrop Application Site: https://github.com/RobinLinus/snapdrop Docker Hub: https://hub.docker.com/r/linuxserver/snapdrop/ Github: https://github.com/linuxserver/docker-snapdrop Please post any questions/issues relating to this docker you have in this thread. If you are not using Unraid (and you should be!) then please do not post here, rather use the linuxserver.io forum for support.1 point
-
docker volume and port mapping is 90% of what you need to understand about setting up most dockers.1 point
-
it looks like ive worked it out i have a i7-5820K cpu with 28 lanes on a asus x99 deluxe with 6 pci-e slots i had the two hba cards in the wrong slots making them pcie 2.0 i shoud of used 1,3,5 but i was using 1,4,6 now my parity estimated speed is 148mb and 23 hours to complete1 point
-
Updated the libvirt linked above. I'm still in the process of learning but tinkering around is sometimes the best way to gain knowledge. Also, the effect of hv-vendor-id=AuthenticAMD and <vendor_id state="on" value="AuthenticAMD"/> is simply hilarious. Its like the Animation Speed of OSX was amplified by 5 times. Geekbench: Previous libvirt 1119 Single-Core 4828 Multi-Core ghost82 libvirt (original) 1203 Single-Core 5084 Multi-Core ghost82 libvirt (modified) 1413 Single-Core 6018 Multi-Core1 point
-
See here: https://forums.unraid.net/topic/57181-docker-faq/?do=findComment&comment=5643091 point
-
I updated fio. Try again and let me know This worked, thank you!1 point
-
Are you sure about that? What about the /config mount which usually isn't shown unless you hit Show More Settings1 point
-
For some reason, certain combinations of CPUs / Motherboards / BIOS revisions (or on occasions Eddies in the Space Time Continuum) will issue an MCE when initializing the processor. This is what's happening to you and can be safely ignored.1 point
-
For (3) an safer alternative rather than enabling disk share universally is to have custom SMB config file pointing to a top level folder on a disk (e.g. for a share called sharename, have custom SMB config pointing to /mnt/cache/sharename or /mnt/disk1/sharename). Then have the SMB Extras in SMB Settings "include" that config file. That way you just need to restart SMB to change the config file (instead of needing to stop the array to change SMB Extras). Works really well with my cache-only nvme-raid0 share. More detailed guide: Let's say you have a cache-only share called "sharename" that you want a user called "windows" to access via SMB with shfs-bypass. Create a smb-custom.conf with the content below and save it in /boot/config [sharename-custom] path = /mnt/cache/sharename comment = browseable = no Force User = nobody valid users = windows write list = windows vfs objects = Then with the array stopped -> Settings -> SMB -> add this line to Samba extra configuration box: include = /boot/config/smb-custom.conf Apply, done, start array. You can now access the bypassed share at \\tower\sharename-custom or \\server-ip\sharename-custom Some hints It's critical that the name of the bypassed share (e.g. sharename-custom) is DIFFERENT from the normal share name or you will run into weird quirks i.e. Unraid share conflicts with your custom share. To add more shares, just copy-paste the above block in the smb-custom.conf and make appropriate changes (e.g. name, path, user), save and then restart SMB. No need to stop array. Similarly, for edit, just edit smb-custom.conf, save and restart SMB.1 point
-
From memory, Alt+num i.e. Alt+5 instead of F5 works for web1 point
-
So now that I can use GUS, was wondering if there is any special gotchas that might exist if I want to migrate my last 2 weeks of data from my stand alone InfluxDB docker to GUS? If a big issue, I'll just scrap the old data and start from scratch. Was just curious if you have heard of anyone successfully doing it before? Thanks!1 point
-
See, something simple and I'm a dumba$$. My other Grafana install has never gone straight in. It has always asked my to log in, so I didn't even realize there was a log in icon in the lower left. What a dufus. Sorry about that and THANKS!!!1 point
-
That's just an alert and is harmless1 point
-
If you have an adblocker whitelist your server1 point
-
I’ve been running @doron’s script for a few days and it has been perfect so far! Absolutely no unwanted spin ups, and my SAS drives are always sent to standby when needed. Thank you so much to everyone who contributed to this thread, especially @SimonF and @doron (and thanks for crediting me in your script even if I really just suggested something and haven’t written a single line of code 😆). Now let’s push this to the devs and get it included in Unraid! Stay safe and keep up the positive vibes 😉1 point
-
same here, 6.9 beta25 is stable and no real issues ... besides my docker size point which i couldnt figure out yet ... but thats prolly not beta related.
 1 point
 -
I've been running 6.9beta25 now for a month and it's great guys. Thanks for all the hard work. Nothing bugging me. Look forward to the stable release.1 point
-
Are Unraid team alive? Last update 12 July. I understand all that covid etc... But beta 25 realy buggy and 6.8.3 didn't have QEMU 5.0 Is there any estimates of release date stable 6.91 point
-
I saw that yesterday and have began coding, i have a working incoming port on next-gen for openvpn, it just needs more work to make it production ready.1 point
-
Great idea. Worked like a charm. The only thing I would add is that if you already have a Booksonic container and are planning on keeping it alongside Booksonic-Air, make sure you define a new config file, perhaps booksonic-air.1 point
-
Updated zsh. Try again. This has fixed the issue, thank you very much1 point
-
OK guys, multi remote endpoint support is now in for this image please pull down the new image (this change will be rolled out to all my vpn images shortly). What this means is that the image will now loop through the entire list, for example, pia port forward enabled endpoints, all you need to do is edit your ovpn config file and add the remote endpoints at the top and sort into the order you want them to be tried, an example pia ovpn file is below (mine):- remote ca-toronto.privateinternetaccess.com 1198 udp remote ca-montreal.privateinternetaccess.com 1198 udp remote ca-vancouver.privateinternetaccess.com 1198 udp remote de-berlin.privateinternetaccess.com 1198 udp remote de-frankfurt.privateinternetaccess.com 1198 udp remote france.privateinternetaccess.com 1198 udp remote czech.privateinternetaccess.com 1198 udp remote spain.privateinternetaccess.com 1198 udp remote ro.privateinternetaccess.com 1198 udp client dev tun resolv-retry infinite nobind persist-key # -----faster GCM----- cipher aes-128-gcm auth sha256 ncp-disable # -----faster GCM----- tls-client remote-cert-tls server auth-user-pass credentials.conf comp-lzo verb 1 crl-verify crl.rsa.2048.pem ca ca.rsa.2048.crt disable-occ I did look at multi ovpn file support, but this is easier to do and as openvpn supports multi remote lines, it felt like the most logical approach. note:- Due to ns lookup for all remote lines, and potential failure and subsequent try of the next remote line, time to initialisation of the app may take longer. p.s. I dont want to talk about how difficult this was to shoe horn in, i need to lie down in a dark room now and not think about bash for a while :-), any issues let me know!.1 point
-
@jovdk this video is pretty helpful when first learning about unraid. bear in mind, its a bit older and his tutorials now are much better! there are ways to make very high performance read/write folders or systems, but that's more hardware and workflow based. hope this video helps!1 point
-
Unraid is not RAID. There is no striping. Typically write speed will be even slower than you experienced if you have parity. Unraid sacrifices speed for other features, such as the ability to mix different sized disks, the ability to easily expand the array by simply adding more disks, and the fact that each disk is an independent filesystem that can be easily read on any Linux. So even if you lose more disks than parity can recover from, any disks that haven't been lost have complete files on them and can be read without any of the other disks. Unraid storage was designed to be used as a repository for media files, backups, etc. Write Once, Read Many Times. Write speed isn't the focus of this design. Unraid does support a cache pool, which can be a redundant array of SSDs (btrfs raid configurations), for data that needs to be written and read faster. And a process to move that data to the slower, larger capacity, parity array if desired.1 point


.png.9a4f708867a76b362eeaac6a578d6d21.png)