Leaderboard


Popular Content
Showing content with the highest reputation on 10/20/20 in all areas
-
Bei mir sind es 4TB total Storage und eine 6TB Parity... Dauert bei mir an schlechten Tagen 10h... Und ich hab aktuell einen i5-6500, also an Zero‘s Prozessor liegts ned 🤔2 points
-
You could use: cat /sys/block/<device>/queue/rotational 0 output is an SSD, 1 is HDD2 points
-
Ich kann dir leider bei Macinabox nicht weiterhelfen evtl aber einer dieser user: @angelstriker, @thilo, @wubbl0rz, @ipxl Gibt schon einen Thread hier wegen Macinabox nur leider zu einem anderen Thema: Klick2 points
-
My first plugin will add file browser features to the WebGUI. But don't tell anyone ^^1 point
-
When you do that, you should try the flash in another port, ideally USB2. It dropped offline yesterday, and is probably the root of your problem.1 point
-
For the PhotoPrism docker you should add in options for using mysql isntead of sqlite since the built in sqlite is horrible with performance and getting itself "locked" causing issues. Here's what I've added on mine to get it working. Name: Database Driver Key: PHOTOPRISM_DATABASE_DRIVER Value: sqlite (default) or mysql Description: Change my mysql instead of sqlite to use a MariaDB or MySQL database. Name: MySQL Data Source Name Key: PHOTOPRISM_DATABASE_DSN value: user:pass@tcp(IP.OF.DATABASE.SERVER:3306)/photoprism?charset=utf8mb4,utf8&parseTime=true Description: MySQL database connection information. Leave alone if using SQLite NOTE. Would just need to test actually leaving DSN blank/unchanged for sqlite, it shouldn't use it at all if sqlite is in use, but I haven't actually tested this. All info from here: https://dl.photoprism.org/docker/docker-compose.yml I have this up and working on the MariaDB container with this information above.1 point
-
Nein, brauche ich nicht und ist eigentlich kein teil von Unraid. Ich verstehe auch nicht warum man sich das paralell zum unraid array installiert bzw einen zpool aufsetzt da es noch nicht offiziell supportet wird.1 point
-
Ja freut mich wenn ich helfen konnte..! Dann mache ich jetzt auch Feierabend Melde dich bitte morgen wie es dir noch ergangen ist, aber sobald das Base System herrunterläd und installiert, hast du es geschafft. Der Step hatte bei mir dann glaub ich nochmal ca. eine halbe Stunde gedauert - je nach Internetleitung halt... Wir lesen uns morgen1 point
-
Jetzt bist du dann im MacOS Wiederherstellung Ding drin, da musst du zuerst die gewünschte Festplatte formatieren und dort dann MacOS installieren... Hier kann ich dir mit gutem Gewissen das Video von Spaceinvaderone ans Herz legen: Klick!1 point
-
ja ich habe Cleanup laufen lassen, aber es sagt mir das keine Datenreste da sind, was ich dann noch mache ist den Papierkorb öffnen und leeren weil da meistens etwas drin ist1 point
-
Schmeiß mal das VNC-Passwort raus, und verwende mal testweise den Host Modus bei der "Netzwerk Brücke"-config1 point
-
Strange part is that the errors stat before array start, try booting in safe mode.1 point
-
CA Cleanup Appdata drüber laufen lassen..? Wenn du fertig bist mit der Installation von Macinabox und der download - wie du aber auch weist - der ISO fertig abgeschlossen ist, startest du das Array neu. Danach siehst du im VM-Tab die Macinabox-VM. Diese bearbeitest du bitte vorerst mal gar nicht, einfach nur starten und dann per VNC aufschalten.1 point
-
Der Pfad muss leer sein und auch bleiben...1 point
-
Von welchem Link genau redest du jetzt?1 point
-
Danke, ich weiß wo ich das her bekomme bzw. bekomm ich den link sicher easy raus wenn ich es bräuchte aber bin auf Debian umgestiegen und glücklich (außer zum Spielen hab ich noch einen wenig stärkeren PC, aber komm sowieso nicht dazu, Unraid und so ).1 point
-
Hey @Maddeen I wrote a response to you but apparently it seemed to have not posted a week ago. The ASUS TUF GAMING X570-PLUS (WI-FI) is a great board for my Unraid. I've had no issues with it, apart from the thermal sensor issue in this thread. I currently run 64GB (2x 32GB) of Micron Multi-Bit ECC DDR4 at 3200MHz and it works great. I'm considering doubling that. The reason I got this board is because I wanted a board that was: - rock-solid stable - X570 chipset - 2x NVME M.2 x4 PCIe Gen 4 slots - ECC support (unofficial, but ASUS is good with including ECC support) - 8x onboard SATA - 2x PCIe x16 slots It delivered on all those accounts. I don't use the onboard WiFi but I wanted to possibly make a VM as a AP, and host that in Unraid. Also, it would seem that I got the thermal sensor to finally work on the 2407 BIOS, no idea what changed. So even that niggle seems to be working now.1 point
-
ah right...I saw that on the first post. Thanks1 point
-
Looks like you have allocated 60G to docker.img. Why? Have you had problems filling it? I am running 17 containers, and they use less than half of my 20G docker.img. Diagnostics would give more information than just that syslog. Just use the power button then when you reboot Go to Tools - Diagnostics and attach the complete Diagnostics ZIP file to your NEXT post in this thread.1 point
-
I learned by using this
 1 point
 -
Just from the first line of it's installation guide, It seems to me that you should be running this as a VM1 point
-
Hopefully this isn't more confusing. For Conan Exiles mods, its supposed to be able to just use the mods file name in a text file, each mod on its own line. I've had issues with this part in the past, idk if they fixed it. There are 2 other alternatives to this, 1. mapping the exact location in the folder, (ie on windows c:\servers\conan exiles\mods\mod.pak) Example is not accurate path. 2. mapping the full steam workshop link (ie. https://steamcommunity.com/sharedfiles/filedetails/?id=880454836) IIRC this is being run with WINE, however I've never dealt with WINE, I am assuming that it uses the same setup as windows for pathing? IMO if the text file works, that would probably be the best option. With all this being said, I haven't run a CE server in around a year-ish.1 point
-
Sorry, no. I'm working out a new way to test, the speed. I've figured out that Perc h710p controller only supports PCIe 2.0 even though they say, "When you flash your H710p to IT-mode, it will start to work as a PCIe 3.0" Maybe that's for the PCIe adapter card and not the internal module. https://www.dell.com/support/article/no-no/sln292279/list-of-poweredge-raid-controller-perc-types-for-dell-emc-systems?lang=en I Also important to notice , is that this controller only supports 6Gb/s, so there is no way this controller can do 10Gb/s alone. As for the m.2 disk I inserted, I used a PCIe-adapter, and still no perfomance. I will try to add a H730P PCIe-card to my server, which indeed is a PCIe 3.0, and handles 12Gb/s. I have 4x 2.5' SAS SSD, that also support 12Gb/s, and will try and see if that makes any impact on my performance. Will report back, when I'm done testing, so it might take a while. Hopefully before X-mas.1 point
-
Start here: https://forums.unraid.net/topic/74208-apc-smartups-setup/ If you don't find anything that makes it work, try googling APC UPS not working unraid.net EDIT: Or return it and get a Cyberpower UPS. (I seem to recall that they are more compatible.) I understand that the apcupsd package that is used in Unraid has nothing to do with the APC company. You can also try the NUT plugin.1 point
-
Servus moonsorrox, probiere mal folgendes; Lade dir "CA Cleanup Appdata" aus dem "CA AppStore" Lösche die VM inkl. Disk Lösche den "Macinabox" Docker Container Führe "CA Cleanup Appdata" aus und bereinige (Grundsätzlich schadet es nicht alles auszuwählen Schaue manuell nochmal im Share nach ob du unter Macinabox was findest, wenn ja - löschen Soweit so gut, wenn du das gemacht hast, dürftest du wieder relativ von "Null" anfangen dürfen. Und dann würde ich es nochmal probieren. Sprich Macinabox herrunterladen und installieren, VM erstellen ect. pp. Sollte derselbe Fehler nochmals auftreten, müssen wir uns mal deine Config von der VM und dem Docker anschauen. Halte mich (uns) auf dem Laufenden! 😉 Beste Grüße, Dominic1 point
-
Just to follow up on my issue, it seems that the beta update stopped my disk errors. My log is not flooded with errors anymore, and every thing seems to be in order. Glad i didn't move to ryzen earlier, when that option was not around 👍 Thanks @JorgeB for pointing me in the right direction 😎1 point
-
Actually disregard, I figured out the issue. ISO storage location was set to a path that it didn't like, changed that and it worked.1 point
-
Sounds correct. Does it work? What I don't understand is the use of duckdns if you have your own domain. If your domain registrar doesn't support any dyndns, you can use cloudflare for free.1 point
-
Thank you very much1 point
-
I am having this exact same issue. Prior to enabling "Host access to custom networks" Wireguard worked perfect for over a year. Since i have made this change it it no longer works.1 point
-
Have you checked the smartctl wrapper is working correctly also? Otherwise the device poll will wake up the drive or any actions that do a smartctl in unraid.1 point
-
Not much point on using flash parity for HDD array, unless you plan on writing to multiple disks at the same time.1 point
-
you are using the old legacy network for pia, this is broken (pia issue), please move over to next-gen, see Q19 from the following link:- https://github.com/binhex/documentation/blob/master/docker/faq/vpn.md1 point
-
I was able to pass a secondary GPU without the error 43.1 point
-
Ok so I ended up grabbing the final proxy.conf file that was available for the letsencrypt docker and replaced the newest Swag one with it. Boom issue solved, Shinobi loads fine via the reverse proxy again. I opened and compared both config files to see what changed. Now I'm no coder but I can understand what most lines are meant to do (I know just enough to be dangerous). After disabling the line "proxy_set_header Upgrade $http_upgrade;" in the Swag proxy.conf file, Shinobi again was working normally though the reverse proxy. Hoping someone much smarter then me can take a look at both these config files and figure out why I was having an issue and if it would effect others. It did not appear to effect any of my other containers running reverse proxy. For now I'm running the final letsencrpyt proxy.conf to be safe. proxy_letsencrypt.conf proxy_swag.conf
 1 point
 -
端口冲突的话,最简单的是在 docker 容器的设置里面将网络类型更改为 Custom:br0 ,使容器获得一个独立的 ip 地址。 当然这样做会有一定的 NAT 损耗。1 point
-
Hi, greifst du per VNC auf Catalina zu? Dann einfach mal die Tastatur für den VNC auch auf Deutsch umstellen. Steht bei dir bestimmt noch auf englisch. Das Problem hatte ich auch1 point
-
Edit: Lösung! Konnte das Problem jetzt "beheben", ist zwar mit Sicherheit keine Musterlösung, aber es hat funktioniert. Und zwar hab ich einen config clear gemacht, also eigentlich nur die Festplattenzuordnung zurückgesetzt. Zuerst habe ich das Array gestoppt. Dann den Punkt unter "Tools" > "New Config" ausgewählt Anschließend hier die Parity und Cache Drives ausgewählt, dass nur die Array Drives neu zugeordnet werden! Nachdem ich dann hier die Array Drives neu zugeordnet habe ging plötzlich die Bildschirmanzeige per VNC wieder... Ich hoffe dass das auch bei jemand anderem so funktioniert... Beste Grüße1 point
-
IT WORKS!!!!!!!! The main difference: The PCI bridge in this card. 1c:00.0 PCI bridge: ASMedia Technology Inc. Device 1806 (rev 01) 1d:00.0 PCI bridge: ASMedia Technology Inc. Device 1806 (rev 01) 1d:02.0 PCI bridge: ASMedia Technology Inc. Device 1806 (rev 01) 1d:06.0 PCI bridge: ASMedia Technology Inc. Device 1806 (rev 01) 1d:0e.0 PCI bridge: ASMedia Technology Inc. Device 1806 (rev 01) 1e:00.0 USB controller: Renesas Technology Corp. uPD720202 USB 3.0 Host Controller (rev 02) 1f:00.0 USB controller: Renesas Technology Corp. uPD720202 USB 3.0 Host Controller (rev 02) 20:00.0 USB controller: Renesas Technology Corp. uPD720202 USB 3.0 Host Controller (rev 02) 21:00.0 USB controller: Renesas Technology Corp. uPD720202 USB 3.0 Host Controller (rev 02) https://www.aliexpress.com/item/32947768312.html One year trying to make this happen.
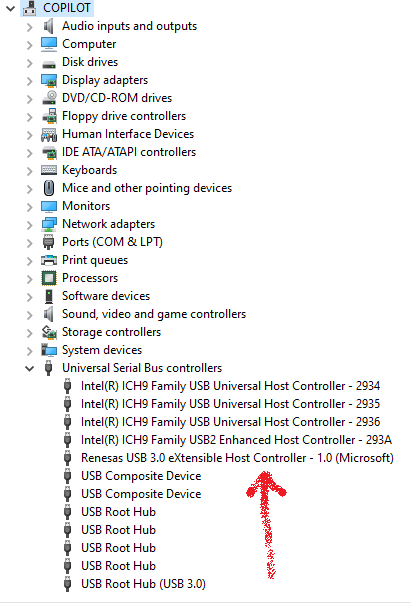 1 point
 -
Basically yes but here is a short tutorial: (Make sure that you stop all VM's and also Docker Containers to avoid problems in the first place before start building) Go in the CA App Search for Unraid-Kernel-Helper and click on download In the template select which drivers/features you want to enable (you can leave to other options as they are for example the versions even if you don't install them) Eventually disable the Backup option if you want to do it by hand Select the Cleanup methode (i recommend to leave it as it is 'moderate' - will clean up the directory and only let the downloaded zip files/drivers and the output folder in it after it finishes) Click on Apply Open the log window for the container and wait for it to finish (after it finishes the container will stop) Copy the created files from the output directory to your USB Boot Device (be sure to backup the old bzroot, bzimage, bzmodules & bzfirmare localy to your computer) Reboot the server After the restart delete the output folder from the kernel directory and also remove the Container from your Dockers (see below why) If you want to build the Images/Kernel again because you need more features or because a new driver version is released: (Delete the Container from your server if you left it installed on your server from a previous Images/Kernel build) Go to the CA App Search for Unraid-Kernel-Helper and click on download (I recommend this because over time I will add features/drivers and change the template slightly so that the template is always the newest version). Continue at step 3 from the tutorial above (with the advantage that the container doesn't have to download for example the Kernel or the Unraid files again - only if there isn't a newer version of Unraid released). (Please note if you are using the Cleanup Appdata App i would recommend to not delete the main folder for this container since if you are going to build the Images/Kernel again the Container doesn't need to download the necessary files for example the Kernel again - only if there isn't a newer version of Unraid released) I hope this all makes sense. If you try the container it would be nice to let me know if all worked well.1 point
-
@LumberJackGeek - had the same issue. This is how I solved it after @binhex made sure to add it to the image: 1. Menu > View > Preferences > Check "Expert mode:" 2. Click on the "Advanced" tab 3. Where it says "ccextractor executable location", use the explorer to find the right path: /bin/ccextractor 4. Click "Apply", Click "OK" 5. Restart the app Hope that helps.1 point
-
For anyone wondering the answer is yes! I had to edit my let's encrypt config and made "blueiris" a sub domain. As soon as I changed that it started working immediately. I was also able to close my stunnel port forwarding rule in my router! Let's Encrypt is pretty cool stuff. 😎 server { listen 443 ssl; root /config/www; index index.html index.htm index.php; server_name blueiris.random.server.name.org; ssl_certificate /config/keys/letsencrypt/fullchain.pem; ssl_certificate_key /config/keys/letsencrypt/privkey.pem; ssl_dhparam /config/nginx/dhparams.pem; ssl_ciphers 'ECDHE-RSA-AES128-GCM-SHA256:ECDHE-ECDSA-AES128-GCM-SHA256:ECDHE-RSA-AES256-GCM-SHA384:ECDHE-ECDSA-AES256-GCM-SHA384:DHE-RSA-AES128-GCM-SHA256:DHE-DSS-AES128-GCM-SHA256:kEDH+AESGCM:ECDHE-RSA-AES128-SHA256:ECDHE-ECDSA-AES128-SHA256:ECDHE-RSA-AES128-SHA:ECDHE-ECDSA-AES128-SHA:ECDHE-RSA-AES256-SHA384:ECDHE-ECDSA-AES256-SHA384:ECDHE-RSA-AES256-SHA:ECDHE-ECDSA-AES256-SHA:DHE-RSA-AES128-SHA256:DHE-RSA-AES128-SHA:DHE-DSS-AES128-SHA256:DHE-RSA-AES256-SHA256:DHE-DSS-AES256-SHA:DHE-RSA-AES256-SHA:AES128-GCM-SHA256:AES256-GCM-SHA384:AES128-SHA256:AES256-SHA256:AES128-SHA:AES256-SHA:AES:CAMELLIA:DES-CBC3-SHA:!aNULL:!eNULL:!EXPORT:!DES:!RC4:!MD5:!PSK:!aECDH:!EDH-DSS-DES-CBC3-SHA:!EDH-RSA-DES-CBC3-SHA:!KRB5-DES-CBC3-SHA'; ssl_prefer_server_ciphers on; client_max_body_size 0; location / { include /config/nginx/proxy.conf; proxy_pass https://192.168.1.100:8777; # NOTE: Port 8777 is the stunnel port number and not the blue iris http port number } }1 point

(Small).thumb.png.b884b0484e848c502a315fc27b995f59.png)