Leaderboard


(Small).thumb.png.b884b0484e848c502a315fc27b995f59.png)

Popular Content
Showing content with the highest reputation on 10/28/20 in all areas
-
Turbo Write technically known as "reconstruct write" - a new method for updating parity JonP gave a short description of what "reconstruct write" is, but I thought I would give a little more detail, what it is, how it compares with the traditional method, and the ramifications of using it. First, where is the setting? Go to Settings -> Disk Settings, and look for Tunable (md_write_method). The 3 options are read/modify/write (the way we've always done it), reconstruct write (Turbo write, the new way), and Auto which is something for the future but is currently the same as the old way. To change it, click on the option you want, then the Apply button. The effect should be immediate. Traditionally, unRAID has used the "read/modify/write" method to update parity, to keep parity correct for all data drives. Say you have a block of data to write to a drive in your array, and naturally you want parity to be updated too. In order to know how to update parity for that block, you have to know what is the difference between this new block of data and the existing block of data currently on the drive. So you start by reading in the existing block, and comparing it with the new block. That allows you to figure out what is different, so now you know what changes you need to make to the parity block, but first you need to read in the existing parity block. So you apply the changes you figured out to the parity block, resulting in a new parity block to be written out. Now you want to write out the new data block, and the parity block, but the drive head is just past the end of the blocks because you just read them. So you have to wait a long time (in computer time) for the disk platters to rotate all the way back around, until they are positioned to write to that same block. That platter rotation time is the part that makes this method take so long. It's the main reason why parity writes are so much slower than regular writes. To summarize, for the "read/modify/write" method, you need to: * read in the parity block and read in the existing data block (can be done simultaneously) * compare the data blocks, then use the difference to change the parity block to produce a new parity block (very short) * wait for platter rotation (very long!) * write out the parity block and write out the data block (can be done simultaneously) That's 2 reads, a calc, a long wait, and 2 writes. Turbo write is the new method, often called "reconstruct write". We start with that same block of new data to be saved, but this time we don't care about the existing data or the existing parity block. So we can immediately write out the data block, but how do we know what the parity block should be? We issue a read of the same block on all of the *other* data drives, and once we have them, we combine all of them plus our new data block to give us the new parity block, which we then write out! Done! To summarize, for the "reconstruct write" method, you need to: * write out the data block while simultaneously reading in the data blocks of all other data drives * calculate the new parity block from all of the data blocks, including the new one (very short) * write out the parity block That's a write and a bunch of simultaneous reads, a calc, and a write, but no platter rotation wait! Now you can see why it can be so much faster! The upside is it can be much faster. The downside is that ALL of the array drives must be spinning, because they ALL are involved in EVERY write. So what are the ramifications of this? * For some operations, like parity checks and parity builds and drive rebuilds, it doesn't matter, because all of the drives are spinning anyway. * For large write operations, like large transfers to the array, it can make a big difference in speed! * For a small write, especially at an odd time when the drives are normally sleeping, all of the drives have to be spun up before the small write can proceed. * And what about those little writes that go on in the background, like file system housekeeping operations? EVERY write at any time forces EVERY array drive to spin up. So you are likely to be surprised at odd times when checking on your array, and expecting all of your drives to be spun down, and finding every one of them spun up, for no discernible reason. * So one of the questions to be faced is, how do you want your various write operations to be handled. Take a small scheduled backup of your phone at 4 in the morning. The backup tool determines there's a new picture to back up, so tries to write it to your unRAID server. If you are using the old method, the data drive and the parity drive have to spin up, then this small amount of data is written, possibly taking a couple more seconds than Turbo write would take. It's 4am, do you care? If you were using Turbo write, then all of the drives will spin up, which probably takes somewhat longer spinning them up than any time saved by using Turbo write to save that picture (but a couple of seconds faster in the save). Plus, all of the drives are now spinning, uselessly. * Another possible problem if you were in Turbo mode, and you are watching a movie streaming to your player, then a write kicks in to the server and starts spinning up ALL of the drives, causing that well-known pause and stuttering in your movie. Who wants to deal with the whining that starts then? Currently, you only have the option to use the old method or the new (currently the Auto option means the old method). But the plan is to add the true Auto option that will use the old method by default, *unless* all of the drives are currently spinning. If the drives are all spinning, then it slips into Turbo. This should be enough for many users. It would normally use the old method, but if you planned a large transfer or a bunch of writes, then you would spin up all of the drives - and enjoy faster writing. Tom talked about that Auto mode quite awhile ago, but I'm rather sure he backed off at that time, once he faced the problems of knowing when a drive is spinning, and being able to detect it without noticeably affecting write performance, ruining the very benefits we were trying to achieve. If on every write you have to query each drive for its status, then you will noticeably impact I/O performance. So to maintain good performance, you need another function working in the background keeping near-instantaneous track of spin status, and providing a single flag for the writer to check, whether they are all spun up or not, to know which method to use. So that provides 3 options, but many of us are going to want tighter and smarter control of when it is in either mode. Quite awhile ago, WeeboTech developed his own scheme of scheduling. If I remember right (and I could have it backwards), he was going to use cron to toggle it twice a day, so that it used one method during the day, and the other method at night. I think many users may find that scheduling it may satisfy their needs, Turbo when there's lots of writing, old style over night and when they are streaming movies. For awhile, I did think that other users, including myself, would be happiest with a Turbo button on the Main screen (and Dashboard). Then I realized that that's exactly what our Spin up button would be, if we used the new Auto mode. The server would normally be in the old mode (except for times when all drives were spinning). If we had a big update session, backing up or or downloading lots of stuff, we would click the Turbo / Spin up button and would have Turbo write, which would then automatically timeout when the drives started spinning down, after the backup session or transfers are complete. Edit: added what the setting is and where it's located (completely forgot this!)2 points
-
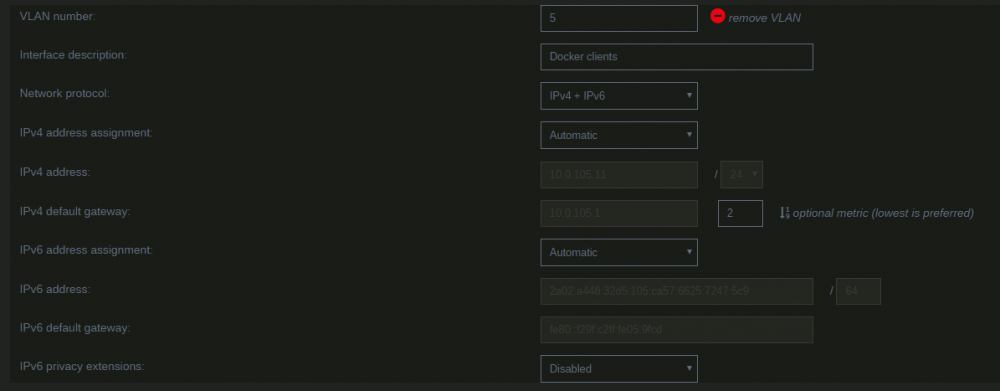
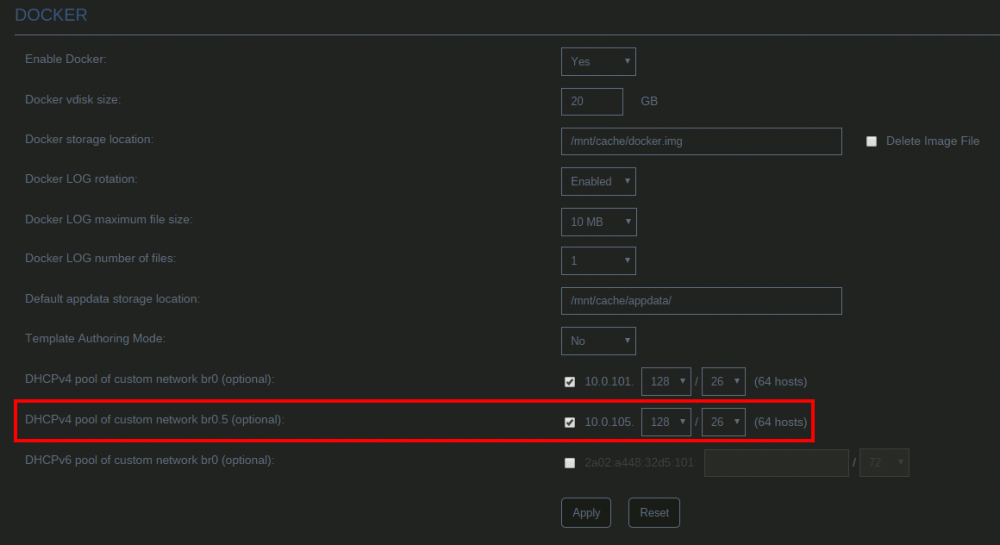
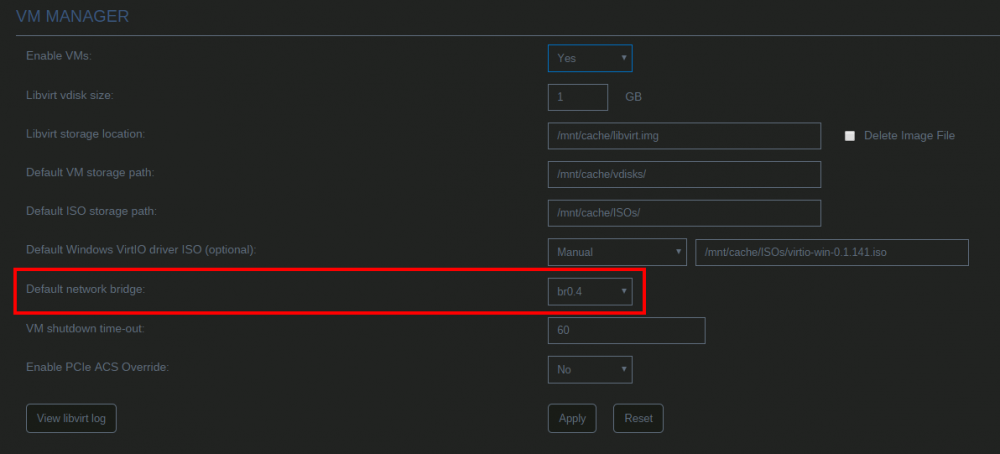
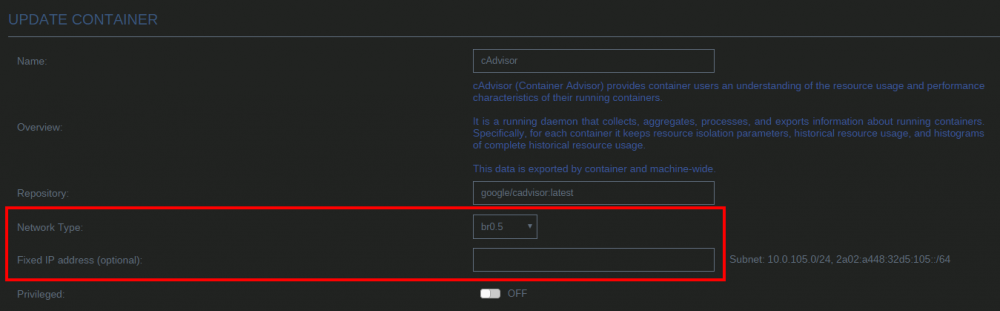
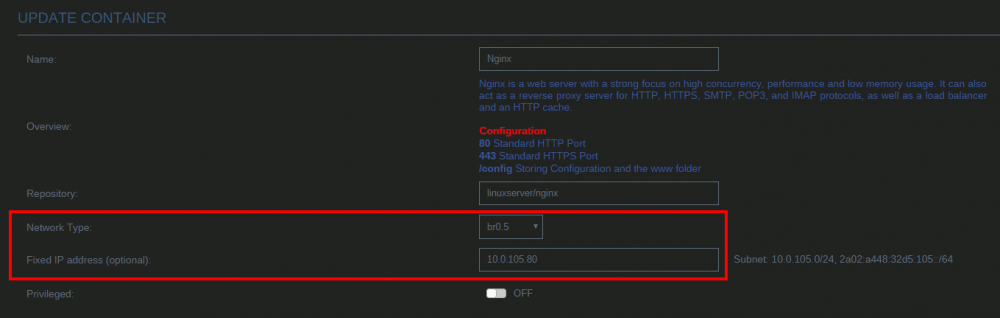
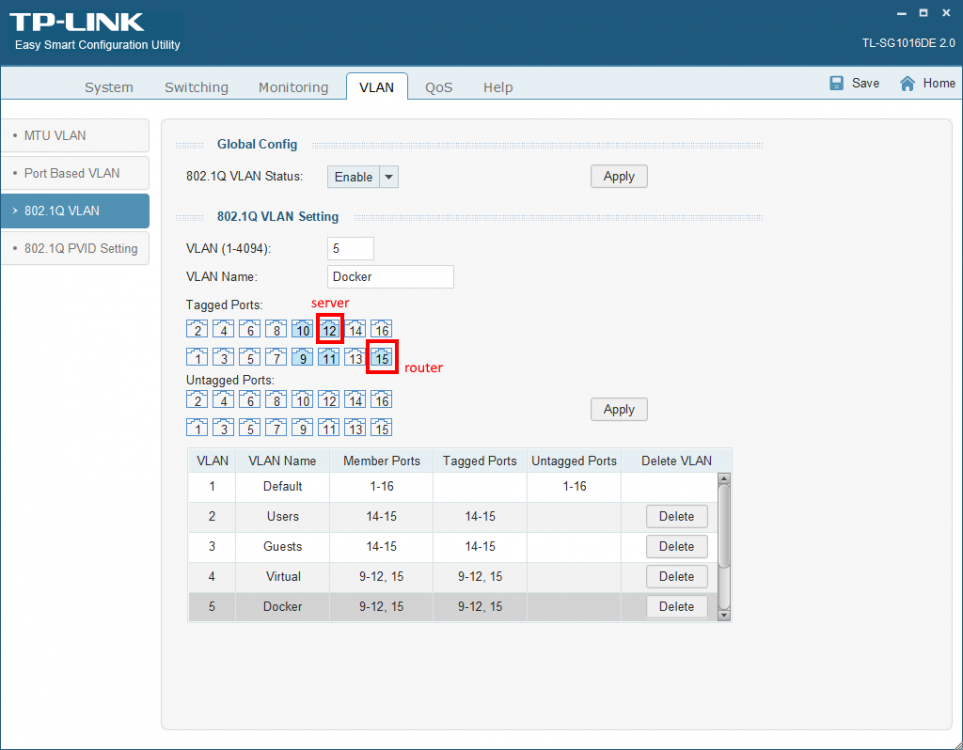
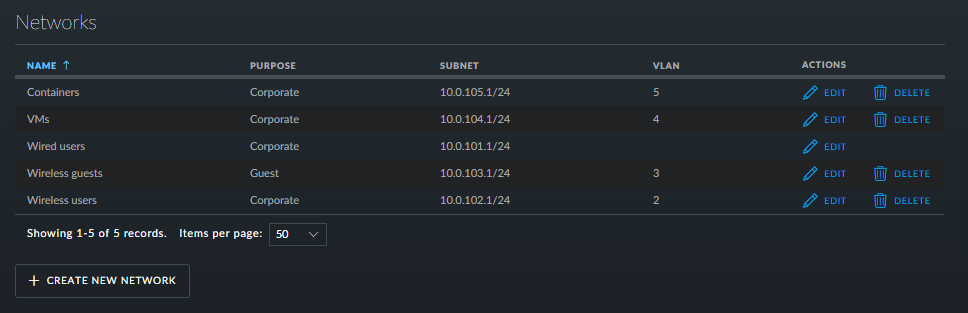
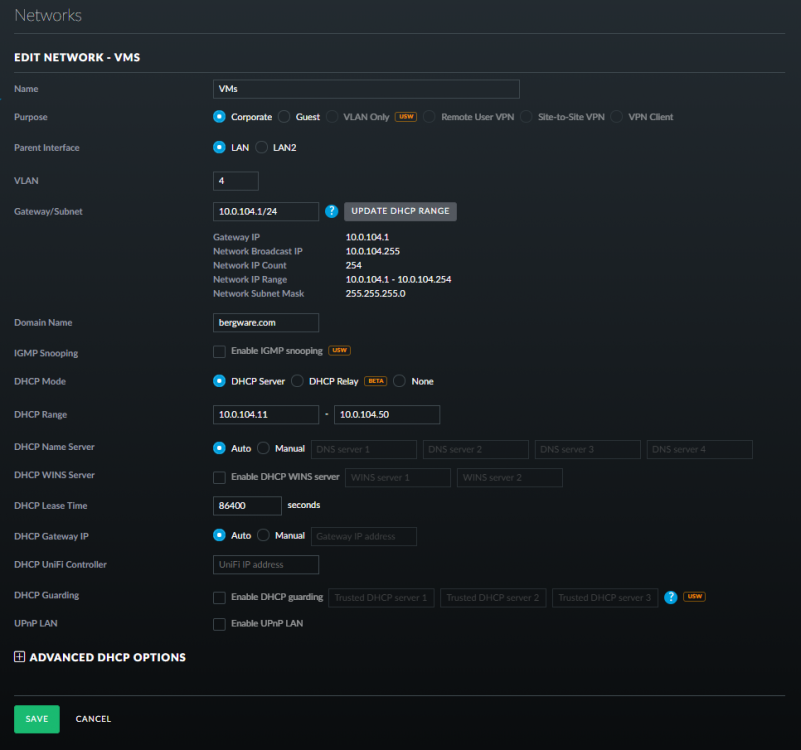
By default unRAID, the VMs and Docker containers all run within the same network. This is a straightforward solution, it does not require any special network setup and for most users this is a suitable solution. Sometimes more isolation is required, for example let VMs and Docker containers run in their own network environment completely separated from the unRAID server. Setting up such an environment needs changes in the unRAID network settings, but also requires your switch and router to have additional network possibilities to support this environment. The example here makes use of VLANs. This is an approach which allows to split your physical cable into two or more logical connections, which can run fully isolated from each other. If your switch does not support VLANs then the same can be achieved by connecting multiple physical ports (this requires however more ports on the unRAID server). The following assingments are done: network 10.0.101.0/24 = unRAID management connection. It runs on the default link (untagged) network 10.0.104.0/24 = isolated network for VMs. It runs on VLAN 4 (tagged) network 10.0.105.0/24 = isolated network for docker containers. It runs on VLAN 5 (tagged) UNRAID NETWORK SETTINGS We start with the main interface. Make sure the bridge function is enabled (this is required for VMs and docker). In this example both IPv4 and IPv6 are used, but this is not mandatory, e.g. IPv4 only is a good starting choice. Here a static IPv4 address is used, but automatic assignment can be used too. In this case it is recommended that your router (DHCP server) always hands out the same IP address to the unRAID server. Lastly enable VLANs for this interface. VM NETWORK SETTINGS VMs will operate on VLAN 4 which corresponds to interface br0.4. Here again IPv4 and IPv6 are enabled, but it may be limited to IPv4 only, without any IP assignment for unRAID itself. On the router DHCP can be configured, which allows VMs to obtain an IP address automatically. DOCKER NETWORK SETTINGS Docker containers operate on VLAN 5 which corresponds to interface br0.5. We need to assign IP addresses on this interface to ensure that Docker "sees" this interface and makes it a choice in the network selection of a container. Assignment can be automatic if you have a DHCP server running on this interface or static otherwise. VM CONFIGURATION We can set interface br0.4 as the default interface for the VMs which we are going to create (existing VMs you'll need to change individually). Here a new VM gets interface br0.4 assigned. DOCKER CONFIGURATION Docker will use its own built-in DHCP server to assign addresses to containers operating on interface br0.5 This DHCP server however isn't aware of any other DHCP servers (your router). Therefor it is recommended to set an IP range to the Docker DHCP server which is outside the range used by your router (if any) and avoid conflicts. This is done in the Docker settings while the service is stopped. When a docker container is created, the network type br0.5 is selected. This lets the container run on the isolated network. IP addresses can be assigned automatically out of the DHCP pool defined earlier. Leave the field "Fixed IP address" empty in this case. Or containers can use a static address. Fill-in the field "Fixed IP address" in this case. This completes the configuration on the unRAID server. Next we have to setup the switch and router to support the new networks we just created on the server. SWITCH CONFIGURATION The switch must be able to assign VLANs to its different ports. Below is a picture of a TP-LINK switch, other brands should have something similar. ROUTER CONFIGURATION The final piece is the router. Remember all connections eventually terminate on the router and this device makes communication between the different networks possible. If you want to allow or deny certain traffic between the networks, firewall rules on the router need to be created. This is however out of scope for this tutorial. Below is an example of a Ubiquiti USG router, again other brands should offer something similar. That's it. All components are configured and able to handle the different communications. Now you need to create VMs and containers which make use of them. Good luck.


 1 point
 -
Current Plex / General Purpose Server i7-4770 / GTX 1060 / 32GB RAM / 48TB *external USB3.0 DAC* array running StableBits DrivePool Why Am I Upgrading I'm at that point where I'm contemplating how best to move forward with upgrading my 8 year old server. Everything performance-wise runs perfectly fine on the system today (1080p transcoding, I don’t expose my 4K library to anyone except my Apple TV) but I’ve put off upgrading to a larger chassis (for more drives) / server-grade components / potentially new OS for many years under the mantra “if it ain't broke, don't fix it” which generally in life has served me well. I’ve now filled up the entire DAS array and instead of buying a larger DAS and shoving more 12TBs in there, I’d rather just build out a 16-24 bay server chassis with Dual Xeons / P2000 / 32-64GB RAM / 120TB *internal* array to future proof. In terms of “needs”, the upgrades are more so to future proof as well as make transcoding large TV season packs to H265 go faster. I don’t plan on allowing other users to transcode my 4K library, but that is certainly a “nice-to-have” feature that I would consider a plus as I figure out which environment to run my server in. Core Programs I Use in Current Server Plex Emby Stablebits DrivePool Stablebits Scanner qBittorrent uTorrent Sonarr / Radarr / Lidarr / Ombi / Jackett / PlexPy / Trakt Scrobbler Plugin etc. No-IP DNS rClone + rClone Browser Various Transcoding and Audio/Video Editing Software (Vidcoder / MKVToolnix / JMkvpropedit / FlacSquisher / DTS Encoder Suite etc.) TagScanner Bulk Rename Utility Chatzilla jDownloader iTunes Chrome Teamviewer + AnyDesk Teamviewer is used almost daily to interact with all the above programs as well as transfer files from my local PC via drag-n-drop to the remote server Upgrade Options This is where I’m looking for some wisdom from this great forum, especially those maybe in my shoes who were thinking about migrating from a Windows 10 Server to an unRAID based system. I have a few options – 1) Simple hardware upgrade and keeping mostly all software the same (Win10 -> Win10) 2) Upgrade to Windows Server 2019 3) Build system with unRAID core and virtualize Windows 10 with mostly everything running inside the VM 4) Migrate to unRAID + Docker-based Solution Option 1) Windows 10 This is the most simple, no-nonsense “if it ain't broke, don't fix it” approach. I won’t be able to simply clone my SSD to the new server but setting up Windows 10 should be relatively straight forward to configure the various ports, install my programs needed above, copy and paste Plex’s %appdata% and keep the DrivePool integrity the same except for the fact that it goes from external pool of drives via USB 3.0 DAC to an array of internal drives. Option 2) Upgrade to Windows Server 2019 There is something inside of me that says: “why would you buy all this nice hardware only to run Windows 10 on it. You should be running a server OS”. At the same time, I don’t think any features Server 2019 offers are immediately obvious to me that I would use (maybe someone can educate me on this?). Based on that fact alone, it doesn’t seem like the “better choice” vs. option 1. Teamviewer I think also completely breaks (makes you pay) if it detects Windows Server OS, which is my preferred client to connect remotely (AnyDesk is okay, I like file transfer speed/ease from Teamviewer better). Option 3) unRAID + Windows 10 VM This is the option I’m trying to research vs. option 1 & 4, in terms of what kind of performance hit “virtualizing” Windows would have and usability of my existing DrivePool setup. I like that unRAID would act as a layer one above my VMs, where if something happens to Windows 10 (say it crashes), I could connect to the web interface and restart it manually. It also helps me “lean into” the software and learn more about it by playing around with different features (plugins/tools) while keeping the integrity of my existing system up and running within the contained VM. After having read threads about poor “VM performance” that requires tinkering with CPU pinning/isolation, among other things. This makes me think there are various complexities with drivers, VM-passthrough performance etc. that will come up that will cause issues in the future that I have to constantly go back to forum searches to fix (unlike Windows main issue being the occasional mandatory random update). I’ve also read various software like CrystalDiskInfo / HWMonitor don’t play well with VMs. I probably know 10% of the potential compatibility issues to come with running such a system vs. plain straight Win10 setup which is why I ask if this is feasible vs. Option 1 without drastic performance hit on apples-to-apples basis. Option 4) Migrate to unRAID + Docker-based Solution So this is the one I know most people would defacto recommend, partially because you all are probably running it. I think I read that there are over 1mm users on Plex Docker plugin so it’s a well-walked path but I know it won’t be an easy 3 hour setup kind of thing. Going back to the "don't fix what's not broke", the question really boils down to figuring out what tangible, specific "upside" is there to an to a unRAID + docker solution vs. Option 1 or 3…I’ve tried to think of some below but any input would be really helpful as I try to think this through: What is the tangible “regular Plex” benefit – does items in Plex load faster in Docker vs. option 1? Do remote streams startup quicker? Is Plex native performance so much better in Docker that it can handle one more incremental 4K stream vs. Option 1 or Option 3? Etc. Can I import all my Win10 %appdata% with custom covers / tags / custom descriptions / playlists / watch status / view count/history etc. to Docker or is Marcus Nailor’s Plex Move Guide just totally not recommended vs. a clean install? Is it purely less resources dedicated to the OS-overhead that will improve tangible performance across my intended program usage (transcoding / torrenting etc.)? If I want to run a Windows 10 VM for some specific Win10 programs while everything else runs in Docker containers, does that mean my performance would need to be effectively split in a fixed proportion (CPU cores / RAM / GPU) to the VM vs. unRAID while they are running at the same time? Can I run Plex / Sonarr / Radarr etc. in Docker while still pointing it to my existing DrivePool or will need to spend a lot of time effectively moving over to a pooled + parity-based solution in unRAID? Can the reformatted drives be accessed from a Windows based machine? Does introducing 1 or 2-parity create significant slow down from a write perspective? Are there unRAID only benefits (cache drives for metadata vs. everything on a single SSD? Cache drives for torrenting?) that are only available in this environment vs. Option 1 / 3? unRAID Parity vs. Stablebits DrivePool Perhaps something overall driving my decision making process is just my general satisfaction with Stablebits Drivepool and not having found the equivalent of its simplicity on unRAID (fine-tuned automatic balancing across large array of disks, volume equalization, drive evacuation based on health monitoring, software level file duplication, and ease of adding/removing drives to the array without long wait times of rebuilding parity) with unRAID so far, understanding that unRAID's parity-array to protect against drive failure is one of the biggest reasons to move over to unraid from Win10 based solutions. I understand the biggest differences between unRAID and Drivepool would be the ability to have real-time redundancy in unRAID if a drive fails, but I’m not too fussed as long as I know approximately which parent folder contains the corruption/failure as I keep a 1:1 monthly online backup of the array offsite that I can always redownload (and I’ve had Drivepool evacuate a detected failing hard drive just fine without…evacuated, removed, put in a new drive and balance redistributed all the files back). Conclusion It seems based on the above, I’m leaning towards Option 3 so long as it retains the majority of performance functionality versus Option 1. Option 4 I could certainly be convinced and perhaps Option 3 eventually does lead to Option 4 down the line. The big hesitation / question is figuring out what performance difference occurs between Option 1 and 3 and what big “upgrades/features” I get using Option 4 over Option 1 / 3. Would love to hear people’s general thoughts, sorry for the wall of text but I’m sure someone else in the world has thought / considered much of the above as they dip their toes into this fascinating software!1 point
-
Sure it's easier. I don't have to maintain a package when python has a perfectly good package manager.1 point
-
I can confirm that replacing the drive that was marked by the diskspeed docker did the trick Cheers! Josh1 point
-
I upgraded and rebooted the server to start and it let me reenable VMs through the GUI. Not sure if it was the upgrade or the reboot (I had already rebooted once) but it works now. Thanks for your help!1 point
-
Thanks I reseated the drive and the errors are gone and the drive is rebuilding much faster now. Seems odd that would fix it but oh well, looking promising! Thanks!! edit: All appears to be working now after the drive rebuild. Thanks1 point
-
Just a question out of curiosity, do you plan to add also 6 graphic cards? because the macOS experience without it is really bad and I see you are putting A LOT of resources to it.1 point
-
1 point
-
You have to tick the device you want to passthrough in the vm template Envoyé de mon HD1913 en utilisant Tapatalk1 point
-
So far so good tnx for the help!1 point
-
Hey Johnnie that seemed to do the trick, There was one drive that was only writing at 1mb/s which is what was triggering the limit. I have replaced it and its now doing the data re-build so once its complete ill do the parity check again but I believe this should be done. I will update the thread when I know for sure Thanks! Josh1 point
-
Never updated this post, but I ended up switching to unraid permanently about 2 weeks after my last post lol #screwwindows. I slapped a tiny Noctua fan on the SB chip that was COOKING but not being reported by the supermicro bios or IPMI. Still not sure of the sudden temperature rise on that chip but could be airflow change in the case who knows, but its been running 24/7 without issues now. Really loving the VMs and dockers.1 point
-
In the repository field (may need to toggle advanced in top right corner) it'll say postgres:11 you can change that to postges:13 or postgres:latest1 point
-
Yep! This one here. When you install it you can install the latest verison which is :13 instead of :11 if you want. Or leave it at latest, but warning it will auto-update to 13.x or 14 when those are released which may include breaking changes. console into the container (click it, choose console) Here's the commands to run. This is from memory, su - postgres createuser --interactive --pwprompt Pick a username for the database. No to all, superuser, DB create permission, create new roles. createdb recipes psql GRANT all privileges ON DATABASE recipes to (username you made); (BE SURE TO END WITH SEMICOLON) Once it confirms GRANT then \q exit NOTE: If it commplains about the word "privileges" try leaving it out, so just GRANT all ON...
 1 point
 -
Replace/swap cables on that drive, can't see which one is ATA5 since log rotated.1 point
-
I have had the same issues on clean installed unraid server, it blocks the webui when using old vpn technology when using PIA, even if you add the line from earlier post. Switch over to the new technology copy new ovpn file, delete everything else in ovpn folder, restart sabnzbd, and it will work like charm. download link described at the support page of deluge vpn. ( Q19. I see that PIA has a new network called 'Next-Gen', does *VPN Docker Images that you produce support this, and if so how do i switch over to it? A19. Yes, it's now fully supported including port forwarding, if you want to switch from PIA's current network to the 'next-gen' network then please generate a new ovpn file using the following procedure:- Please make sure you have the latest Docker Image by issuing a docker pull. Download next-gen ovpn config file - Click on the following link and then click on 'View OpenVPN Configurations' , please download a ovpn file for next-gen:- https://www.privateinternetaccess.com/pages/download# Extract the zip and copy ONE of the ovpn files and any other certs etc to /config/openvpn/, ensuring you either rename the extension or delete the old current-gen network ovpn file. Restart the container and monitor /config/supervisord.log file for any issues.) thnx for all your hard works, Binhex.1 point
-
I managed to get CSM working on my motherboard which has allowed me to access the Unraid GUI. I had to enable CSM but disable all of the options within it. I set the following options to Disabled / Do not run: Launch PXE OpROM Policy Launch Storage OpROM Policy Other PCI Device ROM Priority I also turned off the boot image so it displays the POST, not sure if that helped. It's worth noting that video only worked on the GPU, in the 1.40 motherboard firmware you cannot enable CSM if your running only on integrated graphics. Edit: Can confirm that Unraid 6.9 Beta 25 boots properly when CSM is disabled. Edit 2: Just to clarify I'm running a 10th Gen Intel i5 iGPU.1 point
-
Some one reported some issues with the script I wrote in another thread. I pulled the one I've been using off the server and I think it corrected the bug. No warranties on this, I wouldn't say I'm a bash expert. Note: LVSAVEDIR and LVSNAPSHOTDIR are probably different on your machine so change those to what you want. # S00slqemu.sh #!/bin/bash # stops libvirt and moves the save and snapshot folders creating a symlink to them # LVSAVEDIR=/mnt/cache/VMs/qemu_nv/save LVSNAPSHOTDIR=/mnt/cache/VMs/qemu_nv/snapshot if [ -f /var/run/libvirt/libvirtd.pid ];then /etc/rc.d/rc.libvirt stop fi if [ $LVSAVEDIR != "/var/lib/libvirt/qemu/save" ];then if [ ! -L /var/lib/libvirt/qemu/save ];then if [ ! -e $LVSAVEDIR ];then if [ ! -e /var/lib/libvirt/qemu/save ];then mkdir $LVSAVEDIR else mv /var/lib/libvirt/qemu/save $LVSAVEDIR fi else rm -r /var/lib/libvirt/qemu/save fi fi ln -s $LVSAVEDIR /var/lib/libvirt/qemu/save fi if [ $LVSNAPSHOTDIR != "/var/lib/libvirt/qemu/snapshot" ];then if [ ! -L /var/lib/libvirt/qemu/snapshot ];then if [ ! -e $LVSNAPSHOTDIR ];then if [ ! -e /var/lib/libvirt/qemu/shapshot ];then mkdir $LVSNAPSHOTDIR else mv /var/lib/libvirt/qemu/snapshot $LVSNAPSHOTDIR fi else rm -r /var/lib/libvirt/qemu/snapshot fi fi ln -s $LVSNAPSHOTDIR /var/lib/libvirt/qemu/snapshot fi /etc/rc.d/rc.libvirt start1 point
-
Scenario: Android developer using a Windows VM needing an android VM (ie: Genymotion) for testing. Genymotion uses VirtualBox as it's underlying virtualization platform, in fact it's a prerequisite prior to installing. Genymotion interacts with VB behind the scenes.1 point
-
download the static build from http://johnvansickle.com/ffmpeg/ unzip it to your flash drive somewhere ( i unzipped it to ffmpeg-git ) then add this to your /boot/config/go file cp /boot/ffmpeg-git/ffmpeg /usr/local/sbin1 point