Leaderboard


Popular Content
Showing content with the highest reputation on 12/14/20 in all areas
-
Did you read this in the post above yours? It seems clear that Limetech has no intention of pulling the rug out from under current users and changing the licensing model. Changes if they occur will not affect any current users. Even when subscriptions may be offered for ancillary services (and who knows what those may be), it will not be tied to the features already in the OS.5 points
-
I for one would be happy to move to subscription licensing. Even if that means free upgrades for XXX years in one purchase, further cost if you want to upgrade after that. I get people's concern, but devs have to eat. As for the statement about not liking "forcing people to update", as an InfoSec guy that kind of thinking drives me mad. The amount of back doors and crap I have to deal with on a daily basis due to old software is ridiculous. I just spent the last 6 months fighting hard to ensure our desktop standard going forward is cloud-first, Azure AD Joined and up-to-the-minute patched for our supported software. Your app not work with Windows 10 20H2? Get the vendor to fix it as it's not on the supported software list. What has to change is not the need to update software, it's the resistance to change that has to go, which also means that systems and applications need to be coded so that unexpected downtime related to the update is eradicated.4 points
-
Fast forward four months: Which is it? Will customers who bought licenses still get "all future upgrades and features" or are there going to be new, "premium features" developed which will only be available to subscribers? Every major upgrade of Unraid has included "features not already included with the [prior version of] the OS." In the future, would such new features be termed "premium features" only available to subscribers? Finally, are we conflating "features" with "services"? I'm fine with there being a subscription offered for direct access to priority tech support, for example. But I'm not fine with discovering one day that ZFS is available on Unraid -- but only to subscribers. Thanks for considering my concerns.2 points
-
Don't worry about it. It doesn't work on 6.8.3 Fix coming.2 points
-
Thanks for your detailed feedback @sota. Just to be clear, no current users will be affected by any future subscription offerings. We are also committed to any future subscription offerings being tied only to added premium features not already included with the OS. We fully understand the hesitancy and resistance to some subscription models and will be sure to make it worth while and a big value add for those users interested in the added features. Thank you again!2 points
-
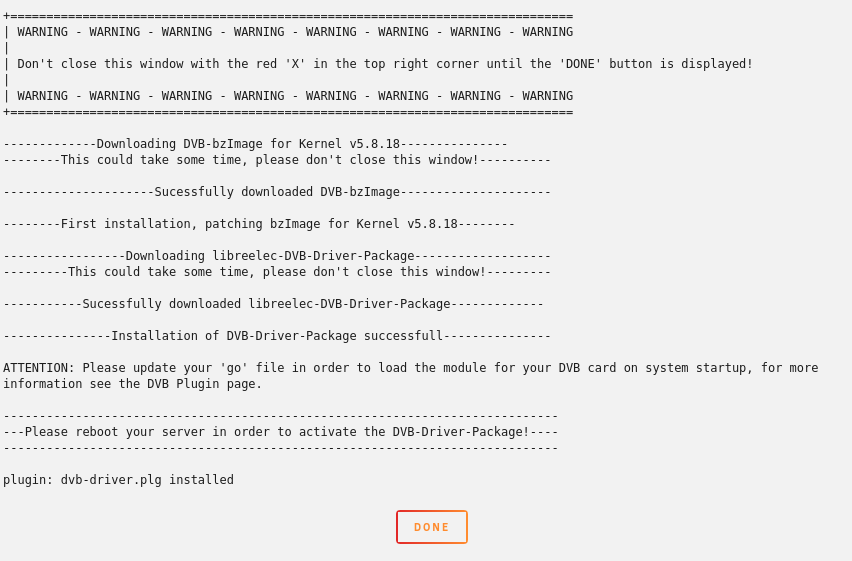
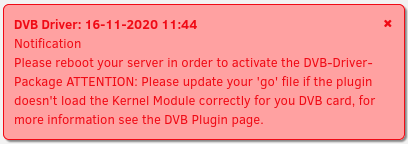
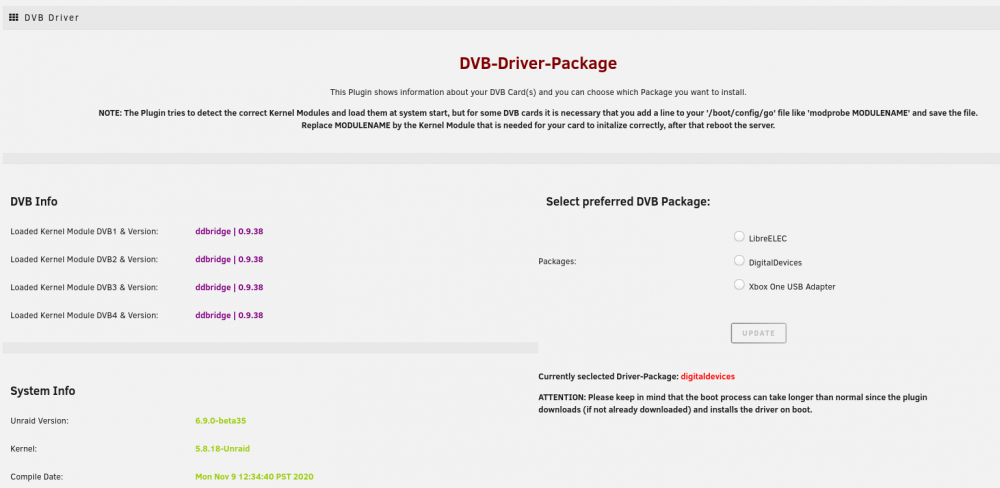
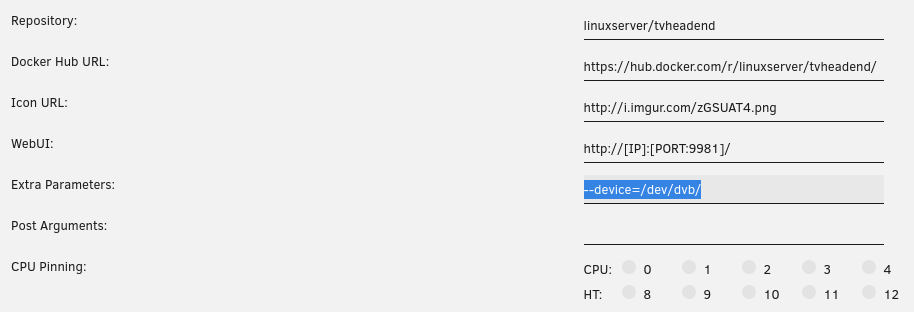
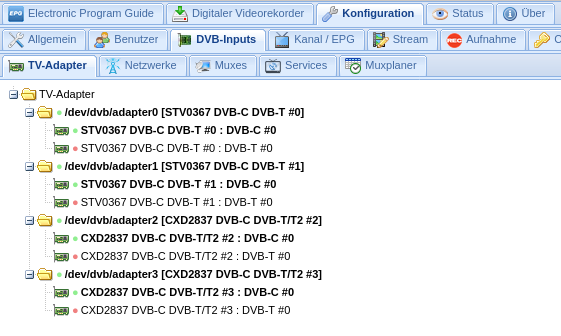
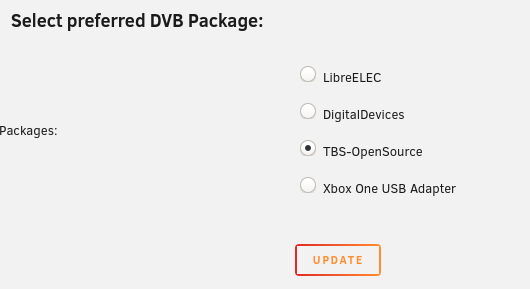
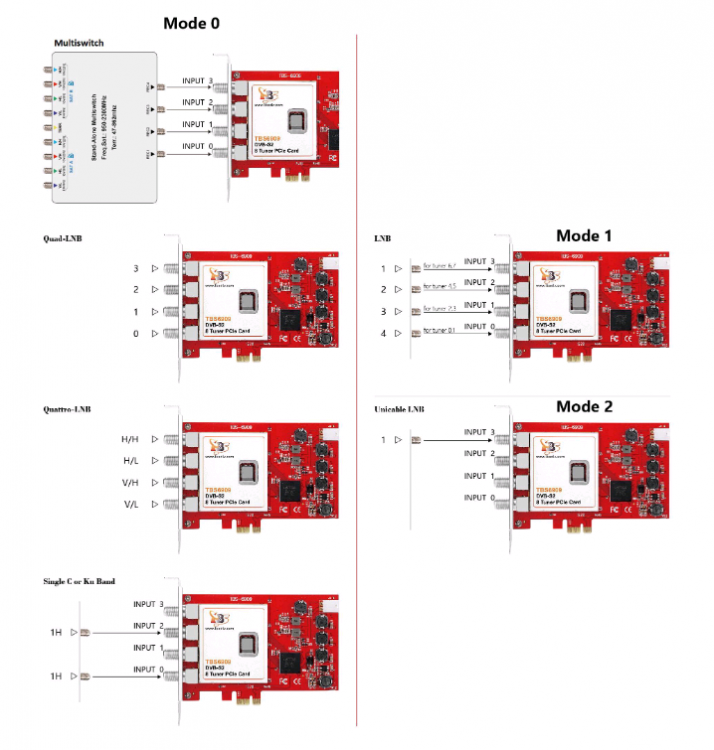
DVB-Driver (only Unraid 6.9.0beta35 and up) This Plugin will add DVB Drivers to Unraid. Please note that this Plugin is community driven and if a newer version of Unraid is released the drivers/modules has to be updated (please make a short post here or see the second post if the drivers/modules are already updated, if you update to a newer version and the new drivers/modules aren't built yet this could break your DVB support in Unraid) ! Installation of the Plugin (this is only necessary for the first installation of the plugin) : Go to the Community Applications App and search for 'DVB-Drivers' and click on the Download button (you have to be at least on Unraid 6.9.0beta35 to see the Plugin in the CA App) : Or download it directly from here: https://raw.githubusercontent.com/ich777/unraid-dvb-driver/master/dvb-driver.plg After that wait for the plugin to successfully install (don't close the window with the , wait for the 'DONE' button to appear, the installation can take some time depending on your internet connection, the plugin downloads a custom bzimage with the necessary DVB Kernel modules, the DVB driver itself and installs it afterwards to your Unraid server) : Click on 'DONE' and read the alert message that appears on the top right hand corner and close it with the 'X': You can skip Step 4 if you are want to use the LibreELEC driver package (selected by default) if you want to choose another driver package go to the Plugin itself PLUGINS -> DVB-Driver and choose which version that you want to install and click on 'UPDATE' (currently LibreELEC, TBS-OpenSource, DigitalDevices and Xbox One USB DVB Adapter drivers available) : Reboot your server MAIN -> REBOOT: After the reboot go back to the Plugin page PLUGINS -> DVB-Driver and check if the cards are properly recognized (if your card(s) aren't recognized please see the Troubleshooting section or make a post in this thread but please be sure to read the Reporting Problems section in this post) : Utilize the DVB card(s) in a Docker container: To utilize your DVB card(s) in your Docker container, in this example for Tvheadend, add '--device=/dev/dvb/' to the 'Extra Parameters' in your Docker template (you have to enable 'Advanced view' in the template to see this option) : Now you should see the card(s) in the Docker container: IMPORTANT: If you switch between driver packages a reboot is always necessary! DigitalDevices Notes: (This applies only if you selected the DigitalDevices drivers in the Plugin) If you are experiencing I²C-Timeouts in your syslog please append 'ddbridge.msi=0' to your syslinux configuration (example below). You can also switch the operating modes for the Max S8/SX8/SX8 Basic with the following options: 'ddbridge.fmode=0' 4-tuner mode (internal multi-switch deactivated) 'ddbridge.fmode=1' Quad-LNB/normal outputs of the multiswitch 'ddbridge.fmode=2' Quattro-LNB / cascade outputs of the multiswitch 'ddbridge.fmode=3' Unicable or JESS LNB / Unicabel output of the multiswitch Link to source You also can combine 'ddbridge.msi=0' (but you don't have to if you don't experience I²C-Timeouts) and for example 'ddbridge.fmode=0' here is a short example how to do it: Go to the 'Main' tab and click on the blue text 'Flash': Scroll a little down and append like mentioned above the commands to the syslinux configuration: (As stated above you don't need to append 'ddbridge.msi=0' if you don't experience I²C-Timeouts) Click on 'Apply' on the bottom and reboot your server! TBS-OpenSource Notes: You can also switch the operating modes from the TBS Cards, in this example for the TBS-6909 or TBS-6903-x, if you append one of the following commands to your syslinux configuration (how to is above): 'mxl58x.mode=0' Mode 0 -> see picture below 'mxl58x.mode=1' Mode 1 -> see picture below 'mxl58x.mode=2' Mode 2 -> see picture below Modes: Link to source Troubleshooting: (This section will be updated as soon as someone reports a common issue and will grow over time) Reporting Problems: Please be sure if you have a problem to always include a screenshot from the Plugin page, a textfile or a link to pastebin of the command 'lspci -v' or 'lsusb -v' - depending on the card you are using PCIe or USB (simply open up a Unraid terminal with the button on the top right of Unraid and type in one of the two commands without quotes) and also the output of 'dmesg' in a textfile or a link to pastebin (simply to not spam the thread with the output).


 1 point
 -
Big thanks to the Selfhosted Podcast for having @jonp on to talk about the past, present and future of Unraid. This is the place to argue about the pronunciation of ZFS and to let us know what you think of the pod! 8/25 Update: After receiving some feedback and seeing some misconceptions about future licensing expressed, we wanted to set the record straight: The Unraid community is the single most important thing to us at Lime Technology and we take all customer concerns seriously. We wanted to clarify a point about future subscription offerings mentioned on this podcast: Any future subscription offerings will be for new Unraid products and services separate from our current core OS licenses and will not affect current users. Your Unraid license will still include all future upgrades and features and you will still be able to purchase licenses for a one-time fee. Thank you very much for your passionate and enthusiastic support. If you have any questions or comments about this podcast or future Unraid offerings, we will do our best to answer what we can here. https://unraid.net/blog/the-past-present-and-future-of-unraid-on-the-selfhosted-podcast1 point
-
Dec 14 14:37:57 NASBOX root: Fix Common Problems: Warning: Dynamix SSD Trim Plugin Not installed Installing this will definitely help to any cache enabled shares. Dec 14 00:00:01 NASBOX kernel: md: recovery thread: check P Q ... You're also currently running a parity check which will impact speed until its done (Many people use the parity tweak plugin to only have it run at night)1 point
-
I would love this. I am currently paying Code 42/CrashPlan $10 a month to backup my unRAID server to their cloud. It works well, but, there are issues with the service (like throttling/slow upload and download) that have me wishing there was another alternative for "unlimited" array backup. If Limetech were to offer a competitively-priced NAS backup service only to licensed unRAID users (so it doesn't get overrun), I would be all over it. "Comptetively-priced" is subjective because I don't know how you could have the economies of scale of some of the larger backup vendors.1 point
-
Sounds like you have dealt with Adobe. 😁1 point
-
Yeah I noticed that when I upgraded my test server to beta 31 (the first beta I tried this round). My non-root users were still able to login but I was getting random permission errors when trying to do things like launch MC. Unfortunately rather than mess with troubleshooting it I decided to just scrub it and wait until the new stable comes out to see what DocGyver and the community would come up with for non-root access again. I'll be following your thread though to see what you find out so do keep us posted.1 point
-
Bonsoir et merci pour vous messages ❤️ n'hésitez pas à rejoindre le discord ou nous sommes très gentils ^^1 point
-
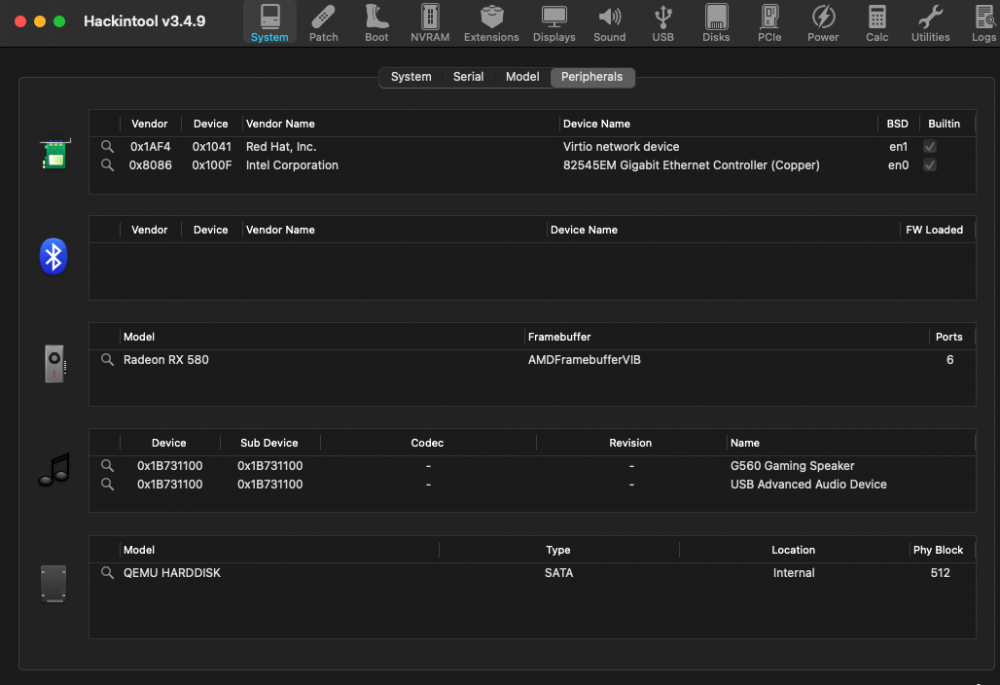
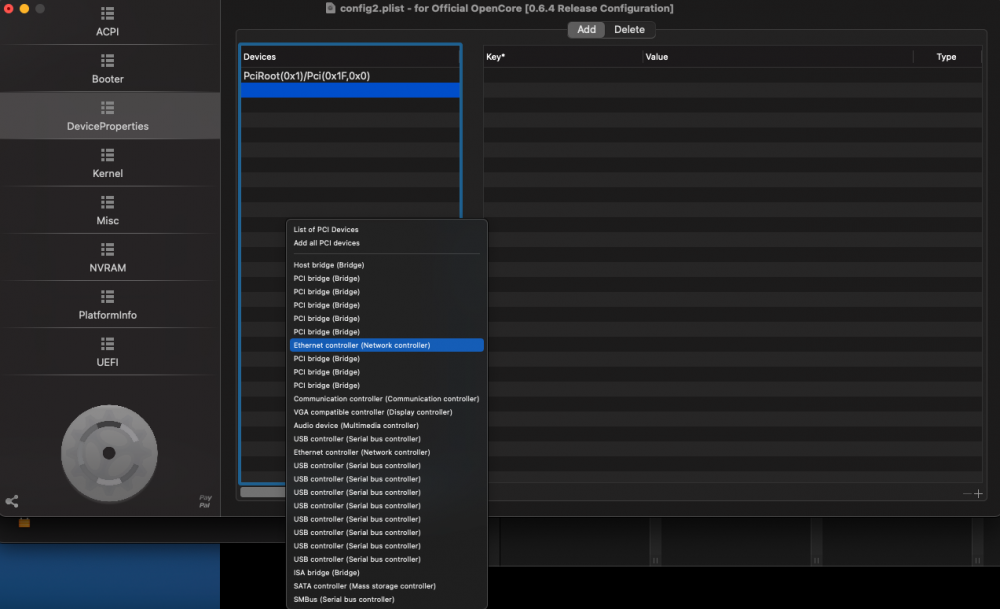
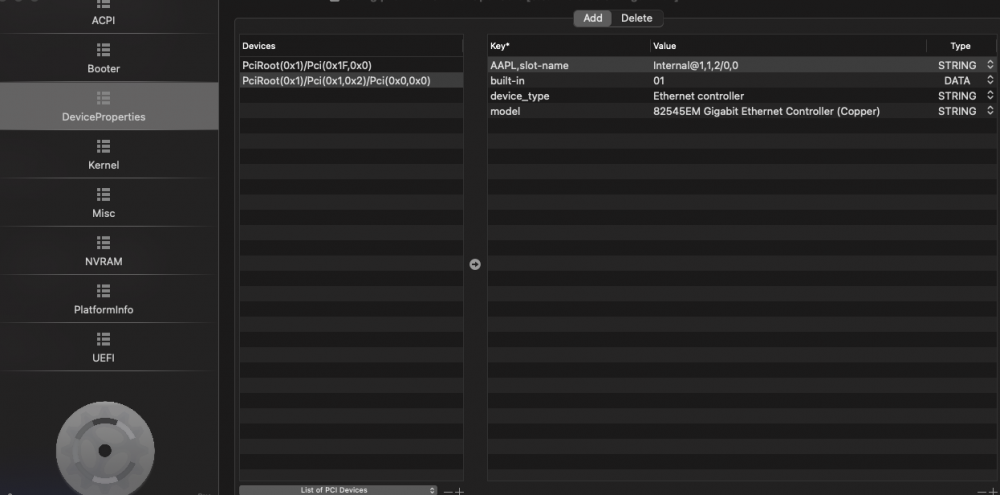
Yes you can fix that by doing the following 1. download hackintool https://github.com/headkaze/Hackintool/releases/tag/3.4.9 2. Open it and goto peripherals 3. Your nic should be en0 and a virtual intel nic (you can have other nics but you must have en0 which is intel. 4. if your nic is not en0 then run the following in mac terminal then reboot the vm. Then it should be en0 sudo rm /Library/Preferences/SystemConfiguration/NetworkInterfaces.plist sudo rm /Library/Preferences/SystemConfiguration/preferences.plist 5. You want the nic to say en0 and have a tick where it says built in as in the pic below 6. If it doesnt then you will need to open your opencore configurator goto tools then open the efi partition and open the config.plist file with open core. 7. goto device properties then at the bottom click on the list of pci devices. Find your network adapter and click it. It will add it in as below Now we need to click the plus button on the bottom far right of the screen. It will allow us to add a key Now we need to add the key built-in with the type set as Data and the value as 01 Now whilst here in opencore configurator double check that you do have a system definition defined in platform info. Now save the changes and reboot the vm, check with hackintool that it now has a tick on builtin. Now log into apple services


 1 point
 -
This is really hitting a string with me. - Yes some of us won't sign up and that equals loss of business. Money talk partner. I am not really happy that a member of limetch actually is telling us "if you don't like it, go somewhere else". And trust me WE WILL. Don't bite the hands that feeds you mate. - This absolute BS, that some users can't afford it, so what you will make it a subscription model at $11 a year LOL ?1 point
-
@ich777 provided suggestion of if ( window.history.replaceState ) { window.history.replaceState( null, null, window.location.href ); } Which fixed the issue thanks.1 point
-
1 point
-
Thanks and it is weird as I also used Tvheadend to see the channels and also they did not come back in HD, I did try and manually change the channel on plex to the HD ones but also no luck. I will ask plex forums. Thanks for the help.1 point
-
@JorgeB got it, thanks! I totally missed the checkbox, it needs to be bigger! haha1 point
-
See here: https://forums.unraid.net/topic/53433-ssds-as-array-drives-question/?do=findComment&comment=5224821 point
-
I've updated the Parity Swap section of the "Official" part of the wiki to make it clear that this is supported.1 point
-
Today's update introduces a number of new items (along with some refinements and bug fixes) Donate Links Donate links are now only listed on apps which you actually have installed. The cleans up the displays and prevents the wall of apps screaming "DONATE" on any given page within CA. Filters on searches When you enter in a search term, the Category listing down the side will instead become Filters against the search. This will allow you to narrow down the results for the search Favourite Repositories On every app's tile / popup, there is a new icon which will allow you to set the Repository the app is from (eg: Self Hosters / Hotio / Binhex) as a favourite repository. When you enter in a search, the results from the favourite repository will always appear first in the list. Additionally, a new menu item (Favourite Repository) will quickly show you every app from the repository Repository "Category" After a search, clicking the repository category will display only the repositories which are present within the search. If no search is active, then all repositories are listed. Note that the results listed here always give preference to authors who have filled out a profile for CA. Repository Popups Clicking within the App's popup there is a new link called "Profile". This will bring up the following, and also allow you to see some stats on the repository, visit any alternative support venues etc. I encourage ALL authors / developers to create a profile for CA by visiting this link: https://forums.unraid.net/topic/38619-docker-template-xml-schema/page/3/?tab=comments#comment-919111 Additionally, support for these new features and something else soon(tm) necessitated some changes and additions to the application feed. The application feed will remain compatible with older versions of CA for the next few weeks, but will in the new year become incompatible with all older versions of CA.
 1 point
 -
Well solved while I write this message at the end after another reboot it started well and I was able to delete the mount points1 point
-
From what I remember besides the SATA controller it was only passing-trhoug a USB controller and a GPU, so it should be fine, but you should check.1 point
-
Would offering 30 day trial extensions for $20 be an acceptable option? Keep everything as it currently stands, just add paid extensions. It would still be a trial version with phone home on array start, but the expiration date could be extended indefinitely in 30 day increments. Note, I have no idea how much work this would be to implement, I'm just floating an idea from an end users prospective.1 point
-
@unRate can you post a few representative examples to set context. Nothing should be `fixed over a year ago` but 280-290 days is unfortunately possible.1 point
-
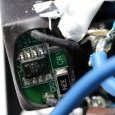
This is a SATA controller. This one:
 1 point
 -
Ok - ich habe den Fehler gefunden. 😀 Ich hatte eine alte Installation von MySQL, die mit den Standard-Passwörtern installiert war. Das fand' ich blöd. Also hatte ich versucht das neu zu installieren. Also dachte ich: Docker-Container löschen und neu installieren wird schon reichen. Nein. Reicht nicht. Beim Versuch mich dann mit dem frisch installierten MySQL einzuloggen bekam ich immer wieder die Meldung, dass das Passwort falsch wäre. War es aber definitiv nicht. Lösung: Docker-Container löschen und zusätzlich das Verzeichnis unter /mnt/user/appdata/mysql. Danach MySQL-Container wieder neu mit neuen Passwörtern installiert: Läuft! Bei Nextcloud scheint es einen großen Unterschied zu machen, ob man nun das "offizielle Release" nimmt oder das von Linuxserver. Das "offizielle Release" installiert einmal alles zum Mitnehmen, kommt vorkonfiguriert mit allem, was man so braucht, macht in den Logs mal einen Fehler, weil irgendeine libfuse (keine Ahnung, was das ist - ich bin noch nicht so all zu sehr vertraut mit Linux) nicht da wäre, macht dann aber mutig weiter - und läuft unfassbar langsam. Lösung: Auch hier: Container löschen und das Verzeichnis unter /mnt/user/appdata/nextcloud (löscht man das nicht, meckert der Installer immer rum, dass es den User schon gibt oder, dass er schon Dateien hat) Nextcloud-Version von Linuxserver installieren Datenbank wie vorher eingerichtet angeben. Das hat drei Versuche gebraucht, weil der Installer jedes Mal in einen Timeout läuft und ich ungeduldiger Hibbelkopp dann einfach die Seite aktualisiere. Erzeugt fröhlich Datenbankeinträge, die man dann mit PHPMyAdmin löschen muss, damit die Datenbank wieder leer ist. Beim dritten Versuch: Timeout einfach Timeout sein gelassen, frustriert zum Kühlschrank gelaufen, Schokoriegel gemampft. Zurück am Rechner: Seite aktualisiert, genervt auf "Jaaa verdammt, übertrag halt die blöden Formulardaten nochmal..." geklickt. Und dann lief's. Keine Ahnung warum. Aber es lief plötzlich. Als ob er im Hintergrund trotz "Timeout" noch irgendwas gewerkelt hätte. Performance: Dem System durchaus angemessen. Jetzt muss ich nur noch rausfinden, wie ich das Ganze mit nginx-Proxy zum Laufen kriege. Aber das ist eine andere Abenteuergeschichte aus dem Reich der Unraid-N00bs. 😂1 point
-
Disks 1 and 2 got dropped: Dec 12 23:14:14 v1ew-s0urce kernel: ata3.00: disabled Dec 12 23:14:14 v1ew-s0urce kernel: sd 3:0:0:0: [sdb] Synchronizing SCSI cache Dec 12 23:14:14 v1ew-s0urce kernel: sd 3:0:0:0: [sdb] Synchronize Cache(10) failed: Result: hostbyte=0x04 driverbyte=0x00 Dec 12 23:14:14 v1ew-s0urce kernel: sd 3:0:0:0: [sdb] Stopping disk Dec 12 23:14:14 v1ew-s0urce kernel: sd 3:0:0:0: [sdb] Start/Stop Unit failed: Result: hostbyte=0x04 driverbyte=0x00 Dec 12 23:14:14 v1ew-s0urce kernel: ata4.00: disabled Dec 12 23:14:14 v1ew-s0urce rc.diskinfo[8888]: SIGHUP received, forcing refresh of disks info. Dec 12 23:14:14 v1ew-s0urce kernel: sd 4:0:0:0: [sdc] Synchronizing SCSI cache Dec 12 23:14:14 v1ew-s0urce kernel: sd 4:0:0:0: [sdc] Synchronize Cache(10) failed: Result: hostbyte=0x04 driverbyte=0x00 Dec 12 23:14:14 v1ew-s0urce kernel: sd 4:0:0:0: [sdc] Stopping disk Dec 12 23:14:14 v1ew-s0urce kernel: sd 4:0:0:0: [sdc] Start/Stop Unit failed: Result: hostbyte=0x04 driverbyte=0x00 Because you're passing-though their controller to a Windows VM: -device vfio-pci,host=0000:06:00.0,id=hostdev0,bus=pci.9,addr=0x0 \1 point
-
Up for over 7 days now without a single issue - I'll mark as resolved. Thanks for your help @JorgeB1 point
-
Pls note fresh means not restore the image, only basic Unraid OS. If this not help, you need try isolate some hardware, i.e. remove one set data disk and its HBA or even both, then try some disk with onboard SATA, you need reach a point which everything resume normal.1 point
-
Durch die im Wiki beschriebene erste Methode "For unRAID v6.2 and later", wird die Disk, die du entfernen möchtest, komplett mit Nullen beschrieben, was auch die Parität entsprechend korrigiert. Dadurch ist nach Ausbau der Disk die Parität immer noch korrekt, weil eine Disk komplett mit Nullen das selbe Ergebnis bei der Berechnung der Parität ergibt, wie eine komplett fehlende Disk. Wichtige Dinge dieser Methode sind Die Daten von der zu entfernenden Disk auf andere verschieben / kopieren Die Disk bei allen Shares (include/exclude) entfernen Ob du nun dieses Methode anwendest, also die zu entfernende Disk jetzt mit Nullen beschreibst, hängt nun davon ab ob du: überhaupt eine Parität hast und ob dir die Parität wichtig ist. Die unter "For unRAID v6.0 and 6.1 and possibly 5.0" beschriebene zweite Methode (geht auch in neueren Versionen), setzt dagegen voraus, dass du einen Screenshot/Foto von der Disk-Übersicht machst, die Disk ausbaust und per New Config die Disks wieder so zuordnest wie sie waren, während man das Dropdown der nun fehlenden Disk leer lässt. Ist eine Parität vorhanden, setzt diese Methode noch voraus, dass du "Parity is already valid" nicht auswählst. Nun wird die Parität komplett neu aufgebaut. Bei dieser Methode hat man also in der Zeit keine Parität / Ausfallsicherheit. Eine dritte, nicht beschriebene Methode wäre wie bei der zweiten vorzugehen, aber stattdessen "Parity is already valid" auswählen. Nun startet das Array mit einer falschen Parität. Diese korrigiert man dann mit einem Parity-Check (und mit aktiver "Write corrections to parity" Option). Auf die Art würde die Parität nicht komplett neu erstellt, sondern nur die Teile aktualisiert, die sich geändert haben. Ich könnte mir vorstellen, dass das die schnellste der drei Methoden ist. Zusammenfassung Willst du durchgehend eine valide Parität, dann verwende Methode "For unRAID v6.2 and later". Hast du dagegen gar keine Parität, dann mach nur die wichtigen Dinge und ordne zum Schluss per "New Config" die Disks wie zuvor zu (Screenshot!). Ist dir die Parität nicht so wichtig, dann verwende eine der anderen Methoden nach belieben. Hinweis Per New Config kann man übrigens auch die Disks umzusortieren, allerdings bekommen die dann andere Disk-Nummern und die "include"-Disks bei den Shares stimmen nicht mehr überein. Man müsste also nach der Umsortierung die "include"-Disks der Shares korrigieren und evtl mit dem UnBalance Plugin in der Zwischenzeit falsch abgelegte Daten auf die korrekte Disk zurück verschieben. Zum Schluss müsste man dann natürlich noch einen Parity-Check machen. Habe ich auch schon mal gemacht, weil das schneller ging als die Daten zwischen den Platten zu verschieben, aber das sollte man nur machen, wenn man das Konzept verstanden hat.1 point
-
Very true statements in here. The reality is that subscriptions by themselves aren't the problem. There are plenty of things I bet even the harshest critics of subscriptions pay for every month. What about your ISP? What about XBOX Live or Netflix? Subscriptions aren't by themselves the problem. Sub-par offerings bundled into a subscription are the problem. We don't intend to do that. We also don't intend to force anyone to pay for a subscription. Anything we charge for will be worth its weight and justifiable. If its not, there's a simple solution to that: just don't sign up In addition, we also need to note that some users can't afford to drop $59-129 all up front for Unraid. Instead, they'd prefer a lower monthly price point to get them in the door for far less. Any idea how many fewer Plex users there would be if they only offered their lifetime pass option and no monthly? I would wager quite a few less.1 point
-
As of last month, 64 GB ECC (DDR3) with Dual Xeon E5-2640 v2. Previously, was running 8GB DDR3 on Core i5 750, before that I was running 2GB on a Pentium 4 3.0. I've come a long way =).1 point
-
Yep, that's the bug I fixed yesterday.1 point
-
sure enough, 5 total clicks on macOS installer after a reboot each time got me into the OS. Thank you! (and SpaceInvader One does indeed note this in the video, now that I've gone back and reviewed, doh!)1 point
-
The usual way to deal with dockers using port 80 is by mapping them to other host ports.1 point
-
I think you need to click through the "macOS installer" (2nd icon from left) 3 or 4 more times before it finishes and the OS starts1 point
-
successful install from scratch then used my timemachine to migrate all my apps and data from the old catalina.. thanks @SpaceInvaderOne
 1 point
 -
Ok as I was going to unassign the cache devices as you said, I noticed I'd left the slot number at 2. When I changed it properly to 1 and started the array it loaded the cache drive just fine, then after re-enabling docker and VMs, and a reboot, everything is back up. Thanks a lot for the help!1 point
-
Settings/Management Access1 point
-
I am thinking of closing this thread and starting a new one for this version of macinabox. Directing people from this thread to there. I think it would be cleaner to have a support thread for the new version separate to this. I wondered what you guys think is that a good idea or not ? 😀1 point
-
Update: New Zen 3 CPU installed, seems to be working well. BIOS 2802 works well, but most importantly, temp monitors seem to be working without changing anything.1 point
-
I'm currently on 2407, but my Ryzen 9 5950x just arrived, so I need to upgrade. I've downloaded the 2802 non-beta and the 2816 beta BIOS, but I'll be using the non-beta for now as it has AGESA 1.1.0.0 needed for Zen 3. For the record, I think Zen 3 requires at least AGESA 1.0.8.0, in BIOS version 2607+. Gonna do that first and see if temp monitors are still working, before swapping in the new chip. @Kash76 this might be useful for you.1 point
-
Salut, Il n'y a pas de raison que le taux d'utilisation de chaque disque évolue de lui même. Chaque disque est un système de fichier indépendant et la position des fichiers n'est décidé par Unraid que à la création du fichier. Par la suite, il ne s'en occupe pas. Un nouveau fichier sera placé lors de sa création en fonction de critères à rêgler dans les paramètres de chaque Share: Allocation method (par défaut High-Water) Minimum free space (par défaut 0 GB) Split level (par défaut Automatically split any directory as required). Je crois que cette dernière option peut outrepasser les précédentes, au miminum l'Allocation method. Le taux d'occupation de chaque disque n'a à priori aucune importance si les Shares sont bien configurées. Par exemple, j'ai ajouté le disk4 qui se rempli petit à petit, mais ça n'a pas d'impact sur le contenu des autres disques. Maintenant si tu souhaites vraiment déplacer des fichiers, tu peux regarder du côté du plugin unBalance. PS : en passant, tes disques sont tout de même assez chauds. Rien d'inquetant encore, mais il faut voir jusqu'où ça monte pendant un Parity Check par exemple.
 1 point
 -
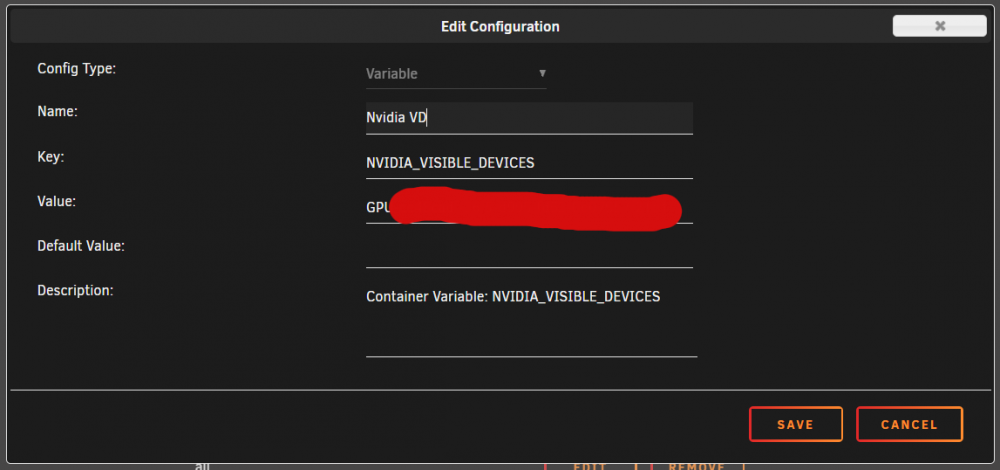
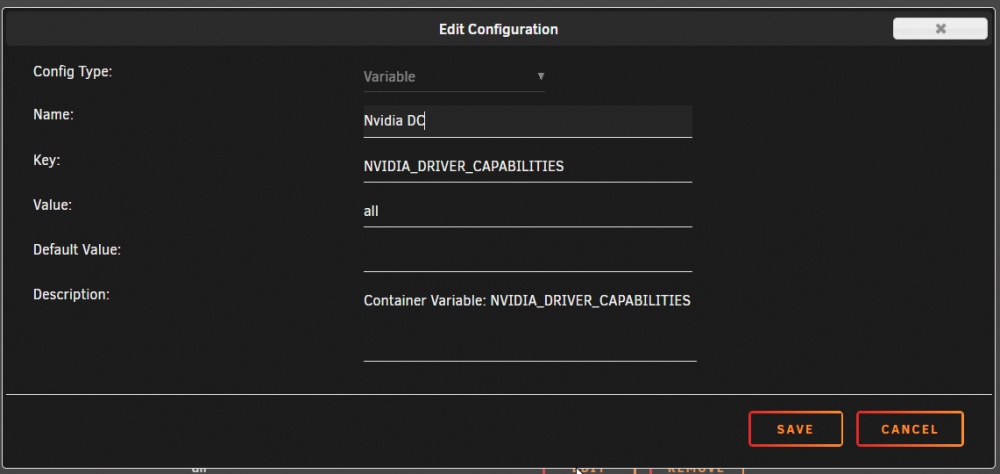
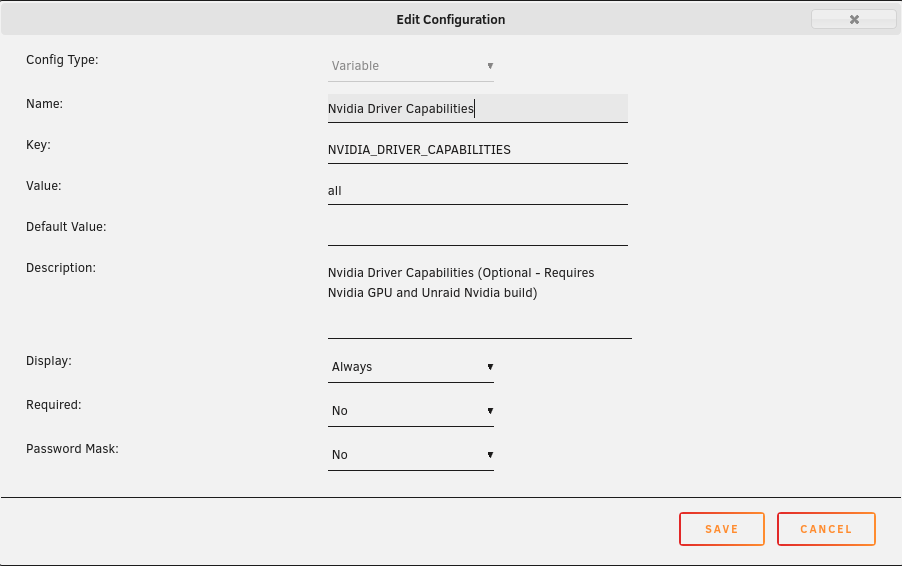
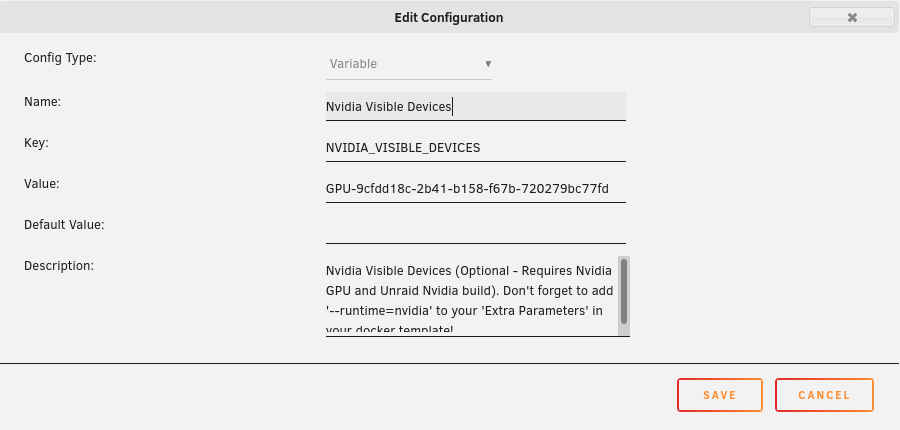
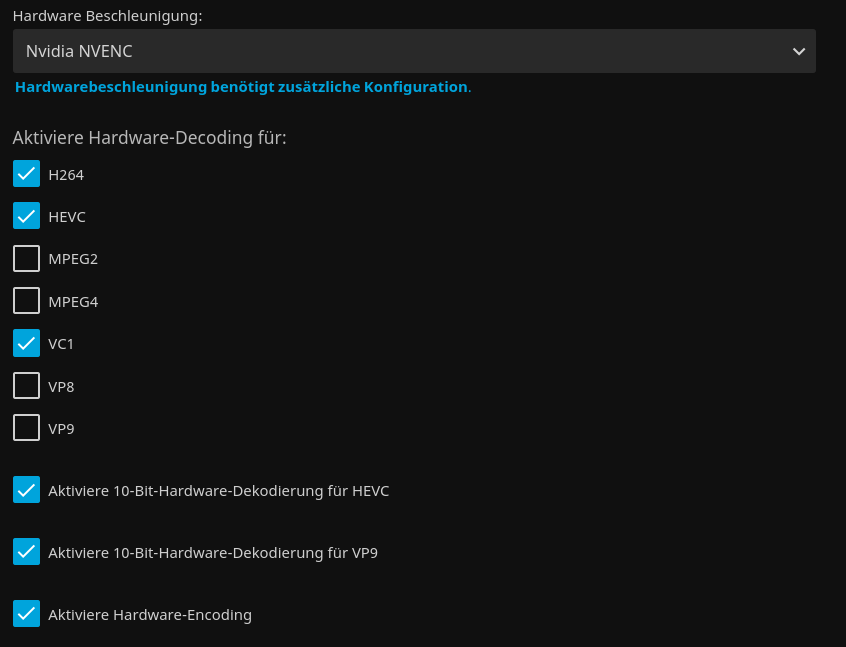
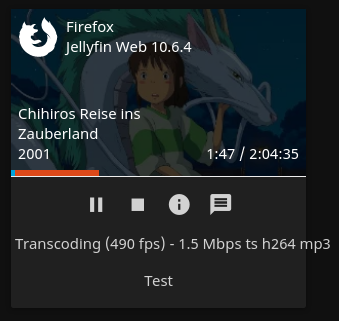
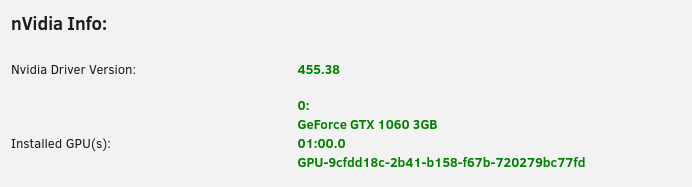
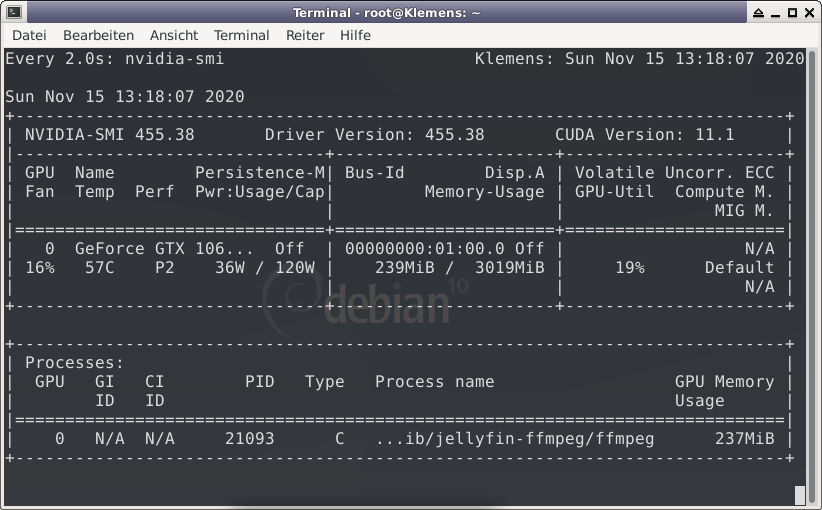
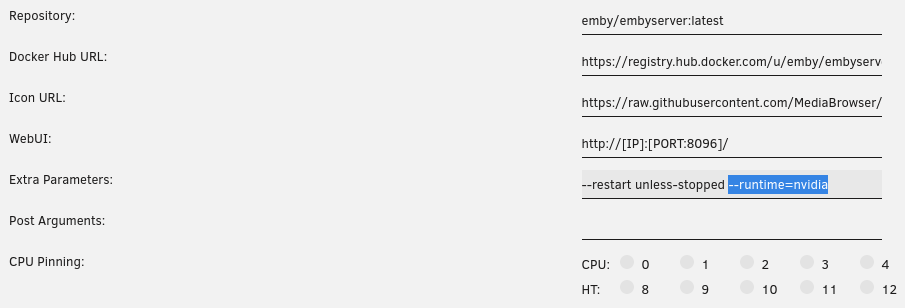
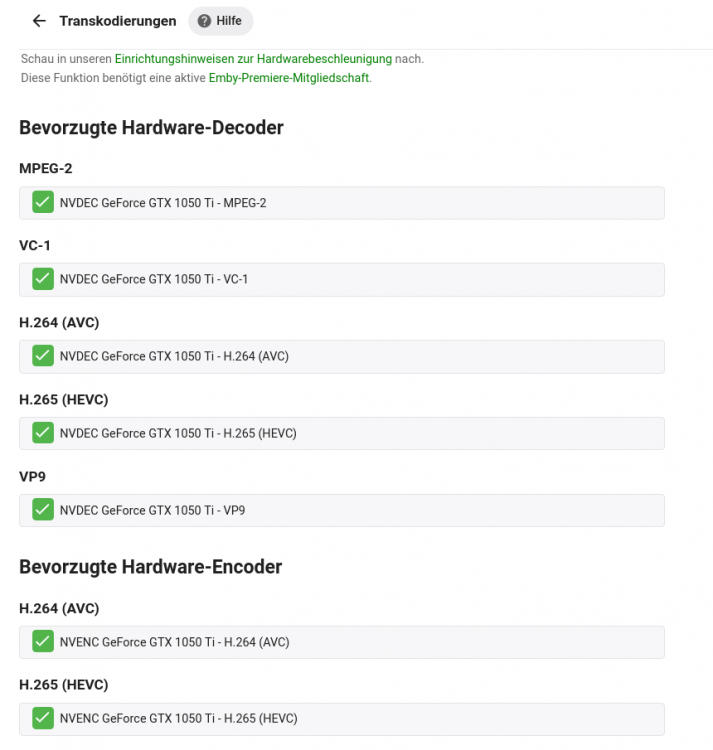
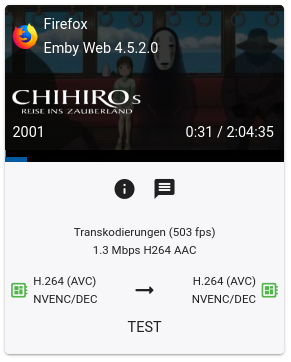
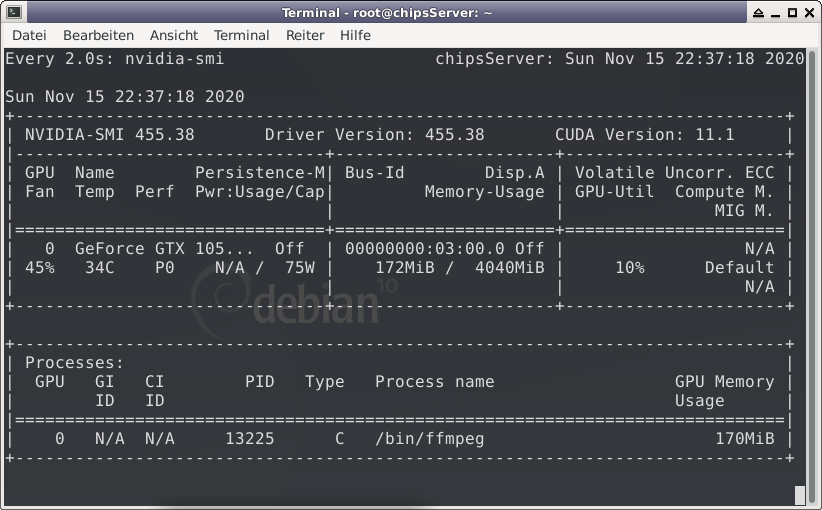
To utilize your Nvidia graphics card in your Docker container(s) the basic steps are: Add '--runtime=nvidia' in your Docker template in 'Extra Parameters' (you have to enable 'Advanced view' in the template to see this option) Add a variable to your Docker template with the Key: 'NVIDIA_VISIBLE_DEVICES' and as Value: 'YOURGPUUUID' (like 'GPU-9cfdd18c-2b41-b158-f67b-720279bc77fd') Add a variable to your Docker template with the Key: 'NVIDIA_DRIVER_CAPABILITIES' and as Value: 'all' Make sure to enable hardware transcoding in the application/container itself See the detailed instructions below for Emby, Jellyfin & Plex (alphabetical order). UUID: You can get the UUID of you graphics card in the Nvidia-Driver Plugin itself PLUGINS -> Nvidia-Driver (please make sure if there is no leading space!) : NOTE: You can use one card for more than one Container at the same time - depending on the capabilities of your card. Emby: Note: To enable Hardware Encoding you need a valid Premium Subscription otherwise Hardwar Encoding will not work! Add '--runtime=nvidia' to the 'Extra Parameters': Add a variable to your Docker template with the Key: 'NVIDIA_VISIBLE_DEVICES' and as Value: 'YOURGPUUUID': Add a variable to your Docker template with the Key: 'NVIDIA_DRIVER_CAPABILITIES' and as Value: 'all': Make sure to enable hardware transcoding in the application/container itself After starting the container and playing some movie that needs to be transcoded that your graphics card is capable of you should see that you can now successfully transcode using your Nvidia graphics card (the text NVENC/DEC is indicating exactly that) : Jellyfin: Add '--runtime=nvidia' to the 'Extra Parameters': Add a variable to your Docker template with the Key: 'NVIDIA_VISIBLE_DEVICES' and as Value: 'YOURGPUUUID': Add a variable to your Docker template with the Key: 'NVIDIA_DRIVER_CAPABILITIES' and as Value: 'all': Make sure to enable hardware transcoding in the application/container itself After starting the container and playing some movie that needs to be transcoded that your graphics card is capable of you should see that you can now successfully transcode using your Nvidia graphics card (Jellyfin doesn't display if it's actually transcoding with the graphics card at time of writing but you can also open up a Unraid terminal and type in 'watch nvidia-smi' then you will see at the bottom that Jellyfin is using your card) : PLEX: (thanks to @cybrnook & @satchafunkilus that granted permission to use their screenshots) Note: To enable Hardware Encoding you need a valid Plex Pass otherwise Hardwar Encoding will not work! Add '--runtime=nvidia' to the 'Extra Parameters': Add a variable to your Docker template with the Key: 'NVIDIA_VISIBLE_DEVICES' and as Value: 'YOURGPUUUID': Add a variable to your Docker template with the Key: 'NVIDIA_DRIVER_CAPABILITIES' and as Value: 'all': Make sure to enable hardware transcoding in the application/container itself: After starting the container and playing some movie that needs to be transcoded that your graphics card is capable of you should see that you can now successfully transcode using your Nvidia graphics card (the text '(hw)' at Video is indicating exactly that):


 1 point
 -
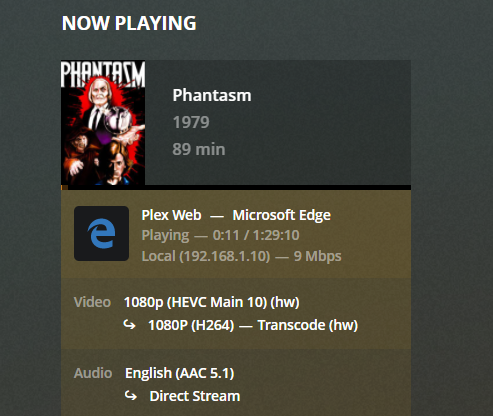
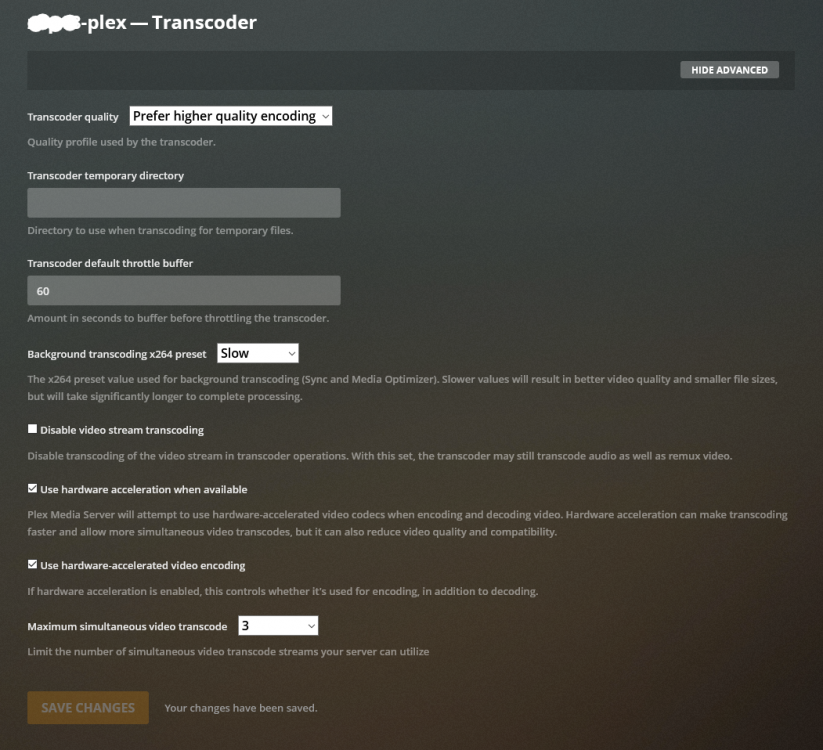
By this guide Plex uses your RAM while transcoding which prevents wearing out your SSD. Edit the Plex Container and enable the "Advanced View": Add this to "Extra Parameters" and hit "Apply": --mount type=tmpfs,destination=/tmp,tmpfs-size=4000000000 Result: Side note: If you dislike permanent writes to your SSD add " --no-healthcheck ", too. Now open Plex -> Settings -> Transcoder and change the path to "/tmp": If you like to verify it's working, you can open the Plex containers Console: Now enter this command while a transcoding is running: df -h Transcoding to RAM-Disk works if "Use%" of /tmp is not "0%": Filesystem Size Used Avail Use% Mounted on tmpfs 3.8G 193M 3.7G 5% /tmp After some time it fills up to nearly 100%: tmpfs 3.8G 3.7G 164M 97% /tmp And then Plex purges the folder automatically: tmpfs 3.8G 1.3G 3.5G 33% /tmp If you stop the movie Plex will delete everything: tmpfs 3.8G 3.8G 0 0% /tmp By this method Plex never uses more than 4GB RAM, which is important, as fully utilizing your RAM can cause an unexpected server behaviour.


 1 point
 -
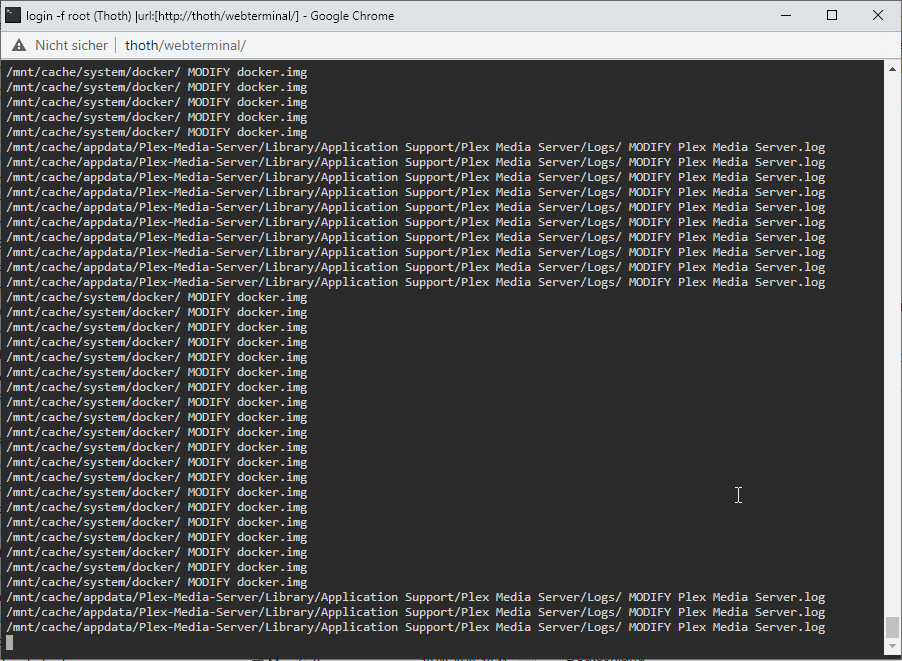
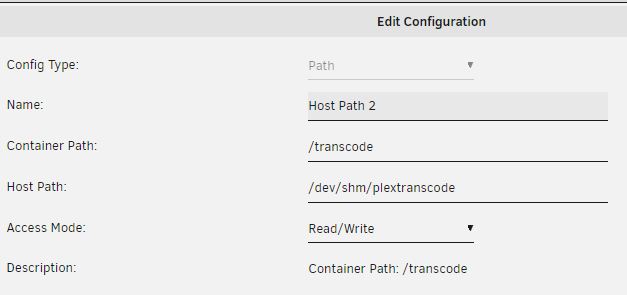
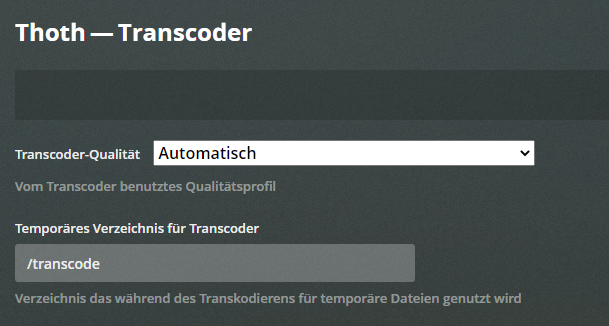
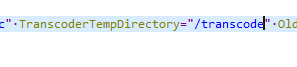
Yesterday, I was lazy and set only "/dev/shm/plextranscode" as my transcoding path. I checked the path and it was created: ls /dev/shm plextranscode/ But it stays empty while transcoding! I saw in the Main overview of the Unraid WebGUI that it still produces writes on the NVMe where the docker image is located. With this useful command I was able to verify it: inotifywait -mr /mnt/cache While this returned nothing: inotifywait -mr /dev/shm So the writes are not leaving the docker image. But why? The container's config looks correct: I opened the plex container's console and tried to find the path and yes its writing to a complete different path: # ls -l /tmp/Transcode/Sessions total 0 drwxr-xr-x 1 plex users 62522 Sep 19 12:49 plex-transcode-b7dnev7r0gdgfjq8267pwoxu-136bae98-3ca4-4cbc-ad26-3656b6830885 # ls -l /tmp/Transcode/Sessions total 0 drwxr-xr-x 1 plex users 62890 Sep 19 12:50 plex-transcode-b7dnev7r0gdgfjq8267pwoxu-136bae98-3ca4-4cbc-ad26-3656b6830885 # I verified if the container is able to write a file into /transcode # echo "test" > /transcode/test.txt # cat /transcode/test.txt test # ls -l /transcode/test.txt -rw-r--r-- 1 root root 5 Sep 19 12:51 /transcode/test.txt Re-checked if it exists in dev/shm: ls /dev/shm/plextranscode test.txt Strange. Re-checked plex transcoding path and its correct: Double-checked the Preferences.xml content: Why is Plex writing to a different folder... hmmm. Maybe a chmod thing? Let's check the auth: ls -l ... drwxrwxrwt 1 root root 132 Sep 19 04:14 tmp drwxr-xr-x 2 root root 60 Sep 19 12:51 transcode I chmod them to 777: chmod -R 777 /dev/shm/plextranscode root@Thoth:~# ls -l /dev/shm total 0 drwxrwxrwx 2 root root 60 Sep 19 12:51 plextranscode/ Check if its inside the docker container active and it looks good: ls -l drwxrwxrwt 1 root root 132 Sep 19 04:14 tmp drwxrwxrwx 2 root root 60 Sep 19 12:51 transcode ... # ls -l /transcode total 4 -rwxrwxrwx 1 root root 5 Sep 19 12:51 test.txt So I restart the plex container and started a different movie... aahh looks nice: inotifywait -mr /dev/shm /dev/shm/plextranscode/Transcode/Sessions/plex-transcode-08xmsae9kwytrf1u91lnijt0-d3df683f-e543-49bc-8f22-7ff29640ead4/ ACCESS init-stream1.m4s /dev/shm/plextranscode/Transcode/Sessions/plex-transcode-08xmsae9kwytrf1u91lnijt0-d3df683f-e543-49bc-8f22-7ff29640ead4/ ACCESS chunk-stream1-00080.m4s /dev/shm/plextranscode/Transcode/Sessions/plex-transcode-08xmsae9kwytrf1u91lnijt0-d3df683f-e543-49bc-8f22-7ff29640ead4/ CLOSE_NOWRITE,CLOSE init-stream1.m4s /dev/shm/plextranscode/Transcode/Sessions/plex-transcode-08xmsae9kwytrf1u91lnijt0-d3df683f-e543-49bc-8f22-7ff29640ead4/ CLOSE_NOWRITE,CLOSE chunk-stream1-00080.m4s /dev/shm/plextranscode/Transcode/Sessions/plex-transcode-08xmsae9kwytrf1u91lnijt0-d3df683f-e543-49bc-8f22-7ff29640ead4/ OPEN init-stream0.m4s /dev/shm/plextranscode/Transcode/Sessions/plex-transcode-08xmsae9kwytrf1u91lnijt0-d3df683f-e543-49bc-8f22-7ff29640ead4/ OPEN chunk-stream0-00081.m4s /dev/shm/plextranscode/Transcode/Sessions/plex-transcode-08xmsae9kwytrf1u91lnijt0-d3df683f-e543-49bc-8f22-7ff29640ead4/ ACCESS init-stream0.m4s /dev/shm/plextranscode/Transcode/Sessions/plex-transcode-08xmsae9kwytrf1u91lnijt0-d3df683f-e543-49bc-8f22-7ff29640ead4/ ACCESS chunk-stream0-00081.m4s /dev/shm/plextranscode/Transcode/Sessions/plex-transcode-08xmsae9kwytrf1u91lnijt0-d3df683f-e543-49bc-8f22-7ff29640ead4/ CLOSE_NOWRITE,CLOSE init-stream0.m4s /dev/shm/plextranscode/Transcode/Sessions/plex-transcode-08xmsae9kwytrf1u91lnijt0-d3df683f-e543-49bc-8f22-7ff29640ead4/ CLOSE_NOWRITE,CLOSE chunk-stream0-00081.m4s /dev/shm/plextranscode/Transcode/Sessions/plex-transcode-08xmsae9kwytrf1u91lnijt0-d3df683f-e543-49bc-8f22-7ff29640ead4/ OPEN init-stream1.m4s /dev/shm/plextranscode/Transcode/Sessions/plex-transcode-08xmsae9kwytrf1u91lnijt0-d3df683f-e543-49bc-8f22-7ff29640ead4/ OPEN chunk-stream1-00081.m4s /dev/shm/plextranscode/Transcode/Sessions/plex-transcode-08xmsae9kwytrf1u91lnijt0-d3df683f-e543-49bc-8f22-7ff29640ead4/ ACCESS init-stream1.m4s /dev/shm/plextranscode/Transcode/Sessions/plex-transcode-08xmsae9kwytrf1u91lnijt0-d3df683f-e543-49bc-8f22-7ff29640ead4/ ACCESS chunk-stream1-00081.m4s /dev/shm/plextranscode/Transcode/Sessions/plex-transcode-08xmsae9kwytrf1u91lnijt0-d3df683f-e543-49bc-8f22-7ff29640ead4/ CLOSE_NOWRITE,CLOSE init-stream1.m4s /dev/shm/plextranscode/Transcode/Sessions/plex-transcode-08xmsae9kwytrf1u91lnijt0-d3df683f-e543-49bc-8f22-7ff29640ead4/ CLOSE_NOWRITE,CLOSE chunk-stream1-00081.m4s /dev/shm/plextranscode/Transcode/Sessions/plex-transcode-08xmsae9kwytrf1u91lnijt0-d3df683f-e543-49bc-8f22-7ff29640ead4/ CREATE chunk-stream1-00143.m4s.tmp /dev/shm/plextranscode/Transcode/Sessions/plex-transcode-08xmsae9kwytrf1u91lnijt0-d3df683f-e543-49bc-8f22-7ff29640ead4/ OPEN chunk-stream1-00143.m4s.tmp Conclusion: If you use a different path than /tmp (which is already chmod 777) f.e. a subfolder inside of /tmp you need to set chmod 777 to it, else it won't work!
 1 point
 -
All we can say for sure, is something called My Servers.1 point
-
Just to make sure it's clear. A single BTRFS disk file system can detect data errors but it can't correct them. I've seen it confused that the BTRFS check summing will provide error correction, but it's only for the metadata on a single disk.1 point
-
A file system issues TRIM commands as a result of deleting a file to tell the ssd that the set of blocks which previously made up the file are no longer being used. The sdd can then mark those blocks as 'free'. Later when the ssd internal garbage collection runs, then it knows that it doesn't have to preserve the contents of those blocks. This makes garbage collection more efficient. There are lots of articles that explain this. The trouble this causes for parity-based array organizations is that the data returned from a TRIM'ed data block can be indeterminate. This paper is a bit wordy but lays it out on p. 13: To boil this down for unRAID: it should work to use SSD's in an unRaid P or P+Q array if TRIM is not used. This is current behavior. However note that: a) Write performance can degrade faster on data disks depending on how many file deletions take place. b) The parity disk is also written for each data disk write. c) The data disks really should be completely written first because theoretically a block that was never written from the point of view of the SSD, can return non-deterministic data for those blocks. We have not seen this happen, but then again we have not run too many SSD arrays (it would show up as parity sync errors). This is pretty undesirable thing to do however since it will guarantee slowing down subsequent writes. d) If you don't want to pre-write the disks as above, then only use SSD's that support "DX_TRIM" or "DZ_TRIM", and instead of writing the disks with zeros, simply use 'blkdisard' command to first TRIM the entire device instead. You can use the 'hdparm' command to determine if your SSD's have this support: hdparm -I /dev/sdX # substitute X for your ssd device assignment You want to look near the end of the "Commands/features:" section for: * Data Set Management TRIM supported Following this will either see this: * Deterministic read data after TRIM or you will see this: * Deterministic read zeros after TRIM or you won't see either of the above (if this is the case, do not use in unRAID P or P+Q array). In a future release we do plan to add proper TRIM support to array disks. Here's a heads-up on that. In order to support TRIM in unRaid P or P+Q array, we must add code to the md/unraid driver and all SSD's in the array must support either "DX_TRIM" or "DZ_TRIM" mode as described above. In addition there's a really good chance we will only support SSD's that support "DZ_TRIM" since to support "DX_TRIM" is a lot more work1 point