Leaderboard


Popular Content
Showing content with the highest reputation on 01/05/21 in all areas
-
Application Name: Nextcloud Application Site: https://nextcloud.com/ Docker Hub: https://hub.docker.com/r/linuxserver/nextcloud/ Github: https://github.com/linuxserver/docker-nextcloud Note: Requires MariaDB or MySQL, please note the issues with binlogging detailed here. This is a Nextcloud issue which we have no control over. https://info.linuxserver.io/issues/2023-06-25-nextcloud/ For setup guide please see the article on our website here. Image is now upgrading Nextcloud internally For upgrading the Nextcloud version there are 3 options. 1. Update via the webui when the upgrade shows as available. 2. Update from the terminal when the upgrade shows as available with: docker exec -it nextcloud updater.phar 3. Manual upgrade using occ. ##Turn on maintenance mode docker exec -it nextcloud occ maintenance:mode --on ##Backup current nextcloud install docker exec -it nextcloud mv /config/www/nextcloud /config/www/nextcloud-backup ##Grab newest nextcloud release and unpack it docker exec -it nextcloud wget https://download.nextcloud.com/server/releases/latest.tar.bz2 -P /config docker exec -it nextcloud tar -xvf /config/latest.tar.bz2 -C /config/www ##Copy across old config.php from backup docker exec -it nextcloud cp /config/www/nextcloud-backup/config/config.php /config/www/nextcloud/config/config.php ##Now Restart docker container docker restart nextcloud ##Perform upgrade docker exec -it nextcloud occ upgrade ##Turn off maintenance mode docker exec -it nextcloud occ maintenance:mode --off ## Now Restart docker container docker restart nextcloud Once all is confirmed as working: ##Remove backup folder docker exec -it nextcloud rm -rf /config/www/nextcloud-backup ##Remove Nextcloud tar file docker exec -it nextcloud rm /config/latest.tar.bz2 Please post any questions/issues relating to this docker you have in this thread. If you are not using Unraid (and you should be!) then please do not post here, instead head to linuxserver.io to see how to get support.1 point
-
This is the support thread for multiple Plugins like: AMD Vendor Reset Plugin Coral TPU Driver Plugin hpsahba Driver Plugin Please always include for which plugin that you need help also the Diagnostics from your server and a screenshots from your container template if your issue is related to a container. If you like my work, please consider making a donation
 1 point
 -
Welcome to the "new" new method of working around HP's RMRR problem on unRaid. For the previous/deprecated method which was no longer working, see: https://forums.unraid.net/topic/72681-unraid-hp-proliant-edition-rmrr-error-patching/ Additionally, for 6.9 there was a way to compile the patch yourself using the now deprecated kernel helper. This method starting with 6.10 is more streamlined as the patch is pre-built into unRaid now. First the disclaimer: This patch been tested with no negative attributes observed by myself and many others. . Many have been running an RMRR patched version since mid 2018 when we first started producing them, and so far have had no reported issues. In 2021 I sold my last proliant, so as new releases of unRaid are made public, it will be on the users to report any issues as they may (or may not) arise.. As the patch only omits RMRR checks, it should not affect any other core function of the OS. But as a general notice, neither Limetech or myself, or any contributors are responsible/liable for any loss of data or damage to hardware in enabling this patch in unRaid, or on any other system you install it. The "New" New unRaid HP Proliant Edition - RMRR Error Patching Description/Problem It is well documented that many HP Proliant servers have RMRR issues using certain BIOS versions after about 2011 when trying to passthrough devices in a linux environment. Device passthrough fails and the onscreen error will show: vfio: failed to set iommu for container: Operation not permitted And a look further into the logs show: Device is ineligible for IOMMU domain attach due to platform RMRR requirement. Contact your platform vendor. HP is aware of this problem and is not updating older machines. There are some bios options to try to fix this on newer models with some success. On unRaid, the problem is addressed by patching out the RMRR check. As of 6.10 the patch is now built into unraid, but off by default. Information regarding the patch can be found here: https://github.com/kiler129/relax-intel-rmrr Note: the patch author states: ------------------ --->>>A big thanks to @ich777 for creating the ability for users to previously easily compile the patch themselves, and to @limetech for now incorporating it into unRaid itself. <<<--- ------------------ Previously, @AnnabellaRenee87 and I maintained and provided the patched file for users. But now you will be able to easily enable the patch as it is included in unRaid starting with 6.10. Installation/Enable Procedure valid starting with 6.10 For users already using a previously patched version of unRaid, follow these steps: 1. Make a backup of your flash device by clicking on the main tab, then scroll down to your boot device section, click flash, then click flash backup and wait for the download. 2. Modify your syslinux.cfg by going to the main tab>boot device>flash in the "Unraid OS" section. Modify to the following: append intel_iommu=relax_rmrr initrd=/bzroot The patch is off by default and requires this to enable it. 3. Update to at least 6.10 of unRaid, reboot. 4. After the server has booted up, open a terminal and enter dmesg | grep 'Intel-IOMMU' If the patch is active you will get the following response DMAR: Intel-IOMMU: assuming all RMRRs are relaxable. This can lead to instability or data loss For users already running 6.10 and above follow these steps: 1. Make a backup of your flash device by clicking on the main tab, then scroll down to your boot device section, click flash, then click flash backup and wait for the download. 2. Modify your syslinux.cfg by going to the main tab>boot device>flash in the "Unraid OS" section. Modify to the following: append intel_iommu=relax_rmrr initrd=/bzroot The patch is off by default and requires this to enable it. 3. Reboot. 4. After the server has booted up, open a terminal and enter dmesg | grep 'Intel-IOMMU' If the patch is active you will get the following response DMAR: Intel-IOMMU: assuming all RMRRs are relaxable. This can lead to instability or data loss Disable To disable the patch, remove the modification to syslinux.cfg and reboot. Other Proliant Problems Check this thread for fixes to other common Proliant problems: https://forums.unraid.net/topic/59375-hp-proliant-workstation-unraid-information-thread/ Happy unRaiding!1 point
-
既然要开发中国市场,希望官方考虑增加个支付宝,微信的支付渠道,随便问一下这个有打折活动吗?1 point
-
I've looked at my go file, I still have the pip3 way in place and it's working nice: # Since the NerdPack does not include this anymore we need to download docker-compose outselves. # pip3, python3 and the setuptools are all provided by the nerdpack # See: https://forums.unraid.net/index.php?/topic/35866-unRAID-6-NerdPack---CLI-tools-(iftop,-iotop,-screen,-kbd,-etc.&do=findComment&comment=838361) pip3 install docker-compose The second way via curl also works well as I equipped my duplicati container with it. You don't have to setup any dependencies that pip3 needs, so for simplicity reasons this may be more perferable. Cheers!1 point
-
Yup I encountered that. I got notifications that a login was detected that didn't meet their security standards. Perhaps I'll make a one off gmail account for this purpose. Thanks!1 point
-
No, only from original paperless to paperless-ng PaperMerge is a different project/product alltogether. I migrated though myself manually from PaperMerge to Paperless-ng I had a few things in Papermerge already so I just grabbed all the PDFs from Papermerge and put them into the consume directory of Paperless-ng and let it consume them and then manually went in and tagged everything I needed to.1 point
-
Many thanks for your detailed answer and advice. I have watched a few videos (mainly from the great spaceinvaderone) about the DockerMan GUI and it does seem like a nice tool. Definitely I won't be able to transfer everything since I do have linked network interfaces for some. I don't know if its worth splitting my docker-compose file migrating some and leaving the rest. However, I might try it for a couple containers initially to check whether it will be convenient for me. Which method you use to make your docker-compose permanent? The below from a previous post or is there another one available nowdays?1 point
-
The PR for the help text hasn't been merged yet @SpencerJ The setting itself is for when the docker service is stopping the amount of time the system waits for a graceful shutdown (in seconds) of the container before the system forcibly kills it.1 point
-
It's been a while since I've looked at these settings. They're buried in the initial bitwarden setup page that has some real long text string in a json file maybe? Generally speaking, you can use Gmail for your email needs. Both sending and receiving stuff. When you give a weird little program access to send mail on your behalf, you need to change some specific settings inside Gmail. https://support.google.com/mail/answer/7126229?hl=en Be sure to follow these 👆 directions to enable external access to smtp and imap for the Gmail account you're using. The default settings are OFF.1 point
-
The problem was in the firewall settings of my UniFi USG.1 point
-
You are doing everything in the VM. Add the bigger vdisk to your xml and then boot the VM. The vdisk will show up as a new disk then clone. I suggest creating a new blank VM with the bigger vdisk then go into that VMs xml and copy the vdisk portion. Copy that into your hackintosh VM xml in the storage/vdisk area. That way you don't mess up the xml guessing paths.1 point
-
posting an update, maybe someone finds this info useful. my system seems to be stable after replacing both SABRENT 1TB Rocket Nvme PCIe 4.0 M.2 drives with Samsung 980 PRO SSD 1TB - M.2 NVMe. i have not had any cache drives failures for 3 days now. the only difference i have noticed is that samsung drives' temperatures are slightly higher by 3C-4C, hovering around 33C-35C.1 point
-
You shouldn't be doing anything with the network if you are cloning the disk. Just clone from vdisk to vdisk.1 point
-
Installed the latest version now and it works just great on my server! Thanks @falconexe much appreciated1 point
-
correct, which nearly all vpn providers do, im only aware of 1 provider that exposes all ports, IPredator i think it was from memory.1 point
-
Hi, I got same problem. Anyway i downgraded Passwords app to version 2020.12.1 in order to be able to use it with PHP 7.3 until Alpine 3.13 will be release. Downgrade app procedure is there: https://git.mdns.eu/nextcloud/passwords/wikis/Administrators/Migrations/Minimum-Requirement-Error1 point
-
Never tried it with windows but something like clonezilla could work for windows. I had a old nvme drive laying around so i decided to use it that's the only reason i switched to it. The performance is good but i do not do much but watch videos and movies using the VM. vdisk are still very good with performance and way easier to back. Just decided to give it a try.1 point
-
I run a Big Sur VM using a passed through nvme drive as my main disk. My EFI sits on a vdisk.1 point
-
You can clone a live disk using CCC. Even works in Big Sur. I cloned my vdisk to a nvme disk live using CCC...the trial version.1 point
-
I know CCC works for sure in all version of mac os. You can even use disk utility in recovery in everything but big sur...Restore one disk to another does not seem to work in big sur right now. But CCC is the for sure thing. Add your new big vdisk to your VM template, boot up and run CCC...clone to new disk. Just make sure you copy over your EFI partition just incase. I myself keep EFI on a separate vdisk from my hackintosh vdisk.1 point
-
I had to clone to a bigger vdisk to get this done. You can use the unRAID GUI to increase the disk but you will just get a bunch of extra unallocated space on the disk. And using Disk utility in to take up the extra space just would now work. It would error out almost every time.1 point
-
appdata is only the data for the applications themselves. So if you have the appdata, then the applications will have their data once the dockers are recreated. The docker templates are on flash in config/plugins/dockerMan/templates-user. Those will allow you to recreate the dockers just as they were using the Previous Apps feature on the Apps page. Without those templates you would have to recreate them all manually by filling in the mappings, etc.1 point
-
For anyone having issues with ES, this documentation may help: https://zmeventnotification.readthedocs.io/en/latest/guides/hooks.html#understanding-detection-configuration1 point
-
See this post.1 point
-
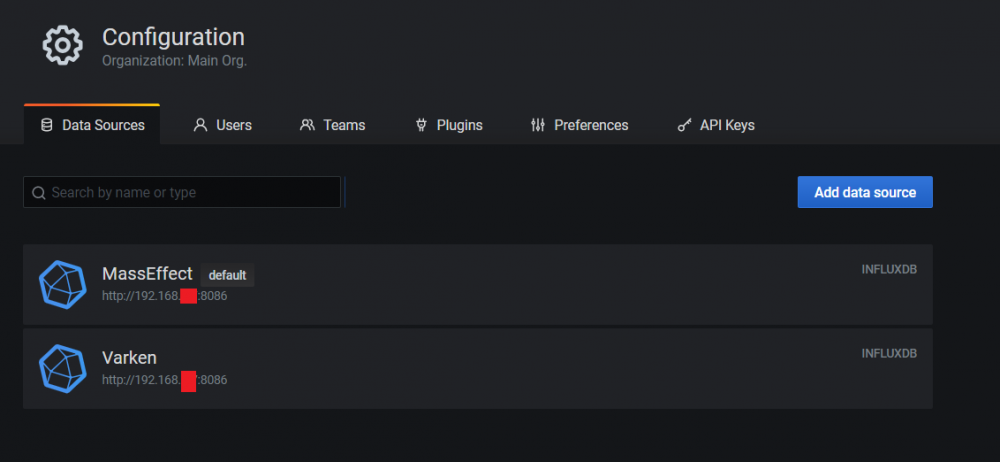
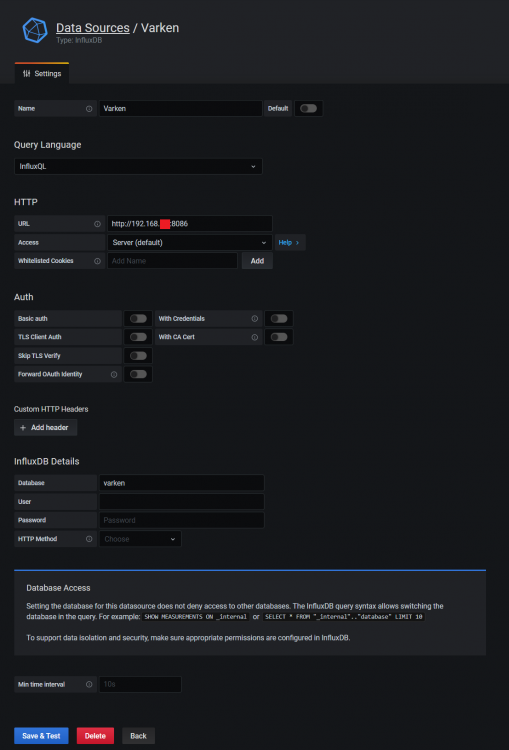
Here is another key element to the UUD Version 1.5. This new datasource should have been created WITHIN GRAFANA if you follow Varken's default installation instructions. However, I thought it would be helpful for everyone to see it! NEW DATASOURCE FOR THE UUD 1.5 (VARKEN): Once setup, you should see 2 datasources. The default one we used for UUD 1.4 and prior (yours may be named differently than mine), and the new one named "Varken" which will be required for UUD version 1.5 onward if you want real time Plex monitoring.
 1 point
 -
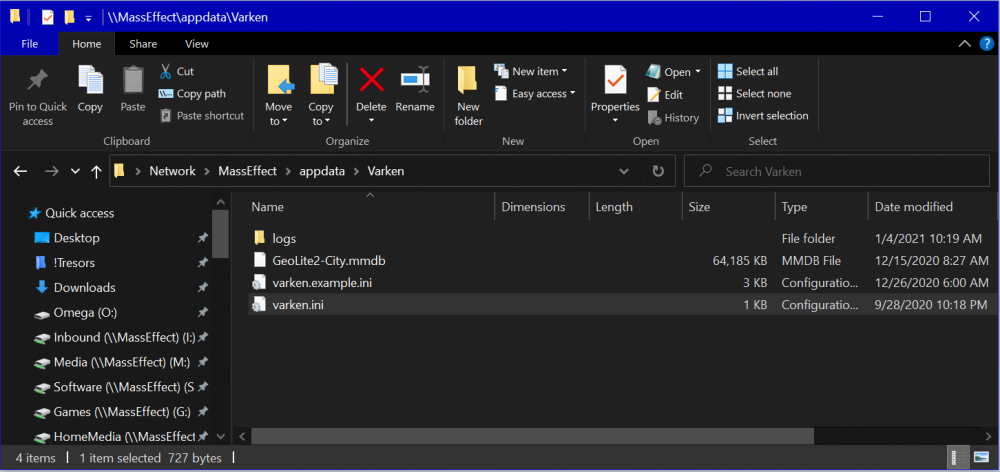
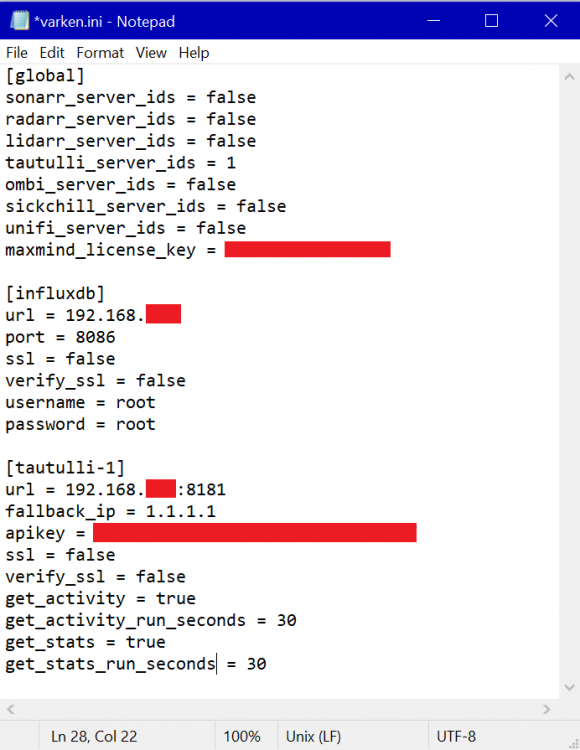
Here is my Varken Config (ini File). I have redacted it of course. This is a streamlined version which removes everything from Varken except Tautuilli for Plex monitoring. You'll notice that the other services are set to "false". Adjust everything in RED for your server including IP addresses, KEYs, and Passwords. This should be placed in the following location: Path: \\YourUNRAIDServer\appdata\Varken File Name: varken.ini FilePath: \\YourUNRAIDServer\appdata\Varken\varken.ini [global] sonarr_server_ids = false radarr_server_ids = false lidarr_server_ids = false tautulli_server_ids = 1 ombi_server_ids = false sickchill_server_ids = false unifi_server_ids = false maxmind_license_key = abcdefghij12345678910 <<< Put Your Max Mind Geo Mapping API Key Here [influxdb] url = 192.168.###.### <<< Put Your InfluxDB Docker IP Address Here port = 8086 <<< Put Your InfluxDB Docker Port Here ssl = false verify_ssl = false username = root password = abc123 <<< Put Your Password Here Or Use the Default of "root" [tautulli-1] url = 192.168.###.###:8181 <<< Put Your Tautulli Docker IP Address/Port Here fallback_ip = 1.1.1.1 apikey = abcdefghij12345678910 <<< Put Your Plex/Tautulli API Key Here ssl = false verify_ssl = false get_activity = true get_activity_run_seconds = 30 get_stats = true get_stats_run_seconds = 30 Here is what the INI file looks like (redacted pic): Here is what the Varken appdata folder should look like once everything is working.
 1 point
 -
I wanted to point out some tips that I may have assumed you guys already know, but it definitely helps a lot when you are scaling the dashboard to your monitor. So I use CHROME when displaying the UUD. Even at 4K resolution, I STILL HAVE TO set the zoom level on the BROWSER to 75% (Control + Dash/Equals Keys) to fit everything nicely. I also press F11 (In Windows) to make the webpage display as full screen (removing the Chrome GUI elements), then finally set the UUD to "KIOSK" mode when displaying it. There is a little monitor looking button in the upper right of Grafana that will display 1 of 3 modes. 1. Dashboard with Variables Visible (Default) 2. Dashboard with Variables Hidden 3. Dashboard in Full Screen Mode with Variables Hidden (Hit Escape to Exit) When I have my dash all setup perfectly, and when displaying it, I'll throw it into its own virtual desktop space (Windows 10), with a dedicated Chrome full screen Window/Tab, with Grafana in Kiosk Full Screen mode. Then I use the Control + Windows Key + Left/Right Arrows (In Windows 10) to navigate to that Desktop Tile when I want to monitor my UNRAID server. So it runs 24/7 in the background with its own virtual screen, and I can quickly switch between my Windows 10 virtual desktop spaces (just like OSX). Furthermore, in Windows 10, you can SNAP any program to a side (Horizontally or Vertically), or any of the 4 corners, by clicking in the app you want to snap, and then pressing the Windows Key + Any Arrow Key. You can also use your mouse and drag a window to a corner to snap it. I usually will snap the UNRAID GUI on the left and UUD on the right so I can see both at once. Or the same thing with file transfers if I want to see how my disks/bandwidth is being impacted, etc... Just thought I would share some usability tips if you are struggling with fitting everything on a single screen and/or best practices. The pro tip is zooming the browser OUT so that it scales everything all at once and uniformly, rather than you having to touch EVERY SINGLE panel manually. Hope this helps!1 point
-
Just a thank you post for ich777, Got the new GPU in and all is as it was! thank you1 point
-
Not until Alpine linux releases 3.13 and we rebase to the new version.1 point
-
Thanks to ich777 and his Kernel Helper container I was able to build an Unraid kernel with the navi reset patch super easily! I have an RX 5600XT and everything seems to be working. The container also has an option for the gnif/vendor-reset module if you want to try that.1 point
-
lol, not gonna happen. I consider renaming hundreds of files manually a bad idea. 😅 I wrote a shell-script for that purpose that renames unsupported windows-characters to underscores. it served me well. #!/bin/sh # -------------------------------------------------------- # User: Greyberry (https://forums.unraid.net/profile/105908-greyberry/) # Date: 01.04.2021 # -------------------------------------------------------- # This Script was written for UNRAID, to guarantee # filename-compatibility with Windows and MacOS Systems. # It changes unsupported chars to an underscore '_' . # # DISCLAIMER # The code within this post comes with no guarantee, # the use of this code is your responsibility. # I take NO responsibility and/or liability for how you choose to use any of the code available here. # By using any of this code, you understand that you are AGREEING TO USE AT YOUR OWN RISK. # ALL code is for EDUCATION and/or RESEARCH purposes ONLY. # --------------------------------------------------------- processDir(){ for file in "$1"/*; do # skip nonexisting files, just in case if [[ ! -e "$file" ]]; then continue fi # rename SPECIAL_CHARS if [[ "$file" == *[$SPECIAL_CHARS]* ]]; then # Preview if [[ "$OPERATION_MODE" == "PREVIEW" ]] && [[ $(basename "$file") == *[$SPECIAL_CHARS]* ]]; then echo "PREVIEW: $file ----> ${file//[$SPECIAL_CHARS]/$REPLACEMENT_CHAR}" fi # Commit if [[ "$OPERATION_MODE" == "COMMIT" ]]; then echo "RENAMING: $file ----> ${file//[$SPECIAL_CHARS]/$REPLACEMENT_CHAR}" mv "$file" "${file//[$SPECIAL_CHARS]/$REPLACEMENT_CHAR}" file="${file//[$SPECIAL_CHARS]/$REPLACEMENT_CHAR}" fi fi # visit directory if [ -d "$file" ]; then processDir "$file" fi done } # check arguments if [ "$#" -ne 2 ] || ! [ -d "$1" ] || [[ "$2" != "PREVIEW" && "$2" != "COMMIT" ]]; then echo "Usage: $0 <DIRECTORY> PREVIEW|COMMIT" >&2 exit 1 fi # vars SEARCH_DIR=$1 OPERATION_MODE=$2 SPECIAL_CHARS='\:\"\?\<\>\\' REPLACEMENT_CHAR='_' # start processDir "$SEARCH_DIR"1 point
-
Probably a VM or docker container. Most Intel NICs are usually OK.1 point
-
Docker containers running in host or bridge mode are not known to cause macvlan call traces. As noted, it is usually those containers that have their own IP address that cause macvlan call traces. Have you assigned IP address to any containers on a custom network?1 point
-
I have not had the same problem with the System Buttons as you BUT I have observed that the Folding@Home docker does not shutdown (within the period of time that I waited). In the case of this Docker (since it does not write to the array), there was a clean shutdown of the array (hence no parity check on restart) but it did require that I reboot the server manually to complete the reboot. You might try stopping any Dockers before trying the button and see if that 'fixes' the problem. (Of course, that would still leave a 'bug' to be resolved but the cause is now more isolated...)1 point
-
I don't use that plugin since many of these buttons are already on the Dashboard page. Are you sure you don't have a problem with flash being read-only or disconnected? You get unclean shutdown if flash can't be written to update the started/stopped status of the array before shutting down.1 point
-
Clearing the browser's cache usually fixes this kind of issue.1 point
-
Re released the Unraid-Kernel-Helper and should be available in the CA App within the next few hours. Build is now limited to 6.9.0 beta's and RC's (and also for the stable when it's released somehow). Currently supported drivers/modules: Nvidia, DigitalDevices, LibreElec, TBS OpenSource, iSCSI Target, Intel iGPU, ZFS, Mellanox Firmware Tools, Navi Reset Patch, gnif/vendor-reset, Intel Relax RMRR Patch1 point
-
Various call traces, including macvlan, those are usually the result of having dockers with a custom IP address:1 point
-
Best wishes to you too 👍 Whether to use docker-compose or Unraid’s own DockerMan, depends on what you want and/or need. The DockerMan templates give you an easy option to redeploy containers from the GUI, you’ll also be notified when a docker container has an update available. I like Unraid’s tools so I default to these and create most containers from the GUI, however certain scenarios cannot be setup via DockerMan (at least not when I checked), like linking the network interfaces of containers together (so that all the container’s traffic flows through one of them). Therefore I use docker-compose for those and also have some containers I’ve built myself that I want to setup with some dependencies. I update them via a bash script I wrote and redeploy them afterwards, as the GUI is not able to modify their properties (which answers your second question, containers deployed outside of the DockerMan GUI do not get a template and cannot be managed/updated, you can start and stop them tho). My advise would be: stay with the Unraid default tooling unless you find a limitation which might make you want to deviate from them.1 point
-
If possible before rebooting and preferably with the array started Go to Tools - Diagnostics and attach the complete Diagnostics ZIP file to your NEXT post in this thread.1 point
-
How come fail2ban isn't running natively on UnRaid? Is that possible?1 point
-
First thing. Please post in your next post the Diagnostics file. Tools >>> Diagnostics You say that using both Windows and Linux computers when you have this problem. Are these free standing computers or VM's that are running under Unraid? Are you using using SMB or NFS to access these shares? Are the shares Public, Secure or Private?1 point
-
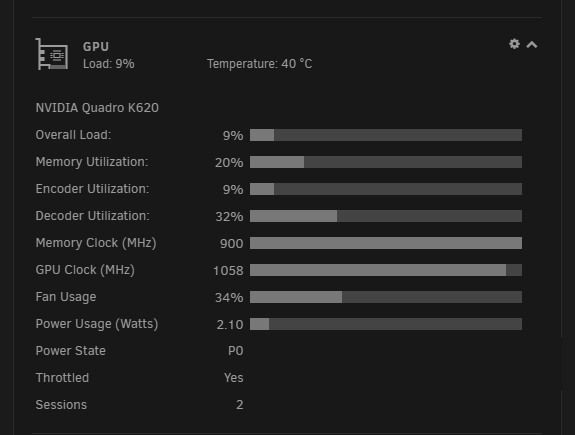
I'm not sure, I just modified it to make it look like the other dashboard, not sure how the back side works. i realized it's missing a memory utilization bar. in the nvidia smi output i see two values. the utilization field for memory doesn't seem to reflect when plex is running transcodes. using the fb_memory_usage value works well though: edit: found it https://docs.nvidia.com/deploy/nvml-api/structnvmlUtilization__t.html#structnvmlUtilization__t_19789def365e5aa382ac222db9c60a400 The utilization field for memory is: so for my purposes i'd just want to know how much memory is being used, just making the bar show the % used memory
 1 point
 -
This patch isn't finished yet and has problems on Navi cards so that the HDMI audio isn't properly reseted so it won't be integrated for now into Unraid. Yes write me a PM.1 point
-
Thank you, pcie_aspm=off solved it for me. Rampage V Extreme motherboard.1 point
-
Thanks! Not sure of the syntax of this file, I did not add a coma. I've updated the file to: append initrd=/bzroot pci=nommconfto,/bzroot-gui1 point
-
Had some time to do some more digging and found out some lovely things about x99 chipset boards. I've included links to my research for those who may experience any similar issues: An Intel document that mentions TLP timeouts http://www.intel.com/content/dam/www/public/us/en/documents/specification-updates/core-i7-lga2011-3-spec-update.pdf Another Intel document on the x99/c610 chipsets with information about TLP stuff http://www.intel.nl/content/dam/www/public/us/en/documents/specification-updates/x99-chipset-pch-spec-update.pdf So what's the issue? I'm no expert on PCI-E, but it seems like a board implementation issue. So if a BIOS update didn't already fix it (I'm using the latest), then the only option was probably to try either pci=nomsi or pci=nommconf Didn't really want to use pci=nomsi if I could avoid it, but using pci=nommconf also left my Windows 10 VMs with no ability to keep a driver (Windows getting a Code 43 on the devices and running in 800x600 resolution) . I found another forum talking about ASUS x99 boards errors being related to bus power management, so I figured why not try disabling aspm. Sure enough, adding pcie_aspm=off has resolved the issue entirely (the error is not occurring anymore), though I still don't know the root cause for certain. Maybe ASUS will fix the problem through a BIOS update eventually.1 point
-
Clear an unRAID array data drive (for the Shrink array wiki page) Mod note: this script usually takes a much longer than normal time to clear a drive with newer Unraid releases, recommend using the "Remove Drives Then Rebuild Parity" Method or if you really want to clear the disk do it manually. This script is for use in clearing a drive that you want to remove from the array, while maintaining parity protection. I've added a set of instructions within the Shrink array wiki page for it. It is designed to be as safe as possible, and will not run unless specific conditions are met - - The drive must be a data drive that is a part of an unRAID array - It must be a good drive, mounted in the array, capable of every sector being zeroed (no bad sectors) - The drive must be completely empty, no data at all left on it. This is tested for! - The drive should have a single root folder named clear-me - exactly 8 characters, 7 lowercase and 1 hyphen. This is tested for! Because the User.Scripts plugin does not allow interactivity (yet!), some kludges had to be used, one being the clear-me folder, and the other being a 60 second wait before execution to allow the user to abort. I actually like the clear-me kludge, because it means the user cannot possibly make a mistake and lose data. The user *has* to empty the drive first, then add this odd folder. #!/bin/bash # A script to clear an unRAID array drive. It first checks the drive is completely empty, # except for a marker indicating that the user desires to clear the drive. The marker is # that the drive is completely empty except for a single folder named 'clear-me'. # # Array must be started, and drive mounted. There's no other way to verify it's empty. # Without knowing which file system it's formatted with, I can't mount it. # # Quick way to prep drive: format with ReiserFS, then add 'clear-me' folder. # # 1.0 first draft # 1.1 add logging, improve comments # 1.2 adapt for User.Scripts, extend wait to 60 seconds # 1.3 add progress display; confirm by key (no wait) if standalone; fix logger # 1.4 only add progress display if unRAID version >= 6.2 version="1.4" marker="clear-me" found=0 wait=60 p=${0%%$P} # dirname of program p=${p:0:18} q="/tmp/user.scripts/" echo -e "*** Clear an unRAID array data drive *** v$version\n" # Check if array is started ls /mnt/disk[1-9]* 1>/dev/null 2>/dev/null if [ $? -ne 0 ] then echo "ERROR: Array must be started before using this script" exit fi # Look for array drive to clear n=0 echo -n "Checking all array data drives (may need to spin them up) ... " if [ "$p" == "$q" ] # running in User.Scripts then echo -e "\n" c="<font color=blue>" c0="</font>" else #set color teal c="\x1b[36;01m" c0="\x1b[39;49;00m" fi for d in /mnt/disk[1-9]* do x=`ls -A $d` z=`du -s $d` y=${z:0:1} # echo -e "d:"$d "x:"${x:0:20} "y:"$y "z:"$z # the test for marker and emptiness if [ "$x" == "$marker" -a "$y" == "0" ] then found=1 break fi let n=n+1 done #echo -e "found:"$found "d:"$d "marker:"$marker "z:"$z "n:"$n # No drives found to clear if [ $found == "0" ] then echo -e "\rChecked $n drives, did not find an empty drive ready and marked for clearing!\n" echo "To use this script, the drive must be completely empty first, no files" echo "or folders left on it. Then a single folder should be created on it" echo "with the name 'clear-me', exactly 8 characters, 7 lowercase and 1 hyphen." echo "This script is only for clearing unRAID data drives, in preparation for" echo "removing them from the array. It does not add a Preclear signature." exit fi # check unRAID version v1=`cat /etc/unraid-version` # v1 is 'version="6.2.0-rc5"' (fixme if 6.10.* happens) v2="${v1:9:1}${v1:11:1}" if [[ $v2 -ge 62 ]] then v=" status=progress" else v="" fi #echo -e "v1=$v1 v2=$v2 v=$v\n" # First, warn about the clearing, and give them a chance to abort echo -e "\rFound a marked and empty drive to clear: $c Disk ${d:9} $c0 ( $d ) " echo -e "* Disk ${d:9} will be unmounted first." echo "* Then zeroes will be written to the entire drive." echo "* Parity will be preserved throughout." echo "* Clearing while updating Parity takes a VERY long time!" echo "* The progress of the clearing will not be visible until it's done!" echo "* When complete, Disk ${d:9} will be ready for removal from array." echo -e "* Commands to be executed:\n***** $c umount $d $c0\n***** $c dd bs=1M if=/dev/zero of=/dev/md${d:9} $v $c0\n" if [ "$p" == "$q" ] # running in User.Scripts then echo -e "You have $wait seconds to cancel this script (click the red X, top right)\n" sleep $wait else echo -n "Press ! to proceed. Any other key aborts, with no changes made. " ch="" read -n 1 ch echo -e -n "\r \r" if [ "$ch" != "!" ]; then exit fi fi # Perform the clearing logger -tclear_array_drive "Clear an unRAID array data drive v$version" echo -e "\rUnmounting Disk ${d:9} ..." logger -tclear_array_drive "Unmounting Disk ${d:9} (command: umount $d ) ..." umount $d echo -e "Clearing Disk ${d:9} ..." logger -tclear_array_drive "Clearing Disk ${d:9} (command: dd bs=1M if=/dev/zero of=/dev/md${d:9} $v ) ..." dd bs=1M if=/dev/zero of=/dev/md${d:9} $v #logger -tclear_array_drive "Clearing Disk ${d:9} (command: dd bs=1M if=/dev/zero of=/dev/md${d:9} status=progress count=1000 seek=1000 ) ..." #dd bs=1M if=/dev/zero of=/dev/md${d:9} status=progress count=1000 seek=1000 # Done logger -tclear_array_drive "Clearing Disk ${d:9} is complete" echo -e "\nA message saying \"error writing ... no space left\" is expected, NOT an error.\n" echo -e "Unless errors appeared, the drive is now cleared!" echo -e "Because the drive is now unmountable, the array should be stopped," echo -e "and the drive removed (or reformatted)." exit The attached zip is 'clear an array drive.zip', containing both the User.Scripts folder and files, but also the script named clear_array_drive (same script) for standalone use. Either extract the files for User.Scripts, or extract clear_array_drive into the root of the flash, and run it from there. Also attached is 'clear an array drive (test only).zip', for playing with this, testing it. It contains exactly the same scripts, but writing is turned off, so no changes at all will happen. It is designed for those afraid of clearing the wrong thing, or not trusting these scripts yet. You can try it in various conditions, and see what happens, and it will pretend to do the work, but no changes at all will be made. I do welcome examination by bash shell script experts, to ensure I made no mistakes. It's passed my own testing, but I'm not an expert. Rather, a very frustrated bash user, who lost many hours with the picky syntax! I really don't understand why people like type-less languages! It only *looks* easier. After a while, you'll be frustrated with the 60 second wait (when run in User Scripts). I did have it at 30 seconds, but decided 60 was better for new users, for now. I'll add interactivity later, for standalone command line use. It also really needs a way to provide progress info while it's clearing. I have ideas for that. The included 'clear_array_drive' script can now be run at the command line within any unRAID v6, and possibly unRAID v5, but is not tested there. (Procedures for removing a drive are different in v5.) Progress display is only available in 6.2 or later. In 6.1 or earlier, it's done when it's done. Update 1.3 - add display of progress; confirm by key '!' (no wait) if standalone; fix logger; add a bit of color Really appreciate the tip on 'status=progress', looks pretty good. Lots of numbers presented, the ones of interest are the second and the last. Update 1.4 - make progress display conditional for 6.2 or later; hopefully now, the script can be run in any v6, possibly v5 clear_an_array_drive.zip clear_an_array_drive_test_only.zip1 point
-
I figured this out on via the KVM forum as no one replied Maybe this will help someone else... I was right editing the XML was the solution the syntax took some time to figure out. The unRAID VM GUI won't let you assign devices with duplicate names properly. (You add one Unified Receiver both are chosen). You have to edit the XML. Remove the vendor & product which takes detective work. The GUI is no help and once you fix the XML if you go back to the GUI it breaks it again. It would be nice if duplicate devices showed the USB Bus & Device ID. I figured out which entries to replace in the XML by adding & remove devices via the GUI, examining the XML and identifying the differences. Then I ran the lsusb command looking for Logitech to find the bus and device ID. Ultimately for me one VM needed this: <hostdev mode='subsystem' type='usb' managed='yes'> <source> <address bus='8' device='16' /> </source> </hostdev> And the other VM needed this: <hostdev mode='subsystem' type='usb' managed='yes'> <source> <address bus='9' device='3' /> </source> </hostdev> Your vendor, product, bus id and device id will likely be different.1 point


(Small).thumb.png.b884b0484e848c502a315fc27b995f59.png)