Leaderboard


Popular Content
Showing content with the highest reputation on 01/11/21 in all areas
-
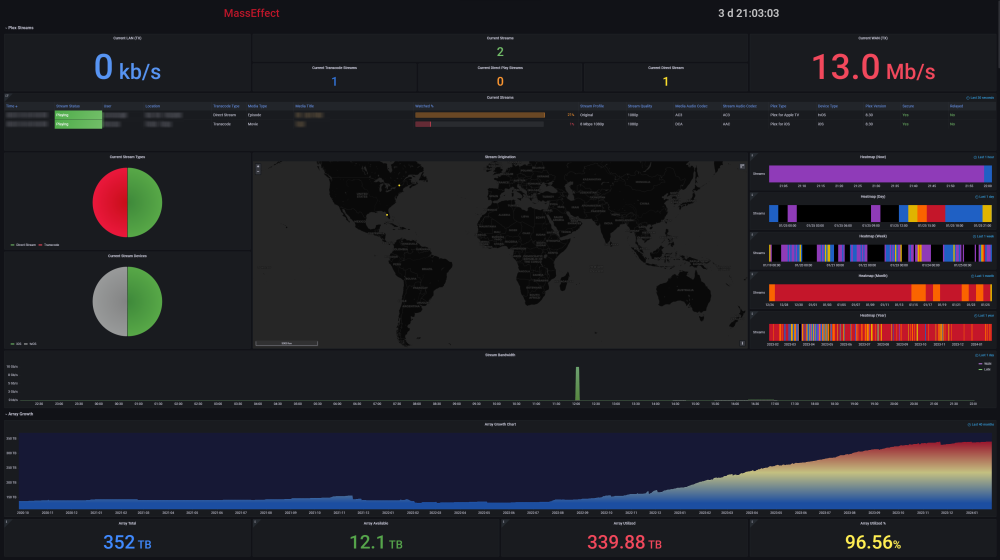
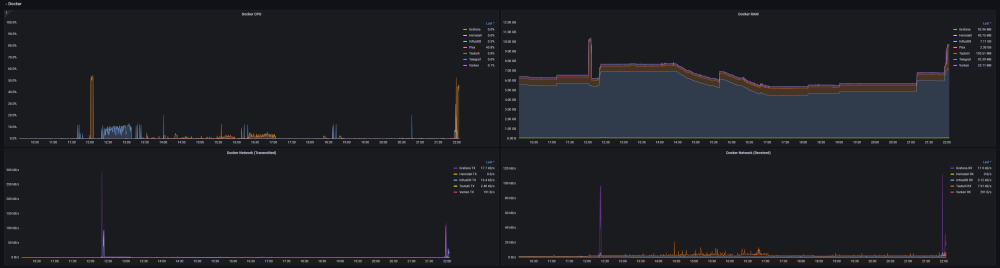
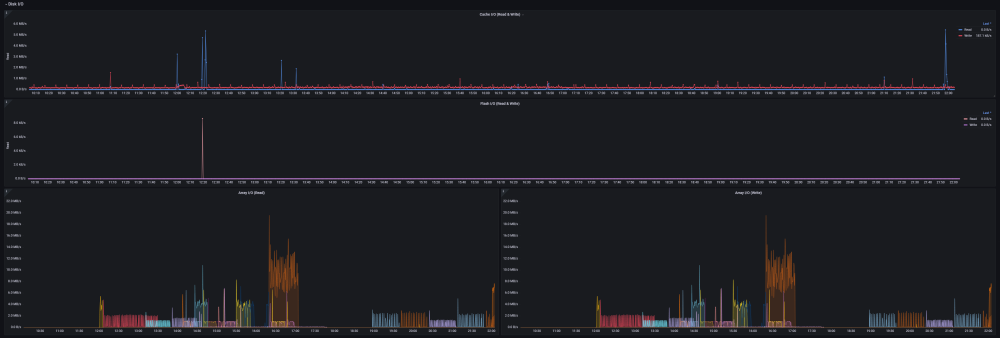
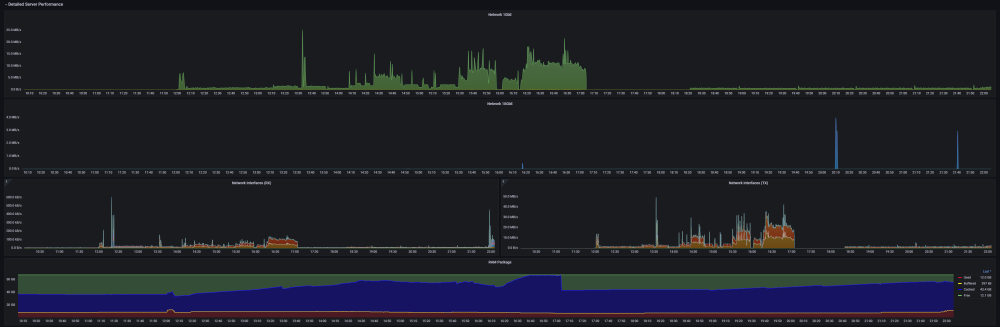
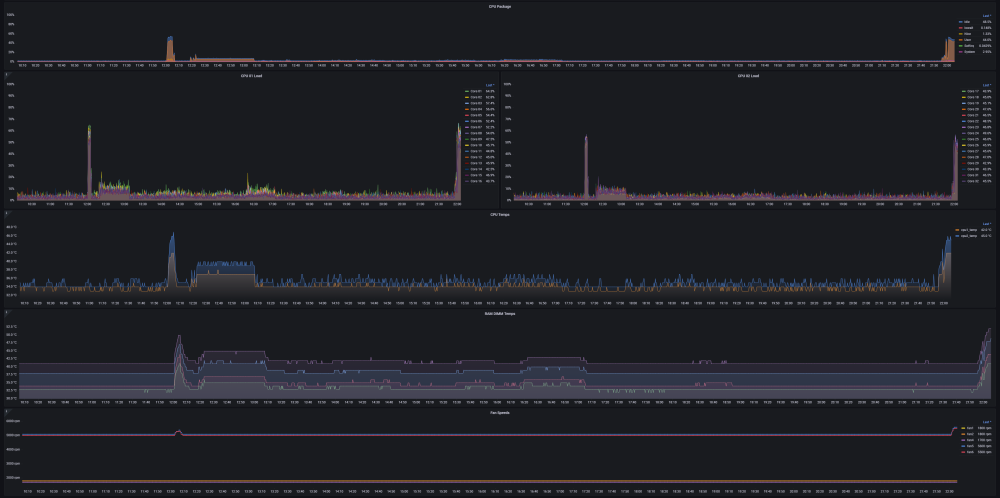
Ultimate UNRAID Dashboard (UUD) Current Release: UUD 1.7 (2024-03-30) UUD NEWS: 2024-03-30: UUD Version 1.7 is Released 2022-06-19: The UUD Forum Topic Reaches 200,000 Views! 👀👀👀 2022-04-17: The UUD Tops 5,000 Unique Downloads 💾💾💾 🎉 2021-05-26: The UUD Forum Topic Reaches 1,000 Replies! 2021-04-17: The UUD Forum Topic Reaches 100,000 Views! 👀👀 2021-03-26: The UUD Tops 2,500 Unique Downloads 💾💾 🎉 2021-03-23: UUD 1.6 is Featured Again in the "Best of the Forum" Blog 🥇🥇 2021-03-21: The UUD Forum Topic Reaches 75,000 Views! 👀 2021-03-20: UUD Version 1.6 is Released 2021-01-19: The UUD Forum Topic Reaches 50,000 Views! 👀 2021-01-11: The UUD Tops 1,000 Unique Downloads 💾 🎉 2021-01-07: UUD is Featured as the FIRST "Best of the Forum" Blog 🥇 2021-01-06: UUD Donations Site is Created 2020-12-31: UUD Version 1.5 is Released 2020-10-09: UUD Version 1.4 is Released 2020-09-28: The UUD is Featured in the Official UNRAID Monthly Newsletter (September 2020)! 2020-09-21: UUD Version 1.3 is Released 2020-09-14: UUD Version 1.2 is Released 2020-09-12: UUD Version 1.1 is Released 2020-09-11: The UUD is Born and Version 1.0 is Released Overview: Welcome to the OFFICIAL UUD forum topic. The UUD is my attempt to develop the Ultimate Grafana/Telegraf/InfluxDB/Plex/Tautulli/Varken dashboard. This entire endeavor started when one of our fellow users @hermy65 posed a simple, but complex question in another forum topic (see post #3). I decided to give it a shot, as I am an IT professional, specifically in enterprise data warehouse/SQL server. After a few days of hard work, UUD version 1.0 was released. We are currently on Version 1.6, and the project is in active development. If you are a Grafana developer, or have had experience building dashboards/panels for UNRAID, please let me know. I would love to collaborate. Version 1.7 Screenshots (Click the Images as They are Very High Resolution): Disclaimer: This is based on my 30 Drive UNRAID Array. So this shows an example of a fully maxed out UNRAID setup with max drives, dual CPUs, Dual NICs, etc. You will/may need to adjust panels & queries to accommodate your individual UNRAID/PLEX architecture. I have spent many hours custom coding new functionality and features based on that original template. Much has been learned and I am excited to see how far this can go in the future. Thanks again! Developers: Primary Developer: @falconexe (USA) UUD Creator | Active Development | Panels | Database Queries | Integration | Look & Feel | GUI | Refinement | Support Developer/Colleague: @GilbN (Europe) Dashboard Examples | Back-end | Dynamics | REGEX | Support | Tutorials Contributors: @hermy65 @atribe @Roxedus @SpencerJ @testdasi @ChatNoir @MammothJerk @FreeMan @danktankk @Dazog @MrLondon @LTM @mattekure @ptchernegovski @caplam @RockDawg @corgan @jbartlett @Hoopster @LTM @skaterpunk0187 @valiente @Agent531C @JudMeherg @Jturner @1471 Dependencies (Last Updated On 2021-03-20) Docker - InfluxDB Docker - Telegraf Docker Network Type: HOST (Otherwise You May Not Get All Server Metrics) 👉 Create Telegraf Configuration File 👈 (DO THIS FIRST!) Create and Place a File into Directory "mnt/user/appdata/YOUR_TELEGRAF_FOLDER" Enable and Install Telegraf Plugins Telegraf Plugin - [[inputs.net]] Enable in telegraf.config Telegraf Plugin - [[inputs.docker]] Enable in telegraf.config Telegraf Plugin - [[inputs.diskio]] Enable in telegraf.config To Use Static Drive Serial Numbers in Grafana (For DiskIO Queries) Do the Following: Edit telegraf.conf > [[inputs.diskio]] > Add device_tags = ["ID_SERIAL"] > Use ID_SERIAL Flag in Grafana Now Upon Booting, You Don't Have to Worry About SD* Mounts Changing (So Your Graphs Don't Get Messed Up!) You Can Also Set Overrides on the Query Fields to Map the Serial Number to a Common Disk Name Like "DISK01" etc. Telegraf Plugin - [[inputs.smart]] Enable in telegraf.config Also Enable "attributes = true" Bash Into Telegraf Docker and Run "apk add smartmontools" Telegraf Plugin - [[inputs.ipmi_sensor]] Enable in telegraf.config Bash Into Telegraf Docker and Run "apk add ipmitool" Telegraf Plugin - [[inputs.apcupsd]] Enable in telegraf.config Telegraf Docker Config Add New Path (NOTE: This path has now been merged into Atribe's Telegraf Docker Image. (Thanks @GilbN & @atribe) Post Arguments "/bin/sh -c 'apk update && apk upgrade && apk add ipmitool && apk add smartmontools && telegraf'" Docker - Grafana Grafana Plugins Pie Chart Panel Run Following Command in Docker: grafana-cli plugins install grafana-piechart-panel World Map Run Following Command in Docker: grafana-cli plugins install grafana-worldmap-panel JSON API Run Following Command in Docker: grafana-cli plugins install marcusolsson-json-datasource Dynamic Image Panel Run Following Command in Docker: grafana-cli plugins install dalvany-image-panel Docker - Tautulli Docker - Varken CA Plugin: IPMI Tools License: GeoLite2 (Free) NON SERVER HARDWARE (If You Cannot Use "IPMI" and Need to Use "Sensors") As an alternate to IPMI to monitor CPU/System/Aux Temps, you can try the Sensors Plugin. Telegraf Plugin - [[inputs.sensors]] Enable in the Telegraf Config (Uncomment It) Bash into the Telegraf Docker and Execute "apk add lm_sensors" Stop All 3 Dockers (Grafana > Telegraf > InfluxDB) If You Want to Keep This Plugin in Perpetuity, You Will Need to Modify Your Telegraf Docker Post Arguments (Adding lm_sensors): "/bin/sh -c 'apk update && apk upgrade && apk add ipmitool && apk add smartmontools && apk add lm_sensors && telegraf'" Start All 3 Dockers (InfluxDB > Telegraf > Grafana) Dashboard Variables (Update These For Your Server): I haven't been this geeked out about my UNRAID server in a very long time. This is the cherry on top for my UNRAID experience going back to 2014 when I built my first server. Thanks everyone! VERSION 1.7 (Current) Ultimate UNRAID Dashboard - Version 1.7 - 2024-03-30 (falconexe).json @SpencerJ


 2 points
 -
Nextcloud est comme un cloud privé. Il permet a chaque utilisateur d'avoir son espace de stockage personnel. Il est utile autant pour les photos que tout autre sortes de fichier. De plus il fonctionne avec des plugins, donc surement des plugins de gestion de photo ou autre. C'est très complet et probablement mieux adapté a ce que tu veux faire. Bonne chance2 points
-
That was very helpful. Thanks. I enabled the syslog server and now have a better visual on system logs. What was looking like multiple bad disks, or maybe a bad HBA turned out to be a bad stick of RAM.2 points
-
Hi all, Just spent the day creating a somewhat simple script for creating snaphots and transferring them to another location, and thought I'd throw it in here as well if someone can use it or improve on it. Note that it's user-at-your-own risk. Could probably need more fail-checks and certainly more error checking, but it's a good start I think. I'm new to btrfs as well, so I hope I've not missed anything fundamental about how these snapshots works. The background is that I wanted something that performs hot backups on my VM's that lives on the cache disk, and then moves the snapshots to the safety of the array, so that's more or less what this does, with a few more bells and whistles. - It optionally handles retention on both the primary and secondary storage, deleting expired snapshots. - Snapshots can be "tagged" with a label, and the purging of expired snapshots only affects the snapshots with this tag, so you can have different retention for daily, weekly and so on. - The default location for the snapshots created on the primary storage is a ".snapshots" directory alongside the subvolume you are protecting. This can however be changed, but no check is currenlty performed that it's on the same volume as the source subvolume. To use it there's some prerequisites: - Naturally both the source and destination volumes must be brtfs. - Also, all things you want to protect must be converted to a brtfs subvolume if they are not. - Since there's way to manage btrfs subvolumes that span multiple disks in unRAID, the source and destinations must be specified by disk path (/mnt/cache/..., /mnt/diskN/...). Note that this is a very abrubt way to protect VM's, with no VSS integration or other means of flushing guest OS file system. It's however not worse than what I've been doing at work with NetApp/vmware for years, and I've yet to see a rollback that didn't work out just fine there. Below is the usage header quoted, and the actual script is attached. Example of usage: ./snapback.sh --source /mnt/cache/domains/pengu --destination /mnt/disk6/backup/domains --purge-source 48h --purge-destination 2w -tag daily This will create a snapshot of the virtual machine "pengu" under /mnt/cache/domains/.snapshots, named something like [email protected]. It will then transfer this snapshot to /mnt/disk6/backup/domains/[email protected]. The transfer will be incremental or full depending on if a symbolic link called "pengu.last" exists in the snapshot-directory. This link always points to the latest snapshot created for this subvolume. Any "daily" snapshots on the source will be deleted if they are older than 48 hours, and any older than two weeks will be deleted from the destination. # snapback.sh # # A.Candell 2019 # # Mandatory arguments # --source | -s # Subvolume that should be backed up # # --destination | -d # Where the snapshots should be backed up to. # # Optional arguments: # # --snapshot-location | -s # Override primary storage snapshot location. Default is a directory called ".snapshots" that is located beside the source subvolume. # # --tag | -t # Add a "tag" on the snapshot names (for example for separating daily, weekly). # This string is appended to the end of the snapshot name (after the timestamp), so make it easy to parse and reduce the risk of # mixing it up with the subvolume name. # # --create-destination | -c # Create destination directory if missing # # --force-full | -f # Force a full transfer even if a ".last" snapshot is found # # --purge-source <maxage> | -ps <maxage> # Remove all snapshots older than maxage (see below) from snapshot directory. Only snapshots with specified tag is affected. # # --purge-destination <maxage> | -pd <maxage> # Remove all snapshots older than maxage (see below) from destination directory. Only snapshots with specified tag is affected. # # --verbose | -v # Verbose mode # # --whatif | -w # Only echoes commands, not executing them. # # Age format: # A single letter suffix can be added to the <maxage> arguments to specify the unit used. # NOTE: If no suffix is specified, hours are assumed. # s = seconds (5s = 5 seconds) # m = minutes (5m = 5 minutes) # h = hours (5m = 5 hours) # d = days (5d = 5 days) # w = weeks (5w = 5 weeks) snapback.sh1 point
-
Hi, this is mostly a WIP thread, but as of the first post it does work up to my relatively limited testing. I plan on expanding this to a fully featured plugin, but this script is a working foundation, and I'd like to make this available to people to play with asap. Bottom Line Up Front: This script only works on your btrfs-formatted array drives. By default, it will keep 8760 snapshots (1 year of hourly snapshots), this value can be adjusted by changing the MAX_SNAPS variable in the script. This script does not handle cache drives, but would be trivial to extend to do so - I just think it is a bad idea. Detection of this is minimal but present. Running this script for the first time will remove and recreate all of your existing array shares (moved to temporary path, original path converted to subvolume, moved back), no data should be lost, but I have only tested this with my own data and configuration, and cannot account for all edge cases and I absolutely cannot be held accountable for your data if it is lost. No script is provided to revert these changes. Goals: I wanted to have delta snapshot recovery as part of my NAS feature set. FreeNAS is appealing, but I dislike FreeBSD's ecosystem (weird problems with bhyve, don't really need ZFS performance improvements), tried ProxMox and didn't care for it, didn't want to roll my own (likely debian-based) setup, very much like unRAID's GUI and asynchronous drive upgrade process, and wasn't interested in the crazy ZFS-on-unRAID frankenstein config by Wendell at L1T. I noted that unRAID can be configured to use BTRFS, and in theory it should be able to do this, given enough scripting to keep everything in sync. I also want to leverage unRAID's GUI as heavily as possible, and do as little command-line work on the regular as possible. Adding a new drive, creating a new share, etc, should all be possible through the GUI, and this setup should automagically adjust. Step 1) Adjust your Settings -> SMB -> SMB Extras field to include the following line. This will publish your snapshots to windows SMB clients as 'previous versions'. vfs objects = shadow_copy2 Notes: This config does work at the global scope (where adding it to extras puts it by default), and will apply to all of your shares. You just don't get to configure any of the other options for this feature. Unfortunately, duplicating the UnRAID team's work to build share configs on the fly is outside of my ambition, so I'm willing to live with that compromise. This is going to get us into an interesting situation, where the only place samba seems to be able to find our snapshots directory is at '/mnt/user/.snapshots'. The directory needs to be created on each storage device and then let unraid aggregate it later, so we are going to do it in the script so we can handle new drives and new shares correctly. Step 2) Install the CA Userscripts Plugin. Details of this step are outside the scope of this post. Step 3) Settings -> User Scripts. Add New Script. Click on script name to edit it. Add the following code to the script. Adjust MAX_SNAPS to your preference. Schedule it as you desire. Adjust EXCLUDE to your preference. Random Notes: This provides some, but minimal protection from ransomware and bit-rot. In particular, ransomware which understands a linux system and actually gets access to the server could purge snapshots. Edit 1/6/20: Added options to exclude some shares from being snapshotted. -e\--exclude <Comma seperated list of shortnames> #!/bin/bash #description=This script implements incremental snapshots on btrfs array drives. #arrayStarted=true #argumentDescription= -n|--number <MAXIMUM NUMBER OF SNAPSHOTS TO RETAIL> #argumentDefault=-s 8760 shopt -s nullglob #make empty directories not freak out date=$(TZ=GMT date +@GMT-%Y.%m.%d-%H.%M.%S) #standardized datestamp MAX_SNAPS=8760 EXCLUDE= is_btrfs_subvolume() { local dir=$1 [ "$(stat -f --format="%T" "$dir")" == "btrfs" ] || return 1 inode="$(stat --format="%i" "$dir")" case "$inode" in 2|256) return 0;; *) return 1;; esac } POSITIONAL=() while [[ $# -gt 0 ]] do key="$1" case $key in -n|--number) MAX_SNAPS="$2" shift # past argument shift # past value ;; -e|--exclude) EXCLUDE="$2" shift # past argument shift # past value ;; *) POSITIONAL+=("$1") # save it in an array for later shift # past argument ;; esac done set -- "${POSITIONAL[@]}" # restore positional parameters #ADJUST MAX_SNAPS to prevent off-by-1 MAX_SNAPS=$((MAX_SNAPS+1)) #Tokenize exclude list declare -A excludes for token in ${EXCLUDE//,/ }; do excludes[$token]=1 done #iterate over all disks on array for disk in /mnt/disk*[0-9]* ; do #examine disk for btrfs-formatting (MOSTLY UNTESTED) if is_btrfs_subvolume $disk ; then #check for .snapshots directory prior to generating snapshot if [ -d "$disk" ]; then if [ ! -d "$disk/.snapshots/" ] ; then mkdir -v $disk/.snapshots fi if [ ! -d "$disk/.snapshots/$date/" ] ; then mkdir -v $disk/.snapshots/$date fi fi #iterate over shares present on disk for share in ${disk}/* ; do #test for exclusion if [ ! -n "${excludes[$(basename $share)]}" ]; then #echo "Examining $share on $disk" is_btrfs_subvolume $share if [ ! "$?" -eq 0 ]; then #echo "$share is likely not a subvolume" mv -v ${share} ${share}_TEMP btrfs subvolume create $share cp -avT --reflink=always ${share}_TEMP $share rm -vrf ${share}_TEMP fi #make new snap btrfs subvolume snap -r ${share} /mnt/$(basename $disk)/.snapshots/${date}/$(basename $share) else echo "$share is on the exclusion list. Skipping..." fi done #find old snaps echo "Found $(find ${disk}/.snapshots/ -maxdepth 1 -mindepth 1 | sort -nr | tail -n +$MAX_SNAPS | wc -l) old snaps" for snap in $(find ${disk}/.snapshots/ -maxdepth 1 -mindepth 1 | sort -nr | tail -n +$MAX_SNAPS); do for share_snap in ${snap}/*; do btrfs subvolume delete $share_snap done rm -rfv $snap done fi done1 point
-
From github https://github.com/shirosaidev/diskover Requirements: Elasticsearch 5.6.x (local or AWS ES Service) Elasticsearch 6 not supported, ES 7 supported in Enterprise version Redis 4.x Working steps: (if you do anything wrong, remove the docker, remove the docker's config folder in appdata, (but can keep docker image to avoid download again).) 0. install redis from apps jj9987's Repository, no config needed. 1. Install CA User Scripts plugin Create a new script named vm.max_map_count navigate to \flash\config\plugins\user.scripts\scripts\vm.max_map_count open 'description' file write some readable description about what this script does. open 'script' file, contents of script as follows: #!/bin/bash sysctl -w vm.max_map_count=262144 Set script schedule to At Startup of Array Run the script once. Navigate to "Docker" tab and then the "Docker Repositories" sub-tab in the unRAID webui Enter in a URL of https://github.com/OFark/docker-templates in the "Template repositories" field Click on the "Save" button Click back to "Docker" tab and then click on the "Add Container" button Click on the "Template" dropdown menu and select the Elasticsearch5 image Use pre config, no change needed. 2. go to apps, find diskover, click install put in ip of the redis and elastic server , which should be your unraid ip not 127 or localhost ES_USER : elastic ES_PASS : changeme change appdata path to /mnt/cache/appdata/diskover/ data path I use /mnt/user/ which is going to index everything from the user webgui port I changed to 8081 because I have qBittorrent on 8080 add a new variable, DISKOVER_AUTH_TOKEN value is from https://github.com/shirosaidev/diskover/wiki/Auth-token click start, and you shoud good to go with the webui of diskover, select the 1st indice and happy searching. It might take half a minute for the 1st indice to appear. For the whole process, you do not seem to need to change any folder/file permissions. One problem I got is, while the file index goes to 94.5% it stuck there for hours. So I have to delete the 3 dockers and do it again, this time, it got 100% and seems to be ok. But this also means this setup could have problem like stuck indexing sometime. The OFark's docker template use Elasticsearch 5 which might be a bit old for the current version diskover. Or running from docker caused this. OFark's docker image is a preconfiged working one. If anyone has time, maybe try to build a version 6 or 7 docker image to work with the current version diskover1 point
-
I had to use a small mirror and a flashlight, but the fan has failed so that would make sense. Once the replacement arrives I'll swap it out and see what happens.1 point
-
Dropped in an LSI 9211 in IT mode and that seems to have solved it.1 point
-
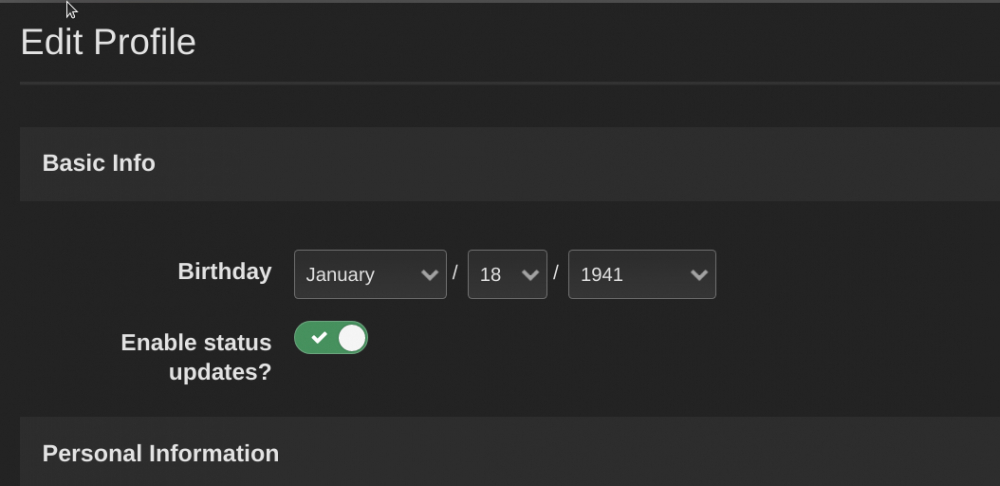
I think the ability to edit that field must be an earned privilege I've yet to achieve, @ChatNoir. I can find no such field in my profile. -- Chris
 1 point
 -
Jan 11 08:37:03 storage kernel: ata15.00: HPA detected: current 3907027055, native 3907029168 Jan 11 08:37:03 storage kernel: ata15.00: ATA-9: WDC WD20EFRX-68AX9N0, WD-WMC300660429, 80.00A80, max UDMA/133 See here:1 point
-
So unraid server IP itself is 192.168.1.129 is that correct? And the fire TV itself is 192.168.1.222 yes? If so then things look okay but ports are wrong somewhre for sure. Is there a reason you are not using the default ADB port of 5555? either way something is wrong somewhere, in the ADB container you say port 8009 for ADB, and in HA config you are saying port 5009, so there's a mismatch on ports right off the bat. Unlessy you've actually changed ADB ports on the FireTV I'd leave them as default of 5555 in both palces otherwise it likely will not work. If you have changed the port then you still have a mismatch somewhere.1 point
-
Of course, here you go: { "period": { "duration": 0.030292, "unit": "ms" }, "frequency": { "requested": 0.000000, "actual": 0.000000, "unit": "MHz" }, "interrupts": { "count": 0.000000, "unit": "irq/s" }, "rc6": { "value": 95.507065, "unit": "%" }, "power": { "value": 0.000000, "unit": "W" }, "imc-bandwidth": { "reads": 34.253191, "writes": 12.089361, "unit": "MiB/s" }, "engines": { "Render/3D/0": { "busy": 0.000000, "sema": 0.000000, "wait": 0.000000, "unit": "%" }, "Blitter/0": { "busy": 0.000000, "sema": 0.000000, "wait": 0.000000, "unit": "%" }, "Video/0": { "busy": 0.000000, "sema": 0.000000, "wait": 0.000000, "unit": "%" }, "VideoEnhance/0": { "busy": 0.000000, "sema": 0.000000, "wait": 0.000000, "unit": "%" } } }, { "period": { "duration": 250.577540, "unit": "ms" }, "frequency": { "requested": 0.000000, "actual": 0.000000, "unit": "MHz" }, "interrupts": { "count": 0.000000, "unit": "irq/s" }, "rc6": { "value": 100.000000, "unit": "%" }, "power": { "value": 0.000000, "unit": "W" }, "imc-bandwidth": { "reads": 183.204454, "writes": 33.909700, "unit": "MiB/s" }, "engines": { "Render/3D/0": { "busy": 0.000000, "sema": 0.000000, "wait": 0.000000, "unit": "%" }, "Blitter/0": { "busy": 0.000000, "sema": 0.000000, "wait": 0.000000, "unit": "%" }, "Video/0": { "busy": 0.000000, "sema": 0.000000, "wait": 0.000000, "unit": "%" }, "VideoEnhance/0": { "busy": 0.000000, "sema": 0.000000, "wait": 0.000000, "unit": "%" } } }1 point
-
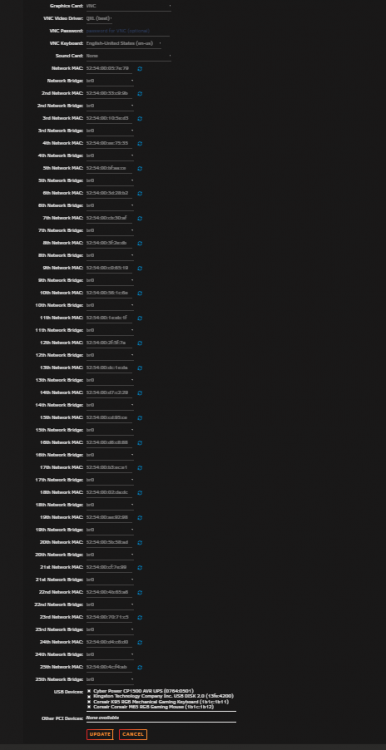
@Jaster I bet you copied the xml of a running VM and used it for other VMs. Default entry for a none running VM for VNC looks something like the following: <graphics type='vnc' port='-1' autoport='yes' websocket='-1' listen='0.0.0.0' keymap='de'> <listen type='address' address='0.0.0.0'/> </graphics> The "port" option is set to auto and counts up with each new VM you start. If you hardcode a value in, it tries to use that port and if in use by another VM you get that error. If I look into a the same xml from that VM while online it looks like the following: <graphics type='vnc' port='5903' autoport='yes' websocket='5703' listen='0.0.0.0' keymap='de'> <listen type='address' address='0.0.0.0'/> </graphics> This is the 4th VM on my system which uses VNC and therefore it got port 5903 starting with 5900. If you need some fixed ports, try to use higher values depending an the amount of VMs you're using to prenvent conflicts and set the rest of the VMs to auto like it's shown on the first screenshot. Make sure your keymap is for your language.1 point
-
@b3rs3rk I have just tried your new intel version on my i9 9900k with UHD 630 graphics and everything is working just fine. Thanks a lot for this update.1 point
-
Have you checked the permissions on the containing directory? I think that ‘wx’ permissions allows deleting files within the directory.1 point
-
What does the 'lsblk' command under Unraid show? Note that 'sda' is the whole drive and so it is still passible for there to be a partition (sda1) present that is not the whole drive.1 point
-
Alle 3 haben jeweils 4 TB, das sollte also passen 🙂1 point
-
Sadly I don't have any. Probably should document it for my own peace of mind.1 point
-
It was. They have hid their changelog in a way that there is no reliable way to get notifications. They silently updated the requirements. Runs on latest build1 point
-
Please remove that entry. The vendor-reset has to be loaded as soon as possible on host boot. If this already has happend and you reload it again with your entry in the go file this might lead into issues. Please reboot unraid after that and try again. The vendor-reset is a wip. Maybe it just doesn't work right now. While your vega is a vega10, there is a reported issue for vega20. The vendor-reset for example breaks the audio on my 5700xt. Had to switch back to the old navi patch.. List of supported GPUs: |AMD|Polaris 10| |AMD|Polaris 11| |AMD|Polaris 12| |AMD|Vega 10| Vega 56/64 | |AMD|Vega 10| Vega 56/64/FE | |AMD|Vega 20| Radeon VII | |AMD|Navi 10| 5600XT, 5700, 5700XT |AMD|Navi 12| Pro 5600M | I keep my fingers crossed for you Keep us updated!1 point
-
Don't change the post arguments. Apk is for alpine and apt is for latest.1 point
-
Try reducing fan speed minimum and or increasing low temperature threshold.1 point
-
In the end I bought two nmve drives and created a new mirror 🙂 (performed the backup and restore). I'm happy with the outcome!1 point
-
I believe you answered your own question. Once they have access to the Unraid GUI, they have complete control. You must secure any access with a VPN tunnel or something similar, i.e. teamviewer or other secure remote access through another machine on the LAN1 point
-
CRAZY: I had a miraculous break through as well. I kept trying to use UEFI, but when I made the unRAID 6.9-rc2 image with the Unraid Flash Drive Tool and as BIOS and CHANGED my R710 to BIOS instead of UEFI it booted this time! I know I've read somewhere where using BIOS instead of UEFI for R/710 is a bad idea (whether for drives space, which apparently is false for an HBA controller; or for some other reason, I do not recall).1 point
-
Thanks! Just downloaded the latest version and created a user script to execute it. Will sleep better now1 point
-
this would involve wiping out existing and pulling down app during startup, this is something i have stayed away from as its frought with issues, not to mention harder to support as you never know what version people are using. switching from plex to plex-pass (or the other way around), should be as simple as stop container, configure the other container to be the same as the stopped one, and start it, that should be it.1 point
-
ok the fix is now in for spaces in share names, during my testing i also noted the default include extensions should be * not *.*, to ensure files with no extension are also locked (if no include extension specified).1 point
-
Yes!
 1 point
 -
Not sure if you still would like this, but here's my take;


 1 point
 -
This was driving me crazy too and I came to the same conclusion regarding papermerge.db. What I did was create a new container path- /db:/mnt/user/appdata/papermerge/db and then edited the papermerge settings.py to point to the new db location ("NAME": "/db/papermerge.db" for me). Now the documents stay on the array and all the db shenanigans that were keeping the drives spun up are taking place on my cache drive. The only times I've noticed the drives spinning back up is when I actually add new documents to papermerge. That does mean I'm relying on CA Appdata Backup/Restore to keep the db backed up, but I can live with that...having all the documents on the actual array is the whole point of doing this on Unraid in the first place. 😀 *Note* In the Papermerge documentation it says you can set a DBDIR path in the papermerge.conf.py, but I didn't have any luck getting that to work, which is why I made the change in settings.py.1 point
-
I have upgraded the container to Apache Guacamole 1.3.0. Please let me know if you run into any problems.1 point
-
So for my main box I got around it by using the community kernel direct download here to get it going, in case anyone else gets stuck. Until this plugin is fixed or whatever is happening. Note the direct download is 6.8.3 though, with ZFS 2.0.0.1 point
-
Ok, thanks for the response AgentXXL and itimpi. I did find this... might try some CLI. Cheers1 point
-
Those following the 6.9-beta releases have been witness to an unfolding schism, entirely of my own making, between myself and certain key Community Developers. To wit: in the last release, I built in some functionality that supplants a feature provided by, and long supported with a great deal of effort by @CHBMB with assistance from @bass_rock and probably others. Not only did I release this functionality without acknowledging those developers previous contributions, I didn't even give them notification such functionality was forthcoming. To top it off, I worked with another talented developer who assisted with integration of this feature into Unraid OS, but who was not involved in the original functionality spearheaded by @CHBMB. Right, this was pretty egregious and unthinking of me to do this and for that I deeply apologize for the offense. The developers involved may or may not accept my apology, but in either case, I hope they believe me when I say this offense was unintentional on my part. I was excited to finally get a feature built into the core product with what I thought was a fairly eloquent solution. A classic case of leaping before looking. I have always said that the true utility and value of Unraid OS lies with our great Community. We have tried very hard over the years to keep this a friendly and helpful place where users of all technical ability can get help and add value to the product. There are many other places on the Internet where people can argue and fight and get belittled, we've always wanted our Community to be different. To the extent that I myself have betrayed this basic tenant of the Community, again, I apologize and commit to making every effort to ensure our Developers are kept in the loop regarding the future technical direction of Unraid OS. sincerely, Tom Mortensen, aka @limetech1 point
-
Alright, got everything working finally! Opencore configurator helped a lot to get the autoboot set up & Big Sur is working almost perfectly. I ran the script to change the network adapter to the e1000 variant to enable Apple services and network settings still shows the VMXnet3 as the ethernet connector. XML lists the correct e1000 variant, any input?1 point
-
My solution was: Build a Ubuntu Server VM, pass trough your shares or use multiple USB Harddrives on the PS3. Or change the OS1 point
-
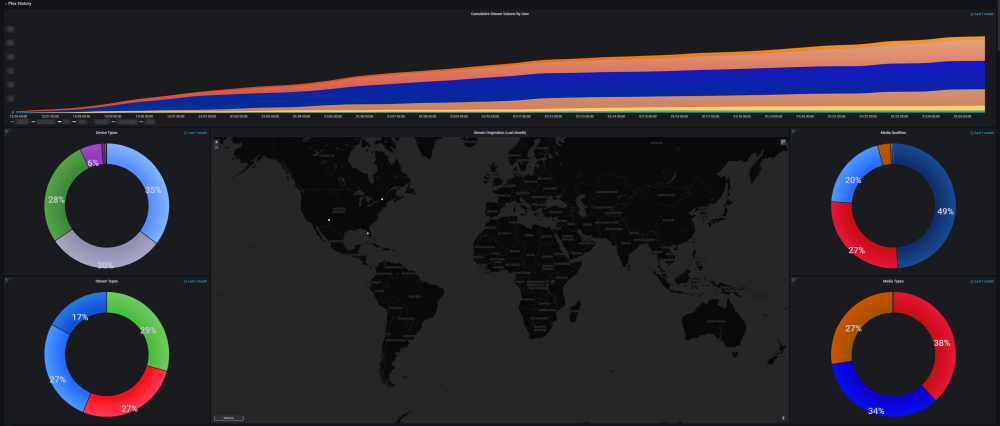
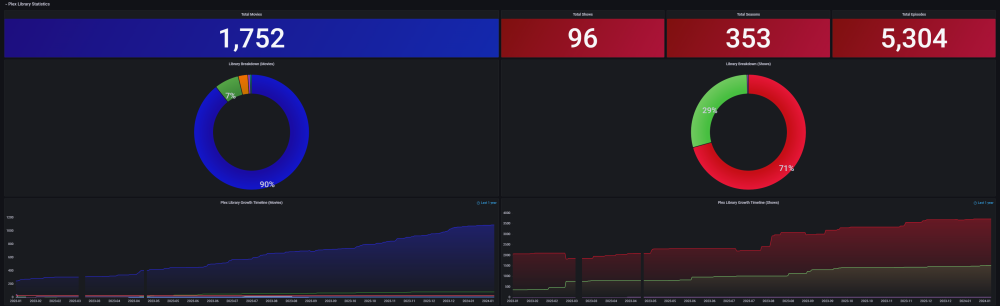
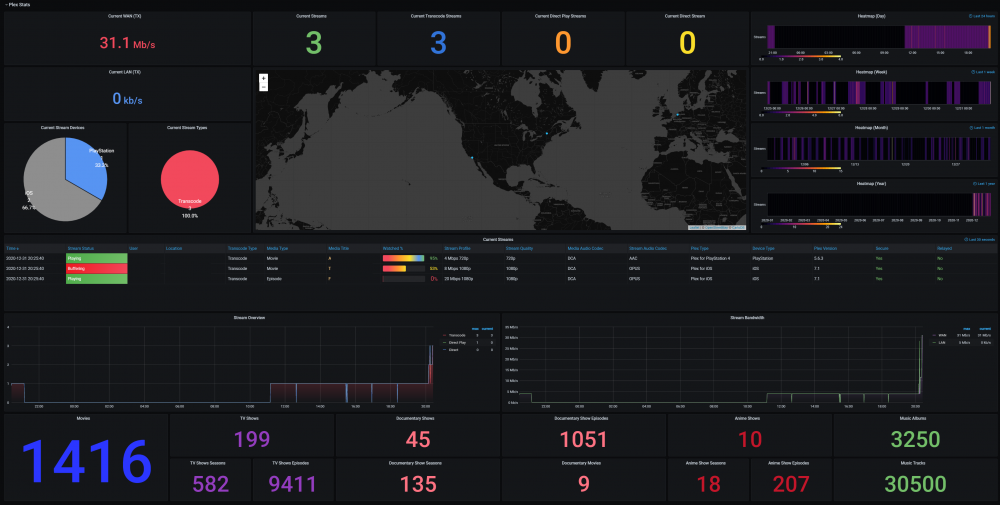
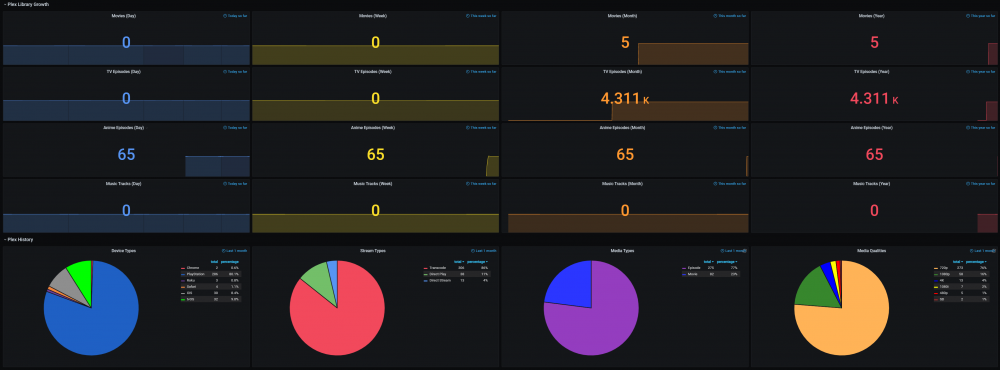
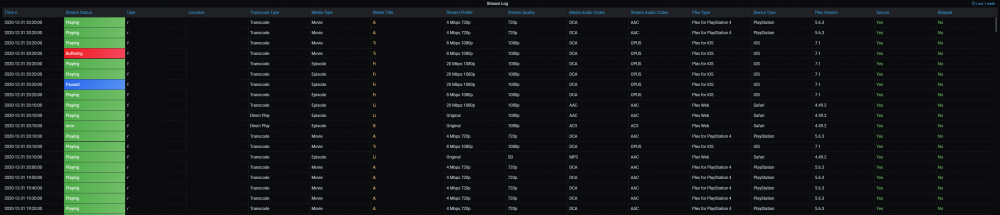
The Ultimate UNRAID Dashboard Version 1.5 is here! This is another HUGE 😁 update adding INTEGRATED PLEX Monitoring via Varken/Tautulli. This update is loosely derived from the official Varken dashboard, but I stripped it down to the bolts, modded the crap out of it, and streamlined it with a straight Plex focus. Honestly, the only code that sill remains from their official dash is the single geo-mapping graph, as it is not actually an editable panel, but rather straight JSON code. I wanted to say thank you to that team for providing a great baseline to start from, and all of their previous work! The UUD Version 1.5 adds 50 new Panels within 3 new sections. I have placed these strategically within the UUD right below the Overwatch section, as this is the second data set that I would want to see, right after my overall server health. As always, with greater features, comes a greater need for plugins and dependencies. I have provided links and resources below to help you along. New Dependencies: Install Guides/Tutorials: https://github.com/Boerderij/Varken https://wiki.cajun.pro/books/varken/chapter/installation https://dev.maxmind.com/geoip/geoip2/geolite2/ Dockers: Varken (Install With Default Setup / Follow Current Project Install Guide) Tautuilli (Install With Default Setup / Follow Current Project Install Guide) Docker AppData: Varken Config (Follow Varken Install Guide) New Grafana Data Source: "Varken" New Grafana Plugins Pie Chart Panel Run Following Command in Docker: grafana-cli plugins install grafana-piechart-panel World Map Run Following Command in Docker: grafana-cli plugins install grafana-worldmap-panel Third Party: FREE GeoLite2 License Registration (Follow Varken Install Guide) Without this, the MAP WILL NOT WORK. Please Note: This release is an example tailored to MY Plex setup/library. The intent here is that you will take this and modify it for your Plex Library/Setup. You have everything you require to template new panels and to add new media sections as needed! Highlights: Real Time Plex Monitoring Extremely Detailed Breakdown of All Current Streams Current Number of Streams Internal and External Streaming Bandwidth Breakdown Stream Origination (Geo Location) With Interactive Map Streaming Types Streaming Devices Detailed User Monitoring Current Library Statistics Broken Out By Library Sections Plex Library Growth Plex Library Growth Over Time (Day/Week/Month/Year) Currently Templated For Following Media Sections TV Shows Movies Documentary TV Shows Documentary Movies Anime Shows Music You Can Add More... Historical Plex Monitoring Heat Maps to See Your Overall Streaming Saturation (Last Day/Week/Month/Year) Device Types (Last Month) Stream Types (Last Month) Media Types (Last Month) Media Streaming Qualities (Last Month) Stream Log (Last Week with Limit of Last 1,000 For Performance Reasons) Log Captures All Streaming Activity Via 10 Minute Intervals Screenshots (With Personal Info Redacted): I am very pleased that I could still get this out to you all in 2020 (my time), so hopefully this will ease us into a better 2021! As always, I'm here if you need me. ENJOY and Happy New Year! See Post Number 1 For the New Version 1.5 JSON File!
 1 point
 -
Here's what I did in my own system (also behind CGNAT). Spun up a Mikrotik CHR (virtual router) on Linode (but any other VPS with completely unblocked ports is also fine). Made a site-to-site VPN between my home networks (3 different houses) and the VPS. then port forwarded port 80 + 443 to an nginx container (kinda like SWAG - but I prefer to roll my own). This could be done with a Linux VPS, but I wanted to play with a Mikrotik router (all of my edge routers are Mikrotiks) and have less issues with the rather performant IPSec site-to-site vpn This means I can access my Emby server + Transmission container over HTTPS from anywhere. (Added DNS entries at the house with the Unraid server to avoid having to go out and back)1 point
-
I actually had a similar issue with a folder within my main SMB share which did not display in Windows Explorer, I could however browse to it via the exact path. Turned out to be the Windows folder attributes, not the Unraid attributes. The folder was \\dataserver\store\hyperoo. When I accessed cmd prompt, and typed attrib \\dataserver\store\hyperoo, the attributes showed as SH (System and Hidden) so I removed these via attrib -S -H \\dataserver\store\hyperoo and now the folder is visible from all devices.1 point
-
Handling of ‘unmountable’ disks is covered here in the online documentation accessible via the ‘Manual’ link at the bottom of the Unraid GUI. Have you run a file system check on the drive? Was the drive showing as unmountable before the rebuild (since a rebuild does not clear ‘unmountable’ state`).1 point
-
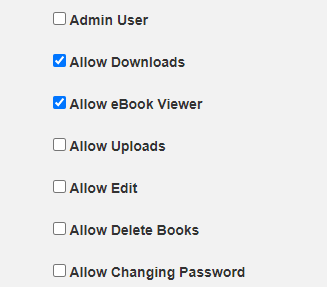
That'll do it, i cant believe i didnt see this, also didnt expect the admin user to have something as simple turned off.1 point
-
Yes, maybe for that user this option needs to be enabled: When the user can read, it looks like this on a book:
 1 point
 -
Did you allow the user to read books?1 point
-
I too am coming across this issue, thought it was because i only had .mobi files, so i grabbed the .epub files and let calibre merge them, now i can see both files types and get the option to download both types, but i dont get a read book button click on any of my titles. I am using the linuxio calibre docker image. Checked the FAQ's and github nothing really about how to troubleshoot the inability to read through calibre-web. Thanks in advance.1 point
-
Plugin author has not posted or provided support for some time, made a note of that in the 1st post.1 point
-
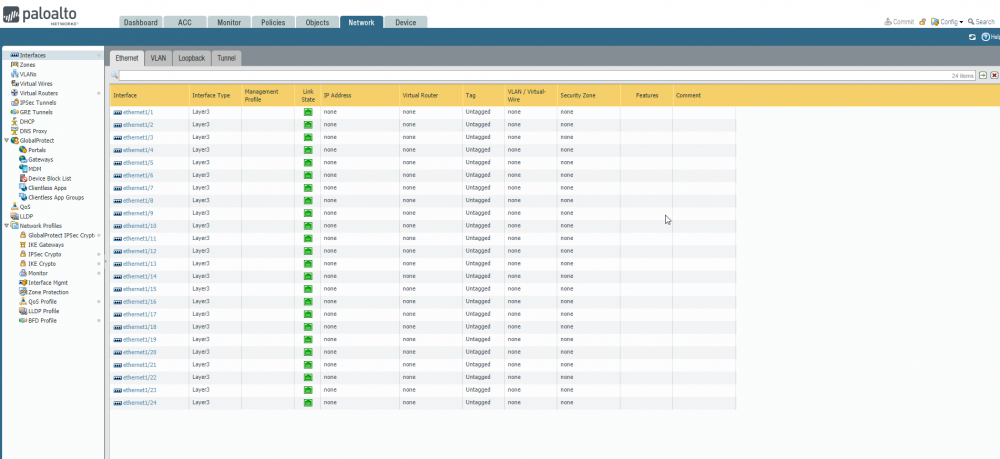
Hey jwiener3 and all others, As far as the perf: interrupt messages, I receive these as well, and the system seems to limit my login until it is done spitting those errors. Not sure if there are other processes still booting in the background. I'm assuming the "accessed a protected system..." is your banner/motd. As far as I know, those alerts don't actually cause any issues (that I have found). OH!!! Also, Update. Running Unraid 6.9.0-beta25. I'm now able to run much more interfaces. Currently running 25 (24 + mgmt). Adding the 26th does.... welp, apparently nothing. only eth1/1 - 1/24 show up, nothing after that. Even looking for the logical 26th unraid interface (25th palo alto, other than mgmt) I'm unable to find it's mac address. -Jockie
 1 point
 -
...and here's an example on how I'm using it. This is my "daily-backup.sh", that is scheduled daily at 01:00. It snapshots and backs up all VM's and all directories under appdata. #!/bin/sh # VMs KEEP_SRC=48h KEEP_DST=14d SRC_ROOT=/mnt/cache/domains DST_ROOT=/mnt/disk6/backup/domains cd /mnt/disk6/backup virsh list --all --name | sed '/^$/d' | while read VM; do /mnt/disk6/backup/snapback.sh -c -s $SRC_ROOT/$VM -d $DST_ROOT -ps $KEEP_SRC -pd $KEEP_DST -t daily done # AppData KEEP_SRC=48h KEEP_DST=14d SRC_ROOT=/mnt/cache/appdata DST_ROOT=/mnt/disk6/backup/appdata for APP in $SRC_ROOT/*/; do /mnt/disk6/backup/snapback.sh -c -s $APP -d $DST_ROOT -ps $KEEP_SRC -pd $KEEP_DST -t daily done1 point
-
The reason nohup doesn't work for this is because when you disconnect, or log out of that terminal, that terminal, and any child processes of the terminal are killed. This is just Linux kernel process management doing it's job. To prevent this you can just disown the process, no need to nohup it. For example you can: $ processname & $ disown and "processname" will continue running after the terminal is killed. This is good because it means that "processname" will still respond to hangup, which may be needed. Of course, you could also call disown with nohup: $ nohup processname $ disown You can also disown processes by using their PID, but calling it immediately following the spawn of a process will automatically disown the last created child.1 point
-
I see this thread has been idle for a month or so but I found it because it is the most recent thread that comes up on google when searching for "unraid wireless"... which I think is a much needed feature based on quite a few threads coming up on google asking for it. I live in a small one bedroom apartment where the only wired access to the internet is at a small desk between my bathroom and bedroom doors. There is not enough space there for my unRAID server and my gaming PC. I have placed my unRAID server in my living room by the TV because that is the only place I really have space. I also plan on having it run a gaming VM to play VR off of in the future (so I don't have to move my gaming PC back and forth for VR and normal PC games). I purchased an AC power adapter like this one based on most threads saying that is the best option... but I think my apartment building has too much interference on the AC power lines because I only get around 6megabits/sec... its not like its going that far either, my apartment is small. Running an Ethernet cable across the floor in front of doorways is not an option, and since I am renting the place I can't drill into the walls or tear up the carpet to run cables either... I own a pcie wireless card that I could add to my server but unRAID doesn't support it. Like pwm said, the important thing is that different users have different use cases and different needs. Even though it is optimal to have a wired connection, it is not always practical/possible, especially when wireless would be a better/faster solution for people like me where any possible wired option is actually slower than my wireless speeds... so slow that I can't even stream plex movies to my chromecast from it... Anyone know if there is a way to contact the devs for a formal feature request? I feel like this feature should at least be given a look at.1 point


(Small).thumb.png.b884b0484e848c502a315fc27b995f59.png)