Leaderboard
.thumb.jpg.25529a82ec4a0fb3d47782b36a1a7049.jpg)


Popular Content
Showing content with the highest reputation on 03/10/21 in all areas
-
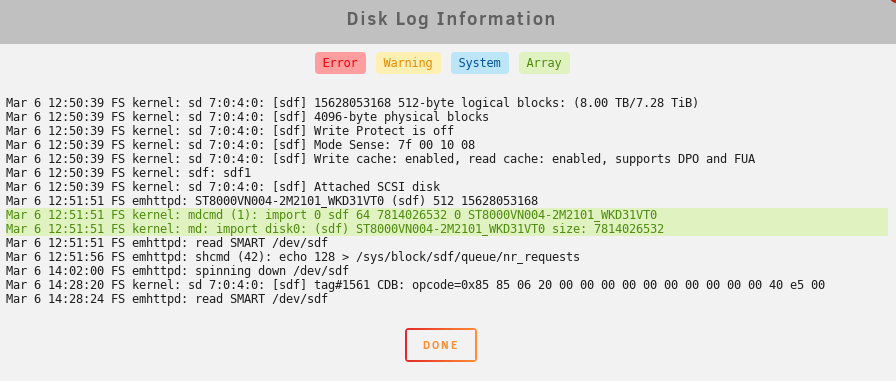
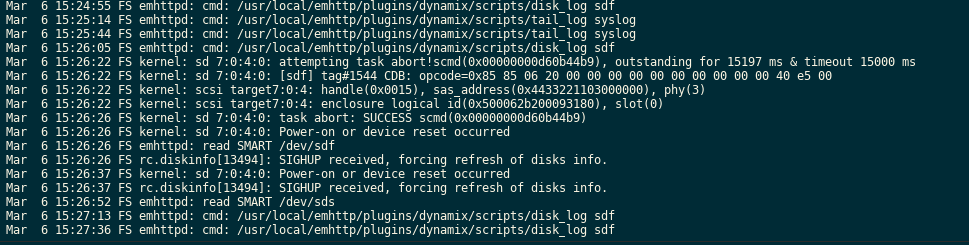
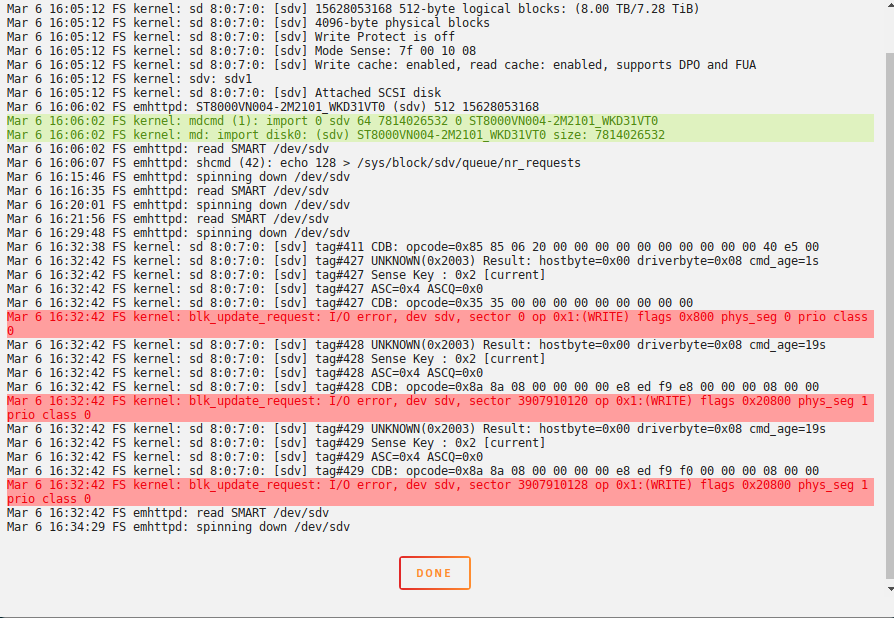
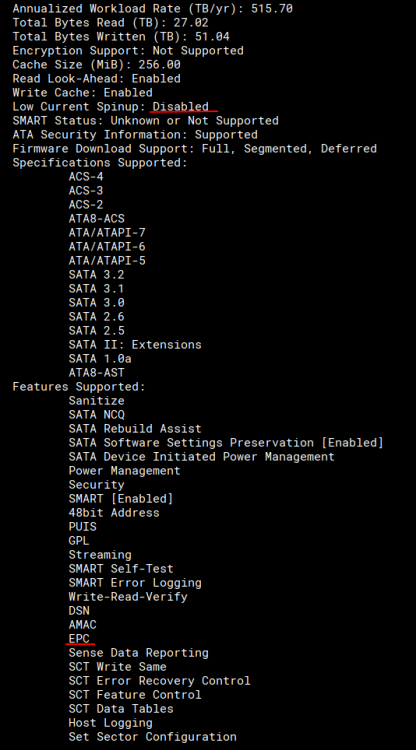
Upgraded from last stable as I had a spin-up problem with my Seagate Ironwolf parity drive under RC2. I see the same quirk again under the new kernel - this time having attached diagnostics. From what I can tell, it appears once the mover kicks in and forces the spin up of the parity. It tripped up once as you can see from the logs but came up and wrote fine. I've done repeated manual spin downs of the parity, writing into the array via the cache, and forcing a move hence bringing up the parity again. No errors as of yet. This is a new drive and under the same hardware setup completely as 6.8.3 so it is a software/timing issue buried deep. If this continues, I will move the parity off my 2116 controller (16 port) and over to my 2008 (8 port) to see if that relieves any issues. Past that, perhaps over to the motherboard connector to isolate the issue. FYI. Kev. Update: I've disabled the cache on all shares to force spin ups much faster. Just had another reset on spin up. I'll move to next controller now. Update 2: Drive dropped outright on my 2008 controller and Unraid dropped the parity and invalidated it: I'm going to replace the Seagate with a 8T WD unit and rebuild. Definitely an issue somewhere with timings between the 2 controllers. Update 3: After some testing offline with the unit and digging, it looks like the Ironwolf may be too aggressively set at the factory for a lazy spin up. This behavior must be tripping up some recent changes in the mpt2/3sas driver. Seagate does have advanced tools for setting internal parameters ("seachest"). I set the drive to disable the EPC (extended power conditions) which have a few stages of timers before various power-down states. I also for good measure disabled the low current spin-up to ensure a quick start. Initial tests didn't flag any opcodes in the log. I'm rebuilding with it and testing. For note, the commands are: SeaChest_PowerControl_xxxx -d /dev/sgYY --EPCfeature disable SeaChest_Configure_xxxx -d /dev/sgYY --lowCurrentSpinup disable Update 4: I've submitted all info to Seagate tech support citing the issue with the 10TB and my suspicions. Deeper testing today once my rebuild is done to see if the fixes clear the issue. Update 5: Full parity rebuild with Ironwolf. No issues. I've done repeated manual drive power downs and spin ups to force the kernel errors across both the controllers above and I have not seen any errors. Looks like the two tweaks above are holding. Kev.
 3 points
 -
You don't have to do that. If the share is empty it will delete all top-level dirs for it on all devices.2 points
-
Normally I would have, but I just didn't have a chance to yet. My life is still a bit of a mess after moving (I'm currently sitting on the floor while I type this because most of my furniture won't arrive for another week haha). I'm planning on incrementing the version later today though, but I wanted to get the quick and dirty fix out sooner rather than later.2 points
-
Have you a active internet connection on boot? The plugin will automatically download the new version for you, but you need to have a internet connection on boot otherwise it will fail. No, you only need a active internet connection on boot and it will download the new driver (keep in mind that the boot will take a little longer since it's downloading the new driver ~130MB). As @tjb_altf4 said if you don't have a Internet connection the worst thing can happen is that you have to reinstall the Plugin and also disable and enable the Docker Daemon or reboot once more. Hopefully the next time a update is released this won't happen again. I check for new versions now every 15 minutes and have everything automated so that about 1 hour and 15 minutes after a release the Plugins are updated, even if I'm sleeping...2 points
-
2 points
-
Personally and I do mean personally I always do the following: Stop all Dockers Spin up all Drives (below does it anyways, but......) Stop the Array Shutdown/Reboot I do that simply because if a docker hangs I can wait for it to shutdown vs wondering what's hung and why my machine isn't shutting down. So I assume control of each step because I don't like unclean shutdowns and having to wait for a parity check to fire up if something goes sideways. I've not done that a few times and had good results, but there was a few times in the past when I had to eventually login and pray when I forced it to shutdown nothing would go wrong.2 points
-
Yeah just a min, actually about 15. I put it on the wrong branch 😆 Ok good to go now, sheesh2 points
-
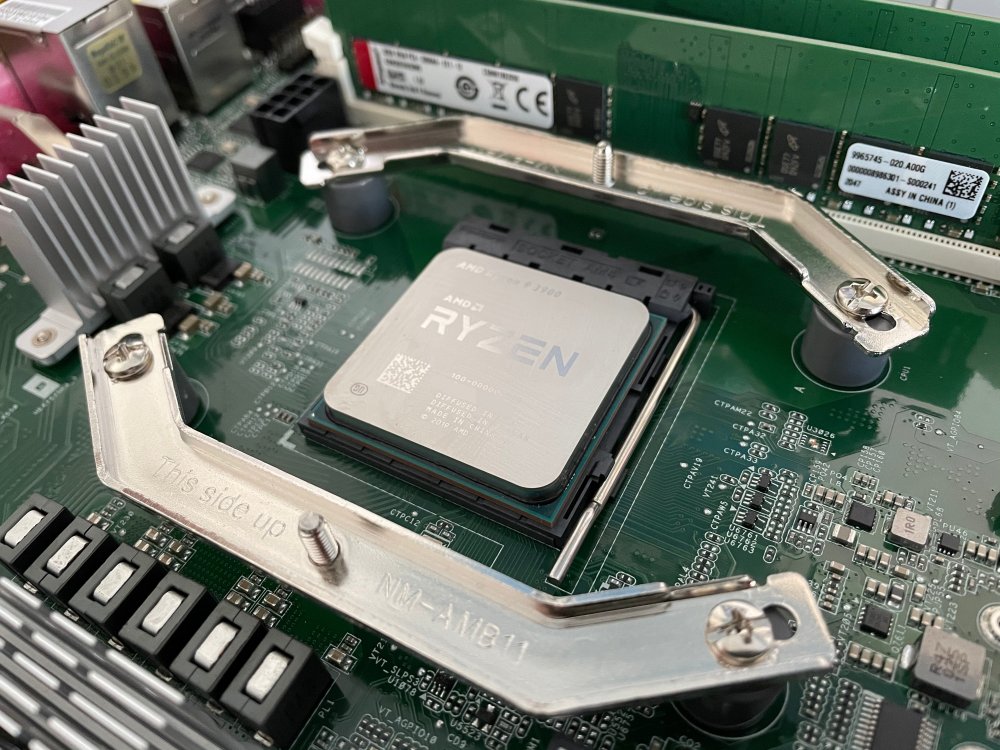
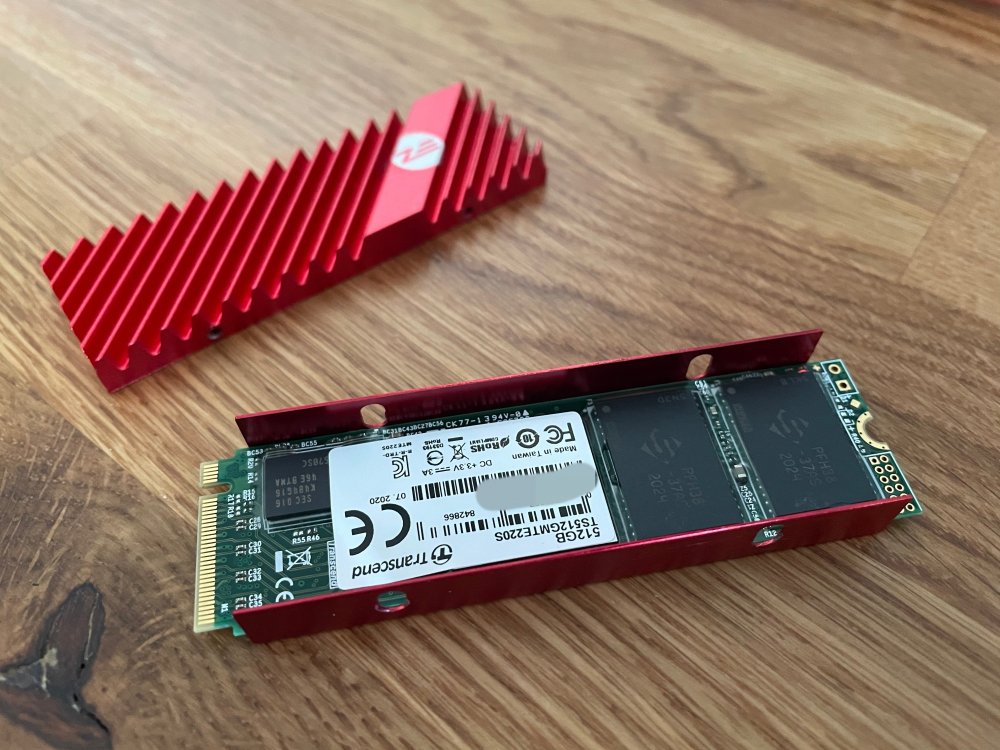
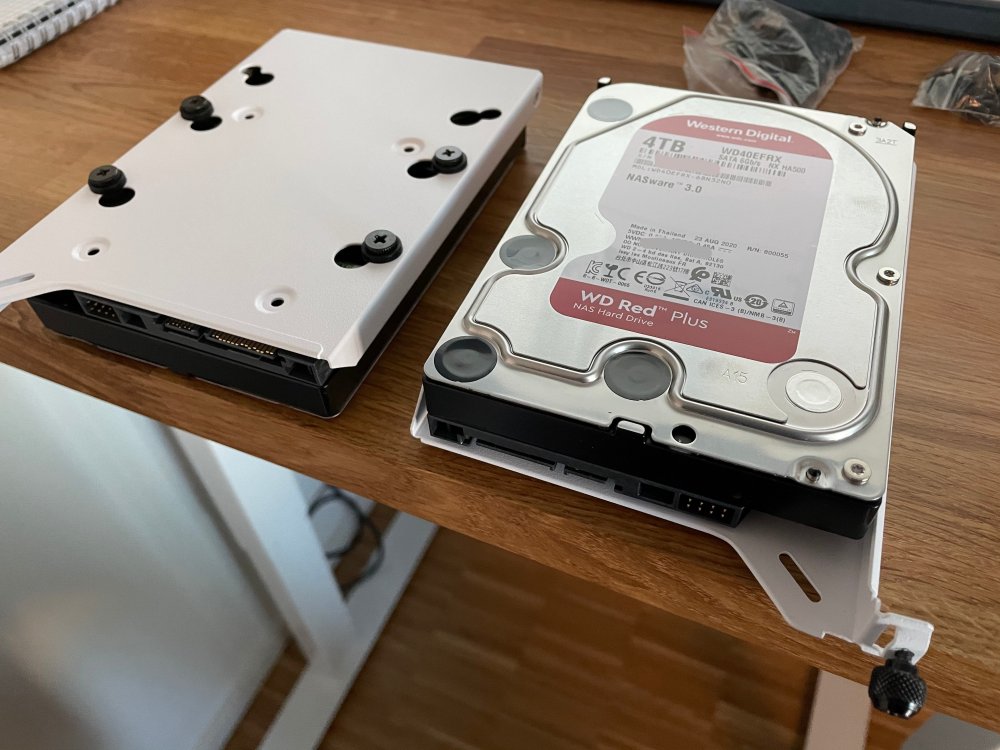
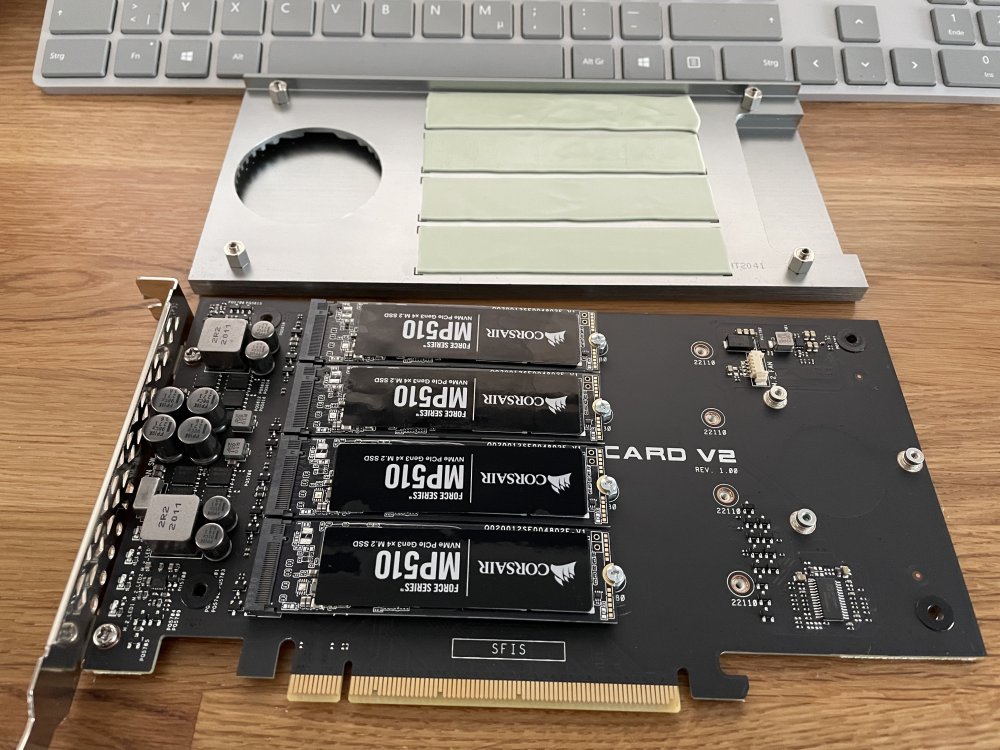
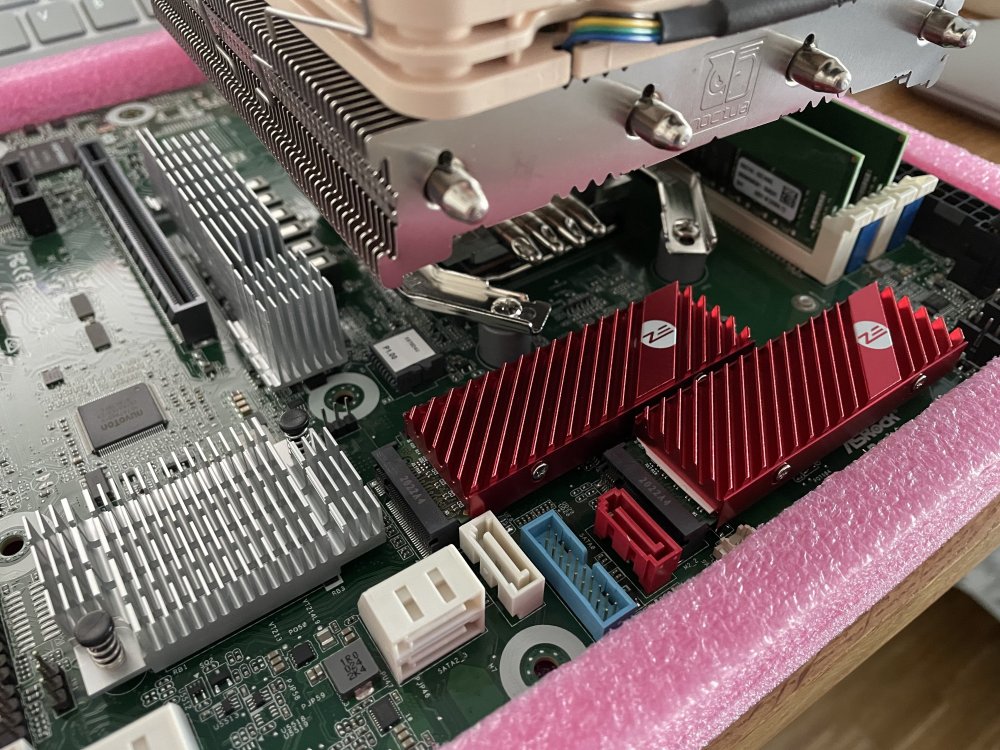
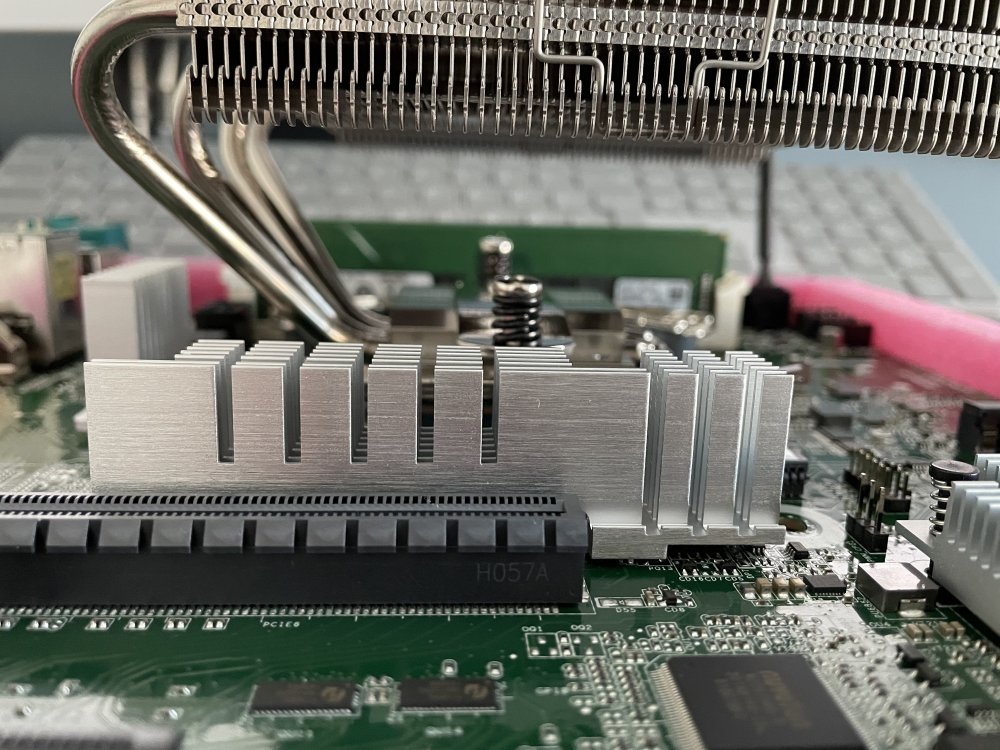
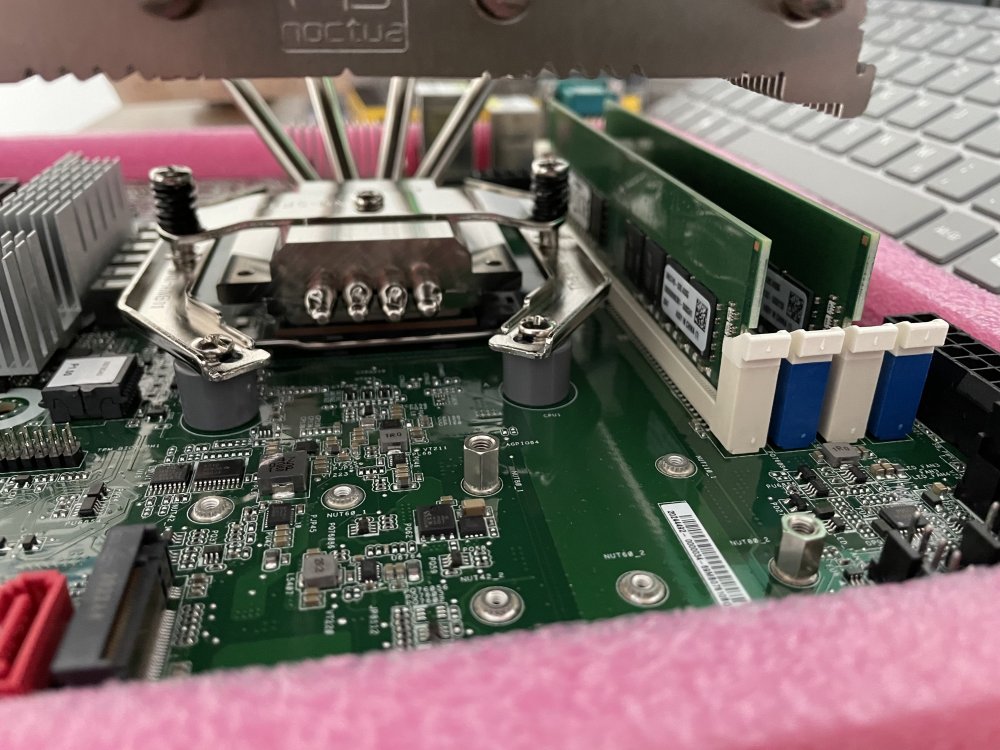
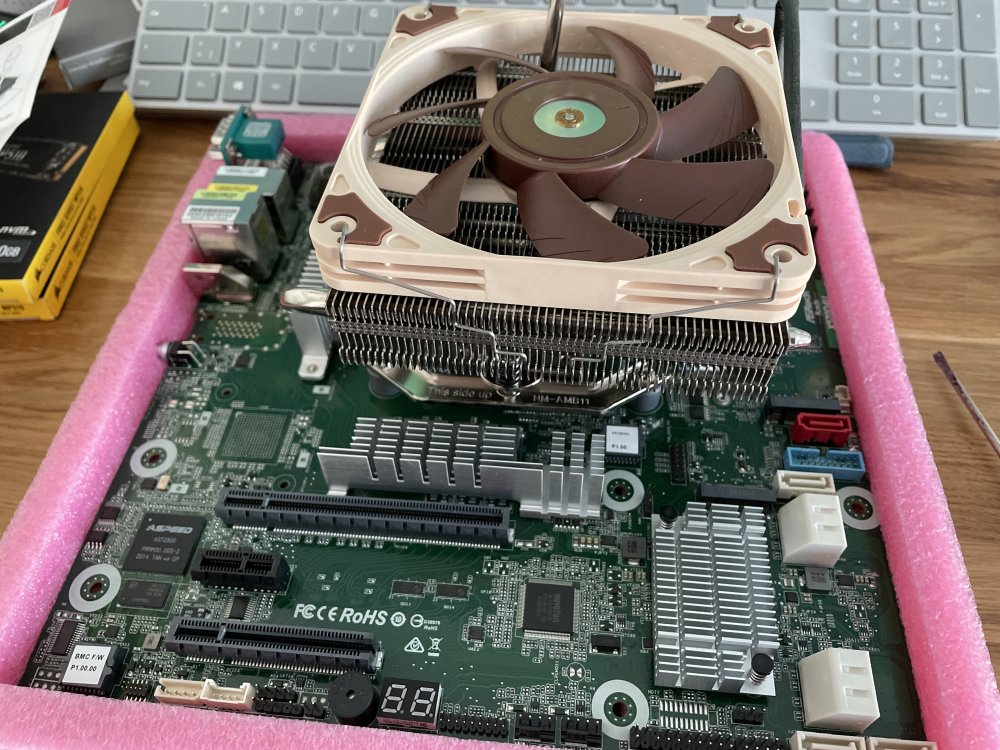
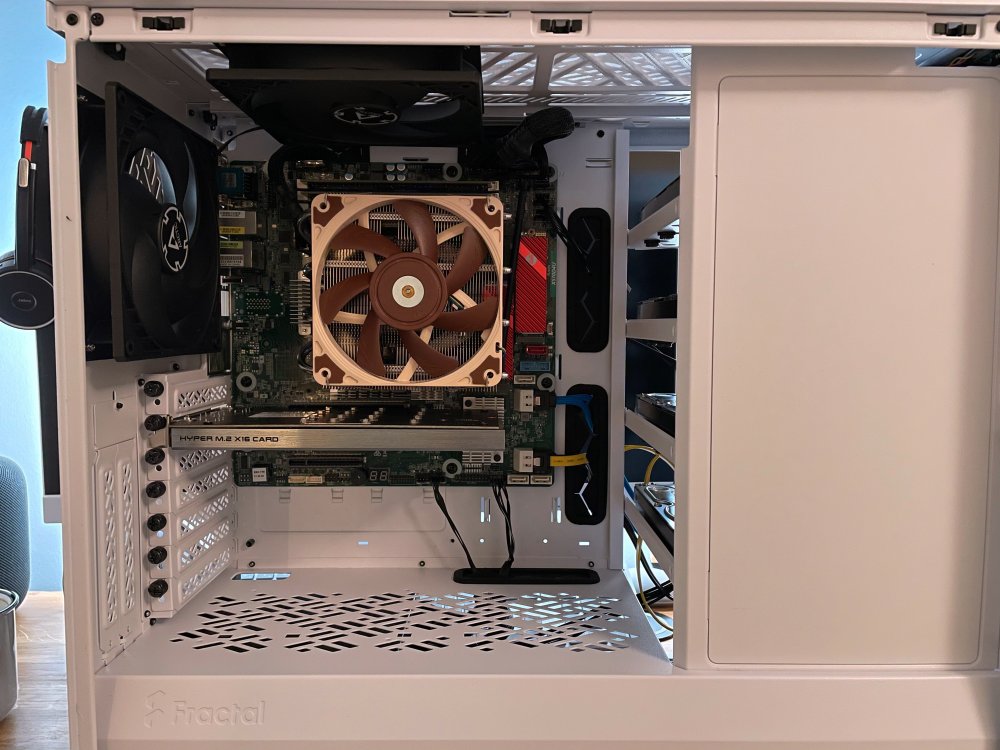
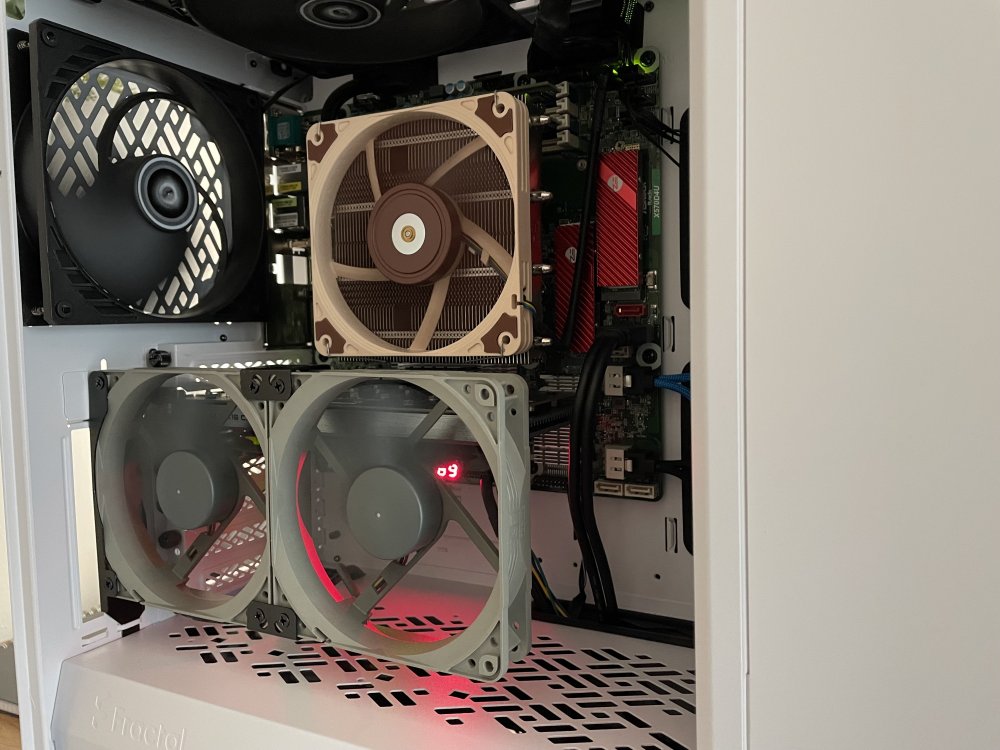
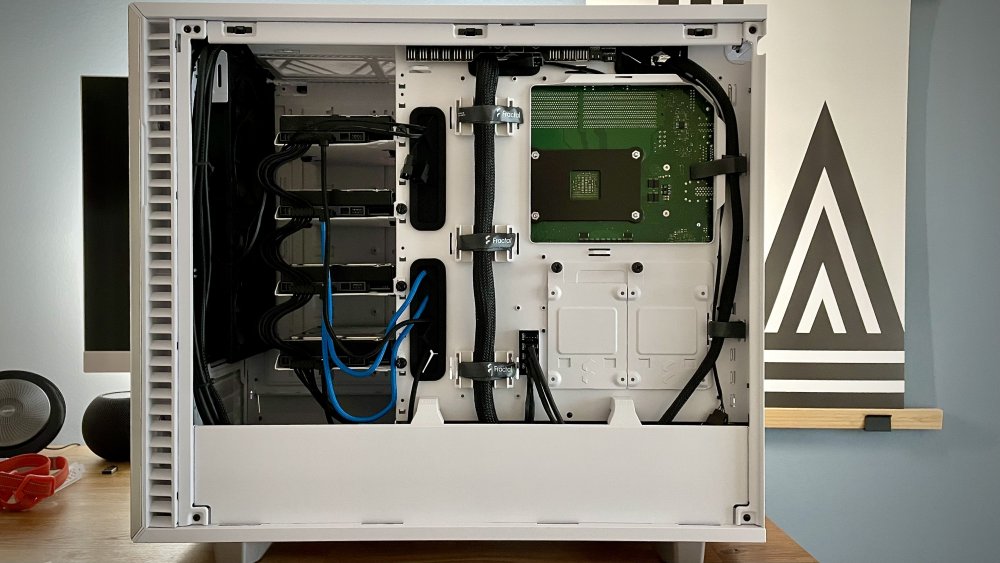
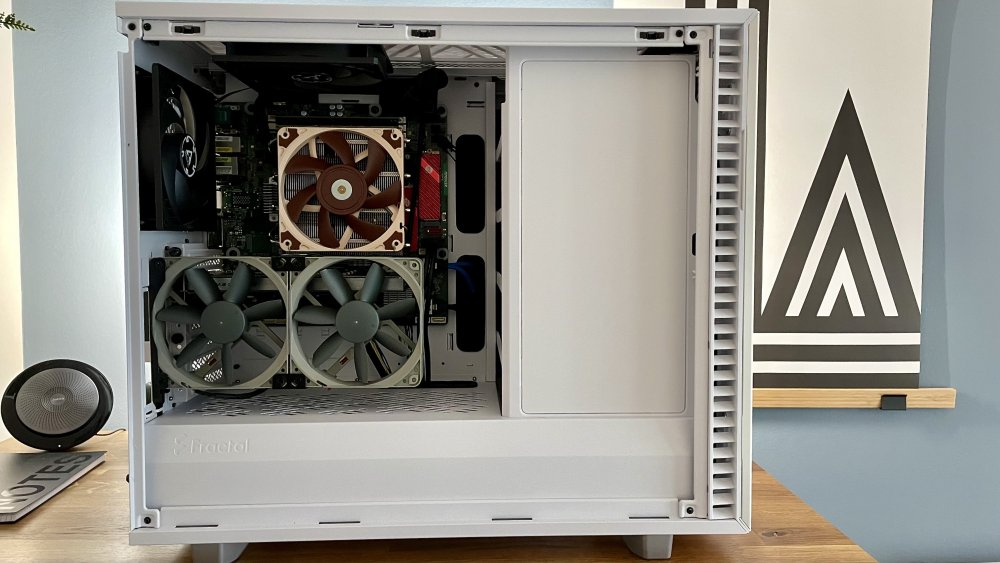
After starting to play around with UnRaid a couple of weeks ago I decided to build a proper system. I want to share build progress and key learnings here. Key requirements have been: AMD system Plenty of CPU cores Low Wattage ECC Memory IPMI Good cooling since the system sits in a warm closet Prosumer build quality Config: Runs 24/7 and is rock stable since day 1. UnRaid OS: 6.10 RC1 Case: Fractal Design Define 7 PSU: Be Quiet! Straight Power 550W Board: AsRockrack X570D4U w/ Bios 1.20; latest version as of 2021/10 CPU: Ryzen 9 3900 (65W PN: 100-000000070) locked to 35W TDP through Bios setting; CPU was difficult to source since it is meant for OEMs only. Cooler: Noctua NH-L12S Case Fans: 5x Arctic P14 PWM - noise level is close to zero / not noticeable Memory: 64 GB ECC (2x32 GB) Kingston KSM32ED8/32ME @ 3200Mhz (Per Memory QVL) Data disks: 3x 4TB WD40EFRX + 1x 4TB WD40EFRX for Parity (all same disks, same size) Cache 0: 2x 512GB Transcend MTE220S NVME SSDs Raid 1 Cache 1: 4x 960GB Corsair MP510 NVME SSDs Raid10. Set up with ASUS Hyper M.2 in PCIE X16 Slot (BIOS PCI Bifurcation config: 4x4x4x4x) Todos: Replace the 4 SATA cables with Corsair Premium Sleeved 30cm Sata cables Eventually install a AIO water cooler Figure dual channel memory setting out, atm. single channel config. Thats done. Eventually configure memory for 3200mhz, Done. Eventually install a 40mm PWM cooler for the X570. Update: After a few weeks of 24/7 uptime this seems to be unnecessary since the temps of the X570 settled at 68 - 70° Get the IPMI Fan control plugin working Temperatures (in Degree Celcius) / Througput: CPU @ 35W: 38° - 41° Basic usage (Docker / VMs) / 51° - 60° Load CPU 65W: 78 - 80° Load (This pushes fans to 1300 - 1500 RPM, which lowers the X570 temps to 65°) Disks: 28° - 34° Load SSDs: 33° - 38° Load Mainboard: 50° in average X570: 67° - 72° during normal operations, 76° during parity check Fan config: 2x Front (air intake), 1x bottom (air intake), 1x rear & 1x top (air out); 800 - 1000 RPM Network Througput: 1 Gbit LAN - Read speed: 1 Gbit / Write speed 550 - 600 Mbit max. (Limited by the UnRaid SMB implementation?). Write tests done directly to shares. So fare meeting expectations. Final Config: 2x1 Gbit Bond attached to a TP-Link TL-SG108E. Learnings from build process: Finding the 65W version of the Ryzen 9 3900 CPU was difficult; finally found a shop in Latvia where I ordered it. Some shops in Japan sell these too. The Case / Board config requires a ATX cable with min. 600mm length IPMI takes up to 3 mins after Power disconnect to become available The Bios does not show more than 2 M.2 SSDs which are connected to the Asus M.2 Card in the x16 slot. However, unRaid has no problem seeing them. Mounting the CPU before mounting the board was a good decision, should have also installed the ATX and 8PIN cable on the board before mounting it, since installing the two cables on the mounted board was a bit tricky Decided to go with the Noctua Top Blower to allow airflow for the components around the CPU socket, seems to work good so far Picked the case primarily because it allows great airflow for the HDDs and a clean cable setup The front Fans may require PWM extension cables for proper cable setup, depending where on the board the Fan connectors are located X570 is hot, however with a closed case airflow seems to be decent (vs. open case) and temps settled at 67° - 68° Removed the fan from the ASUS M.2, learned later that it has a fan switch too. Passive cooling seem to work for the 4 SSDs PCIe Bifurcation works well for the x16 slot, so far no trouble with the 4x SSD config Slotting (& testing) the two RAM modules should be done with the board not mounted yet since any changes to ram slots, or just in's/out's is a true hassle since the slots can only be opened on one side (looking down at the board on the left side, towards external connectors) and the modules have to be pushed rather hard to click in. IPMI works well, still misses some data in the system inventory. However the password can only have a max. length of 16 Byte; used a online generator to meet that. Used a 32 char PW at first instance and locked the account. Had to unlock it with the second default IPMI user (superuser) Asrock confirmed the missing data in the IPMI system inventory. Suggested to refresh the BMC what I didn't do yet. Performance: With CPU @ 35W the system performs well for day to day tasks, however feels like it could be a bit faster here and there. Nothing serious. VMs are not as fluent as expected. The system is ultra silent. With CPU @65W the system, especially VMs and docker tasks such as media encoding are blazing fast. VM performance is awsome and a Win10 VM through RDP on a MacBook feels 99% like a native desktop. The app performance in the VM is superiour to usual Laptops from my view, given the speed of the cache drive where I have the VM sitting at and the 12 core CPU. Fans are noticeable but not noisy. 45W Eco Mode seems to be the sweet spot, comparing performance vs. wattage vs. costs. Transcoding of a 1.7GB 4K .mov file using a Handbrake container: 65W config - 28 FPS / 3mins 30sec - 188W max. 45W (called ECO Mode in Bios) - 25 FPS / 3min 45sec - 125W max. 35W config - 4FPS / 25 mins - 79W max. Power consumption: Off (IPMI on) - 4W Boot 88W Bios 77- 87W Unraid running & ECO Mode (Can be set in Bios) - 48W Unraid running & TDP limited to 35W - 47W Parity check with CPU locked to 35W - 78W Without any power related adjustments and the CPU running at stock 65W the system consumes: 80W during boot 50 - 60W during normal operations e.g. docker starts / restarts 84 - 88W during parity check and array start up (with all services starting up too) 184 - 188W during full load when transcoding a 4K video CPU temps at full load went up to 86° (degree celcius). Costs: If I did the math right - the 35W config has less peak power consumption, however since calculations take longer the costs (€/$) are higher, compared to the 65W config. In this case 0.3 (188W over 3,5 Minutes) vs. 2.3 (78W over 25 Minutes) Euro Cent. So one might look for the sweet spot in the middle January 2021 - Update after roughly a month of runtime - No issues, freezes etc. so far. The system is rock stable and just does its job. Details regarding IOMMU groupings further below. I will revisit and edit the post while I am progressing with the build.
 1 point
 -
This release contains bug fixes and minor improvements. Refer to Summary of New Features for an overview of changes since version 6.8. To upgrade: First create a backup of your USB flash boot device: Main/Flash/Flash Backup If you are running any 6.4 or later release, click 'Check for Updates' on the Tools/Update OS page. If you are running a pre-6.4 release, click 'Check for Updates' on the Plugins page. If the above doesn't work, navigate to Plugins/Install Plugin, select/copy/paste this plugin URL and click Install: https://s3.amazonaws.com/dnld.lime-technology.com/stable/unRAIDServer.plg Bugs: If you discover a bug or other issue in this release, please open a Stable Releases Bug Report. Thank you to all Moderators, Community Developers and Community Members for reporting bugs, providing information and posting workarounds. Please remember to make a flash backup.1 point
-
Hey plugin authors! I am trying to prevent a class of errors related to ownership and permissions on files/dirs installed by plugins. We want to make sure that all files/dirs are owned by root:root and have perms of 755 or 644. This applies to files installed in the operating system, not user files you place on the flash or array. Unraid itself does not yet enforce these rules, but I'd like to get there. I've written a small script that detects problems, you can see it here: https://gist.github.com/ljm42/d612bcfbc071d854baba53c482fd64e4 To run it on your system and detect issues with the plugins you have installed: cd /tmp wget https://gist.github.com/ljm42/d612bcfbc071d854baba53c482fd64e4/raw -O plgcheck bash plgcheck It will run through the txz files on your flash drive and flag any ownership issues or permission issues. Please update your plugin's txz files so they are not flagged by this test. Or let me know if you think it is flagging something unnecessarily. Thanks! p.s. please don't feel personally attacked by this, my plugin fails this test currently too1 point
-
Thats awesome! Thanks!1 point
-
No, but you then have to manage everything yourself instead of the OS You do the stubbing via system devices Either there or in Settings - CPU pinning. Doesn't matter as CPU Pinning writes the entries to syslinux. no1 point
-
是的,这样更准确1 point
-
That's always my first go-to. I'm not an expert in any of this stuff. 2) I double checked that before pulling the plug this morning... I HAVE done that before and spent an hour scratching my head going WTF... !! But not this time. The UPS does have both, but I'm plugged into the "backup" section with for both power supplies. 1) will test tomorrow with the other UPS... it's old too, so it won't necessarily be conclusive. But it will be an indication!1 point
-
I edited your first post and title to reflect that, it will be better for clarity in the future.1 point
-
how full a drive is will have no effect on a parity check as the parity check works at the raw sector level and is unaware of the meaning of the contents of the sectors - just that they have a bit pattern it is going to use/check.1 point
-
I'd say that you have an empty directory called "Work" in the root of Disk 3 and therefore the reported available free space is the sum of that on Disk 3 and Disk 5. I'm guessing that directory was created when you first created the Work share and that you later changed the share to include only Disk 5.1 point
-
Good ideas. Hmm, until you are confident that reboots work, I'd suggest stopping the array manually before you shutdown or reboot. Array status is stored on the flash, so if the array stops successfully before the system hangs then you can avoid unclean shutdowns and forced parity checks.1 point
-
My script now looks like this: #!/bin/bash cat /mnt/user/<share>/<file>; With 1 line per disk, that just outputs the file to the console, or in that case the log. So same as before, script as cronjob for the time that you want them to keep spinning, spindown settings for the rest of the time. Yeah, that remains to be seen, my script will start soon and I'll report back if it kept working through the evening. Still this is a clunky workaround, there has got to be something lke the old version with 'sdspin'1 point
-
No these are host keys - what the server uses to identify itself to the user - and all the files in /boot/config/ssh will be installed into /etc/ssh upon startup of the ssh server. If the ssh server starts up and cannot find these host keys, it will generate new ones and scare anybody trying to ssh in with a warning message about possible Man in the Middle Attacks due to host key mismatch. Needless to say, the new ones will be saved to /boot/config/ssh as well. For those who use the ssh plugin or know what they are doing, the configuration of the ssh service can be changed and persisted by copying the modified /etc/ssh/sshd_config file here.1 point
-
Nvidia 2021-03-10 Plugin Update and reboot fixed it for me, thank you!1 point
-
MTU gibt an, wie gross die Nutzlast eines Ethernet Pakets sein kann....also auf Layer-2. Jedes Paket, welches durch die Geräte/das Ethernet flitzt verursacht "Kosten" im Sinne von Latenz/Performance und hat "Meta-"-Daten, welche eben mit in die Brutto-Datenrate zählen, die transportiert werden kann. MTU-9000 hat also knapp 6x mehr Nutzlast als ein MTU1500 Paket. Um die gleiche Datenmenge von A nach B zu transportieren braucht es also 6x zu viele MTU-1500 Pakete...Diese haben eben 6x Meta-Daten als das eine MTU-9000 Paket...der Anteil an "Verpackung" ist also 6x höher und damit ist die für die Nutzlast verwendbare Bandbreite auf dem Ethernet kleiner. Soweit ich weiss, musst Du in Windoof die MTU für Sende- und Empfangsrichtung separat einstellen? Wenn es nix bringt, hast Du evtl nicht alles umgestellt oder die Performance war vorher schon nicht an der Auslastungsgrenze des Links. Ich hatte meine mellanox auf 9000 gestellt....konnte raus aber nur bis 8966 (statt normal 8972) pingen...von aussen ging ein Ping auf die Mellanox-IP mit 8972. ...ja, alle im gleichen L2 Strang, die miteinander kommunizieren, zB weil im gleichen IP-Segment, da dort von L3 (IP) auf L2 gewechselt wird. Man muss / sollte also zB die MTU zur Default-Route oder zu einem anderen (V)LAN dann dediziert auf 1500 stellen, wenn man nicht weiss, dass die andere Seite (Edit: und dazu gehärt auch der Router/das Gateway) es kann.1 point
-
@binhex, please accept my apology as I go jump off a bridge for not RTFM!. Thanks for all of your great work.1 point
-
Ok, thanks a lot! Will try tonight and report here1 point
-
According to wiki max Reiser FS volume size is 16TiB, so likely why you're running into trouble, best to upgrade to Unraid V6 and convert to XFS.1 point
-
Quick update: Everything's back to normal, without any issues:)1 point
-
The rsyslogd entries are "normal" after a reboot.. The syslogdeamon is trying to send data before the network is up..1 point
-
Make sure you're booting using legacy BIOS/CSM, memtest doesn't support UEFI boot.1 point
-
@Kaldek & @sterofuse & @almulder Fixed! Update the Nvidia-Driver Plugin (make sure that you are on version 2021.03.10) and reboot your server into GUI mode again.1 point
-
Okay danke für die Info. Hab ich leider nicht mitbekommen. @mgutt Vielleicht kannst du das ja bei dem Topic "Häufig gestellte Fragen" ergänzen, dass dies ab 6.9 nicht mehr benötigt wird.1 point
-
Some fail others run as they just start creating directories and initialise data under the mountpoint (.mnt/disks/virtuals) of the not mounted zfs volume/datasets if these dont exists. So i have to stop them all and clean up the mess they create. Now i undrstand i think i know how i am gong to do upgrades in the future. I will do the builds on my backup unraid server, which runs no docker containers and then just copy the build files to my primary when all works fine. Seems a better approach anyway1 point
-
I do not think that it is safe to assume that the current parity is valid after that level of error so you are going to almost certainly need to do a correcting parity check anyway after the rebuild. I would go directly for rebuilding parity from scratch as at least that way (as long as it completes without error) you know it matches the current drive set.1 point
-
Yea, probably not. Which is fine. But, as the popular saying goes, "once you go firewalld, you never go back". Sort of like NetworkManager vs network, or systemd vs sysv. At the end of the day, if it gets the job done, that's all that matters!1 point
-
1 point
-
Hi @coblck, can you advise on how much ram your system running rsync has? also, what is the file format for the external hd? sometimes using the -a tag for rsync between different file formats can cause problems. so i'm wondering if using -r and -t, and maybe some other options would help solve the problem of using -a. there could be a few different things to try here1 point
-
Well as it stands, you should enable root as that's the supported unraid way.1 point
-
Server name and password changed - all works. The only steps I did different from when it didn't work: 1. steamcmd was on mnt/cache instead of default mnt/user 2. On first install I didn't have steamcmd on the server at all. I did try to remove the image and delete both steamcmd and valheim directories before asking for help. However, this time (your advice) I only deleted the valheim directory and left the steamcmd director - then reinstalled the docker with default settings. Not sure if that makes a difference but now it works. Thanks for your response!1 point
-
FCP supports this on 6.91 point
-
So, Sonarr v3 is FINALLY here, its out of beta and is now the latest release, if you want to switch from Sonarr v2 to v3 then simply pull down the 'latest' tagged image. However, if you want to stick on Sonarr v2 then please do the following:- Go to unRAID Web UI/Docker/left click Sonarr/Edit and change the value for 'Repository' to:- binhex/arch-sonarr:2.0.0.5344-1-04 Click apply to pull down v2 image. Note:- There will be NO further development on v2 going forward. If you are using the tag name of 'v3' then please do the following to switch back to 'latest' (now v3):- Go to unRAID Web UI/Docker/left click Sonarr/Edit and change the value for 'Repository' to:- binhex/arch-sonarr:latest Note:- the 'v3' tag is now deprecated and will NOT be updated.1 point
-
Its not broken, just "vice versa" 😉 You can fix this. If the sleep plug-in is active, you can enter all drives (which you want to monitor) under "Monitor disks outside array:" There is something "the other way around" - but it is working 😉👍 It seems the plugin does not recognise the array correctly (last update from 6.2020)
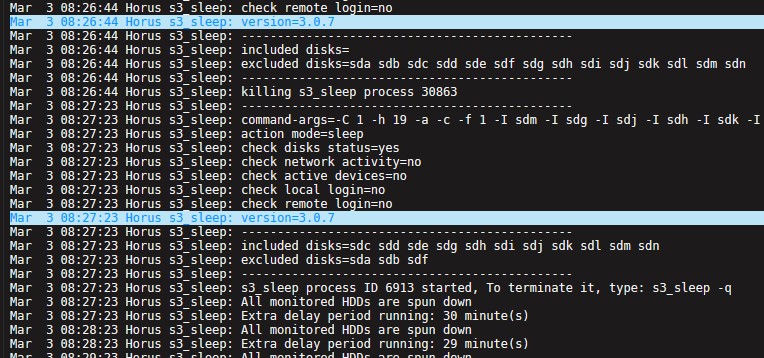
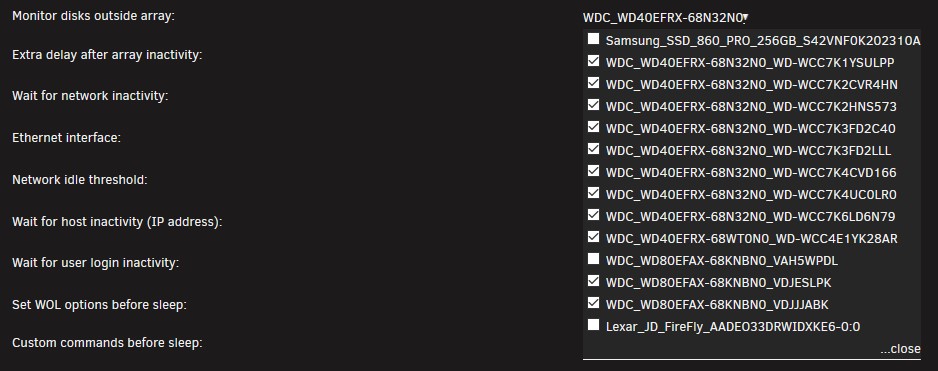 1 point
 -
Looks like its time to close my feature request now.1 point
-
If you want a container to use multiple cores, then you can't pin it to the same isolated cores. Sure the OS will possibly take some cycles on the cores, but since you're not running any VM, the hit would be minimal. If you really want it to have more or less unhindered access to certain cores, then you pin it to those cores, and then pin every other container to all the cores except for those ones.1 point
-
I added a Cyberpower UPS ValuePRO VP700ELCD Green Power UPS 700VA/390W which was detected immediatly by the integrated APC deamon. Approx. runtime on battery is 40 mins.1 point
-
I think the Meshify allows even a better cable management, especially for the ATX connector since it has one more rubber protected cable grommet on top of the other two upper grommets. With the experience from my Define build I'd recommend the Meshify. And, the optics of the Meshify are cooler too. The Switch is fine. Not nowing your home / infrastructure I'd probably throw away the other small switch a get device which allows Link Aggregation. The full PCIe4 x1 slot of the board allows a 10G upgrade at a later stage.1 point
-
Good summary! My use case is low overall (average) load. I have a Nextcloud, Photo DB, few VMs, Jellyfin etc. container. My system is peaking only when I transcode 4K footage from my IPhone, and that's basically it.1 point
-
@jonathanmWhich Bios setting would you use to limit draw?1 point
-
My suggestion is to update your BIOS, change to Legacy boot if currently UEFI (if possible), or switch the physical slot your GPU is in and see if the problem goes away. The issue is your build parameters, not my plugin. The only other option would be to figure out a way to squelch that log. Maybe a combination of using this script and creating a custom .conf file to remove the offending log messages. If anyone wants to try it, create a file (02-barmappingblock.conf) in /etc/rsyslog.d/ that contains: :msg,contains,"mapping multiple BARs" stop :msg,contains,"which spans more than PCI Bus" stop Then do a: /etc/rc.d/rc.rsyslogd restart > /dev/null If it works, then copy that .conf file to the location the script suggestions, and then add it to your startup scripts when UnRAID boots. It's not a 'fix' per se, but a kernel/driver issue can't be fixed by myself or the linuxserver folks.1 point
-
Thanks everything is looking good for now. If somone else got the problem, this is what I did: Disable the Docker under Settings->Docker->EnableDocker Disable the VM Manager under Settings->VM Manager->EnableVMs Backup Cache Drive: /usr/bin/rsync -avrtH --delete /mnt/cache/ /mnt/(SOMEDISK)/cache_backup >> /var/log/cache_backup.log Format Disk: Stop Array Under Main -> Cache Change "File system type:" to something different Start array Under the stop array button you should find a format button -> format disk Stop array Change "File system type:" back to the old value Start array Format again Done Restore Cache Disk: /usr/bin/rsync -avrtH --delete /mnt/(SOMEDISK)/cache_backup /mnt/cache/ >> /var/log/cache_backup2.log DONE1 point
-
Triple Parity Please 🙏 I ask this half serious, and I know the math behind this would be insane. I'd take this or multiple arrays on single hardware. I have nearly 30 disks in a 45 Drives Storinator with 206TB usable, including X5 14TB drives. As single drive sizes go up, I'm getting more and more nervous ha ha. I have backups of everything, on and off site, but still, recovering would be a PITA.1 point
-
SOLVED! Solved solved solved! I can across this post from MHzTweaker: http://lime-technology.com/forum/index.php?topic=28727.msg256252#msg256252. In turn, he had posted this link: http://yannickdekoeijer.blogspot.com/2012/04/modding-dell-perc-6-sas-raidcontroller.html Sure enough, after sticking a piece of electrical tape over pins B5 and B6, the card now boots on all of my systems. Attached is a picture. Once I had flashed the card, literally the electrical tape was the thing to get it to work. I've attached a picture of the card, and below is a link to the zip file I used to flash the card. Instructions are in the file. I'll also update the LSI controller thread. https://www.dropbox.com/s/l4kadyukkh2w497/Flash%20Dell%20PERC%20H310%20for%20unRAID.zip
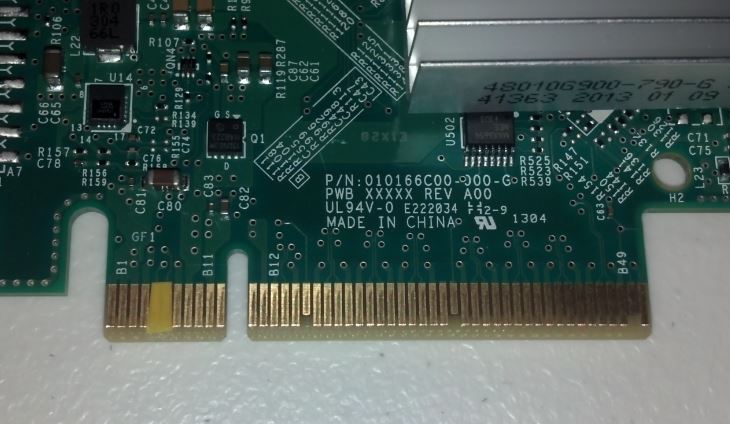 1 point