Leaderboard


Popular Content
Showing content with the highest reputation on 03/11/21 in all areas
-
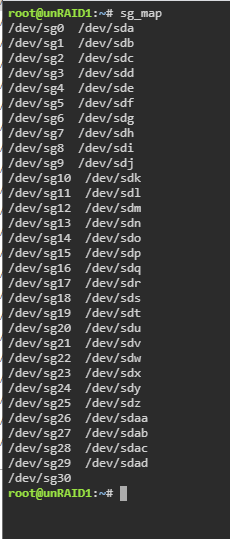
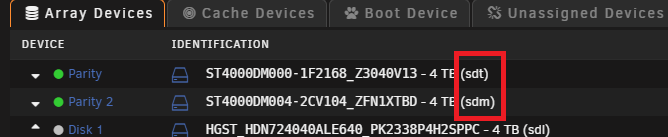
NOTE: There's a TL;DR section at the end of this post with required steps People with specific Seagate Ironwolf disks on LSI controllers have been having issues with Unraid 6.9.0 and 6.9.1. Typically when spinning up the drive could drop off the system. Getting it back on would require checking, unassigning, reassigning and rebuilding its contents (about 24 hours). It happened to me three times in a week across two of my four affected drives. The drive in question is the 8TB Ironwolf ST8000VN004, although 10TB has been mentioned, so it may affect several. There have been various comments and suggestions over the threads, and it appears that there is a workaround solution. The workaround is reversible, so if an official fix comes along you can revert your settings back. This thread is here to consolidate the great advice given by @TDD, @SimonF, @JorgeB and others to hopefully make it easier for people to follow. This thread is also here to hopefully provide a central place for those with the same hardware combo to track developments. NOTE: Carry out these steps at your own risk. Whilst I will list each step I did and it's all possible within Unraid, it's your data. Read through, and only carry anything out if you feel comfortable. I'm far from an expert - I'm just consolidating valuable information scattered - if this is doing more harm than good, or is repeated elsewhere, then close this off. The solution involves making changes to the settings of the Ironwolf disk. This is done by running some Seagate command line utilities (SeaChest) explained by @TDD here The changes we will be making are Disable EPC Disable Low Current Spinup (not confirmed if this is required) The Seagate utilities refer to disks slightly differently than Unraid, but there is a way to translate one to the other, explained by @SimonF here I have carried out these steps and it looks to have solved the issue for me. I've therefore listed them below in case it helps anybody. It is nowhere near as long-winded as it looks - I've just listed literally every step. Note that I am not really a Linux person, so getting the Seagate utilities onto Unraid might look like a right kludge. If there's a better way, let me know. All work is carried out on a Windows machine. I use Notepad to help me prepare commands beforehand, I can construct each command first, then copy and paste it into the terminal. If you have the option, make these changes before upgrading Unraid... Part 1: Identify the disk(s) you need to work on EDIT: See the end of this part for an alternate method of identifying the disks 1. Go down your drives list on the Unraid main tab. Note down the part in brackets next to any relevant disk (eg, sdg, sdaa, sdac, sdad) 2. Open up a Terminal window from the header bar in Unraid 3. Type the following command and press enter. This will give you a list of all drives with their sg and sd reference sg_map 4. Note down the sg reference of each drive you identified in step 1 (eg, sdg=sg6, sdaa=sg26, etc.) There is a second way to get the disk references which you may prefer. It uses SeaChest, so needs carrying out after Part 2 (below). @TDD explains it in this post here... Part 2: Get SeaChest onto Unraid NOTE: I copied SeaChest onto my Flash drive, and then into the tmp folder. There's probably a better way of doing this EDIT: Since writing this the zip file to download has changed its structure, I've updated the instructions to match the new download. 5. Open your flash drive from Windows (eg \\tower\flash), create a folder called "seachest" and enter it 6. Go to https://www.seagate.com/gb/en/support/software/seachest/ and download "SeaChest Utilities" 7. Open the downloaded zip file and navigate to Linux\Lin64\ubuntu-20.04_x86_64\ (when this guide was written, it was just "Linux\Lin64". The naming of the ubuntu folder may change in future downloads) 8. Copy all files from there to the seachest folder on your flash drive Now we need to move the seachest folder to /tmp. I used mc, but many will just copy over with a command. The rest of this part takes place in the Terminal window opened in step 2... 9. Open Midnight Commander by typing "mc" 10. Using arrows and enter, click the ".." entry on the left side 11. Using arrows and enter, click the "/boot" folder 12. Tab to switch to the right panel, use arrows and enter to click the ".." 13. Using arrows and enter, click the "/tmp" folder 14. Tab back to the left panel and press F6 and enter to move the seachest folder into tmp 15. F10 to exit Midnight Commander Finally, we need to change to the seachest folder on /tmp and make these utilities executable... 16. Enter the following commands... cd /tmp/seachest ...to change to your new seachest folder, and... chmod +x SeaChest_* ...to make the files executable. Part 3: Making the changes to your Seagate drive(s) EDIT: When this guide was written, there was what looked like a version number at the end of each file, represented by XXXX below. Now each file has "_x86_64-linux-gnu" so where it mentions XXXX you need to replace with that. This is all done in the Terminal window. The commands here have two things that may be different on your setup - the version of SeaChest downloaded (XXXX) and the drive you're working on (YY). This is where Notepad comes in handy - plan out all required commands first 17. Get the info about a drive... ./SeaChest_Info_XXXX -d /dev/sgYY -i ...in my case (as an example) "SeaChest_Info_150_11923_64 -d /dev/sg6 -i" You should notice that EPC has "enabled" next to it and Low Current Spinup is enabled 18. Disable EPC... ./SeaChest_PowerControl_XXXX -d /dev/sgYY --EPCfeature disable ...for example "SeaChest_PowerControl_1100_11923_64 -d /dev/sg6 --EPCfeature disable" 19. Repeat step 17 to confirm EPC is now disabled 20. Repeat steps 17-19 for any other disks you need to set 21. Disable Low Current Spinup...: ./SeaChest_Configure_XXXX -d /dev/sgYY --lowCurrentSpinup disable ...for example "SeaChest_Configure_1170_11923_64 -d /dev/sg6 --lowCurrentSpinup disable" It is not possible to check this without rebooting, but if you do not get any errors it's likely to be fine. 22. Repeat step 21 for any other disks You should now be good to go. Once this was done (took about 15 minutes) I rebooted and then upgraded from 6.8.3 to 6.9.1. It's been fine since when before I would get a drive drop off every few days. Make sure you have a full backup of 6.8.3, and don't make too many system changes for a while in case you need to roll back. Seachest will be removed when you reboot the system (as it's in /tmp). If you want to retain it on your boot drive, Copy to /tmp instead of moving it. You will need to copy it off /boot to run it each time, as you need to make it executable. Completely fine if you want to hold off for an official fix. I'm not so sure it will be a software fix though, since it affects these specific drives only. It may be a firmware update for the drive, which may just make similar changes to above. As an afterthought, looking through these Seagate utilities, it might be possible to write a user script to completely automate this. Another alternative is to boot onto a linux USB and run it outside of Unraid (would be more difficult to identify drives). *********************************************** TL;DR - Just the Steps I've had to do this several times myself and wanted somewhere to just get all the commands I'll need... Get all /dev/sgYY numbers from list (compared to dashboard disk assignments)... sg_map Download seachest from https://www.seagate.com/gb/en/support/software/seachest/ Extract and copy seachest folder to /tmp Change to seachest and make files executable... cd /tmp/seachest chmod +x SeaChest_* For each drive you need to change (XXXX is suffix in seachest files, YY is number obtained from above)... ./SeaChest_Info_XXXX -d /dev/sgYY -i ./SeaChest_PowerControl_XXXX -d /dev/sgYY --EPCfeature disable ./SeaChest_Configure_XXXX -d /dev/sgYY --lowCurrentSpinup disable Repeat first info command at the end to confirm EPC is disabled. Cold boot to make sure all sorted.
 3 points
 -
Came from 6.9-beta-35 I had some issues where my drives wouldn't spin down using 6.9.0 with Auto Fan. Updated to 6.9.1 and I haven't had any issues that I can notice. I made sure all my dockers and plugins are up to date along with the Nvidia plugin and shut everything down, rebooted and so far everything is green or spun down just like I like it.2 points
-
Again not Asus, if you are man enough then go pfsense, I'm using a Qotom silent passively cooled unit and it is simply fantastic! I believe it can do symmetrical gigabit encrypted, best £280 aid I've ever spent £180.12 16%OFF | Qotom Mini PC with Core i3 i5 i7 processor and 4 Gigabit NICs, AES-NI, RS232, Fanless Mini PC PFSense Firewall Router https://a.aliexpress.com/_m0fcObV Sent from my iPlay_40 using Tapatalk2 points
-
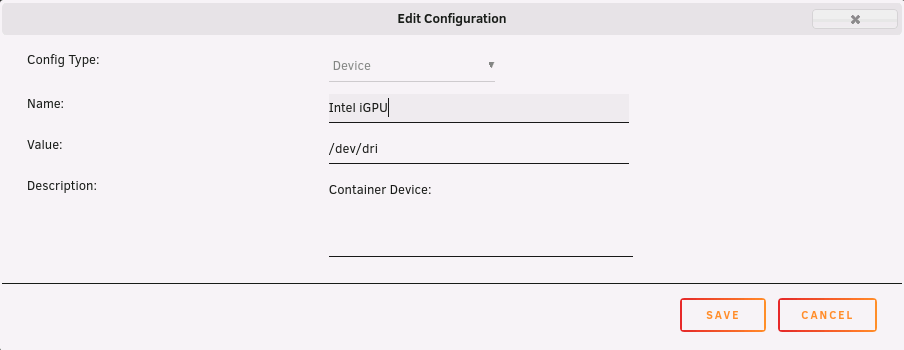
I think you get me wrong... Use the iGPU (QuickSync - this is also Hardware transcoding) not the CPU (this is Software transcoding), simply install my Intel-GPU-Top Plugin that will enable the iGPU and then you have to add a device to the Plex/Jellyfin/Emby container template with the path '/dev/dri' and remove the Nvidia entries: That should be no problem as long as you don't transcoding only 4K files (but 8x 4K transcodes is also too much for the P2000). This is completely off topic here, eventually start another thread and mention me there, or look for something like Intel iGPU and Plex, you even can install the GPU Statistics Plugin from @b3rs3rk and see the usage of your Intel iGPU.
 2 points
 -
To second this, I tried it last night and it seems to be going well. It was easier than I was expecting. I'm just creating a General Support post collating the entries spread across the 6.9.0 & 6.9.1 topics and including the resulting step-by-steps that I took if you don't mind.2 points
-
After doing some digging I believe I have solved my issue. It seems like it is somewhat a known bug on Asus X99 motherboards. Mine is an Asus X99-WS/IPMI. I am on the latest BIOS so updating was not an option. The solution was to add "pcie_aspm=off" to my syslinux configuration. After a reboot I appear to no longer be getting errors. Fingers crossed it stays fixed. If anyone has anything to add feel free to chime in. If I don't have any errors tomorrow morning I'll mark this solved.2 points
-
Done and done. And yeah - totally a 1% problem to have. It's just such a pretty card though...
 2 points
 -
You can type anything into that field. You don't need to use the drop down to select. Personally, I'm undecided whether to allow UD disks to be used there (anywhere). The existence of multiple cache pools has pretty much eliminated the need for UD disks mounted permanently1 point
-
You have a old template and it will always add the ports on a container update. Eventually try to delete the container (note your existing settings down) and pull a fresh copy from the CA App and set it to the same values as before so this won't happen any more...1 point
-
Updating my PuTTY client from 0.62 to 0.74 seems to have done the trick. I guess that makes the SSH updates a GoodThing™.1 point
-
Es gab Lesefehler auf sdf. Welches Laufwerk das ist, siehst du in der Übersicht.1 point
-
...ziemlich sicher, zB https://www.google.com/url?sa=t&source=web&rct=j&url=https://forums.servethehome.com/index.php%3Fthreads/supermicro-x11sc-f-igpu-support.23410/&ved=2ahUKEwin6ITj7qjvAhUCzaQKHeiSBh8QjjgwAXoECAYQAg&usg=AOvVaw2hJLakB1O4WIM1Ddd57eil Gesendet von meinem SM-G960F mit Tapatalk1 point
-
Bonjour, Olivier , 51 ans / romans sur isère responsable réseau pour une communauté religieuse. Je découvre Unraid et cela donne pas mal d'idées. Merci pour ce forum francophone. A très vite😀1 point
-
Okay so jellyfin works but cant figure out plex. Ill try binhex.1 point
-
This is what I said. OK will try later. (made the file and folder, just waiting for reboot) I did not run any beta (for this beta cycle) - my server was too busy these last few months.1 point
-
So, ich hatte jetzt Mainboard, CPU und Speicher, für die Überprüfung, zurückgeschickt. Das ganze war bei Mindfactory bestellt und sie haben es auch nochmals durchgetestet. Anderer Speicher, CPU und Netzteil, mit dem selben Ergebnis. Also Mainboard defekt und ich bekomme ein neues, allerdings zur Zeit nicht vorrätig, ist aber im Zulauf. Ich musste fünf Tage warten, dann bekam ich ein neues zugeschickt. Habe es jetzt ausgiebig getestet und es läuft alles mit UnRAID 6.9.0 stabil und ohne weitere Probleme. Ich möchte nochmal allen ganz herzlich für die Hilfe danken 👍1 point
-
Yeah they are kinda jerks when it comes to helping Docker / Unraid users. They don't care what the problem is, the moment they hear Unraid they stop listening. Oh well. We have been pretty good at solving the problems on our own. Glad it worked!1 point
-
Ich werd mir das dann gleich ansehen.1 point
-
Thank you for this plugin!1 point
-
Bind the GT730 that is for the VM to VFIO (Tools -> System Devices -> Select everything that is related to the card and press Apply), so Unraid can't use the card for video output. Also why are you using the P2000 for transcoding? The i3-8100 has about the same transcoding perfomance as the P2000 and is more efficient than the P2000 and also has no limits in simultaneous transcodes.1 point
-
Au final c'est ok : L'erreur était là : Https 192.168.0.5 : 8123 Le S était en trop Et j'ai viré de mon fichier de config les lignes ssl key et certificat.... En tous cas, ça fonctionne ! Merci pour l'aide 🙂1 point
-
Did you have a trailing slash ("/")1 point
-
Thanks for the response, the docker engine was actually stopped already as well as vm manager per the guide. I did manage to overcome this and regain access by shutting down the server. removing the flash drive and finding the network.cfg file and playing with that. Eventually i downloaded the Unraid 6.9.1 package and restored the default editing the ip address for the server as defined by the network. This gave me access again to the GUI.1 point
-
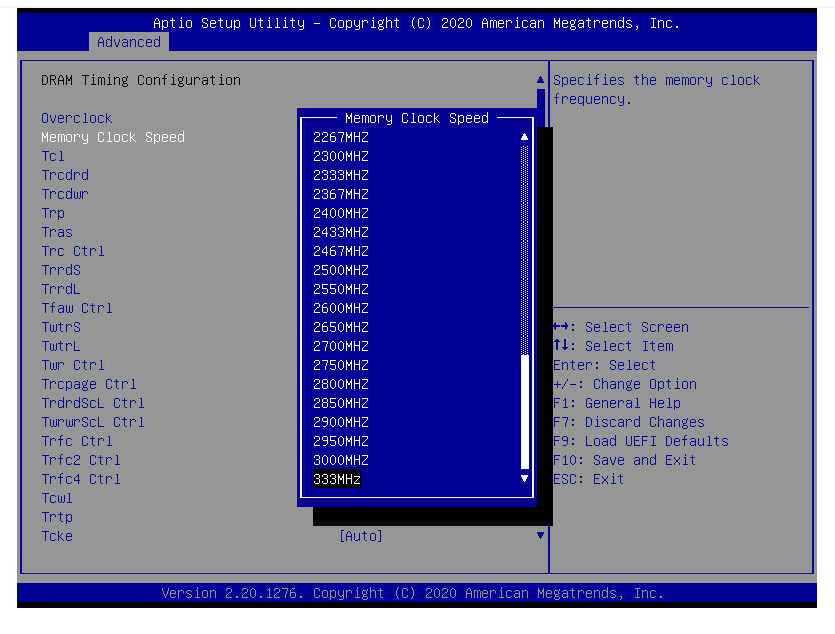
Memory Speed settings in Bios: Since the system is super stable I dont mind to change these settings. However, the memory is recognized as DDR4-3200 in the Bios main screen. Regarding SSDs - I'll try to explain it simple, but if you have more general questions I suggest you post the the general support section. As you can see in my earlier post I have 6 SSDs in two "pools". The small pool is a raid 1, the large pool a raid 10. Once I had my harddisk up and running I created several shares like you can see below. For each share I configured how to make use of the SSD caches. For some shares I dont need caching (NO), for some I want the data to "preferably" reside on the SSD if there is enough space on the SSD (e.g. for my VMs). And for some shares I decided to first write on cache, but once the mover kicks in at night the data gets moved to the harddisks and will be removed from the cache (Yes: Cache or XCache). There is also a "Only" option which means you keep data only on the cache but I see a risk here, should you run out of cache space, especially when the cache drive is shared between shares hence I changed that to "prefer" so data can overflow to the harddisk if a cache runs out of space. So, depending on the purpose you can configure your shares to make use of an SSD cache or not and to what extend. If you have two shares (VM and Data), you could configure the VM share to keep the data on the SSD (Prefer:Cache) and for example to only keep new files on the SSD for the Data share, until the mover gets invoked (Yes:Cache). However, this probably will only benefit you when you copy large amount of data to your UnRaid host over a network connection that can exceed the harddisk write speed (More than 100 - 130MB/Sec). There might be also other reasons to cache data drives, but that could be explored in a separate post :). My network is Gbit / Gbit WIFI and the UnRaid is bonded with 2x1GBit to the network. I dont use a special router since my Internet connection is just a 100Mbit connection. Hope that helped.
 1 point
 -
Alright, yesterday's version was a bit overkill, I turned it down a little and ended up with this: #!/bin/bash for ((N=0; N<5; N++)) do dd if=/dev/sdc of=/dev/null skip=$(($RANDOM % 4*1024*1024*1024)) bs=$((1024 + $RANDOM % 1024)) count=10 &> /dev/null dd if=/dev/sde of=/dev/null skip=$(($RANDOM % 4*1024*1024*1024)) bs=$((1024 + $RANDOM % 1024)) count=10 &> /dev/null done So 5 rounds (per disk) of reading 10 random blocks of a size between 1 and 2 kb, skipping up to 4*2^9 blocks, so that should if I'm not mistaken cover the first 8tb of my 10tb disks, way too much to be cached, with relatively little read activity. Works perfectly fine so far.1 point
-
Unfortunately, I don't have another Nvidia card lying around. This was the only graphics unit in my unraid build, since I opted for a cpu without iGPU. It turns out that after trying the card on a windows machine, none of the Nvidia drivers actually work, even when going back as far as v353, they just turn a black screen, so unless I'm misunderstanding, there is probably something fundamentally wrong with the card. Installing the drivers just throws errors and doesn't actually run other than a rudimentary display via microsoft compatible drivers. I remember a few years back the card used to work properly on that machine, so the card probably got messed up since then. But the card is still good to use to watch unraid booting and changing bios settings so there's that. Thanks for all your help in diagnosing this with me. I should have caught that the graphics card itself was problematic by testing it with the nvidia drivers in Windows beforehand rather than assuming it worked because it was detected by windows and unraid. Hopefully I'll be able to get a new Nvidia card soon so I can finally make use of your awesome plugin!!1 point
-
@ich777 hehe kein thema dachte das würde so reichen mit dem makieren danke auf jeden fall für deine hilfe muss mich erst mal bissel durch fuchsen wie was funzt habe sonst alles immer via proxmox gemacht oder Esxi also ich habe die nvidia-Driver installiert alles andere muss ich dann mal in ruhe machen bin mal gespannt1 point
-
My TVs are connected to 5 GHz wireless, there is enough bandwidth for direct streaming. On another note, I have decided not to bother doing the hardware upgrade later, so I ordered new Motherboard, CPU, PSU and RAM. Motherboard: ASRock X570 Phantom Gaming 4 CPU: AMD Ryzen 5 2400G (I wanted a 3400g but it's nowhere to be found where I live) PSU: Corsair RM850 2019 - 12 SATA connectors RAM: Corsair Vengeance LPX 32GB (2x16), DDR4, 3000MHz A couple USB 2.0 sticks for Unraid. They should all arrive tomorrow. This way I will be able to use both nVME SSDs as well as the 2x 500 GB SATA SSDs I bought. The SSDs as well as the new HDDs are already installed in the case. The LSI controllers also arrived at customs yesterday, waiting for processing. I'm pretty excited about the whole thing, it's my first time using Unraid, and I guess I'll mess up a few things, but in the end it's a learning process. Thank you all for your replies, I appreciate it, you've helped me clarify quite a few things!1 point
-
No I'm not responsible for this part of unRAID but I'm happy to help.1 point
-
No, this is fine. Maybe, what kind of machine do you have? Is there enough space on the cache drive? In my case the server sometimes starts fine. Eventually they have to fix the files for 0.9.5 since it's am alpha. You have to create it in '.../tf/cfg/server.cfg' Search for something like: TeamFortress2 Dedicated Linux Server and you will find all informations.1 point
-
Last week I setup a new Windows Server 2019 (1809) VM and took a while to get SMB up and running, thought this would be applicable for Win10 installs also. Most of these tips are on here so I won't go into great detail about how to do them, but I thought I'd post my summary of "from scratch" changes that got me from fresh install to connected to unraid via SMB. - Needed for guest access GPO: Computer Configuration\Administrative Templates\Network\Lanman Workstation > “Enable insecure guest logons" = Enabled - Needed for secure/private access... guest access to same server will block secure/private server access As my username was different to SMB configured usernames, I added the record into Credential Manager (Windows) - Needed to 'find' server Networking: Ensure Network profile is Private Turn on network discovery, if setting won't save ensure these services are running (in services.msc) · DNS Client · Function Discovery Resource Publication · SSDP Discovery · UPnP Device Host Not sure if it matters, but my VM was also configured on br0 rather than virtbr01 point
-
When you say it's running beautifully .... Have you been able to separate the IOMMU groups out so you can individually pass through selectively what you want? I.e. what are the chances of running a VM with usb, gpu1, sata ssd off main board, M2 off main board all passed through, whilst Unraid used gpu2, sata HDDs off main board as well as off a hba card in pcie slot?1 point
-
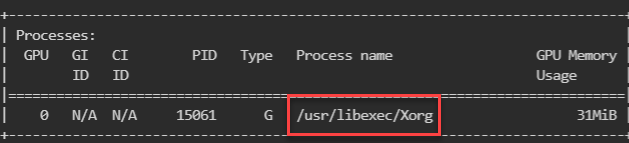
@ich777 I can confirm this update fixes the issue for me. For anyone who's rebooting their server remotely, you can tell if the permanent fix (the update to the nvidia plugin) worked just by running "nvidia-smi" at a terminal prompt. If it's working you will see Xorg running as a process on the GPU:
 1 point
 -
Just an update. Tested both 2 x 16gb on there own no issue.. Had a friend of mine said to increase voltage on memory. WIll test again tomorrow see if i get the issue then up the voltage and try again. Fingers crossed.1 point
-
1 point
-
I believe for Unmineable, your username needs to use this format: ASSET:Address.Worker, so using ADA as an example, you'd set your username to: ADA:D6vEw4k7FKmw99L82QgaG1nud9woBbDURw.BenStark1 point
-
Normally I would have, but I just didn't have a chance to yet. My life is still a bit of a mess after moving (I'm currently sitting on the floor while I type this because most of my furniture won't arrive for another week haha). I'm planning on incrementing the version later today though, but I wanted to get the quick and dirty fix out sooner rather than later.1 point
-
See q27 in the recommended post. Sent from my CLT-L09 using Tapatalk1 point
-
You catch more flies with honey. craigr1 point
-
If the nvme was disk1, then adding parity and letting it build will allow you to replace disk1 with a spinner and let it rebuild then nvme will be free and you can use it as cache and add other spinners to the array as needed. The parity array does not do raid5 or 6, see here for an idea of how Unraid differs from traditional RAID: https://wiki.unraid.net/Overview1 point
-
1 point
-
v3 is still not 'latest' release, its still marked as beta, and until this changes im afraid it will stay tagged as v3, as soon as it gets tagged as 'latest release' then i will merge the change from v3 branch to master and latest will then be v3, make sense?.1 point
-
I like to request Signal-server It is for a private Messenger applications on Android, Desktop, and iOS.1 point
-
This tweak has nothing to do with your RAM usage. The source of your problem must be something else (or you used a path, that targeted your RAM). Do you use transcoding to RAM and use the /tmp or /shm folder? Than this is your problem. Next time you should investigate the RAM usage before restarting your server / containers. Use this command: ps aux | awk '{print $6/1024 " MB\t\t" $11}' | sort -n In addition check the sizes of your Ramdisks as follows: df -h -t tmpfs And finally you could check the size of your tmp folder which is even located in your RAM: du -sh /tmp1 point
-
This can work. The issue is the third PCIE slot on most x570 or B550 boards uses the Chipset. If you do want to do this I would suggest PCIE Bifurcation of a single X16 slot into multiple slots. Now for this to work the board will need to support this and you will need to do your research. But you can find the parts for this at the following link: https://riser.maxcloudon.com/en/1 point
-
Check the settings of all of your docker containers, one (or more) of them is configured wrongly.1 point
-
Im not gonna lie... the performance of this would be terrible. The 3900x and 3950x both have a very limited amount of PCIe lanes... so after the 2nd GPU your performance will suffer horribly even if the motherboard has 3 full x16 slots. Most of the AM4 motherboards when you plug 3 GPUs into them, they will drop the first GPU to 8x, 2nd GPU to 4x, and last one to 2x or 4x only.1 point
-
Fix Common Problems is telling me that Write Cache is disabled on a drive. What do I do? This test has nothing to do with any given unRaid version. For some reason, sometimes hard drive manufacturers disable write cache on their drives (in particular shucked drives) by default. This is not a problem per se, but you will see better performance by enabling the write cache on the drive in question. To do this, first make a note of the drive letter which you can get from the Main Tab Then, from unRaid's terminal enter in the following (changing the sdX accordingly) hdparm -W 1 /dev/sdm You should get a response similar to this: /dev/sdm: setting drive write-caching to 1 (on) write-caching = 1 (on) If write caching stays disabled, then either the drive is a SAS drive, in which case you will need to utilize the sdparm commands (google is your friend), or the drive may be connected via USB in which case you may not be able to do anything about this. 99% of the time, this command will permanently set write caching to be on. In some rare circumstances, this change is not permanent, and you will need to add the appropriate command to either the "go" file (/config/go on the flash drive), or execute it via the user scripts plugin (with it set to run at first array start only) It should be noted that even with write-caching disabled this is not a big deal. Only performance will suffer. No other ill-effects will happen. NOTE: If this does not work for you, then you will either need to contact the drive manufacturer as to why or simply ignore the warning from Fix Common Problems
 1 point
 -
Thanks to thomast_88 for setting up this docker I've set it up and muddled through learning git at the same time and just wanted to post a config I've came up with to let you use the "Linuxserver.io - letsencrypt" docker to reverse proxy the this (gitlab-ce) docker without having to use SSH etc to edit the gitlab.rb config file or any other suggestion I've seen here that involves a workaround of sorts like Gizmotoy's port workaround (although it did work). ##### How to use reverse proxy gitlab-ce with the letsencrypt docker Summary: I use the letsencrypt docker to reverse proxy my home stuff with each service being on it's own host.domain.com:443. I couldn't/didn't want to: NAT 80/443 or custom ports to this docker's built in nginx server so I could use it externally Not mess around with custom editing the standard docker config files I wanted all my URL's in gitlab-ce to show the proper https://host.domain.com/blah.git URL that I could just copy and paste them * These steps assume you have a NAT for letsencrypt:nginx set up correctly to reverse proxy on HTTPS/443. Don't ask for help here regarding getting that set up, please ask in the thread for that docker here Steps 1. Stop the docker 2. Reset your gitlab.rb file to docker/factory defaults 3. Add/Update your letsencrypt ngix config file area for gitlab-ce to use the following config and restart it. proxy_pass http://your.unraid.ip.here:9080; proxy_set_header X-Forwarded-Proto https; proxy_set_header X-Forwarded-Ssl on; 4. Edit the gitlab-ce docker, open advanced settings 5. Edit the 'Extra Parameters:' section and paste in the following; --env GITLAB_OMNIBUS_CONFIG="external_url 'https://host.domain.com/'; nginx['listen_port'] = 9080; nginx['listen_https'] = false" This is the standard config line included in the docker where your supposed to change the DNS name only. The line above changes http:// to https:// and passes config to the dockers built in nginx server to listen for https:// but not enable it's own SSL port and config. Reference: Supporting Proxied SSL https://docs.gitlab.com/omnibus/settings/nginx.html#supporting-proxied-ssl The reference link mention's about including a few more config items I already have them in the default letsencrypt nginx config so I didn't need to add them1 point


.thumb.jpg.25529a82ec4a0fb3d47782b36a1a7049.jpg)