Leaderboard


Popular Content
Showing content with the highest reputation on 03/31/21 in all areas
-
Interesting. Unraid OS 6.9.1 is on kernel 5.10.21 and the referenced patch is not applied. Upcoming 6.9.2 release is on kernel 5.10.27 which does have the patch. Working on finalizing the release now.4 points
-
Big News from NVIDIA Just a few hours ago, NVIDIA added an article to its support knowledge base regarding GPU passthrough support for Windows VMs. While we've supported this functionality for some time, it was done without official support from the vendor themselves. This move by NVIDIA to announce official support for this feature is a huge step in the right direction for all of our VM pass through users. This should also help instill confidence in users that wish to pass through these GPUs to virtual machines without the worry that a future driver update would break this functionality. Let us know what you think about this announcement here!3 points
-
@Boyturtle an update just rolled out. Give that shot. Resolved it for me so far.2 points
-
currently working on it with a glass of rum&coke2 points
-
Hi All, It has a 2.5G network onboard, updated the unraid version on the USB and it looks to have found the network again. All looks good besides my VM which requires a BIOS setting somewhere. Thank you for the help, things are rocking again this side. Regards, Brandan2 points
-
Yes, I know, the server already built it about 1 and a half hours ago. EDIT: Please give my scripts a little bit, I update the versions every two hours and the build only for the Nvidia Driver takes about 30 minutes so the longest time you have to wait after a new driver is released is 2 and a half hours. EDIT2: But the good news is that the automated build is working.2 points
-
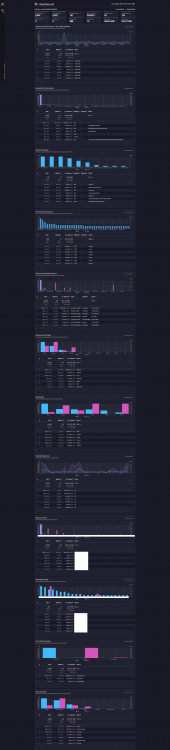
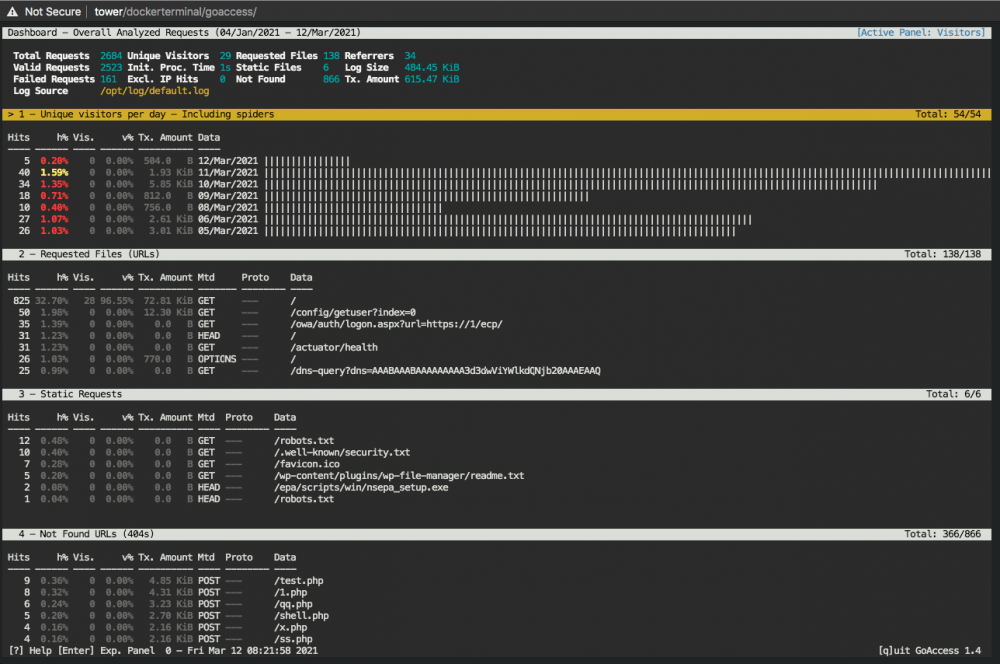
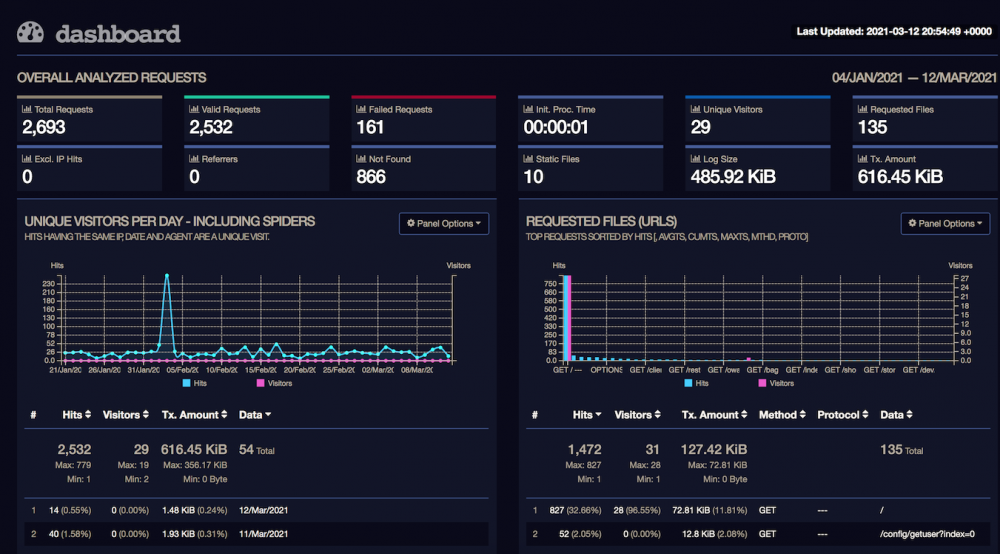
Pre-requisites - You have Nginx Proxy Manager already installed and working. I am using this one from the Community Applications: jlesage/nginx-proxy-manager: - You have installed goaccess from Community Applications but it's not working out-of-the-box. I am using this one from the Community Applications: gregyankovoy/goaccess There are three main steps 1- Have your log generator container (Nginx Proxy Manager) output its logs into a folder that goaccess can, well, access 2- Configure goaccess to look for the right log file 3- Configure goaccess to understand how to parse the log/date/time format Step One: Map Log File Folder I use Nginx Proxy Manager and by default, it puts its access logs in the file /config/log/default.log. This location is non-configurable. Well, actually it's configured in the file /etc/nginx/nginx.conf with the line: access_log /config/log/default.log proxy; ... but nginx.conf is not in a mapped folder so I just left it alone. I just ensured that it mapped its /config/log folder to a folder that both containers could access. In my case, I used /mnt/user/dmz/goaccess/log Step Two: Configure Log File The goaccess container looks for its access logs in the file /opt/log/access.log by default. Luckily, this is configurable in the goaccess.conf file that is mapped to the host's /mnt/user/appdata/goaccess/goaccess.conf file. In there, change the line: log-file /opt/log/access.log To: log-file /opt/log/default.log Step Three: Configure Log Format The other thing to do is to provide the log/date/time file format that Nginx Proxy Manager uses in a language that goaccess understands. The nginx format is defined in the same nginx.conf file mentioned above as: log_format standard '[$time_local] $status - $request_method $scheme $host "$request_uri" [Client $remote_addr] [Length $body_bytes_sent] [Gzip $gzip_ratio] "$http_user_agent" "$http_referer"'; There is a nifty script that does this mapping for you here. The short story is that it has to look like this for goaccess to understand it otherwise you get parsing errors. time-format %T date-format %d/%b/%Y log_format [%d:%t %^] %s - %m %^ %v "%U" [Client %h] [Length %b] [Gzip %^] "%u" "%R" Now, open the file goaccess.conf again and comment out the line: log-format COMBINED and paste the three lines describing the log/date/time format we want. That's it. You should now have a beautiful dashboard of your Nginx Proxy Manager access logs including which subdomains are getting used most (virtual hosts) and which URLs end up going to 404 (possible attacks) and a whole lot more besides! Sample Dashboard: Note that it should update in real time as long as the settings cog on the left has a green dot near it like this: That means that the websocket is connected. BONUS If you want to get all geeky and see the results in a terminal window, you can do that too. Just open the goaccess container's Console window and paste the three lines of log/date/time format into the file ~/.goaccessrc so it looks like this: # cat ~/.goaccessrc time-format %T date-format %d/%b/%Y log_format [%d:%t %^] %s - %m %^ %v "%U" [Client %h] [Length %b] [Gzip %^] "%u" "%R" and run: goaccess /opt/log/default.log And you will get the same information in a terminal window: (Navigate with TAB and SHIFT+TAB button to jump between sections and ENTER to expand selection. q to quit)


 1 point
 -
This container will no longer be maintained or supported as of 23.07.2021. Fork it, modify it, do whatever with it if you need it. Docker container for Ethereum mining with CUDA (nsfminer) with Nvidia OC capabilities. This Docker container was inspired by the docker-nsfminer which was inspired by docker-ethminer. It uses the nsfminer with OC capabilities with the Nvidia driver. This docker will allow for over- and underclocking of Nvidia GPU's for Ethereum mining in a docker. One docker template per GPU. GitHub project: https://github.com/olehj/docker-nsfminerOC Questions about mining specific questions, workers and wallets will not be answered anymore. There's enough guides and information out there in the sky. Google it, please. Support here is limited to the docker container, where most is answered in this post below: Requirements Unraid 6.9+ NVIDIA drivers for your GPU installed* Docker is set to run in privileged mode, it is required for overclocking and for setting the drivers in persistence mode. GPU with at least 5GB memory or more (current requirement is above 4,2GB). *) Verified working Nvidia driver: v460.73.01 (Production Branch) - v465.X does not allow for overclocks with Unraid/docker combo for unknown reasons. Installation Install this docker container using CA (Community Applications), search for NsfminerOC and install! Configuration Variable Default Value Description ------------------------------------------------------------------------------------------- NSFMINER_GPU 0 Set GPU ID to use (open terminal and check "nvidia-smi") NSFMINER_GPUPOWERLIMIT 150 Set power limit for GPU in Watt (set this as low as you can with highest possible hashrates) NSFMINER_POWERMIZER 2 Set PowerMizer performance level (0=adaptive, 1=max performance, 2=auto) NSFMINER_GPUGFXCLOCKOFFSET 0 Set GPU graphics clock offset (under- or overclock your GPU in MHz offset) NSFMINER_GPUMEMCLOCKOFFSET 0 Set GPU memory clock offset (overclock your memory in MHz, NB! often these values are the double of what they are shown as in Windows so just crank it up!) NSFMINER_HWMON 2 Set Feedback level from nsfminer (feedback from the miner, 0=off, 1=temp+fan, 2=temp+fan+power) NSFMINER_TRANSPORT stratum1+ssl Set transport for worker NSFMINER_ETHADDRESS 0x516eaf4546BBeA271d05A3E883Bd2a11730Ef97b Set your worker ethereum address (or mine an hour or so for me if you wanna support my docker work ;) NSFMINER_WORKERNAME unraid-worker Set a worker name NSFMINER_ADDRESS1 eu1.ethermine.org Set address 1 for worker, both must be set NSFMINER_ADDRESS2 us1.ethermine.org Set address 2 for worker, both must be set NSFMINER_PORT1 5555 Set port for address 1 NSFMINER_PORT2 5555 Set port for address 2 NSFMINER_GPUFANCONTROLL 0 Set GPU fan controll, 0 will run auto and other fan settings are ignored. GPU MUST have exactly 2 fan controllers available, else this container will fail if this is used. NSFMINER_GPUFAN1 0 Set the FAN ID 1 of GPU (check fan ID with "nvidia-settings -q fans" in terminal) NSFMINER_GPUFANSPEED1 100 Set the speed in percent of FAN ID 1 NSFMINER_GPUFAN2 1 Set the FAN ID 2 of GPU (check fan ID with "nvidia-settings -q fans" in terminal) NSFMINER_GPUFANSPEED2 100 Set the speed in percent of FAN ID 2 Running View the logs for worker output Overclocking example Some cards will report that they are read-only when trying to overclock them, such as Quadro cards. This is normal behavior as they are factory locked. For on-demand overclocking, open the "Logs" to check the hashrates when the docker container is running. Then open "Console" to enter in tuning data manually to figure out the optimized mining values for your card. When all values are found, store them in the variables in the docker container edit in Unraid. The GPU ID is set to "0", adjust yours accordingly. The examples below is set for a GTX 1070. Set the PowerMizer mode to 0=adaptive, 1=max performance, 2=auto nvidia-settings -a [gpu:0]/GPUPowerMizerMode=1 Adjust the GPU Graphics clock offset on all performance levels, crank it up until it starts giving errors and then back up. If you are on a 3000-series card, you might want to underclock this one instead and save the power consumption (check example settings for other cards below). nvidia-settings -a [gpu:0]/GPUGraphicsClockOffsetAllPerformanceLevels=200 Adjust the GPU Memory clock offset, crank this one up until it gives errors, crashes or decreases in hashrates, then back it up to a stable value. nvidia-settings -a [gpu:0]/GPUMemoryTransferRateOffsetAllPerformanceLevels=800 Finally, adjust the power limit. Decrease this as much as possible until you hit a target where the hashrates fall. Optimally calculate how much power vs. hashrates you can squeeze out. Sometimes some fine tuning with less or more clocks and power draw can give you better profit. Slightly less hashrates with less power draw might be better profit! nvidia-smi -i 0 -pl 135 Other GPU value examples GPU PowerMizer GPU GFX GPU MEM Power limit Hashrates (~) Effective Score -------------------------------------------------------------------------------------------------- RTX 3080 1 (-300)-(-200) 2300-2500 230-235 97.0-98.5 MH/s 0,421-0,419 * RTX 3070 1 (-600)-(-550) 2300-2400 130-135 60.0-60.2 MH/s 0,462-0,446 * GTX 1070 Stock 1 200 800 135 28 MH/s 0,207 GTX 1070 OC 1 100 400 135 28 MH/s 0,207 Quadro P2000 1 0 0 65 15.6 MH/s 0,24 Some cards might have higher factory clocks in VBIOS like these GTX 1070 GPU's. One of these cards is an OC optimized VBIOS/card, the other one just a standard VBIOS/card with less cooling. The target to reach the hashrates might vary, don't use this table for your own input, this is just an example and might be slightly used for a reference of where it should be. The values might need slight tuning after a while as it might wear out the real top performance of the memory chips, or the ambient temperature simply rises etc. *) The effective score of the RTX 3000 cards shows that it might even be better to run at slightly lower hashrates and power limit, than trying to boost it all up, even with just 5 watts. Fan curves You can also play around with the fan curves, setting it low to reduce the noise can also impact the hashrates. But maybe you want to duplicate your docker container for a "optimized run mode" and a "night mode". Adjusting fan curves might require 2 fan controllers on the graphics card, if the docker container fails and the GPU has only one controller, use "auto" setting (default). Adjust fan controller, 0=auto, 1=manual nvidia-settings -a [gpu:0]/GPUFanControlState=1 Adjust speed for fan 1 (same procedure for fan 2, just replace the number with another fan ID), value in %: nvidia-settings -a [fan:0]/GPUTargetFanSpeed=80 Setting up multiple cards/containers root@Odin:~# nvidia-smi Tue Apr 6 15:06:36 2021 +-----------------------------------------------------------------------------+ | NVIDIA-SMI 460.67 Driver Version: 460.67 CUDA Version: 11.2 | |-------------------------------+----------------------+----------------------+ | GPU Name Persistence-M| Bus-Id Disp.A | Volatile Uncorr. ECC | | Fan Temp Perf Pwr:Usage/Cap| Memory-Usage | GPU-Util Compute M. | | | | MIG M. | |===============================+======================+======================| ID -> | 0 GeForce GTX 1070 On | 00000000:04:00.0 Off | N/A | | 51% 76C P2 135W / 135W | 4631MiB / 8119MiB | 100% Default | | | | N/A | +-------------------------------+----------------------+----------------------+ ID -> | 1 Quadro P2000 On | 00000000:83:00.0 Off | N/A | | 92% 81C P0 65W / 75W | 4862MiB / 5059MiB | 100% Default | | | | N/A | +-------------------------------+----------------------+----------------------+ ... The output of "nvidia-smi" in the terminal will show you each GPU ID, this ID you enter under NSFMINER_GPU variable. If you have multiple GPU's: Install first the NsfminerOC container via CA. Configure the first NsfminerOC Click "Add container" and select one of your NsfminerOC templates Configure your second container Repeat steps 1-4 for third, fourth etc...1 point
-
OK..... problem solved i believe. So i got a message from my ISP last week that they were doing maintenance to the entire township and i was included in that. What i didnt know is that my IP address changed 😆. Steam seems to be able to see it both ways now. I will have a friend try to connect and see what happens1 point
-
The mce's are somewhat common when the system initializes the cores and affects certain hardware combinations for some reason, and can be safely ignored.1 point
-
Settings - Notifications1 point
-
Thanks again, Jorge! Have had a few other things to deal with, and being away for a little while, but working on it slowly here and there. Looks like I've at least got the server array back up and running along with my docker services, etc. The NVMe shows up in the unassigned devices as I removed it from the cache pool for the moment while doing some clean up and reworking. So I think I'm back in a good spot to continue with everything. Thanks again! Considering this solved for now!1 point
-
That confirms it's a network problem, you should get close to line speed (1Gbits/s), it's at 20/25% expected bandwidth.1 point
-
Das muss nichts heissen. Aktuelle Dateisysteme besitzen wie Datenbanken einen Transaktions-Puffer (transaction log). Alle Änderungen wandern da durch und der Transaktions-Manager arbeitet diese ab. Sobald abgeschlossen werden die Änderungen als "abgeschlossen" markiert (commit). Bei einem ordentlichen Shutdown werden alle hängenden Änderungen, inkl. das Log selbst, noch synchronisiert. Bei einem harten Shutdown geht das naturgemäß nicht. Das geschieht dann nach dem mounten oder bei einem repair. Wie bei Datenbanken können mehrere Änderungen (Metadaten, Daten, ...) in einer Transaktion stecken. Erst wenn alle Änderungen einer Transaktion erfolgreich abgeschlossen wurden, wird die Transaktion als solche markiert. Also das habe ich noch nie gemacht. Wo hast Du das her? Meiner bescheidenen Meinung nach ist das nicht notwendig. Der Transaktion-Manager wird beim mount ohnehin das transaction-log prüfen und unvollständige Transaktion bearbeiten. Erst danach startet der Parity-Sync. Mag mich aber irren und bin bereit neu zu lernen.1 point
-
v0.3 ist fertig. Jetzt kann man IP-Bereiche freischalten, die Dateien enden auf .ip und der Firewall-Code steht nun ganz oben in der .htaccess.1 point
-
@bonienl There are lots of mover failure messages in this syslog: syslog.txt.zip1 point
-
Yes. IIRC It's been quite a while since I've looked at this. The not displaying only really affects HOST / Custom networks.1 point
-
This setting restricts management access to interface eth0 only, still this interface needs connectivity as before to do upgrades and plugin/docker installations.1 point
-
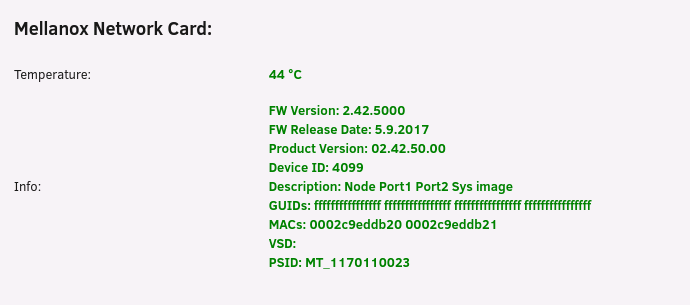
Genau, @ich777 - mit dem Befehl ließ sich dann die Original FW flashen und die PSID hat sich von "IBM1080110023" in "MT_1080120023" geändert. Die kommenden Updates sind somit auch auf dem ganz normalen Weg flashbar Dank dir - mach ich bzw. deaktivier ich1 point
-
Aber wenn du mit dem parameter "-allow_psid_change" hat es funktioniert oder? Überleg dir auch ob du das BIOS der Karte entfernst wenn du den Netzwerkboot nicht brauchst usw, sieht dann so aus: Sollte bei dir mit diesem Befehl funktionieren: mstflint -d 01:00.0 --allow_rom_change drom
 1 point
 -
Hab mal kurz was zusammengeschrieben: Lad dir die entsprechende Firmware für deine Karte runter für eine ConnectX2 zB von: https://www.mellanox.com/support/firmware/connectx2en Entpacke sie zB nach "/tmp/mellanox" am Server Gehe in den Ordner in den du Firmware entpackt hast Gib "/sbin/lspci -d 15b3:" ein und du solltest sowas in die richtung als Ausgabe erhalten: 07:00.0 Ethernet controller: Mellanox Technologies MT26448 [ConnectX EN 10GigE, PCIe 2.0 5GT/s] (rev b0) Gib "mstflint -d 07:00.0 -i firmware.bin burn" (ersetze hier "07:00.0" mit der Geräte ID deiner Karte von Schritt 4 ein und ersetze "firmware.bin" mit dem Dateinamen der Firmware) Danach sollte der Flash-/burnvorgang der Firmware starten Wenn du mehr Infos benötigst markier mich einfach.1 point
-
Welche Karte hast du genau bzw was willst du flashen. Ich hab meine ConnectX2 und 3 damit geflasht und das BIOS entfernt. Vergiss bitte nicht das Plugin basiert auf den Open Source Treibern und die Kommandos sind bei denen ein wenig anders das sind alle verfügbaren: mstconfig mstfwtrace mstmwrite mstresourceparse mstcongestion mstmcra mstprivhost mstvpd mstflint mstmread mstregdump mstfwreset mstmtserver mstresourcedump EDIT: Was meinst du mit nötigen Kernel-Modifikationen?1 point
-
Thank you for your help, that worked perfectly.Server booted with the GUI first try.1 point
-
okay have fix that, think there is something corrupt inside the docker.img? Is that loop3? as you stated. I will try re-create it.. hope my plex files are gucci I get a tone of errors of this nature when starting plex Mar 31 20:46:09 unRAID kernel: BTRFS warning (device loop3): csum failed root 9874 ino 10569 off 8192 csum 0xb8ef9c9e expected csum 0xba489cc3 mirror 1 Mar 31 20:46:09 unRAID kernel: BTRFS error (device loop3): bdev /dev/loop3 errs: wr 0, rd 0, flush 0, corrupt 654, gen 0 Mar 31 20:46:09 unRAID kernel: BTRFS warning (device loop3): csum failed root 9874 ino 10569 off 8192 csum 0xb8ef9c9e expected csum 0xba489cc3 mirror 1 Mar 31 20:46:09 unRAID kernel: BTRFS error (device loop3): bdev /dev/loop3 errs: wr 0, rd 0, flush 0, corrupt 655, gen 0 Mar 31 20:46:09 unRAID kernel: BTRFS warning (device loop3): csum failed root 9874 ino 10569 off 8192 csum 0xb8ef9c9e expected csum 0xba489cc3 mirror 1 Mar 31 20:46:09 unRAID kernel: BTRFS error (device loop3): bdev /dev/loop3 errs: wr 0, rd 0, flush 0, corrupt 656, gen 0 Mar 31 20:46:09 unRAID kernel: BTRFS warning (device loop3): csum failed root 9874 ino 10569 off 8192 csum 0xb8ef9c9e expected csum 0xba489cc3 mirror 1 Mar 31 20:46:09 unRAID kernel: BTRFS error (device loop3): bdev /dev/loop3 errs: wr 0, rd 0, flush 0, corrupt 657, gen 0 Mar 31 20:46:09 unRAID kernel: BTRFS warning (device loop3): csum failed root 9874 ino 10569 off 8192 csum 0xb8ef9c9e expected csum 0xba489cc3 mirror 1 Mar 31 20:46:09 unRAID kernel: BTRFS error (device loop3): bdev /dev/loop3 errs: wr 0, rd 0, flush 0, corrupt 658, gen 0 After docker.img rebuild, plex is gucci again... thanks so much for you help @JorgeB1 point
-
1 point
-
This won't help, if there are uncorrectable errors the corrupt file(s) will be listed in the syslog, you'll need to delete them or restore from backups.1 point
-
This is usually the result of a device dropping offline, see below for more info: https://forums.unraid.net/topic/46802-faq-for-unraid-v6/?do=findComment&comment=700582 That's what likely caused the issues with loop3, which is the docker image and should now be recreated.1 point
-
Wenn du keinen ECC RAM benötigst, gibt es ja viel Auswahl. Zb das ASRock B365 Pro4 kombiniert mit einem Pentium Gold G5400? Kommt auch drauf an wie viel Leistung du benötigst. Oder ein neueres Board wo direkt auch 2.5G LAN dabei ist und 8 SATA Ports wie das Gigabyte W480M Vision, kombiniert mit einem G6400. Das Board ist allerdings deutlich teurer.1 point
-
I had the same issue. Try replacing repository with olehj/docker-nsfmineroc:latest1 point
-
Back about ten years ago, I decided I had a storage space problem. So I looked around to see what was available. I don't remember what was around at the time but I came across the unRAID product. So you load something on an USB and then boot to it and it then sees all the attached drives. Create shares, add data and you're good. It has data recovery as well in case of drive failure. Sounded pretty much agnostic as far as motherboard hardware was concerned. Interesting concept. And an online community with all kinds of info. Like any IT guy with 20+ years of hardware experience I had accumulated assorted old/unused small drives and out of date motherboards. Let me slap together something as a proof of concept thing real quick and see what happens. This was just as SATA was coming out. But my old boards only had IDE Master/Slave stuff. It was just stuff I had laying around. Got four assorted drives of unknown heritage from the junk box and stuffed them into an old case. Made the bootable USB and fired the whole mess up. Got the web console up and poked around. Yea, all the drives were listed. OK, biggest drive will be parity and the assorted leftovers will be drive space. I liked that idea because you could use what you had on hand, they didn't need to be the same size. Probably had a total of less than one TB of drive space scattered across the entire box. UnRAID got done prepping all the space and I set up some shares and copied test files to them. That was pretty straight forward. So I let it run a few days as I went on to other stuff in life. I brought the console up a few days later and saw that I had a drive failure. The drives did come from the junk box so that was sorta expected. Ok, let's see how this data protection things works. The shares were still there and so was the data. The parity drive was doing it's job. Nice. That's working as advertised. Almost got me sold at this point. Back to the online community and the assorted FAQ's. How do you recover the drive/data? Shut down, pull bad drive and insert another drive of same or larger size. Click a few buttons and the system kicks in and the data recovery begins and then new drive is repopulated with data. Only downtime was swapping out hardware. From the user point of view I couldn't tell anything was going on in the background as the data was being recovered. Ok, I'm sold. Take my money now. Bought a couple keys and a pair of USB drives in September of 2011. Don't remember for sure but I think they had a sale or something going at the time. I'm on my second specially built production server now. Got the second USB on the test box. it's just just an old desktop stuffed with the smaller drives I have pulled from the production box as I upsize it. 23 TB scattered across 8 drives with Plex running on the SSD. Yes, I'm happy with the product.1 point
-
The error 43 is the exact driver shenanigans they pull with video cards, but with virtual functions its unfortunately even more difficult to get around. A couple things you can try: * instead of running the full installer, open the executable (.exe installer) with 7zip or the like, and manually install the drivers for your OS (using the .inf files) * test against a different version of windows 10 to verify whether its locked to a specific build type (education, pro, pro for workstation, or an enterprise LTS build) * read through the release notes for earlier driver versions in order to find one that has the best chances for success; 2017 or earlier is likely your best bet in my experience - note, this may require a firmware downgrade of your card, which I've very limited personal experience with1 point
-
Not necessarily. There are still many good uses for unassigned devices: Plug in an external USB drive and backup share data to it automatically via a UD script Use a USB device as a location for the syslog A UD for VMs is still preferred by some A UD as a download, personal cloud data, transcode or media conversion location may still be preferable in some cases over a cache pool Unassigned Devices supports formats such as NTFS which allow these devices to read in Windows outside the array.1 point
-
It's a long-shot but you may want to try WinOF v5.50.54000 (the one that's allegedly for Server2019 only) Worked fine with Win10 LTSC (1809) and ConnectX-21 point
-
Post it here, if you feel like editing it you can delete it later. Trust me, you are not the dumbest person on this forum.1 point
-
I was having issues getting ProFTP running again after upgrading Unraid to version 6.9.1 using ProFTP 1.3.7a. ProFTP just would not start and I could not get anything in the log. I tried enabling debug logging, but still nothing. I removed the plugin and did a clean install multiple times and still nothing. Then I stumbled upon running this command in terminal sudo -u root /usr/local/SlrG-Common/usr/local/sbin/proftpd -c /etc/proftpd.conf which resulted in this error: 2021-03-30 20:12:19,459 TOWER proftpd[24730]: fatal: unknown configuration directive 'IdentLookups' on line 24 of '/etc/proftpd.conf' So looking at the config file I removed this section at lines 22-24: # Speedup Login UseReverseDNS off IdentLookups off Tehn ProFTP started without any issues.1 point
-
If you want it as a separate module, you need to specify export CONFIG_TLS_DEVICE=m When you specify it as "y", it is compiled into the kernel (becomes part of it).1 point
-
Hopefully this opens up the possibility of SR-IOV at a later date1 point
-
Common issue is not selecting the codec that is GPU accelerated.1 point
-
My best for a Linux machine was 4years. We moved and I thought it was safer for me to shut it all down than to carry the UPS and pray the drive didn't get bumped in the back of my car for the 15minute drive. lol1 point
-
Apologies all for the lack of updates on this project. I'll be picking it back up and working on it again very soon. I shall update you all here once I have some news.1 point
-
Actually the devs can do something about it I made a correction to not flag mover messages.1 point
-
The first one failed to mount but the second one did and I was able to recover about 50GB of appdata and the docker.img. Thanks for all of your help!1 point
-
...das ist "normal"...ein "Feature" des Docker Daemon, glaube ich...hatte da auch vor vielen Jahren Probleme das zu verstehen. Ich habe seitdem meine Docker alle in einem anderen VLAN und dann keine Probleme. Das braucht aber einen VLAN-fähigen Switch und Router. Edit: Ich muss mich korrigieren, das VLAN allein hilft da nicht...brauchte noch ein externes Interface oder eines mit NAT dazwischen 😅 (habe das Feature aber bisher schon ewig nicht gebraucht). ...ist leider aktuell so...liegt wohl am Template/Dockerfile des Docker-Maintainers ...funktioniert aber trotzdem. Wenn Du auf der custom bridge bist ist alles offen, keine extra Portweiterleitungen nötig. Das Web-UI ist, glaube ich immer auf port 9000 erreichbar. Probier es aus. @mgutt hatte vor einiger Zeit mal das Template gebaut und den Support-Thread eröffnet. Ich nutze iobroker nicht, sonderm nur Node-Red, daher kann ich da nicht helfen....ist aber alles mMn eher nur Kosmetik.1 point
-
Are you getting errors, or is it converting files? Just because you have hardware acceleration enabled, does not mean the CPU will not be used. The CPU is still used for decoding, audio encoding and remixing. If the task is only those, then it will use 100% CPU. Sent from my Mi MIX 2 using Tapatalk1 point
-
Hey team, I'm getting ready to push another lot of changes to the staging branch. I have been busy developing a new plugin system for Unmanic over the past 2 weeks. I chose not to merge the current staging changes into the master branch as there was identified some additional issues with conversion tasks and cache files not being delete. I am hoping that the changes that I push to the staging branch tonight fix those. But as always, if you update tomorrow and are still having issues, let me know and I will dive deeper. I have begun writing some documentation on using Unamnic. You can find this here: https://docs.unmanic.app/ I want to give a shout out to @Cpt. Chaz as he has been putting some decent effort into making great video guides on setting up Unraid and he has made some great ones on Unmanic to date. He has provided me with some sweet updated graphics for Unmanic logos and he is taking it upon himself to create some more in-depth guides on using the application. Check out is first Unmanic video tutorial here: With more to follow. Cheers guys.1 point
-
I do prefer the mixture of the both. I code up a bunch and drop all that into User.Scripts so I can click a button and it does its things. There's a lot to be said about a nice interface and knowing how things work in the background. I've always been intrigued with how things work in the background and it cracks me up watching people search for that "button". However, you are totally right you can win or loose a user if the interface is to complicated or simply not there. unraid has come a long way for me since 2009 when I started using it the interface was very limited, but it worked very well. Along came some really smart people both internally to limetech and community members who continue to add their spins and polish. Do yourselves some favors. If you come up with any ideas no matter how wacky make sure you submit ideas for requests in the forums. Docker/Plugin creators do look there as well as members of limetech. You never know what ideas they might implement.1 point
-
I made a correction for this. Thanks for reporting.1 point
-
Here is the resolution since Google brought me first to this page instead of any let's encrypt support pages and the official support thread did not link to any support thread or post any resolutions: https://www.linuxserver.io/2018/01/11/psa-changes-to-our-lets-encrypt-container/ In the unraid GUI, select 'Edit' in the Lets Encrypt container, and expand 'Advanced Settings' change HTTPVAL variable from 'false' to 'true'1 point
-
Just one quibble, the parity drive does not have a format, so don't bother trying. It's going to be *completely* overwritten.1 point