Leaderboard


Popular Content
Showing content with the highest reputation on 04/10/21 in Posts
-
Schön zu hören!! Ich konnte leider nicht früher schreiben, aber den Grund hatte ich ja schon genannt. Ich muss zu deinem Phänomen sagen, dass ich noch in meiner ersten Woche mit Unraid auf ovmf umgestiegen bin und daher den vendor-reset sowie den alten navi-patch nie mit seabios betrieben habe. Kann gut sein, dass dein Problem allein durch den Wechsel auf das UEFI bios gelöst wurde. Noch eine Frage zu deiner GPU.. Wenn du deine verschiedenen VM's über das OS neustartest, funktioniert der Sound? Hast du kurzzeitig merkwürdige Fragmente auf dem Display? Oder funktioniert alles reibungslos? Zu der Treiberinstallation.. Bei mir selbst verhält sich die Treiberinstallation exakt identisch zu einer Installation auf Bare Metal. Kann aber auch bei Windows gern mal an vorherigen fehlgeschlagenen Installationen o.ä. liegen. Windows bereinigt sich selbst ja nicht so "gut" Kann dir hier sonst noch für spätere Situationen "DDU" - einfach mal googlen - empfehlen. Damit konnte ich Windows eigentlich immer überzeugen Uff 💚2 points
-
I was waiting for a couple of minor revisions before upgrading from 6.8.3, just did it this morning, straight to 6.9.2, the update was seamless. I even added a disk after I shut down for the update and it rebooted just fine with the update and detected the new disk that I added to the array. One issue is with the VNC browser viewer for VMs. same as here: Disabling adblock didn't help but clearing browsing history does the trick. For anyone interested, under Chrome, you don't have to clear your whole history (I definitely didn't want that), you can clear only the "Cached images and files" from all time and you're good to go. It won't change much in practice, it just forces Chrome to redownload everything it put in cache which is exactly what we want here. Other than that, I wish we had an easy way to test features in a non-production environment in Unraid without buying another license and having other dedicated hardware. Making Unraid work as a VM in Unraid requires a lot of workarounds currently.2 points
-
Please provide the instructions for doing this in the Official Unraid Manual (the one you get to by clicking lower right-hand corner of the GUI) and not just in the release notes of the version number when the changes are introduced. Remember that many folks are two or three releases behind and then when they do upgrade they can never seem to locate the instructions which results in unneeded queries that the folks who provide most of the support for Unraid have to deal with. Having an updated manual section that deals with these changes makes pointing these folks to find what they will have to change a much similar task... EDIT: I would actually prefer that you link directly to the manual sections in the change notes. That way the information will be available in the manual when the changes are released!2 points
-
We're working on a design that lets driver plugins be automatically updated when we issue a release.2 points
-
Having any trouble setting up an Unraid 6.9 Capture, Encoding, and Streaming Server? Are you a streamer who uses Unraid? Let us know all about it here!1 point
-
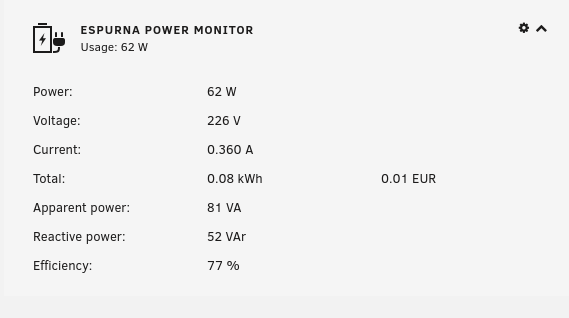
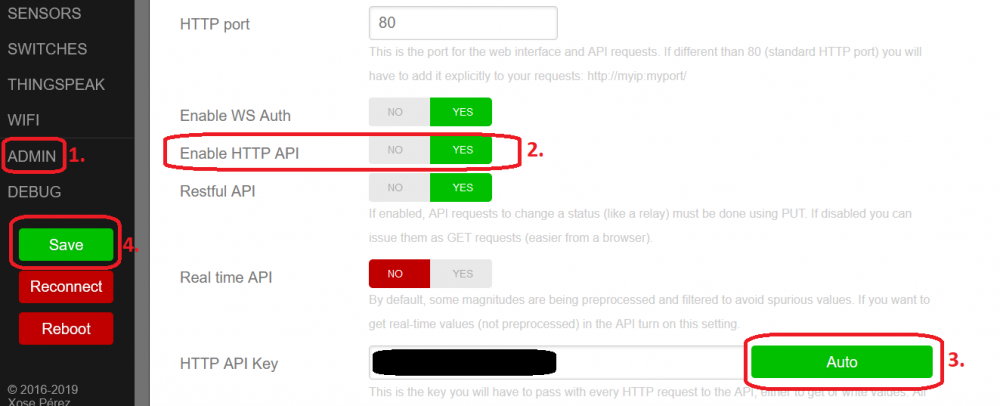
Hi guys, here is the power monitor for your ESPurna device. The plugin works like the Tasmota Power Monitor. You have to activate the API on your ESPurna device and enter the key in the plugin. To enable the API from your ESPurna device go to the WebUI and click on: 1. Admin 2. Enable HTTP API 3. Auto 4. Save If you find a nice logo for the plugin, please send it to me. Thanks to ich777 for testing. Created and tested with Unraid 6.9.1. Installation as usual... https://raw.githubusercontent.com/Flippo24/espurnapm-unraid/main/espurnapm.plg
 1 point
 -
This release contains bug fixes and minor improvements. To upgrade: First create a backup of your USB flash boot device: Main/Flash/Flash Backup If you are running any 6.4 or later release, click 'Check for Updates' on the Tools/Update OS page. If you are running a pre-6.4 release, click 'Check for Updates' on the Plugins page. If the above doesn't work, navigate to Plugins/Install Plugin, select/copy/paste this plugin URL and click Install: https://s3.amazonaws.com/dnld.lime-technology.com/stable/unRAIDServer.plg Bugs: If you discover a bug or other issue in this release, please open a Stable Releases Bug Report. Thank you to all Moderators, Community Developers and Community Members for reporting bugs, providing information and posting workarounds. Please remember to make a flash backup! Edit: FYI - we included some code to further limit brute-force login attempts; however, fundamental changes to certain default settings will be made starting with 6.10 release. Unraid OS has come a long way since originally conceived as a simple home NAS on a trusted LAN. It used to be that all protocols/shares/etc were by default "open" or "enabled" or "public" and if someone was interested in locking things down they would go do so on case-by-case basis. In addition, it wasn't so hard to tell users what to do because there wasn't that many things that had to be done. Let's call this approach convenience over security. Now, we are a more sophisticated NAS, application and VM platform. I think it's obvious we need to take the opposite approach: security over convenience. What we have to do is lock everything down by default, and then instruct users how to unlock things. For example: Force user to define a root password upon first webGUI access. Make all shares not exported by default. Disable SMBv1, ssh, telnet, ftp, nfs by default (some are already disabled by default). Provide UI for ssh that lets them upload a public key and checkbox to enable keyboard password authentication. etc. We have already begun the 6.10 cycle and should have a -beta1 available soon early next week (hopefully).1 point
-
Undervolten bringt nicht viel und du riskierst nur Instabilität. Beide schaffen um die 10W. Such im deutschen Forum nach der jeweiligen Bezeichnung, dann wirst du fündig. Kommt drauf an wie viele VMs schlussendlich darauf laufen sollen und was die so an Leistung benötigen. Ansonsten kannst auch erst mal mit einem i3 anfangen. Nur für den Server ist das egal. Ich würde 2666 Mhz nehmen, weil das vom Xeon unterstützt wird. Kommt auf die Menge an Platten an. Ab 14TB rechne mit 30W Stromaufnahme pro HDD beim Hochfahren. Darunter mit 20W. Die PicoPSU hat nicht viel 5V Leistung, also nicht sonderlich für viele SSDs geeignet, aber wenn sie reicht, ist sie das sparsamste Netzteil.1 point
-
Danke für den Tipp bezüglich der cfg-Files, die benötigte ist die /boot/config/smart-one.cfg [VMware_Virtual_NVMe_Disk_VMWare_NVME-0000] hotTemp="11760" maxTemp="11780" Einen feature request werde ich morgen erstellen, wobei ich kaum glaube, dass die Anfrage auf der road map landet.1 point
-
Good night, i've made 3 others untranslated files : /CA Auto Update/autoupdateapps.txt /CA Config File Edit/configedit.txt /Disable Security Mitigations/disablesecurity.txt I go to sleep, it's 11:32PM here1 point
-
Thank you, i've done all the untranslated french in the presents files, made the correction needed in settings.txt (display settings was wrongly translated), commited all the changes in my fork and pushed it to the master, i'm not very familiar with git-hub, i hope it was the good way to proceed1 point
-
Es gibt dass Tool "stress". Ich weiß nicht ob das beim Nerd Pack dabei ist. Wenn nein hier habe ich erklärt wie man das installiert (runterscrollen):1 point
-
No If you always use GUI mode, then set it as the default via Main, Boot Device, (click on Flash), syslinux configuration1 point
-
thanks, @binhex! It did the trick!1 point
-
Upgraded from 6.9.1 to 6.9.2 and no issues picked up so far. Thanks to the Unraid dev team!1 point
-
Glad you were able to get it working!1 point
-
Thank you so much, these steps are what I needed to remove my last errors and get back to all checks passed. Much appreciated!1 point
-
If you need me to give you logs or anything else, please let me know i'll gladly provide! Thanks for at quick response!1 point
-
Danke für den Tip. Versuche ich heute abend einmal. Gruß Frank1 point
-
Not quite as the licence is tied to the GUID of a particular drive. the easy way to do what you want is to get a new “Pro” licence linked to a new USB drive. You then copy the ‘config’ folder off the current USB drive to transfer all your current settings to the new USB drive. You can then use the existing drive with the Plus licence for the secondary server. You can set up the old drive as if it were a new flash if you want, but if doing so make sure you first copy the licence file off the existing drive so you can then put it back after recreating the drive to keep it licence.1 point
-
yep i got stuck on this myself and wrote up how to fix it, see Q2:- https://github.com/binhex/documentation/blob/master/docker/faq/qbittorrentvpn.md1 point
-
Does this mean I can now remove the vbios from my gaming VM? Is there a performance benefit? Does it perhaps pass the GPU "more directly" through or something like that?1 point
-
Hi, Well, now I feel a bit stupid. Of course I had it in the configuration, I did not think of what it meant when I installed it the first time. I removed everything with MQTT/HomeAssistant and the queries stopped. Thank you!1 point
-
Yes, it is my network problem. I solved it by using the proxy and the docker page is now displayed normally1 point
-
I actually just requested this from @ich777 and he had it done the same day. Amazing. it's on CA now! Donating to him now if anyone else is interested too. https://unraid.net/blog/want-an-unraid-case-badge1 point
-
Thank you! Should have been obvious to me, but I didn't know the new version was out yet 😅1 point
-
Unraid doesn't work.1 point
-
You can also flash a Tasmota device with ESPurna and vice versa from the WebUI from what I remember back when I tried Tasmota.1 point
-
Finally got an opportunity to try some things. - Putting the server to v4+v6 did not further the error - Added "-o tls=yes" in the ARG line to try and force it to TLS and it did pop a new error indicating keys are not functioning. Due to the last error, and your ability to send email, I'm going to demise that it's something misconfigured or not configured on my system and the feature is functions (thanks for that!). Mine is pretty much out of the box with only a few dockers/plugins/VMs for internal usage. I've not setup remote access/administration so I've not had a need for nginx or any other similar type of remote tool. I'm guessing something along this line needs setup in order to establish TLS connections. Dockers do have internet access (like Emby, Plex, etc) so I know the bridge is working. I'll need to do some system troubleshooting to see if I can figure this part out Thank you so much for all your hard work, it is very much appreciated! ed1 point
-
They didn't lock it, they just refused to fix a bug (hardware reset) that made pass-through unusable. As soon as the community started to build working fixes, AMD's next generation didn't have these issues, but the fixes weren't backported to previous gen. I should also note these hardware reset problems have never appeared in AMD's professional GPU lineup (Quadro competitors), funny that.1 point
-
Haha yeah it's super expensive here, I calculated that at a rate of $0.21AUD/kWh. I have flat rate electricity (included in my rent) so I can play around a bit, but it would have to cost someone less than $0.035AUD/kWh to be profitable with an RX 580. But hey, it's max 14c (57f) here today, and mining heats two rooms of my house 😂1 point
-
Haaa. Jetzt scheint es zu gehen. Folgendes hab ich jetzt durchgeführt: - Wiederherstellung des ursprünglichen Unraids - Update auf die neueste Version V. 6.9.1 auf V. 6.9.2 (Hatte ich vorher nicht gemacht) - Bereinigung der Kernel-Helper Dateien und Deinstallation des Dockers - Neustart und Neuinstallation des Kernel-Helpers - Nur die Option bei vendor-patch auf true setzen - Dateien auf dem USB-Stick getauscht - Win10VM nun von Seabios auf OVMF gestellt Neustart der VM geht und Herunterfahren und Wechsel zur MAC-VM und dessen Neustart geht auch. Einzig bei der Installation der Radeon-Software unter Win10 und setzen des Punktes "Werkseinstellung" habe ich mal kein Videosignal bekommen. Auch nicht nach einem Unraid-Neustart. Hab dann Unraid beendet, wieder gestartet, die Radeon Software zu Ende installiert und seitdem bisher keine Probleme mehr gehabt.1 point
-
Empfehlen kann ich dir das Gigabyte C246M-WU2 oder das Gigabyte W480M Vision. Hier die CPUs für C246: https://en.wikipedia.org/wiki/List_of_Intel_Coffee_Lake-based_Xeon_microprocessors Und hier für W480: https://en.wikipedia.org/wiki/List_of_Intel_Comet_Lake-based_Xeon_microprocessors Oder von AMD einen 4000er Ryzen mit einem B550M Board von Asus, ASRock oder Gigabyte. Allerdings gibt es wohl nur das ASRock Pro4 was zu deinem Bedarf passt: https://geizhals.de/?cat=mbam4&xf=11924_2~1244_6~317_B550~4400_%B5ATX&sort=t&hloc=at&hloc=de&v=e Wie da der Stromverbrauch ist, kann ich dir leider nicht sagen. Der i7-8700k würde auf das C246M-WU4 passen: https://download.gigabyte.com/FileList/Document/server_cpu_support_c246m-wu4_200303.pdf Nur dann ist eben kein ECC RAM möglich. Wobei die Frage ist, ob man das System erstmal mit der CPU aufbaut und auf ein gebrauchten Xeon hofft?!1 point
-
this is correct, however i have enhanced binhex-minecraftserver so that you can now run whatever jar you want, and i also allow the ability to switch java version (8 or 11), although it is still a single server per container. im going to include both versions, hopefully this will allow users to run papermc and other minecraft servers which still run best on java 8, at least that is the hope. that is a question for the developer of mineos-node, as i only package what is available, create 'issue' here:- https://github.com/hexparrot/mineos-node/issues1 point
-
thanks, its always appreciated.1 point
-
...das geht bei Intel nur mit Server-Chipsatz....hab ich da was übersehen, dass Du ECC wolltest? Mea Culpa, Sorry! 😪 Bei S1151v2 gehen dann XEONs und alles bis i3, kein i5, i7, i9....bei S1200 *nur* XEONs1 point
-
On one of my servers I do, but on the other it is gone....1 point
-
Yep, Unassigned Devices, i.e; networked storage from unRAID's perspective. I don't have cache pools, I don't even have parity. My server is a single small SSD and all storage is on NFS shares. I only used unRAID for the apps when I got it, then I switched to Fedora Server but I got it back online 'cause there's always something fresh and cool and unbelievably easy to manage by the unRAID's dev community it's hard to stay away. To sum it up, I can now create a share on my little SSD then add UDs as cache pools to it. Correct? It seems like nice concept if the main storage is mechanical. Though if it's flash-based I hope they implemented some sort of referencing mechanism so the clients can access the UD-based cache directly at the servers providing them, more or less like DFS Namespaces so it doesn't have to route trough unRAID. I think I'll obsess with that today, I feel it already. Thanks that's really helpful. I had already. Basically unRAID shares nothing. It provides nothing to the network but its more like a data processor--well, the apps running on it. Thanks again to both for answering. It's Friday here so, have a great weekend!1 point
-
...bei 1151 genau hinschauen...gemeint ist 1511v2....die sind zwar pin-kompatibel, aber es gibt immer noch "alte" v1-er MB am Markt und eine v2-CPU läuft dann schonmal nicht. Gegen einen S1200 spricht eigentlich aktuell auch nix, denke ich....aber vom neuen 2066er auf jeden Fall die Finger lassen ....jedes Kernchen leistet da einen kleinen Beitrag...aber nicht wesentlich. ...eine 10G braucht das auch nicht, aber ab dann ist eher Schluss mit unter 20W....vor allem wenn es dann 10GBE-T / RJ45 sein muss. Interessant wird es für die M.2-NVMe .... Insgesamt auf weniger Komponenten setzen, wenn es ein Stromsparer werden soll, zB nur 1 NIC, 1 RAM Riegel, keine "dicken" Kühler, keine dedizierte GraKa, kein Gaming MB mit "hunderten" USB und Audio / Video-Out Optionen, nur on-board SATA vom Chipsatz, kein IPMI Bei Intel: Ein C246 MB (mATX) wäre da der "sweet-spot"....wenn man aktuell eines findet, wie das Gigabyte C246M-WU4 -> https://geizhals.de/gigabyte-c246m-wu4-a2019282.html Als Desktop ein https://geizhals.de/asrock-b365m-pro4-90-mxb9t0-a0uayz-a1963468.html?hloc=de bei AMD: 🤐1 point
-
Die Capture Card wird ja eine eigene GPU besitzen. Dh die braucht selbst keine um die Stream-Datei zu erstellen. Allerdings ist die Frage ob beim Upload zum jeweiligen Anbieter der Stream noch mal transcodiert werden muss. Weißt du das? Also nur als Beispiel: Sagen wir mal die Capture Card erstellt einen Quicktime Stream, aber der Anbieter erlaubt nur H264, was die Capture Card nicht unterstützt. Dann müsste eine weitere GPU zum Einsatz kommen oder die CPU müsste diesen Job erledigen, was natürlich sehr ineffizient ist und eine hohe Last verursacht. Das halte ich nicht für möglich. Denn da wären wir schon bei einem Problem was VMs so mit sich bringen: https://forums.unraid.net/topic/103212-stromverbrauch-von-gpus-wenn-vm-aus-ist/ Dh sobald man die VM herunterfährt, geht der Verbrauch der GPU und vermutlich auch der Capture Card nach oben. Denn die schalten nur in den Leerlauf, wenn der Treiber das ihnen mitteilt und der ist ja nicht mehr aktiv, wenn die VM aus ist. Es würde also sparsamer sein die VM im Leerlauf zu lassen. Ob das auch im Standby der VM so ist, weiß ich leider nicht. Hat spaceinvader in seinem Video meine ich auch leider nicht getestet. Allerdings haben wir ja trotzdem GPU + Capture Card. Die beiden zusammen werden ja sicher schon 20W ziehen: https://www.techpowerup.com/review/nvidia-geforce-rtx-3080-founders-edition/31.html Vor allem wenn du zwei Ausgänge verwendest. Also wenn ein Ausgang zur Capture Card geht und der andere zu einem Monitor. Gerade bei Multi-Monitor haben die Grafikkarten aller Hersteller massiv bei der Effizienz nachgelassen: Davon ist in Linux Umgebungen abzuraten. Als ich würde jetzt keinen Rocket Lake (Cypress Cove) oder so nehmen. Bei Ubuntu müsstest du dafür zB die neueste Beta Version nehmen, da es da noch keine stabile Version für gibt. Unraid wird vermutlich laufen, da die neuste Version einen aktuellen Kernel verwendet, aber wenn irgendwas nicht geht, stehst du da mit der Hardware da, die du nicht gebrauchen kannst. Nun ja, sagen wir die VM startet nicht. Wie willst du auf die Unraid WebGUI gehen um das zu prüfen. Mit dem Smartphone? Also wirst du Unraid im GUI Modus verwenden. Den Monitor bekommst du dann aber nur noch von Hand aus, da Unraid ja durchgehend läuft. Auch die Frage welche Tastatur / Maus du da holst bzw mehrere?! Und die Powertaste am Rechner ist auch mit Unraid verbunden. Also da gibt es schon ein paar Fallstricke. Es gibt für alles natürlich Lösungen, aber das meine ich eben mit "zu stressig", denn einen normalen Client mache ich an und aus wie ich es gewohnt bin. Ich habe kein Gaming System, sondern möchte einen effizienten Storage. Daher habe ich einen Xeon E-2146G und ein Mini ITX Board. Für dich wäre zB ein Xeon W-1290P eine Option. Ich warne dich aber gleich vor. Teuer ^^ Alternativ vielleicht auch ein W-1270P. Wobei die W-1200 Serie nicht nennenswert stärker ist als die E-2100G oder E-2200G Serie. Also auch was älteres gebrauchtes wäre absolut ok und stromsparend. Wobei auch ein AMD System eine Option wäre. zB ein 5800X, aber von Strom sparen kannst du dich dann ganz sicher verabschieden. Der zieht mit einem X570 Chipsatz alleine schon 25W. Auch gäbe es dann keine GPU für Unraid (nicht Pflicht, aber dann geht auch kein GUI Modus mehr). Daher vielleicht eher einen 4750G mit einem mATX B550 Board. Je nach Mainboard wären hier unter 10W möglich. Hier kurzer Vergleich der CPU Leistung: https://www.cpubenchmark.net/compare/AMD-Ryzen-7-PRO-4750G-vs-Intel-Xeon-W-1270P/3789vs3839 Nachteil: Keiner der beiden unterstützt PCIe 4.0, wobei du das jetzt denke ich aber auch nicht auf der Liste hattest.
 1 point
 -
On the other hand I suppose it takes resources from the GPU, which can certainly cause other issues (drop in fps, etc.) As most thing, it is probably a compromise depending on the hardware at hand for every one (network bandwidth, GPU resources, server resources, etc.)1 point
-
1 point
-
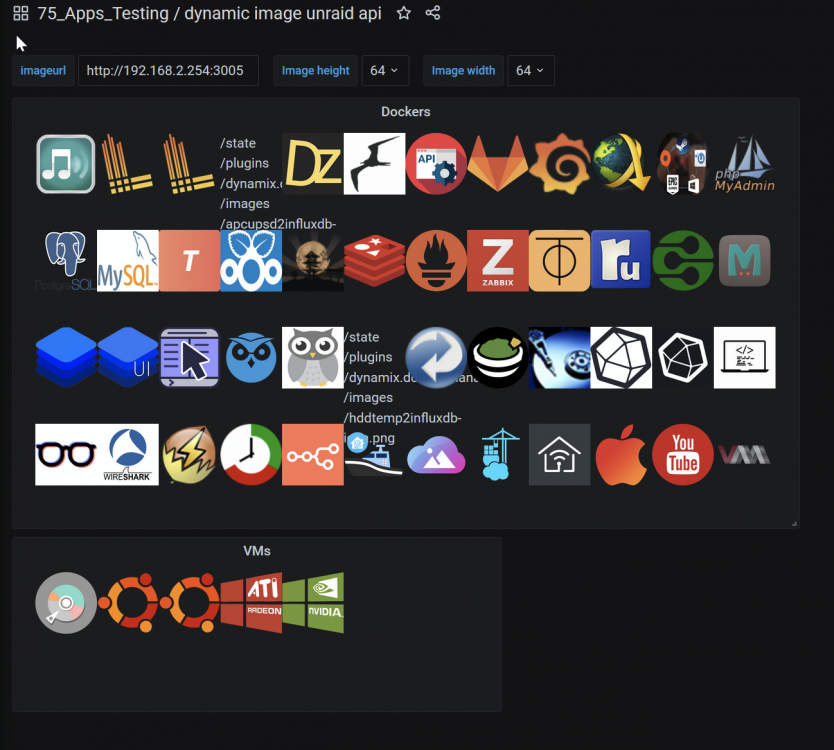
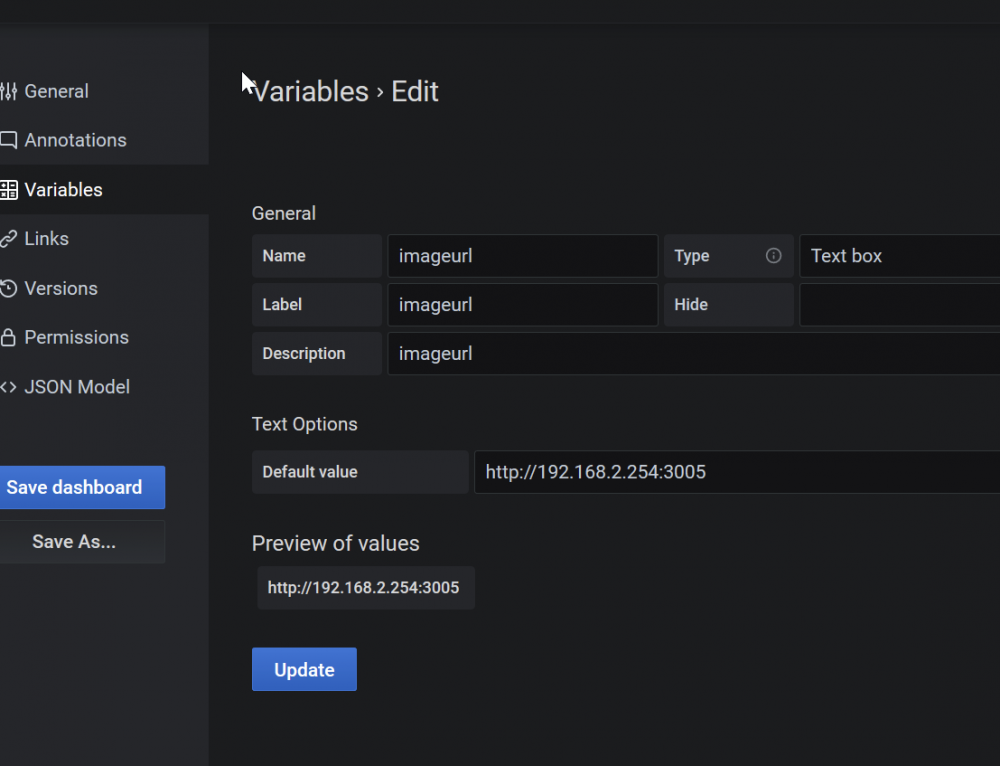
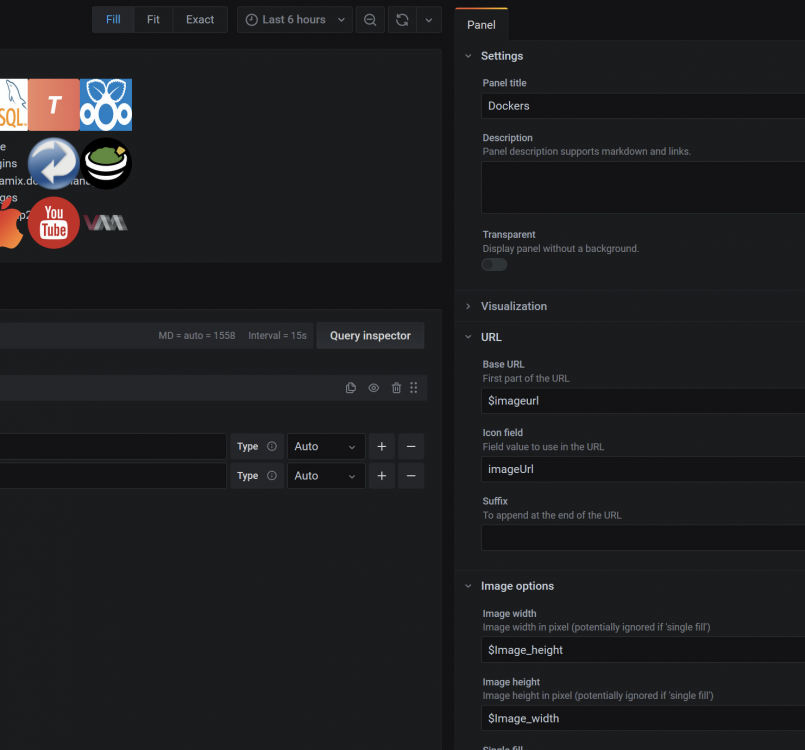
@falconexe I asked the grafana image plugin developer to implement the use of dashboard variables, like image url. He released a pre-release version of the plugin, which runs fine. Now it's much easier to set the Image Path (and width/height if needed) once and reuse it everywhere its needed. Download image plugin pre-release 2.3.0
 1 point
 -
Right now this link is dead. I'll check it later. here is the new issue i created. If you want you can do a comment there with your steps. and if you have the error still. https://github.com/linuxserver/docker-nextcloud/issues/189 Edit* Check the issue for the solution. TL?DR? Update docker, delete /config/nginx/site-confs/default, restart docker, Go to Settings > Overview, (for chrome) Press F12 and while having dev tools open right click refresh button and click emtpy cache and hard reload.1 point
-
Necro post with value below, as this is the top Google result on the topic. bulldozer !'s question on @SpaceInvaderOne's recent video (How to Test the Speed inside a VPN Download Container: https://www.youtube.com/watch?v=m7Qly7a_-M0) prompted this post. WARNING! EDITING THE sudoers FILE (OR ANY FILE THAT FEEDS INTO IT) INCORRECTLY CAN CAUSE IRREPERABLE DAMAGE AND POSSIBLE LOSS OF ACCESS TO YOUR SYSTEM! YOU HAVE BEEN WARNED. Only use visudo to edit the sudoers file (or any file that feeds into it)! visudo performs checks to aid in correct sudo file formatting (it is not fool-proof, double check your formatting!). Learning vi/visudo is on you, Google it for plenty of resources! https://lmgtfy.app/?q=how+to+use+visudo+in+linux Also, I am no Linux expert, but have used this method to successfully add a user to the sudoers list - on boot. Okay, now that the disclaimers are over... lets check out a more complete explanation of adding a user to the sudoers list without the use of any additional tools/plugins (UserScripts is great btw, I use it heavily on my server). Understand that sudo access can be dangerous, do not give this to users who do not understand it's power The /etc/sudoers file itself does not need to be edited, by default it will include the /etc/sudoers.d/ directory (below is a snippet of the end of the sudoers file) ## Read drop-in files from /etc/sudoers.d ## (the '#' here does not indicate a comment) #includedir /etc/sudoers.d Create a file named sudoadd (no .extension), using visudo, in /boot/custom/ /boot/ is your flashdrive, storing the file here allows it to survive reboots and unRaid to access it while booting up You may need to create the /boot/custom/ subdirectory I had the subdirectory after following Spaceinvaders video on setting up the docker-shell script Add the following to the sudoadd file (adjusting USERNAME to the one you'd like to use) ## ## User privilege specification ## USERNAME ALL=(ALL) NOPASSWD: ALL This is in the format of root's section in the /etc/sudoers file NOTE: the "NOPASSWD: " is not required and allows the specified user to execute the sudo command without entering a password Again, this is another dangerous setting... see this article for more info: https://www.tecmint.com/run-sudo-command-without-password-linux/ If you prefer to enter a password when using the sudo command, just remove "NOPASSWD: " The resulting line (password required) would read as: USERNAME ALL=(ALL) ALL Write the file and Quit (generally ESC > : > wq > ENTER in visudo) Next we need to tell unRaid to move the custom file and set it's permissions appropriately in the go file AGAIN, BE CAREFUL - THE GO FILE IS VERY IMPORTANT, IT STARTS YOUR WEBUI! Add the following to the end/bottom of the go file located at /boot/config/go cp /boot/custom/sudoadd /etc/sudoers.d/sudoadd chmod 0440 /etc/sudoers.d/sudoadd The first line copies the custom sudoadd file from the flash drive to the OS files running in memory The second line changes the permissions on the copied file to what Linux expects for a system file (IIRC) Also add the following to the end/bottom of the go file chsh -s /bin/bash USERNAME This line changes the shell for the USERNAME you specify, allowing the user to login via SSH I use vi to edit the go file, so Write the file and Quit (generally ESC > : > wq > ENTER) If you're using another editor, save the go file and exit Reboot your server and test that the USERNAME you setup above can: Login via SSH Execute the sudo command P.S. I normally give full credit via links to sources where possible, but I researched and successfully did this a very long time ago. That aside, this thread and @SpaceInvaderOne were definite contributors of my solution. If something in this post needs to be clarified please reply or message me and I will update it1 point
-
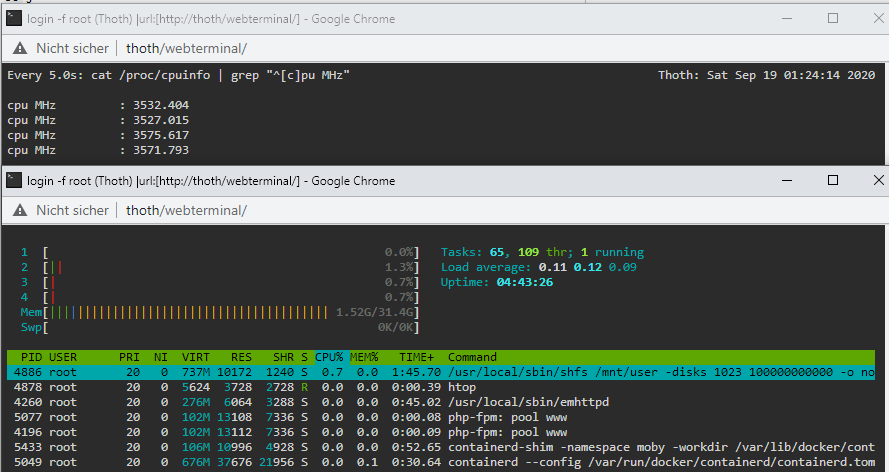
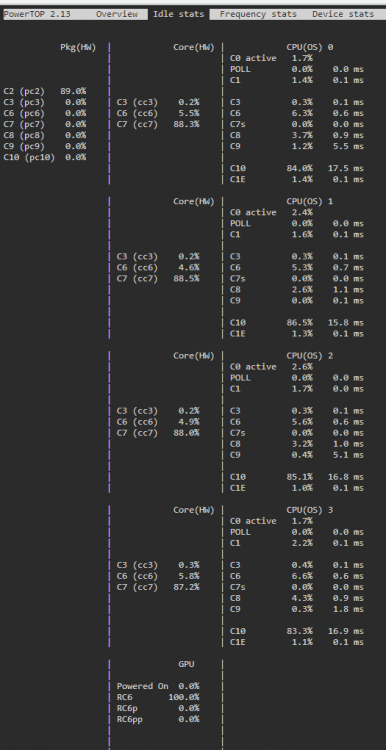
I asked this question by myself and found out that this message is created through the underlying Slackware: https://www.linuxquestions.org/questions/slackware-14/locking-all-cpu's-to-their-maximum-frequency-4175607506/ So I checked my file as follows: cat /etc/rc.d/rc.cpufreq #!/bin/sh # # rc.cpufreq: Settings for CPU frequency and voltage scaling in the kernel. # For more information, see the kernel documentation in # /usr/src/linux/Documentation/cpu-freq/ # Default CPU scaling governor to try. Some possible choices are: # performance: The CPUfreq governor "performance" sets the CPU statically # to the highest frequency within the borders of scaling_min_freq # and scaling_max_freq. # powersave: The CPUfreq governor "powersave" sets the CPU statically to the # lowest frequency within the borders of scaling_min_freq and # scaling_max_freq. # userspace: The CPUfreq governor "userspace" allows the user, or any # userspace program running with UID "root", to set the CPU to a # specific frequency by making a sysfs file "scaling_setspeed" # available in the CPU-device directory. # ondemand: The CPUfreq governor "ondemand" sets the CPU depending on the # current usage. # conservative: The CPUfreq governor "conservative", much like the "ondemand" # governor, sets the CPU depending on the current usage. It # differs in behaviour in that it gracefully increases and # decreases the CPU speed rather than jumping to max speed the # moment there is any load on the CPU. # schedutil: The CPUfreq governor "schedutil" aims at better integration with # the Linux kernel scheduler. Load estimation is achieved through # the scheduler's Per-Entity Load Tracking (PELT) mechanism, which # also provides information about the recent load. SCALING_GOVERNOR=ondemand # For CPUs using intel_pstate, always use the performance governor. This also # provides power savings on Intel processors while avoiding the ramp-up lag # present when using the powersave governor (which is the default if ondemand # is requested on these machines): if [ "$(cat /sys/devices/system/cpu/cpu0/cpufreq/scaling_driver 2> /dev/null)" = "intel_pstate" ]; then SCALING_GOVERNOR="performance" fi # If rc.cpufreq is given an option, use it for the CPU scaling governor instead: if [ ! -z "$1" -a "$1" != "start" ]; then SCALING_GOVERNOR=$1 fi # To force a particular option without having to edit this file, uncomment the # line in /etc/default/cpufreq and edit it to select the desired option: if [ -r /etc/default/cpufreq ]; then . /etc/default/cpufreq fi # If you need to load a specific CPUFreq driver, load it here. Most likely you don't. #/sbin/modprobe acpi-cpufreq # Attempt to apply the CPU scaling governor setting. This may or may not # actually override the default value depending on if the choice is supported # by the architecture, processor, or underlying CPUFreq driver. For example, # processors that use the Intel P-state driver will only be able to set # performance or powersave here. echo $SCALING_GOVERNOR | tee /sys/devices/system/cpu/cpu*/cpufreq/scaling_governor 1> /dev/null 2> /dev/null # Report what CPU scaling governor is in use after applying the setting: if [ -r /sys/devices/system/cpu/cpu0/cpufreq/scaling_governor ]; then echo "Enabled CPU frequency scaling governor: $(cat /sys/devices/system/cpu/cpu0/cpufreq/scaling_governor)" fi As you can see the default is "ondemand", but then follows this condition which sets "performance" as default: # For CPUs using intel_pstate, always use the performance governor. This also # provides power savings on Intel processors while avoiding the ramp-up lag # present when using the powersave governor By that explanation its not recommened to set something else then "performance" for an Intel cpu. I had problems with "powersave" in the past, but this was with an Intel Atom CPU (now I'm having an i3): https://forums.plex.tv/t/cpu-scaling-governor-powersave-causes-massive-buffering/604018 I never experienced similar problems with "ondemand", so I wanted this gorvernor for the i3, too. Nevertheless I checked the active governor as follows: cat /sys/devices/system/cpu/cpu0/cpufreq/scaling_governor performance Ok, performance has been set as expected. Lets try to overwrite it: /etc/rc.d/rc.cpufreq ondemand Enabled CPU frequency scaling governor: performance Hmm.. does not work. Seems to be this condition: # ... For example, # processors that use the Intel P-state driver will only be able to set # performance or powersave here. Lets try it out: cat /sys/devices/system/cpu/cpu*/cpufreq/scaling_governor performance performance performance performance This means our cpu cores support only "performance"?! EDIT: Yes, recent Intel CPUs do only support performance or powersave (with massive lags): https://wiki.archlinux.org/index.php/CPU_frequency_scaling#Scaling_governors And the most important part: The performance governor should give better power saving functionality than the old ondemand governor. For me it does not really look like a proper p-state handling as my cpus maximum is 3.6Ghz and with really low load it never reduces the frequency: So lets try to find out what goes wrong here. At first the pstate values: ls /sys/devices/system/cpu/intel_pstate/* /sys/devices/system/cpu/intel_pstate/hwp_dynamic_boost /sys/devices/system/cpu/intel_pstate/num_pstates /sys/devices/system/cpu/intel_pstate/max_perf_pct /sys/devices/system/cpu/intel_pstate/status /sys/devices/system/cpu/intel_pstate/min_perf_pct /sys/devices/system/cpu/intel_pstate/turbo_pct /sys/devices/system/cpu/intel_pstate/no_turbo root@Thoth:~# cat /sys/devices/system/cpu/intel_pstate/hwp_dynamic_boost 0 root@Thoth:~# cat /sys/devices/system/cpu/intel_pstate/max_perf_pct 100 root@Thoth:~# cat /sys/devices/system/cpu/intel_pstate/min_perf_pct 22 root@Thoth:~# cat /sys/devices/system/cpu/intel_pstate/no_turbo 1 root@Thoth:~# cat /sys/devices/system/cpu/intel_pstate/num_pstates 29 root@Thoth:~# cat /sys/devices/system/cpu/intel_pstate/status active root@Thoth:~# cat /sys/devices/system/cpu/intel_pstate/turbo_pct 0 Explanations can be found here: https://www.kernel.org/doc/html/v4.12/admin-guide/pm/intel_pstate.html#user-space-interface-in-sysfs For example num_pstates returns the amount of p-states supported by the cpu. As we can see we have 29 for my cpu. And we know that the status is "active" and this means changing the p-states should work, but we do not know how: https://www.kernel.org/doc/html/v4.12/admin-guide/pm/intel_pstate.html#active-mode do we have Active with HWP or not? I found this sentence: https://01.org/linuxgraphics/gfx-docs/drm/admin-guide/pm/intel_pstate.html#user-space-interface-in-sysfs Our value is zero. What could that mean? Another hint that we are using Active with HWP is this explanation: https://www.kernel.org/doc/html/v4.12/admin-guide/pm/intel_pstate.html#energy-vs-performance-hints Lets check if they are present: Both are present so we can be sure. We use Active Mode with HWP: https://www.kernel.org/doc/html/v4.12/admin-guide/pm/intel_pstate.html#active-mode-with-hwp I disabled all my writings to the unraid server and stopped all disks. In this state the server consumes 24W. Performance still does not downclock: watch -n1 "cat /proc/cpuinfo | grep \"^[c]pu MHz\"" cpu MHz : 3600.114 cpu MHz : 3600.910 cpu MHz : 3601.040 cpu MHz : 3600.269 Does HWP + Performance mean it never changes the p-state? Which algorithm is used and where can I find it or influence it? I tried it with powersave /etc/rc.d/rc.cpufreq powersave Enabled CPU frequency scaling governor: powersave I don't know why, but all disks started with several seconds delay and very small writes (1,4 kB/s) were done. I waited one minute and spun them down again. The power consumption stayed at 24W. The frequency is only a little bit lower watch -n10 "cat /proc/cpuinfo | grep \"^[c]pu MHz\"" cpu MHz : 3263.100 cpu MHz : 3021.631 cpu MHz : 3252.913 cpu MHz : 2819.033 I checked the available HWP profiles and which one is used: cat /sys/devices/system/cpu/cpu0/cpufreq/energy_performance_preference balance_performance cat /sys/devices/system/cpu/cpu0/cpufreq/energy_performance_available_preferences default performance balance_performance balance_power power I did not found any documentation about these variables. Only this answer to the same question: https://superuser.com/a/1449813/129262 So lets try them out: echo "power" > /sys/devices/system/cpu/cpu0/cpufreq/energy_performance_preference echo "power" > /sys/devices/system/cpu/cpu1/cpufreq/energy_performance_preference echo "power" > /sys/devices/system/cpu/cpu2/cpufreq/energy_performance_preference echo "power" > /sys/devices/system/cpu/cpu3/cpufreq/energy_performance_preference cat /sys/devices/system/cpu/cpu*/cpufreq/energy_performance_preference power power power power I tested "power" and "balance_power". No difference in power consumption. If I set "/etc/rc.d/rc.cpufreq" to "performance" the "/sys/devices/system/cpu/cpu0/cpufreq/energy_performance_preference" becomes "performance". If I set it to "powersave" the preference becomes "balance_performance". Conclusion: Although "performance" is set, there is no room to save more energy in an idle state. "powersave" seems only influence the time in which the core stays in a slower state which could cause latency issues, but the lowest p-state is the same for all profiles. This is completely different to my Atom CPU, which directly showed a lower energy consumption after changing the profile to "ondemand". So it depends on the used CPU. But finally "ondemand" is set if its present so no further optimization seems to be needed. The next we could check are the c-states. For this I used "powertop" from the nerd pack. It seems we have the best results as c-state C10 is used most of the time:
 1 point
 -
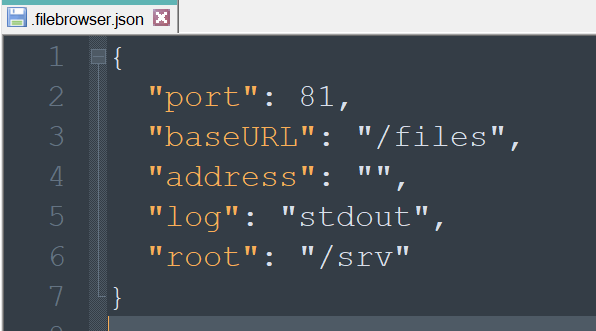
when u want to change natively the listen port from filebrowser @brent3000 change it in the filebrowser.json file .. restart docker ... whyever u want todo so ...
 1 point
 -
The easiest way to do this and to have everything in the webUI all in "sync" with the updates etc would be to install the Auto Update plugin. There you can configure it to automatically do this on a schedule etc. But, if you still want to trigger it via the command prompt, then /usr/local/emhttp/plugins/ca.update.applications/scripts/updateDocker.php > /dev/null 2>&1 Edit: You will have to configure the plugin though as to which apps to update, etc1 point
-
Hi Folks, I've been searching the forum and I still have a few questions. I'm trying to prepare for the worst case scenario which would result in me having to rebuild my unraid system from scratch (and of course, have no data loss). From forum posts I've read, I see "Community Applications" recommended to backup flash and files. I have this plugin but don't see any option where I can actually perform a backup of the flash/array files... Am I missing something? Thanks!1 point
-
Share & Enjoy!


 1 point


ZohoMail.thumb.jpg.703f4dc537aa53b46dc7ce5559d6bccb.jpg)