Leaderboard


Popular Content
Showing content with the highest reputation on 04/15/21 in all areas
-
Amazing work guys - thank you. Also thanks to @SpaceInvaderOne for an awesome video on it! I love your videos.4 points
-
Original comment thread where idea was suggested by reddit user /u/neoKushan : https://old.reddit.com/r/unRAID/comments/mlcbk5/would_anyone_be_interested_in_a_detailed_guide_on/gtl8cbl/ The ultimate goal of this feature would be to create a 1:1 map between unraid docker templates and docker-compose files. This would allow users to edit the docker as either a compose file or a template and backing up and keeping revision control of the template would be simpler as it would simply be a docker-compose file. I believe the first step in doing so is changing the unraid template structure to use docker-compose labels for all the metadata that unraid uses for its templates that doesn't already have a 1:1 map to docker-compose. this would be items such as WebUI, Icon URL, Support Thread, Project Page, CPU Pinning, etc. Most of the meat of these templates are more or less direct transcriptions of docker-compose, put into a GUI format. I don't see why we couldn't take advantage of this by allowing users to edit and backup the compose file directly.2 points
-
New Release ###2021.04.15 - Changed text for field description of "Force move of files on a schedule:" to "Force move of all files on a schedule:" - No log entry for this, only an email with the output will be sent, like most cron jobs. Basically I put it back to how it used to work. The cron entry in the configs now calls unraids original mover file. None of the plug-in settings will be read (other than the time/s specified in the cron text field).2 points
-
If you go to Settings -> Global Share Settings and turn on the help (the ? icon at the top right) you'll see the explanation of how the first item works. Enable Disk Shares is set to Auto by default, which means If it is indeed set to Auto then look below to see if Disk4 is either on the Excluded Disks list (default setting is "None") or not on the Included Disks list (default setting is "All") and correct the setting accordingly. Note that these are Global Share Settings. You can fine tune each User Share individually via the Shares page. EDIT: From the config/share.cfg file in the diagnostics: shareDisk="auto" shareUser="e" shareUserInclude="disk1,disk2,disk3" shareUserExclude="" Disk4 is not included.2 points
-
had more of a in depth look into this this morning and i can confirm if i switch to netherlands i am seeing 503 gateway failures on PIA side, but its intermittent, i restarted the container and it started fine, so i am happy that no changes to the API have happened, its just PIA being a bit shit, hopefully they will get it sorted, god PIA can really be a Pain In the Arse sometimes.2 points
-
Docker labels is probably something we can do in Unraid 6.10 Thx for the explanation.2 points
-
Overview: Support thread for lnxd/XMRig in CA. Application: XMRig - https://github.com/xmrig/xmrig Docker Hub: https://hub.docker.com/r/lnxd/xmrig GitHub: https://github.com/lnxd/docker-xmrig Please ensure that you know what you're doing before setting this up, as excessively high temperatures are BAD for computers and could damage your hardware / eventuate in data loss. Instructions: Install lnxd's XMRig via CA. Add in your XMR receive address to the wallet field. Update the pool address to your closest node or preferred pool. Don't forget to pay attention to the port if you change pools, as they tend to use arbitrary ports. Set the --donate-level you would like to enable. Eg. entering a 1 causes XMRig to mine for 99 minutes for you, and then 1 minute for the fee option chosen in the next step. Setting the --donate-level flag to 0 will not work unless you follow the steps below. There are 3 fee options enabled by a custom build from my fork of the latest release source. This allows for some options that aren't available in the base version: no-fee: Makes it possible to set the --donate-level flag to 0%. Unless you set it to 0%, the fee goes to the developer of XMRig. dev-fee: The fee goes to the developer of XMRig. lnxd-fee: The fee goes to me 🙃 Thank you in advance if you choose this option. Turn on advanced mode for the template and select CPU core / thread pairs that you would like to use in CPU pinning. I recommend leaving core 1 and its thread pair unselected, as it could possibly cause Unraid to unexpectedly slow down / the Docker engine to quit if things get too intense while mining. Run the container and check the temperature of your CPU and other hardware regularly for at least 20-30 minutes to ensure everything is safe and stable. If you get any errors that you can't decipher, feel free reach out and I'll take a look for you. (Optional) To increase your hash rate, you can add and run the following User Script. At the moment, in order to reset your MSR values to default you need to restart your Unraid host. For this reason, it needs to be re-run after every boot as the updated values do not survive reboots. The script installs msr-tools and then updates the registry values to optimise your CPU for XMRig. This may have performance implications for other functions on your server. The logs will also show that XMRig is being run with MSR MOD disabled, but if you run this script it serves the same purpose and you should get a higher hash rate. #!/bin/bash # Write XMRig Optimised MSR values # https://github.com/xmrig/xmrig/blob/master/scripts/randomx_boost.sh VERSION=1.3 echo "Installing msr-tools v${VERSION}" echo "" echo "(don't!) blame lnxd if something goes wrong" echo "" curl -fsSL https://packages.slackonly.com/pub/packages/14.2-x86_64/system/msr-tools/msr-tools-${VERSION}-x86_64-1_slonly.txz -o /tmp/msr-tools-${VERSION}-x86_64-1_slonly.txz upgradepkg --install-new /tmp/msr-tools-${VERSION}-x86_64-1_slonly.txz rm /tmp/msr-tools-${VERSION}-x86_64-1_slonly.txz echo "" echo "Optimising register values for XMRig" echo "" modprobe msr if cat /proc/cpuinfo | grep "AMD Ryzen" >/dev/null; then if cat /proc/cpuinfo | grep "cpu family[[:space:]]:[[:space:]]25" >/dev/null; then echo "Detected Ryzen (Zen3)" wrmsr -a 0xc0011020 0x4480000000000 wrmsr -a 0xc0011021 0x1c000200000040 wrmsr -a 0xc0011022 0xc000000401500000 wrmsr -a 0xc001102b 0x2000cc14 echo "MSR register values for Ryzen (Zen3) applied" else echo "Detected Ryzen (Zen1/Zen2)" wrmsr -a 0xc0011020 0 wrmsr -a 0xc0011021 0x40 wrmsr -a 0xc0011022 0x1510000 wrmsr -a 0xc001102b 0x2000cc16 echo "MSR register values for Ryzen (Zen1/Zen2) applied" fi elif cat /proc/cpuinfo | grep "Intel" >/dev/null; then echo "Detected Intel" wrmsr -a 0x1a4 0xf echo "MSR register values for Intel applied" else echo "No supported CPU detected" fi echo "" echo "Done!" echo "To reset values, please reboot your server." If you get stuck, please feel free to reply to this thread and I'll do my best to help out 🙂
 1 point
 -
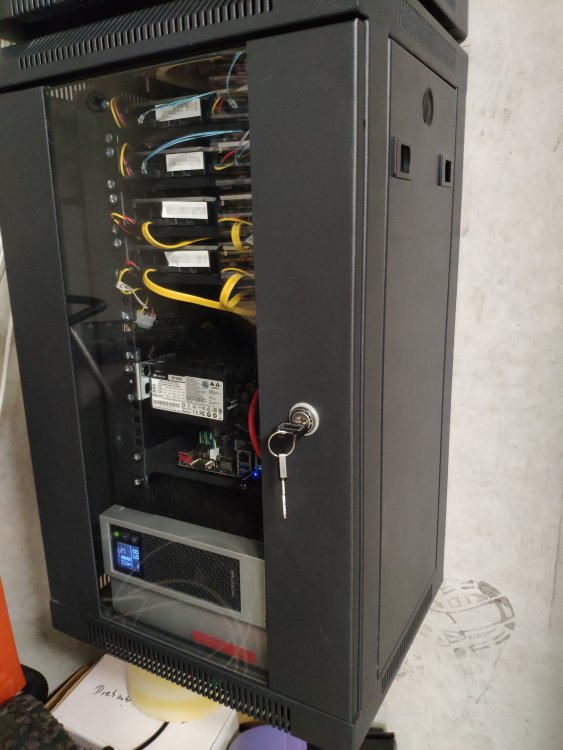
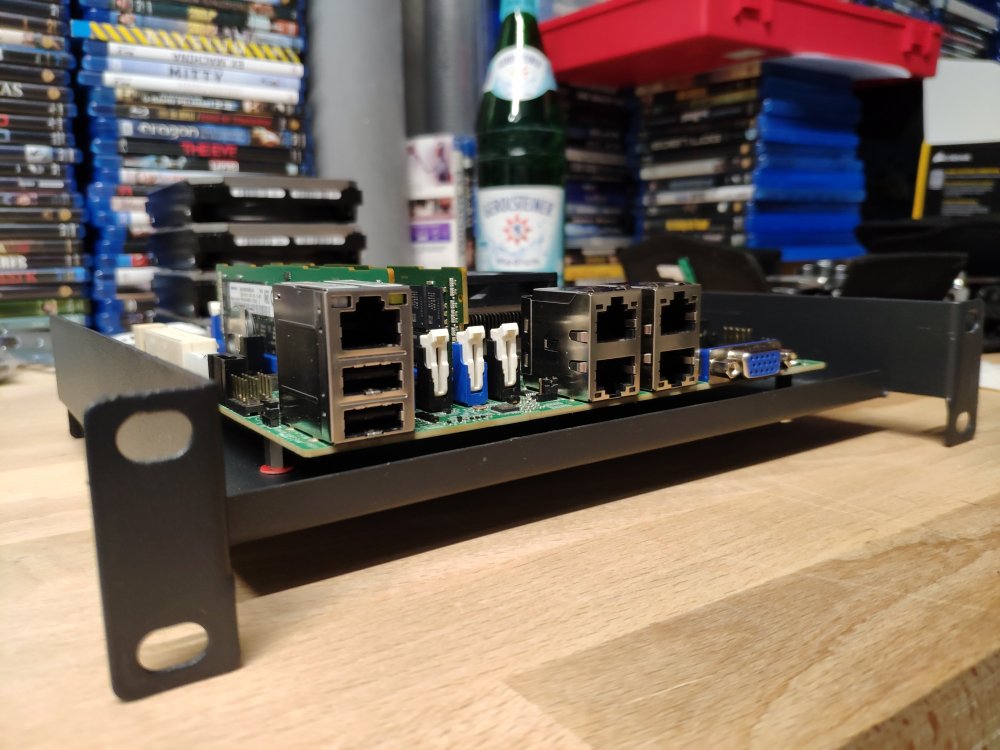
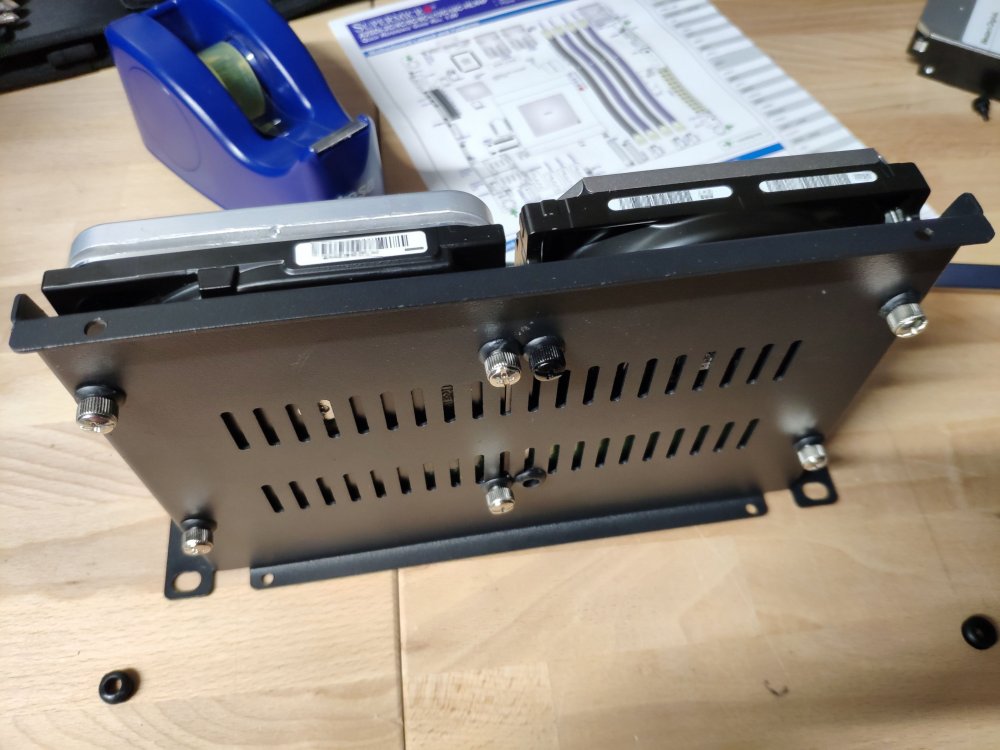
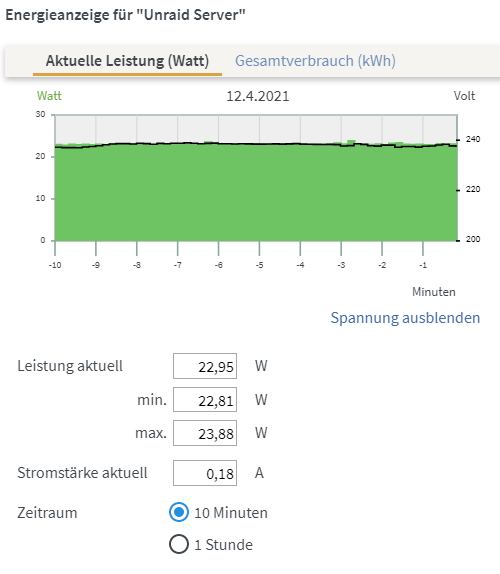
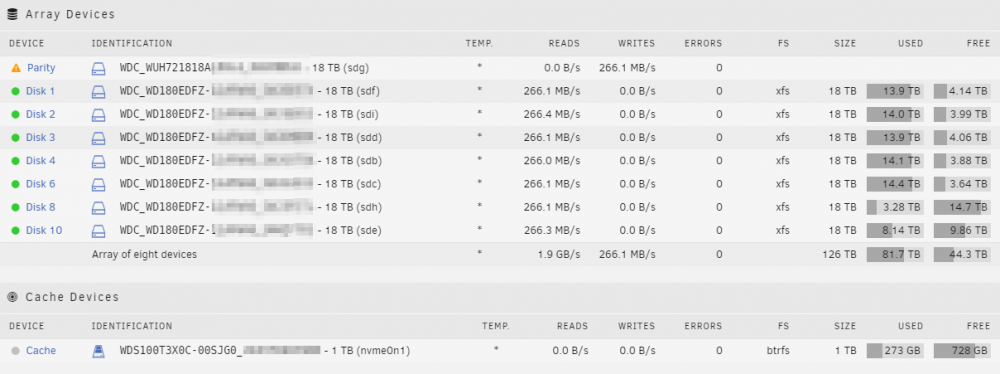
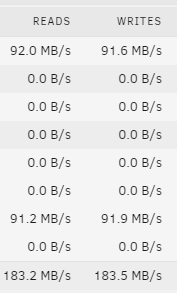
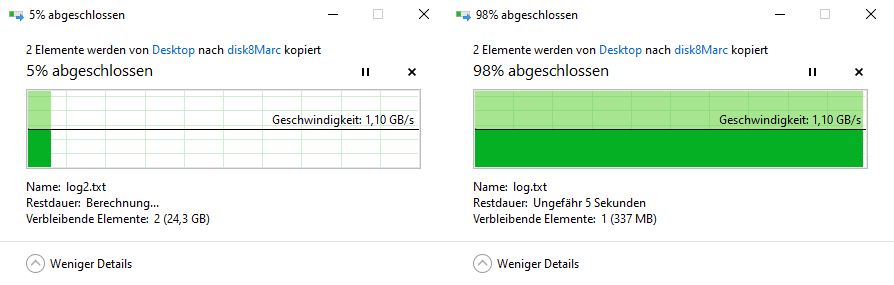
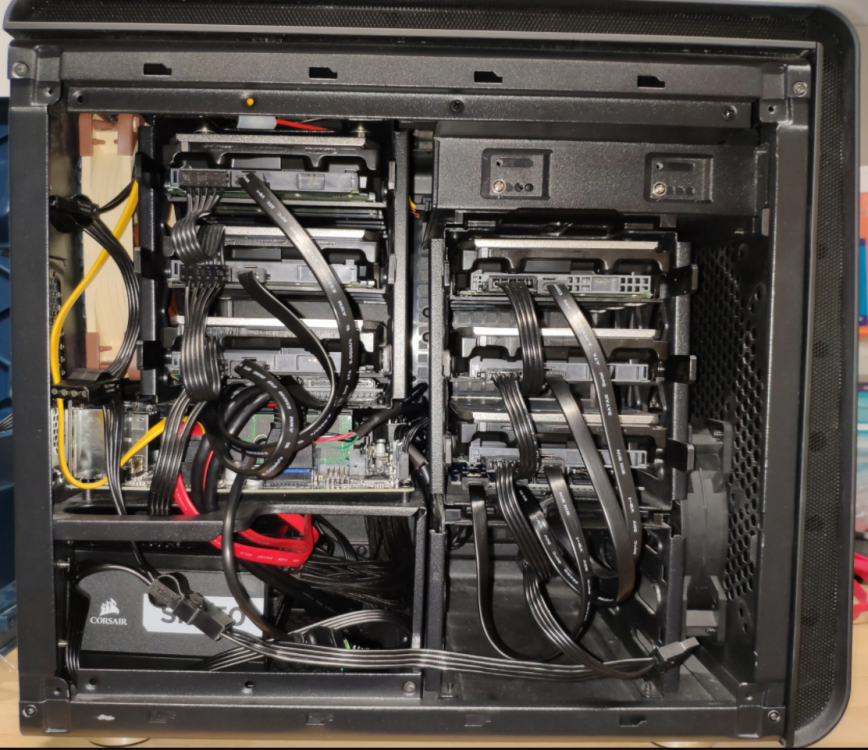
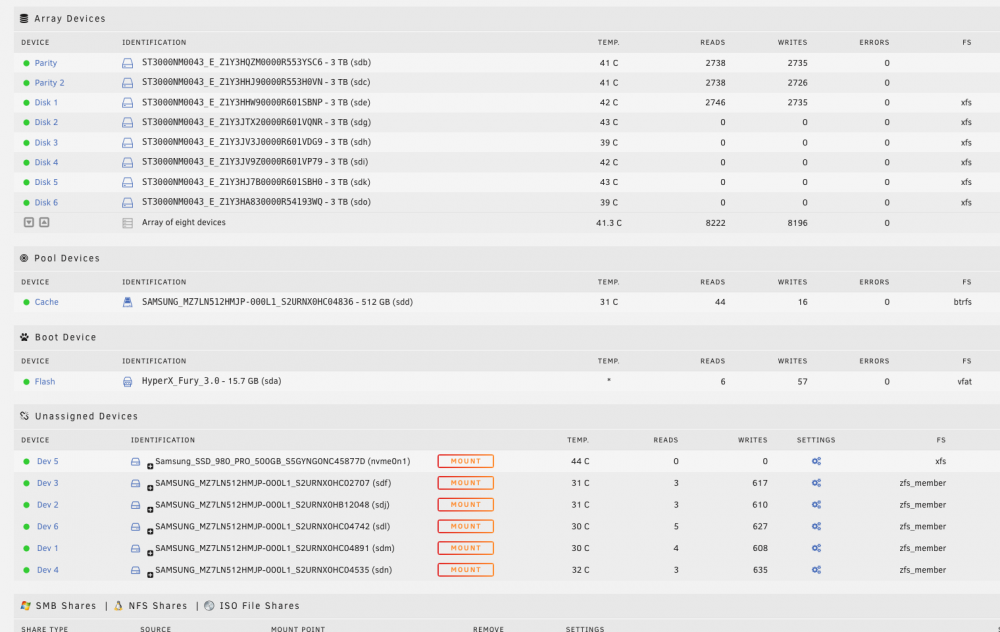
Ich wollte hier mal meinen aktuellen Stand zeigen. Meinen Server habe ich selbst in einem 10 Zoll Rack verbaut: HDDs und Motherboard sind auf simplen Rackböden montiert: Hardware MB: Gigabyte C246N-WU2 CPU: Xeon E-2146G mit Boxed Kühler vom i3-9100 (der vorher verbaut war) RAM: 64GB ECC NT: Corsair SF450 Platinum LAN: 10G QNAP Karte HDD: 126TB bestehend aus 1x 18TB Ultrastar (Parität) und 7x 18TB WD Elements (Ultrastar White Label) Cache: 1TB WD 750N NVMe M.2 SSD USV: AEG Protect NAS quer auf Gummifüßen Als Server-Namen habe ich "Thoth" gewählt, da dies der ägyptische Gott der Weisheit war. Das verleitet auch manchmal dazu ihn "Thot" zu nennen. ^^ Bei 8 stehenden HDDs liegt der Verbrauch im Leerlauf bei 23W: Disk-Übersicht: Beim Hochladen direkt auf die Disks komme ich auf über 90 MB/s, was ich den schnellen HDDs zu verdanken habe: Auf den Cache sind natürlich 1 GB/s kein Problem: Dank 50% RAM-Cache gehen aber auch die ersten 30GB auf die HDDs mit 1 GB/s: Diese Kombination aus Performance und geringem Stromverbrauch bietet nur Unraid 😍 Ich betreibe außerdem noch einen Unraid Backupserver an einem externen Standort. Dieser nutzt ein Asrock J5005 und ist möglichst kompakt / günstig aufgebaut, wobei ich in einem Bitfenix ITX Case einen zusätzlichen HDD Käfig eingepasst habe, um 9 HDDs verbauen zu können:


 1 point
 -
This thread is reserved for Frequently Asked Questions, concerning all things Docker, their setup, operation, management, and troubleshooting. Please do not ask for support here, such requests and anything off-topic will be deleted or moved, probably to the Docker FAQ feedback topic. If you wish to comment on the current FAQ posts, or have suggestions or requests for the Docker FAQ, please put them in the Docker FAQ feedback topic. Thank you! Note: I am the author of many of these posts. But I am not the author of all of them. Due to circumstances beyond our control, the original postings have been lost, but I took it upon myself to salvage them, with the unfortunate net result that I had to take "ownership" of the posts. ANY user can reply to this thread with any new Q/A. I will add such posts to this table of contents. I need help with an application? What information should I supply? Getting Started How do I get started using Docker Containers? What are the host volume paths and the container paths Dockers, theres so much to learn! Are there any guides? How do I know if I've set up my paths, ports, etc correctly? With 6.2, do I need to move my appdata and/or docker image into unRaid's recommended shares? How should I set up my appdata share? General Questions Why doesnt the "Check for Updates" button bring my Docker to the newest version of the application? How do I update to the newest version of the application? How do I move or recreate docker.img? What do I fill out when a blank template appears? How can I run other docker applications that are not listed within the App tab? I've told {App-X} to look / move / copy files via SMB to my server. Why doesn't it work? If I need to delete my docker.img file, will I lose my application's settings, etc? How do I get a command prompt within a docker application? How do I increase the size of my docker.img file? Why does the "EDIT" not appear on the dashboard / docker tab when I click on an icon? What do I do when I see 'layers from manifest don't match image configuration' during a docker app installation? How Do I Create My Own Docker Templates? I've recreated my docker.img file. How do I re-add all my old apps? I want to run a container from docker hub, how do I interpret the instructions. I want to change the port my docker container is running on or I have two containers that want to use the same port, how do I do that? Why it's important to understand how folder mappings work... and an example of why it goes wrong. How do I Stop/Start/Restart Docker via Command Line How Do I Pass Through A device To A Container? Can I switch Docker containers, same app, from one author to another? How do I do it? For a given application, how do I change Docker containers, to one from a different author or group? How do I install a second instance of an application? I closed the transfer window on Krusader. How do I get it back? How can I use private template repositories with unRaid? What does "Deprecated" mean? Docker Image Filling Up Why does my docker.img file keep filling up? Why does my docker.img file keep filling up while using Plex? My docker.img file is filling up due to excessive logging from various apps Troubleshooting, Maintenance I continually have "Server Execution Errors" whenever I try and start a container Why don't my Docker Container and VM mappings of remote shares to the local mount point (/mnt/disks) work after updating to 6.9? How come I get "Execution Error" when trying to start a container? Why cant (insert docker app name here) see my files mounted on another server or outside the array Where did my Docker files go? Why did my files get moved off the Cache drive? Why does Sonarr keep telling me that it can't import a file downloaded by NZBGet? (Or any other combination of apps?) How do I limit the CPU resources of a particular docker application? How do I limit the memory usage of a docker application? Why do I keep losing my Docker container configurations? Why did my newly configured Docker just stop working? Fix Common Problems plugin is complaining about Container Port x not found or changed on installed applications. What do I do? Fix Common Problems plugin is complaining about UD Mounted paths not mounted with the Slave Option. What do I do? Why can't I delete / modify files created by CouchPotato (or another docker app)? Why does a certain docker application always start when booting unRaid when autostart is set off? Why are some of my applications randomly stopping and won't restart? (unRaid 6.4+ with Unassigned Devices mounting SMB shares) How do I fix permission issues on file(s) created by Plex DVR? Why does Unraid keep adding ports that I've removed from the template back to the application when I update? Why do my remote share mappings fail after I updated UD? Using private repositories within CA How do I check my installed apps for vulnerabilities (Log4J etc)?1 point
-
Today's blog follows a couple of student's educational journey with Unraid in their classroom: https://unraid.net/blog/unraid-in-the-classroom If you are an educator and would like to teach with Unraid in the classroom, please reach out to me directly as we would love to support this educational program at your place of instruction!1 point
-
Had a local business need to expose their CRM server to the public net today and the owner did not want to open any ports. Cloudflare's Argo Tunnel came to mind. They had an existing Unraid server handling file shares and backups, so started looking at ways to leverage this (actually underutilised) server. Thought I'd share the steps I got to getting the tunnel to work here. Below steps assume understanding/experience with reverse proxy setups and User Scripts. The setup consists of two broad steps: A. Install any reverse proxy as a Docker image (I used Nginx Proxy Manager) and take note of the exposed port / IP. In this example, I will be setting only the HTTP proxy on port 1880. This reverse proxy is the entry point of the tunnel. Configure this proxy to connect to whichever other services you have. B. Installing cloudflared and run on startup ssh into your server and download the cloudflared binary wget https://bin.equinox.io/c/VdrWdbjqyF/cloudflared-stable-linux-amd64.tgz unzip the tgz tar -xvzf cloudflared-stable-linux-amd64.tgz Login to Cloudflare (this will produce a URL. Open that URL on your browser) ./cloudflared tunnel login Once authenticated, verify that the tunnel works (change your.hostname.com to your hostname) ./cloudflared tunnel --hostname your.hostname.com --url http://localhost:1880 Then visit your.hostname.com, you should see a Cloudflare welcome page. If DNS hasn't propagated, try setting your DNS resolver to 1.1.1.1 Save your configuration as a YAML-formatted file in ~/.cloudflared/config.yml; The contents should look like this: hostname: your.hostname.com url: http://localhost:1880 Copy the contents of ~/.cloudflared into /etc/cloudflared mkdir -p /etc/cloudflared cp ~/.cloudflared/config.yml /etc/cloudflared/ cp ~/.cloudflared/cert.pem /etc/cloudflared/ Install the User Scripts plugin if you haven't already, and create a new script. I named mine cloudflared Remove the default description file and copy the contents of the script below: #!/bin/bash #description=Launches cloudflared with config and cert loaded in /etc/cloudflared #backgroundOnly=true #arrayStarted=true # Above lines set the script info read: https://forums.unraid.net/topic/48286-plugin-ca-user-scripts/page/7/?tab=comments#comment-512697 # Set path to cloudflared binary configpath=/etc/cloudflared echo "Starting Cloudflared Binary with config and cert in $configpath" /root/cloudflared --config $configpath/config.yml --origincert $configpath/cert.pem echo "Exiting Cloudflared Binary" exit Refresh the User Scripts page and set the script to run on startup of array View the logs to ensure that your routes are secured and established. You should see something like this: Starting Cloudflared Binary with config and cert in /etc/cloudflared time="2019-07-24T01:36:27+08:00" level=info msg="Version 2019.7.0" time="2019-07-24T01:36:27+08:00" level=info msg="GOOS: linux, GOVersion: go1.11.5, GoArch: amd64" time="2019-07-24T01:36:27+08:00" level=info msg=Flags config=/etc/cloudflared/config.yml hostname=your.hostname.com logfile=/var/log/cloudflared.log origincert=/etc/cloudflared/cert.pem proxy-dns-upstream="https://1.1.1.1/dns-query, https://1.0.0.1/dns-query" url="http://localhost:1880" time="2019-07-24T01:36:27+08:00" level=info msg="Starting metrics server" addr="127.0.0.1:38457" time="2019-07-24T01:36:27+08:00" level=info msg="Autoupdate frequency is set to 24h0m0s" time="2019-07-24T01:36:27+08:00" level=info msg="Proxying tunnel requests to http://localhost:1880" time="2019-07-24T01:36:30+08:00" level=info msg="Connected to HKG" time="2019-07-24T01:36:30+08:00" level=info msg="Each HA connection's tunnel IDs: map[<REDACTED>]" time="2019-07-24T01:36:30+08:00" level=info msg="Route propagating, it may take up to 1 minute for your new route to become functional" time="2019-07-24T01:36:32+08:00" level=info msg="Connected to SIN" time="2019-07-24T01:36:32+08:00" level=info msg="Each HA connection's tunnel IDs: map[<REDACTED>]" time="2019-07-24T01:36:32+08:00" level=info msg="Route propagating, it may take up to 1 minute for your new route to become functional" time="2019-07-24T01:36:33+08:00" level=info msg="Connected to HKG" time="2019-07-24T01:36:33+08:00" level=info msg="Each HA connection's tunnel IDs: map[<REDACTED>]" time="2019-07-24T01:36:33+08:00" level=info msg="Route propagating, it may take up to 1 minute for your new route to become functional" time="2019-07-24T01:36:34+08:00" level=info msg="Connected to SIN" time="2019-07-24T01:36:34+08:00" level=info msg="Each HA connection's tunnel IDs: map[<REDACTED>]" time="2019-07-24T01:36:34+08:00" level=info msg="Route propagating, it may take up to 1 minute for your new route to become functional" Voila!
 1 point
 -
Thank you for this, I believe you may have helped me solve another issue I was having.1 point
-
yes, thanks, I figured it out, just replied too soon to the thread. thanks for all your work and support!1 point
-
Here: https://drive.google.com/file/d/1rhH3lulCYtfMGaT2sQhJnwiMqxhcEhA_/view?usp=sharing1 point
-
Server is up and running again. Cleaned the CPU cooler and the shutdowns have disappeared since then. Thank you @JorgeB and @trurl! Lesson learned for the next time :)1 point
-
You've got to either double check your mover tuning settings, remove the plugin, or ask in it's support thread.1 point
-
It didn't run at all, even after the update. Seems like the issue might still be there. I'll report back tomorrow if it still didn't run.1 point
-
Ah I get what your saying. Looks like there was an update to address this right below your reply.1 point
-
That was it, Toronto which was previously working, isn't anymore. Thanks!1 point
-
There have been other reports of very bad performance with that specific model, just with some, not all, so it's not just because they are SMR, if the other disks are performing nominally you should replace it, or exclude it from writes.1 point
-
Default is auto, and since there's no data, disk share is enable.1 point
-
I can report all issues to be gone now. Disks are fixed, no more errors. Whats pretty cool is that also there is speed penalty while disks are Type 2 Formatted. Before it took 8+ hours to do parity build, but now it took 6 hours. Thanks guys!
 1 point
 -
Thats a bug - Version 10.0.2 will be out shortly fixing the underlying issue. Please open a github issue next time, since the process there is much more streamlined than a forum post.1 point
-
Cheers John! Many thanks i have ordered a 12TB WD to Replace the 8TB as i am slowly replacing the Seagates with WD! that 8TB is the newest of the seagates i have 3 x 4TB Seagates left in there that are like 5 years old so they was going to be swapped out anyway but in oldest date order, See how i get on after Replacing the Disk1 point
-
Looks like a power/connection problem, I believe that Microserver uses a fan-out cable for the disks, that would be the first thing to check.1 point
-
Why is your docker.img path "/mnt/disk1/Share 1/docker.img" ? Probably the space in that path is breaking something. Can't imagine why you would want a user share named "Share 1" anyway. The conventional place for docker.img is in the system user share at /mnt/user/system/docker/docker.img or similar. And system share should be configured to stay on cache. Also, your appdata has some files on the array. Since docker isn't currently working and appdata is cache-prefer, you should be able to get those moved to cache by going to Main - Array Operation and click Move.1 point
-
Is there a default passphrase or email configured if youd want to change your pool payout settings? I found it searching the thread, my bad. Thank you for this docker!1 point
-
Thank you for the help JorgeB. That worked out great. It's been 270 something days since I last had access or thought of any of this.1 point
-
Thank you for the second opinion. That worked1 point
-
Forgive me if I am missing something, but can you not backup and restore your dockers using the plugin: CA Backup / Restore Appdata You can choose it to automatically backup your appdata folder? I am not sure about VM's yet I am yet to run one (only recently set my server up 1-2 days ago) but will run one soon and I agree with your points on being able to backup all the configurations to be able to easy restore them if something happened but I thought this plugin backed up your libvert folder as well, is that not enough to restore from there? Since it backs it up to the array and you have parity on your array, aren't you all good in terms of backing up? I think I might be missing something here though1 point
-
Hi guys! I think I'm a bit lost and I need some help. I'm sure there is a really simple and logical reason for this, but I can't see it atm. NPM with cloudflare and a custom domain works great if I set the "Forward Hostname / IP" in NPM to my internal unraid IP (192.168.1.85) and port to an docker running on say 8080 or 7878. This works both locally and remote. What I can't get to work is the forwarding to the local ip of my VM that is running Emby (192.168.1.75:8096). When I change it from 192.168.1.85 to 192.168.1.75 I get error 502 right away. Is there something wrong with my network config? NPM docker (and all other dockers) is using in "Brigde" and my VM is using br0. EDIT: NVM, It's working now, after a reboot.1 point
-
you know that feeling when you actually stop and think about it and go "F@#K it was that simple" left field blank and all is working now1 point
-
Hey! Let me share my syslinux config which works on my system... label Unraid OS menu default kernel /bzimage append video=vesafb:off,efifb:off vfio_iommu_type1.allow_unsafe_interrupts=1 isolcpus=4-15,20-31 pcie_acs_override=downstream,multifunction initrd=/bzroot ( Do not just copy & paste this) I guess you do not allow unsafe interrupts? What is the behaviour if you try a linux vm?1 point
-
You can always visit my Github page but I don't keep track of minor things that I've changed to make something work again... I try my best to keep everything up and most of the time I change only small things to make the containers more secure or fix minor bugs.1 point
-
netherlands also had issues a while ago and its possible they still have intermittent issues, try changing to sweden.1 point
-
Turns out this is pretty simple to implement. It requires editing core files - which means it'll probably be lost one day on upgrades. I have no idea if this can be done with a community app, but this is at least a beginning for us who are used to docker-compose but still able to use the dynamix docker manager web interface. Tested this in version 6.9.2 I take no responsibility if you break something. Make sure you have a backup of this file before you begin. It would be great to see this included in the core of unraid since it's such a simple addition. Edit /usr/local/emhttp/plugins/dynamix.docker.manager/include/DockerClient.php Look for public function getAllInfo($reload=false) { and at the very end of the foreach add: if ($ct['Icon']) $tmp['icon'] = $ct['Icon']; if ($ct['url']) $tmp['url'] = $ct['url']; Look for public function getDockerContainers() { and inside the foreach, beneath the line containing $c['BaseImage'], add: $c['Icon'] = $info['Config']['Labels']['net.unraid.docker.icon'] ?? false; $c['url'] = $info['Config']['Labels']['net.unraid.docker.webui'] ?? false; Clear browser cache and reload the unraid web ui. Icons and webui links from unraid templates still work, and those from a docker container label also now work.1 point
-
With E-bay and LSI cards, you are buying the vendor. Look at the Vendor's reputation. See what his policy is on returns. You could ask a question of him to see what his response is and how quickly he answers you. Look to see how long he has been a E-bay vendor. There are a lot of the older LSI cards that are advertised as 'New'. Well that is a sure sign that they are counterfeit! (LSI has 'disappeared' as a separate company several years ago. You can find online that the rights now belong to Broadcom. You can find what they currently make here: https://www.broadcom.com/products/storage ) However, Broadcom apparently still sells those older chip sets and several(?) Chinese companies have copied the design of the older LSI boards (right down to the paper labels used on the genuine cards)! These boards are usually referred to as counterfeit as the true origin is being concealed. And no one has any idea what the quality level of these cards are. (Remember that while genuine LSI chips are (probably) used, everything else is sourced elsewhere.) Some of these manufacturers may produce a quality product but without his identifying marking on the board, there is no way for a average consumer to figure out what he is getting! An long term E-bay vendor, with a reputation to protect, will be vetting his sources carefully to protect it.1 point
-
It wasn't on purpose, I promise!! You've put a lot into this and it's appreciated. Get yourself sorted out, and I pray we see you back some day.1 point
-
New Config rebuilds parity so it agrees with the currently assigned disks. Since that original disk wasn't assigned, after the parity rebuild it wouldn't be possible to rebuild that disk to a replacement. You really should have asked for advice. I have seen advice that you need to unassign a disk before replacing it. I have often responded to such advice saying it isn't necessary. Shouldn't matter if you do or you don't, so why do it? In this case, since you thought it was a mistake to not do it, you ran off the rails. The only thing Unraid needs to see is a different disk assigned to that slot and no changes to any other disk assignments, and it will rebuild to that different disk. Doesn't matter if the original disk has been removed or not or unassigned or not. Since you did New Config, as far as Unraid was concerned, all disks were different, so obviously the requirements for rebuilding to the new disk couldn't apply.1 point
-
You need to do a new config with the old 2TB disk and re-sync parity, but this: suggests a hardware problem, server should never shutdown own it's own, start by checking if the CPU cooler needs cleaning, an overheating CPU can cause a shutdown, and more likely to happen during a sync since it can be CPU intensive.1 point
-
@ich777 will update them when he awakes. He is on the other side of the world1 point
-
What's the type of device? If it's a Windows PC running the Wireguard client, you have to edit the tunnel and disable "Block untunneled traffic (kill-switch)".1 point
-
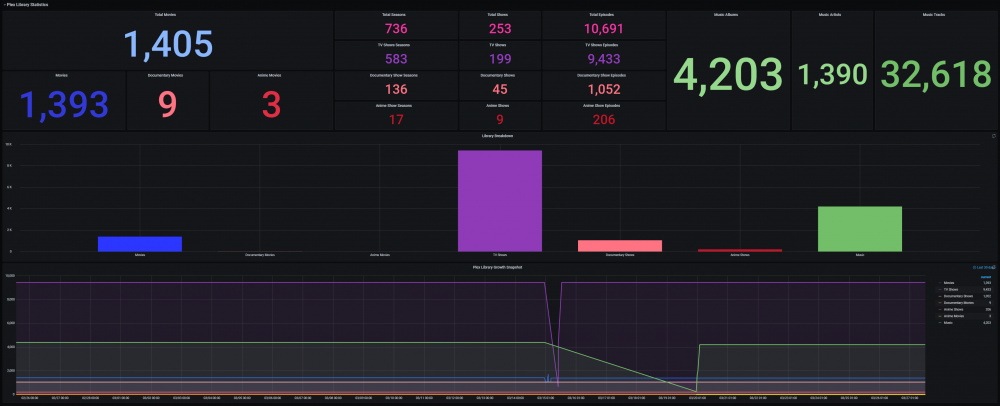
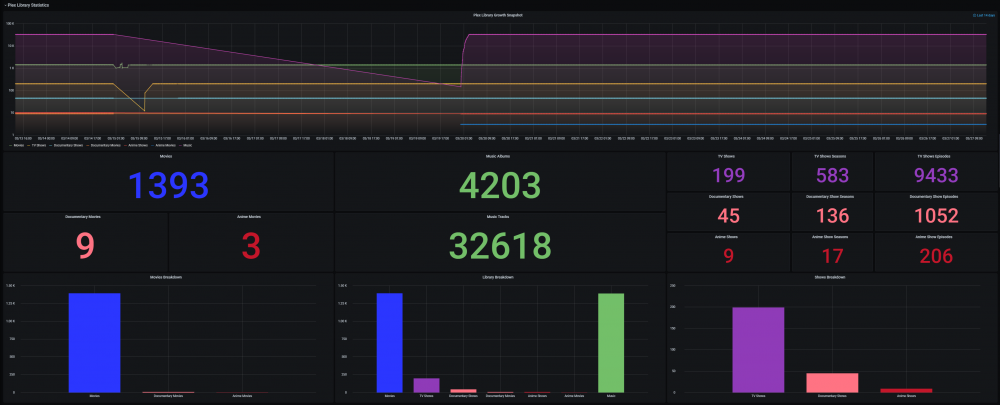
So I am messing with my personal dash and further tweaked the Plex Library stats. I added section totals stats panels, rearranged the furniture, consolidated, and changed the unit to "Locale format" to get the thousands commas. I think it looks great and will be adding this to UUD 1.7. Before: After: And it goes without saying, you guys will do whatever you want with your Plex Library stats panels. I'm adding all this stuff as a foundation for your to build upon and to provide example code. If any of you have suggestions, I'd be happy to add them. Also, I would love to see how you guys have adapted my UUD for your personal use.
 1 point
 -
Thanks to @ich777 for the nvidia driver download script for complete driver version support.1 point
-
I would rather automate backups to a local network share rather than unraid.net. I doubt I'll even install the unraid.net plugin as I already have remote access set up to my satisfaction. Disappointed to hear that this plugin's auto-backup for flash will be deprecated in favor of a cloud solution.1 point
-
Have you ruled out Plex doing a scan of the media? Dec 29 17:55:10 BlackBox kernel: mdcmd (34): set md_write_method 1 You've got turbo mode enabled. Any write to any drive will result in them all spinning up.1 point
-
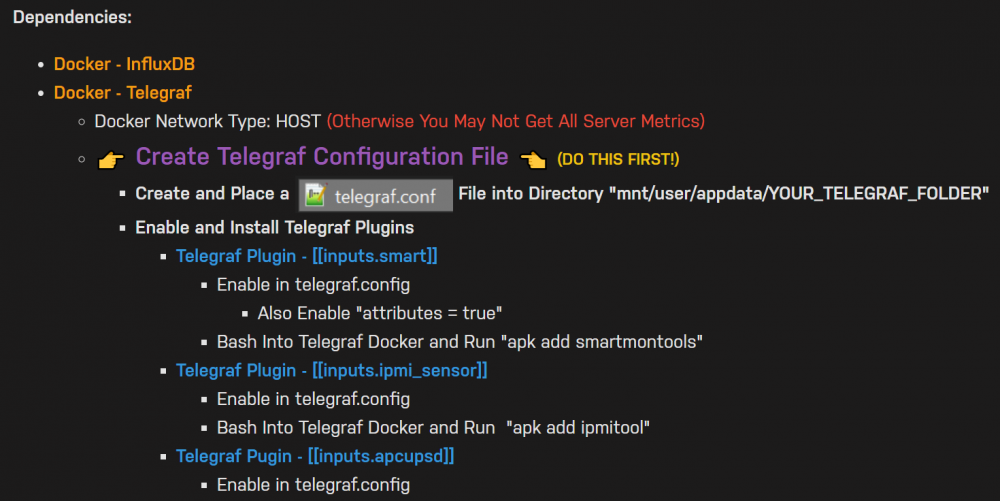
Sweet. Glad you got it working. I updated the install/dependencies sections on post 1 to include this explicitly for the Telegraf config. Just in case anyone else isn't clear on it or forgets that single line. Cheers!
 1 point
 -
solved! Changing from SeaBIOS to OVMF did the trick.1 point
-
Okay, I've done this several dozen times now, so here goes. Part 1 -- Getting, Converting and Resizing the Image 1. Download the VirtualBox VM from https://dietpi.com -- Make sure it's named: DietPi_VirtualBox-x86_64-Buster.7z 2. Uncompress this into an empty folder. Keep the DietPi_VirtualBox-x86_64-Buster.ova 3. Untar DietPi_VirtualBox-x86_64-Buster.ova -- Resulting in 3 new files. We will focus on the .vmdk file. tar -xf DietPi_VirtualBox-x86_64-Buster.ova 4. Convert the .vmdk into a qcow2 file. qemu-img convert -p -f vmdk -O qcow2 DietPi_VirtualBox-x86_64-Buster-disk001.vmdk DietPi_64GB.qcow2 5. Resize the qcow2 file to 64GB, or whatever size you want the final image to be. qemu-img resize DietPi_64GB.qcow2 64G 6. Convert this 64GB qcow2 file to a raw image. qemu-img convert -p -f qcow2 -O raw DietPi_64GB.qcow2 DietPi_64GB.img Part 2 -- Adding the Image to unRAID Create a VM using Debian template. Change BIOS to SeaBIOS. Primary vDisk Location = Manual -- Add the location of the raw image from Part 1. Primary vDisk Bus = SATA Click [Create] When DietPi first starts, it'll automatically resize the partition inside the image. Thats all folks! Let me know if you come across this and found it helpful, or have any questions. Some notes: I chose to use the VirtualBox image rather than the VMware option, as it doesn't require the need to use 3rd party tools and many times more steps to get the same result 😅1 point
-
Seems so be a very old story of Linux vs. Microsoft.... Its a known issue since Samba 4.0 (2013...) If you add the following to "Settings" -> "SMB" -> "SMB Extras" in unRAID and restart the Array, VHD/ISO should work. Unless you really need SMB3 features, it should do the trick. max protocol= SMB2_02 As You can see, patches are still beeing applied... https://bugzilla.samba.org/show_bug.cgi?id=10159 The last fix is quite new, maybe not yet realeased and ready to use.1 point