Leaderboard


Popular Content
Showing content with the highest reputation on 04/15/21 in Posts
-
Amazing work guys - thank you. Also thanks to @SpaceInvaderOne for an awesome video on it! I love your videos.4 points
-
Original comment thread where idea was suggested by reddit user /u/neoKushan : https://old.reddit.com/r/unRAID/comments/mlcbk5/would_anyone_be_interested_in_a_detailed_guide_on/gtl8cbl/ The ultimate goal of this feature would be to create a 1:1 map between unraid docker templates and docker-compose files. This would allow users to edit the docker as either a compose file or a template and backing up and keeping revision control of the template would be simpler as it would simply be a docker-compose file. I believe the first step in doing so is changing the unraid template structure to use docker-compose labels for all the metadata that unraid uses for its templates that doesn't already have a 1:1 map to docker-compose. this would be items such as WebUI, Icon URL, Support Thread, Project Page, CPU Pinning, etc. Most of the meat of these templates are more or less direct transcriptions of docker-compose, put into a GUI format. I don't see why we couldn't take advantage of this by allowing users to edit and backup the compose file directly.2 points
-
New Release ###2021.04.15 - Changed text for field description of "Force move of files on a schedule:" to "Force move of all files on a schedule:" - No log entry for this, only an email with the output will be sent, like most cron jobs. Basically I put it back to how it used to work. The cron entry in the configs now calls unraids original mover file. None of the plug-in settings will be read (other than the time/s specified in the cron text field).2 points
-
If you go to Settings -> Global Share Settings and turn on the help (the ? icon at the top right) you'll see the explanation of how the first item works. Enable Disk Shares is set to Auto by default, which means If it is indeed set to Auto then look below to see if Disk4 is either on the Excluded Disks list (default setting is "None") or not on the Included Disks list (default setting is "All") and correct the setting accordingly. Note that these are Global Share Settings. You can fine tune each User Share individually via the Shares page. EDIT: From the config/share.cfg file in the diagnostics: shareDisk="auto" shareUser="e" shareUserInclude="disk1,disk2,disk3" shareUserExclude="" Disk4 is not included.2 points
-
had more of a in depth look into this this morning and i can confirm if i switch to netherlands i am seeing 503 gateway failures on PIA side, but its intermittent, i restarted the container and it started fine, so i am happy that no changes to the API have happened, its just PIA being a bit shit, hopefully they will get it sorted, god PIA can really be a Pain In the Arse sometimes.2 points
-
Docker labels is probably something we can do in Unraid 6.10 Thx for the explanation.2 points
-
Hi guys, i got inspired by this post from @BRiT and created a bash script to allow you set media to read only to prevent ransomware attacks and accidental or malicious deletion of files. The script can be executed once to make all existing files read only, or can be run using cron to catch all newly created files as well. The script has an in-built help system with example commands, any questions let me know below. Download by issuing the following command from the unRAID 'Terminal' :- curl -o '/tmp/no_ransom.sh' -L 'https://raw.githubusercontent.com/binhex/scripts/master/shell/unraid/system/no_ransom/no_ransom.sh' && chmod +x '/tmp/no_ransom.sh' Then to view the help simply issue:- /tmp/no_ransom.sh Disclaimer:- Whilst i have done extensive tests and runs on my own system with no ill effects i do NOT recommend you run this script across all of your media until you are fully satisfied that it is working as intended (try a small test share), i am in no way responsible for any data loss due to the use of this script.1 point
-
Overview: Support thread for lnxd/XMRig in CA. Application: XMRig - https://github.com/xmrig/xmrig Docker Hub: https://hub.docker.com/r/lnxd/xmrig GitHub: https://github.com/lnxd/docker-xmrig Please ensure that you know what you're doing before setting this up, as excessively high temperatures are BAD for computers and could damage your hardware / eventuate in data loss. Instructions: Install lnxd's XMRig via CA. Add in your XMR receive address to the wallet field. Update the pool address to your closest node or preferred pool. Don't forget to pay attention to the port if you change pools, as they tend to use arbitrary ports. Set the --donate-level you would like to enable. Eg. entering a 1 causes XMRig to mine for 99 minutes for you, and then 1 minute for the fee option chosen in the next step. Setting the --donate-level flag to 0 will not work unless you follow the steps below. There are 3 fee options enabled by a custom build from my fork of the latest release source. This allows for some options that aren't available in the base version: no-fee: Makes it possible to set the --donate-level flag to 0%. Unless you set it to 0%, the fee goes to the developer of XMRig. dev-fee: The fee goes to the developer of XMRig. lnxd-fee: The fee goes to me 🙃 Thank you in advance if you choose this option. Turn on advanced mode for the template and select CPU core / thread pairs that you would like to use in CPU pinning. I recommend leaving core 1 and its thread pair unselected, as it could possibly cause Unraid to unexpectedly slow down / the Docker engine to quit if things get too intense while mining. Run the container and check the temperature of your CPU and other hardware regularly for at least 20-30 minutes to ensure everything is safe and stable. If you get any errors that you can't decipher, feel free reach out and I'll take a look for you. (Optional) To increase your hash rate, you can add and run the following User Script. At the moment, in order to reset your MSR values to default you need to restart your Unraid host. For this reason, it needs to be re-run after every boot as the updated values do not survive reboots. The script installs msr-tools and then updates the registry values to optimise your CPU for XMRig. This may have performance implications for other functions on your server. The logs will also show that XMRig is being run with MSR MOD disabled, but if you run this script it serves the same purpose and you should get a higher hash rate. #!/bin/bash # Write XMRig Optimised MSR values # https://github.com/xmrig/xmrig/blob/master/scripts/randomx_boost.sh VERSION=1.3 echo "Installing msr-tools v${VERSION}" echo "" echo "(don't!) blame lnxd if something goes wrong" echo "" curl -fsSL https://packages.slackonly.com/pub/packages/14.2-x86_64/system/msr-tools/msr-tools-${VERSION}-x86_64-1_slonly.txz -o /tmp/msr-tools-${VERSION}-x86_64-1_slonly.txz upgradepkg --install-new /tmp/msr-tools-${VERSION}-x86_64-1_slonly.txz rm /tmp/msr-tools-${VERSION}-x86_64-1_slonly.txz echo "" echo "Optimising register values for XMRig" echo "" modprobe msr if cat /proc/cpuinfo | grep "AMD Ryzen" >/dev/null; then if cat /proc/cpuinfo | grep "cpu family[[:space:]]:[[:space:]]25" >/dev/null; then echo "Detected Ryzen (Zen3)" wrmsr -a 0xc0011020 0x4480000000000 wrmsr -a 0xc0011021 0x1c000200000040 wrmsr -a 0xc0011022 0xc000000401500000 wrmsr -a 0xc001102b 0x2000cc14 echo "MSR register values for Ryzen (Zen3) applied" else echo "Detected Ryzen (Zen1/Zen2)" wrmsr -a 0xc0011020 0 wrmsr -a 0xc0011021 0x40 wrmsr -a 0xc0011022 0x1510000 wrmsr -a 0xc001102b 0x2000cc16 echo "MSR register values for Ryzen (Zen1/Zen2) applied" fi elif cat /proc/cpuinfo | grep "Intel" >/dev/null; then echo "Detected Intel" wrmsr -a 0x1a4 0xf echo "MSR register values for Intel applied" else echo "No supported CPU detected" fi echo "" echo "Done!" echo "To reset values, please reboot your server." If you get stuck, please feel free to reply to this thread and I'll do my best to help out 🙂
 1 point
 -
This container will no longer be maintained or supported as of 23.07.2021. Fork it, modify it, do whatever with it if you need it. Docker container for Ethereum mining with CUDA (nsfminer) with Nvidia OC capabilities. This Docker container was inspired by the docker-nsfminer which was inspired by docker-ethminer. It uses the nsfminer with OC capabilities with the Nvidia driver. This docker will allow for over- and underclocking of Nvidia GPU's for Ethereum mining in a docker. One docker template per GPU. GitHub project: https://github.com/olehj/docker-nsfminerOC Questions about mining specific questions, workers and wallets will not be answered anymore. There's enough guides and information out there in the sky. Google it, please. Support here is limited to the docker container, where most is answered in this post below: Requirements Unraid 6.9+ NVIDIA drivers for your GPU installed* Docker is set to run in privileged mode, it is required for overclocking and for setting the drivers in persistence mode. GPU with at least 5GB memory or more (current requirement is above 4,2GB). *) Verified working Nvidia driver: v460.73.01 (Production Branch) - v465.X does not allow for overclocks with Unraid/docker combo for unknown reasons. Installation Install this docker container using CA (Community Applications), search for NsfminerOC and install! Configuration Variable Default Value Description ------------------------------------------------------------------------------------------- NSFMINER_GPU 0 Set GPU ID to use (open terminal and check "nvidia-smi") NSFMINER_GPUPOWERLIMIT 150 Set power limit for GPU in Watt (set this as low as you can with highest possible hashrates) NSFMINER_POWERMIZER 2 Set PowerMizer performance level (0=adaptive, 1=max performance, 2=auto) NSFMINER_GPUGFXCLOCKOFFSET 0 Set GPU graphics clock offset (under- or overclock your GPU in MHz offset) NSFMINER_GPUMEMCLOCKOFFSET 0 Set GPU memory clock offset (overclock your memory in MHz, NB! often these values are the double of what they are shown as in Windows so just crank it up!) NSFMINER_HWMON 2 Set Feedback level from nsfminer (feedback from the miner, 0=off, 1=temp+fan, 2=temp+fan+power) NSFMINER_TRANSPORT stratum1+ssl Set transport for worker NSFMINER_ETHADDRESS 0x516eaf4546BBeA271d05A3E883Bd2a11730Ef97b Set your worker ethereum address (or mine an hour or so for me if you wanna support my docker work ;) NSFMINER_WORKERNAME unraid-worker Set a worker name NSFMINER_ADDRESS1 eu1.ethermine.org Set address 1 for worker, both must be set NSFMINER_ADDRESS2 us1.ethermine.org Set address 2 for worker, both must be set NSFMINER_PORT1 5555 Set port for address 1 NSFMINER_PORT2 5555 Set port for address 2 NSFMINER_GPUFANCONTROLL 0 Set GPU fan controll, 0 will run auto and other fan settings are ignored. GPU MUST have exactly 2 fan controllers available, else this container will fail if this is used. NSFMINER_GPUFAN1 0 Set the FAN ID 1 of GPU (check fan ID with "nvidia-settings -q fans" in terminal) NSFMINER_GPUFANSPEED1 100 Set the speed in percent of FAN ID 1 NSFMINER_GPUFAN2 1 Set the FAN ID 2 of GPU (check fan ID with "nvidia-settings -q fans" in terminal) NSFMINER_GPUFANSPEED2 100 Set the speed in percent of FAN ID 2 Running View the logs for worker output Overclocking example Some cards will report that they are read-only when trying to overclock them, such as Quadro cards. This is normal behavior as they are factory locked. For on-demand overclocking, open the "Logs" to check the hashrates when the docker container is running. Then open "Console" to enter in tuning data manually to figure out the optimized mining values for your card. When all values are found, store them in the variables in the docker container edit in Unraid. The GPU ID is set to "0", adjust yours accordingly. The examples below is set for a GTX 1070. Set the PowerMizer mode to 0=adaptive, 1=max performance, 2=auto nvidia-settings -a [gpu:0]/GPUPowerMizerMode=1 Adjust the GPU Graphics clock offset on all performance levels, crank it up until it starts giving errors and then back up. If you are on a 3000-series card, you might want to underclock this one instead and save the power consumption (check example settings for other cards below). nvidia-settings -a [gpu:0]/GPUGraphicsClockOffsetAllPerformanceLevels=200 Adjust the GPU Memory clock offset, crank this one up until it gives errors, crashes or decreases in hashrates, then back it up to a stable value. nvidia-settings -a [gpu:0]/GPUMemoryTransferRateOffsetAllPerformanceLevels=800 Finally, adjust the power limit. Decrease this as much as possible until you hit a target where the hashrates fall. Optimally calculate how much power vs. hashrates you can squeeze out. Sometimes some fine tuning with less or more clocks and power draw can give you better profit. Slightly less hashrates with less power draw might be better profit! nvidia-smi -i 0 -pl 135 Other GPU value examples GPU PowerMizer GPU GFX GPU MEM Power limit Hashrates (~) Effective Score -------------------------------------------------------------------------------------------------- RTX 3080 1 (-300)-(-200) 2300-2500 230-235 97.0-98.5 MH/s 0,421-0,419 * RTX 3070 1 (-600)-(-550) 2300-2400 130-135 60.0-60.2 MH/s 0,462-0,446 * GTX 1070 Stock 1 200 800 135 28 MH/s 0,207 GTX 1070 OC 1 100 400 135 28 MH/s 0,207 Quadro P2000 1 0 0 65 15.6 MH/s 0,24 Some cards might have higher factory clocks in VBIOS like these GTX 1070 GPU's. One of these cards is an OC optimized VBIOS/card, the other one just a standard VBIOS/card with less cooling. The target to reach the hashrates might vary, don't use this table for your own input, this is just an example and might be slightly used for a reference of where it should be. The values might need slight tuning after a while as it might wear out the real top performance of the memory chips, or the ambient temperature simply rises etc. *) The effective score of the RTX 3000 cards shows that it might even be better to run at slightly lower hashrates and power limit, than trying to boost it all up, even with just 5 watts. Fan curves You can also play around with the fan curves, setting it low to reduce the noise can also impact the hashrates. But maybe you want to duplicate your docker container for a "optimized run mode" and a "night mode". Adjusting fan curves might require 2 fan controllers on the graphics card, if the docker container fails and the GPU has only one controller, use "auto" setting (default). Adjust fan controller, 0=auto, 1=manual nvidia-settings -a [gpu:0]/GPUFanControlState=1 Adjust speed for fan 1 (same procedure for fan 2, just replace the number with another fan ID), value in %: nvidia-settings -a [fan:0]/GPUTargetFanSpeed=80 Setting up multiple cards/containers root@Odin:~# nvidia-smi Tue Apr 6 15:06:36 2021 +-----------------------------------------------------------------------------+ | NVIDIA-SMI 460.67 Driver Version: 460.67 CUDA Version: 11.2 | |-------------------------------+----------------------+----------------------+ | GPU Name Persistence-M| Bus-Id Disp.A | Volatile Uncorr. ECC | | Fan Temp Perf Pwr:Usage/Cap| Memory-Usage | GPU-Util Compute M. | | | | MIG M. | |===============================+======================+======================| ID -> | 0 GeForce GTX 1070 On | 00000000:04:00.0 Off | N/A | | 51% 76C P2 135W / 135W | 4631MiB / 8119MiB | 100% Default | | | | N/A | +-------------------------------+----------------------+----------------------+ ID -> | 1 Quadro P2000 On | 00000000:83:00.0 Off | N/A | | 92% 81C P0 65W / 75W | 4862MiB / 5059MiB | 100% Default | | | | N/A | +-------------------------------+----------------------+----------------------+ ... The output of "nvidia-smi" in the terminal will show you each GPU ID, this ID you enter under NSFMINER_GPU variable. If you have multiple GPU's: Install first the NsfminerOC container via CA. Configure the first NsfminerOC Click "Add container" and select one of your NsfminerOC templates Configure your second container Repeat steps 1-4 for third, fourth etc...1 point
-
Today's blog follows a couple of student's educational journey with Unraid in their classroom: https://unraid.net/blog/unraid-in-the-classroom If you are an educator and would like to teach with Unraid in the classroom, please reach out to me directly as we would love to support this educational program at your place of instruction!1 point
-
That's really good to know! I haven't had time to look into the above yet, but more info on this is certainly helpful. That's great to hear! Thank you. If you need any help or thoughts on the implementation, feel free to reach out!1 point
-
I would not overthink it . My 2 cents: If the zfs status -x does not show all is healthy , just flag it as not healthy and additionaly show the status and action fields contents, which are designed to tell you what is going on. So rather then trying to interpret and grade the level of severity , you just spit out what zfs gives us.1 point
-
Here: https://drive.google.com/file/d/1rhH3lulCYtfMGaT2sQhJnwiMqxhcEhA_/view?usp=sharing1 point
-
Server is up and running again. Cleaned the CPU cooler and the shutdowns have disappeared since then. Thank you @JorgeB and @trurl! Lesson learned for the next time :)1 point
-
You've got to either double check your mover tuning settings, remove the plugin, or ask in it's support thread.1 point
-
I created some User.Scripts that call for different things so I can pin point some without locking/unlocking everything all the time so I can avoid dupes too. Sure you could run Chattr directly on the file and then just delete it, but honestly I get lazy and often forget code so I just make up some scripts and let them do the work. Security.Lock.Media locks TV share and Movies share Security.Unlock.Media unlocks TV share and Movies share Security.Unlock.TV unlocks TV share Security.Unlock.Movies unlocks Movies share on and on1 point
-
It didn't run at all, even after the update. Seems like the issue might still be there. I'll report back tomorrow if it still didn't run.1 point
-
That was it, Toronto which was previously working, isn't anymore. Thanks!1 point
-
Default is auto, and since there's no data, disk share is enable.1 point
-
Cheers John! Many thanks i have ordered a 12TB WD to Replace the 8TB as i am slowly replacing the Seagates with WD! that 8TB is the newest of the seagates i have 3 x 4TB Seagates left in there that are like 5 years old so they was going to be swapped out anyway but in oldest date order, See how i get on after Replacing the Disk1 point
-
I have this one: https://www.amazon.com/BEYIMEI-Controller-Expansion-Non-Raid-Converter/dp/B08DFK4LZ7/ref=mp_s_a_1_1?dchild=1&keywords=asm1166&qid=1618470992&sr=8-11 point
-
Looks like a power/connection problem, I believe that Microserver uses a fan-out cable for the disks, that would be the first thing to check.1 point
-
Even in that crazy long post, I forgot to add something. After first installing the plugin, there were more options listed in the dropdown boxes for CPU temp and MB temp on the settings page. Temps from coretemp and i5500_temp modules in addition to the temps and fan speeds from the w83795adg module. But for some reason those only showed up the first time I ran thru the setup. I'm not really interested in using the temps from those modules, so its not a big deal to loose them, but its weird that they showed up initially and then sort of permanently went away. So I thought it might help to share that info too.1 point
-
I do confirm it works with Sweden (where it doesn't with Netherlands, France, Belgium), thanks a lot for your assistance1 point
-
Thanks man. I appreciate it. It wasn’t you. I’ve been mulling it over for a few weeks. I’m sure I’ll be back. Just going on hiatus. Nvidia GPU monitoring was going to be in UUD 1.7, and since I still want that personally, I’m sure we’ll see it eventually added. The passion and excitement to further develop this will return...1 point
-
https://www.ebay.com/itm/Silverstone-SST-ECS06-6Port-SATA-Gen3-6Gbps-Non-RAID-PCI-E-Low-Profile-Card-/333915822650?hash=item4dbeef1a3a1 point
-
Why is your docker.img path "/mnt/disk1/Share 1/docker.img" ? Probably the space in that path is breaking something. Can't imagine why you would want a user share named "Share 1" anyway. The conventional place for docker.img is in the system user share at /mnt/user/system/docker/docker.img or similar. And system share should be configured to stay on cache. Also, your appdata has some files on the array. Since docker isn't currently working and appdata is cache-prefer, you should be able to get those moved to cache by going to Main - Array Operation and click Move.1 point
-
Is there a default passphrase or email configured if youd want to change your pool payout settings? I found it searching the thread, my bad. Thank you for this docker!1 point
-
Ugh I have a time machine. I will dial it back down 🙂1 point
-
Thank you for the help JorgeB. That worked out great. It's been 270 something days since I last had access or thought of any of this.1 point
-
Thank you for the second opinion. That worked1 point
-
Forgive me if I am missing something, but can you not backup and restore your dockers using the plugin: CA Backup / Restore Appdata You can choose it to automatically backup your appdata folder? I am not sure about VM's yet I am yet to run one (only recently set my server up 1-2 days ago) but will run one soon and I agree with your points on being able to backup all the configurations to be able to easy restore them if something happened but I thought this plugin backed up your libvert folder as well, is that not enough to restore from there? Since it backs it up to the array and you have parity on your array, aren't you all good in terms of backing up? I think I might be missing something here though1 point
-
Hi guys! I think I'm a bit lost and I need some help. I'm sure there is a really simple and logical reason for this, but I can't see it atm. NPM with cloudflare and a custom domain works great if I set the "Forward Hostname / IP" in NPM to my internal unraid IP (192.168.1.85) and port to an docker running on say 8080 or 7878. This works both locally and remote. What I can't get to work is the forwarding to the local ip of my VM that is running Emby (192.168.1.75:8096). When I change it from 192.168.1.85 to 192.168.1.75 I get error 502 right away. Is there something wrong with my network config? NPM docker (and all other dockers) is using in "Brigde" and my VM is using br0. EDIT: NVM, It's working now, after a reboot.1 point
-
Das hatte ich total vergessen.... Ja.. Stimmt, ohne diesen Parameter läuft iCloud nicht..1 point
-
Hey! Let me share my syslinux config which works on my system... label Unraid OS menu default kernel /bzimage append video=vesafb:off,efifb:off vfio_iommu_type1.allow_unsafe_interrupts=1 isolcpus=4-15,20-31 pcie_acs_override=downstream,multifunction initrd=/bzroot ( Do not just copy & paste this) I guess you do not allow unsafe interrupts? What is the behaviour if you try a linux vm?1 point
-
netherlands also had issues a while ago and its possible they still have intermittent issues, try changing to sweden.1 point
-
With E-bay and LSI cards, you are buying the vendor. Look at the Vendor's reputation. See what his policy is on returns. You could ask a question of him to see what his response is and how quickly he answers you. Look to see how long he has been a E-bay vendor. There are a lot of the older LSI cards that are advertised as 'New'. Well that is a sure sign that they are counterfeit! (LSI has 'disappeared' as a separate company several years ago. You can find online that the rights now belong to Broadcom. You can find what they currently make here: https://www.broadcom.com/products/storage ) However, Broadcom apparently still sells those older chip sets and several(?) Chinese companies have copied the design of the older LSI boards (right down to the paper labels used on the genuine cards)! These boards are usually referred to as counterfeit as the true origin is being concealed. And no one has any idea what the quality level of these cards are. (Remember that while genuine LSI chips are (probably) used, everything else is sourced elsewhere.) Some of these manufacturers may produce a quality product but without his identifying marking on the board, there is no way for a average consumer to figure out what he is getting! An long term E-bay vendor, with a reputation to protect, will be vetting his sources carefully to protect it.1 point
-
We're working on a design that lets driver plugins be automatically updated when we issue a release.1 point
-
If you want to have it listen to 80/443 you need to change the container itself. When using bridge network mode there is no such thing as "port mapping" so whatever you do it still will be 8080 But: I also needed 80/443 so I forked this project and change the ports so you can use that1 point
-
I have the same problem, but my CPU Scaling is set to Performance, so changing that didn't solve the problem. The CPU usage and RAM usage in task manager inside the Windows VM show low to medium usage, and the usage shown in Unraid is also equally low, and yet the Windows VM is super choppy and laggy even in things as simple of opening file explorer or simple web browsing. It was running perfectly fine before the upgrade to Unraid 6.9.1, so that's the only thing I can think of that could have caused this. It seems so weird that it would lag like that when the CPU usage, RAM usage, Disk usage, etc. are all fairly low according that task manager and Process Lasso in Windows, and the CPU clock speed is at 4.8 GHz (checked using `grep MHz /proc/cpuinfo` in the unraid terminal). Edit: After updating from 6.9.1 to 6.9.2, the problem seems to be fixed. I will come back and add more if the problem reappears Edit 2: The problem came back about a day later, it is intermittently lagging with occassional moments of perfect smooth performance. I have tested while viewing the resource usage in Unraid and there is no correlation at all between changes in Unraid CPU usage or memory usage vs. the weird lag inside the VM, and same with the resource usage reported by task manager. It is like there is a bottleneck somewhere, but there is not sign of additional load anywhere and it was running flawlessly on Unraid 6.7.X and 6.8.X, I also tried update the VFIO guest drivers, and updating graphics driver in Windows, neither of those had any impact on the problem I may make a separate thread for my scenario, since my computer's symptoms are now starting to deviate from the OP of this thread1 point
-
For those have 3d printer you can check this out https://www.thingiverse.com/thing:4691890 3d print your own server with 24 hard drives case1 point
-
What's the type of device? If it's a Windows PC running the Wireguard client, you have to edit the tunnel and disable "Block untunneled traffic (kill-switch)".1 point
-
Thanks to @ich777 for the nvidia driver download script for complete driver version support.1 point
-
I would rather automate backups to a local network share rather than unraid.net. I doubt I'll even install the unraid.net plugin as I already have remote access set up to my satisfaction. Disappointed to hear that this plugin's auto-backup for flash will be deprecated in favor of a cloud solution.1 point
-
This clearly falls within the bounds of the release methodology. I appreciate the conflicting pressures and associated costs but its time, 332 days between security releases is pushing it a bit.1 point
-
Have you ruled out Plex doing a scan of the media? Dec 29 17:55:10 BlackBox kernel: mdcmd (34): set md_write_method 1 You've got turbo mode enabled. Any write to any drive will result in them all spinning up.1 point
-
Just to be clear, the UUD does not have an "All In One" Package. You are referring to the "Grafana UNRAID Stack" (GUS), which I DID NOT develop. GUS was created by @testdasi, and I GAVE HIM PERMISSION to include the UUD as a built in Dashboard within GUS' default Grafana install. So any and all support for GUS, should be addressed in his forum post. However, I will always help where I can. As such, even with GUS, you DO have a Telegraf docker, as it is installed as a part of GUS, along with Grafana and Influx DB (appdata folder). You can made any modifications to Telegraf's configs, etc. the same way you do if you don't use GUS, and manually install those 3 dockers and then import the UUD into Grafana.1 point
-
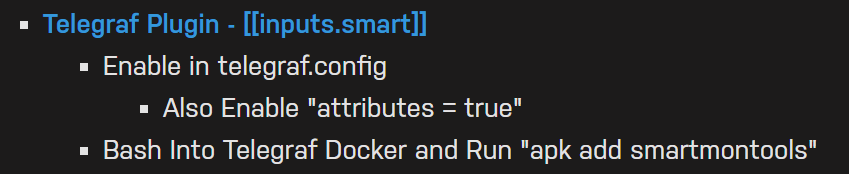
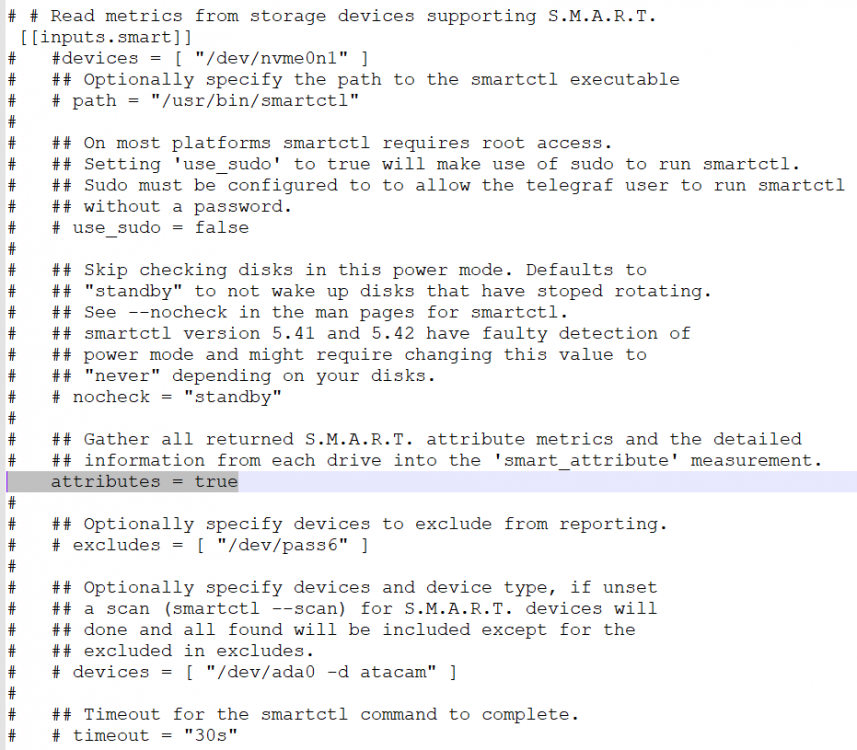
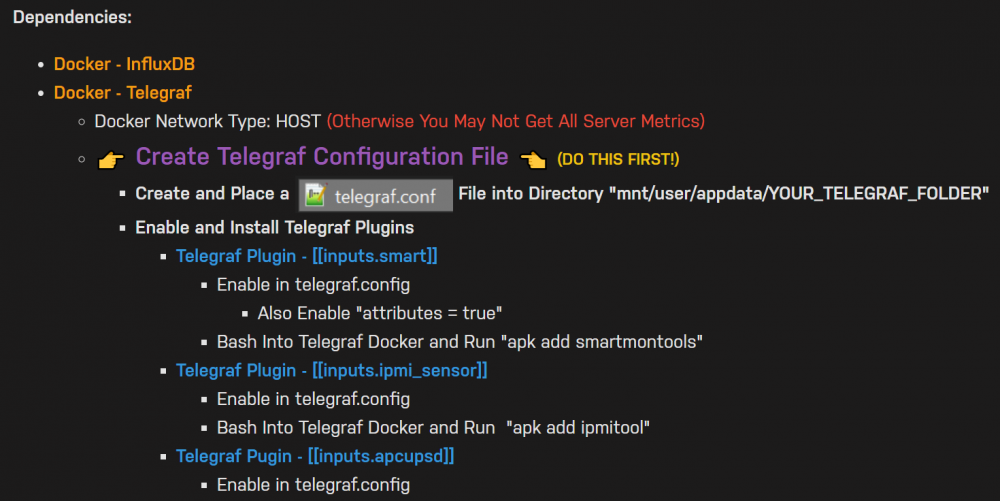
@MrLondon Yeah, so you missed the following when you installed it. Within the telegraf.conf, you need to add/uncomment/set to true the following line. Get that fixed and restart all 3 dockers (Grafana/Telegraf/InfluxDB). I'm betting your issue will be resolved!
 1 point
 -
Sweet. Glad you got it working. I updated the install/dependencies sections on post 1 to include this explicitly for the Telegraf config. Just in case anyone else isn't clear on it or forgets that single line. Cheers!
 1 point
 -
solved! Changing from SeaBIOS to OVMF did the trick.1 point