Leaderboard


Popular Content
Showing content with the highest reputation on 04/18/21 in all areas
-
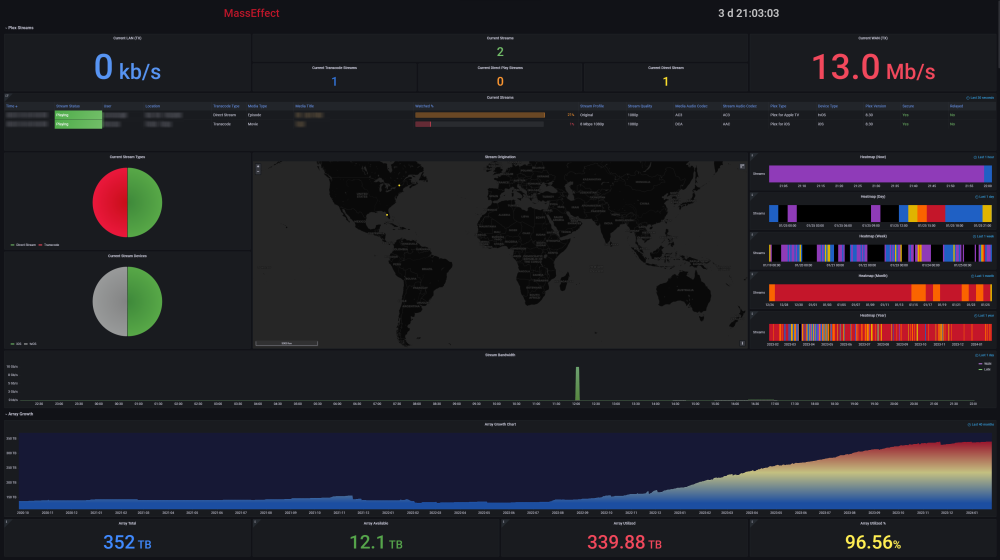
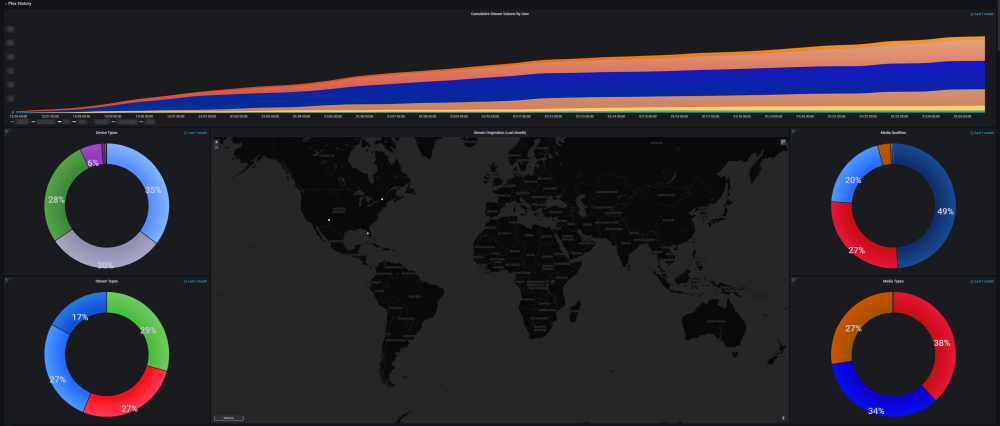
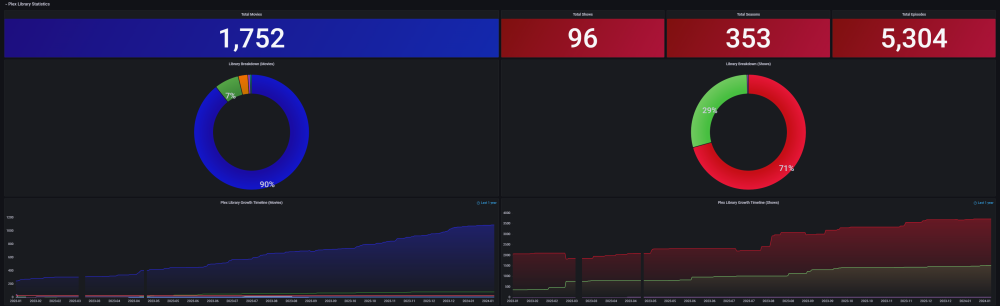
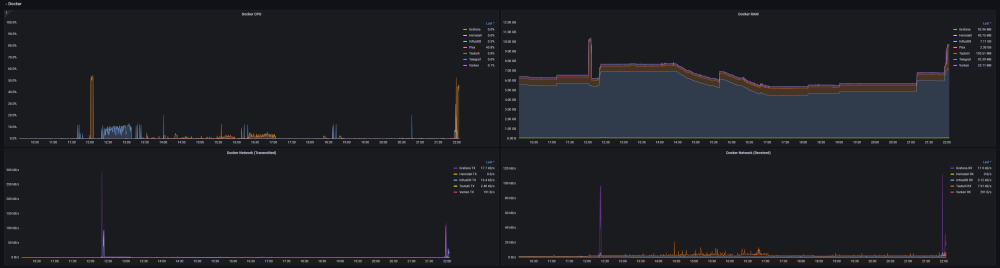
Ultimate UNRAID Dashboard (UUD) Current Release: UUD 1.7 (2024-03-30) UUD NEWS: 2024-03-30: UUD Version 1.7 is Released 2022-06-19: The UUD Forum Topic Reaches 200,000 Views! 👀👀👀 2022-04-17: The UUD Tops 5,000 Unique Downloads 💾💾💾 🎉 2021-05-26: The UUD Forum Topic Reaches 1,000 Replies! 2021-04-17: The UUD Forum Topic Reaches 100,000 Views! 👀👀 2021-03-26: The UUD Tops 2,500 Unique Downloads 💾💾 🎉 2021-03-23: UUD 1.6 is Featured Again in the "Best of the Forum" Blog 🥇🥇 2021-03-21: The UUD Forum Topic Reaches 75,000 Views! 👀 2021-03-20: UUD Version 1.6 is Released 2021-01-19: The UUD Forum Topic Reaches 50,000 Views! 👀 2021-01-11: The UUD Tops 1,000 Unique Downloads 💾 🎉 2021-01-07: UUD is Featured as the FIRST "Best of the Forum" Blog 🥇 2021-01-06: UUD Donations Site is Created 2020-12-31: UUD Version 1.5 is Released 2020-10-09: UUD Version 1.4 is Released 2020-09-28: The UUD is Featured in the Official UNRAID Monthly Newsletter (September 2020)! 2020-09-21: UUD Version 1.3 is Released 2020-09-14: UUD Version 1.2 is Released 2020-09-12: UUD Version 1.1 is Released 2020-09-11: The UUD is Born and Version 1.0 is Released Overview: Welcome to the OFFICIAL UUD forum topic. The UUD is my attempt to develop the Ultimate Grafana/Telegraf/InfluxDB/Plex/Tautulli/Varken dashboard. This entire endeavor started when one of our fellow users @hermy65 posed a simple, but complex question in another forum topic (see post #3). I decided to give it a shot, as I am an IT professional, specifically in enterprise data warehouse/SQL server. After a few days of hard work, UUD version 1.0 was released. We are currently on Version 1.6, and the project is in active development. If you are a Grafana developer, or have had experience building dashboards/panels for UNRAID, please let me know. I would love to collaborate. Version 1.7 Screenshots (Click the Images as They are Very High Resolution): Disclaimer: This is based on my 30 Drive UNRAID Array. So this shows an example of a fully maxed out UNRAID setup with max drives, dual CPUs, Dual NICs, etc. You will/may need to adjust panels & queries to accommodate your individual UNRAID/PLEX architecture. I have spent many hours custom coding new functionality and features based on that original template. Much has been learned and I am excited to see how far this can go in the future. Thanks again! Developers: Primary Developer: @falconexe (USA) UUD Creator | Active Development | Panels | Database Queries | Integration | Look & Feel | GUI | Refinement | Support Developer/Colleague: @GilbN (Europe) Dashboard Examples | Back-end | Dynamics | REGEX | Support | Tutorials Contributors: @hermy65 @atribe @Roxedus @SpencerJ @testdasi @ChatNoir @MammothJerk @FreeMan @danktankk @Dazog @MrLondon @LTM @mattekure @ptchernegovski @caplam @RockDawg @corgan @jbartlett @Hoopster @LTM @skaterpunk0187 @valiente @Agent531C @JudMeherg @Jturner @1471 Dependencies (Last Updated On 2021-03-20) Docker - InfluxDB Docker - Telegraf Docker Network Type: HOST (Otherwise You May Not Get All Server Metrics) 👉 Create Telegraf Configuration File 👈 (DO THIS FIRST!) Create and Place a File into Directory "mnt/user/appdata/YOUR_TELEGRAF_FOLDER" Enable and Install Telegraf Plugins Telegraf Plugin - [[inputs.net]] Enable in telegraf.config Telegraf Plugin - [[inputs.docker]] Enable in telegraf.config Telegraf Plugin - [[inputs.diskio]] Enable in telegraf.config To Use Static Drive Serial Numbers in Grafana (For DiskIO Queries) Do the Following: Edit telegraf.conf > [[inputs.diskio]] > Add device_tags = ["ID_SERIAL"] > Use ID_SERIAL Flag in Grafana Now Upon Booting, You Don't Have to Worry About SD* Mounts Changing (So Your Graphs Don't Get Messed Up!) You Can Also Set Overrides on the Query Fields to Map the Serial Number to a Common Disk Name Like "DISK01" etc. Telegraf Plugin - [[inputs.smart]] Enable in telegraf.config Also Enable "attributes = true" Bash Into Telegraf Docker and Run "apk add smartmontools" Telegraf Plugin - [[inputs.ipmi_sensor]] Enable in telegraf.config Bash Into Telegraf Docker and Run "apk add ipmitool" Telegraf Plugin - [[inputs.apcupsd]] Enable in telegraf.config Telegraf Docker Config Add New Path (NOTE: This path has now been merged into Atribe's Telegraf Docker Image. (Thanks @GilbN & @atribe) Post Arguments "/bin/sh -c 'apk update && apk upgrade && apk add ipmitool && apk add smartmontools && telegraf'" Docker - Grafana Grafana Plugins Pie Chart Panel Run Following Command in Docker: grafana-cli plugins install grafana-piechart-panel World Map Run Following Command in Docker: grafana-cli plugins install grafana-worldmap-panel JSON API Run Following Command in Docker: grafana-cli plugins install marcusolsson-json-datasource Dynamic Image Panel Run Following Command in Docker: grafana-cli plugins install dalvany-image-panel Docker - Tautulli Docker - Varken CA Plugin: IPMI Tools License: GeoLite2 (Free) NON SERVER HARDWARE (If You Cannot Use "IPMI" and Need to Use "Sensors") As an alternate to IPMI to monitor CPU/System/Aux Temps, you can try the Sensors Plugin. Telegraf Plugin - [[inputs.sensors]] Enable in the Telegraf Config (Uncomment It) Bash into the Telegraf Docker and Execute "apk add lm_sensors" Stop All 3 Dockers (Grafana > Telegraf > InfluxDB) If You Want to Keep This Plugin in Perpetuity, You Will Need to Modify Your Telegraf Docker Post Arguments (Adding lm_sensors): "/bin/sh -c 'apk update && apk upgrade && apk add ipmitool && apk add smartmontools && apk add lm_sensors && telegraf'" Start All 3 Dockers (InfluxDB > Telegraf > Grafana) Dashboard Variables (Update These For Your Server): I haven't been this geeked out about my UNRAID server in a very long time. This is the cherry on top for my UNRAID experience going back to 2014 when I built my first server. Thanks everyone! VERSION 1.7 (Current) Ultimate UNRAID Dashboard - Version 1.7 - 2024-03-30 (falconexe).json @SpencerJ


 1 point
 -
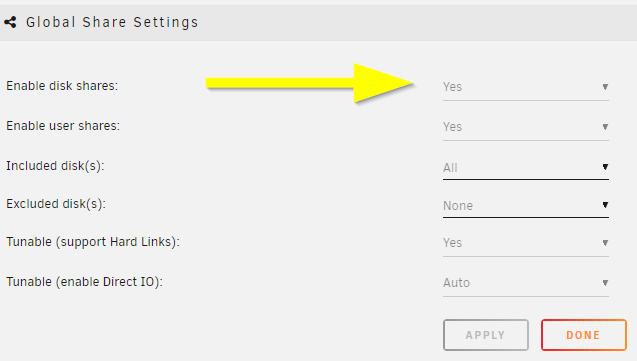
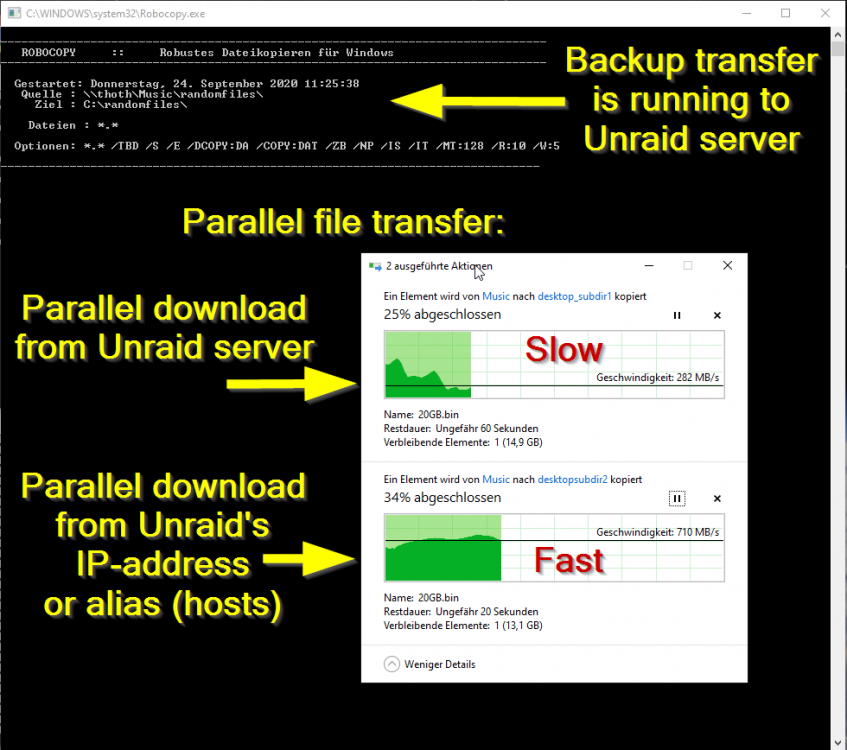
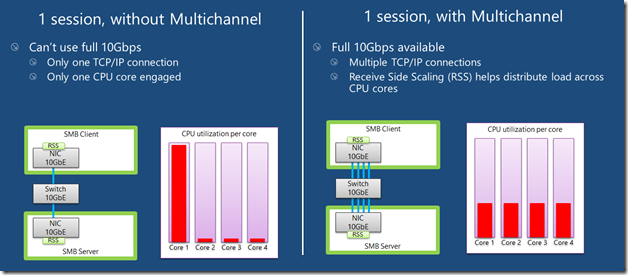
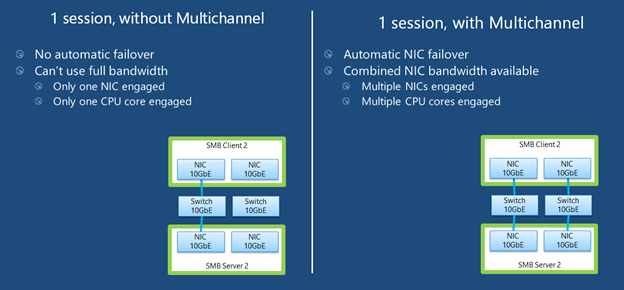
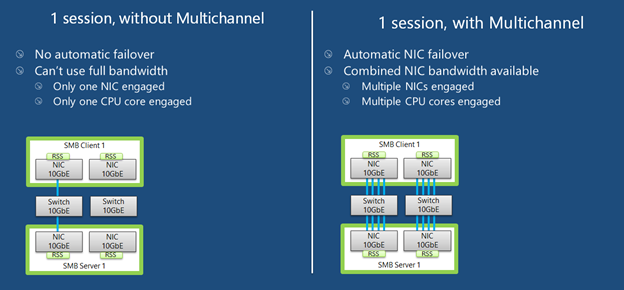
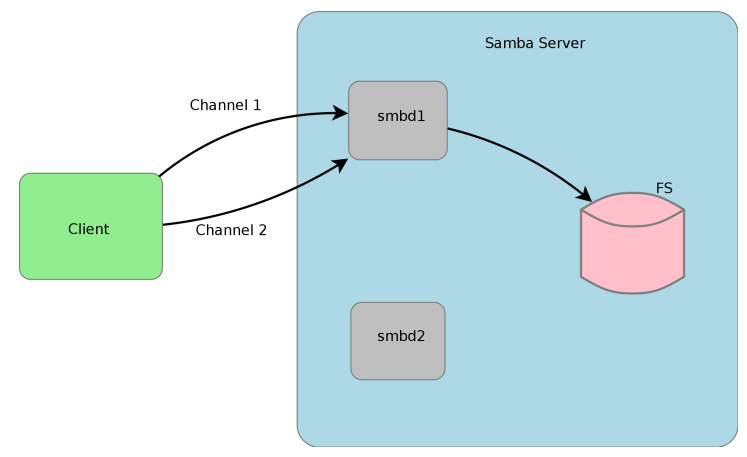
I'm using Unraid for a while now and collected some experience to boost the SMB transfer speeds: Donate? 🤗 1.) Choose the right CPU The most important part is to understand that SMB is single-threaded. This means SMB uses only one CPU core to transfer a file. This is valid for the server and the client. Usually this is not a problem as SMB does not fully utilize a CPU core (except of real low powered CPUs). But Unraid adds, because of the ability to split shares across multiple disks, an additional process called SHFS and its load raises proportional to the transfer speed, which could overload your CPU core. So the most important part is, to choose the right CPU. At the moment I'm using an i3-8100 which has 4 cores and 2257 single thread passmark points: And since I have this single thread power I'm able to use the full bandwith of my 10G network adapter which was not possible with my previous Intel Atom C3758 (857 points) although both have comparable total performance. I even was not able to reach 1G speeds while a parallel Windows Backup was running (see next section to bypass this limitation). Now I'm able to transfer thousands of small files and parallely transfer a huge file with 250 MB/s. With this experience I suggest a CPU that has around 1400 single thread passmark points to fully utilize a 1G ethernet port. As an example: The smallest CPU I would suggest for Unraid is an Intel Pentium Silver J5040. P.S. Passmark has a list sorted by single thread performance for desktop CPUs and server CPUs. 2.) Bypass single-thread limitation The single-thread limitation of SMB and SHFS can be bypassed through opening multiple connections to your server. This means connecting to "different" servers. The easiest way to accomplish that, is to use the ip-address of your server as a "second" server while using the same user login: \\tower\sharename -> best option for user access through file explorer as it is automatically displayed \\10.0.0.2\sharename -> best option for backup softwares, you could map it as a network drive If you need more connections, you can add multiple entries to your windows hosts file (Win+R and execute "notepad c:\windows\system32\drivers\etc\hosts"): 10.0.0.2 tower2 10.0.0.2 tower3 Results If you now download a file from your Unraid server through \\10.0.0.2 while a backup is running on \\tower, it will reach the maximum speed while a download from \\tower is massively throttled: 3.) Bypass Unraid's SHFS process If you enable access directly to the cache disk and upload a file to //tower/cache, this will bypass the SHFS process. Beware: Do not move/copy files between the cache disk and shares as this could cause data loss! The eligible user account will be able to see all cached files, even those from other users. Temporary Solution or "For Admins only" As Admin or for a short test you could enable "disk shares" under Settings -> Global Share Settings: By that all users can access all array and cache disks as SMB shares. As you don't want that, your first step is to click on each Disk in the WebGUI > Shares and forbid user access, except for the cache disk, which gets read/write access only for your "admin" account. Beware: Do not create folders in the root of the cache disk as this will create new SMB Shares Safer Permanent Solution Use this explanation. Results In this thread you can see the huge difference between copying to a cached share or copying directly to the cache disk. 4.) Enable SMB Multichannel + RSS SMB Multichannel is a feature of SMB3 that allows splitting file transfers across multiple NICs (Multichannel) and create multiple TCP connection depending on the amount of CPU Cores (RSS) since Windows 8. This will raise your throughput depending on your amount of NICs, NIC bandwidth, CPU and used settings: This feature is experimental SMB Multichannel is considered experimental since its release with Samba 4.4. The main bug for this state is resolved in Samba 4.13. The Samba developers plan to resolve all bugs with 4.14. Unraid 6.8.3 contains Samba 4.11. This means you use Multichannel on your own risk! Multichannel for Multiple NICs Lets say your mainboard has four 1G NICs and your Client has a 2.5G NIC. Without Multichannel the transfer speed is limited to 1G (117,5 MByte/s). But if you enable Multichannel it will split the file transfer across the four 1G NICs boosting your transfer speed to 2.5G (294 MByte/s): Additionally it uses multiple CPU Cores which is useful to avoid overloading smaller CPUs. To enable Multichannel you need to open the Unraid Webterminal and enter the following (the file is usually empty, so do not wonder): nano /boot/config/smb-extra.conf And add the following to it: server multi channel support = yes Press "Enter+X" and confirm with "Y" and "Enter" to save the file. Then restart the Samba service with this command: samba restart Eventually you need to reboot your Windows Client, but finally its enabled and should work. Multichannel + RSS for Single and Multiple NICs But what happens if you're server has only one NIC. Now Multichannel is not able to split something, but it has a sub-feature called RSS which is able to split file transfers across multiple TCP connections with a single NIC: Of course this feature works with multiple NICs, too: But this requires RSS capability on both sides. You need to check your servers NIC by opening the Unraid Webterminal and entering this command (could be obsolete with Samba 4.13 as they built-in an RSS autodetection ) egrep 'CPU|eth*' /proc/interrupts It must return multiple lines (each for one CPU core) like this: egrep 'CPU|eth0' /proc/interrupts CPU0 CPU1 CPU2 CPU3 129: 29144060 0 0 0 IR-PCI-MSI 524288-edge eth0 131: 0 25511547 0 0 IR-PCI-MSI 524289-edge eth0 132: 0 0 40776464 0 IR-PCI-MSI 524290-edge eth0 134: 0 0 0 17121614 IR-PCI-MSI 524291-edge eth0 Now you can check your Windows 8 / Windows 10 client by opening Powershell as Admin and enter this command: Get-SmbClientNetworkInterface It must return "True" for "RSS Capable": Interface Index RSS Capable RDMA Capable Speed IpAddresses Friendly Name --------------- ----------- ------------ ----- ----------- ------------- 11 True False 10 Gbps {10.0.0.10} Ethernet 3 Now, after you are sure that RSS is supported on your server, you can enable Multichannel + RSS by opening the Unraid Webterminal and enter the following (the file is usually empty, so do not wonder): nano /boot/config/smb-extra.conf Add the following and change 10.10.10.10 to your Unraid servers IP and speed to "10000000000" for 10G adapter or to "1000000000" for a 1G adapter: server multi channel support = yes interfaces = "10.10.10.10;capability=RSS,speed=10000000000" If you are using multiple NICs the syntax looks like this (add RSS capability only for supporting NICs!): interfaces = "10.10.10.10;capability=RSS,speed=10000000000" "10.10.10.11;capability=RSS,speed=10000000000" Press "Enter+X" and confirm with "Y" and "Enter" to save the file. Now restart the SMB service: samba restart Does it work? After rebooting your Windows Client (seems to be a must), download a file from your server (so connection is established) and now you can check if Multichannel + RSS works by opening Windows Powershell as Admin and enter this command: Get-SmbMultichannelConnection -IncludeNotSelected It must return a line similar to this (a returned line = Multichannel works) and if you want to benefit from RSS then "Client RSS Cabable" must be "True": Server Name Selected Client IP Server IP Client Interface Index Server Interface Index Client RSS Capable Client RDMA Capable ----------- -------- --------- --------- ---------------------- ---------------------- ------------------ ------------------- tower True 10.10.10.100 10.10.10.10 11 13 True False In Linux you can verify RSS through this command which returns one open TCP connection per CPU core (in this case we see 4 connections as my client has only 4 CPU cores, altough my server has 6): netstat -tnp | grep smb tcp 0 0 192.168.178.8:445 192.168.178.88:55975 ESTABLISHED 3195/smbd tcp 0 0 192.168.178.8:445 192.168.178.88:55977 ESTABLISHED 3195/smbd tcp 0 0 192.168.178.8:445 192.168.178.88:55976 ESTABLISHED 3195/smbd tcp 0 0 192.168.178.8:445 192.168.178.88:55974 ESTABLISHED 3195/smbd Note: Sadly Samba does not create multiple smbd processes, which means we still need a CPU with high single thread performance to benefit from RSS. This is even mentioned in the presentation: If you are interested in test results, look here. 5.) smb.conf Settings Tuning I did massive testing with a huge amount of smb.conf settings provided by the following websites and really NOTHING resulted in a noticable speed gain: https://wiki.samba.org/index.php/Performance_Tuning https://wiki.samba.org/index.php/Linux_Performance https://wiki.samba.org/index.php/Server-Side_Copy https://www.samba.org/~ab/output/htmldocs/Samba3-HOWTO/speed.html https://www.samba.org/samba/docs/current/man-html/smb.conf.5.html https://lists.samba.org/archive/samba-technical/attachments/20140519/642160aa/attachment.pdf https://www.samba.org/samba/docs/Samba-HOWTO-Collection.pdf https://www.samba.org/samba/docs/current/man-html/ (search for "vfs") https://lists.samba.org/archive/samba/2016-September/202697.html https://codeinsecurity.wordpress.com/2020/05/18/setting-up-smb-multi-channel-between-freenas-or-any-bsd-linux-and-windows-for-20gbps-transfers/ https://www.snia.org/sites/default/files/SDC/2019/presentations/SMB/Metzmacher_Stefan_Samba_Async_VFS_Future.pdf https://www.heise.de/newsticker/meldung/Samba-4-12-beschleunigt-Verschluesselung-und-Datentransfer-4677717.html I would say the recent Samba versions are already optimized by default. 6.) Choose a proper SSD for your cache You could use Unraid without an SSD, but if you want fast SMB transfers an SSD is absolutely required. Else you are limted to slow parity writes and/or through your slow HDD. But many SSDs on the market are not "compatible" for using it as an Unraid SSD Cache. DRAM Many cheap models do not have a DRAM Cache. This small buffer is used to collect very small files or random writes before they are finally written to the SSD and/or is used to have a high speed area for the file mapping-table. In Short, you need DRAM Cache in your SSD. No exception. SLC Cache While DRAM is only absent in cheap SSDs, SLC Cache can miss in different price ranges. Some cheap models use a small SLC cache to "fake" their technical data. Some mid-range models use a big SLC Cache to raise durability and speed if installed in a client pc. And some high-end models do not have an SLC Cache, as their flash cells are fast enough without it. Finally you are not interested in SLC Cache. You are only interested in continuous write speeds (see "Verify Continuous Writing Speed") Determine the Required Writing Speed But before you are able to select the right SSD model you need to determine your minimum required transfer speed. This should be simple. How many ethernet ports do you want to use or do you plan to install a faster network adapter? Lets say you have two 5G ports. With SMB Multichannel its possible to use them in sum and as you plan to install a 10G card in your client you could use 10G in total. Now we can calculate: 10G * 117.5 MByte/s (real throughput per 1G ethernet) = 1175 MByte/s and by that we have two options: buy one M.2 NVMe (assuming your motherboard has such a slot) with a minimum writing speed of 1175 MByte/s buy two or more SATA SSDs and use them in a RAID0, each with a minimum writing speed of 550 MByte/s Verify Continuous Writing Speed of the SSD As an existing "SLC Cache" hides the real transfer speed you need to invest some time to check if your desired SSD model has an SLC cache and how much the SSD throttles after its full. A solution could be to search for "review slc cache" in combination with the model name. Using the image search could be helpful as well (maybe you see a graph with a falling line). If you do not find anything, use Youtube. Many people out there test their new ssd by simply copying a huge amount of files on it. Note: CrystalDiskMark, AS SSD, etc Benchmarks are useless as they only test a really small amount of data (which fits into the fast cache). Durability You could look for the "TBW" value of the SSD, but finally you won't be able to kill the SSD inside the warranty as long your very first filling of your unraid server is done without the SSD Cache. As an example a 1TB Samsung 970 EVO has a TBW of 600 and if your server has a total size of 100TB you would waste 100TBW on your first fill for nothing. If you plan to use Plex, think about using the RAM as your transcoding storage which would save a huge amount of writes to your SSD. Conclusion: Optimize your writings instead of buying an expensive SSD. NAS SSD Do not buy "special" NAS SSDs. They do not offer any benefits compared to the high-end consumer models, but cost more. 7.) More RAM More RAM means more caching and as RAM is even faster than the fastest SSDs, this adds additional boost to your SMB transfers. I recommend installing two identical (or more depening on the amount of slots) RAM modules to benefit from "Dual Channel" speeds. RAM frequency is not as important as RAM size. Read Cache for Downloads If you download a file twice, the second download does not read the file from your disk, instead it uses your RAM only. The same happens if you're loading covers of your MP3s or Movies or if Windows is generating thumbnails of your photo collection. More RAM means more files in your cache. The read cache uses by default 100% of your free RAM. Write Cache for Uploads Linux uses by default 20% of your free RAM to cache writes, before they are written to the disk. You can use the Tips and Tweaks Plugin to change this value or add this to your Go file (with the Config Editor Plugin) sysctl vm.dirty_ratio=20 But before changing this value, you need to be sure to understand the consequences: Never use your NAS without an UPS if you use write caching as this could cause huge data loss! The bigger the write cache, the smaller the read cache (so using 100% of your RAM as write cache is not a good idea!) If you upload files to your server, they are 30 seconds later written to your disk (vm.dirty_expire_centisecs) Without SSD Cache: If your upload size is generally higher than your write cache size, it starts to cleanup the cache and in parallel write the transfer to your HDD(s) which could result in slow SMB transfers. Either you raise your cache size, so its never filled up, or you consider totally disabling the write cache. With SSD Cache: SSDs love parallel transfers (read #6 of this Guide), so a huge writing cache or even full cache is not a problem. But which dirty_ratio value should you set? This is something you need to determine by yourself as its completely individual: At first you need to think about the highest RAM usage that is possible. Like active VMs, Ramdisks, Docker containers, etc. By that you get the smallest amount of free RAM of your server: Total RAM size - Reserved RAM through VMs - Used RAM through Docker Containers - Ramdisks = Free RAM Now the harder part: Determine how much RAM is needed for your read cache. Do not forget that VMs, Docker Containers, Processes etc load files from disks and they are all cached as well. I thought about this and came to this command that counts hot files: find /mnt/cache -type f -amin -86400 ! -size +1G -exec du -bc {} + | grep total$ | cut -f1 | awk '{ total += $1 }; END { print total }' | numfmt --to=iec-i --suffix=B It counts the size of all files on your SSD cache that are accessed in the last 24 hours (86400 seconds) The maximum file size is 1GiB to exclude VM images, docker containers, etc This works only if you hopefully use your cache for your hot shares like appdata, system, etc Of course you could repeat this command on several days to check how it fluctuates. This command must be executed after the mover has finished its work This command isn't perfect as it does not count hot files inside a VM image Now we can calculate: 100 / Total RAM x (Free RAM - Command Result) = vm.dirty_ratio If your calculated "vm.dirty_ratio" is lower than 5% (or even negative), you should lower it to 5 and buy more RAM. between 5% and 20%, set it accordingly, but you should consider buying more RAM. between 20% and 90%, set it accordingly If your calculated "vm.dirty_ratio" is higher than 90%, you are probably not using your SSD cache for hot shares (as you should) or your RAM is huge as hell (congratulation ^^). I suggest not to set a value higher than 90. Of course you need to recalcuate this value if you add more VMs or Docker Containers. #8 Disable haveged Unraid does not trust the randomness of linux and uses haveged instead. By that all encryptions processes on the server use haveged which produces extra load. If you don't need it, disable it through your Go file (CA Config Editor) as follows: # ------------------------------------------------- # disable haveged as we trust /dev/random # https://forums.unraid.net/topic/79616-haveged-daemon/?tab=comments#comment-903452 # ------------------------------------------------- /etc/rc.d/rc.haveged stop
.png.9a4f708867a76b362eeaac6a578d6d21.png)
 1 point
 -
What? Why? Consider this plugin like topping on steini84's ZFS Plugin. I love how Unraid makes it easy to run Docker and VMs and to allow for expansion with mismatched drives, but coming from another software I learned to trust ZFS more than other filesystems. If you're reading this, I guess you prefer it too. While the ZFS Plugin brings our loved filesystem, and I fully understand and share steini84's opinion about keeping the plugin pure and simple with just the binaries, I missed a way to keep an eye on the status of my pool without resorting to shell commands or copy-pasted scripts. In fact I was not fully trusting the pool just because I was not monitoring it adequately. Judging by some threads I was not the only one, so... Enter ZFS-companion. What does it do? Right now it's just a dashboard widget. It shows the general health of all your pools, plus a list of all the zpools with their status and last scrub information. I don't have ETAs, but I have some ideas of what could be added to make it more useful (not necessarily in order): Full (secondary?) widget in the disks section of the dashboard Section in the Main screen, something like Unassigned Devices does for other filesystems. Integrated scripts for scrubbing and error reporting, to avoid copy-pasting from different places Shares management Maybe with some detailed page about more detailed info (pool properties? snapshot list?) How to install Install it directly (Plugins -> Install Plugin -> Enter Url then click INSTALL): https://raw.githubusercontent.com/GiorgioAresu/ZFS-companion-unraid/main/ZFS-companion.plg If you have suggestions or issues you can post them below. If you can provide examples of different messages for pools status, scrub results, errors, and so on please write them (PM if you want) because I'm having difficulties finding all possible values. Troubleshooting If you're having issues or the state is not what you'd expect, please post the output of the following commands: zpool status -x zpool status -v zpool list
 1 point
 -
advCPaMV Support the plugin? This is my Advanced Copy and Move Plugin for unRAID v6.8.3 and later. Please feel free to test it and report back if there are problems. To install it: v6.8.3 and later: Install it using CA or in the unRAID plugin manager by installing from github: https://raw.githubusercontent.com/SlrG/unRAID/master/Plugins/advCPaMV.plg Description: This plugin provides advanced cp and mv shell command alternatives named cpg and mvg that were created by applying the advcpmv-0.9-8.32.patch from here on the coreutils version used by unRAID. The Patch is a modified version of the one available here. But what does it do? cpg and mvg are the normal cp and mv shell commands extended to support the parameters -g or --progress-bar, which will show the progress of the copy or move commands. It will look like this while in progress: cpg -rg temp/ temp1 2 files copied so far... 3.0 GiB / 5.0 GiB [================================> ] 60.0 % Copying at 2.6 GiB/s (about 0h 0m 12s remaining) temp/file2.txt 1.0 GiB / 1.0 GiB [=============================================================> ] 99.9 % And afterwards it will show a summary of the copy process: 5 files ( 5.0 GiB) copied in 44.5 seconds (115.2 MiB/s). THIS SOFTWARE IS PROVIDED 'AS IS' AND WITHOUT ANY EXPRESSED OR IMPLIED WARRANTIES, INCLUDING, BUT NOT LIMITED TO, THE IMPLIED WARRANTIES OF MERCHANTABILITY AND FITNESS FOR A PARTICULAR PURPOSE. THE AUTHOR SHALL NOT BE HELD LIABLE FOR ANY DAMAGES RESULTING FROM THE USE OF THIS SOFTWARE, EITHER DIRECTLY OR INDIRECTLY, INCLUDING, BUT NOT LIMITED TO, LOSS OF DATA OR DATA BEING RENDERED INACCURATE. SlrG1 point
-
Cheers john i am on a flight back home in 4 weeks so no more Tough-book and Satphone frantically trying to sort it,1 point
-
Sometimes you also just don't want any communication between different networks. eg: I'm cheap and can't be bothered to buy a switch that supports VLANs, but I do have various routers available, and have set up things like my Ring Door Bell, and the Alexa's to all run off of a separate router so that the IoT devices (which I do not completely trust from a security standpoint) have zero access to the rest of the network. Even some so-called "trusted devices" (ie: my wife's phone / tablet) I keep off the main network since I'm not 100% in control of them. I don't know about you, but I seriously doubt that any manufacturer for a smart-plug is ever going to release any firmware update for them....1 point
-
wow! passing in the usb hub actually works. steamvr can see headset. setup and calibration pass. it works but there is a weird blur or jittery view when looking around in the headset. like some kind of video lag. i think the video lag might be parsec since... this is a headless unraid server. I will have to experiment with direct attached monitor.
 1 point
 -
Das geht bestimmt auch. Einfach mit User Scripts erstellen und dann liegt das ja unter /tmp. Und Scripte ausführen kann man so: bash /tmp/.../script.sh Hangel dich einfach mal mit "ls -la /tmp" bzw "ls -la /tmp/subdir" durch das Verzeichnis bis du das Script gefunden hast.1 point
-
Yes No really as I remember it. There is no powerdown required when doing a new configuration. I found that there is a section in the manual which describes the use of this option: https://wiki.unraid.net/Manual/Storage_Management#Reset_the_array_configuration1 point
-
IF you pursue this option, I would install the Unassigned Devices plugin and mount you old drives using that plugin. Then copy the files from the old drives to the array.1 point
-
Sure that this is not a BTRFS problem? All these reports, SSD or HDD, have one single factor in common: BTRFS. I would not ignore the FS in these cases.1 point
-
That's correct except the discovery prefix should just be homeassistant (without /tower)1 point
-
The usual reason for setting static IP addresses on the router instead of on each device is that by default every device is already set to DHCP, and all of the management can then be handled in one place. The other is that assuming that at some point you change your router. The replacement hands out addresses of 192.168.1.x and the original handed out 192.168.0.x Any device that you had set on the device itself with a static IP would now be unable to communicate when connected to the replacement router. By doing the management on the router itself, all devices would still work (albeit not on the IP address you want), and you can simply adjust the settings there, rather than on the device which may be a pain to get at if you can't access it due to the wrong subnet. Beyond all that, I'm a fan of always having static IPs for every device that's permanently connected (ie: ethernet) and only utilizing DHCP for mobile devices. Changing the pool of available addresses for DHCP is so that any static addresses you may set do not possibly conflict with an address being handed out via DHCP. But, truth be told I've never seen a router that ever hands out a conflicting address, and if I did I'd probably immediately replace the router as it is too completely brain-dead for me to trust it to do anything right at all.1 point
-
Okay I'll change that for the future, thanks very much for your help.1 point
-
The default if you didn't change it scans /mnt/user, so all your shares1 point
-
Yes, read the previous posts.1 point
-
More security, fully manageable firewall, u2f fido, live like journalctrl in dashboard...1 point
-
No need to since you're backing up shares in Unraid, not folders within the app. Unraid.net will automatically backup the flash drive to the cloud as it changes. You can also use the appdata backup plugin to backup the flash and appdata to a destination of your choice.1 point
-
If your cache is a SSD, cache dirs is not really necessary for cache only shares. Cache dirs is intended for spinning disks. The idea is to not spin up a disk when accessing directories - like browsing a share. This keeps disks from spinning up unnecessarily and you don't have a delay while waiting for a disk to spin up.1 point
-
@tetrapod thanks for the support. It took a lot of hours but if it helps others that's the idea. It has been posted to all three Deluge repositories and NGNX PM home too. I looked at swag but seemed like more effort 'at the time' and I wasn't sure if it supported multi proxy hosts with different SSLs which I need.1 point
-
Run a non correcting check, if no more errors are found you're fine.1 point
-
Very nice plugin ! Thank you @SlrG1 point
-
@JorgeB I think there are referencing the Unraid Share options in VMs. They can add one but second fails. But I have been able to add 2.
 1 point
 -
driver: ixgbe version: 5.10.28-Unraid firmware-version: 0x00012b2c expansion-rom-version: bus-info: 0000:03:00.0 supports-statistics: yes supports-test: yes supports-eeprom-access: yes supports-register-dump: yes supports-priv-flags: yes1 point
-
Just need to check "parity is already valid" after the new config and before array start.1 point
-
Nice write-up! I was struggling with this three weeks ago when starting with reverse proxy. In the end I went with swag and did the job understanding that route. But if I had this information then it could have been different. Maybe it should be copied to other places also?1 point
-
Do you have the Mover Tuner plugin? Update settings or Remove should fix Mover.1 point
-
Both checks were correcting and both found errors, and only on parity1, which is kind of strange, what was done between the two checks?1 point
-
SpaceInvader One has just put a video up on this subject.1 point
-
I see a message in the syslog about too many devices connected and as a result the array non being started - you do not by any chance have a removable USB device plugged in? Not sure about your connection issue Maybe the Value "invalid" is not no/yes. indicates there is an error introduced in the MyServers support? Have you tried connecting directly via IP using http://192.168.1.44 It also looks like you do not have a password set for the root user - this will stop you being able to make SSH connections on the latest unRaid releases due to tightened security.1 point
-
TBW is partially the expect life but mostly the limit for the device to be within warranty, it doesn't mean the SSD is going to fail when you reach that, for example the cache device for one of my servers has a TBW of 500TB and is currently at 847TB and still going strong, though it's a good idea to monitor that, on NVMe devices you just need to monitor this: This is the estimated life used percentage.1 point
-
@Cliff I was actually getting that same symptom when I first set everything up....but after messing with a bunch of configs...it went away...sadly I'm not really sure what "fixed" that as I was troubleshooting a different problem...I'll see if maybe I can replicate it on a different server1 point
-
Settings - VM Settings, disable the service. Then delete libvirt.img from the system share. If it won't allow you, you'll have to reboot first1 point
-
Not clear to me if you have run a correcting parity check to completion since using the wrong variant of the xfs_repair command? That would certainly have resulted in parity errors that would need correcting. Looking at the diagnostics the last check was correcting and unRaid confusingly reports each corrected sector as part of the error count.1 point
-
I just wanted to give a quick THANK YOU for this post. I was receiving multiple errors when my 8TB Ironwolf drive would spin up. I went through cables, relocating on the controller, and finally trying a new 8TB Ironwolf drive. The issue persisted through all of my measures. Digging a bit deeper, I found this post. I tried the SeaChest commands and the spin up errors are resolved. For anyone else forum searching, here is the syslog output anytime a drive would spin up (sometimes with read errors in unraid, sometimes no read errors as in the example below): Apr 17 11:03:37 Tower emhttpd: spinning up /dev/sdc Apr 17 11:03:53 Tower kernel: sd 7:0:1:0: attempting task abort!scmd(0x000000009175e648), outstanding for 15282 ms & timeout 15000 ms Apr 17 11:03:53 Tower kernel: sd 7:0:1:0: [sdc] tag#1097 CDB: opcode=0x85 85 06 20 00 00 00 00 00 00 00 00 00 00 40 e3 00 Apr 17 11:03:53 Tower kernel: scsi target7:0:1: handle(0x0009), sas_address(0x4433221101000000), phy(1) Apr 17 11:03:53 Tower kernel: scsi target7:0:1: enclosure logical id(0x5c81f660d1f49300), slot(2) Apr 17 11:03:56 Tower kernel: sd 7:0:1:0: task abort: SUCCESS scmd(0x000000009175e648) Apr 17 11:03:56 Tower emhttpd: read SMART /dev/sdc After disabling low current and EPC, here is the result of spinning up the same drives (no errors!): Apr 17 12:08:42 Tower emhttpd: spinning up /dev/sdc Apr 17 12:08:51 Tower emhttpd: read SMART /dev/sdc1 point
-
Nachtrag: Ich habe mich mal durchs Bios gegraben und fleißig Google konsultiert. Außer der Bios Option "externe USB Ports Enable oder Disable" gibt es nicht mehr einzustellen. Habe jetzt aber eine brauchbare Lösung durch ausprobieren gefunden. Es muss immer ein USB3 Port belegt sein. Dann kann ich auch einen weiteren in den 2. USB3 Port stecken und er wird erkannt. Da kann ich mit leben. Vielen Dank für eure Unterstützung. Averall1 point
-
It's working great! Thanks!1 point
-
It's literally on the post before yours. WITH PICTURES. Please, please please people, if you need FREE support for a FREE product. At least TRY to solve it yourself or read / search this forum. Cmon Sent from my Mi 10 Pro using Tapatalk1 point
-
You are very welcome. Glad to be of help.1 point
-
You need to configure a capture solver for flaresolverr. As per the git page, there are currently 2 which you can use, but don't work all that great. Edit your flaresolverr Unraid template to look like this: Now take note of this line in the flaresolverr github: So basically it may or may not work. But the error message will be gone now and hopefully the hcaptcha-solver will eventually work and let you in.
 1 point
 -
Getting a newer version of Seafile for Unraid docker would be fantastic. Someone has already containerized a newer version of Seafile here: https://github.com/ggogel/seafile-containerized1 point
-
Hi @loopback Based on what I understand of your use case and knowledge in security I would also strongly advise against opening any of the 80/443/445 port (or corresponding HTTP, HTTPS and SMB services) to the internet (not that I am an expert myself either). IMO, the simplest and safest way to remotely access your Unraid server is via VPN. In addition to @trurl's suggestion to use WireGuard, I would also recommend OpenVPN, which have been around (and audited) for a long time now, and therefore could be seen by some as potentially less likely to suffer from vulnerabilities compared to WireGuard. If you really cannot use a VPN because of the need to have a VPN client or a VPN-client capable router, then @tudalex suggestion may be the way to go. You would then need to install some sort of web service to access your files (maybe a cloud file service like nextcloud ?). Then, as an additional mitigation measure, you can avoid using default ports for the different services you have opened to the internet, and use high number ports instead (like 45299 instead of 443 for your Nginx proxy). I have personally found it to drastically reduce the number of BOT attacks on my network. Some will argue that this is "security through obscurity" and that therefore it is bad. And some would argue that in some use cases, a bit of obscurity is beneficial. Finally, you could install fail2ban and have it watch for failed attempts to connect to the services running on your server. When a potential attack is detected (i.e. multiple failed connection attempts in a set period of time), fail2ban will ban the IP and prevent it from connecting to your machine. Please feel free to report back with what you did. Best, OP1 point
-
OK, looks like using the 6.9.0-rc2 release got me up and running... Thanks for the help! Is there a tip jar in this place?1 point
-
After a bit more digging found several related posts (after understanding that this is about forcing a user over SMB): Exactly my problem Solution is to add the following lines to your /boot/config/smb-extra.conf [Global] force create mode = 0666 force directory mode = 0777 force user = nobody force group = users create mask = 0666 Marking as solved.1 point
-
Just thought I would mention in case anybody is unaware. Midnight Commander (mc from the command line), a textGUI file manager, is built-in and isn't difficult to figure out, google it. And of course, there are file manager docker apps.1 point
-
Yes, but why does Emby write those files only if you change the path of the docker.img. Where did Emby wrote those .ts files before you changed the path to "PlexRamScratch"? If you don't know it, use this command to find them: find / -path '/proc/*' -prune -o -path '/sys/*' -prune -o -path '/mnt/disk*/*' -prune -o -path '/mnt/user*/*' -prune -o -iname '*.ts' -print Me too. Works flawlessly. Did you use Krusader between your first and last memory check? Because at the beginning it had a low usage: 36.5742 MB krusader And now it reached 5GB. If you used it, maybe it caches files while transfers are running or similar. But if you didn't use it all, this sounds like a bug to me. P.S. You can limit the RAM usage through this extra docker parameter (advanced view): --memory=1G Ok, now things become clearer. My original tweak is only to change the plex config path to /mnt/cache and not the general docker.img path. This means you quoted my tweak in your "warning", but you even don't use it: https://forums.unraid.net/topic/88999-unraid-tweaks-for-media-server-performance/?tab=comments#comment-901831 Changing the general docker.img path is a different tweak, but I didn't even write a guide for this. I use it, but wasn't able to test it with multiple dockers. So its more a "beta" thing. Maybe Emby has a problem with that. If I find the time, I will test that. Can you send me a screenshot of your Emby settings so I can test this with the same settings? I have no experience if Emby is able to clean up the dir as Plex does it. I would suggest to add an additional ramdisk for Emby alone. The steps are the same (could be added to your existing script): mkdir /tmp/EmbyRamScratch chmod -R 777 /tmp/EmbyRamScratch mount -t tmpfs -o size=8g tmpfs /tmp/EmbyRamScratch Now set this path in your emby container as transcoding path. By that it would be also easier to disinguish between the container's ramdisk usage. No idea. Maybe you find the answer here: https://emby.media/community/index.php?/topic/54676-how-often-is-transcoding-temp-cleaned/ Correct. If you want to delete them without rebooting the server, use this command: rm -r /tmp/transcoding-temp If it does, then you could do that. But do not forget. If your SSD becomes full, Plex is not able to write any more data (will probably crash). Because of that I wrote in my guide, that it is useful to set a "Min. free space" in the Global Share Settings > Cache Settings, so caching through usual shares will not fill up your NVMe. Of course it does not influence the Plex usage. If Plex alone fully utilizes the NVMe, then you should leave it to /mnt/user or buy a bigger NVMe. Side note: I hope you set up a backup of your NVMe
 1 point
 -
I was having the same problem wit hthe GUI locking up after an NFS server went down that my unraid box connected to. Fixed it with: /etc/rc.d/rc.nginx restart /etc/rc.d/rc.nginx reload /etc/rc.d/rc.php-fpm restart /etc/rc.d/rc.php-fpm reload1 point
-
I have this: http://mirrors.slackware.com/slackware/slackware64-14.2/slackware64/a/slocate-3.1-x86_64-4.txz and these user scripts using User Scripts plugin # slocateInitialize @ Array startup #!/bin/bash cat << EOF > /etc/updatedb.conf # /etc/updatedb.conf: slocate configuration file PRUNEFS="devpts NFS nfs afs proc smbfs autofs iso9660 udf tmpfs cifs" PRUNEPATHS="/dev /proc /sys /tmp /usr/tmp /var/tmp /afs /net /media /var/lib/docker /mnt/user0 /mnt/user /boot" export PRUNEFS export PRUNEPATHS EOF [ -f /mnt/user/appdata/slocate/slocate.db ] && cp -p /mnt/user/appdata/slocate/slocate.db /var/lib/slocate/slocate.db # slocateBackup @Custom "0 6 * * *" #!/bin/bash cp -vp /var/lib/slocate/slocate.db /mnt/user/appdata/slocate/slocate.db What these extra scripts do is tell slocate where to search (and where not to search) after the plugin is installed and to backup the search database daily @ 6am local time. (about 1hr after the default run of slocate cronjob at 4am (AFAIK that's what it is on my system)1 point
-
How do I replace/upgrade my single cache device? (unRAID v6.2 and above only) This procedure assumes that there are at least some dockers and/or VMs related files on the cache disk, some of these steps are unnecessary if there aren't. Stop all running Dockers/VMs Settings -> VM Manager: disable VMs and click apply Settings -> Docker: disable Docker and click apply For v6.11.5 or older: Click on Shares and change to "Yes" all cache shares with "Use cache disk:" set to "Only" or "Prefer" For v6.12.0 or newer: Click on all shares that are using the pool you want to empty and change them to have the pool as primary storage, array as secondary storage and mover action set to move from pool to array Check that there's enough free space on the array and invoke the mover by clicking "Move Now" on the Main page When the mover finishes check that your cache is empty (any files on the cache root will not be moved as they are not part of any share) Stop array, replace cache device, assign it, start array and format new cache device (if needed), check that it's using the filesystem you want For v6.11.5 or older: Click on Shares and change to "Prefer" all shares that you want moved back to cache For v6.12.0 or newer: Click on Shares and change the mover action to move from array to pool for all shares that you want moved back to cache On the Main page click "Move Now" When the mover finishes re-enable Docker and VMs1 point


.png.9a4f708867a76b362eeaac6a578d6d21.png)


.png.90c84bf62c02cbbcebfbfd318f2f5ae3.png)