Leaderboard


Popular Content
Showing content with the highest reputation on 04/19/21 in all areas
-
Hi guys, the image has now been fixed up, please pull down latest.2 points
-
After tinkering with this for a while, it seems the solution is much simpler than I thought. For some reason, the only step required is to modify the config.php file. No need to install ffmpeg or even to enable the app "Preview Generator" inside Nextcloud. I'll leave what I did here if it can help anyone looking to generate thumbnails for video files : 1. Go to your config.php file located at /mnt/user/appdata/nextcloud/www/nextcloud/config/config.php 2. Just before the end of your config file, add the following lines (after the 'installed' => true,) : 'installed' => true, 'enable_previews' => true, 'enabledPreviewProviders' => array ( 0 => 'OC\\Preview\\TXT', 1 => 'OC\\Preview\\Image', 2 => 'OC\\Preview\\MP3', 3 => 'OC\\Preview\\Movie', 4 => 'OC\\Preview\\MP4', ), ); You can also add other file types that you require (mkv, avi, etc.)2 points
-
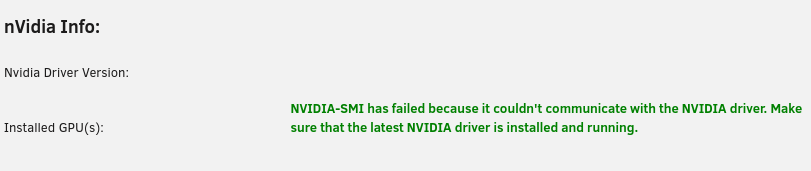
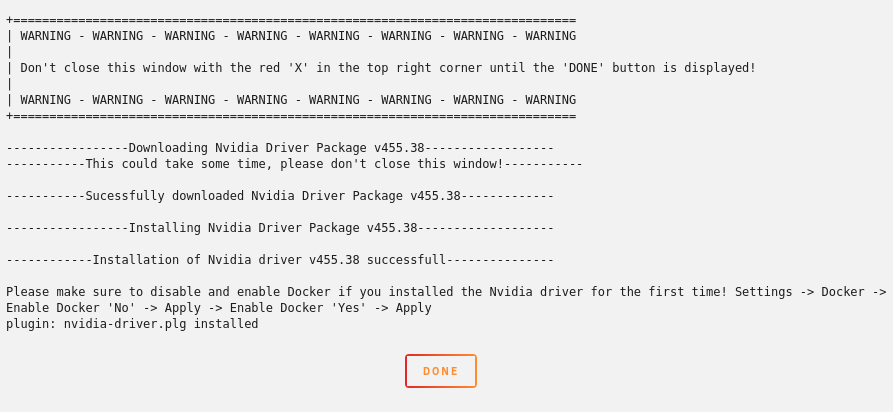
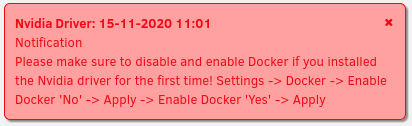
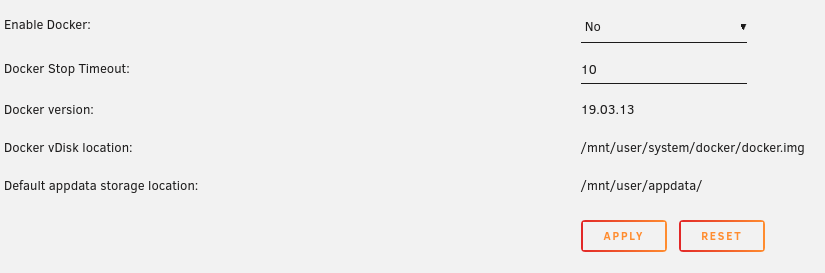
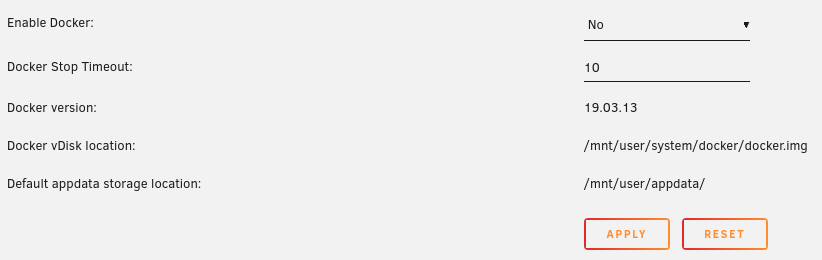
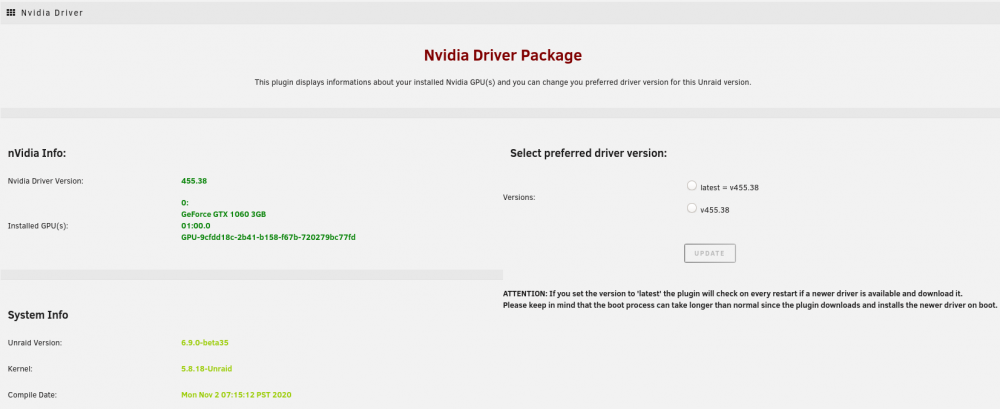
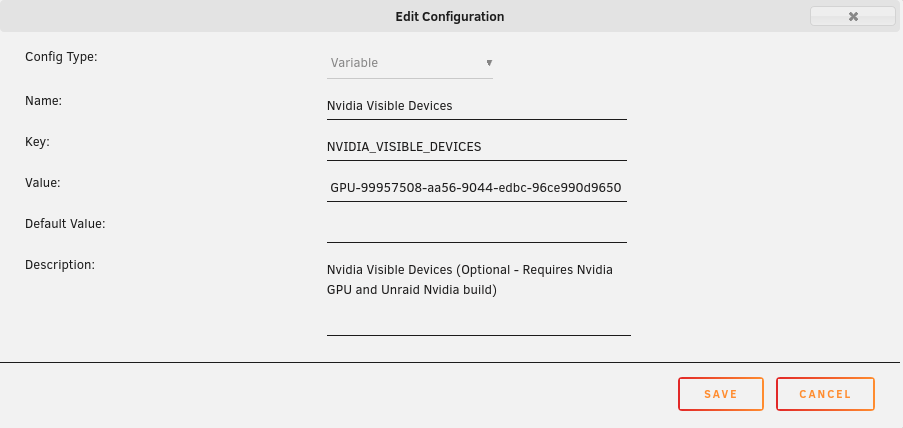
Nvidia-Driver (only Unraid 6.9.0beta35 and up) This Plugin is only necessary if you are planning to make use of your Nvidia graphics card inside Docker Containers. If you only want to use your Nvidia graphics card for a VM then don't install this Plugin! Discussions about modifications and/or patches that violates the EULA of the driver are not supported by me or anyone here, this could also lead to a take down of the plugin itself! Please remember that this also violates the forum rules and will be removed! Installation of the Nvidia Drivers (this is only necessary for the first installation of the plugin) : Go to the Community Applications App and search for 'Nvidia-Drivers' and click on the Download button (you have to be at least on Unraid 6.9.0beta35 to see the Plugin in the CA App) : Or download it directly from here: https://raw.githubusercontent.com/ich777/unraid-nvidia-driver/master/nvidia-driver.plg After that wait for the plugin to successfully install (don't close the window with the , wait for the 'DONE' button to appear, the installation can take some time depending on your internet connection, the plugin downloads the Nvidia-Driver-Package ~150MB and installs it afterwards to your Unraid server) : Click on 'DONE' and continue with Step 4 (don't close this window for now, if you closed this window don't worry continue to read) : Check if everything is installed correctly and recognized to do this go to the plugin itself if everything shows up PLUGINS -> Nvidia-Driver (if you don't see a driver version at 'Nvidia Driver Version' or another error please scroll down to the Troubleshooting section) : If everything shows up correctly click on the red alert notification from Step 3 (not on the 'X'), this will bring you to the Docker settings (if you are closed this window already go to Settings -> Docker). At the Docker page change 'Enable Docker' from 'Yes' to 'No' and hit 'Apply' (you can now close the message from Step 2) : Then again change 'Enable Docker' from 'No' to 'Yes' and hit again 'Apply' (that step is only necessary for the first plugin installation, you can skip that step if you are going to reboot the server - the background to this is that when the Nvidia-Driver-Package is installed also a file is installed that interacts directly with the Docker Daemon itself and the Docker Daemon needs to be reloaded in order to load that file) : After that, you should now be able to utilize your Nvidia graphics card in your Docker containers how to do that see Post 2 in this thread. IMPORTANT: If you don't plan or want to use acceleration within Docker containers through your Nvidia graphics card then don't install this plugin! Please be sure to never use one card for a VM and also in docker containers (your server will hard lock if it's used in a VM and then something want's to use it in a Container). You can use one card for more than one Container at the same time - depending on the capabilities of your card. Troubleshooting: (This section will be updated as soon as more someone reports an issue and will grow over time) NVIDIA-SMI has failed because it couldn't communicate with the NVIDIA driver. Make sure that the latest NVIDIA driver is installed and running.: This means that the installed driver can't find a supported Nvidia graphics card in your server (it may also be that there is a problem with your hardware - riser cables,...). Check if you accidentally bound all your cards to VFIO, you need at least one card that is supported by the installed driver (you can find a list of all drivers here, click on the corresponding driver at 'Linux x86_64/AMD64/EM64T' and click on the next page on 'Supported products' there you will find all cards that are supported by the driver. If you bound accidentally all cards to VFIO unbind the card you want to use for the Docker container(s) and reboot the server (TOOLS -> System devices -> unselect the card -> BIND SELECTED TO VFIO AT BOOT -> restart your server). docker: Error response from daemon: OCI runtime create failed: container_linux.go:349: starting container process caused "process_linux.go:449: container init caused "process_linux.go:432: running prestart hook 0 caused \"error running hook: exit status 1, stdout: , stderr: nvidia-container-cli: device error: GPU-9cfdd18c-2b41-b158-f67b-720279bc77fd: unknown device\\n\""": unknown.: Please check the 'NVIDIA_VISIBLE_DEVICES' inside your Docker template it may be that you accitentally have what looks like a space at the end or in front of your UUID like: ' GPU-9cfdd18c-2b41-b158-f67b-720279bc77fd' (it's hard to see that in this example but it's there) If you got problems that your card is recognized in 'nvidia-smi' please check also your 'Syslinux configuration' if you haven't earlier prevented Unraid from using the card during the boot process: Click Reporting Problems: Please be sure if you have a problem to always include a screenshot from the Plugin page, a screenshot of the output of the command 'nvidia-smi' (simply open up a Unraid terminal with the button on the top right of Unraid and type in 'nvidia-smi' without quotes) and the error from the startup of the Container/App if there is any.


 1 point
 -
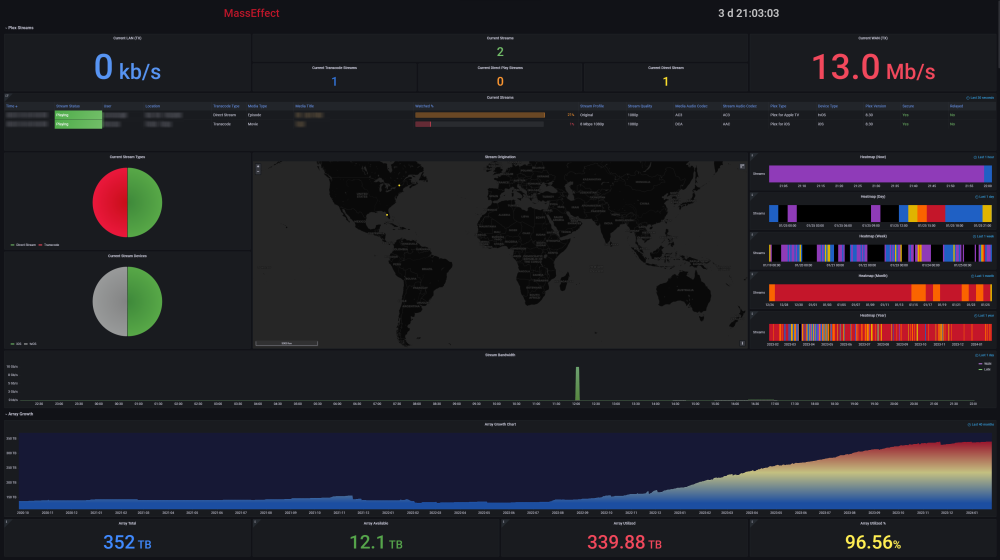
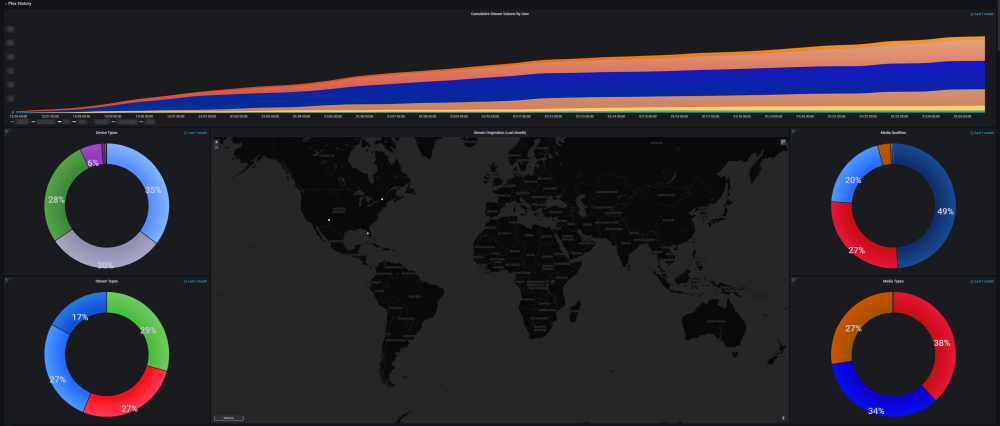
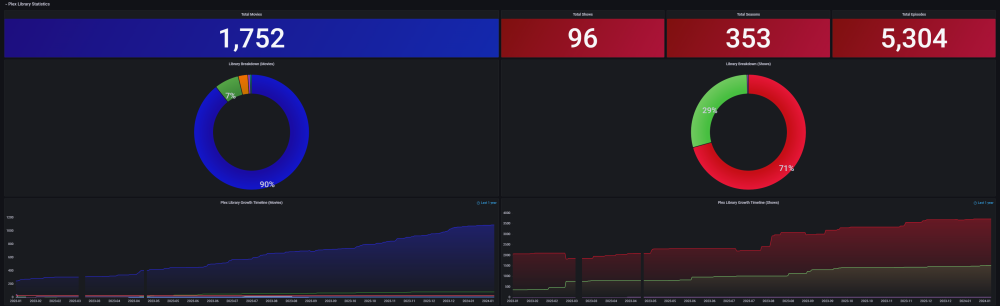
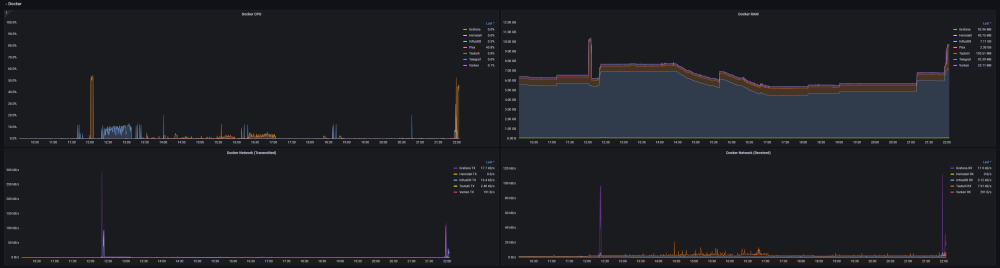
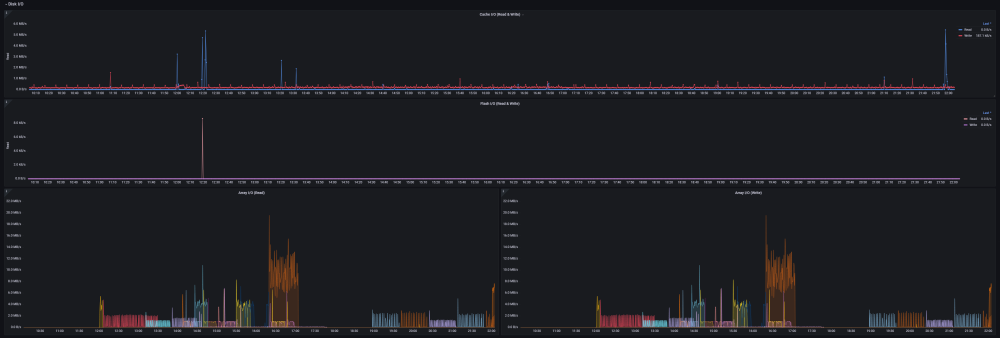
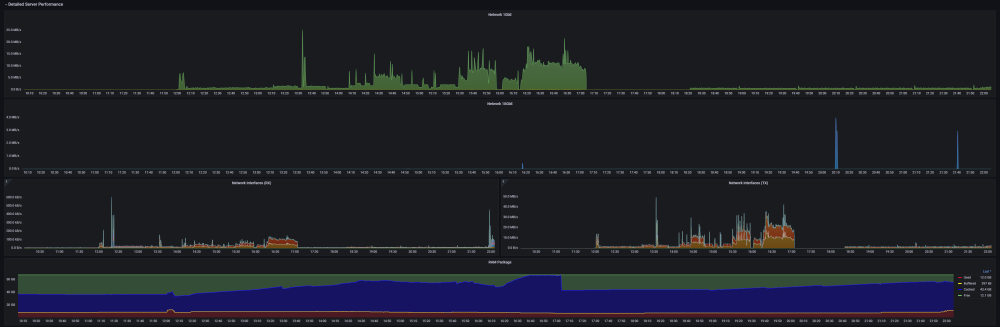
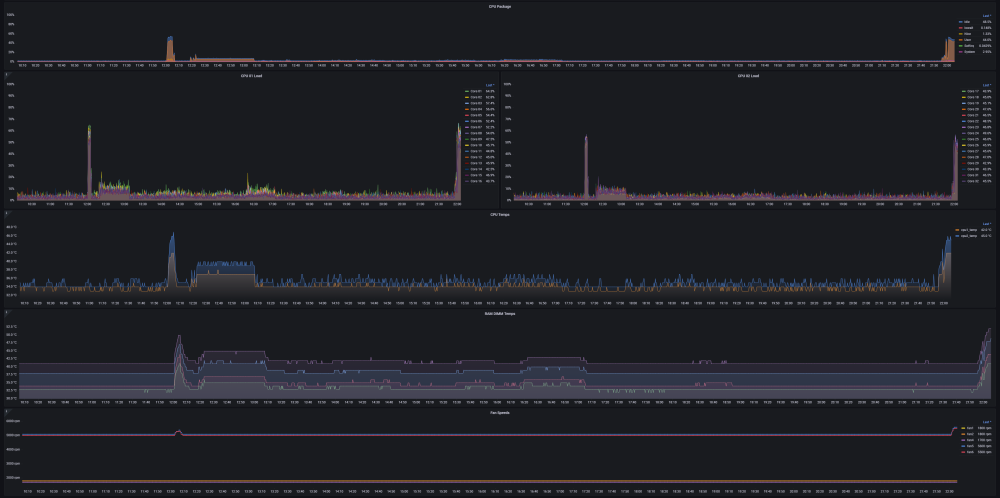
Ultimate UNRAID Dashboard (UUD) Current Release: UUD 1.7 (2024-03-30) UUD NEWS: 2024-03-30: UUD Version 1.7 is Released 2022-06-19: The UUD Forum Topic Reaches 200,000 Views! 👀👀👀 2022-04-17: The UUD Tops 5,000 Unique Downloads 💾💾💾 🎉 2021-05-26: The UUD Forum Topic Reaches 1,000 Replies! 2021-04-17: The UUD Forum Topic Reaches 100,000 Views! 👀👀 2021-03-26: The UUD Tops 2,500 Unique Downloads 💾💾 🎉 2021-03-23: UUD 1.6 is Featured Again in the "Best of the Forum" Blog 🥇🥇 2021-03-21: The UUD Forum Topic Reaches 75,000 Views! 👀 2021-03-20: UUD Version 1.6 is Released 2021-01-19: The UUD Forum Topic Reaches 50,000 Views! 👀 2021-01-11: The UUD Tops 1,000 Unique Downloads 💾 🎉 2021-01-07: UUD is Featured as the FIRST "Best of the Forum" Blog 🥇 2021-01-06: UUD Donations Site is Created 2020-12-31: UUD Version 1.5 is Released 2020-10-09: UUD Version 1.4 is Released 2020-09-28: The UUD is Featured in the Official UNRAID Monthly Newsletter (September 2020)! 2020-09-21: UUD Version 1.3 is Released 2020-09-14: UUD Version 1.2 is Released 2020-09-12: UUD Version 1.1 is Released 2020-09-11: The UUD is Born and Version 1.0 is Released Overview: Welcome to the OFFICIAL UUD forum topic. The UUD is my attempt to develop the Ultimate Grafana/Telegraf/InfluxDB/Plex/Tautulli/Varken dashboard. This entire endeavor started when one of our fellow users @hermy65 posed a simple, but complex question in another forum topic (see post #3). I decided to give it a shot, as I am an IT professional, specifically in enterprise data warehouse/SQL server. After a few days of hard work, UUD version 1.0 was released. We are currently on Version 1.6, and the project is in active development. If you are a Grafana developer, or have had experience building dashboards/panels for UNRAID, please let me know. I would love to collaborate. Version 1.7 Screenshots (Click the Images as They are Very High Resolution): Disclaimer: This is based on my 30 Drive UNRAID Array. So this shows an example of a fully maxed out UNRAID setup with max drives, dual CPUs, Dual NICs, etc. You will/may need to adjust panels & queries to accommodate your individual UNRAID/PLEX architecture. I have spent many hours custom coding new functionality and features based on that original template. Much has been learned and I am excited to see how far this can go in the future. Thanks again! Developers: Primary Developer: @falconexe (USA) UUD Creator | Active Development | Panels | Database Queries | Integration | Look & Feel | GUI | Refinement | Support Developer/Colleague: @GilbN (Europe) Dashboard Examples | Back-end | Dynamics | REGEX | Support | Tutorials Contributors: @hermy65 @atribe @Roxedus @SpencerJ @testdasi @ChatNoir @MammothJerk @FreeMan @danktankk @Dazog @MrLondon @LTM @mattekure @ptchernegovski @caplam @RockDawg @corgan @jbartlett @Hoopster @LTM @skaterpunk0187 @valiente @Agent531C @JudMeherg @Jturner @1471 Dependencies (Last Updated On 2021-03-20) Docker - InfluxDB Docker - Telegraf Docker Network Type: HOST (Otherwise You May Not Get All Server Metrics) 👉 Create Telegraf Configuration File 👈 (DO THIS FIRST!) Create and Place a File into Directory "mnt/user/appdata/YOUR_TELEGRAF_FOLDER" Enable and Install Telegraf Plugins Telegraf Plugin - [[inputs.net]] Enable in telegraf.config Telegraf Plugin - [[inputs.docker]] Enable in telegraf.config Telegraf Plugin - [[inputs.diskio]] Enable in telegraf.config To Use Static Drive Serial Numbers in Grafana (For DiskIO Queries) Do the Following: Edit telegraf.conf > [[inputs.diskio]] > Add device_tags = ["ID_SERIAL"] > Use ID_SERIAL Flag in Grafana Now Upon Booting, You Don't Have to Worry About SD* Mounts Changing (So Your Graphs Don't Get Messed Up!) You Can Also Set Overrides on the Query Fields to Map the Serial Number to a Common Disk Name Like "DISK01" etc. Telegraf Plugin - [[inputs.smart]] Enable in telegraf.config Also Enable "attributes = true" Bash Into Telegraf Docker and Run "apk add smartmontools" Telegraf Plugin - [[inputs.ipmi_sensor]] Enable in telegraf.config Bash Into Telegraf Docker and Run "apk add ipmitool" Telegraf Plugin - [[inputs.apcupsd]] Enable in telegraf.config Telegraf Docker Config Add New Path (NOTE: This path has now been merged into Atribe's Telegraf Docker Image. (Thanks @GilbN & @atribe) Post Arguments "/bin/sh -c 'apk update && apk upgrade && apk add ipmitool && apk add smartmontools && telegraf'" Docker - Grafana Grafana Plugins Pie Chart Panel Run Following Command in Docker: grafana-cli plugins install grafana-piechart-panel World Map Run Following Command in Docker: grafana-cli plugins install grafana-worldmap-panel JSON API Run Following Command in Docker: grafana-cli plugins install marcusolsson-json-datasource Dynamic Image Panel Run Following Command in Docker: grafana-cli plugins install dalvany-image-panel Docker - Tautulli Docker - Varken CA Plugin: IPMI Tools License: GeoLite2 (Free) NON SERVER HARDWARE (If You Cannot Use "IPMI" and Need to Use "Sensors") As an alternate to IPMI to monitor CPU/System/Aux Temps, you can try the Sensors Plugin. Telegraf Plugin - [[inputs.sensors]] Enable in the Telegraf Config (Uncomment It) Bash into the Telegraf Docker and Execute "apk add lm_sensors" Stop All 3 Dockers (Grafana > Telegraf > InfluxDB) If You Want to Keep This Plugin in Perpetuity, You Will Need to Modify Your Telegraf Docker Post Arguments (Adding lm_sensors): "/bin/sh -c 'apk update && apk upgrade && apk add ipmitool && apk add smartmontools && apk add lm_sensors && telegraf'" Start All 3 Dockers (InfluxDB > Telegraf > Grafana) Dashboard Variables (Update These For Your Server): I haven't been this geeked out about my UNRAID server in a very long time. This is the cherry on top for my UNRAID experience going back to 2014 when I built my first server. Thanks everyone! VERSION 1.7 (Current) Ultimate UNRAID Dashboard - Version 1.7 - 2024-03-30 (falconexe).json @SpencerJ


 1 point
 -
Hello Unraid Community! It has come to our attention that in recent days, we've seen a significant uptick in the amount of Unraid server's being compromised due to poor security practices. The purpose of this post is to help our community verify their server's are secure and provide helpful best-practices recommendations to ensuring your system doesn't become another statistic. Please review the below recommendations on your server(s) to ensure they are safe. Set a strong root password Similar to many routers, Unraid systems do not have a password set by default. This is to ensure you can quickly and easily access the management console immediately after initial installation. However, this doesn't mean you shouldn't set one. Doing this is simple. Just navigate to the Users tab and click on root. Now set a password. From then on, you will be required to authenticate anytime you attempt to login to the webGui. In addition, there is a plugin available in Community Apps called Dynamix Password Validator. This plugin will provide guidance on how strong of a password you're creating based on complexity rules (how many capital vs. lowercase letters, numbers, symbols, and overall password length are used to judge this). Consider installing this for extra guidance on password strength. Review port mappings on your router Forwarding ports to your server is required for specific services that you want to be Internet-accessible such as Plex, FTP servers, game servers, VoIP servers, etc. But forwarding the wrong ports can expose your server to significant security risk. Here are just a few ports you should be extra careful with when forwarding: Port 80: Used to access the webGui without SSL (unless you've rebound access to another port on the Management Access settings page). DO NOT forward port 80. Forwarding this port by default will allow you to access the webGui remotely, but without SSL securing the connection, devices in between your browser and the server could "sniff" the packets to see what you're doing. If you want to make the webGui remotely accessible, install the Unraid.net plugin to enable My Servers on your system, which can provide a secure remote access solution that utilizes SSL to ensure your connection is fully encrypted. Port 443: Used to access the webGui with SSL. This is only better than port 80 if you have a root password set. If no root password is set and you forward this port, unauthorized users can connect to your webGui and have full access to your server. In addition, if you forward this port without using the Unraid.net plugin and My Servers, attempts to connect to the webGui through a browser will present a security warning due to the lack of an SSL certificate. Consider making life easier for yourself and utilize Unraid.net with My Servers to enable simple, safe, and secure remote access to your Unraid systems. NOTE: When setting up Remote Access in My Servers, we highly recommend you choose a random port over 1000 rather than using the default of 443. Port 445: Used for SMB (shares). If you forward this port to your server, any public shares can be connected to by any user over the internet. Generally speaking, it is never advisable to expose SMB shares directly over the internet. If you need the ability to access your shares remotely, we suggest utilizing a Wireguard VPN to create a secure tunnel between your device and the server. In addition, if the flash device itself is exported using SMB and this port is forwarded, its contents can easily be deleted and your paid key could easily be stolen. Just don't do this. Port 111/2049: Used for NFS (shares). While NFS is disabled by default, if you are making use of this protocol, just make sure you aren't forwarding these ports through your router. Similar to SMB, just utilize Wireguard to create a secure tunnel from any remote devices that need to connect to the server over NFS. Port 22/23: Used by Telnet and SSH for console access. Especially dangerous for users that don't have a root password set. Similar to SMB, we don't recommend forwarding these ports at all, but rather, suggest users leverage a Wireguard VPN connection for the purposes of connecting using either of these protocols. Ports in the 57xx range: These ports are generally used by VMs for VNC access. While you can forward these ports to enable VNC access remotely for your VMs, the better and easier way to do this is through installing the Unraid.net plugin and enabling My Servers. This ensures that those connections are secure via SSL and does not require individual ports to be forwarded for each VM. Generally speaking, you really shouldn't need to forward many ports to your server. If you see a forwarding rule you don't understand, consider removing it, see if anyone complains, and if so, you can always put it back. Never ever ever put your server in the DMZ No matter how locked down you think you have your server, it is never advisable to place it in the DMZ on your network. By doing so, you are essentially forwarding every port on your public IP address to your server directly, allowing all locally accessible services to be remotely accessible as well. Regardless of how "locked down" you think you actually have the server, placing it in the DMZ exposes it to unnecessary risks. Never ever do this. Consider setting shares to private with users and passwords The convenience of password-less share access is pretty great. We know that and its why we don't require you to set passwords for your shares. However, there is a security risk posed to your data when you do this, even if you don't forward any ports to your server and have a strong root password. If another device on your network such as a PC, Mac, phone, tablet, IoT device, etc. were to have its security breached, it could be used to make a local connection to your server's shares. By default, shares are set to be publicly readable/writeable, which means those rogue devices can be used to steal, delete, or encrypt the data within them. In addition, malicious users could also use this method to put data on your server that you don't want. It is for these reasons that if you are going to create public shares, we highly recommend setting access to read-only. Only authorized users with a strong password should be able to write data to your shares. Don't expose the Flash share, and if you do, make it private The flash device itself can be exposed over SMB. This is convenient if you need to make advanced changes to your system such as modifying the go file in the config directory. However, the flash device itself contains the files needed to boot Unraid as well as your configuration data (disk assignments, shares, etc). Exposing this share publicly can be extremely dangerous, so we advise against doing so unless you absolutely have to, and when you do, it is advised to do so privately, requiring a username and password to see and modify the contents. Keep your server up-to-date Regardless of what other measures you take, keeping your server current with the latest release(s) is vital to ensuring security. There are constant security notices (CVEs) published for the various components used in Unraid OS. We here at Lime Technology do our best to ensure all vulnerabilities are addressed in a timely manner with software updates. However, these updates are useless to you if you don't apply them in a timely manner as well. Keeping your OS up-to-date is easy. Just navigate to Tools > Update OS to check for and apply any updates. You can configure notifications to prompt you when a new update is available from the Settings > Notifications page. More Best Practices Recommendations Set up and use WireGuard, OpenVPN or nginxProxyManager for secure remote access to your Shares. For WireGuard set up, see this handy getting started guide. Set up 2FA on your Unraid Forum Account. Set up a Remote Syslog Server. Install the Fix Common Problems plugin. Installing this plugin will alert you to multiple failed login attempts and much, much more. Change your modem password to something other than the default. Consider installing ClamAV. In addition to all of the above recommendations, we've asked SpaceInvaderOne to work up a video with even more detailed best-practices related to Unraid security. We'll post a link as soon as the video is up to check out what other things you can do to improve your system security. It is of vital importance that all users review these recommendations on their systems as soon as possible to ensure that you are doing all that is necessary to protect your data. We at Lime Technology are committed to keeping Unraid a safe and secure platform for all of your personal digital content, but we can only go so far in this effort. It is ultimately up to you the user to ensure your network and the devices on it are adhering to security best-practices.1 point
-
Original comment thread where idea was suggested by reddit user /u/neoKushan : https://old.reddit.com/r/unRAID/comments/mlcbk5/would_anyone_be_interested_in_a_detailed_guide_on/gtl8cbl/ The ultimate goal of this feature would be to create a 1:1 map between unraid docker templates and docker-compose files. This would allow users to edit the docker as either a compose file or a template and backing up and keeping revision control of the template would be simpler as it would simply be a docker-compose file. I believe the first step in doing so is changing the unraid template structure to use docker-compose labels for all the metadata that unraid uses for its templates that doesn't already have a 1:1 map to docker-compose. this would be items such as WebUI, Icon URL, Support Thread, Project Page, CPU Pinning, etc. Most of the meat of these templates are more or less direct transcriptions of docker-compose, put into a GUI format. I don't see why we couldn't take advantage of this by allowing users to edit and backup the compose file directly.1 point
-
Nice usecase! I am surprised, that the only missing features are iSCSI and ZFS. In my opinion there are more important features than ISCSI, but I agree with ZFS and it is already in the works.1 point
-
Also ich habe massig versucht, konnte aber nicht herausfinden wie Unraid den Status einer Disk prüft, was dann das Kommando für den Spindown auslöst. Daher habe ich ein Script entwickelt, das hoffentlich das Problem löst: https://forums.unraid.net/topic/106508-force-spindown-script/ Der Langzeit-Test steht jetzt noch aus. Kann ja nicht sein, dass ich mir jetzt teure Ultrastar kaufen muss. 🙈1 point
-
@Vr2Io and everyone want to give an update. So my sad saga on trying to fix my issues has finally concluded. Thanks to you Vr2lo you help me determine that the issue is with my CPU. I've since bought a replacement (Ryzen 5 3600x) and my system is back operational has been running now for 24hrs and counting. This made sense that it was a hardware issue since nothing I've done in the last 6 months configuration lead me to believe it was software but I started with software. Trial and error I replaced my memory, then motherboard and issue still was not resolved if anything got worse. once I replaced my CPU it was back to operational. Since my CPU is under warranty I've started the process to request a new one. Now I have all this extra hardware its now time to build a second system :). Thank you everyone for your support in this. Much appreciated.1 point
-
Deployed version 2.9.2 which will ignore virtual USB hubs1 point
-
It's a bug in Unraid 6.9. Reported and acknowledged. Set the spindown delay for that disk to "Never" until it has completed.1 point
-
just to let you know that this issue is still present in 6.9.2 and this solution is still valid. My system is now 10times faster than in "power safe". Thank you very much!1 point
-
@cesarvog / @DrLucasMendes : Finalmente terminei meu "rack": Falta algumas "miudezas" mas tá praticamente pronto. Depois posto as configurações mas sim, consegui montar uma rede 10GBit entre as máquinas usando uma topologia em anel, sem switch.
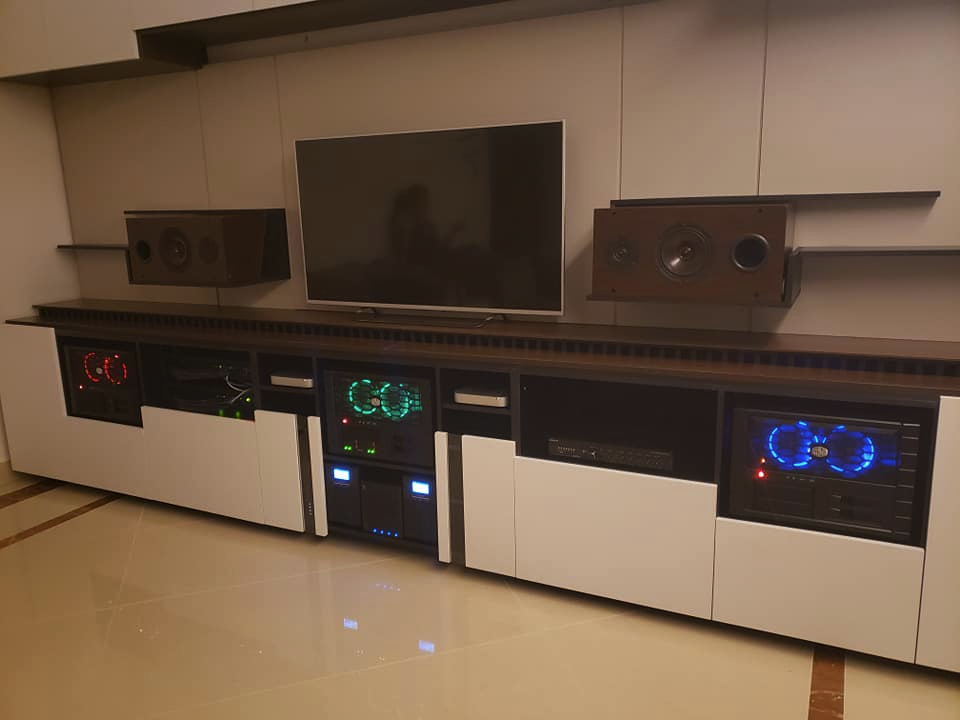 1 point
 -
Thanks i go test that1 point
-
I don't beleive so, this container would have no way of communicating with that file.1 point
-
I was able to get into the webUI and do it. However as of the 6.9.1 update this is broken for me again. No combination of installing and re-installing will fix it. So I've simply stopped using GUI mode completely.1 point
-
I'm so dumb.... My port forwarding was something like this: 80 --> 8080 443 --> 4443 I think I changed the ports last time, I can't remember why. Now it's: 80 --> 2080 443 --> 20443 I've got 10000 - 19999 assigned for game servers so I don't have to update that range all the time. It works now, thanks1 point
-
As far as i know the limitation should only affect iGPUs since the RAM has to share its memory with the iGPU. I recently switched from my intel igpu to a Nvidia 1650, flawlessly.1 point
-
upstream php-handler { server 127.0.0.1:9000; } server { listen 80; listen [::]:80; server_name _; return 301 https://$host$request_uri; } server { listen 443 ssl http2; listen [::]:443 ssl http2; server_name _; ssl_certificate /config/keys/cert.crt; ssl_certificate_key /config/keys/cert.key; # Add headers to serve security related headers # Before enabling Strict-Transport-Security headers please read into this # topic first. add_header Strict-Transport-Security "max-age=15768000; includeSubDomains;" always; # # WARNING: Only add the preload option once you read about # the consequences in https://hstspreload.org/. This option # will add the domain to a hardcoded list that is shipped # in all major browsers and getting removed from this list # could take several months. # set max upload size client_max_body_size 512M; fastcgi_buffers 64 4K; # Enable gzip but do not remove ETag headers gzip on; gzip_vary on; gzip_comp_level 4; gzip_min_length 256; gzip_proxied expired no-cache no-store private no_last_modified no_etag auth; gzip_types application/atom+xml application/javascript application/json application/ld+json application/manifest+json application/rss+xml application/vnd.geo+json application/vnd.ms-fontobject application/x-font-ttf application/x-web-app-manifest+json application/xhtml+xml application/xml font/opentype image/bmp image/svg+xml image/x-icon text/cache-manifest text/css text/plain text/vcard text/vnd.rim.location.xloc text/vtt text/x-component text/x-cross-domain-policy; # HTTP response headers borrowed from Nextcloud `.htaccess` add_header Referrer-Policy "no-referrer" always; add_header X-Content-Type-Options "nosniff" always; add_header X-Download-Options "noopen" always; add_header X-Frame-Options "SAMEORIGIN" always; add_header X-Permitted-Cross-Domain-Policies "none" always; #add_header X-Robots-Tag "none" always; add_header X-XSS-Protection "1; mode=block" always; # Remove X-Powered-By, which is an information leak fastcgi_hide_header X-Powered-By; root /config/www/nextcloud/; # display real ip in nginx logs when connected through reverse proxy via docker network set_real_ip_from 172.0.0.0/8; real_ip_header X-Forwarded-For; # Specify how to handle directories -- specifying `/index.php$request_uri` # here as the fallback means that Nginx always exhibits the desired behaviour # when a client requests a path that corresponds to a directory that exists # on the server. In particular, if that directory contains an index.php file, # that file is correctly served; if it doesn't, then the request is passed to # the front-end controller. This consistent behaviour means that we don't need # to specify custom rules for certain paths (e.g. images and other assets, # `/updater`, `/ocm-provider`, `/ocs-provider`), and thus # `try_files $uri $uri/ /index.php$request_uri` # always provides the desired behaviour. index index.php index.html /index.php$request_uri; # Rule borrowed from `.htaccess` to handle Microsoft DAV clients location = / { if ( $http_user_agent ~ ^DavClnt ) { return 302 /remote.php/webdav/$is_args$args; } } location = /robots.txt { allow all; log_not_found off; access_log off; } # Make a regex exception for `/.well-known` so that clients can still # access it despite the existence of the regex rule # `location ~ /(\.|autotest|...)` which would otherwise handle requests # for `/.well-known`. location ^~ /.well-known { # The following 6 rules are borrowed from `.htaccess` location = /.well-known/carddav { return 301 /remote.php/dav/; } location = /.well-known/caldav { return 301 /remote.php/dav/; } # Anything else is dynamically handled by Nextcloud location ^~ /.well-known { return 301 /index.php$uri; } try_files $uri $uri/ =404; } # Rules borrowed from `.htaccess` to hide certain paths from clients location ~ ^/(?:build|tests|config|lib|3rdparty|templates|data)(?:$|/) { return 404; } location ~ ^/(?:\.|autotest|occ|issue|indie|db_|console) { return 404; } # Ensure this block, which passes PHP files to the PHP process, is above the blocks # which handle static assets (as seen below). If this block is not declared first, # then Nginx will encounter an infinite rewriting loop when it prepends `/index.php` # to the URI, resulting in a HTTP 500 error response. location ~ \.php(?:$|/) { fastcgi_split_path_info ^(.+?\.php)(/.*)$; set $path_info $fastcgi_path_info; try_files $fastcgi_script_name =404; include /etc/nginx/fastcgi_params; fastcgi_param SCRIPT_FILENAME $document_root$fastcgi_script_name; fastcgi_param PATH_INFO $path_info; fastcgi_param HTTPS on; fastcgi_param modHeadersAvailable true; # Avoid sending the security headers twice fastcgi_param front_controller_active true; # Enable pretty urls fastcgi_pass php-handler; fastcgi_intercept_errors on; fastcgi_request_buffering off; } location ~ \.(?:css|js|svg|gif)$ { try_files $uri /index.php$request_uri; expires 6M; # Cache-Control policy borrowed from `.htaccess` access_log off; # Optional: Don't log access to assets } location ~ \.woff2?$ { try_files $uri /index.php$request_uri; expires 7d; # Cache-Control policy borrowed from `.htaccess` access_log off; # Optional: Don't log access to assets } location / { try_files $uri $uri/ /index.php$request_uri; } } And yes, Iam on latest.1 point
-
Ich vermute @Thomas1978meint unbound. Kenn ich aber auch nur dem Namen nach. Ob das in den Containern enthalten ist oder separat kombiniert werden kann, ka?!1 point
-
The drivers are not compatible with the Quadro 2000 only the Pascal based Quadro P2000. The Quadro 2000 won't work for accelerating your Docker Containers since the nvidia-container-tools needs a card that is from the production branch or from the new feature branch, you can see a full list here: Click (if you click on one of the drivers from the two branches and then click on "SUPPORTED PRODUCTS" you can get a full list what cards are compatible).1 point
-
@John_M Thank you I ran the error check and followed the steps you described above. It is currently rebuilding drives 6 and 11. It says it will take 2 days to complete so thank you for your help, I will update this post to correct my other issues after it finishes. I have also disabled the VM's as you described, thank you for your clarification. Best, GTP1 point
-
Settings -> VM Manager. Then set Enable VMs to "No". As far as I could tell, the docker.img is OK.1 point
-
SMB Einstellungen auf Active Directory umstellen und in der smb-extra.conf fügst du einen Share mit dem Pfad zu deinem ZFS Array hinzu. Denke schon, dass das geht. Warum aber kein BTRFS RAID5? Ja, du kannst ja mehrere Pools hinzufügen. Jeder kann einen eigenen RAID Typ besitzen. Nur ist dein Vorhaben nicht wirklich sicher (Server brennt / wird geklaut = alles weg). Denk an die 3-2-1 Backup Regel. Ist das nicht genau das was Pi-Hole macht oder verstehe ich die Frage falsch?1 point
-
Righto all. RE - 502 Gateway error Just a quick psa that had me scratching my head for a few days and cause me to install/reinstall this and other containers that doesn't get mentioned in many videos on container setup when using a custom proxy network wondering why it would work fine for hours then break giving 502 bad gateway errors. Set your container IP's as static within unraid container edit page as they are ultimately static in the proxy manager. So whatever ip you designated the redirect ip to, in my case 172.18.0.5 is what you need in the container edit page under the ip. Can't believe I was so oblivious to this yet have static ips for all sorts of things. I was under the impression that unraid would just keep giving containers the same ip for some strange reason. I'm sure heaps of people know this one but had an epiphany this morning after my dramas. This container kicks butt btw1 point
-
Also your libvirt.img has some corruption. It looks as though you've allowed problems to mount up. You ought to disable the VM service for now and get the array disks sorted first.1 point
-
Also run a file system check/repair on Disk 8 as it also has some corruption.1 point
-
Since you have two disks disabled and two parity disks you should be able to start the array in Maintenance mode and do a file system check/repair on Disk 11 (the default action is no-modify so remove the "-n" option). If it tells you to run it again with the "-L" option, then do so. SMART reports for the two disabled disks look good and you've replaced the cables so re-build the emulated disks onto the originals: Stop the array. Unassign Disks 6 and 11. Start the array. Stop the array. Reassign them (you can check the serial numbers match your screenshot, above, though they are both 8 TB so it doesn't really matter). Start the array and let them build.1 point
-
Thanks a lot - now working1 point
-
Goal for the build was a server with much space, hot swap bays, and options for +12 hdd`s . My previous server was a hackintosh running Softraid in raid 5. With the upgrade to Macos Big sur, this was not a very stable run anymore as Softraid stil has no stable version out. I also was a bit tired of always be afraid of rebooting and updating my system. I have now successfully moved all data from my hackintosh to my new Unraid build, and I really like it. As for the wife... I got it free from work 🙉.... But i guess she know my by know anyway so. [b]OS at time of building:[/b] Unraid 6.9.1 [b]CPU:[/b] AMD Ryzen 7 3700X AM4, 8-Core, 16-Thread, 3.6/4.4GHz, 65W [b]Motherboard:[/b] ASUS Pro WS X570-ACE, S-AM4 [b]RAM:[/b] Kingston DDR4 16GB 3200MHz DDR4 ECC 2Rx8 [b]Case:[/b] Inter tech 4U 4424 [b]Drive Cage(s):[/b] Included in case [b]Power Supply:[/b] Corsair TX750M, 750W PSU [b]GPU[/b] EVGA GeForce GTX 1050 Ti 4 GB [b]SATA Expansion Card(s):[/b] LSI 6Gbps SAS HBA LSI 9211-8i (=9201-8i) P20 IT Mode [b]HBA expansion adapter [/b] Lenovo 16-Port 6Gbps SAS-2 SATA Expansion Adapter 03X3834 [b]Cables:[/b] Mini SAS SFF 8087 to SFF 8087 36 Pin Cable Male to Male 1M [b]Fans:[/b] 3x Noctua NF-A12x25 PWM [b]Parity Drive:[/b] Seagate IronWolf 10TB 3.5" NAS HDD (2) [b]Data Drives:[/b] Seagate IronWolf 10TB 3.5" NAS HDD (1) Seagate SkyHawk 6 TB 3.5" 5900RPM (4) [b]Cache Drive:[/b] Kingston SSDNow UV400 120 GB 2.5" Solid State Drive (Leftover from another build) [b]Total Drive Capacity:[/b] 24 drives [b]Primary Use:[/b] Data storage, Plex, Sonarr, Radarr, and so on. [b]Likes:[/b] Hot swap drives, easy to add another drive later, much space inside case. [b]Dislikes:[/b] The 80mm fans are a bit loud, need to swap them out with Noctua fans. Has not been able to PWM adjust the 120mm fans yet. [b]Add Ons Used:[/b] Fix Common Problems GPU Statistics Nvidia DriveR CA Backup / Restore Appdata CA Cleanup Appdata CA Config Editor Community Applications Dynamix Active Streams Dynamix Cache Directories Dynamix S3 Sleep Dynamix SSD TRIM Dynamix System Information Dynamix System Statistics Dynamix System Temperature Nerd Tools Open Files Preclear Disks Recycle Bin Unassigned Devices Unassigned Devices Plus unBALANCE User Scripts [b]Future Plans:[/b] Add PWM to 120mm fans, swap out 80mm fans. Start swapping out 6TB drives as they are old.1 point
-
You should set up Plex to transcode to the RAM as it's much faster than even an SSD and doesn't wear out your SSD if you're using one.1 point
-
@karateo I have just checked the card and it works. The seller seems to sell a lot of server hardware. The board looks used, even one of the fins of on the LSI chip cooler looks a bit banged, but the board runs. and at 45 Euros I'm happy with what I paid.1 point
-
That makes sense. I tried another estata caddy that doesn't have a port multiplier and the disk mounts.1 point
-
You can switch the docker tab to advanced view, see if there's any orphans in there which can be deleted. Or delete the entire image and start it over again (painless and easy process), Or switch the system to instead utilize a folder which doesn't have any inherent limitations on the maximum size it can grow to (except for the size of the drive it's on)1 point
-
I saw the F2A for the forum. Nice. How about F2A for unRAID himself ? I am using my yubikey on almost every accounts/services I have, except my own unRAID...1 point
-
https://github.com/BeryJu/authentik - authentik is an open-source Identity Provider focused on flexibility and versatility. You can use authentik in an existing environment to add support for new protocols. authentik is also a great solution for implementing signup/recovery/etc in your application, so you don't have to deal with it. https://goauthentik.io/1 point
-
I think I have exact same issue with combo of nextcloud v21 and nginx proxy manager. Everything works like a breeze except that every file more than 1gb downloaded remotely stops after 1gb. Can someone please explain me like i'm 4-yr old which files in nextcloud and/or in NPM should I edit to get rid of this limitation once and for all. Many thanks in advance. EDIT: so basically I found the solution myself. No need to edit any files in nextcloud. In order to get rid of 1gb download limitation : 1. go to NPM Proxy Host tab. 2. Click '3 dots' and click 'Edit' in your nextcloud proxy host. 3. Go to advances tab and put the following: proxy_request_buffering off; proxy_buffering off; 4. Click Save That's it. Enjoy no more stupid limitations on the file size downloaded. Tested 13gb file from remote location and it worked like a charm. Hopefully someone finds it useful for their setup.1 point
-
Thanks @bytchslappa for the heads up. Everyone using a User Script for Nvidia GPU Power State just edit the script to: #!/bin/bash nvidia-persistenced fuser -v /dev/nvidia* and leave the schedulle At first Array start only unchanged.1 point
-
I went back to 6.9.0-rc2 and NVIDIA 455.45.01 - no crashes. This is definitely a bug and not my hardware. I really wish I knew what was causing the crash on 6.9.0 and 6.9.1. I'm not sure what to look for in changelogs in future releases to see if this gets fixed.1 point
-
Turns out we are a victim of our own success We planned for growth in certain areas of the system but a surge of sign-ins uncovered problems in an unexpected area. Thanks to everyone who installed the plugin and helped uncover this! We are actively working on this and intend to have everything back up later today. Your systems may connect and disconnect throughout the day but it won't hurt them. Please do update your Unraid.net plugin if you haven't already, the latest version has improved logic for disconnects / reconnects and plays a little nicer with mothership1 point
-
Just thought I'd share my experience setting up a Valheim server with this docker app from @ich777(thank you!) You don't need to worry about Steam authentication for Valheim, the default anonymous user can download and host a server (yay!), so no fuss with Steam users or Steam Guard to worry about. Deploy the docker as provided, leaving username & password blank. The Server Name field is important, this is how your name will appear in the public server list in Valheim. (as of this writing there are 7 "Valheim Docker" server names, good luck finding yours! So choose something unique that you and your friends can find. World Name is the name of your world, this can be anything, if you wish to import a single-player or self-hosted save file in your docker, this name must be set to the same name/spelling as your save game world. Save the docker/let it install. You'll want to make sure your firewall or router has UDP ports 2456-2458 forwarded to your Unraid server's IP so the game can work as intended. In 10-15 minutes typically you should see your server name in the public server list in Valheim, you're done! * if you wish to import a previous save file, you need to make sure the Docker is Stopped first. Then browse your local computer's profile, typically in "%appdata%\..\LocalLow\IronGate\Valheim\worlds" you will find your save games. You'll want to take a copy of your world files, database, everything named the same as your world name over to your docker data files, by default with this docker settings should be: \\<your unraid server IP or name>\appdata\valheim\.config\unity3d\IronGate\Valheim\worlds Place your save game files in there, and overwrite any existing newly generated world of the same name with your save game. Start the Docker, wait for it to appear in Valheim, join & play! I hope this was helpful for someone, took a bit to figure out the exact steps to follow1 point
-
After more research on your site, it appears as if my on-board network HW may not be compatible with the Unraid ver 6.8.3. My HW: MB = Asrock TRX40D8-2N2T uP = AMD 3960x Mem = 128G Drives = 12 x ST2000NM0033 2TB M2 = 2x Force MP600 1TB The MB has the following Ethernet interface description: Ethernet Interface - 10Gbps/2.5Gbps LAN Controller - 2 x RJ45 10GbEby Intel® X710-AT2 - 2 x RJ45 2.5GbEby Intel® i225 - Supports Wake-On-LAN - Supports Energy Efficient Ethernet 802.3az - Supports PXE - LAN3 Supports NCSI1 point
-
It looks like you have Tips and Tweaks installed, what is your "CPU Scaling Governor" set to? If it is "Power Save", try "On Demand". Made a big difference for me. There is more discussion here: https://forums.unraid.net/bug-reports/prereleases/690-beta-30-pre-skylake-intel-cpus-stuck-at-lowest-pstate-r1108/1 point
-
I had quite a hard time figuring out how to persistently create user only for docker without giving root access to Gitlab in CI/CD pipeline. If you do normal unix suff with adduser, passwd and so on you will loose all of that after reboot. In the end it was quite easy. So I'm going to share with you all to save you three days I spent with this stupidly trivial task. You just need to do this: Create new user with password via Web Managment of UnRAID in USERS tab. Let's call this new user deployer. Change deployers default group with: usermod -g docker deployer Edit /etc/passwd manually (not recomended, but this is small change) Find line with deployer Change from /bin/false to /bin/bash to allow ssh access for deployer Save copy /etc/passwd to /boot/passwd with: cp /etc/passwd /boot/passwd DONE! That's IT! It just works. Now you have persistent user that you can add to Gitlab (or Github or whatever else) and automatically deploy your things from CI/CD pipeline straight to Docker on your UnRAID machine.1 point
-
As a technical note, FusionIO/WesternDigital are still supporting their products with drivers current as of 01/30/2020. Energen....these are still great cards, and hella not obsolete for this application. I have a ioDrive2 and a SX350 that can do ~2GB/s+ R/W at 8W idle through a ESXi6.7 VM with super low latency like nvme. If i were to make a guess, I'd say there are prolly ~50-60 of us in the forums that would integrate FusionIO prducts into our builds and at least that many more that would be inclined to buy these cheap used cards in the future for that purpose. No, we aren't a majority... but it's not 5 or 6 or a dozen. There's dozens of us... Tom, the CEO and admin, chimed in on this thread and put the ball in our court. If we want to merge this into his repo, somebody will need to work on the 5.X kernel integration. I would suggest following this proxmox guide as a starting point. -> https://forum.proxmox.com/threads/configuring-fusion-io-sandisk-iodrive-iodrive2-ioscale-and-ioscale2-cards-with-proxmox.54832/1 point
-
If you are just seeing this alert in Glances it could just be due to Glances default config. It sets the threshold based on core count, so if you have a higher core count it's going trigger too often. https://github.com/nicolargo/glances/issues/12141 point
-
Eh, sure. Effectively you just have to execute the command from my other post. If you don't want to do that manually every time you open a ssh connection then you have to add it to this file: /root/.bash_profile To make it persistent across reboots (that's how I did it, not saying it's the most ideal way): Edit /boot/config/go and add: # Customise bash cat /boot/config/bash_extra.cfg >> /root/.bash_profile Create the /boot/config/bash_extra.cfg (e.g. with nano) and add: #docker-compose as container alias docker-compose='docker run --rm \ -v /var/run/docker.sock:/var/run/docker.sock \ -v "$PWD:$PWD" \ -w="$PWD" \ docker/compose:latest' And that's it. After a reboot that will add the command to the .bash_profile file meaning it'll automatically get executed one you open a shell.1 point
-
I have add a alias that launches docker-compose in a container. It has the benefit of being up-to-date without any modifications: alias docker-compose='docker run --rm \ -v /var/run/docker.sock:/var/run/docker.sock \ -v "$PWD:$PWD" \ -w="$PWD" \ docker/compose:latest' It has worked great so far for me.1 point
-
An update: I got it to work by moving my Unraid USB to a USB2 port as suggested elsewhere in the forum.1 point
-
Clear an unRAID array data drive (for the Shrink array wiki page) Mod note: this script usually takes a much longer than normal time to clear a drive with newer Unraid releases, recommend using the "Remove Drives Then Rebuild Parity" Method or if you really want to clear the disk do it manually. This script is for use in clearing a drive that you want to remove from the array, while maintaining parity protection. I've added a set of instructions within the Shrink array wiki page for it. It is designed to be as safe as possible, and will not run unless specific conditions are met - - The drive must be a data drive that is a part of an unRAID array - It must be a good drive, mounted in the array, capable of every sector being zeroed (no bad sectors) - The drive must be completely empty, no data at all left on it. This is tested for! - The drive should have a single root folder named clear-me - exactly 8 characters, 7 lowercase and 1 hyphen. This is tested for! Because the User.Scripts plugin does not allow interactivity (yet!), some kludges had to be used, one being the clear-me folder, and the other being a 60 second wait before execution to allow the user to abort. I actually like the clear-me kludge, because it means the user cannot possibly make a mistake and lose data. The user *has* to empty the drive first, then add this odd folder. #!/bin/bash # A script to clear an unRAID array drive. It first checks the drive is completely empty, # except for a marker indicating that the user desires to clear the drive. The marker is # that the drive is completely empty except for a single folder named 'clear-me'. # # Array must be started, and drive mounted. There's no other way to verify it's empty. # Without knowing which file system it's formatted with, I can't mount it. # # Quick way to prep drive: format with ReiserFS, then add 'clear-me' folder. # # 1.0 first draft # 1.1 add logging, improve comments # 1.2 adapt for User.Scripts, extend wait to 60 seconds # 1.3 add progress display; confirm by key (no wait) if standalone; fix logger # 1.4 only add progress display if unRAID version >= 6.2 version="1.4" marker="clear-me" found=0 wait=60 p=${0%%$P} # dirname of program p=${p:0:18} q="/tmp/user.scripts/" echo -e "*** Clear an unRAID array data drive *** v$version\n" # Check if array is started ls /mnt/disk[1-9]* 1>/dev/null 2>/dev/null if [ $? -ne 0 ] then echo "ERROR: Array must be started before using this script" exit fi # Look for array drive to clear n=0 echo -n "Checking all array data drives (may need to spin them up) ... " if [ "$p" == "$q" ] # running in User.Scripts then echo -e "\n" c="<font color=blue>" c0="</font>" else #set color teal c="\x1b[36;01m" c0="\x1b[39;49;00m" fi for d in /mnt/disk[1-9]* do x=`ls -A $d` z=`du -s $d` y=${z:0:1} # echo -e "d:"$d "x:"${x:0:20} "y:"$y "z:"$z # the test for marker and emptiness if [ "$x" == "$marker" -a "$y" == "0" ] then found=1 break fi let n=n+1 done #echo -e "found:"$found "d:"$d "marker:"$marker "z:"$z "n:"$n # No drives found to clear if [ $found == "0" ] then echo -e "\rChecked $n drives, did not find an empty drive ready and marked for clearing!\n" echo "To use this script, the drive must be completely empty first, no files" echo "or folders left on it. Then a single folder should be created on it" echo "with the name 'clear-me', exactly 8 characters, 7 lowercase and 1 hyphen." echo "This script is only for clearing unRAID data drives, in preparation for" echo "removing them from the array. It does not add a Preclear signature." exit fi # check unRAID version v1=`cat /etc/unraid-version` # v1 is 'version="6.2.0-rc5"' (fixme if 6.10.* happens) v2="${v1:9:1}${v1:11:1}" if [[ $v2 -ge 62 ]] then v=" status=progress" else v="" fi #echo -e "v1=$v1 v2=$v2 v=$v\n" # First, warn about the clearing, and give them a chance to abort echo -e "\rFound a marked and empty drive to clear: $c Disk ${d:9} $c0 ( $d ) " echo -e "* Disk ${d:9} will be unmounted first." echo "* Then zeroes will be written to the entire drive." echo "* Parity will be preserved throughout." echo "* Clearing while updating Parity takes a VERY long time!" echo "* The progress of the clearing will not be visible until it's done!" echo "* When complete, Disk ${d:9} will be ready for removal from array." echo -e "* Commands to be executed:\n***** $c umount $d $c0\n***** $c dd bs=1M if=/dev/zero of=/dev/md${d:9} $v $c0\n" if [ "$p" == "$q" ] # running in User.Scripts then echo -e "You have $wait seconds to cancel this script (click the red X, top right)\n" sleep $wait else echo -n "Press ! to proceed. Any other key aborts, with no changes made. " ch="" read -n 1 ch echo -e -n "\r \r" if [ "$ch" != "!" ]; then exit fi fi # Perform the clearing logger -tclear_array_drive "Clear an unRAID array data drive v$version" echo -e "\rUnmounting Disk ${d:9} ..." logger -tclear_array_drive "Unmounting Disk ${d:9} (command: umount $d ) ..." umount $d echo -e "Clearing Disk ${d:9} ..." logger -tclear_array_drive "Clearing Disk ${d:9} (command: dd bs=1M if=/dev/zero of=/dev/md${d:9} $v ) ..." dd bs=1M if=/dev/zero of=/dev/md${d:9} $v #logger -tclear_array_drive "Clearing Disk ${d:9} (command: dd bs=1M if=/dev/zero of=/dev/md${d:9} status=progress count=1000 seek=1000 ) ..." #dd bs=1M if=/dev/zero of=/dev/md${d:9} status=progress count=1000 seek=1000 # Done logger -tclear_array_drive "Clearing Disk ${d:9} is complete" echo -e "\nA message saying \"error writing ... no space left\" is expected, NOT an error.\n" echo -e "Unless errors appeared, the drive is now cleared!" echo -e "Because the drive is now unmountable, the array should be stopped," echo -e "and the drive removed (or reformatted)." exit The attached zip is 'clear an array drive.zip', containing both the User.Scripts folder and files, but also the script named clear_array_drive (same script) for standalone use. Either extract the files for User.Scripts, or extract clear_array_drive into the root of the flash, and run it from there. Also attached is 'clear an array drive (test only).zip', for playing with this, testing it. It contains exactly the same scripts, but writing is turned off, so no changes at all will happen. It is designed for those afraid of clearing the wrong thing, or not trusting these scripts yet. You can try it in various conditions, and see what happens, and it will pretend to do the work, but no changes at all will be made. I do welcome examination by bash shell script experts, to ensure I made no mistakes. It's passed my own testing, but I'm not an expert. Rather, a very frustrated bash user, who lost many hours with the picky syntax! I really don't understand why people like type-less languages! It only *looks* easier. After a while, you'll be frustrated with the 60 second wait (when run in User Scripts). I did have it at 30 seconds, but decided 60 was better for new users, for now. I'll add interactivity later, for standalone command line use. It also really needs a way to provide progress info while it's clearing. I have ideas for that. The included 'clear_array_drive' script can now be run at the command line within any unRAID v6, and possibly unRAID v5, but is not tested there. (Procedures for removing a drive are different in v5.) Progress display is only available in 6.2 or later. In 6.1 or earlier, it's done when it's done. Update 1.3 - add display of progress; confirm by key '!' (no wait) if standalone; fix logger; add a bit of color Really appreciate the tip on 'status=progress', looks pretty good. Lots of numbers presented, the ones of interest are the second and the last. Update 1.4 - make progress display conditional for 6.2 or later; hopefully now, the script can be run in any v6, possibly v5 clear_an_array_drive.zip clear_an_array_drive_test_only.zip1 point


(Small).thumb.png.b884b0484e848c502a315fc27b995f59.png)