Leaderboard


Popular Content
Showing content with the highest reputation on 04/27/21 in all areas
-
Marvel is somewhat akin to this: Sure, it'll work on occasion, but there's so many inherent problems with them (and the manufacturer not fixing the problems in the driver) that it's definitely caveat emptor
 2 points
 -
Genau, aber betrifft eben nur Macinabox. Ich bin aber in Österreich zu Hause... Spaß beiseite, ich weiß einfach wirklich nicht was ich von dem halten soll deswegen erwähne ich das hier immer und wenn sich wieder mal eine Kleinigkeit ändert im Gesetzestext und Apple doch irgendwo ein Schlupfloch findet sieht die Sache dann wieder ganz anders aus, aber ich bin kein Rechts Experte und will es auch nicht sein. ...und vergiss nicht Unraid ist in den USA zu Hause, soweit ich weiß ist es dort auch so das drüber diskutiert werden darf aber eigentlich nichts verbreitet werden darf um gewisse Herstellervorgaben zu "umgehen". @MPC561 danke für die Erklärung wusste ich nicht da ich mich nicht wirklich auskenne mit OSX bzw. Hackintosh/OSX VM's2 points
-
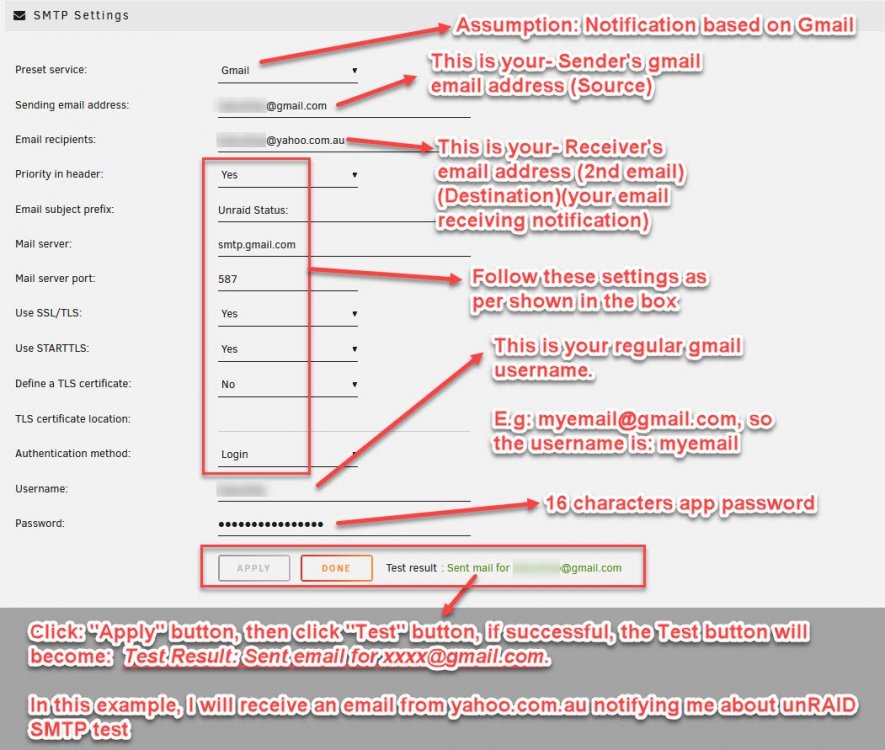
Hi All, Just want to share out my findings about unRAID notification. My notification settings are based on Gmail. This how-to will enable the user to send email notification from Gmail to Yahoo email. If you like my how-to, then make it a sticky. Thank you.🙂 ======================================================================== Requirements: A) Setup a gmail account. This account will be the SENDER's email address << Assumption: you have setup 2-step authentication via you mobile phone for logging into your gmail account >> B) Setup a second gmail or any other free webmail account. eg: [email protected] This account will be the RECEIVER's email address ======================================================================== You need to set up google App Password. 1) login into: accounts.google.com 2) Go to "Security" on your left section. 3) Under the heading: "Signing in to Google" 3.1) Click on App passwords 3.2) Sign in your normal gmail accounts 3.3) click: Select app, then select: Mail 3.4) click: Select device, then select: Custom 3.5) Give a name for the unRAID server e.g: midtowerunraid 3.6) Press Generate button 3.7) A window will pop out and app password for the device is display in the yellow box. Copy the password and keep in a safe place and save in notepad. This password is 16 character long. Next click the button: Done e.g: sskwowcomemtyufg <----- 16 character long app password. 3.8) Finally sign out all accounts Follow the steps below, to complete SMTP settings within unRAID server
 1 point
 -
@Smolo @ich777 Entschuldigt die späte Reaktion... Der vendor-reset unterstützt AMD Karten ab der Polaris-Generation ---> z.B. RX 470 Deine alte 5670 wird also nicht unterstützt... Grundsätzlich sollte deine 5670 in vms, z.B. mit Windows 7/10, einwandfrei funktionieren, außer es ist ein modellspezifisches Problem.. Aber wenn die freezes sporadisch auftreten - sorry falls ich hier was vermische, hab grad alles in einem Rutsch überflogen - kann durchaus auch ein Hardwarefehler vorliegen (was bei dem Alter mich nicht überraschen würde). Bitte checke mal die Liste aus deiner Erfahrung (in Bezug auf die HD5670): GPU passthrough zur vm funktioniert (gpu + sound). Softe resets der VM (Neustarten über Windows z.b.) funktionierten einwandfrei und auch die Soundkarte funktionierte. Herunterfahren und erneutes Starten der VM funktionierte einwandfrei und auch die Soundkarte funktionierte. Kann eines oder mehrere dieser Szenarien nicht mit "Ja" beantwortet werden, dann leidet deine Karte an einem Reset Bug oder einem der sich zufällig ähnlich äußert. Auch wenn es funktionierende Setups mit qemu,hd5670 und windows 10 gibt, kann auch ein neuer adrenalin treiber oder windows selber mittlerweile ein Problem darstellen. Daher würde ich auch durchaus auch mal einen Test mit Linux in Betracht ziehen.. Mal sehen, ob wir dem Schlingel auf die Spur kommen1 point
-
Nicht wirklich, ich setze nur AMD ein. Ich meine allerdings gehört zu haben das Nvidia einige Probleme macht. Da muss man das Biosfile patchen. Youtube: How to easily passthrough a Nvidia GPU as primary without dumping your own vbios! in KVM unRAID PS: in deinem Bild hast Du bei Soundcard nicht die HDMI Ausgabe der GTX 1050 gewählt. Das sollte/muss ausgewählt sein. Gruss, MPC5611 point
-
Thanks! Working great.1 point
-
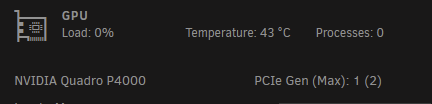
The first figure is usually dynamic based on the power state. To reduce power consumption, the card uses Gen 1 when idle and ramps up to the maximum as determined by the power state. The value in the parentheses is the maximum of your card or your PCI express bus capabilities and is static. My maximum, for example, displays as Generation 2 because I'm using an older motherboard/chipset even though the Quadro P4000 I'm using can use 3.0.
 1 point
 -
You can't do that, the complete procedure must be done in one go, you can start over.1 point
-
Why are your DNS 192... addresses but your IP is 10...? I am guessing that you have put your server on a different network than the rest of your LAN. Probably better if you just delete config/network.cfg and let it use default DHCP, then if you want a static IP assign to your Unraid MAC address in the router from the available IPs the router is using for your LAN.1 point
-
There are two tasks that run on a cron, one calculates the trash size, and the other does the remove of aged files depending on your settings. The last time the recycle bin ran to remove aged files was on April 15th. Try the following: Restart the recycle bin. Reboot if that doesn't work.1 point
-
Thanks @ChatNoir and @jonathanm, all set!!!1 point
-
No. I found that this is simply not possible for individual disks. According to my findings the host is responsive for SMART and Spindown. I kept it that way, marked the passed through disks as "passed through" within Unassigned Devices of the host. The host spins them down and shows SMART values. The guest spins them up, if required. As I said, thats the fact for individual disks. If you pass through an HBA, its drives will be handled from the guest instead. It's not what I did expect, but I can live with it.1 point
-
Thank you for the hint, will do that but the plugin will change in the near future a little bit but I will also include this... (I think you know that my web coding skills are subpar... )1 point
-
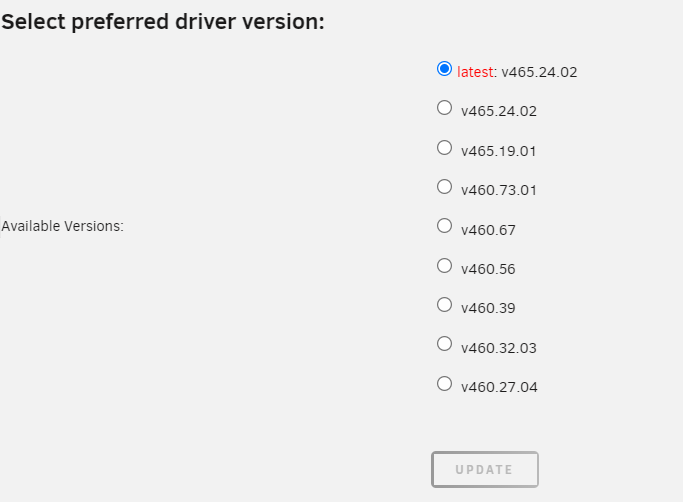
@ich777 add krsort <td>Available Versions:</td> <td> <p><input type="radio" name="drv_version" value="latest" <?php echo ( $selected_v == "latest") ? 'checked="checked"'> <?php krsort($eachlines) ; foreach($eachlines as $lines){ $arr = explode(" ", $lines); $lines2 = implode(" ", $arr); for:
 1 point
 -
i kinda like the descending order, perhaps with a minor adjustment for latest as that is a special case, perhaps have the version number in brackets, i think it should still be visible, so something like this:- latest (v465.24.02) v465.24.02 v465.19.01 v460.67 v460.56 v460.39 v460.32.03 v460.27.04 at least thats my preferred way of ordering it, i shall leave it up to you to make the final decision @ich777 🙂1 point
-
That's not a problem. Slackware doesn't support TUE as a cron entry1 point
-
did a fresh install and the mac as an imac 14.2 and it works great with the quadro k600! thanks! now i have to figure out how to get rid of that boot screen at the start, so it boots right away...1 point
-
@ich777 Bitte verzeih mir, aber das ist ein veralteter Fehlglaube. Früher gab es Distributionen die hatten die Treiber in der eigentlichen OSX Installation ersetzt. Dadurch gab es Probleme bei updates weil die Treiber/configs wieder überschrieben wurden. Das war btw. illegal. Durch Clover/OpenCore als Bootloader und das nutzen der UEFI Funktionalität wird heutzutage die reine OSX Installation nicht mehr angefasst. Die Treiber und Konfigurationen liegen in der UEFI Partition (die sowohl auf der Installdisk oder auf einem USB Stick sein kann). Damit wird bei einem OSX Update keine Konfiguration/Treiber überschrieben. Ich habe es seit Mojave nicht mehr erlebt das ein OSX Update schief gelaufen ist. Man sollte ab und zu OpenCore (mehr oder weniger ein bootloader) updaten und die entsprechenden Configs anpassen. Vor einem OSX Update aktualisiere ich auch noch die Kext/Treiber. Bei Macinabox hat der gute Spacinvader faktisch eine OpenCore Konfiguration für eine VM gemacht. Die ist eigentlich relativ HW unabhängig, was dazu führt das man sogar dicke AMD Threadripper HW nutzen kann. HW limitiert ist man lediglich bei allem was man durchliefen möchte. So gehen die AMD Grafikkarten die Apple supported (in Variationen die ein Treiber abdeckt) in OSX, NVIDIA (ausgenommen Kepler Chipsätze) nur bis High Sierra. Durch den OpenCore Bootmanager/Loader kann ich sogar einfach eine via IOMMU freigeschnittene und durchgeschleifte NVME SSD (die nicht am SATA Controller hängt) direkt booten auf der ein OSX installiert ist. Bzgl. der legalen Aspekte ist man im Hackintosh-Forum Forum gut aufgehoben. Solange man eine OSX Installation erworben hat soll das ganze, auch wenn in den EULA von Apple verboten) in Deutschland legal sein (wenn man die OSX Installation nicht selber ändert, aber das tut man mit OpenCore ja nicht). Die Jungs da sind auch recht streng wenn mal wieder einer mit den TonyMac Tools kommt. Da wird nicht supported und die sind nicht legal. Gruss, Joerg1 point
-
@MPC561 Bin nun nach deiner Anleitung vorgegangen und habe folgendes gemacht um sicherzustellen das alles Clean ist ! 1.) alle Files / Ordner die auf OsX hindeuten gelöscht 2.) Macinabox gelöscht ! 3.) per Unraid-Console nach tmp files von der Osx / macinabox installation gesucht und gelöscht (find . -name "*Macinabox*" ; find . -name "*macinabox*") Unglaublich wo da überall was steht 4.) Nach dem "Saubermachen" nun "macinabox" neu installiert mit Default Settings nur als System habe ich wieder "HighSierra gewählt und Installation's Methode 2 5.) Gut 1 Stunde gewartet (hatte zum glück noch andere Dinge zu erledigen ) 6.) Das "1_macinabox_vmready_notify " script unter den "User Scripts" ausgeführt (RUN SCRIPT) und auf das grüne Bestätigungsfenster rechts geachtet. 7.) Das "1_macinabox_helper" script unter den "User Scripts" ausgeführt (RUN SCRIPT) und auch auf das grüne 2.Bestätigungsfenster rechts geachtet. 8.) Auf den Reiter "VMS" und dort die VM "Macinabox HighSierra" gestartet. 9.) via "VNC Remote" auf die VM und die option "OS X Base System" ausgewählt. 10.) macOS Utilitis meldet sich und schaut schonmal nicht mehr nach dem BigSur installer aus ... 11.) ich wechsel hier nun in die "Disk Utilitiy" und wähle meine 107.37GB QEMU HDD aus und oben die Option "Erase" 12.) Name : HighSierra - Format: APFS - mit "Erase" bestätigt - bestätige dann mit "Done" 13.) Verlasse nun das "Disk Utility" mit dem roten X links oben. 14.) im "macOS Utilities" wähle ich nun "Reinstall macOS" --> Der Installer "macOS High Sierra" meldet sich .... MEGA MEGA MEGA 15.) nach dem 1. Neustart erscheinen nun 2 HDDs zur Auswahl "OS X Base System" & "macOS Installer" wobei das "macOS Installer" schon vorausgwählt ist und somit davon auch gestartet wird. 16.) Bei mir nach ca. 30min. ein neustart und es melden sich wieder 2 HDDs zur Auswahl "OS X Base System" & "Untitled" ich starte die vorausgewählte "Untitled" 17.) Ich richte die Sprache und sonstiges unter HighSierra ein ! Tja, was soll ich sagen es klappt nun wieder... Ich mutmaße mal das daß permanente Falsche Versions installiern (trotz gewählter HighSierra wird Bigsur installiert etc..etc..) was ja nicht nur bei mir auftritt mit dem gut versteckten Template File von macinabox zu tun hat was ja trotz deinstallieren von macinabox nicht mit deinstalliert wird... (ob das nun gut oder schlecht muss jeder selbst entscheiden ich pers. finde es ehr unglücklich) Ein Riesen Dankeschön an MPC5611 point
-
Downgrade to 6.9.1 and pull a fresh copy from the CA App and create a variable in the template with the Key: 'UNRAID_V' and the Value '6.9.2'. I think it should be possible to do this on 6.9.2 also but I really don't recommend it since you can run into other problems!1 point
-
sorry for the late response, i have actually been thinking about this and i too would quite like to have coordinates to show, so i have implemented an additional env var to allow you to run whatever command you want on startup, to use it you will need to do the following:- 1. pull down the latest image by 'force update' link 2. follow procedure Q8:- https://github.com/binhex/documentation/blob/master/docker/faq/unraid.md using key name of 'STARTUP_CMD' and value of 'gamerule showcoordinates true'. tested and working for me, let me know how you get on.1 point
-
Yes it is possible (I do that myself). You just use the Add Remote SMB/NFS Share and follow the step. In any case, this discussion should be in the UD support thread :1 point
-
Updated to the latest release 2.8.8 also using the version as docker tag to makes things easier Seems like the ppa failed for the base image... need to have a futher look Edit: PPA was fixed and new image pushed1 point
-
There is a lot of information here: https://community.ui.com/questions/Error-on-startup-of-Unifi-Controller-on-Raspberry-Pi-Error-processing-element-InMemoryAppender/4ed28ed2-fa98-4d7a-b242-80a4100b7529?page=2 Possible solutions: Modify the package Change backups to settings only Upgrade to 6.2.171 point
-
Nachtrag: - Kein VFIO Bind - Aktuellster Nvidia Treiber in der VM - Ich777 Nvidia Plugin mit der Treiber Version 460.73.01 Und die VM läuft mit GPU Support!!! 🤪 Ich werd dann noch dein Persistent Script einbauen und hoffe es läuft dann halbwegs. Vielen Dank @ich7771 point
-
HI, Im afraid i'm no longer maintaining this container. It also appears that watcher3 itself is no longer being maintained1 point
-
Jap, oder du entscheidest dich für einen Ryzen mit iGPU, die erscheinen doch jetzt oder sind schon erschienen. Genau, musst dir ein custom image bauen mit dem Unraid-Kernel-Helper, aber sollte wirklich schmerzbefreit sein, hab das wirklich so einfach wie möglich gemacht. Jein, du kannst auch persistenced starten und gleich wieder beenden beim boot, so kannst du die GPU dann auch in der VM verwenden wenn persistenced wieder beendet wurde, wäre ein workaround. Schau mal in die letzten Posts von @giganode (nur so am Rande: wenn du wen markierst musst nochmal auf den namen klicken damit er auch eine Benachrichtigung bekommt) indem du einfach auf seinen Namen klickst, ich markier ihn von Zeit zu Zeit wegen genau solchen Themen, aber wie gesagt, @giganode hat momentan viel um die Ohren und ist glaub ich nur sporadisch am Wochenende hier.1 point
-
Enable this then post that log after a crash.1 point
-
Ändert aber nichts dran wenn du den gnif/vendor reset nicht integriert hast wird es ebenso das gleiche sein. @giganode kennt sich mit dieser thematik besser aus aber hat momentan wenig zeit soweit ich weiß. Du musst eigentlich nur das Radeon-TOP Plugin installieren (vorausgesetzt ist das du eine AMD iGPU oder dGPU verbaut hast) und den Jellyfin Container mit der device '/dev/dri' durchgereicht wie in diesem Beispiel: Ist auch eine Quadro kannst mit AMD Fire Karten vergleichen (ECC RAM, getestete Treiber, usw...). 💰🤑 Wie gesagt das ist mir schon lange egal. Performance und mein Konto muss es vertragen können... Dann wird deine Karte nicht in P8 geschickt. Wie meinst du das 36W bis 43W? Die Karte braucht auf jeden Fall nicht mehr oder weniger Strom wenn sie in P8 ist und nichts drauf läuft (sollte ein konstanter Wert sein). Ist auf jeden Fall besser als vorher, aber irgendwas stimmt da nicht die Karte sollte wie gesagt nur ca 8Watt brauchen im Idle, sprich also ca 37Watt gesamt in deinem Fall.
 1 point
 -
I see the same issue as @ionred, also specifically only on main.

 1 point
 -
This is not generally true. You only pay such a high price if you buy batteries from the UPS manufacturer. For example, APC batteries for any APC UPS are normally very expensive. But you can generally buy the same batteries from a trusted battery brand much cheaper. (Examples would be Lucas or Yuasa batteries sold in the UK). Then you can buy the same capacity maybe for around 30% of the cost. Many UPS use 12V 7Ah or 12V 9Ah batteries - these are standard sizes from many manufacturers. Also many battery suppliers will list equivalent types for UPS batteries for APC and other UPS makes. Here is an example from a supplier in the UK - https://www.tayna.co.uk/ups-batteries/ Sometime a UPS battery is made of two standard batteries joined together, and it is generally possible to assemble the replacements using the same cables and housing.1 point
-
I think @ich777 has a plugin coming for this looking at the release notes for his Intel GPU TOP plugin1 point
-
This mobo was refresh version with B365 chipset (previous B250). There are 7 SATA controller onboard, each use PCIe1x and provide 28 port, other 4 port was come from B365. Previous use Marvell controller and not recommend for Unraid.1 point
-
Well it really is a reverse proxy mostly used for SSL offloading. It has some access control features so you can use that. Like only allowing a certain IP or add a password. But in most routers you can also allow only specific IPs and most containers have some kind of login. So yeah in my opinion it is really just for SSL offloading. Nextcloud for example has users so you won't be adding a password to NPM so really only the accesslist is left over imo :) anyway you can open and close the port yes but you must open the port if you want to renew your certificate in a couple of months. It's not really the way to go with letsencrypt to have a flow like that. But yeah it should work.1 point
-
Die Skripte von Spaceinvader sind fehlerhaft. Ich hatte auch eine Catalina Version obwohl ich BigSur ausgewählt hatte. (Nachdem ich beim ersten mal fehlerhaft Catalina ausgewählt hatte und auf BigSur wechseln wollte.) Der Fehler passiert wenn man nicht alle iso´s von Spaceinvader aus dem ISO Ordner löscht. Am besten ganz ruhig: - VM löschen (inkl. disk), Notfalls per Konsole - Konsole in /mnt/user/isos alles löschen das nach OSX aussieht. Alles, auch wenn da was mit High Sierra steht und du das danach installieren willst! - Macinabox löschen - Macinabox template löschen - Konsole /mnt/user/appdata/macinabox löschen - Konsole /mnt/user/system/custom_ovmf löschen - die zwei userscripte löschen Fresh install - Dann Macinabox wieder installieren und warten - warten - Das 2. Userscript im Hintergrund ausführen. Ist die Benachrichtigung da dann das erste userscript ausführen - VM und Installation starten ohne die config zu ändern und via VNC installieren (Pain in the ass, slow) - OSX installieren (noch nicht mit iCloud verbinden, am besten einen dummyuser anlegen) - VM herunterfahren - VM Kongig ändern (Kerne, RAM, ggf. Grafikkarten Passthrough aktivieren), Name der VM kopieren - Danach usescript 1 editieren und den Wert bei "firstinstall" auf no setzen - den Namen der VM an die richtige Stelle kopieren im script - wenn man 3C/6T oder irgendwelche komischen Kernzuordnungen gemacht hat, die es bei den Prozessoren so gar nicht gibt noch die 3. Variable im userscript ändern (irgendwas mit Standardlayout). Am besten aber einfach 2C/4T, 4C/8T, 6C/12T etc. konfigurieren. - danach das userscript nochmal ausführen. Erst dann wird die Konfiguration wirklich übernommen - VM starten - dummy user einloggen - OpenCore Konfigurator (2.19.0 war es glaube ich, muss auf jeden Fall für OpenCore 0.6.4 sein) downloaden. - Mit dem OpenCore Konfiguration die EFI der OpenCore Partition mounten - EFI Folder und "var" auf den Desktop kopieren und danach die OpenCore Partition unmounten - config.plist (aus dem auf den Desktop geladenen EFI Folder) mit OpenCore Konfigurator laden und ein neues SMBIOS auf Basis von iMacPro1,1 erstellen (nicht iMac20,1 oder ähnliches, da sonst Videoconvertierung nicht funktioniert da er dazu die iGPU hernehmen will. Bei iMacPro nimmt er die Grafikkarte her die eh meist viel schneller ist) - config.plist mit den neuen Seriennummern die er bei der Auswahl des SMBIOS erstellt hat abspeichern. - mit dem OpenCore Konfiguration EFI der vDisk mounten - EFI und "vars" auf diese Partition kopieren - EFI der vDisk unmounten - OSX herunterfahren - VM Konfig modifizieren: den Pfad des 3. Installmediums an den Pfad des ersten kopieren und dann 2. und 3. InstallPfad löschen - 1. userscript von Spaceinvader wieder ausführen um die Konfiguration wirklich auch zu speichern - VM starten und alles sollte laufen. - Nun sollte man in der Lage sein auch seinen echten Nutzer anzulegen und iCloud ohne Fehler zu verbinden Ist recht komplex geworden das macinabox. //Edit: Korrektur Workflow und EFI Position1 point
-
Hello there, so i bought the ASM1166, sadly it is 4x pcie and is blocking now one of my big slots but that is ok. It is working fine, i have no troubles at all. Thank you all for your help!1 point
-
Ruhig Blut ihr beiden. Vom Prinzip kannst du ja problemlos zurück zu 6.8.3. Ich glaube allerdings, dass das nicht an 6.9.x liegt. Gerade das mit dem Download des falschen MacOS ist meine ich wegen spaceinvader so bzw er hat da meine ich einen Bug in seiner Downloadquelle. Bedenke, dass die Leute 6.9 schon seit Monaten als Beta getestet haben und solche massiven Probleme eigentlich nicht mehr auftauchen sollten. Da hätten sich ja sicher schon andere beschwert.1 point
-
Are you following dortania instructions? https://dortania.github.io/GPU-Buyers-Guide/modern-gpus/nvidia-gpu.html#kepler-series-gtx-6xx-7xx Try to add in your config.plist, boot args: shikigva=40 shiki-id=Mac-27ADBB7B4CEE8E61 Append them if you have others, follows example: <key>NVRAM</key> <dict> <key>Add</key> <dict> ....... ....... <key>7C436110-AB2A-4BBB-A880-FE41995C9F82</key> <dict> ....... ....... <key>boot-args</key> <string>shikigva=40 shiki-id=Mac-27ADBB7B4CEE8E61</string>1 point
-
@scorcho99 Yes. All of the IOMMU groupings I posted were without any ACS overiddes.1 point
-
Irgendwie ist Deine Ausdrucksweise Grütze. Lies mal hier, da ist ne Lösung für Dein Problem (Englisch von Nöten). https://forums.unraid.net/topic/84601-support-spaceinvaderone-macinabox/?do=findComment&comment=951094 Zur Not: https://www.deepl.com/translator Und bitte: Big Sur ohne "e"1 point
-
Container und VMs laufen unabhängig vom OS. Ein Zusammenhang zu 6.9.x wäre daher ungewöhnlich. Das meinte ich. Das habe ich bei einem YouTube Video von spaceinvader in den Kommentaren gelesen. Und was ist mit dem Löschen des Ordners unter system?1 point
-
Yes, download the User Scripts plugin from the CA App and create a new entry in this plugin that has the command: 'docker restart CONTAINERNAME' in it (change CONTAINERNAME to the exact name from your container). You can then create a Cron entry with a fixed schedule. Hope that helps.1 point
-
Hilft das? https://forums.unraid.net/topic/84601-support-spaceinvaderone-macinabox/?do=findComment&comment=9229231 point
-
Finally got it working on my Asrock X570D4U-2L2T board. Step by step guide. Login to your ASRockRack IPMI web ui (BMC) Go to Settings -> FAN Settings -> FAN Mode In the lower section "Set Fan Control Mode" set all fans to "Manual" and press the "Save control mode" button Open a ssh session to your unraid server or use the unraid web terminal Go to the following directory by entering the command cd /usr/local/emhttp/plugins/ipmi/scripts Download the custom ipmi2json file wget https://raw.githubusercontent.com/lucasteligioridis/IPMI-unRAID/master/source/ipmi/usr/local/emhttp/plugins/ipmi/scripts/ipmi2json Set the permission for the file chmod 755 ipmi2json.1 Exchange the original file with the custom one mv ipmi2json ipmi2json.ori && mv ipmi2json.1 ipmi2json Download the custom ipmifan file wget https://raw.githubusercontent.com/lucasteligioridis/IPMI-unRAID/master/source/ipmi/usr/local/emhttp/plugins/ipmi/scripts/ipmifan Set the permission for the file chmod 755 ipmifan.1 Exchange the original file with the custom one mv ipmifan ipmifan.ori && mv ipmifan.1 ipmifan Login to your unraid web ui Go to Settings -> IPMI -> Fan Control Set "Fan Control" to "No" and press the button "APPLY" Press now the "CONFIGURE" button and wait until its finished When finished, press the "DONE" button Configure now your "Fan Settings" which fan should be linked to which temperature sensor, e.g. HDD Temperature Start the fan control again by setting "Fan Control" to "Yes" and press the "APPLY" button Enjoy NOTES What is missing is to make the files persistent, so with this guide your would need to repeat step 5-11 every time you restart your unraid server and then stop the fan control and start it again to load the activate the changed files If you do not set in the BMC your fan control mode to manual, the configure script in unraid will not work properly. Many thanks again to @cakes044 who made effort to get the raw ipmi values for the board. cheers, Horfic1 point
-
Perfect place to post it.1 point
-
How often is your upload script running? Can you manually run it and see if it appears on your remote computer? You will just have to use the first part of the script (Create Rclone Mount). You won't need anything after that. I caution about using a cache with the rclone mount if you are just reading as well. I say this because if you update a file on your system and it isn't the same file extension, it won't overwrite the existing media if its in cache. This will make the media server see duplicate files for the same media. It will eventually work itself out due to cache size/time, but something to be aware of.1 point
-
Sure, you can delete /var/log/pwfail/[ipaddress] if you don't want to wait for the 15 minute cooldown to expire. This file is stored in RAM, so the other option is to reboot. Every line in that file is a timestamp of a failed login attempt. When you try to login, the first thing it does is remove any timestamps that are older than 15 minutes. If more than 3 remain, you are prevented from logging in and another timestamp is added to the file. Upon successful login the the file is deleted. If you get locked out for an extended period again, attach the file mentioned above and I'll take a closer look1 point
-
Thanks Mason, this apps works well and is a good addition to sonarr / radarr1 point
-
The USB Flash Drive backup lets us keep more control over our backups. Deprecating this in favor of a method that only backups to the cloud is a mistake in my opinion. Would you do the same with appdata if unRaid added an option to backup appdata to their servers? This isn't even accounting for the fact that the backups made by unRaid aren't encrypted currently. I ask you to please reconsider this stance, maintaining the ability to create controlled backups of flash is important.1 point
-
Setting MakeMKV to run as root user fixed the drive not being detected for me. Use PGID and PUID as 0.1 point