Leaderboard


Popular Content
Showing content with the highest reputation on 05/03/21 in all areas
-
Big News from NVIDIA Just a few hours ago, NVIDIA added an article to its support knowledge base regarding GPU passthrough support for Windows VMs. While we've supported this functionality for some time, it was done without official support from the vendor themselves. This move by NVIDIA to announce official support for this feature is a huge step in the right direction for all of our VM pass through users. This should also help instill confidence in users that wish to pass through these GPUs to virtual machines without the worry that a future driver update would break this functionality. Let us know what you think about this announcement here!2 points
-
Your definitely not the assholes here....2 points
-
That 'asshole' would be me. Please keep in mind that I have a full time demanding job, a child, a 10 month old and a wife outside of what I do in ombi. All of my free time is pretty much dedicated to working on the product. V4 was released as it's more stable than v3 and I needed to release.it at some point or I never would have. If you are not happy with it then I suggest your stick to v3 and if you want the voting feature ported faster, then you submit a PR or be able to contribute in some other way.2 points
-
Hi guys, i got inspired by this post from @BRiT and created a bash script to allow you set media to read only to prevent ransomware attacks and accidental or malicious deletion of files. The script can be executed once to make all existing files read only, or can be run using cron to catch all newly created files as well. The script has an in-built help system with example commands, any questions let me know below. Download by issuing the following command from the unRAID 'Terminal' :- curl -o '/tmp/no_ransom.sh' -L 'https://raw.githubusercontent.com/binhex/scripts/master/shell/unraid/system/no_ransom/no_ransom.sh' && chmod +x '/tmp/no_ransom.sh' Then to view the help simply issue:- /tmp/no_ransom.sh Disclaimer:- Whilst i have done extensive tests and runs on my own system with no ill effects i do NOT recommend you run this script across all of your media until you are fully satisfied that it is working as intended (try a small test share), i am in no way responsible for any data loss due to the use of this script.1 point
-
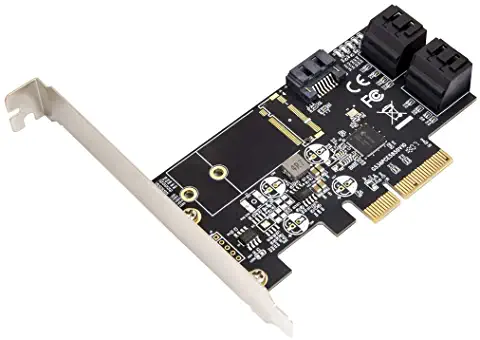
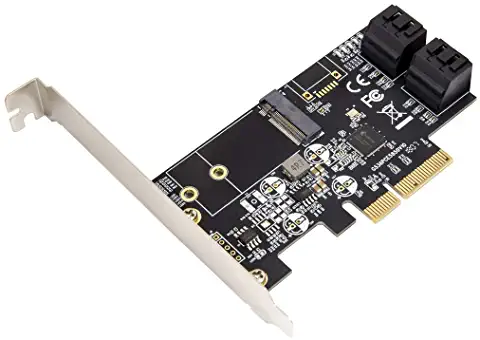
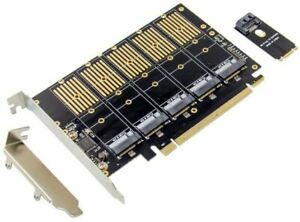
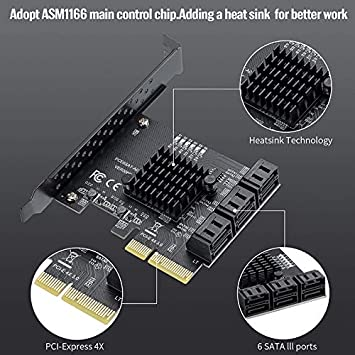
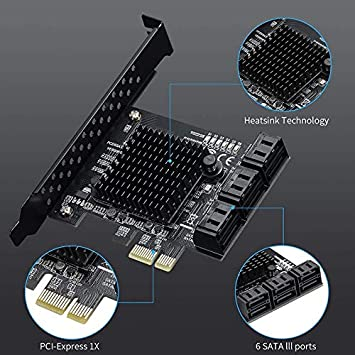
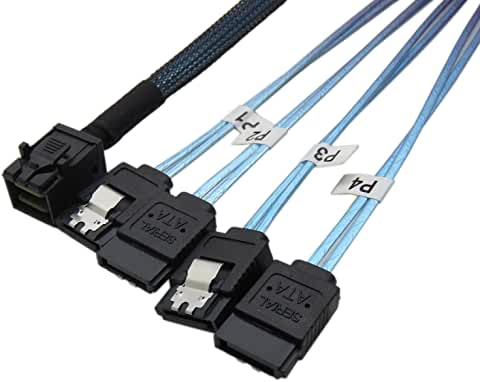
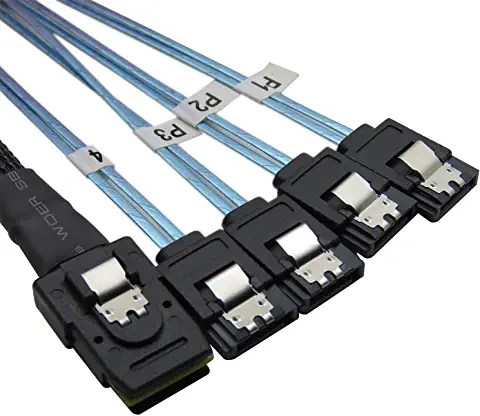
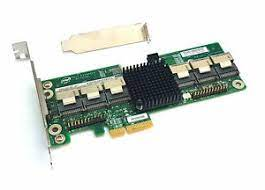
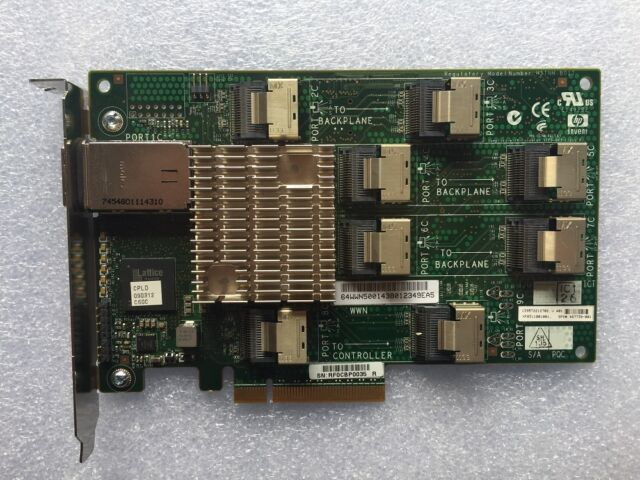
This thread is meant to replace the now outdated old one about recommended controllers, these are some controllers known to be generally reliable with Unraid: Note: RAID controllers are not recommended for Unraid, this includes all LSI MegaRAID models, doesn't mean they cannot be used but there could be various issues because of that, like no SMART info and/or temps being displayed, disks not being recognized by Unraid if the controller is replaced with a different model, and in some cases the partitions can become invalid, requiring rebuilding all the disks. 2 ports: Asmedia ASM1061/62 (PCIe 2.0 x1) or JMicron JMB582 (PCIe 3.0 x1) 4 ports: Asmedia ASM1064 (PCIe 3.0 x1) or ASM1164 (PCIe 3.0 x4 physical, x2 electrical, though I've also seen some models using just x1) 5 ports: JMicron JMB585 (PCIe 3.0 x4 - x2 electrically) These JMB controllers are available in various different SATA/M.2 configurations, just some examples: 6 ports: Asmedia ASM1166 (PCIe 3.0 x4 physical, x2 electrical) * * There have been some reports that some of these need a firmware update for stability and/or PCIe ASPM support, see here for instructions. These exist with both x4 (x2 electrical) and x1 PCIe interface, for some use cases the PCIe x1 may be a good option, i.e., if you don't have larger slots available, though bandwidth will be limited: 8 ports: any LSI with a SAS2008/2308/3008/3408/3808 chipset in IT mode, e.g., 9201-8i, 9211-8i, 9207-8i, 9300-8i, 9400-8i, 9500-8i, etc and clones, like the Dell H200/H310 and IBM M1015, these latter ones need to be crossflashed (most of these require a x8 or x16 slot, older models like the 9201-8i and 9211-8i are PCIe 2.0, newer models like the 9207-8i, 9300-8i and newer are PCIe 3.0) For these and when not using a backplane you need SAS to SATA breakout cables, SFF-8087 to SATA for SAS2 models: SFF-8643 to SATA for SAS3 models: Keep in mind that they need to be forward breakout cables (reverse breakout look the same but won't work, as the name implies they work for the reverse, SATA goes on the board/HBA and the miniSAS on a backplane), sometimes they are also called Mini SAS (SFF-8xxx Host) to 4X SATA (Target), this is the same as forward breakout. If more ports are needed you can use multiple controllers, controllers with more ports (there are 16 and 24 port LSI HBAs, like the 9201-16i, 9305-16i, 9305-24i, etc) or use one LSI HBA connected to a SAS expander, like the Intel RES2SV240 or HP SAS expander. P.S. Avoid SATA port multipliers with Unraid, also avoid any Marvell controller. For some performance numbers on most of these see below:
 1 point
 -
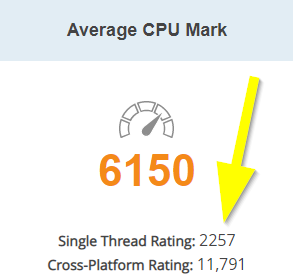
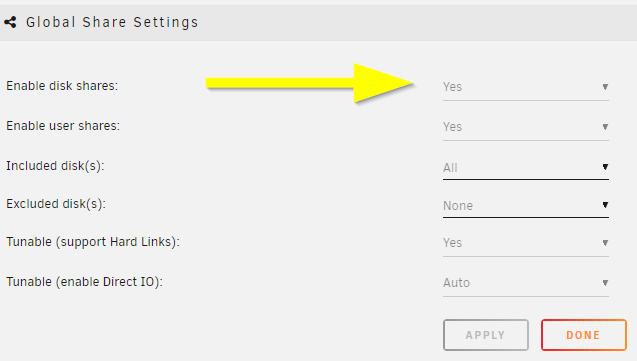
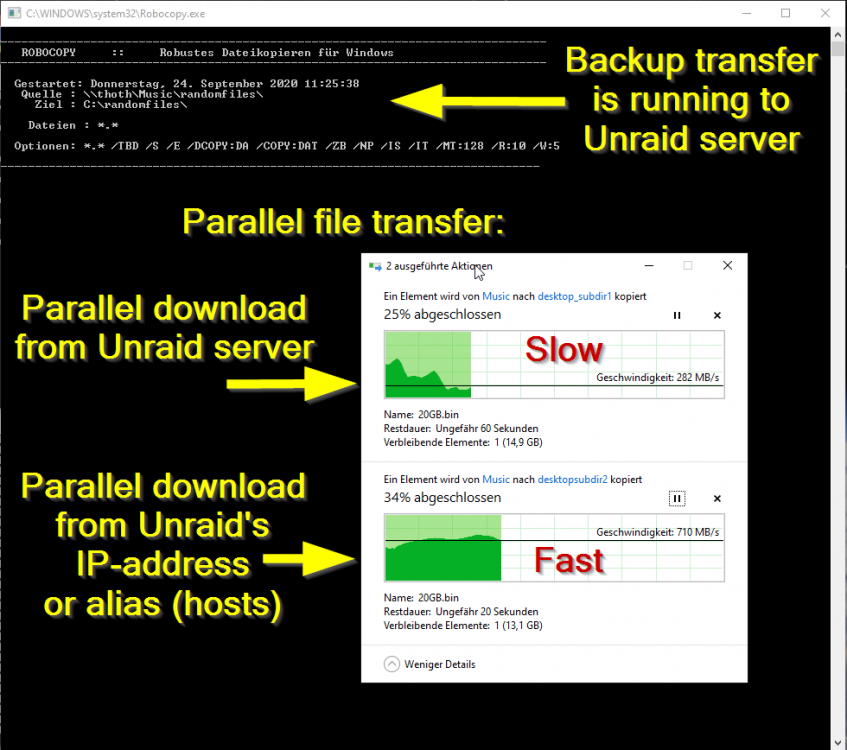
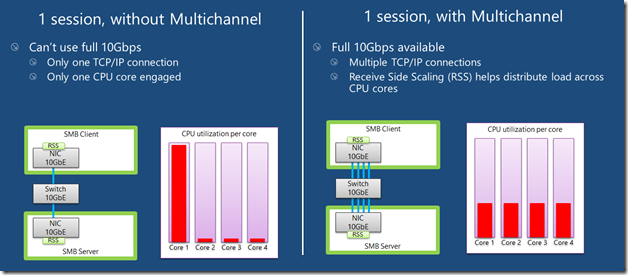
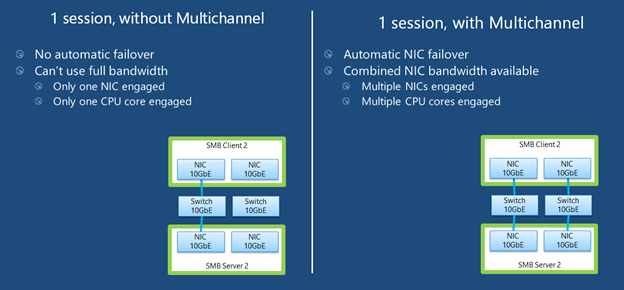
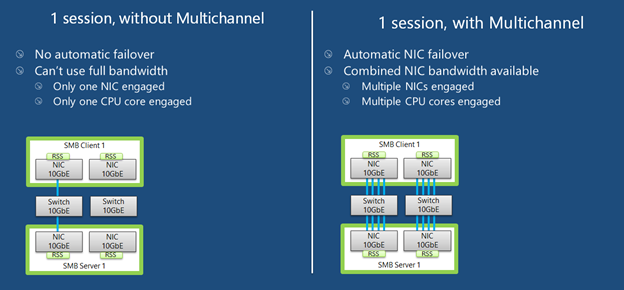
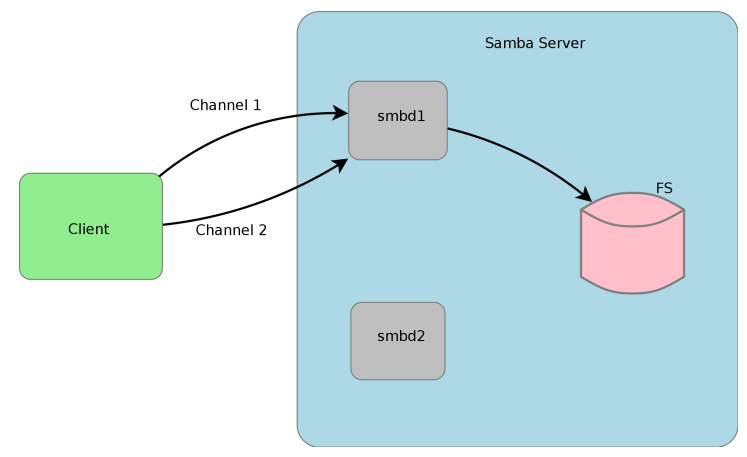
I'm using Unraid for a while now and collected some experience to boost the SMB transfer speeds: Donate? 🤗 1.) Choose the right CPU The most important part is to understand that SMB is single-threaded. This means SMB uses only one CPU core to transfer a file. This is valid for the server and the client. Usually this is not a problem as SMB does not fully utilize a CPU core (except of real low powered CPUs). But Unraid adds, because of the ability to split shares across multiple disks, an additional process called SHFS and its load raises proportional to the transfer speed, which could overload your CPU core. So the most important part is, to choose the right CPU. At the moment I'm using an i3-8100 which has 4 cores and 2257 single thread passmark points: And since I have this single thread power I'm able to use the full bandwith of my 10G network adapter which was not possible with my previous Intel Atom C3758 (857 points) although both have comparable total performance. I even was not able to reach 1G speeds while a parallel Windows Backup was running (see next section to bypass this limitation). Now I'm able to transfer thousands of small files and parallely transfer a huge file with 250 MB/s. With this experience I suggest a CPU that has around 1400 single thread passmark points to fully utilize a 1G ethernet port. As an example: The smallest CPU I would suggest for Unraid is an Intel Pentium Silver J5040. P.S. Passmark has a list sorted by single thread performance for desktop CPUs and server CPUs. 2.) Bypass single-thread limitation The single-thread limitation of SMB and SHFS can be bypassed through opening multiple connections to your server. This means connecting to "different" servers. The easiest way to accomplish that, is to use the ip-address of your server as a "second" server while using the same user login: \\tower\sharename -> best option for user access through file explorer as it is automatically displayed \\10.0.0.2\sharename -> best option for backup softwares, you could map it as a network drive If you need more connections, you can add multiple entries to your windows hosts file (Win+R and execute "notepad c:\windows\system32\drivers\etc\hosts"): 10.0.0.2 tower2 10.0.0.2 tower3 Results If you now download a file from your Unraid server through \\10.0.0.2 while a backup is running on \\tower, it will reach the maximum speed while a download from \\tower is massively throttled: 3.) Bypass Unraid's SHFS process If you enable access directly to the cache disk and upload a file to //tower/cache, this will bypass the SHFS process. Beware: Do not move/copy files between the cache disk and shares as this could cause data loss! The eligible user account will be able to see all cached files, even those from other users. Temporary Solution or "For Admins only" As Admin or for a short test you could enable "disk shares" under Settings -> Global Share Settings: By that all users can access all array and cache disks as SMB shares. As you don't want that, your first step is to click on each Disk in the WebGUI > Shares and forbid user access, except for the cache disk, which gets read/write access only for your "admin" account. Beware: Do not create folders in the root of the cache disk as this will create new SMB Shares Safer Permanent Solution Use this explanation. Results In this thread you can see the huge difference between copying to a cached share or copying directly to the cache disk. 4.) Enable SMB Multichannel + RSS SMB Multichannel is a feature of SMB3 that allows splitting file transfers across multiple NICs (Multichannel) and create multiple TCP connection depending on the amount of CPU Cores (RSS) since Windows 8. This will raise your throughput depending on your amount of NICs, NIC bandwidth, CPU and used settings: This feature is experimental SMB Multichannel is considered experimental since its release with Samba 4.4. The main bug for this state is resolved in Samba 4.13. The Samba developers plan to resolve all bugs with 4.14. Unraid 6.8.3 contains Samba 4.11. This means you use Multichannel on your own risk! Multichannel for Multiple NICs Lets say your mainboard has four 1G NICs and your Client has a 2.5G NIC. Without Multichannel the transfer speed is limited to 1G (117,5 MByte/s). But if you enable Multichannel it will split the file transfer across the four 1G NICs boosting your transfer speed to 2.5G (294 MByte/s): Additionally it uses multiple CPU Cores which is useful to avoid overloading smaller CPUs. To enable Multichannel you need to open the Unraid Webterminal and enter the following (the file is usually empty, so do not wonder): nano /boot/config/smb-extra.conf And add the following to it: server multi channel support = yes Press "Enter+X" and confirm with "Y" and "Enter" to save the file. Then restart the Samba service with this command: samba restart Eventually you need to reboot your Windows Client, but finally its enabled and should work. Multichannel + RSS for Single and Multiple NICs But what happens if you're server has only one NIC. Now Multichannel is not able to split something, but it has a sub-feature called RSS which is able to split file transfers across multiple TCP connections with a single NIC: Of course this feature works with multiple NICs, too: But this requires RSS capability on both sides. You need to check your servers NIC by opening the Unraid Webterminal and entering this command (could be obsolete with Samba 4.13 as they built-in an RSS autodetection ) egrep 'CPU|eth*' /proc/interrupts It must return multiple lines (each for one CPU core) like this: egrep 'CPU|eth0' /proc/interrupts CPU0 CPU1 CPU2 CPU3 129: 29144060 0 0 0 IR-PCI-MSI 524288-edge eth0 131: 0 25511547 0 0 IR-PCI-MSI 524289-edge eth0 132: 0 0 40776464 0 IR-PCI-MSI 524290-edge eth0 134: 0 0 0 17121614 IR-PCI-MSI 524291-edge eth0 Now you can check your Windows 8 / Windows 10 client by opening Powershell as Admin and enter this command: Get-SmbClientNetworkInterface It must return "True" for "RSS Capable": Interface Index RSS Capable RDMA Capable Speed IpAddresses Friendly Name --------------- ----------- ------------ ----- ----------- ------------- 11 True False 10 Gbps {10.0.0.10} Ethernet 3 Now, after you are sure that RSS is supported on your server, you can enable Multichannel + RSS by opening the Unraid Webterminal and enter the following (the file is usually empty, so do not wonder): nano /boot/config/smb-extra.conf Add the following and change 10.10.10.10 to your Unraid servers IP and speed to "10000000000" for 10G adapter or to "1000000000" for a 1G adapter: server multi channel support = yes interfaces = "10.10.10.10;capability=RSS,speed=10000000000" If you are using multiple NICs the syntax looks like this (add RSS capability only for supporting NICs!): interfaces = "10.10.10.10;capability=RSS,speed=10000000000" "10.10.10.11;capability=RSS,speed=10000000000" Press "Enter+X" and confirm with "Y" and "Enter" to save the file. Now restart the SMB service: samba restart Does it work? After rebooting your Windows Client (seems to be a must), download a file from your server (so connection is established) and now you can check if Multichannel + RSS works by opening Windows Powershell as Admin and enter this command: Get-SmbMultichannelConnection -IncludeNotSelected It must return a line similar to this (a returned line = Multichannel works) and if you want to benefit from RSS then "Client RSS Cabable" must be "True": Server Name Selected Client IP Server IP Client Interface Index Server Interface Index Client RSS Capable Client RDMA Capable ----------- -------- --------- --------- ---------------------- ---------------------- ------------------ ------------------- tower True 10.10.10.100 10.10.10.10 11 13 True False In Linux you can verify RSS through this command which returns one open TCP connection per CPU core (in this case we see 4 connections as my client has only 4 CPU cores, altough my server has 6): netstat -tnp | grep smb tcp 0 0 192.168.178.8:445 192.168.178.88:55975 ESTABLISHED 3195/smbd tcp 0 0 192.168.178.8:445 192.168.178.88:55977 ESTABLISHED 3195/smbd tcp 0 0 192.168.178.8:445 192.168.178.88:55976 ESTABLISHED 3195/smbd tcp 0 0 192.168.178.8:445 192.168.178.88:55974 ESTABLISHED 3195/smbd Note: Sadly Samba does not create multiple smbd processes, which means we still need a CPU with high single thread performance to benefit from RSS. This is even mentioned in the presentation: If you are interested in test results, look here. 5.) smb.conf Settings Tuning I did massive testing with a huge amount of smb.conf settings provided by the following websites and really NOTHING resulted in a noticable speed gain: https://wiki.samba.org/index.php/Performance_Tuning https://wiki.samba.org/index.php/Linux_Performance https://wiki.samba.org/index.php/Server-Side_Copy https://www.samba.org/~ab/output/htmldocs/Samba3-HOWTO/speed.html https://www.samba.org/samba/docs/current/man-html/smb.conf.5.html https://lists.samba.org/archive/samba-technical/attachments/20140519/642160aa/attachment.pdf https://www.samba.org/samba/docs/Samba-HOWTO-Collection.pdf https://www.samba.org/samba/docs/current/man-html/ (search for "vfs") https://lists.samba.org/archive/samba/2016-September/202697.html https://codeinsecurity.wordpress.com/2020/05/18/setting-up-smb-multi-channel-between-freenas-or-any-bsd-linux-and-windows-for-20gbps-transfers/ https://www.snia.org/sites/default/files/SDC/2019/presentations/SMB/Metzmacher_Stefan_Samba_Async_VFS_Future.pdf https://www.heise.de/newsticker/meldung/Samba-4-12-beschleunigt-Verschluesselung-und-Datentransfer-4677717.html I would say the recent Samba versions are already optimized by default. 6.) Choose a proper SSD for your cache You could use Unraid without an SSD, but if you want fast SMB transfers an SSD is absolutely required. Else you are limted to slow parity writes and/or through your slow HDD. But many SSDs on the market are not "compatible" for using it as an Unraid SSD Cache. DRAM Many cheap models do not have a DRAM Cache. This small buffer is used to collect very small files or random writes before they are finally written to the SSD and/or is used to have a high speed area for the file mapping-table. In Short, you need DRAM Cache in your SSD. No exception. SLC Cache While DRAM is only absent in cheap SSDs, SLC Cache can miss in different price ranges. Some cheap models use a small SLC cache to "fake" their technical data. Some mid-range models use a big SLC Cache to raise durability and speed if installed in a client pc. And some high-end models do not have an SLC Cache, as their flash cells are fast enough without it. Finally you are not interested in SLC Cache. You are only interested in continuous write speeds (see "Verify Continuous Writing Speed") Determine the Required Writing Speed But before you are able to select the right SSD model you need to determine your minimum required transfer speed. This should be simple. How many ethernet ports do you want to use or do you plan to install a faster network adapter? Lets say you have two 5G ports. With SMB Multichannel its possible to use them in sum and as you plan to install a 10G card in your client you could use 10G in total. Now we can calculate: 10G * 117.5 MByte/s (real throughput per 1G ethernet) = 1175 MByte/s and by that we have two options: buy one M.2 NVMe (assuming your motherboard has such a slot) with a minimum writing speed of 1175 MByte/s buy two or more SATA SSDs and use them in a RAID0, each with a minimum writing speed of 550 MByte/s Verify Continuous Writing Speed of the SSD As an existing "SLC Cache" hides the real transfer speed you need to invest some time to check if your desired SSD model has an SLC cache and how much the SSD throttles after its full. A solution could be to search for "review slc cache" in combination with the model name. Using the image search could be helpful as well (maybe you see a graph with a falling line). If you do not find anything, use Youtube. Many people out there test their new ssd by simply copying a huge amount of files on it. Note: CrystalDiskMark, AS SSD, etc Benchmarks are useless as they only test a really small amount of data (which fits into the fast cache). Durability You could look for the "TBW" value of the SSD, but finally you won't be able to kill the SSD inside the warranty as long your very first filling of your unraid server is done without the SSD Cache. As an example a 1TB Samsung 970 EVO has a TBW of 600 and if your server has a total size of 100TB you would waste 100TBW on your first fill for nothing. If you plan to use Plex, think about using the RAM as your transcoding storage which would save a huge amount of writes to your SSD. Conclusion: Optimize your writings instead of buying an expensive SSD. NAS SSD Do not buy "special" NAS SSDs. They do not offer any benefits compared to the high-end consumer models, but cost more. 7.) More RAM More RAM means more caching and as RAM is even faster than the fastest SSDs, this adds additional boost to your SMB transfers. I recommend installing two identical (or more depening on the amount of slots) RAM modules to benefit from "Dual Channel" speeds. RAM frequency is not as important as RAM size. Read Cache for Downloads If you download a file twice, the second download does not read the file from your disk, instead it uses your RAM only. The same happens if you're loading covers of your MP3s or Movies or if Windows is generating thumbnails of your photo collection. More RAM means more files in your cache. The read cache uses by default 100% of your free RAM. Write Cache for Uploads Linux uses by default 20% of your free RAM to cache writes, before they are written to the disk. You can use the Tips and Tweaks Plugin to change this value or add this to your Go file (with the Config Editor Plugin) sysctl vm.dirty_ratio=20 But before changing this value, you need to be sure to understand the consequences: Never use your NAS without an UPS if you use write caching as this could cause huge data loss! The bigger the write cache, the smaller the read cache (so using 100% of your RAM as write cache is not a good idea!) If you upload files to your server, they are 30 seconds later written to your disk (vm.dirty_expire_centisecs) Without SSD Cache: If your upload size is generally higher than your write cache size, it starts to cleanup the cache and in parallel write the transfer to your HDD(s) which could result in slow SMB transfers. Either you raise your cache size, so its never filled up, or you consider totally disabling the write cache. With SSD Cache: SSDs love parallel transfers (read #6 of this Guide), so a huge writing cache or even full cache is not a problem. But which dirty_ratio value should you set? This is something you need to determine by yourself as its completely individual: At first you need to think about the highest RAM usage that is possible. Like active VMs, Ramdisks, Docker containers, etc. By that you get the smallest amount of free RAM of your server: Total RAM size - Reserved RAM through VMs - Used RAM through Docker Containers - Ramdisks = Free RAM Now the harder part: Determine how much RAM is needed for your read cache. Do not forget that VMs, Docker Containers, Processes etc load files from disks and they are all cached as well. I thought about this and came to this command that counts hot files: find /mnt/cache -type f -amin -86400 ! -size +1G -exec du -bc {} + | grep total$ | cut -f1 | awk '{ total += $1 }; END { print total }' | numfmt --to=iec-i --suffix=B It counts the size of all files on your SSD cache that are accessed in the last 24 hours (86400 seconds) The maximum file size is 1GiB to exclude VM images, docker containers, etc This works only if you hopefully use your cache for your hot shares like appdata, system, etc Of course you could repeat this command on several days to check how it fluctuates. This command must be executed after the mover has finished its work This command isn't perfect as it does not count hot files inside a VM image Now we can calculate: 100 / Total RAM x (Free RAM - Command Result) = vm.dirty_ratio If your calculated "vm.dirty_ratio" is lower than 5% (or even negative), you should lower it to 5 and buy more RAM. between 5% and 20%, set it accordingly, but you should consider buying more RAM. between 20% and 90%, set it accordingly If your calculated "vm.dirty_ratio" is higher than 90%, you are probably not using your SSD cache for hot shares (as you should) or your RAM is huge as hell (congratulation ^^). I suggest not to set a value higher than 90. Of course you need to recalcuate this value if you add more VMs or Docker Containers. #8 Disable haveged Unraid does not trust the randomness of linux and uses haveged instead. By that all encryptions processes on the server use haveged which produces extra load. If you don't need it, disable it through your Go file (CA Config Editor) as follows: # ------------------------------------------------- # disable haveged as we trust /dev/random # https://forums.unraid.net/topic/79616-haveged-daemon/?tab=comments#comment-903452 # ------------------------------------------------- /etc/rc.d/rc.haveged stop
.png.9a4f708867a76b362eeaac6a578d6d21.png)
 1 point
 -
Hello Unraid Community, I made a beginners guide/tutorial to install/setup Unraid (It was using v6.6.6). I cover the following topics: USB Key - 18:00 BIOS - 3:42 Disk Array - 4:56 Parity Check - 10:30 Format Drives - 11:03 Single Share - 11:38 PSA - 21:11 Security - 22:11 Share per Media Type - 28:43 APC UPS - 40:36 10 Gigabits/Second Transfer Test - 43:11 Share Troubleshooting - 44:41 I hope it helps those looking for some initial direction to get started and be inspired to continue their Unraid journey. How to Install & Configure an Unraid NAS - Beginners Guide1 point
-
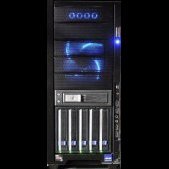
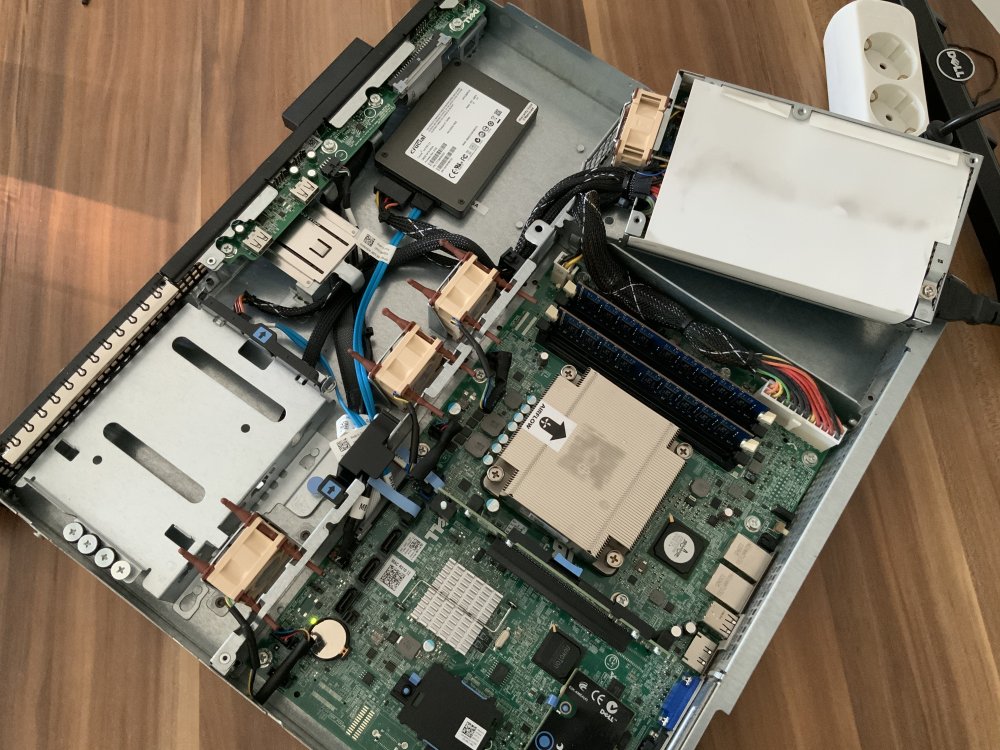
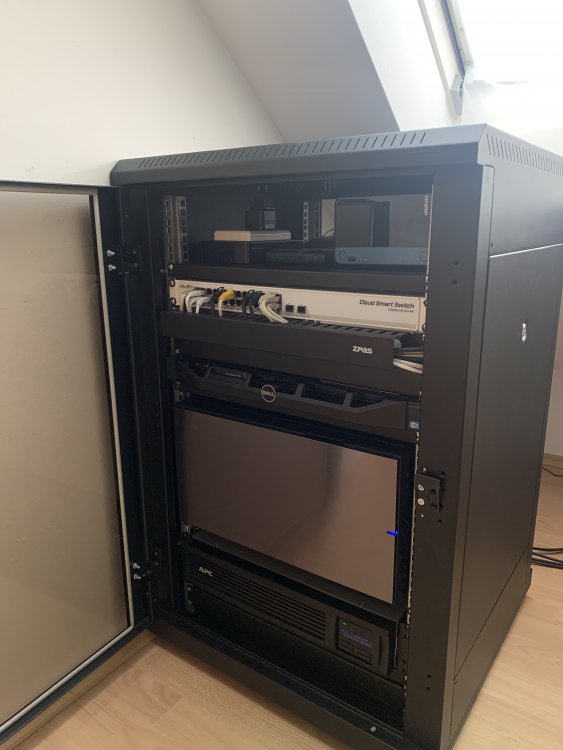
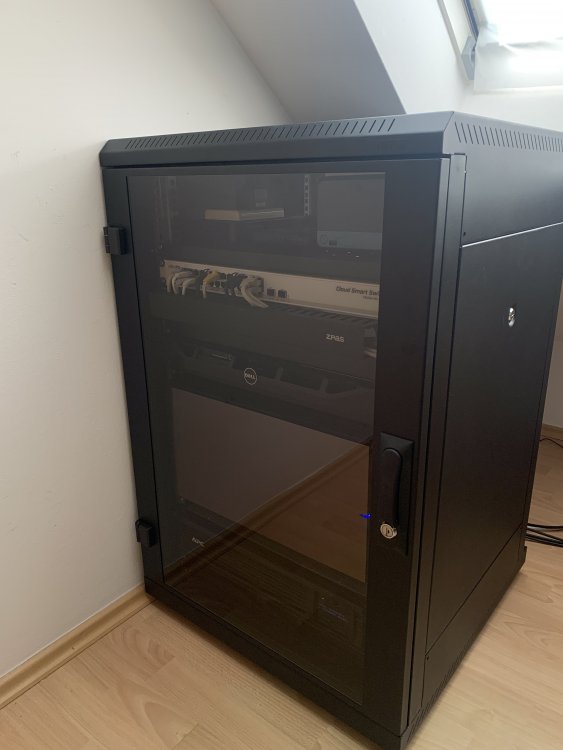
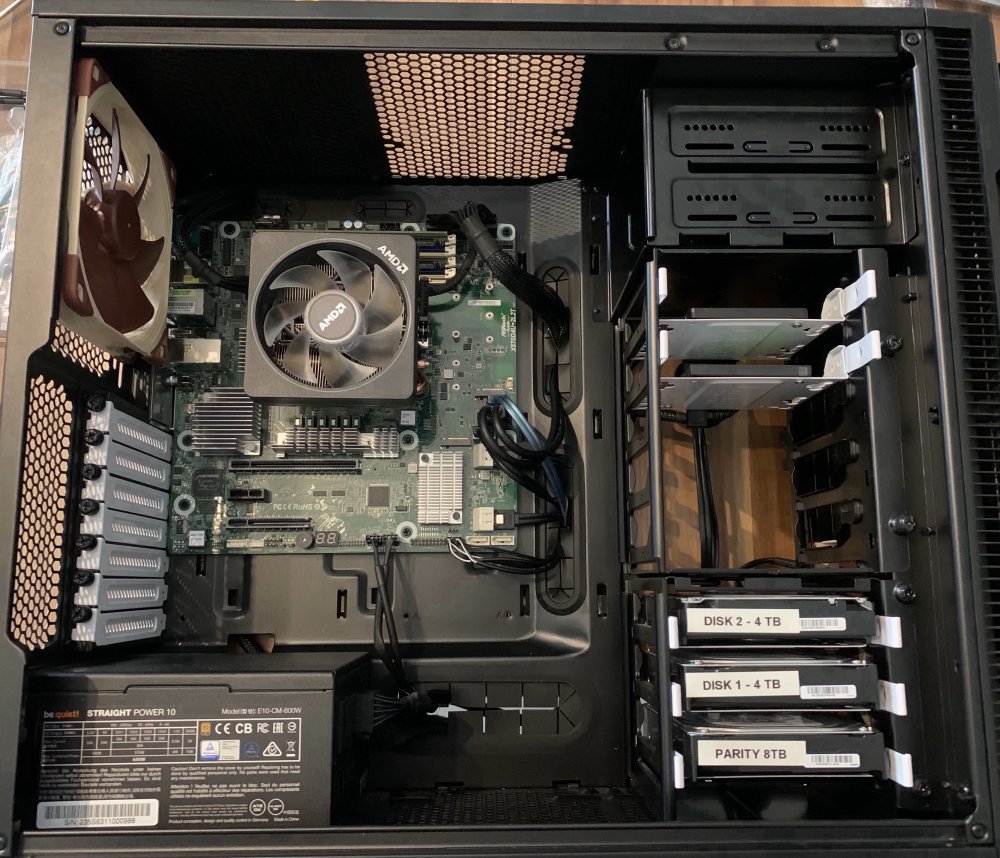
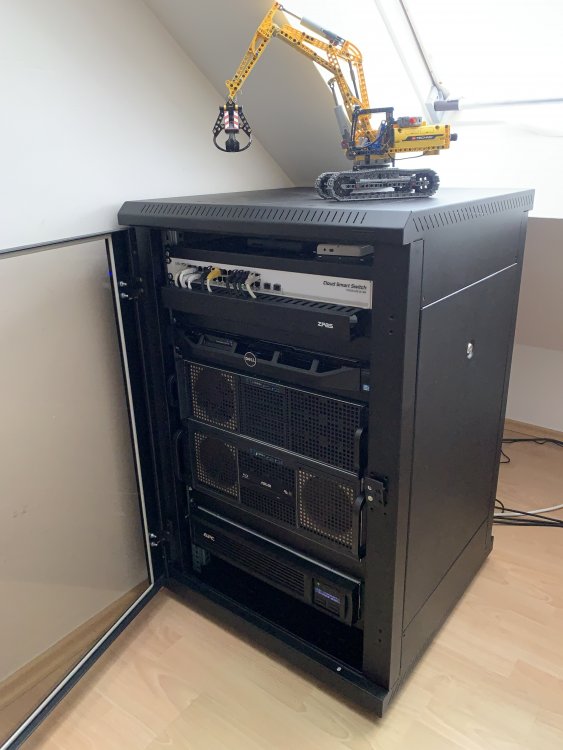
Huhu, wollte auch kurz mein mein Unraid-Server bzw. Rack vorstellen. Verbaut ist folgendes: - AMD Ryzen 3800x - ASRock Rack X570D4U-2L2T - 64GB DDR4-3200 ECC - Alpenföhn Brocken Eco - Fractal Define R5 -> IPC 4U-40248 Folgende Platten sind Verbaut (nicht alle Platten sind auf dem Foto zu erkennen, da es ein älteres Bild ist ) - 1x 16 TB als Parity - 1x 14 TB - 1x 12 TB - 2x 4TB Docker: - Nextcloud - NginxProxyManager - Datenbank - PiHole - Plex - paperless--ng - makeMKV - grocy - BarcodeBuddy - 2x Minecraft-Server per MineOS - Ark-Server - noch ein paar andere kleine Docker VM: - 1x Win für einen DayZ Server - 1x Win für verschiedene Schrank: - Dell R210II für pfSense (Noctua lüfter verbaut) - normale Firewallsettings - OpenVPN-Server: damit ich von Unterweges mit meinen mobilen Geräten auf mein Heimnetz zugreifen kann - VPN-Anbieter: worüber einige Docker verbunden sind. - pfBlockerNG: läuft aber noch nicht perfekt - Fritzbox 7490 für das WLan - Smart-UPS 1500 - Mikrotik CSS326-24G-2S+ - QNAP QNAP TS-253Be-4G -> dient als Backup. Fährt alle zwei Tage hoch und Unraid schiebt die Daten per rsync aufs QNAP --> neuer Backupserver - kleine Ablage für externe Platten + anderen Stuff Geplant: - zweiter Mikrotik für 10Gbit - CRS305-1G-4S+IN oder CRS309-1G-8S+IN die Entscheidung ist noch nicht gefallen. - externe Backuplösung. Bin mir aber noch unschlüssig ob ein zweiter Server bei jemanden stehen soll oder in die Cloud Der komplette Schrank hat einen Verbraucht von ca. 100 Watt laut APC und 110 Watt laut TP-Link Steckdose. Den einzelnen Verbrauch vom Server oder so kann ich leider nicht sagen, da ich es nicht gemessen habe. Der Dell R210II bekommt noch eine andere CPU spendiert (E3-1220L v2) da der aktuell verbaute E3-1220 (V1) viel zu überdimensioniert ist. Dadurch werden auch noch ein paar Watt eingespart. EDIT 03.07.2021 So sieht es aktuell aus: -------------------------------------ALT------------------------------------------------------------------------------ Danke an allen für die Unterstützung und Ratschlägen! Mega Support hier Gruß
 1 point
 -
Thanks for that. I know what the problem is, and it is a false positive (Somehow you've got the scan running twice concurrently) Should have an update out tomorrow. Now1 point
-
That worked! Thank you!1 point
-
It's not in our documentation and I can't remember having it there either.1 point
-
Yes, definitely don't include it yet. DVB-C doesn't work at all, and while I think I managed to set up an antenna well enough so it should be able to at least create the channel list, every time it reaches that point of the scan in tvheaded, the kernel throws a fatal error (not always the same, so I don't copy it here) and restarts the tuner. I probably won't put any more effort into this unless I get help in the TBS-OS github. I already ordered the 230C/230Cv2 version, which should be well tested at this point. Anyone needs a 230A?1 point
-
No worries, I thought I would ask.1 point
-
@ich777 Thanks I'll give your suggestion a try soon. I don't like the extra whiring sound from the fans on this barrowed GTX 750. Built a silent server and the little out of balance, bad bearing sound is driving me a little batty. Lol I didn't try a dummy plug in the HDMI slot and I didn't know about the docker confiig change either. I have this in my advanced settings under extra parameters. --device=/dev/dri/renderD128 In my Bios I did enable dual video output I think it was in the GPU settings. It just never seemed to work until I dropped in this other video card which I thought was weird.1 point
-
Indeed it works. In my case however, it looks like the firmware files are not part of the package. I had to manually wget these files: https://github.com/osmc/dvb-firmware-osmc/raw/master/dvb-demod-si2168-d60-01.fw https://github.com/osmc/dvb-firmware-osmc/raw/master/dvb-tuner-si2141-a10-01.fw Now I just need to figure out why dvb-c doesn't want to work.1 point
-
https://github.com/linuxserver/docker-projectsend/issues/171 point
-
shfs segfaulted, rebooting will fix it.1 point
-
No you definitely need to run mkswap on the file before using it. I didnt notice that the steps you had posted skipped that. Your missing steps are (note 1G for a 1GB swapfile).1 point
-
Ob nun appdata oder system ist vom Prinzip egal. Beide wirst du dann ja auch auf "prefer" oder "only" gestellt haben. Rein thematisch wäre system richtig, weil Unraid da ja auch das docker.img und die VMdisks liegen hat, also die "Betriebssysteme".1 point
-
Oh, I was wondering what all of that jazz was about the remote buttons within LuckyBackup! I'll look into this more! (I'm not too big of a fan with the Unassigned Devices going through the internet, as that seems a bit sketchy to me at best) Thanks!1 point
-
This was exactly what I ended up doing. Came across another thread with the same error when mounting and I think it was you suggesting the same thing in that thread. Worked perfectly and currently rebuilding the parity! Thanks to you both for the help!1 point
-
@xylcro, I activated the built-in apcuspd daemon and it detected my Eaton UPS directly. I guess there is some common protocol both APC and Eaton use? But I haven't tried yet if it actually works. Will do that once I'm back home1 point
-
Ja gut, damit lässt sich wohl arbeiten denke ich und bei dem Verbrauch für mich akzeptabel.1 point
-
I actually had the same thought but I haven't had a chance to shut my sever down to verify. I'll report back when I can check (hopefully tomorrow). Thanks for the response! EDIT: I went ahead and pulled the card and it's a GTS 4501 point
-
Edit the Telegraf Docker container. Select advanced view in the top right. Scroll down to the Post Arguments line. Put the commands you want to run on this line. And Bob's my uncle.
 1 point
 -
The Unassigned Devices plugin.1 point
-
Hey, please be nice or please go elsewhere. Thanks1 point
-
...für mich sieht es in etwa wie ein Dual i3-8100 in einem Package aus: https://nanoreview.net/en/cpu-compare/intel-core-i7-9700-vs-intel-core-i3-8100 ... also die Performance von Zweien, aber in einem Sockel, also stromsparender. Edit: fast wie zwei i3-9100 https://nanoreview.net/en/cpu-compare/intel-core-i7-9700-vs-intel-core-i3-91001 point
-
You're more than welcome to contribute to it.... it is free and open source after all. https://github.com/Ombi-app/Ombi How to improve you’re WiFi repeater signal: Step 1: throw repeater in trash. Step 2: never buy a repeater/extender ever again. Step 3: ? Step 4: profit.1 point
-
Thank you for your help! I've run scrub multiple times and deleted the files that were reported in the log. It appeared all of the corrupted files were in my unifi-controller appdata folder. Once those were all deleted, and scrub returned no errors, I tried to delete the entire unifi-controller app data folder. While windows reported the folder was deleted, it still existed. I then put the array into maintenance mode and the file system check came back with errors. I ran a repair, did another scrub, deleted the unifi-controller folder (for real this time), and everything seems back to normal. I am concerned about upgrading this system to 6.9.2, given the hangs that occurred with 6.9, but that's another issue and not a pressing matter given 6.8.3 runs rock solid for me.1 point
-
Now I just feel like an idiot. This was the issue. Thank you sir. Wow what a rookie move.1 point
-
yea, i recreated twice yesterday, then i notice many of the files from the backup weren't present on the usb drive. I manually copy it over and unraid booted fine. Seems the backup was corrupted or the unraid usb tool had some weird bug.1 point
-
3.0.1? That's what we are building, so you should get that. If you want a beta release, then we don't build that.1 point
-
My bad ... Everything works fine now, thank you all for your help !1 point
-
so ive been reading for ages but theres so many pages here, my issue is that when the array is stopped the mergerfs mount is not unmounted casuing unraid to keep retrying indefinately to unmount shares, i have to manually kill the PIDs for rclone mounts to get the array to stop. is there a fix for this? ps -ef | grep /mnt/user to find the PIDs then kill PID to kill it i tried adding fusermount -uz /mnt/user to the cleanup script and run at array stop and that kills all the mounts. but im not sure thats the best way to do it (so this didnt actually work on a reboot) i found that if you set it to : umount -l /mnt/user/mount_mergerfs/gdrive_vfs (my mount) then umount -l /mnt/user/mount_rclone/gdrive_vfs in the cleanup script it finishes without error. seems a bit convoluted to get it working for a clean shutdown.1 point
-
Update: it started working after a. unraid-api restart1 point
-
Cross-posting here for greater user awareness since this was a major issue - on 6.9.2 I was unable to perform a dual-drive data rebuild, and had to roll-back to 6.8.3. I know a dual-drive rebuild is pretty rare, and don't know if it gets sufficiently tested in pre-release stages. Wanted to make sure that users know that, at least on my hardware config, this is borked on 6.9.2. Also, it seems the infamous Seagate Ironwolf drive disablement issue may have affected my server, as both of my 8TB Ironwolf drives were disabled by Unraid 6.9.2. I got incredibly lucky that I only had two Ironwolfs, so data rebuild was an option. If I had 3 of those, recent data loss would likely have resulted. Paul1 point
-
It has no appdata, its all in the database. However I noticed the mount for the images got lost, the container path is /var/www/html/images, it will be in the template soon.1 point
-
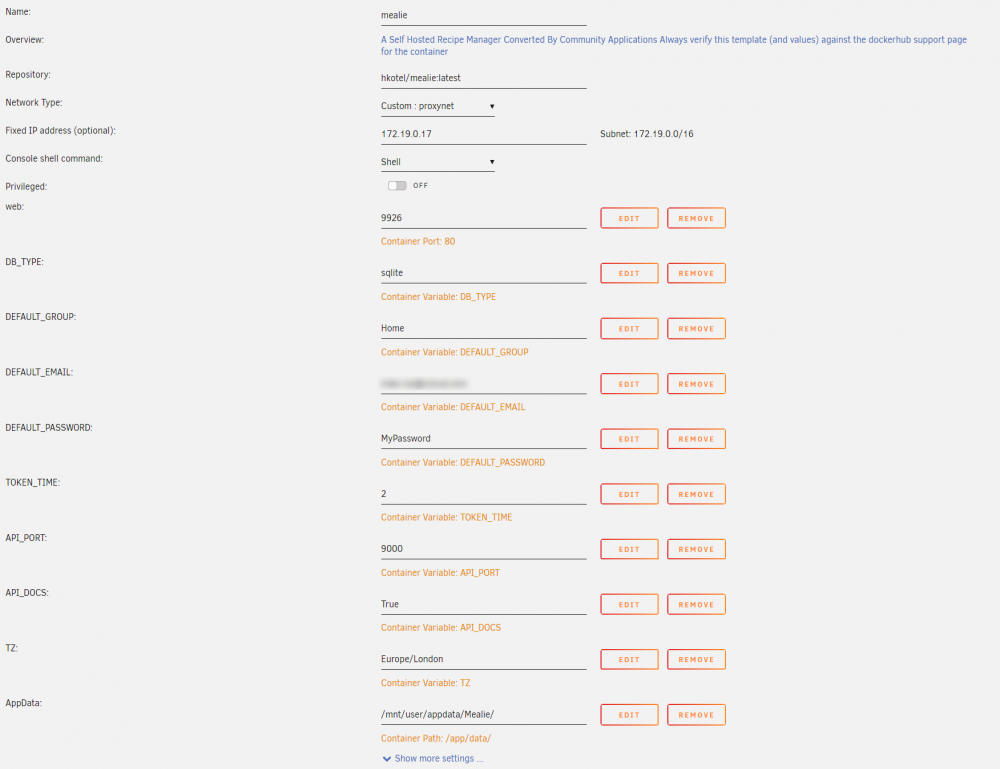
Click "Add Container" and enter the following. You will need to add new Vairables for everything except the AppData location which is a path. You can use the following as an icon URL (visible by clicking the advanced view toggle) - https://hay-kot.github.io/mealie/assets/img/favicon.png The WebUI can also be changed to your Unraid address followed by port 9926, unless you change this port in the initial step.
 1 point
 -
Off topic slightly, but wow if accurate https://www.tomshardware.com/news/nvidia-gpu-virtualization-unlocked-on-client-gpus1 point
-
I had a similar issue. This is what I did to solve the problem. You probably can skip right to the msi_util step, but I outlined everything I did, just in case...1 point
-
So coming back on this bug report. I have upgraded to 6.9 on March 2nd and also wiped the cache to take advantage of the new partition alignment (I have Samsung EVO's and perhaps a portion of OCD 🤣). Waited a bit to get historic data. Pre 6.9 TBW on 19-02-2021 23:57:01 --> 15.9 TB, which is 16313.7 GB. TBW on 20-02-2021 23:57:01 --> 16.0 TB, which is 16344.9 GB. TBW on 21-02-2021 23:57:01 --> 16.0 TB, which is 16382.8 GB. TBW on 22-02-2021 23:57:01 --> 16.0 TB, which is 16419.5 GB. -> Writes somewhere on 34/35GB's average a day. 6.9 TBW on 05-03-2021 23:57:01 --> 16.6 TB, which is 16947.4 GB. TBW on 06-03-2021 23:57:01 --> 16.6 TB, which is 16960.2 GB. TBW on 07-03-2021 23:57:01 --> 16.6 TB, which is 16972.8 GB. TBW on 08-03-2021 23:57:01 --> 16.6 TB, which is 16985.3 GB. -> Writes round 12/13GB's a average a day So I would say 6.9 (and reformatting) made a very big improvement. I think most of these savings are due to the new partition alignment as I was running docker directly on the cache already and recall made a few tweaks suggested here (adding mount options, cannot remember which exactly). Thanks @limetech and all other devs for the work put into this. This bug report is Closed 👍1 point
-
I don't know who you are. I don't know what you wanted when you created nerdpack. If you're looking for donations, I can tell you I don't have money... but what I do have are a very particular set of skills. Skills I have acquired over a very long career... I will look for you, I will find you... and I will buy you many beers. Thank you for creating nerdpack it is an AWESOME resource!!! If we ever run into to one another at a bar, beers are on me! Great work and thanks again.1 point
-
Thanks, Squid! Yeah, I've read that New Permissions tool is the solution for my issue. Ran it and after 5mins it's been fixed! To fix the issue with the files created by docker containers like Radarr, Sonarr and Bazarr, in the settings of those containers set these permissions: CHMOD for files 0666 CHMOD for folders 0777 And set those permissions. I hope that this helps somebody with the same issue.1 point
-
https://hay-kot.github.io/mealie/ I would love to see “mealie” as a unraid docker container. looks pretty cool for us cooks,1 point
-
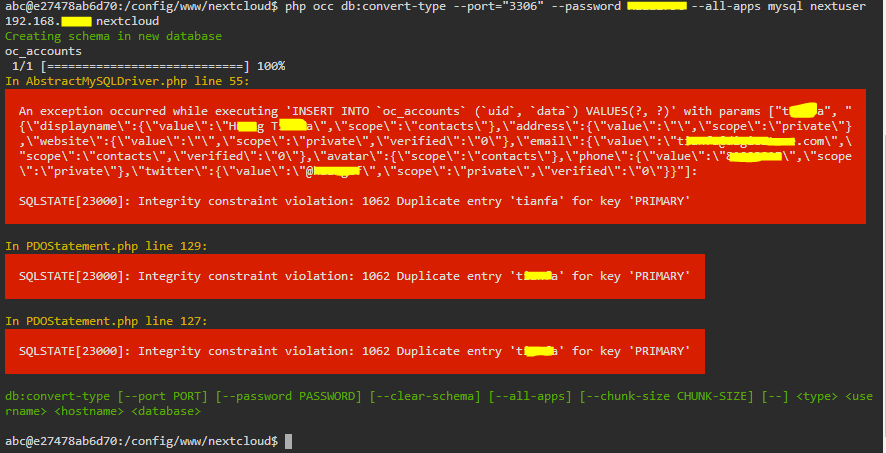
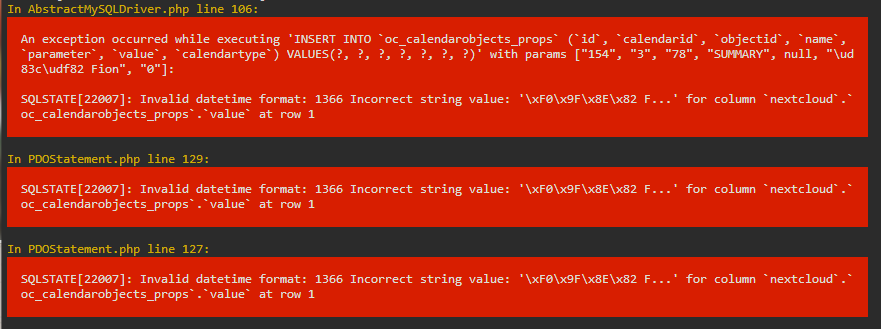
***Update I found out i got the above error due to running the update twice. Below is the initial error I'm able to clear all records in the new db using the --clear-schema flag I manage to fix the errors using the below commands php occ config:system:set mysql.utf8mb4 --type boolean --value="true" php occ maintenance:repair then running the conversion again
 1 point
 -
Hi Findus, Following your guide it seems to work fine, but as my installation is an current installation which i've been using, i'm hit with some errors, i'm wondering if any of u have any idea how i can fix it?
1 point
-
OK. This works for me so far with onboard NIC. 😎 (Based on the OP's experiment in this thread. He's asked MSI for help a couple months back, but apparently to no avail so far.) Fortunately we can easily add the required code to our go script. Add following to /config/go . # Enable WOL if needed (i.e. for MSI X470 Gaming Plus). ethtool -s eth0 wol g1 point
-
After looking at your diagnostics, here are some specific recommendations. Set your appdata, domains, and system shares to cache-prefer. Disable the Docker and VM services in Settings, then run mover. This will get those shares moved from the array to cache where they belong. The reason you want these to stay on cache is so your apps and VMs won't be affected by the slower writes of the parity array, and so your apps and VMs won't keep parity and array disks spinning. You can see which disks each user share is using by going to Shares - User Shares and clicking the Compute All button. Wait for the results, and if those shares have all their files on cache then enable Docker and VM services again. You shouldn't be saving anything other than appdata in the appdata share. If you have downloads going there then change that. Typically people will have a downloads share or something like that they download to, and that one can be set to cache-yes so it gets moved from cache to array.1 point
-
I'm assuming this is GeForce 210 (G 210) not a GT 210 which I don't think exists. In order to passthrough a video card, it has to support UEFI. This is an older card and I don't see that it has this support. See here: https://www.techpowerup.com/vgabios/114395/msi-g210-1024-110622 That site is a good one for checking for a video card that can be passed through. Unfortunately, there are few low end in this category. I was looking for a cheap single width card and didn't have any luck. Let me know if you find one.1 point


.png.9a4f708867a76b362eeaac6a578d6d21.png)