Leaderboard


Popular Content
Showing content with the highest reputation on 05/07/21 in all areas
-
I have a feature suggestion which may (for valid reasons I'm not able to think of) get shot down. Right now everyone has their own https://hash.unraid.net address with this plugin. It would be fantastic if you could implement a setting to change the hash to a custom value. The plugin could then check to see if that custom value is already in use, but if not then it would assign that as the new subdomain prefix. It would look like this: Default URL: https://hash.unraid.net Change custom URL field in Unraid plugin settings to (for example) metallica. Plugin checks to see if https://metallica.unraid.net is already assigned. If it is, it rejects the change with an error that the requested value is unavailable. If it is not, the change is made. Right now we have to go to the Unraid forum first, and then get redirected to the URL, and then bookmark that page for easier access. Implementing this change would make it easier to be able to access your server because you would (hopefully) always know what the URL is. There might be a completely valid reason that this cannot be done (or even that it can be done but won't be implemented), but in case this is possible and just wasn't something anyone thought of I figured I would mention it. Thanks for this plugin! I love it.3 points
-
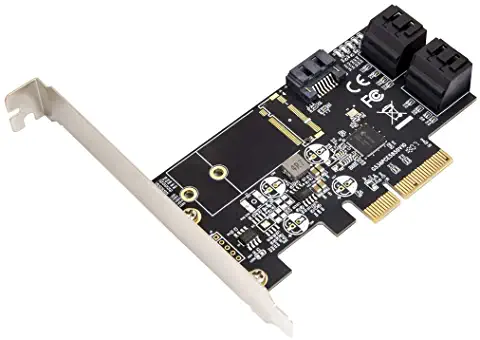
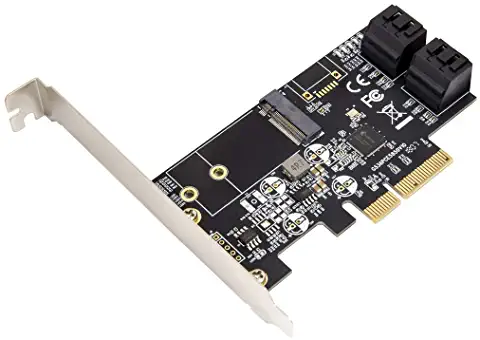
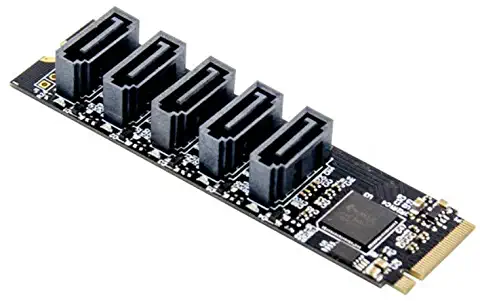
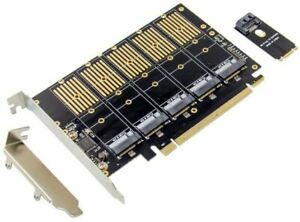
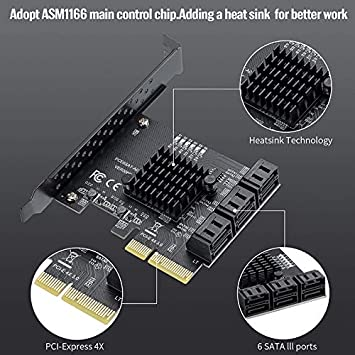
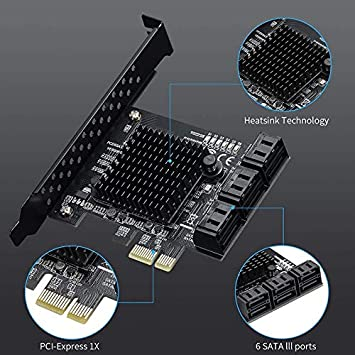
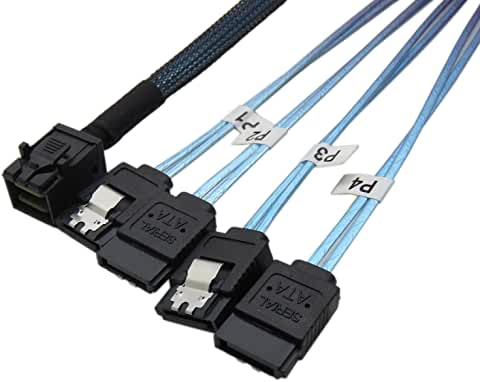
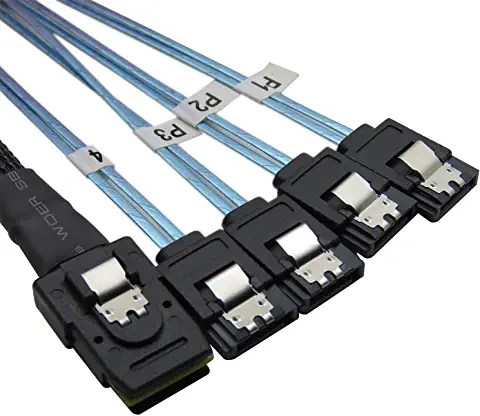
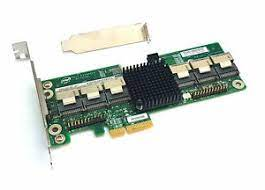
This thread is meant to replace the now outdated old one about recommended controllers, these are some controllers known to be generally reliable with Unraid: Note: RAID controllers are not recommended for Unraid, this includes all LSI MegaRAID models, doesn't mean they cannot be used but there could be various issues because of that, like no SMART info and/or temps being displayed, disks not being recognized by Unraid if the controller is replaced with a different model, and in some cases the partitions can become invalid, requiring rebuilding all the disks. 2 ports: Asmedia ASM1061/62 (PCIe 2.0 x1) or JMicron JMB582 (PCIe 3.0 x1) 4 ports: Asmedia ASM1064 (PCIe 3.0 x1) or ASM1164 (PCIe 3.0 x4 physical, x2 electrical, though I've also seen some models using just x1) 5 ports: JMicron JMB585 (PCIe 3.0 x4 - x2 electrically) These JMB controllers are available in various different SATA/M.2 configurations, just some examples: 6 ports: Asmedia ASM1166 (PCIe 3.0 x4 physical, x2 electrical) * * There have been some reports that some of these need a firmware update for stability and/or PCIe ASPM support, see here for instructions. These exist with both x4 (x2 electrical) and x1 PCIe interface, for some use cases the PCIe x1 may be a good option, i.e., if you don't have larger slots available, though bandwidth will be limited: 8 ports: any LSI with a SAS2008/2308/3008/3408/3808 chipset in IT mode, e.g., 9201-8i, 9211-8i, 9207-8i, 9300-8i, 9400-8i, 9500-8i, etc and clones, like the Dell H200/H310 and IBM M1015, these latter ones need to be crossflashed (most of these require a x8 or x16 slot, older models like the 9201-8i and 9211-8i are PCIe 2.0, newer models like the 9207-8i, 9300-8i and newer are PCIe 3.0) For these and when not using a backplane you need SAS to SATA breakout cables, SFF-8087 to SATA for SAS2 models: SFF-8643 to SATA for SAS3 models: Keep in mind that they need to be forward breakout cables (reverse breakout look the same but won't work, as the name implies they work for the reverse, SATA goes on the board/HBA and the miniSAS on a backplane), sometimes they are also called Mini SAS (SFF-8xxx Host) to 4X SATA (Target), this is the same as forward breakout. If more ports are needed you can use multiple controllers, controllers with more ports (there are 16 and 24 port LSI HBAs, like the 9201-16i, 9305-16i, 9305-24i, etc) or use one LSI HBA connected to a SAS expander, like the Intel RES2SV240 or HP SAS expander. P.S. Avoid SATA port multipliers with Unraid, also avoid any Marvell controller. For some performance numbers on most of these see below:
 2 points
 -
Overview: Support thread for Partition Pixel/Chia in CA. Application: Chia - https://github.com/Chia-Network/chia-blockchain "Docker Hub": https://github.com/orgs/chia-network/packages/container/package/chia GitHub: https://github.com/Chia-Network/chia-docker This is not my docker, nor my blockchain, and I'm not a developer for them either. I simply did an Unraid template for the already existing docker so that way It will be easier for me and others to install the docker on an existing Unraid Server. I can support any changes required to the xml template and provide assistance on how to use the parameters or how to use the docker itself. Please read on SSD Endurance if you don't know about Chia and you plan on farming it : https://github.com/Chia-Network/chia-blockchain/wiki/SSD-Endurance Instructions: Install Partition Pixel's Chia via CA. Create a 'chia' directory inside of your appdata folder. Skip to step 4 if you do not have an existing chia wallet Inside this new folder, create a new file called 'mnemonic.txt' and copy and paste your 24 words mnemonic from your wallet inside (every word one after another on the same line with 1 space in between like this sentence). Back on the docker template, choose a location for your plotting if you plan on plotting on your server (preferably a fast SSD here) Choose a location for storing your plots (this is where they will be used to 'farm', preferably HDD here) Feel free to click on show more settings and change any other variable or path you would like Save changes, pull down the container and enjoy ! If you have some unassigned or external HDDs that you want to use for farming: edit /mnt/user/appdata/chia/mainnet/config/config.yaml Add more plot directories like so : plot_directories: - /plots - /plots2 Create a new path in the docker template like so : config type : Path container path : /plots2 host path : /mnt/an_unassigned_hdd/plots/ Here are some often used command lines to get you started: Open a console in the docker container, then type : venv/bin/chia farm summary venv/bin/chia wallet show venv/bin/chia show -s -c venv/bin/chia plots check Command to start plotting : venv/bin/chia plots create -b 5000 -r 2 -n 1 -t /plotting/plot1 -d /plots -b is amount of ram you want to give -r is the amount of threads -n is the number of plots you want to queue -t is temp dir -d is the completed directory From user ropes: If you only want to harvest on this docker, then you don't need to create a mnemonic file with your passphrase. Instead you can do the following (more secure imo) : chia plots create [other plot options] -f <farmer key> -p <pool key> If you want to run in Parallel just run the command in another terminal window as many times as your rig will allow. Here are all the available CLI commands for chia : https://github.com/Chia-Network/chia-blockchain/wiki/CLI-Commands-Reference From user tjb_altf4:
 2 points
 -
Da ich mit meinem altem Supermicro bisher sehr zufrieden war ist es jetzt das X11SCH-LN4F und der E-2226G geworden (alle andern Xeons mit iGPU sind mir aktuell zu teuer). Dabei muss ich aus meiner Sicht die wenigsten Kompromisse eingehen und habe eine potentere CPU, iGPU und 2 Sata und eine NVME Anschluss mehr + die Möglichkeit der 4x1GB im Bond. Danke für eure Unterstützung auch wenn es jetzt um einiges mehr gekostet hat. Das alte Board und den i3 werde ich dann wohl verkaufen. Die Teile haben ja noch Garantie und sind beide um einiges teurer als 2020 - verrückte Welt. Falls jemand Interesse hat kann er sich gerne an mich wenden 🙂2 points
-
Check out both the NVENC and NVDEC lists and check the Consumer and Professional tabs for supported cards and limitations2 points
-
This issue isn't due to UNRAID OS. For anyone getting this issue, spin up your drives first before running a controller benchmark. The cause is that my spin-up logic isn't working. The first second of the 15 seconds if data read is discarded to account for any drive head relocation but the spin up times is causing at least one second of 0 MB/sec read which is hurting the average. This issue isn't evident on the individual drive benchmarks because it performs seek & latency tests first so the drive is spun up before it gets to the benchmark.2 points
-
My response, not the official Limetech response. Every single user of CA has had to acknowledge two distinct popups regarding applications prior to any installation being allowed. A general one and also another specifically geared towards plugins, which link to https://forums.unraid.net/topic/87144-ca-application-policies-notes/?tab=comments#comment-809115 and https://forums.unraid.net/topic/87144-ca-application-policies-notes/?tab=comments#comment-817555 respectively, which also detail some (but nowhere near all) of the security procedures in place. The lists within CA are not just a compendium of "applications at large". They are moderated, and constantly being reviewed. Great pains are also taken to have the ability to notify users of any malicious software installed, either through FCP or CA's own emergency notification system (opt-in). Now, if you do decide to go and install an app that is outside of CA's control, then you are on your own. But to directly answer your question, all plugins and many containers are code reviewed when being added into CA. ALL plugins MUST be open source except in exceptional circumstances. Provisions exist for removal / notification to the user if anything malicious happens after the fact. (To be quite honest though, I would worry far far more about a docker container being installed via the command line (or a dockerHub search) that's not listed within CA rather than a plugin. eg: How many examples are there already of mining software being embedded in a random container on dockerHub?)2 points
-
Hello I'd like to request the ability to give a maximum size you want a certain share to be. I read this post but I believe it would be possible if you allowed a script to run that basically checks the share size with du or so and then makes it read only if it's the given size or higher. I wanted to allow SFTP before I made an ubuntu vm for it and I noticed that with each reboot it would revert the files I changed (due to it being on RAM to limit write usage to the usb stick) so diy'ing this isn't possible as far as my knowledge goes on unraid. Thanks in advance1 point
-
EDIT (March 9th 2021): Solved in 6.9 and up. Reformatting the cache to new partition alignment and hosting docker directly on a cache-only directory brought writes down to a bare minimum. ### Hey Guys, First of all, I know that you're all very busy on getting version 6.8 out there, something I'm very much waiting on as well. I'm seeing great progress, so thanks so much for that! Furthermore I won't be expecting this to be on top of the priority list, but I'm hoping someone of the developers team is willing to invest (perhaps after the release). Hardware and software involved: 2 x 1TB Samsung EVO 860, setup with LUKS encryption in BTRFS RAID1 pool. ### TLDR (but I'd suggest to read on anyway 😀) The image file mounted as a loop device is causing massive writes on the cache, potentially wearing out SSD's quite rapidly. This appears to be only happening on encrypted caches formatted with BTRFS (maybe only in RAID1 setup, but not sure). Hosting the Docker files directory on /mnt/cache instead of using the loopdevice seems to fix this problem. Possible idea for implementation proposed on the bottom. Grateful for any help provided! ### I have written a topic in the general support section (see link below), but I have done a lot of research lately and think I have gathered enough evidence pointing to a bug, I also was able to build (kind of) a workaround for my situation. More details below. So to see what was actually hammering on the cache I started doing all the obvious, like using a lot of find commands to trace files that were written to every few minutes and also used the fileactivity plugin. Neither was able trace down any writes that would explain 400 GBs worth of writes a day for just a few containers that aren't even that active. Digging further I moved the docker.img to /mnt/cach/system/docker/docker.img, so directly on the BTRFS RAID1 mountpoint. I wanted to check whether the unRAID FS layer was causing the loop2 device to write this heavy. No luck either. This gave me a situation I was able to reproduce on a virtual machine though, so I started with a recent Debian install (I know, it's not Slackware, but I had to start somewhere ☺️). I create some vDisks, encrypted them with LUKS, bundled them in a BTRFS RAID1 setup, created the loopdevice on the BTRFS mountpoint (same of /dev/cache) en mounted it on /var/lib/docker. I made sure I had to NoCow flags set on the IMG file like unRAID does. Strangely this did not show any excessive writes, iotop shows really healthy values for the same workload (I migrated the docker content over to the VM). After my Debian troubleshooting I went back over to the unRAID server, wondering whether the loopdevice is created weirdly, so I took the exact same steps to create a new image and pointed the settings from the GUI there. Still same write issues. Finally I decided to put the whole image out of the equation and took the following steps: - Stopped docker from the WebGUI so unRAID would properly unmount the loop device. - Modified /etc/rc.d/rc.docker to not check whether /var/lib/docker was a mountpoint - Created a share on the cache for the docker files - Created a softlink from /mnt/cache/docker to /var/lib/docker - Started docker using "/etc/rd.d/rc.docker start" - Started my BItwarden containers. Looking into the stats with "iotstat -ao" I did not see any excessive writing taking place anymore. I had the containers running for like 3 hours and maybe got 1GB of writes total (note that on the loopdevice this gave me 2.5GB every 10 minutes!) Now don't get me wrong, I understand why the loopdevice was implemented. Dockerd is started with options to make it run with the BTRFS driver, and since the image file is formatted with the BTRFS filesystem this works at every setup, it doesn't even matter whether it runs on XFS, EXT4 or BTRFS and it will just work. I my case I had to point the softlink to /mnt/cache because pointing it /mnt/user would not allow me to start using the BTRFS driver (obviously the unRAID filesystem isn't BTRFS). Also the WebGUI has commands to scrub to filesystem inside the container, all is based on the assumption everyone is using docker on BTRFS (which of course they are because of the container 😁) I must say that my approach also broke when I changed something in the shares, certain services get a restart causing docker to be turned off for some reason. No big issue since it wasn't meant to be a long term solution, just to see whether the loopdevice was causing the issue, which I think my tests did point out. Now I'm at the point where I would definitely need some developer help, I'm currently keeping nearly all docker container off all day because 300/400GB worth of writes a day is just a BIG waste of expensive flash storage. Especially since I've pointed out that it's not needed at all. It does defeat the purpose of my NAS and SSD cache though since it's main purpose was hosting docker containers while allowing the HD's to spin down. Again, I'm hoping someone in the dev team acknowledges this problem and is willing to invest. I did got quite a few hits on the forums and reddit without someone actually pointed out the root cause of issue. I missing the technical know-how to troubleshoot the loopdevice issues on a lower level, but have been thinking on possible ways to implement a workaround. Like adjusting the Docker Settings page to switch off the use of a vDisk and if all requirements are met (pointing to /mnt/cache and BTRFS formatted) start docker on a share on the /mnt/cache partition instead of using the vDisk. In this way you would still keep all advantages of the docker.img file (cross filesystem type) and users who don't care about writes could still use it, but you'd be massively helping out others that are concerned over these writes. I'm not attaching diagnostic files since they would probably not point out the needed. Also if this should have been in feature requests, I'm sorry. But I feel that, since the solution is misbehaving in terms of writes, this could also be placed in the bugreport section. Thanks though for this great product, have been using it so far with a lot of joy! I'm just hoping we can solve this one so I can keep all my dockers running without the cache wearing out quick, Cheers!1 point
-
It's working now 🎉! . Thanks John.1 point
-
Your USB device is annoying. 😁 I added an existence check for that variable and looked for other potential misses and repushed version 2.9.31 point
-
Don't take this the wrong way but please don't spread misinformation. At the moment, you can get pretty lucky and get some with 1 plot but it is indeed just pure luck. In about 1-2 weeks, devs are supposed to release the pool protocol which will allow everyone to farm together in a pool. This will give you more consistent rewards and everyone will have to replot to participate in a pool. I personally still think it is worth it if you already have some storage that's doing nothing (which I'm suspecting a lot of unraid users have), but I'm not here to advocate for the blockchain, just providing an easier way to install for those who are insterested by the project. Also you are wrong about the price, chia is currently 550$ USD each and it is now tradeable in a few exchanges. (It was around 1300$ USD at the time of release on exchanges and is slowly stabilizing in the 500-600 range) EDIT: It also takes less space than you think, I have 14 TB right now and I have an estimated time to win of 1 month. Of course, the network is growing very quickly but it's just not in the 40 TB range yet 2nd EDIT: Seems like it's back in the 1100$ range lol 3rd EDIT: I also suggest you look into the project more in dept. Chia does not take a lot of electricity, especially if you already have a server running, only plotting really takes a bit but farming itself is very green especially compared to other crypto that are using proof of work (like bitcoin)1 point
-
Great, thanks Hoopster. Ah, thanks, Ich777, I must have missed it.1 point
-
Please look at the first post (in the Troubleshooting section) I've linked a page from Nvidia where you can check which cards are compatible with the drivers.1 point
-
Vielen lieben Dank. Da hab ich wohl zu kompliziert gedacht. Diese Vorgehensweise ist mir garnicht in den Sinn gekommen1 point
-
Absolutely, added the command in my first post, thank you 😃1 point
-
Hat sich deutlich verbessert mit Ryzen 4000 und 5000, aber wie gesagt leider nur mit dem B550 Chipsatz. Der X570 ist auch mit mind 20W dabei. Es gibt von Asrock eine IPMI Karte. Ansonsten gibt es noch https://pikvm.org/ und ich nutze einfach einen HDMI Capture Stick und meinen Laptop. Für Reboot/Hochfahren geht auch eine smarte Steckdose.1 point
-
Nice work boss...I nutted out how to build the docker from reddit the other day and then fix common problems popped up tonight and found an issue because you have put a template up...winning now I can plot away happily and and get auto updates in CA 🍻 one thing you might want to add is a how to start plotting once docker is up and running I assume from the console it will be venv/bin/chia plots create -b 5000 -r 2 -n 1 -t /plotting/plot1 -d /plots I've always started my from the terminal window using docker exec -it chia venv/bin/chia plots create -b 5000 -r 2 -n 1 -t /plotting/plot1 -d /plots -b is amount of ram you want to give -r is the amount of threads -n is the number of plots you want to queue -t is temp dir -d is the completed directory and if you want to run in Parallel just run the command in another terminal window as many times as your rig will allow1 point
-
my 2cents: RAM behalten, einen Xeon ohne HT - denn die bringen für VMs nix - aber mit IGP und als MB das X11SCH-LN4F. Wenn du schon IPMI gewöhnt bist, weisst Du ja was Dir das bringt. 4x1GB im Bond sind nicht zu verachten. Alternativ, wie @mguttoben schon schrieb.1 point
-
Epyc ist nicht gerade stromsparend und hat auch relativ geringe Single Core Performance. Den holt man sich, wenn man viele GPUs und M.2 SSDs verbauen will (wegen der ganzen Lanes, die der Epyc bietet). Dann eher was aus dem Consumerbereich. Mit iGPU also ein 4000er Ryzen. Kommen aber alle nicht von der Effizienz an einen 1151v2 dran. Außer mit einem B550 Board, aber die haben meist nur 4 SATA Ports. In der Hinsicht sind C246 und W480 unschlagbar. Ich liebe zB mein Gigabyte C246N-WU2. Auch schick ist das Gigabyte C246M-WU4 und Gigabyte W480M Vision D. W480 in ITX gibt es leider nichts empfehlenswertes. Da entwickeln die Hersteller am Markt vorbei.1 point
-
No. Currently you must have 1 data disk defined. That shouldn't be an issue, you could technically assign a scrap 1GB USB to it if you want.1 point
-
I'm having difficulty locating this via searching in CA, and my normal method of narrowing results by encasing search terms in quotes doesn't seem to net me less results, or any depending on how I format... how can I find this package in CA's search?1 point
-
...eben, für mich keiner...papermerge hat oft neue Bugs in den Releases, daher sind Updates des Docker mit Vorsicht zu geniessen und nur mit paperless-ng bekomme ich die Cache/HHD-Spinndown "Problematik" ohne Probleme hin. Von der Funktion her fand ich papermerge auch gewöhnungsbedürftiger. Wechseln der App ist, denke ich schwierig, da das Datenmodell und die DB ja nicht einfach migrierbar/interoperabel ist, oder? Das ist dann aber bei EcoDMS usw auch so....sobald mal anso einen sunstantiellen "Datenvorrat" hat, finde ich das schwierig. Erst recht, wenn papier schon geschreddert ist1 point
-
Ahead of you :-) I also noticed that and changed my post... And at the moment I am actually checking out SSD's :-) ROFL !1 point
-
Yes works with multiple pools. Gotcha's? 1.) Try to avoid spaces in share or pool names. 2.) All fields from gui are applied to all pools. i.e. it's all the same. with one exception at the moment. 2a.) You can specify a different percentage per pool. Create an entry in ca.mover.tuning.cfg file. (example: /boot/config/plugins/ca.mover.tuning cachetv="65") - "cachetv" being the name of the pool. - if using single digits leading zero required. (i.e. cachetv="01" for 1 percent) 3.) I plan to expand this type of entry for a few other fields in the future. 4.) As with any share setting, be very careful when setting cache-prefer. Several posts where users are filling up their cache drive when using that setting.1 point
-
I think you are talking about the maximum players that can connect or am I wrong? The setting for that should be located in '.../Game.ini', to set the value search for '[/script/engine.gamesession]' and add 'MaxPlayer = 70' or whatever you prefer (if the line '[/script/engine.gamesession]' doesn't exist you have to also add it to the bottom): [/script/engine.gamesession] MaxPlayers = 70 (please note that the hard limit for private dedicated servers is 70). You can get a full overview what to put where for example here: Click1 point
-
Thank you very much! Worked1 point
-
Es ist umgekehrt. Im Github bei papermerge https://github.com/the-paperless-project/paperless steht: .....also ich lese daraus, dass papermege-ng neu ist und paperless selbst nicht mehr aktiv vom Original-Autor betreut wird. Vor allem kann ich bei paperless-ng den Cache nutzen. Das ging bei papermerge und paperless nicht, da gingen die Array-Disks (cache einstellungen "yes/prefer") nie schlafen, verursacht durch die Überwachung des Input-Ordners vom Scanner. Edit: Oh Mann...Du meinst papermerge Das lief bei mir nie wirklich stabil und hatte auch das "Problem" mit dem Cache/Aufwecken des Arrays im Scan-Folder.1 point
-
Maybe a path in a docker or VM that is not correct ?1 point
-
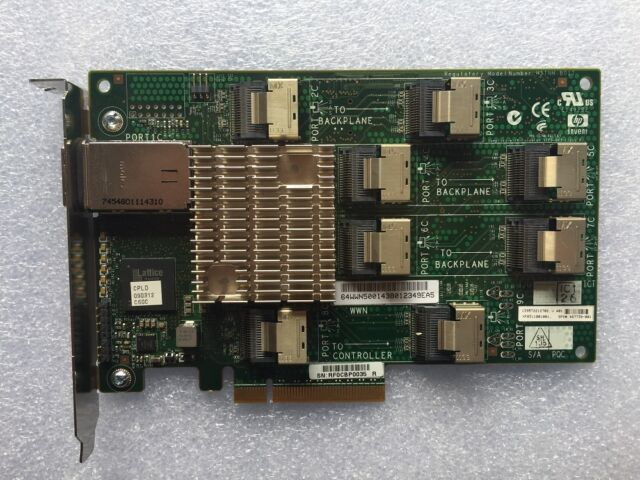
Settings - Disk Settings
 1 point
 -
Thanks for the reply, I've added a static route now on both configs - Some improvements, but I still having some issues. On the simple server - I can now connect to the Unraid UI and to the pfsense UI. but I still can't access anything else on the network. I've tried the firewall rules because of the firewall log: (first one 192.168.0.31:8123 is the source, the 10.253.0.2 is the destination) it looks like the remote device (the VPN peer) try to talk to the local service, but when the local service try to "take back" there's an issue. on the complex server, it's basically the same + but I can't access the main UI as it forward automatically to the local domain (unraid.privateFQDN.org) and it stops there. dockers on the unraid server (using the IP address) connect perfectly. Edit: Found the fix the the issue, not sure why my config is causing it - but the scenario here is Asymmetric Routing. The solution is to enable "Bypass firewall rules for traffic on the same interface" under System/Advanced/Firewall & NAT: That fix both of the issues described above.1 point
-
Yep, on downgrading the firmware to 20.00.07.00 the disks are now showing up correctly in 6.9.2. Super weird, the .11 firmware is what it shipped from the reseller with. Regardless, I really appreciate your help, and I'll go ahead and mark resolved.1 point
-
###2020.05.06 - Added 0 to options of days old. (Will move anything greater than 24 hours old) - Added 6,7,8,9 to options of days old. - Increased days old limit to 765 - Removed "Original Mover" button after paypal donation link. - Added "Move Now button follows plug-in filters:" to make "Move Now" button run based off of plug-in settings (Yes), or run original mover (No). - Moved some code around in mover.php so ionice would be initiated. - Updated mover code for moving from array to cache (generally cache-prefer) to follow Squid's update on 4/11/2021. (Fix for shares with space in their name) **********CAUTION**************** Move Now button now calls unraids original move now code!!!!! It will move almost everything, to change set Yes to " Move Now button follows plug-in filters:" (Last question in section) Future Changes: Add an option to invoke original mover (i.e. everything) if percent used reaches a user selectable percent. (Must be higher than the entry for "Only move at this threshold of used cache space:")1 point
-
Ok, its working now. It was indeed as you suggested "adding" the new penryn patch to the plist instead of as i did before replacing the existing patch. Tnx again !!!
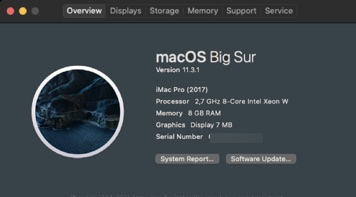 1 point
 -
The biggest advantage my method has is that each step is discrete per drive, so it's much less risk as you can take your time and verify that everything is still where it should be after each step. Once you are done the only difference you should see is more free space on each replaced drive slot, and a totally empty 4TB in slot 7. All data should remain available throughout, with no major interruptions. I'd assign each line a new "job", and look for help and ask questions as needed, checking off before attempting to start the next item. Looking back over what I wrote, step 2 may require additional parts, I can't remember if Unraid will allow you to drop a parity drive without setting a new config. You definitely can't remove a data slot. If not, then it's a simple matter of setting the new config with save all, then doing the unassigning of parity2, checking that parity is valid, starting the array and letting it check. After that's done you would add the old parity 2 disk to slot 7 and let it clear. The array would still be available throughout. If you don't care to keep parity valid, you could combine step 1 and 2 for a considerable time savings, by simply doing the new config saving all data and cache, assigning the new single 8TB parity and old parity 2 to slot 7, DON'T check the parity is valid box, and let it build. Proceed from there. @JorgeB would know for sure, he plays around with test arrays much more than I do. It's fine, but it will be slow, and slow down the check more than the sum of the 2 tasks. Just to throw some random figures, if a parity check with no data access takes 12 hours, and copying a block of data would normally take 1 hour without the check running, it might take 2 hours to copy and extend the parity check to 16 hours. That's an example for effect, I haven't actually done hard benchmarks, but it feels pretty close based on observations.1 point
-
Pretty sure this is not going to work with 6.9.2 as-is. Please unplug the device, open terminal window, and type (or paste) command above. This creates a file called /etc/udev/rules.d/99-removable.rules After that file is present, then hot plug the device and see if it it's recognized. We will be publishing 6.10-beta soon, any further work on this will need to be accomplished in this release. Note: for anyone wondering: we simply added Linux kernel support for Thunderbird/USB4 per user request. We made no "promise" that we are committed to Thunderbird/USB4 support in any particular release; however, during the 6.10-beta/rc series we will take a hard look at this assuming assistance from those interested in helping to get this working.1 point
-
Ich bin, kurz nachdem ich zu unRaid kam, auf den Kanal von TGF aufmerksam geworden. Wohl dem YouTube-Algorithmus geschuldet. 😉 Meiner Meinung nach machen die Videos auf unRaid und seine Funktionen aufmerksam/neugierig. Die fundierten Infos dazu habe ich mir dann anderweitig besorgt. Ich denke aber, das genau das beabsichtigt ist. Die Videos sollen unterhalten. Und das tun sie.1 point
-
Lots of UDMA CRC errors on the disable disk, you should replace the SATA cable before rebuilding.1 point
-
In principle that is correct. However when you start the array with the drive unassigned Unraid should be emulating the missing drive and you should check that it contains the expected content before proceeding with the rebuild steps. The rebuild will only end up with what is on the emulated drive so you do not want to overwrite the physical disk with that if the emulated contents do not look correct.1 point
-
Updated to 1.6.51 point
-
The error in the USB Bus tree stopped the rest of the page from displaying which prevented you from seeing the Benchmark All button. I pushed version 2.9.3 which checks for the existence of the idProduct variable and sets it if not created by the USB device.1 point
-
Good news, no more AMD reset bug with RX 6xxx XT series GPUs in macOS 11.4 beta 1 on UnRAID.1 point
-
1 point
-
Ne das verfällt hinterher Die bisherige Vermutung ist, dass durch den SMART Test, die Firmware Bremse deaktiviert wird, der SMART Test aber nicht abgeschlossen werden kann, weil die Festplatte dann ja mit was anderem beschäftigt ist. Sobald der SMART Test dann abgeschlossen ist, aktiviert sich die "Bremse" wieder. Deswegen muss die Reihenfolge auch sein: 1. Parity Check/File Integrity/was auch immer anschmeißen 2. SMART Short Test für die jeweilige Platte/alle Platten starten 3. Freuen😉1 point
-
How about this for a gag bit every few podcasts... like once a month/quarter for a topic. "Well it would have worked if...." The most spectacular fails in unraid; if it burned down we want to know.1 point
-
Would be nice to see some highlight builds that are interesting from hardware perspective or from the ways Unraid itself is being used, maybe that falls into the community interview option.1 point
-
Major new release of UD: "Where are the switches?" The "Pass Through", "Read Only", "Automount", and "Share" switches have been moved to a new Edit Settings dialog. This is also where the script is modified. This saves some real estate on the UD page and keeps the page refresh smooth. A "Show Partitions" switch has been added to set showing all partitions by specific hard drive device and not generically as before. The option to show all partitions has been removed from the UD Settings. Read and Writes and all other status is updated every 3 seconds. You don't have to refresh the page with the browser to get an update. Mounts, unmounts, disk spin, and read and write status updates are much smoother. This is the same as the array pages. The values just update in place. You can see the current status of the device switches in a tool tip by hovering your mouse over the settings icon. Automount of remote shares and ISO files is off now by default. If you previously had a remote share that automounted and is not now, just edit the settings and turn on the Automount switch. I've been trying to achieve this for a long time, and I think I finally got there.1 point
-
Copy the config folder, redo the flash drive and copy it back.1 point