Leaderboard

Popular Content
Showing content with the highest reputation on 05/08/21 in all areas
-
Overview: Support thread for Partition Pixel/Chia in CA. Application: Chia - https://github.com/Chia-Network/chia-blockchain "Docker Hub": https://github.com/orgs/chia-network/packages/container/package/chia GitHub: https://github.com/Chia-Network/chia-docker This is not my docker, nor my blockchain, and I'm not a developer for them either. I simply did an Unraid template for the already existing docker so that way It will be easier for me and others to install the docker on an existing Unraid Server. I can support any changes required to the xml template and provide assistance on how to use the parameters or how to use the docker itself. Please read on SSD Endurance if you don't know about Chia and you plan on farming it : https://github.com/Chia-Network/chia-blockchain/wiki/SSD-Endurance Instructions: Install Partition Pixel's Chia via CA. Create a 'chia' directory inside of your appdata folder. Skip to step 4 if you do not have an existing chia wallet Inside this new folder, create a new file called 'mnemonic.txt' and copy and paste your 24 words mnemonic from your wallet inside (every word one after another on the same line with 1 space in between like this sentence). Back on the docker template, choose a location for your plotting if you plan on plotting on your server (preferably a fast SSD here) Choose a location for storing your plots (this is where they will be used to 'farm', preferably HDD here) Feel free to click on show more settings and change any other variable or path you would like Save changes, pull down the container and enjoy ! If you have some unassigned or external HDDs that you want to use for farming: edit /mnt/user/appdata/chia/mainnet/config/config.yaml Add more plot directories like so : plot_directories: - /plots - /plots2 Create a new path in the docker template like so : config type : Path container path : /plots2 host path : /mnt/an_unassigned_hdd/plots/ Here are some often used command lines to get you started: Open a console in the docker container, then type : venv/bin/chia farm summary venv/bin/chia wallet show venv/bin/chia show -s -c venv/bin/chia plots check Command to start plotting : venv/bin/chia plots create -b 5000 -r 2 -n 1 -t /plotting/plot1 -d /plots -b is amount of ram you want to give -r is the amount of threads -n is the number of plots you want to queue -t is temp dir -d is the completed directory From user ropes: If you only want to harvest on this docker, then you don't need to create a mnemonic file with your passphrase. Instead you can do the following (more secure imo) : chia plots create [other plot options] -f <farmer key> -p <pool key> If you want to run in Parallel just run the command in another terminal window as many times as your rig will allow. Here are all the available CLI commands for chia : https://github.com/Chia-Network/chia-blockchain/wiki/CLI-Commands-Reference From user tjb_altf4:
 2 points
 -
@ich777 Kobra, übernehmen sie ^^2 points
-
After looking at Github and the Main page again I see what's the problem: In english the header is called Reads/Writes for both displays (Toogle reads/writes display). So it seems there is only one translation possible for both displays. @ich777 Please forget my change request I wrote here. Sorry about that.2 points
-
This document linked from their FAQ should give you a good idea https://www.chia.net/faq/#faq-82 points
-
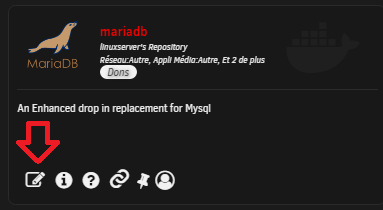
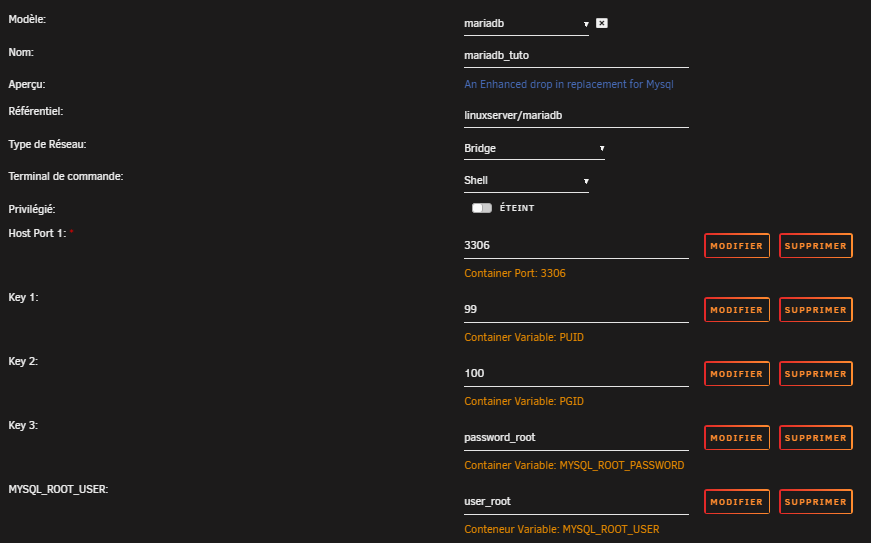
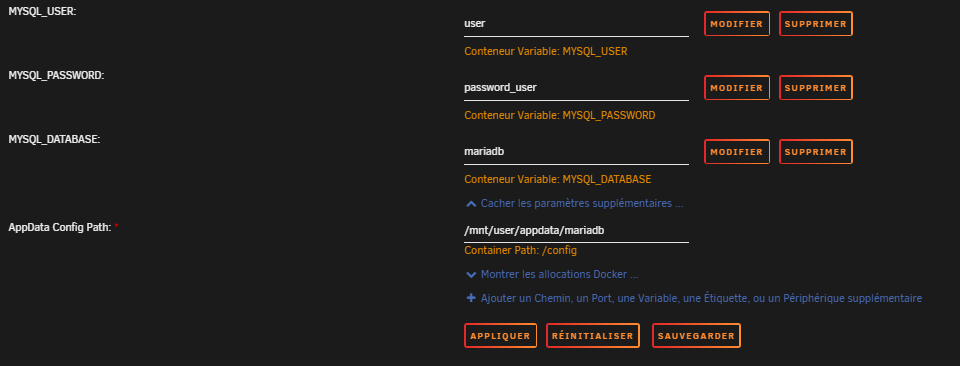
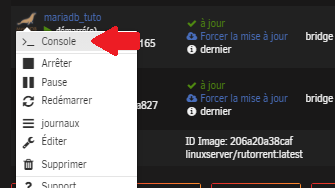
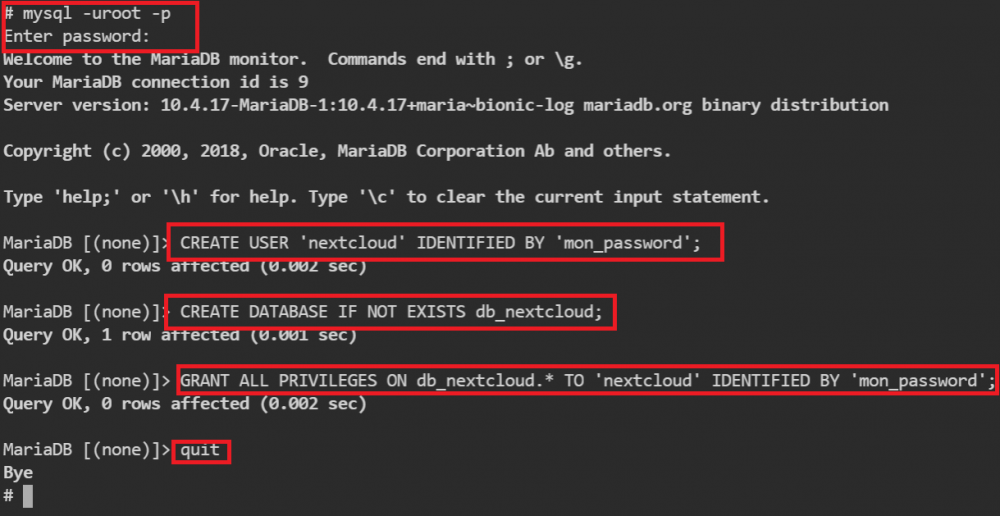
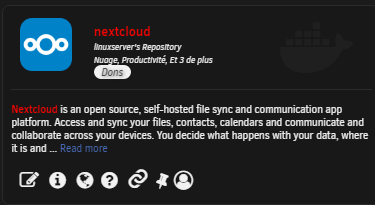
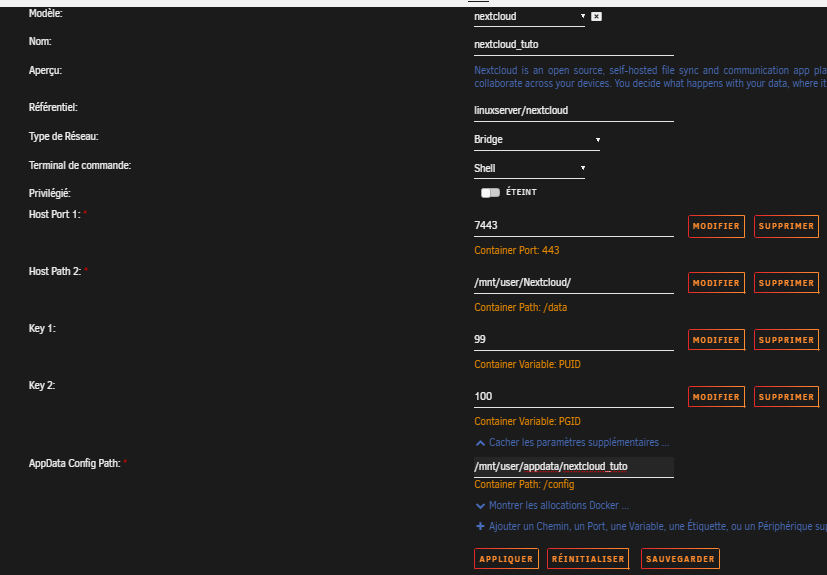
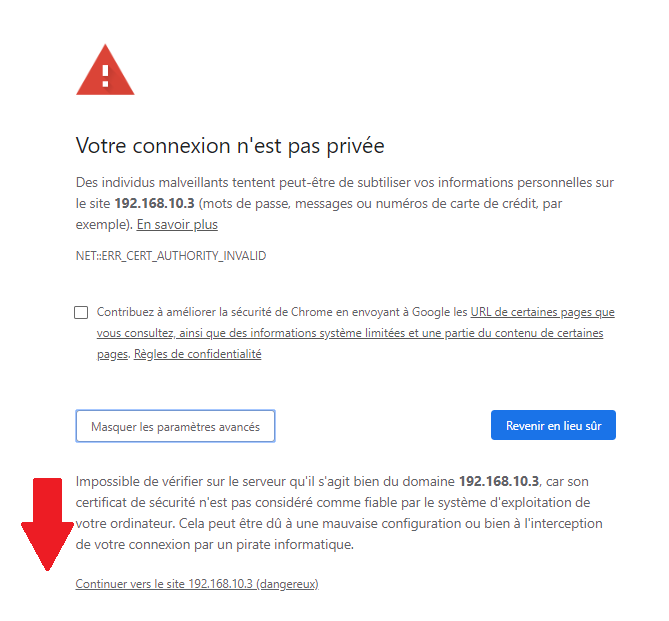
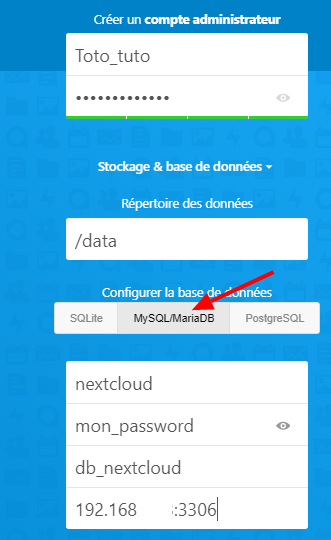
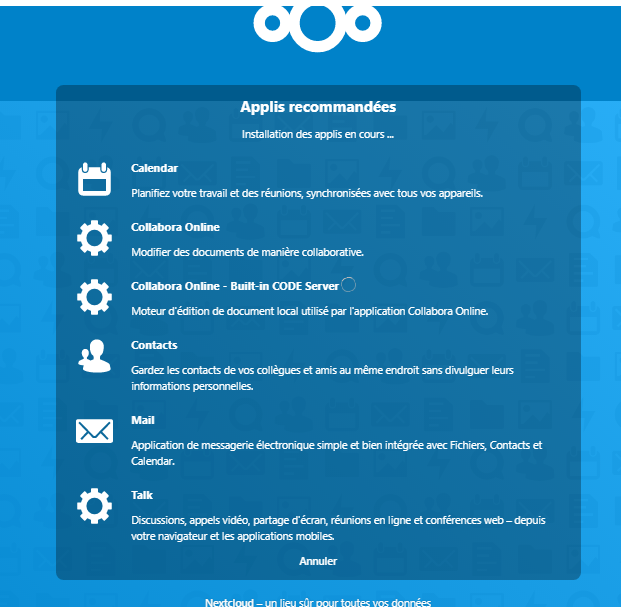
Information: Je crée ce premier tuto en français basé sous UNRAID, j'ai essayé de faire le plus simple et le plus explicite pour les novices! Créer un NEXTCLOUD avec une base de données MySQL est important si vous avez beaucoup de fichiers ou plusieurs utilisateurs. En effet l'installation proposé de base en SQlite est destiné surtout à une utilisation développeur et n'est pas fiable ni stable dans le temps! Vous risquez d'avoir des lenteurs d'accès voir que la base de données plante. Je n'aborderais que la partie installation de NEXTCLOUD, ce tuto n'est pas destiné à la configuration de NEXTCLOUD ni de son utilisation. Pré-requis: Je pars du principe que vous avez installé: - le plugin "COMMUNITY APPLICATIONS" - que vous avez activé DOCKER. - que vous connaissez l'ip du NAS. - si vous avez déjà installé le conteneur MariaDB, passé directement à l'étape pour créer un utilisateur dans MariaDB. Installation: 1) Installation de MariaDB a) Téléchargement de l'image MariaDB Recherché dans l'onglet "APPS" le conteneur "MariaDB - linuxserver's Repository": b) Paramétrage du conteneur host port 1 = port utilisé pour mariadb MYSQL_ROOT_USER = nom de l'utilisateur avec accès "root" key 3 = mot de passe du l'utilisateur "root_user" MYSQL_USER = nom de l'utilisateur avec accès simple utilisateur MYSQL_PASSWORD = mot de passe utilisateur MYSQL_DATABASE = nom de la base de données AppData_config_path = chemin du conteneur c) Création d'une base de données et d'un utilisateur dans MariaDB Ouvrir la console de commande pour MariadDB: Il va falloir entrer quelques commandes (adapter nom et mot de passe) D'abord ont ce connecte en utilisateur "root" (avec les identifiants crée au-dessus lors de l'installation du conteneur MariaDB) mysql -uroot -p Le password demandé est celui créé lors de l'installation: key 3 = mot de passe du l'utilisateur "root_user" Créer un utilisateur et un mot de passe (il faut garder les ' qui encadre le nom et mot de passe) CREATE USER 'nom_utilisateur' IDENTIFIED BY 'mdp'; Création d'une base de données pour NEXTCLOUD: CREATE DATABASE IF NOT EXISTS nom_de_base; Autorisé l'utilisateur à accéder à la base de données: (il faut garder les ' qui encadre le nom et mot de passe) GRANT ALL PRIVILEGES ON nom_de_base.* TO 'nom_utilisateur' IDENTIFIED BY 'mdp'; Puis ont quitte proprement: quit !!! ATTENTION!!! DE BIEN NOTER LES IDENTIFIANTS ET LE NOM DE BASE DE DONNEE QUELQUE PART Si tout ce passe bien vous devez obtenir ceci: 2) Installation de NEXTCLOUD a) Téléchargement de l'image Rechercher dans l'onglet "APPS" le conteneur "NEXTCLOUD" linuxserver's Repository: b) Paramétrage du conteneur NEXTCLOUD Host port 1 = port utilisé pour accéder à l'interface NEXTCLOUD Host path 2 = chemin ou est stocké vos FICHIERS AppData Config Path = chemin ou est stocké la config NEXTCLOUD c) Accès Interface de NEXTCLOUD Pour accéder à l'interface NEXTCLOUD, utiliser: https://IP_DU_NAS:7443 https car NEXTCLOUD demande un accès sécurisé IP_DU_NAS: le port choisi lors de l'installation du conteneur ci-desus (dans mon cas 7443) vous aurez tout de même un message d'erreur lorsque vous tapez le chemin de votre NEXTCLOUD car il n'y a pas de certificat SSL: d) Paramètrage de NEXTCLOUD avec MariaDB Vous accédez maintenant à l'interface NEXTCLOUD: Vous créé un utilisateur "admin" et un mot de passe POUR NEXTCLOUD !!! (!!! notez le bien !!!) On choisi MySQL/MariaDB Ont reprend l'identifiant / mot de passe / et nom de base de données créé en ligne de commande dans MariaDB. L'adresse IP de MariaDB est IP_DU_NAS:3306 (si laissé d'origine) et on installe! Si tout va bien vous avez un écran comme ceci: Pour accéder à NEXTCLOUD avec un reverse proxy (Nginx Proxy Manager) Vous redirigerez vers l'IP du conteneur "IP_DU_NAS:7443" dans mon cas. Attention si un jour vous voulez changer le nom de votre sous-domaine il faudra allez modifier un fichier .conf dans le dossier du conteneur NEXTCLOUD FIN
 1 point
 -
Welcome to IBRACORP Support = Support Us = Membership Help support my work by subscribing to our site and our Youtube Channel. It's free with paid options. There are no fees involved and it really helps me give back to you. Become a free subscriber of our site to: Receive the latest YouTube videos first, before going public on YouTube. Read our articles which go with our videos and other work we do. Emails directly to your inbox with the latest content. No spam, no bs. More Become a paid subscriber of our site to: Get exclusive videos only for supporters. Ask for direct support with helping install or provide consultancy to you. Receive advanced tutorials and articles for your IT needs. Help support indie creators (and a father of two) to bring you the best content possible! = PayPal = Prefer to donate via PayPal? You can donate to us right HERE. We really appreciate your support in any shape or form. = IBRACORP = IBRACORP - https://ibracorp.io/ YouTube: https://youtube.com/c/IBRACORP GitHub - https://github.com/ibracorp Discord - https://discord.gg/VWAG7rZ Twitter - https://twitter.com/IBRACORP_IO == Contact Us == If you require support or have any questions you can contact us at [email protected]. All questions/issues related to getting any of my images running on Unraid can be asked here. If you think a template needs improvement, feel free to post that here too. <-------------------------------------------------------------------------------------------------------------------------------------------------------> Authelia Authelia is an open-source authentication and authorization server providing 2-factor authentication and single sign-on (SSO) for your applications via a web portal. It acts as a companion of reverse proxies like nginx, Traefik or HAProxy to let them know whether queries should pass through. Unauthenticated users are redirected to Authelia Sign-in portal instead. IBRACORP Links: Guide: unRAID Template: https://github.com/ibracorp/authelia.xml/blob/master/authelia.xml unRAID Installation instructions: https://github.com/ibracorp/authelia This documentation will help users who have NGINX Proxy Manager and want to use Authelia to secure their endpoint. i.e. radarr etc. Official Links: Authelia: https://www.authelia.com/ Docs: https://www.authelia.com/docs GitHub: https://github.com/authelia/authelia Docker Hub: https://hub.docker.com/r/authelia/authelia1 point
-
This repo was created to update the original piHole DoT/DoH by testdasi https://forums.unraid.net/topic/96233-support-testdasi-repo/ Official pihole docker with added DNS-over-TLS (DoT) and DNS-over-HTTPS (DoH). DoH uses cloudflare (1.1.1.1/1.0.0.1) and DoT uses google (8.8.8.8/8.8.4.4). Config files are exposed so you can modify them as you wish e.g. to add more services. This docker supercedes testdasi's previous Pi-Hole with DoH and Pi-Hole with DoT dockers. For more detailed instructions, please refer to Docker Hub / Github links below. Docker Hub: https://hub.docker.com/r/flippinturt/pihole-dot-doh Github: https://github.com/nzzane/pihole-dot-doh Please make sure you set a static IP for this docker, as DHCP will not work! FAQ: Q: Can this be installed on top of testdasi's current pihole DoT-DoH? A: Yes, this can be installed over, without any problems Q: How do I change the hostname? A: Use the '--hostname namehere' parameter, under 'extra parameters' in the containers settings Q: Is there a list of good block lists? A: https://firebog.net/ Initial Upload: 20/1/21 Latest Update: 27/04/22 (dd/mm/yy) Current FTL Version: 5.15 Current WEB Version: 5.12 Current PiHole Version: 5.101 point
-
Was willst du genau machen? Willst du eine Karte in Docker containern verwenden oder nur für die VM? Wenn du eine Karte nur für die VM verwenden willst (ich schätze mal die RTX) dann musst du sie an VFIO binden (Tools -> System Devices). Du solltest aber im BIOS schon einstellen können welche Grafikkarte du für den primären display output nehmen willst wenn nicht hilft nur Karte umstecken. Wenn du die 210 für den GUI modus benutzen willst dann kann ich leider auch nicht helfen mit der Auflösung da di schlichtweg nicht unterstützt wird von den treibern. EDIT: deinstallier die Nvidia treiber wenn du nicht vor hast die GPU (RTX) in einem container zu nutzen.1 point
-
Yes that is true but I have some unassigned HDDs. Also is very common for people to use external HDDs for farming.1 point
-
It's my pleasure ! It was really nothing to create a template as the docker itself was already made. Plus my way of finally giving back to this awesome community (I have much to give back to spaceinvaderone 😆) I share your concern for consumer SSDs. All my SSDs are consumer grade, relatively new and they have a somewhat okay tbw, so for now I'm plotting on them, but this is indeed not viable in the long run. For your question, there is an already existing solution. With Unraid 6.9, we can now create many cache pools. What I plan on doing is buying a few enterprise SSD and create a cache pool name something like 'Plotting Pool' with btrfs. I plan on keeping my other ssds in separate cache pools, for VM and for Cache stuff (docker, appdate etc...). Once I have this new cache, I simply plan on changing my plotting share cache to 'Plotting Cache'. I also believe in chia and I'm sure it will take off (I mean it's already well priced atm but we'll see). Personally I'd only be down for a pool if it's a real one (if it uses the new pool protocol which is coming soon). I don't have the knowledge on how to make one, but if the community made a real one I would participate for sure !1 point
-
I have been using UnRaid for at least 5 years and i love it. Also thank you for getting this is the docker hub. i was curious which way i was going to go, either setting up and total separate system for chia farming or expand my UnRaid system. i have read all the green paper and documentation on the blockchain and find it interesting. I was hoping it would make it to UnRaid cause i read the xfs and btrfs filesystems are actually best for chia on read and write speeds for harvesting. i do have a question and concern though on running it in a docker though. 1. you can use consumer ssd and nvme but will wear out rather quickly for plotting and recommends enterprise ssd's do to the overall lifetime writes of 1 PDW and up. i could see this problematic for the cache pools UnRaid uses for the average users who can't afford enterprise ssd's. so im curious if its possible to create a totally different cache pool designated specifically for chia. this would be one solution of replacing cache pools which most house our dockers and stuff. other wise and VM in UnRaid would still be need to pass-through the HDDs to VM unless you feel like stubbing them out in the docker of chia itself. thank you for creating this docker i think chia is gonna take off because it is solving a case and real world use at least on the mining side IMO. Oh And if this community was to create a pool i total in and long as the rewards can get divided up evenly. i just order 8 18tb seagate's enterprise HDD's and i got 6 Intel 480 SSD's ready give it a shot.1 point
-
I was referring to /plots not plotting. I found a solution by adding a new directory in the config file /mnt/user/appdata/chia/mainnet/config/config.yaml I added another directory named plots2 and mapped it to another HDD where I store more plots plot_directories: - /plots - /plots2 So I guess you can add as many directories as you need if you're using multiple HDDs.1 point
-
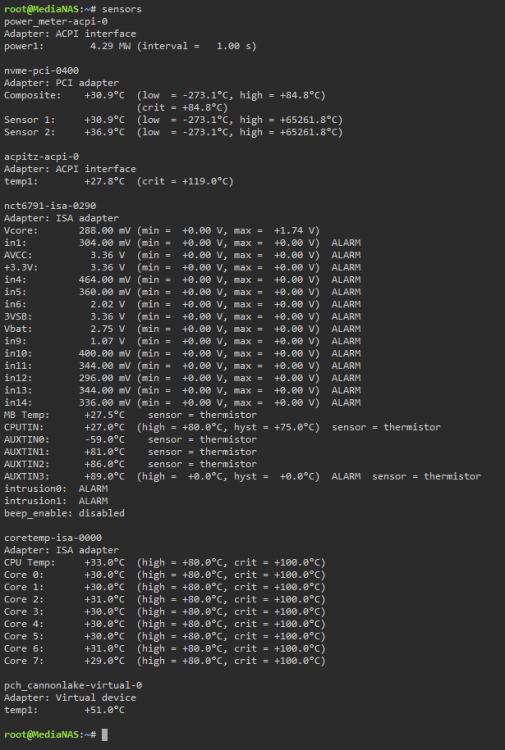
And on my system, I find 'sensors' provides better information on available sensors than 'sensors-detect' which is very verbose.
 1 point
 -
whooops1 point
-
In my case, the NIC has a static ip and all what i see is this: May 8 15:43:37 Horus kernel: atlantic 0000:05:00.0 eth1: atlantic: link change old 0 new 10000 That happens when i start my PC and both NICs are online. But... some settings are different... Port eth1 Information Supported ports:[ TP ] Supported link modes:100baseT/Full 1000baseT/Full 10000baseT/Full 2500baseT/Full 5000baseT/Full Supported pause frame use:Symmetric Receive-only Supports auto-negotiation:Yes Supported FEC modes:Not reported Advertised link modes:100baseT/Full 1000baseT/Full 10000baseT/Full 2500baseT/Full 5000baseT/Full Advertised pause frame use:Symmetric Advertised auto-negotiation:Yes Advertised FEC modes:Not reported Speed:10000Mb/s Duplex:Full Auto-negotiation:on Port:Twisted Pair PHYAD: Transceiver:internal MDI-X:Unknown Supports Wake-on:pg Wake-on:g Current message level:0x00000005 (5) drv link Link detected:yes MTU size:1500 bytes1 point
-
Merci pour ce tuto, moi qui n'y connais rien, ça me met le pied à l'étrier !1 point
-
Dazu auch gleich ein Tipp. Wähle "Custom" und dann nutzt du am besten einen Cron Generator: https://crontab.guru/#0_23_*_*_* Also 0 23 * * * wäre jeden Tag um 23:00 Uhr.1 point
-
@stpkle installier dir mal die Community Applications und dort findest du alle Plugins/Docker container. Ein user script würde ca so aussehen: #!/bin/bash powerdown Das musst du in den Userscripts eintragen und dann per cron laufen lassen an dem Zeitpunkt den du willst. User Scrips ist übrigens auch ein Plugin.1 point
-
Okay, so yes it was a stupid question 😁 Move is simple and only needed me to make sure that the shares were set to 'Cache - Yes' and then run 'Move' and after some time it had freed up nearly all of the cache drive and as soon as this was done, and a quick reboot, all my VM's came back and Docker started working again with no further changes. So moral of the story, always make sure you have you cache setting correct and space on your drive. Thanks for the help everyone.1 point
-
It's not necessary for btrfs pools, still is if you use XFS.1 point
-
Ich habe das anders gemeint, Qemu ist nicht Spice und GL support kompiliert auf Unraid 6.9.2 somit kannst du keine direkte Bildschirmausgabe machen. Alles andere was du beschrieben hast ist natürlich möglich und funktioniert auch einwandfrei mit dem Plugin, ist noch im Beta stadium und es fehlt noch eine Beschreibung und ein paar andere wichtige Hinweise aber es funktioniert. Bitte Anfrage per PN stellen, ich will den link nicht öffentlich posten.1 point
-
Some configs have issues with free space, as is reported by df or statfs as you can see above (Unraid uses statfs), this happens for example with an odd number of devices in raid1 and apparently also happens with raid10 when not using multiples of 4 devices, you still have 3TB of usable space, as reported by btrfs fi usage, and as the pool gets filled free space should also get closer to correct, i.e., when you have 2TB used it should show close to 1TB free.1 point
-
Thank you for this! ...and hang in there. My bingo card won 2 chia after about 200 plots about a week ago.1 point
-
Thank you OP (PARTITION PIXEL) for setting this up. I have a question. How can you configure this Docker to only be a plotter? I already have a full Chia Node setup in a windows 10 VM on another unRAID server. It's not immediately obvious in the Chia documentation as to how to do this.1 point
-
Ok, prefer is not an option.. I'll see if I can sort the errors out, otherwise it's gotta go.1 point
-
Thank you, glennv, that did the trick.1 point
-
Hi, If you submit a PR here: https://github.com/unraid/lang-de_DE/blob/master/main.txt @ich777 will take a look and we will update it if agreed! Thanks in advance for your contribution. Please let me know if you have any questions.1 point
-
docker.img isn't full and is using less than 10G. But it has been created as 200G due to the Settings for Docker. Looks like you must have increased it yourself.1 point
-
Ich habe gerade im deutschen Forum einen Screenshot der Main Page in Deutsch gesehen. Auf dem Screenshot war die Einstellung der Schreibrate zu sehen. Also 0 B/s und nicht die Summe der Lese-/Schreibaktivitäten. Die Header hierzu lauten "Gelesen" bzw. "Geschrieben" was meines Erachtens nicht korrekt ist. Gelesen/Geschrieben passt zur anderen Darstellung mit den Summen, aber nicht zur aktuellen Schreib-/Leseaktivität. Meiner Meinung nach müssten die Header z.B. "Leserate" bzw. "Schreibrate" lauten, oder? Alternativ "Lesen" und "Schreiben".1 point
-
Looks like i have the same problem: I deleted the nextcloud.log (+5MB) file yesterday and my disks went idle. Today a new log file popped up in the data share. The info inside the log-file is about 'mail, smtp settings error'. I forgot to copy before i deleted the file...1 point
-
I have a need to run the WebUI behind a separate Reverse Proxy.... in this case, I'm running Nginx Proxy Manager. https://github.com/binhex/arch-rtorrentvpn/issues/56 I found this issue listed and tried to implement the solution from the wiki, but it didn't change anything. Overall, most of the UI works just fine. So far, the only issue I have run into is an HTTP 500 when I try to add cookies. Does anyone have a suggestion on how I should configure the host in Nginx Proxy Manager? edit: It seems my thoughts may be misplaced. Bypassing NPM, I still get the same message even though I'm connecting directly. 2021/05/03 23:10:47 [error] 405#405: *3740 FastCGI sent in stderr: "PHP message: PHP Fatal error: Uncaught TypeError: count(): Argument #1 ($var) must be of type Countable|array, bool given in /usr/share/webapps/rutorrent/plugins/cookies/cookies.php:38 Stack trace: #0 /usr/share/webapps/rutorrent/plugins/cookies/action.php(28): rCookies->set() #1 {main} thrown in /usr/share/webapps/rutorrent/plugins/cookies/cookies.php on line 38" while reading response header from upstream, client: [local_ip], server: localhost, request: "POST /plugins/cookies/action.php HTTP/1.1", upstream: "fastcgi://127.0.0.1:7777", host: "[host]", referrer: "https://[host]/" edit2: I have 3 different instances of ruTorrent, two are this docker container, and the other is installed directly on a machine. Only the two running in docker have this problem.1 point
-
If there is no config/vfio-pci.cfg file then your problems are not related to your vfio-pci setup. I'd recommend starting a new thread in the general support. If the system won't boot then you won't be able to upload diagnostics, but it will help if you can post a screenshot of whatever is in the root folder of the flash drive along with the config folder Then connect a monitor and keyboard to the system and post a photo of whatever is on the screen when the text stops scrolling. This needs to be in a new thread though, it will get lost in this discussion of vfio-pci1 point
-
It sets the CPU usage of the container to be the absolute lowest priority if another container wants the cycles. If nothing else wants it then it will run and use as many cycles as it wants. If combined with pinning, then basically the same thing happens, but it's confined onto the pinned cores.1 point
-
Unfortunately no what I'm aware of, all information is contained in the /mnt/user/system/docker/docker.img file and the easiest way to get any meta information from this file is running docker CLI commands. If you read the content of my script, it's basically the same docker commands that you would normally write in a terminal. I don't think there is any similar way than this unless someone either creates a plugin or be part of some backup plugin/tool. Anyhow, just install User script plugin, if you not already have it, and copy paste the script, change path and you are done.1 point
-
anyone interested, for NPM just add under advanced. ✔️✔️✔️
.png.0504ce7d5faaced974259e7f1129841a.png) 1 point
1 point -
vDisk performance quite low, no matter which Bus type setting. You need passthrough whole disk for performance. ** I haven't try above setting, I don't think it equivalent device passthrough **1 point
-
It does for most people. I understand it can be frustrating if you cannot do what you expect but simply saying that it does not work will not improve the situation. We have nothing to work from to try solve issues you might have with Unraid. Please make a post in General support explaining your issues in details. What you expect to do, what step you took, what is happening in return ? Pictures of errors can help. Attaching your Diagnostics will also give us information to help you (Tools / Diagnostics).1 point
-
Tools - Upgrade OS, and revert to 6.8.3 if it's an option. You will need to reassign your cache pool though after this is done. If it's not an option to revert, then download the 6.8.3 zip file from https://unraid.net/download and overwrite all of the bz* files on the flash drive with those in the archive and reboot (You'll still need to reassign the cache pool) Why do you want to revert?1 point
-
@rvijay007 left click the icon of the VM and you get all the options you're asking for 👍
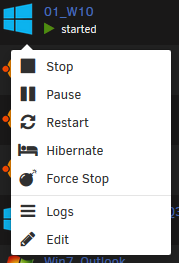
 1 point
 -
Uncovered a little more... Ubuntu 18 can't be shutdown or rebooted from within Ubuntu VM. Instead it has to be shutdown and restarted from the Unraid Dashboard-->Apps panel using Stop and Start. That fixes up the messiness with editing the boot order. The boot order generated by the Ubuntu template appears correct without changes. -- Tom1 point


.png.0504ce7d5faaced974259e7f1129841a.png)