Leaderboard


Popular Content
Showing content with the highest reputation on 05/15/21 in all areas
-
@kennygunit I was able to SSH in to my server. But this will only last until you reboot. sudo nano /usr/local/emhttp/plugins/dynamix.docker.manager/include/DockerClient.php The permanent way would be to modify the boot via SSH: sudo nano /boot/config/go Paste this at the end: (Shift Insert or Right Click) # Fix Docker - Case Insensitive sed -i 's#@Docker-Content-Digest:\\s*\(.*\)@#\@Docker-Content-Digest:\\s*\(.*\)@i#g' /usr/local/emhttp/plugins/dynamix.docker.manager/include/DockerClient.php Ctrl X and save then Reboot. All thanks goes to HyperV, Morthan, and ich777 ❤️3 points
-
Pardon my rudeness but your sed command replaces the entire line with just that text. I adjusted it a bit and use this instead, so it only replaces the found text ( I almost always use different delimiters because the slashes get in the way of seeing what is being done with the backslashes in the way) sed -i 's#@Docker-Content-Digest:\\s*\(.*\)@#\@Docker-Content-Digest:\\s*\(.*\)@i#g' /usr/local/emhttp/plugins/dynamix.docker.manager/include/DockerClient.php I used https://sed.js.org/ to check the syntax3 points
-
I think that did it. Thank you so much for going above and beyond and helping me out with an issue in the middle of a weekend. You didn't cause the problem, but you sure stepped up and helped me fix it, and I appreciate that. Cheers!!!2 points
-
You're not screwed. Worst case, you set up a trial key on a new stick. Assign all of the drives as data drives, whatever shows up as unmountable you re-assign as the parity drive. (Or better yet, restore your backup of the flash drive with the exception of the .key file in the flash drive)2 points
-
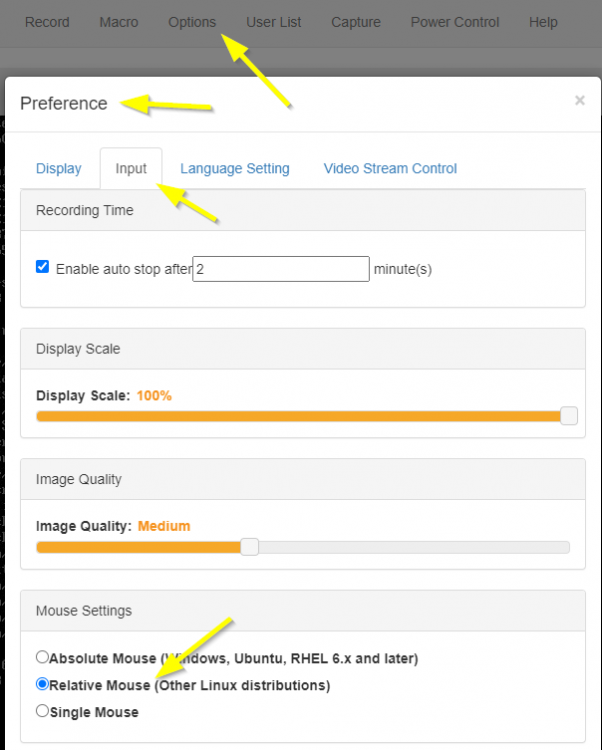
Ok, ich glaube ich habe das Problem gelöst. Erst wenn ich auf "Relative Mouse" umstelle, kann ich Tastatureingaben mit meiner Tastatur und dem Virtual Keyboard absetzen: Ich entferne jetzt das Kommando in der Go File und starte noch mal neu. Dann sollte ich ihn ja auch wieder wecken können. Sorry, dass ich vorher nicht getestet habe, dass die Tastatur überhaupt im Terminal geht. Da sie im BIOS ging, kam ich nicht auf die Idee, das sie im Terminal nicht gehen könnte.
 2 points
 -
No problem, and yes I know, see the second answer below. Exctly because I thought this is the full line because I have no such old system to test with. @Ford Prefect please change the line to the answer two post above from @Morthan.2 points
-
So I have swar plot manager running, had time to play with it today. This setup isn't elegant and probably isn't following best practices but it works for me. Please be mindful of this, if you break something, lose plots, etc.. don't come cryin' Open the docker console (click on the docker --> console) NOTE: not the unraid main console We are going to pull swar's git and install its python dependencies. Installing into /root/.chia in the docker which points to /mnt/user/appdata in unraid. cd /root/.chia git clone https://github.com/swar/Swar-Chia-Plot-Manager cd Swar-Chia-Plot-Manager /chia-blockchain/venv/bin/pip install -r requirements.txt cp config.yaml.default config.yaml You can now edit the config.ymal file using an editor supported within this docker OR from the appdata/chia/Swar-Chia-Plot-Manager folder within unraid (unraid console, krusader, a windows share if you set that up) Here are some values to be used along with whatever else you set in the config... chia_location: /chia-blockchain/venv/bin/chia folder_path: /root/.chia/logs/plotting temporary_directory: /plotting destination_directory: /plots now test if it's working . /chia-blockchain/activate python manager.py view make sure the drives look like they have the correct space and used space values (if not then your probably mapping to a folder inside your docker image. /plotting and /plots are the mappings used during the default chia docker setup, that's why we used them here. If you start a chia plotting process and these aren't right you will fill your docker to 100% usage! If you're running "fix common problems" plugin, you will see warnings in the unraid GUI. You'll have to clean up the mess you made buy deleting whatever incorrect folders you created in the docker. CTRL+C to get out of view mode If everything looks good lets start swar manager python manager.py start Now whenever you want to use the swar manager open the chia docker console and view (or replace which ever command you need.. start, restart). You need to activate the python virtual environment everytime before your manager.py command as stated by the swar documentation. This is the second line you see here.. cd /root/.chia/Swar-Chia-Plot-Manager/ . /chia-blockchain/activate python manager.py view Want to use the main unraid console instead of being stuck inside the docker console, heck even use tmux? Do the following then repeat the commands directly above... docker exec -it chia bash Enjoy! I look forward to any suggestions for improvement, I'm sure there are better methods.2 points
-
If you guys want to try this champions @guy.davis docker with plotman inside jump on his discord channel he has a walk through for template setup and it works well so far...or actually i just saw he has added it to get approved by CA so u can wait a little bit if you want and do it from there2 points
-
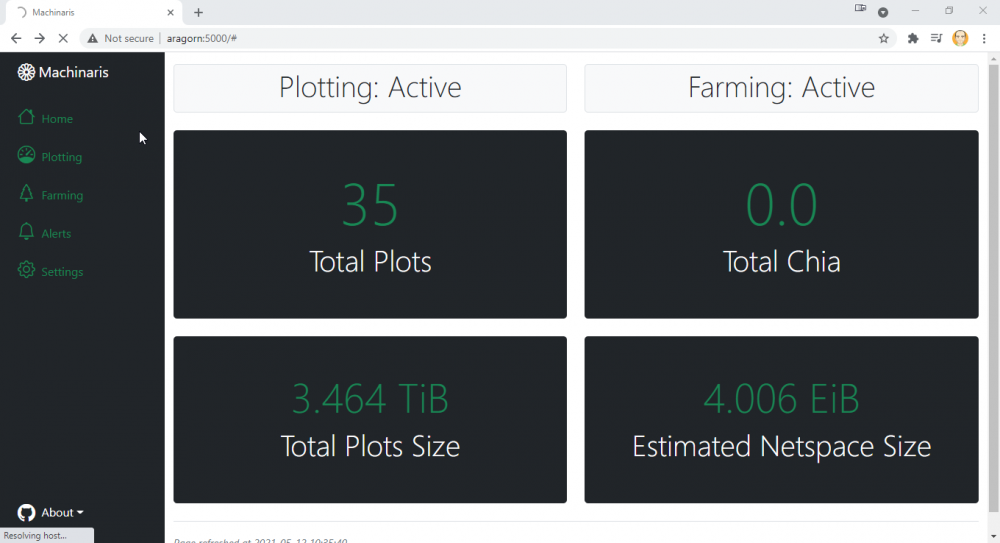
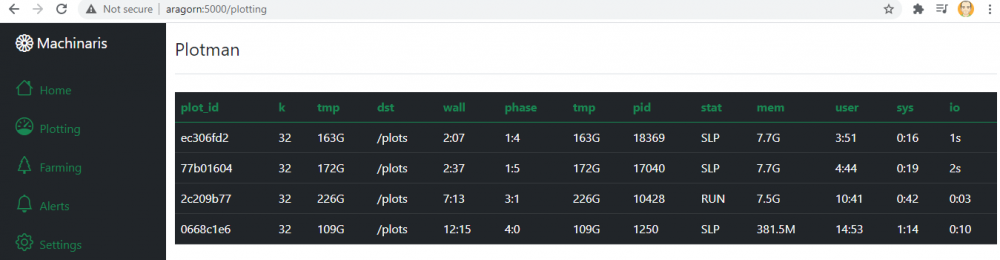
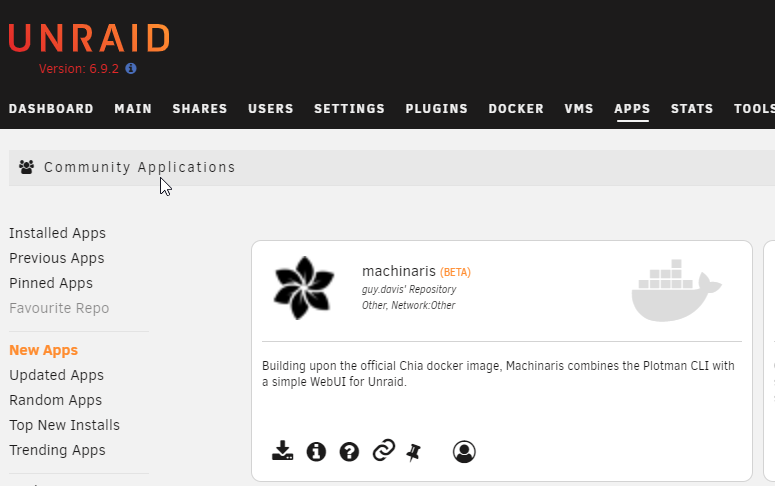
First off, a big thanks @Partition Pixel for getting the official Docker image added to Unraid as an application! Plotting is good fun, but tricky to get going well. @Footlocker_ Yes, Plotman is great! In fact, I am working on a single Docker image that includes this official docker image along with Plotman and a basic Web UI, all wrapped up as an Unraid application template. Right now, the Plotman CLI is invokable via the container CLI, but I hope to wire control into the Web UI shortly. The primary goal is to make plotting on Unraid as easy as the official Windows GUI application. I've called it Machinaris and it's available for early beta testing now. I'm using it for plotting on Unraid 6.9 and welcome anyone interested in trying the beta and helping out with the project. As you an see below, I'm just starting out too and still a member of 0 XCH gang. Plot on! Thanks, Guy UPDATE: Machinaris is now available as an Unraid Community Application, just search for "Chia".
 2 points
 -
Overview: Support thread for Partition Pixel/Chia in CA. Application: Chia - https://github.com/Chia-Network/chia-blockchain "Docker Hub": https://github.com/orgs/chia-network/packages/container/package/chia GitHub: https://github.com/Chia-Network/chia-docker This is not my docker, nor my blockchain, and I'm not a developer for them either. I simply did an Unraid template for the already existing docker so that way It will be easier for me and others to install the docker on an existing Unraid Server. I can support any changes required to the xml template and provide assistance on how to use the parameters or how to use the docker itself. Please read on SSD Endurance if you don't know about Chia and you plan on farming it : https://github.com/Chia-Network/chia-blockchain/wiki/SSD-Endurance Instructions: Install Partition Pixel's Chia via CA. Create a 'chia' directory inside of your appdata folder. Skip to step 4 if you do not have an existing chia wallet Inside this new folder, create a new file called 'mnemonic.txt' and copy and paste your 24 words mnemonic from your wallet inside (every word one after another on the same line with 1 space in between like this sentence). Back on the docker template, choose a location for your plotting if you plan on plotting on your server (preferably a fast SSD here) Choose a location for storing your plots (this is where they will be used to 'farm', preferably HDD here) Feel free to click on show more settings and change any other variable or path you would like Save changes, pull down the container and enjoy ! If you have some unassigned or external HDDs that you want to use for farming: edit /mnt/user/appdata/chia/mainnet/config/config.yaml Add more plot directories like so : plot_directories: - /plots - /plots2 Create a new path in the docker template like so : config type : Path container path : /plots2 host path : /mnt/an_unassigned_hdd/plots/ Here are some often used command lines to get you started: Open a console in the docker container, then type : venv/bin/chia farm summary venv/bin/chia wallet show venv/bin/chia show -s -c venv/bin/chia plots check Command to start plotting : venv/bin/chia plots create -b 5000 -r 2 -n 1 -t /plotting/plot1 -d /plots -b is amount of ram you want to give -r is the amount of threads -n is the number of plots you want to queue -t is temp dir -d is the completed directory From user ropes: If you only want to harvest on this docker, then you don't need to create a mnemonic file with your passphrase. Instead you can do the following (more secure imo) : chia plots create [other plot options] -f <farmer key> -p <pool key> If you want to run in Parallel just run the command in another terminal window as many times as your rig will allow. Here are all the available CLI commands for chia : https://github.com/Chia-Network/chia-blockchain/wiki/CLI-Commands-Reference From user tjb_altf4:
 1 point
 -
I have a SanDisk Ultra Fit 256GB USB drive. It's formatted for exFAT@4k with the volume set as 'UNRAID'. Win10, latest updates/patches. I've tried a couple different USB controllers on my machine but it doesn't change the situation. No listed USB devices in the USB creator. Edit: TrueNAS does not require a USB stick and works great.1 point
-
Emailed you back. Follow those instructions and you should be all set. As @Squid mentioned, you can also always set up a free trial until we get back to you. -Spencer1 point
-
😳 ...quietly changes settings from "sleep after 30mins" and waits to report back...1 point
-
@ich777 how much do I owe you for being my front line support engineer lol1 point
-
Also double check device info page unraid to ensure you havent selected the card for pcie passthrough. I just bought a 1660 and it worked perfectly.1 point
-
So I have been looking at enabling IPV6 for my network. My main concern is that you don't get the natural isolation we currently get with NAT and if my unraid is prepared for it. I have tried searching for tips/suggestions but no success, is there a particular set of steps to ensure that my unraid is secured against intrusion? (ie can someone access my gui/dockers remotely? do I need to disable telnet or change unraid password, etc).1 point
-
...wieder qemu-img. Die m2 SSD über unassigned devices einbinden....auf den Device-Pfad achten unter dem die Disk liegt und convertieren. Beispiel: "qemu-img convert -p -O raw /dev/sdX /mnt/user/domains/MeinWinSRV2019/vdisk1.img" für eine vdisk im raw format.1 point
-
Try a different port, ideally USB21 point
-
use nano or vi. If you want to access it through Windows GUI, try WinSCP.1 point
-
First thing which the Gurus (I am not even close to one with this type of problem!) are going to need is a Diagnostics File. Tools >>> Diagnostics Post it up in a new Post. (No one will know that you did it if you add to your first post by editing it!)1 point
-
thanks again everyone, especially @HyperV, @ich777, @Morthan and @ephdisk for your help. I am glad that any easy, non-intrusive fix has been found, as I am still reluctant to move away from 6.8.3.1 point
-
Ah! Right well I like your plugins too! 😁🤣 I have installed intel-gpu-top and nvidia-driver (I used spaceinvaders videos) and just stumbled on intel_gpu_top. Terminal currently tells me nothing working with a very old quad core2 @2400MHz as youd expect. So I haven't actually tested intel-gpu-top as I haven't installed my new CPU yet but from what I see it looks good and the NVIDIA driver plugin is brilliant (not sure i fully understand but it seems essential for the equipment and it foung the GTX750 drivers). I bought the 10900K and I'm waiting on a super micro motherboard C9Z490 to ship from US. 2Pcie will be for HBA controllers (16 hard disks). 2PCie for the 750 and 1660 I have. So the motherboard has both DP and HDMI ports on it. So the idea (and remember I've not tested yet) HomeSeer Ubuntu VM - baremetal GTX750 - hdmi used for automation control screens. Plex Server/Kodi FrontEnd in VM Ubuntu using HDMI port for Kodi (it goes into 4K HDBT matrix distributed around house) - baremetal GTX1660 (I believe manages 5 transcodes unlocked but locked at 3). Then either the (usb-c to hdmi adapter) OR motherboard HDMI (iGPU) will probably be for the UNRAID GUI (which i may be able to utilise as part of the VM). The 10900K has QuickSync for transcoding and I believe is considered iGPU. I now believe although still cant find info on - that transcoding is done either on NVEC or IGPU, but not both! So if I've completely got it wrong - bare with me, do educate me! Just remember I've not got the motherboard yet to learn and there is so much info out there!!! I've no idea which will be better for transcoding. That said my original post was just about seeing multiple graphics cards on the dashboard 😂 and thank you b3rs3rk
 1 point
 -
Ffmpeg is installed from the alpine repo, so we can't update until alpine updates it. libxml2 is installed in the container, if that is what's needed.1 point
-
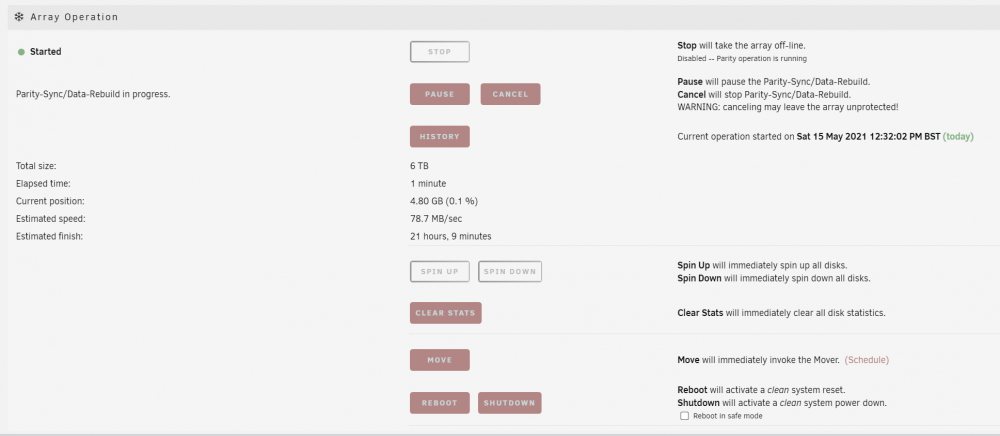
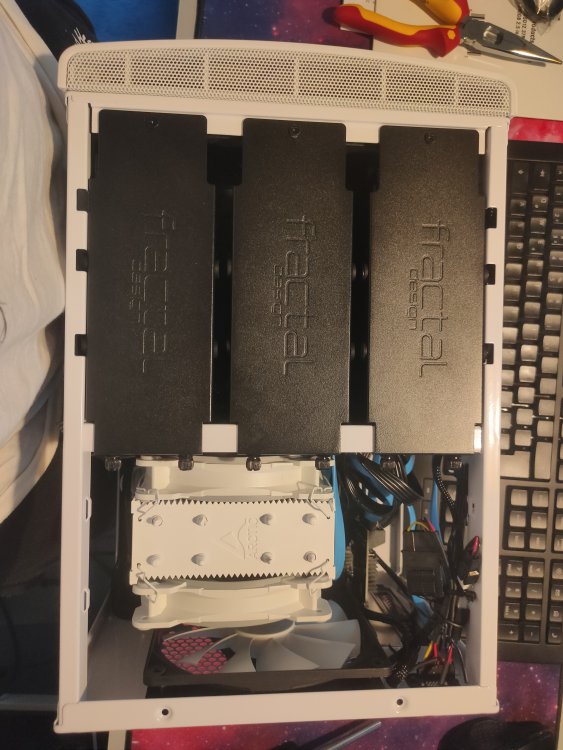
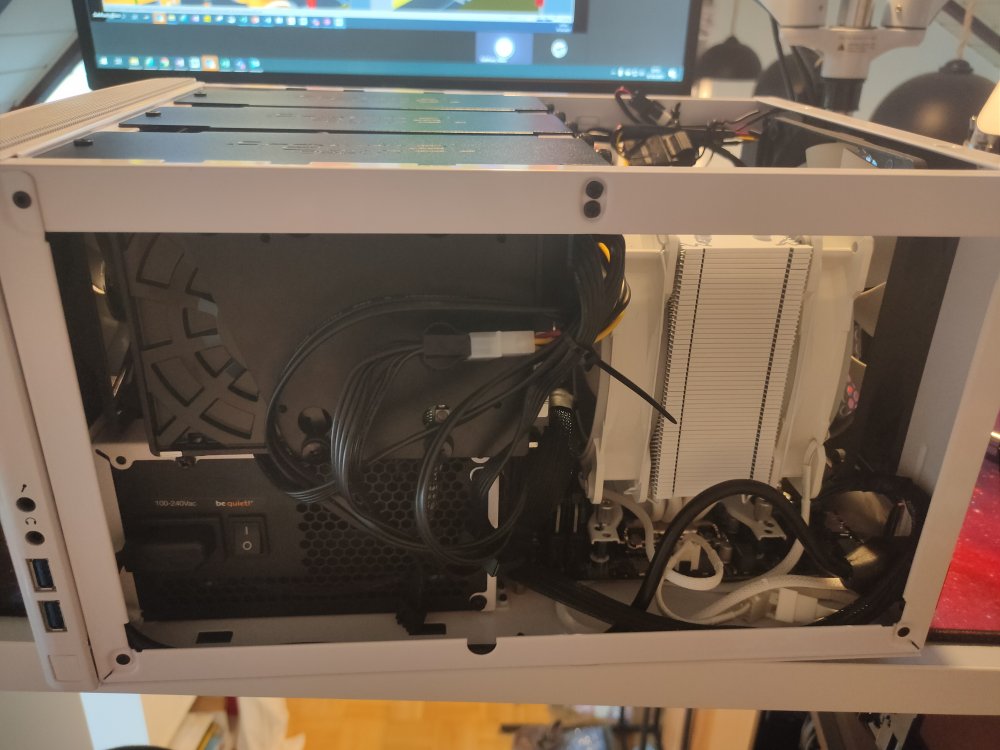
Yes I clearly didn't do it; isn't it funny how nerves can throw you so much! I am resyncing now, and will look at fixing my shares "Included disks" - also now have a pro licence and the next big one will be the real migration to the new motherboard and case Thank you for your help

 1 point
 -
This is not my plugin My plugins are the Intel-GPU-TOP, Radeon-TOP and Nvidia-Driver... About which iGPU are we talking? Both Intel (8th Gen.+) and AMD (Ryzen APUs) have excellent iGPUs that should be capable of transcoding the same amount of parallel streams as the 1660 with the benefit of not having a base power consumption when they are in idle like the Nvidia GPU has. Thank @b3rs3rk, the creator of this wonderful plugin.1 point
-
Netmask on Ubuntu is not the same as Unraid, /24 is 255.255.255.01 point
-
I think you may be over thinking the cool stuff your plugin does - I don't really care about seeing the docker apps like plex, emby, jellyfin etc. I have 3 GPUs: I have a 750 for a Ubuntu VM which runs HomeSeer. a 1660 which I use for Plex and Kodi through a VM, Finally I have a usb-c to hdmi adaptor which i plan to use, maybe this falls under iGPU - I'm not exactly 100% aware how thats going to work, which is why your plugin is handy. Or i use the iGPU on the motherboard if it doesn't work. But I was hoping to play around with iGPU and GX1660 to see which is better with transcoding (I didn't really appreciate its one or the other with PLEX). I guess it depends if i get that adapter to work - i think there more made for apple and google laptops. I am still waiting for my new motherboard. But I've almost got the system ideal for how i plan to use it in the future. In addition I really like to see the fan, the PCIe details, especially the temperature, and the encoder/decoder states on my dash board so I know how hard its working. Hence would love to see multiple GPUs. But its OK - I appreciate what it does and that its free, and I'm thankful. Its a good plug-in, i really like it!1 point
-
I've added a 'Volume' setting in the device settings for an apfs formatted partition so you can set the volume to mount.1 point
-
An update I had setup back to the previous configuration and reboot my Unraid server. Before starting the array, I have tried one more time this process and is working now. May 15 05:11:49 honeysnas emhttpd: spinning down /dev/sde May 15 05:11:49 honeysnas emhttpd: spinning down /dev/sdf May 15 06:21:17 honeysnas emhttpd: read SMART /dev/sdf May 15 06:51:21 honeysnas emhttpd: spinning down /dev/sdf May 15 09:45:33 honeysnas emhttpd: read SMART /dev/sde May 15 09:45:33 honeysnas emhttpd: read SMART /dev/sdf May 15 10:17:25 honeysnas emhttpd: spinning down /dev/sde May 15 10:17:25 honeysnas emhttpd: spinning down /dev/sdf No read errors since yesterday afternoon Thank you @Cessquill, great work.
 1 point
 -
Updated and couldn't connect. The realized it defaulted to "NO on allow remote connection" Up and running again.1 point
-
This. Looks. Amazing. Thank you for this! Another neat addition to add (which imo is the most important, since not everyone uses unraid for plotting, but im assuming everyone (or at least, more people ) who uses this uses it for harvesting): https://github.com/stolk/chiaharvestgraph1 point
-
Cache device problems: May 15 00:00:47 whale kernel: sd 1:0:0:0: [sdc] tag#14 UNKNOWN(0x2003) Result: hostbyte=0x00 driverbyte=0x06 cmd_age=37s May 15 00:00:47 whale kernel: sd 1:0:0:0: [sdc] tag#14 CDB: opcode=0x2a 2a 00 0a f8 92 b8 00 00 10 00 May 15 00:00:47 whale kernel: blk_update_request: I/O error, dev sdc, sector 184062648 op 0x1:(WRITE) flags 0x800 phys_seg 2 prio class 0 May 15 00:00:47 whale kernel: sd 1:0:0:0: [sdc] tag#13 UNKNOWN(0x2003) Result: hostbyte=0x00 driverbyte=0x06 cmd_age=37s May 15 00:00:47 whale kernel: sd 1:0:0:0: [sdc] tag#13 CDB: opcode=0x2a 2a 00 0a f8 8f 70 00 00 08 00 May 15 00:00:47 whale kernel: blk_update_request: I/O error, dev sdc, sector 184061808 op 0x1:(WRITE) flags 0x800 phys_seg 1 prio class 0 May 15 00:00:47 whale kernel: sd 1:0:0:0: [sdc] tag#7 UNKNOWN(0x2003) Result: hostbyte=0x00 driverbyte=0x06 cmd_age=37s May 15 00:00:47 whale kernel: sd 1:0:0:0: [sdc] tag#7 CDB: opcode=0x28 28 00 00 52 c4 70 00 00 08 00 May 15 00:00:47 whale kernel: blk_update_request: I/O error, dev sdc, sector 5424240 op 0x0:(READ) flags 0x800 phys_seg 1 prio class 0 May 15 00:00:47 whale kernel: sd 1:0:0:0: [sdc] tag#8 UNKNOWN(0x2003) Result: hostbyte=0x00 driverbyte=0x06 cmd_age=37s May 15 00:00:47 whale kernel: sd 1:0:0:0: [sdc] tag#8 CDB: opcode=0x28 28 00 07 8f 48 80 00 00 20 00 May 15 00:00:47 whale kernel: blk_update_request: I/O error, dev sdc, sector 126830720 op 0x0:(READ) flags 0x1000 phys_seg 4 prio class 0 May 15 00:00:47 whale kernel: dm-1: writeback error on inode 209549217, offset 4096, sector 184028976 May 15 00:00:47 whale kernel: dm-1: writeback error on inode 209549217, offset 8192, sector 184029816 May 15 00:00:47 whale kernel: XFS (dm-1): metadata I/O error in "xfs_imap_to_bp+0x5c/0xa2 [xfs]" at daddr 0x78ec840 len 32 error 5 May 15 00:00:47 whale kernel: XFS (dm-1): xfs_do_force_shutdown(0x1) called from line 296 of file fs/xfs/xfs_trans_buf.c. Return address = 00000000b84208d3 May 15 00:00:47 whale kernel: XFS (dm-1): I/O Error Detected. Shutting down filesystem May 15 00:00:47 whale kernel: XFS (dm-1): Please unmount the filesystem and rectify the problem(s) Start by replacing cables to see if it helps.1 point
-
Guten Morgen zusammen, Nach meiner kleinen Odyssee zu meinem Unraid wollte ich nochmal schnell Danke sagen für die guten Fingerzeige! Also, um es kurz zu machen, nachdem ich mir einen versucht habe einen 9100 gebraucht gekauft habe und der "in der Post verloren gegangen ist", bin ich günstig an einen neuen 11400 gekommen und habe dann ein System gebaut mit einem ASRock H510M-ITX/ac. Dazu gabs noch 16GB Crucial DDR4 Ram und einen Arctic Freezer 34 esports duo. Dann ging es weiter mit einer Crucial 1TB SSD m.2. Eigentlich waren es zwei aber ein PCI-E Board, dass m.2 SSDs und noch SATA Anschlüsse hat hat sich beim ersten Start einfach mal wortwörtlich in Rauch aufgelöst... Also habe ich jetzt 1 m.2 SSD und eine Sata SSD als cache eingebunden. Weiter ging es mit meinen schon vorhandenen Festplatten. Beide WD Red 4 TB und eine zusätzliche 1 TB Platte haben beim ersten Start massive Fehler produziert und mussten auch direkt wieder getauscht werden... Jetzt läuft das System schön entspannt und sehr stabil. Ich habe es schon geschafft neben den SMB Shares noch Swag, nextcloud incl only office und paperless so einzurichten, dass es mir gefällt. Also Danke nochmal!
 1 point
 -
Yup, and on top of that everything is already in the same workgroup. Even changed the workgroup across all of my relevant devices to something other than what it was originally (but still the same one across all my computer, Unraid server, and qnap NAS) and it changed nothing. The only time I was able to remotely navigate to it was when SMB1 was the only SMB protocol active, which is not a configuration I’m willing to keep.1 point
-
So far I have upgraded my parity drive 2 -> 3tb, and replaced a 1tb drive with a 3tb drive. I guess my next step after letting this disk rebuild is to rsync the 1tb I want to remove to the new 3tb drive, stop the array, add new 2nd parity disk and start a new config? Then that leaves me with no spare spots to add new drives but a spare 3tb drive remaining, the other drives in my system are new (this year) wd red 2tb drives so I don’t really want to bench one just yet but I may swap it to the 3tb then use that 2tb in my camera system (currently 640G) The 1tb drives I’m replacing are 5 year old blacks lol (5y, 8m, 12d, 5h) UDMA CRC error count 13. I am hoping from the views to this thread and no replies I am on the right track with what I am doing.1 point
-
Cool. Back on the stock kernel that ships with unraid and plugin installed. Working great 👍1 point
-
No you just load the plugin1 point
-
It is entirely possible that your ISP is blocking outbound requests on port 53 (DNS). Quoting that answer so you don't have to click the link... "Yes, they can block custom DNS - and its fairly trivial. All they need to do is block port 53 exiting their network (except from their nameservers - but in practice its more likely to be from their broadband IP ranges) The logical reasons for doing this include (which I vehemently disagree with, but thats besides the point) tracking usage, forcing traffic to local caches, blocking access to certain sites, injecting adverts instead of errors for non-existent domain names. There could theoretically also be benefits to you (prevent some kinds of malware, faster DNS resolution times for people with wrong DNS settings)" To test if they are, just run this at the terminal: telnet 8.8.8.8 53 If it times out/fails to connect then your ISP is blocking outbound requests on port 53. This is what my successful result looks like (not blocked):
 1 point
 -
Great, thus I won't have to manually editing it after rebuild!1 point
-
You have to do a Tools - New Config, and reassign the drives. Note that parity will not be valid after this (specifically, Parity 2) so you must rebuild the parity information.1 point
-
GUI tests won't work on SAS devices, you can still run them manually.1 point
-
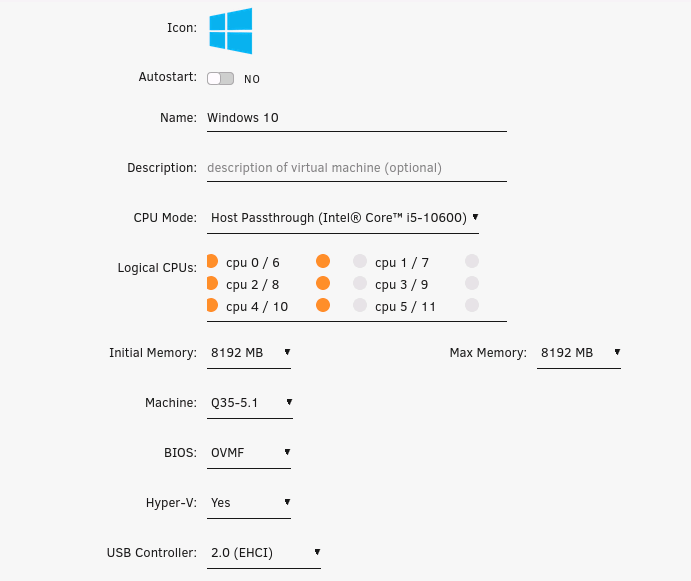
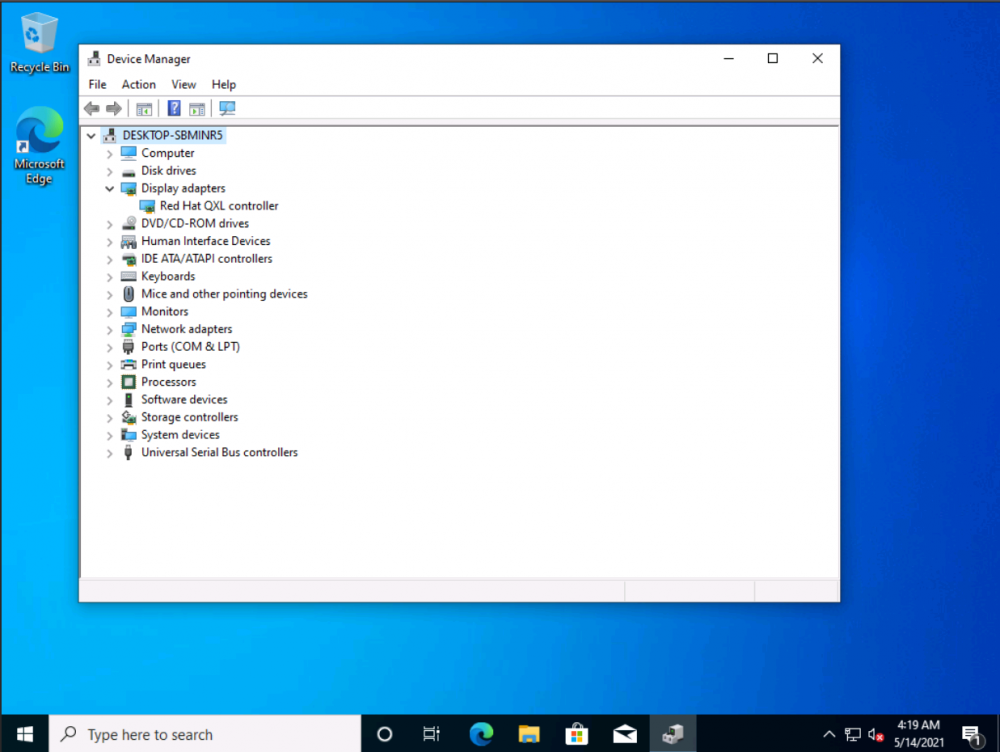
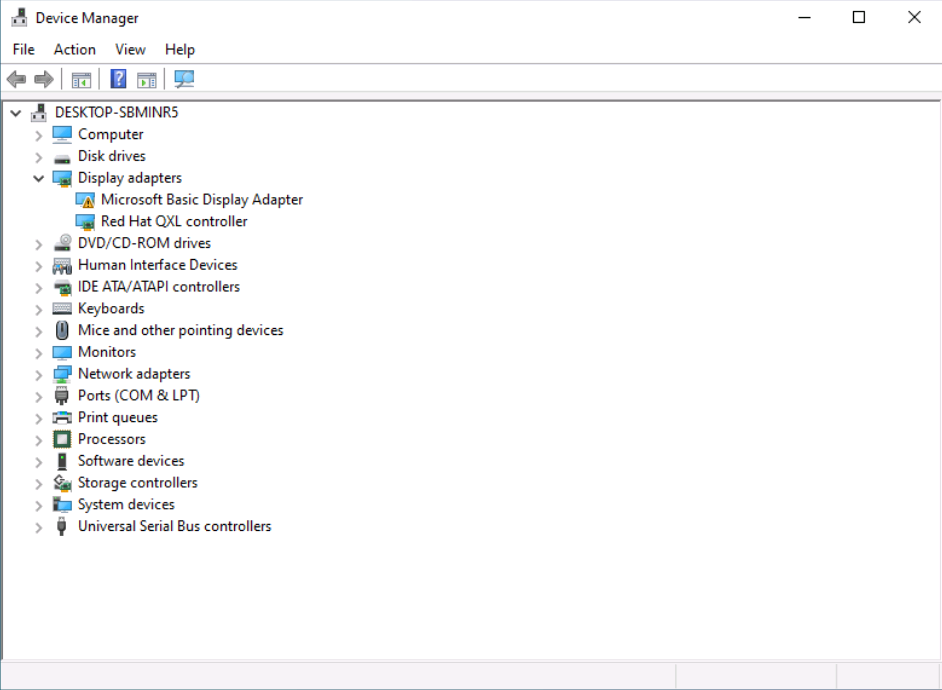
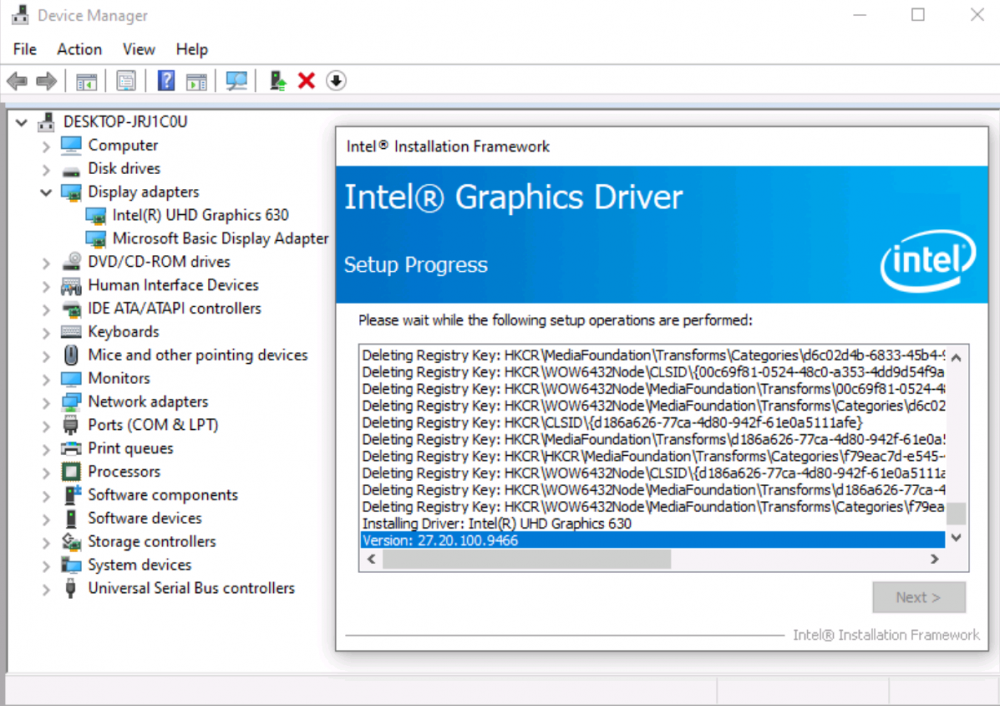
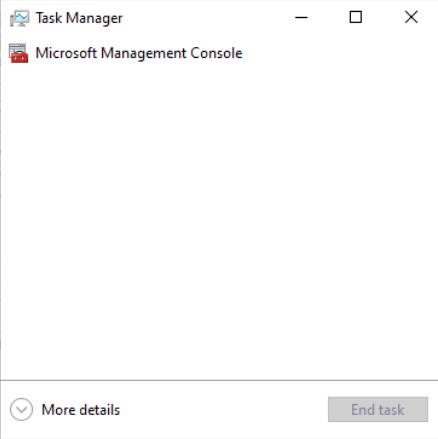
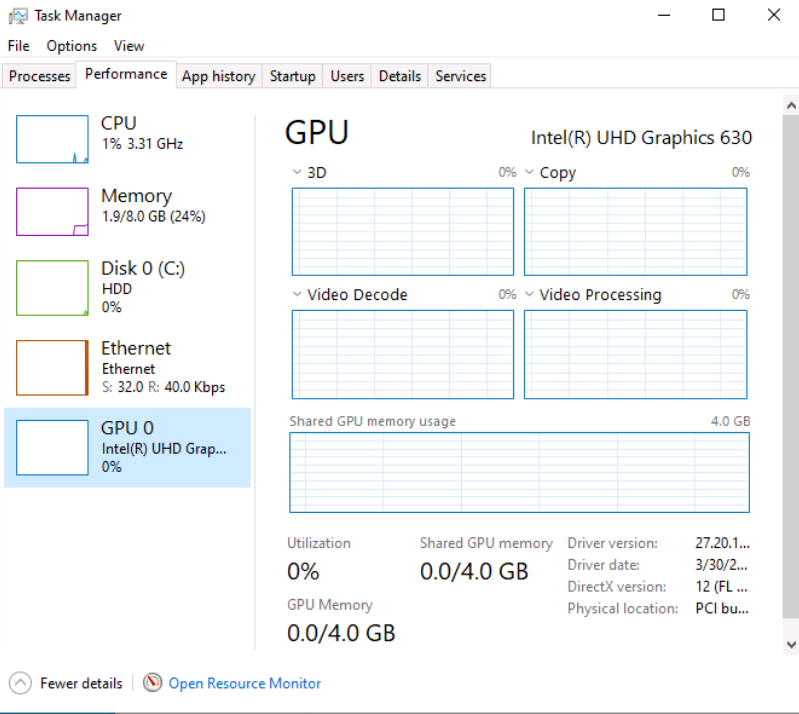
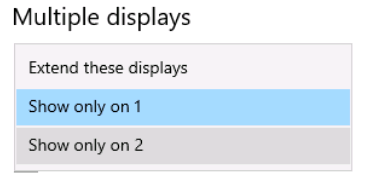
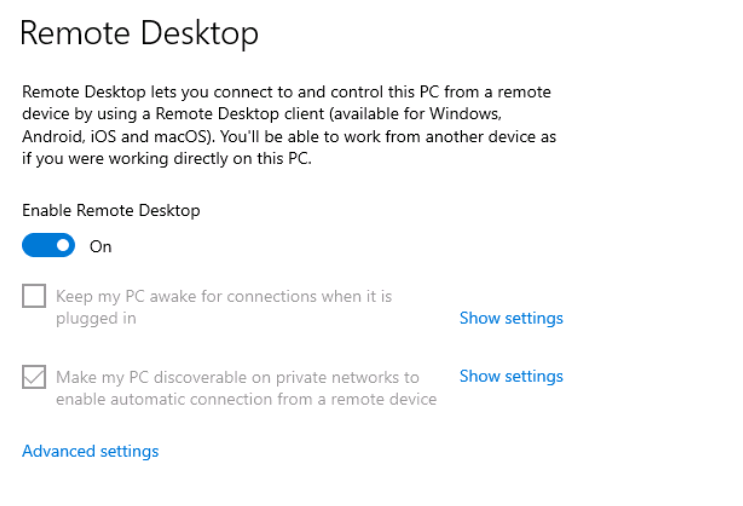
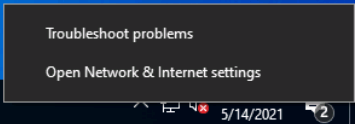
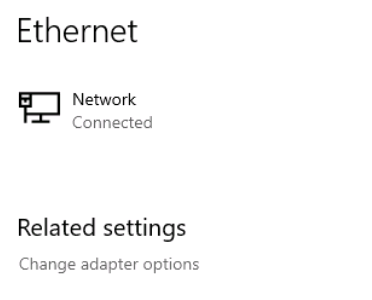
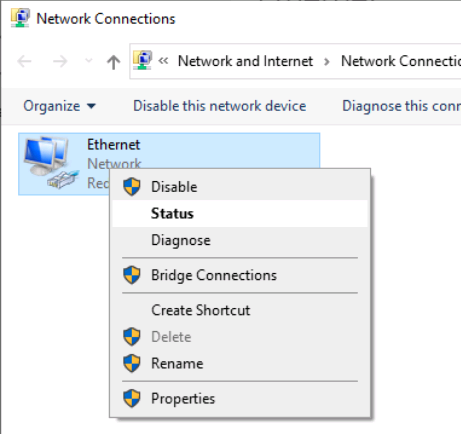
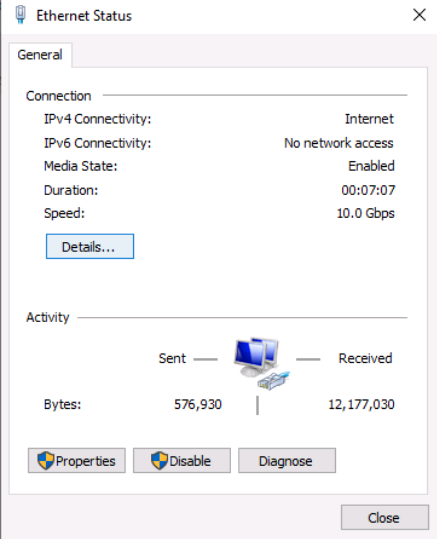
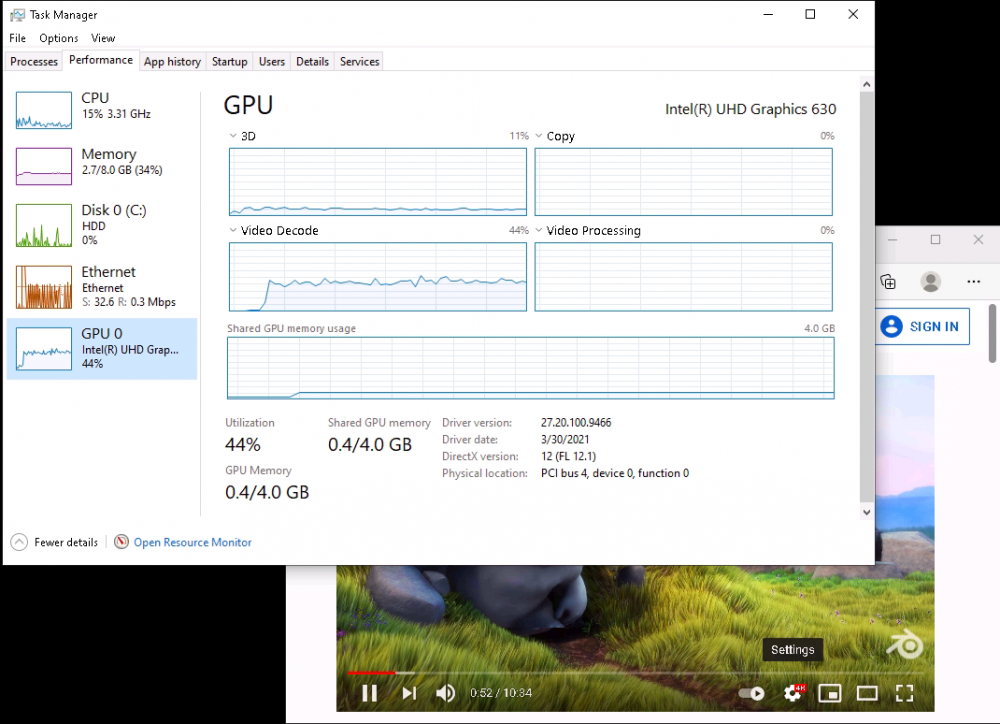
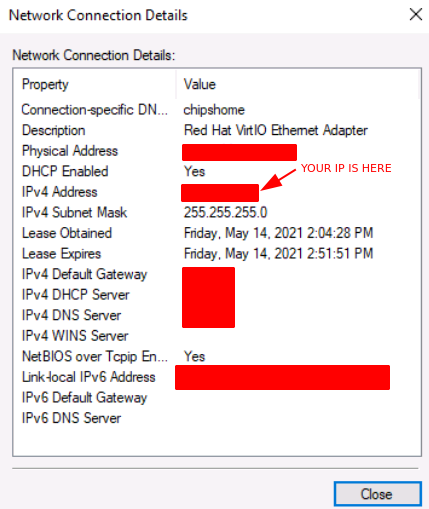
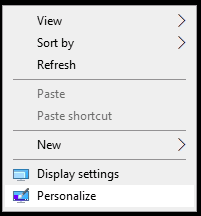
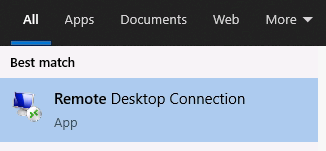
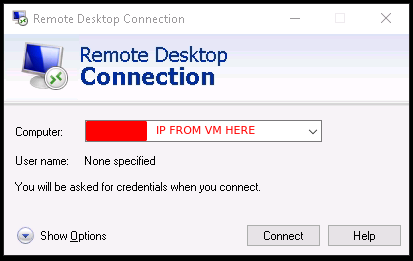
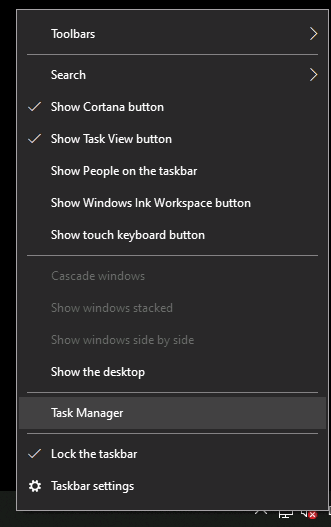
Tutorial (Windows 10 VM) First of all we will create a new VM with the latest Q35 "Machine" type (you can also use an existing VM but make sure that it actually set to to the latest Q35 "Machine"). But don't assign a vGPU just yet, first we will install Windows and after everything is installed we will actually assign a vGPU. Both SeaBIOS and OVMF will work fine with vGPU's. Please note this is just one way to set up your vGPU, you don't have to enable RDP like in this tutorial, and you can also set up Parsec or any other kind of remote connection software that you want to. This tutorial is written for less experienced users and should be seen as a step-by-stepwalk through. These are the basic settings for this tutorial (you can assign as much RAM and as many CPU cores as you want) : Install Windows as usual and make sure that you create a password for your User (this is really important for the RDP connection in this tutorial, otherwise you can't connect to the VM via RDP) : After installing Windows go to your Device Manger (right click the "Start" button -> Device Manger) install all missing drivers for Ethernet, and the the other devices from the VirtIO Drivers ISO and it should look like this: Shutdown the VM and go to the Intel-GVT-g plugin page and select the "Mode" that you want to use and the VM you want to assign a vGPU to click "Assign VM" (please make sure that the VM isn't running when you do this!) : Start the VM and go again to the Device Manager and see if the vGPU is displayed in the VM: Download the Intel Driver for your iGPU in your VM from here: Click and install it. After the installation is complete you should see that your vGPU is recognized correctly in the Device Manager. Once done, reboot once more: Enable the RDP service from Windows itself by going to the Settings and searching for "Remote Desktop", switch "Enable Remote Desktop" from "Off" to "On" and confirm that you want enable it and close the Settings Window again: Now we are going to check the VM's IP address. Right click on the Network icon in the lower right corner and select "Open Network & Internet settings": In the following window, click on "Change adapter options": In the following window, right click on your Ethernet connection and select "Status": In the following window click on "Details...": And finally in the following window you will see your IP here: Write that IP down so that we can actually can connect to it later from our local computer, smartphone,... Now we disable the output to the QXL Display Adapter and display everything on the vGPU Adapter, right click somewhere on the Desktop and select "Display settings": Scroll down a little down to the "Multiple displays" section and select "Show only on 2" (PLEASE NOTE, that you don't get any VNC output after doing this!) and press on time on the "TAB" Key once and then on "Return" once: After that, close the VNC Remote window and on your local computer search for "Remote Desktop Connection" in the Start menu and open it up: In the next window enter the IP from Step 14 here and click on "Connect": In the next window enter the credentials for the VM/User that you created when setting up the VM and click "OK": You should be greeted with the Desktop from your VM. Now right click somewhere on the Task Bar and select "Task Manager": In the next window click on "More details": Got to the "Performance" tab and you should see your vGPU at the bottom: To test if everything is working correctly simply open up a browser and play a video on YouTube and check your vGPU's utilization in Task Manager: Have fun with your HW accelerated VM! Now you can install your favorite kind of Remote Connection software (Parsec, TeamViewer,...) and make use of the vGPU. If something isn't working, you have always the ability to connect via RDP (please not if you use Parsec for streaming, unlike RDP, that you actually have to pass through a Audio Device to the VM otherwise you will get no sound output, the onboard audio or a cheap USB audio adapter will do the job just fine).


 1 point
 -
a feature i created an issue for in 2017 is now going to be in the next build, yay!, and in my opinion its a good un', it allows for logical grouping of index sites, so you will be able to hit aggregated named groups, as opposed to having to use the 'all' group, for anybody interested here is my feature request:- https://github.com/Jackett/Jackett/issues/21851 point
-
Hi, how do i see whats going on in chia if i close terminalwindow ? :)1 point
-
My understanding is, that it works but HDR to SDR tone mapping don't...1 point
-
No. All checks that come to a controlled ending should end with entries in the history file. The only time I can think of where this might not be true if if an unclean shutdown happened in the middle of the check. It might be worth pointing out that if you have the Parity Check Tuning plugin installed then the history entries will contain additional information over those generated as standard by Unraid even if you are not using the plugin to run the check in increments.1 point
-
Here's something I discovered recently that may help you decide what not to do. Steam Link (both the physical device and the app) somehow ties to the NIC itself. So, if you're running multiple VMs with a bridge, it won't be able to tell them apart. I have to exit Steam on one VM in order to use Steam Link with the other.1 point
-
Docker labels is probably something we can do in Unraid 6.10 Thx for the explanation.1 point
-
I apologise for the necro, but came across this thread when I was trying to do the same. This command worked for me on 6.9.0: ifconfig br0 down && ifconfig br0 up I also noted there is /sbin/dhcpcd. So that could also be used but haven't tried it.1 point