Leaderboard


Popular Content
Showing content with the highest reputation on 06/20/21 in all areas
-
Hab ich eben nochmal kontrolliert und es steht alles auf manuell.1 point
-
you can add that to a "FUNDING.yml" in the repo ... https://docs.github.com/en/github/administering-a-repository/managing-repository-settings/displaying-a-sponsor-button-in-your-repository also if you setup GH Sponsors, they will match donations ..1 point
-
ich hab gerade mal geschaut, bei direct play legt plex keine chunks an bei Filmen, teste mal einen Film von einer SSD (cache)1 point
-
das sag ich ja auch, ist wahrscheinlich nur um GANZ sicher zu gehen ... hatte bisher auch noch nie einen Film wo das Endgerät das Limit war, aber soll es ja geben ... sieht doch gut aus, jetzt müsste man schauen wo die Unterschiede sind bei den Filmen wo nicht gehen ...1 point
-
Ja und ja.1 point
-
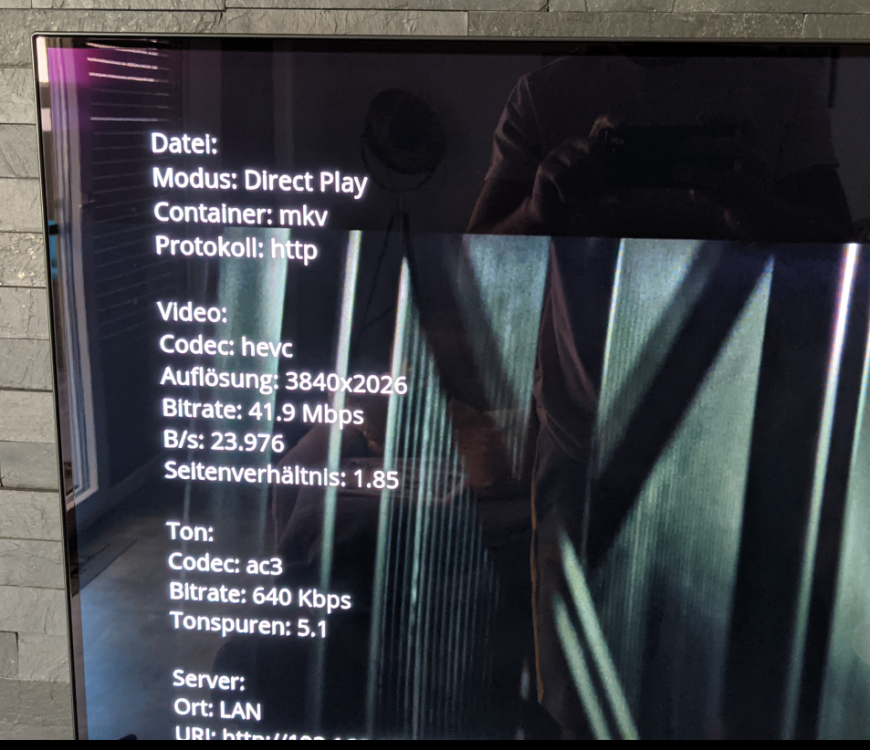
https://webostv.developer.lge.com/discover/specifications/supported-media-formats/webos-60/ Danke @ich777 für den Link, @i-B4se Limit ist hier bei webOS6 bei 60 mbit angegeben (bin mal gespannt wenn ich teste). Puffern in Plex ... auch bei unter 60mbit im WLAN ? das mit dem LAN Port ist leider kein Scherz ... war (und ist) lange Zeit so ... Liegen die Filme auch auf SSD zum Test (nur um HDD auszuschließen), liegt dein transcode Pfad auch auf SSD (oder besser noch im RAM), auch nur zum Test (Ausschlussverfahren) ?1 point
-
ich777 made some tests on my Unraid Server. There seems to be some problems in the official emby docker. With jellyfish the hardware transcoding is working without problems. I will rise a ticket in the emby forum hoping that they will fix it in one of the next updates...1 point
-
die 50mbit wären ja mal ... ich melde retour, hab ja keinen LG hier. Und @mgutt das steht heute noch bei denen auf der support Seite bei 4k/60 50mbit https://ww w.lg.com/ca_en/support/product-help/CT20098005-20150291407535 das wäre ja nur erbärmlich wenn das Stand heute immer noch so wäre, dann bliebe @i-B4se nur ein externer Zuspieler.1 point
-
No. You can get the container sizes right from the docker tab (Container Size button) to see which app is taking up which space (not quite 100% accurate, but will give a good idea)1 point
-
Die Bitrate kann auch manchmal der Auslöser sein. Mein Samsung akzeptiert zb VC1 nur bis zu einer bestimmten Bitrate. Sonst wird transcodiert.1 point
-
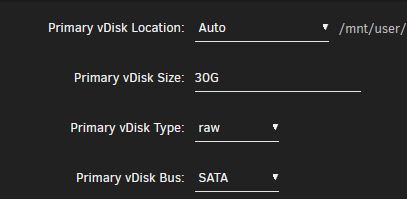
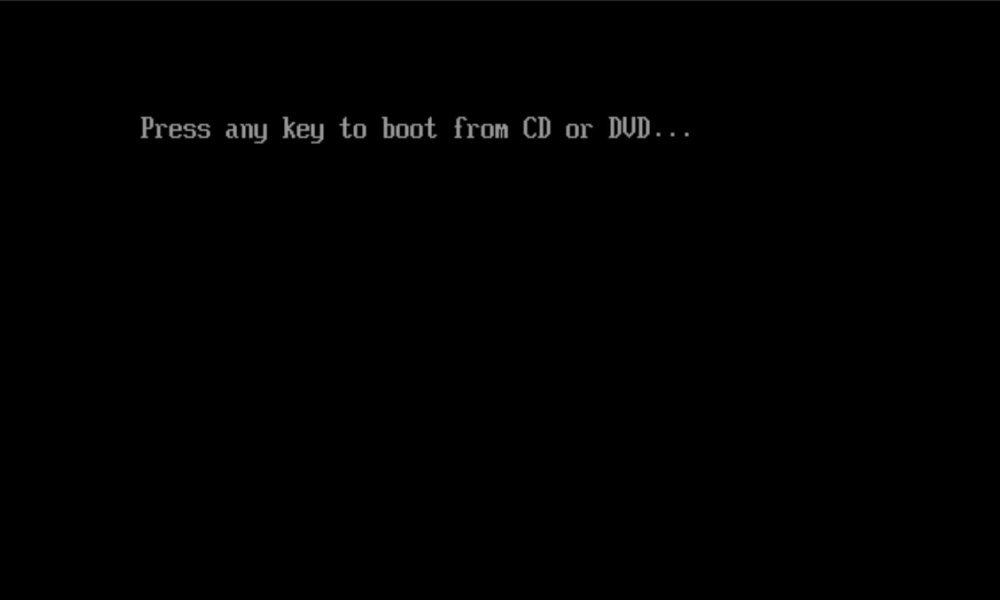
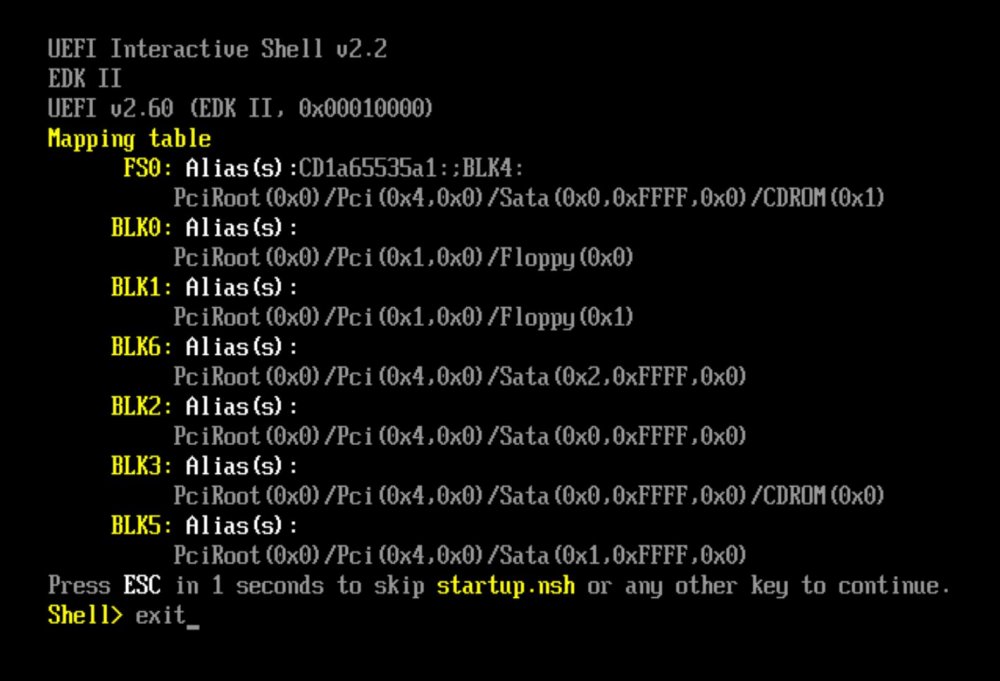
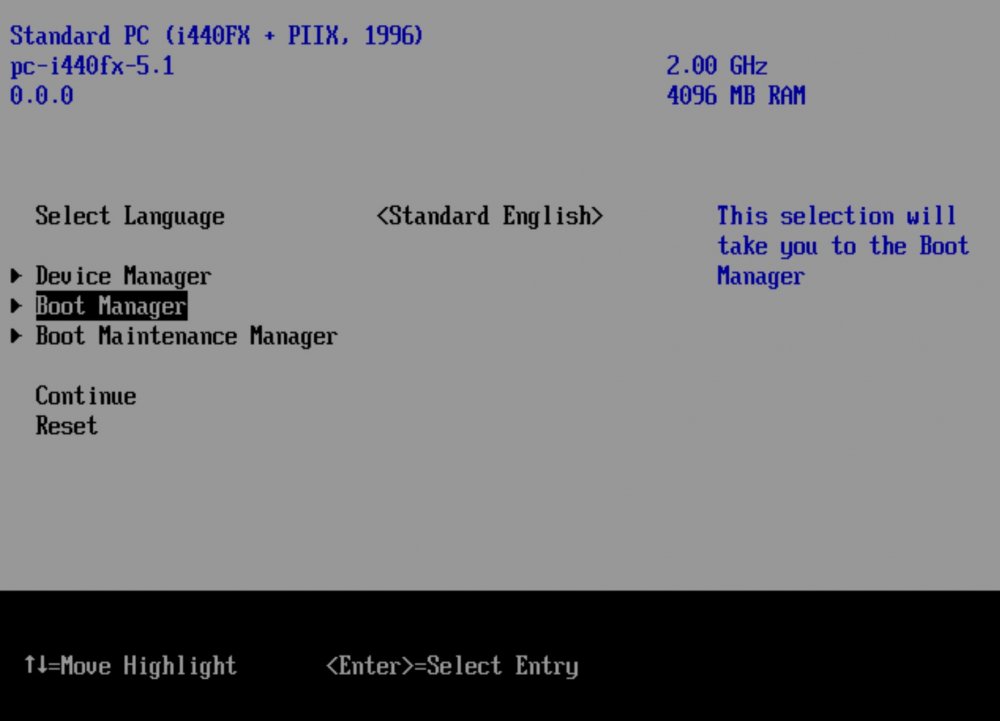
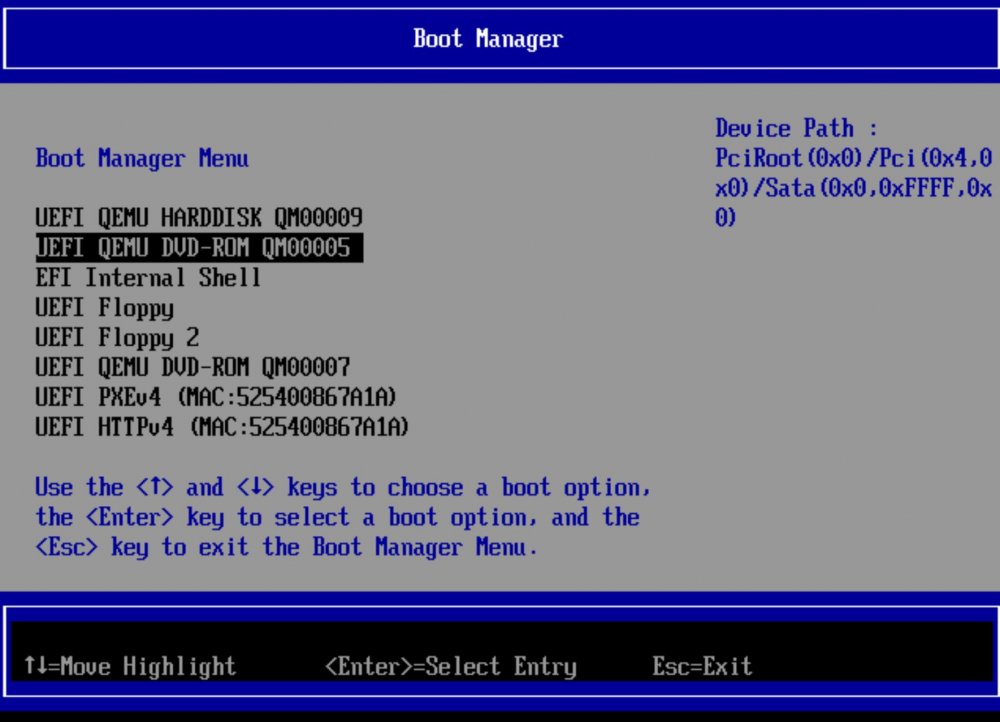
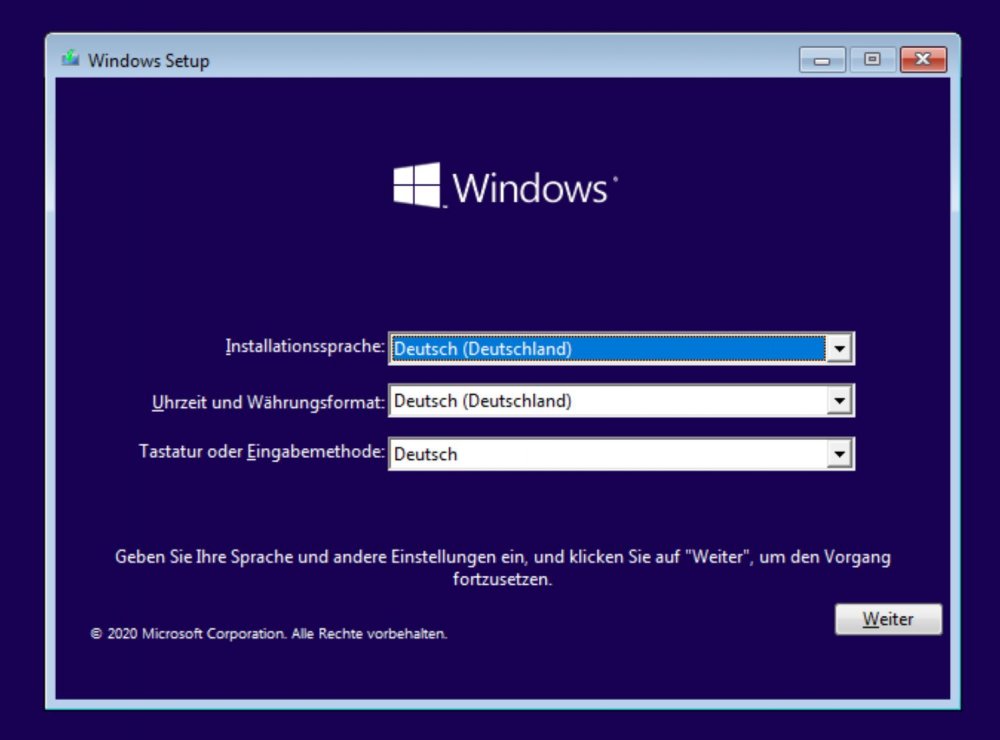
So... Kleiner persönlicher Tipp meinerseits. Stell bei der vDisk ganz unten statt "VirtIO" auf z.B. Sata. Dann musst du nicht während der Einrichtung den Treiber für die Platte installieren. Ich kann aber nicht garantieren, dass das bei dir oder sonst wem funktioniert. Ich mache das lediglich bei mir immer. Wenn du die VM (das erste Mal) startest dürfte ganz am Anfang für ein paar Sekunden folgende Anweisung zu sehen sein. Kein Problem wenn du es nicht gesehen hast. Danach kommt die Anzeige, welche auch du hier gepostet hast. Schreibe einfach "exit" und drücke Enter. Anschließend kommst du ins BIOS der VM, wo du den Boot Manager auswählst und erneut mit Enter bestätigst. Hier einfach das virtuelle DVD-Laufwerk mit der Windows ISO auswählen und erneut Enter. Danach kommt wieder der Satz "Press any key to boot from CD or DVD...". Dies bitte auch tun. Danach kommst du in das gewohnte Windows Setup.
 1 point
 -
mal abgesehen davon dass die Plex App kein sauberes framerate timing hat sollte man auf jeden Fall über einen externen Zuspieler nachdenken wenn du 4k Filme schauen möchtest ... das ganze lokal zu transcoden um auf einem 77er abzuspielen ... dann bist du besser dran die Filme in 1080p "abzulegen" und nativ abzuspielen. Ich schau mal bei meinem Schwager, der hat sich gerade einen LG TV geholt und teste mal da, würde mich schwer wundern wenn das nur mit Transcode gehen sollte ... wenn nicht wie gesagt, ist das .. sorry, absurd, von hevc zu h264 4k zu transcoden ... da verlierst du mehr ... und wie ich hier schreibe, Schwager hat gerade getestet, geht wunderbar ohne transcode, 4k remux in plex auf einem LG C9, denke nicht dass es auf deinem ein Problem sein sollte
 1 point
 -
Advanced View an machen, dann steht es beim Autostart dabei oder besser gesagt unterhalb:
 1 point
 -
Was muss man bei einem All-In-One Server/Gaming System beachten? Beim ersten Booten oder falls eine VM nicht startet, muss man in der Lage sein auf die Unraid WebGUI zugreifen zu können (um die VM zu starten). Man braucht also jederzeit einen lauffähigen Rechner neben dem Server, was aber auch ein Tablet oder Notebook sein kann. Alternativ: Unraid bekommt eine eigene GPU und man bootet Unraid im GUI Modus. Fährt man eine VM herunter oder versetzt sie in den Standby, verbraucht die GPU genauso so viel Strom, als würde man die VM inkl der GPU im Leerlauf belassen. Der Grund ist, dass GPUs erst Strom sparen, wenn ihnen der GPU Treiber das sagt, der aber außerhalb der VM nicht aktiv ist. Es macht also eigentlich gar keinen Sinn die VM herunterzufahren. Man muss also mit einem Stromverbrauch rechnen, der einem PC gleichkommt, der 24 Stunden pro Tag läuft. Die Powertaste am Gehäuse fährt nicht die VM, sondern den kompletten Server herunter. Es gibt keine Taste mit der man die VM hochfahren kann (denkbare Lösungen sind WoL Widgets auf dem Smartphone in Kombination mit einem Script, dass dann die VM startet). Den Server bei Nichtnutzung herunterzufahren würde Strom sparen, aber Unraid hat immer eine Bootzeit von ~2 Minuten, also deutlich langsamer als Windows, MacOS & Co. und dessen VM-Bootzeit muss natürlich noch addiert werden. Nicht alle Spiele laufen in einer VM. Bekannt ist zB dass alle Spiele mit BattleEye Kopierschutz den Betrieb in einer VM als cheaten betrachten und den Zugriff dann sperren. Nicht jedes Board verfügt über mehrere LAN Controller oder erlaubt überhaupt das Durchschleifen einzelner LAN-Controller an eine VM. Es macht allerdings gerade beim Gaming Sinn einen physischen LAN Controller / Karte durchzuschleifen, da der virtuelle Controller einiges an CPU Last verursachen kann (Fazit: Eine LAN-Karte oder einen USB LAN Adapter einplanen) Normalerweise erstellt man auf dem SSD Cache von Unraid die VM-Disk(s). Damit erhält die VM eine virtuelle Festplatte. Diese Virtualisierung kostet CPU Leistung. Das Durchschleifen einer NVMe ist daher empfehlenswert, wenn man die beste Performance erreichen will. Allerdings kommt man schnell an die Grenzen eines Consumer-Mainboards, wenn man einen SSD Cache mit 2x NVMe erstellt hat und zusätzlich noch eine NVMe in einer VM nutzen möchte (oder gar mehrere). Innerhalb einer VM kann man nicht nativ auf die Dateien des Unraid Arrays zugreifen. Der Zugriff erfolgt dann über das Netzwerk (SMB, NFS), was aber lokal passiert und daher recht schnell geht. Unraid kann zwar ohne GPU (headless) gestartet werden, aber sobald eine GPU verbaut ist, gibt es gerne mal Probleme (Unraid "besteht" auf die GPU, UEFI muss evtl deaktiviert werden, etc). Deutlich weniger Probleme hat man, wenn das System zwei GPUs besitzt. zB eine iGPU in der CPU für Unraid und eine dGPU für die VM. Zwei dGPUs sind natürlich auch denkbar. Wer Single GPU Passthrough machen möchte, sollte hier lesen. Bedient man Unraid im GUI Modus, benötigt Unraid eine eigene Tastatur & Maus (oder Umschalter oder Multi-Device Eingabegerät wie zb von Logitech mit mehreren USB Receivern). Ein Wechsel zwischen zwei VMs ist nicht ohne weiteres möglich. Eine Nvidia oder AMD GPU kann nicht von mehreren VMs gleichzeitig genutzt werden.1 point
-
Also 4 Streams gehen problemlos - Auslastung 90-95% Mit den oben genannten Settings. EDIT: Jetzt issa runter auf 45-60%1 point
-
Kein Thema, aber bring die Schubkarre voller €-Scheine mit1 point
-
Nicht jeder hat auf seinem Prozessor eine iGPU (Xeon beispielsweise). Selbst dort würde es funktionieren aber dort gilt auch, nicht jeder Prozessor hat eine iGPU. Da kommt es stark auf die bitrate an die das Originalfile hat. Wenn du ein HEVC mit HFR und 100Mbit/s hast könnte es schon mit 2 knapp werden.1 point
-
....denke dran, das -ls durch -delete zu ersetzen und teste es über die command Zeile erstmal an einem unverfänglichen Pfad [emoji16] Gesendet von meinem SM-G960F mit Tapatalk1 point
-
Edit config/share.cfg in the flash drive and change: shareCacheEnabled="no" to shareCacheEnabled="yes" Then reboot.1 point
-
Du kannst die einpacken und zu mir schicken, bin schon ewig auf der Suche... Wie gesagt ich hab das noch nie getestet weil ich keine Karte mit 2GB hab. War zwar auch kurz davor mir eine P400 zu kaufen hab mich dann aber doch für einen 1050Ti entschieden da die damals noch erschwinglich waren und die nur 40,- mehr gekostet hat.1 point
-
Sei dir aber bewusst das ein 4k Stream mit Plex gleich mal ca. 1GB VRAM frisst und ich mir nicht sicher bin ob wenn ein Stream beispielsweise 1,1GB VRAM brauchen würde und der 2. auch das es da evtl. zu Problemen kommt, bin mir aber nicht ganz sicher, hab das leider noch nie probiert... Eine normale 1050 ist auch nicht zu bekommen? Ich empfehl lieber eine 1050 oder 1050Ti als eine P400 da du jetzt 3 Streams gleichzeitig transcoden könntest und noch immer genug VRAM zur verfügung hättest.1 point
-
Thanks, works perfectly1 point
-
Nothing stands out, the config looks ok. What are you doing to initiate the handshake? Typically the systems won't connect until you actually try sending data. Try using the Ping button next to the tunnel ip.1 point
-
Ja kannst du. Nvidia Driver Plugin drauf und Einstellungen im Docker template machen und fertig. Sieh dir am besten den Nvidia Driver Suppoert thread an, dort ist auch ein link zu den unterstützten Karten. Aber pass auf, ab ende August werden Kepler 6xx-Serie & 7xx-Serie Karten dann nicht mehr unterstützt.1 point
-
Thanks for the help on this, but I didn't find a solution that worked. The closest I came was by trying an external, powered USB hub. I actually saw the TPU do some detection in Frigate for a moment... only to stop working shortly thereafter. I think I might have a defective device so I'm going to return it.1 point
-
Thank you! That seemed to work. Now I just need to find a means to use quicksync to encode everything. Handbrake doesn't seem to have it as an option.1 point
-
Thank you for the testing results with your X11SSH-LN4F. I'm happy to learn it is working properly. This could indicate a hardware issue on my end or I might still be facing a kernel bug. I'll keep researching. I did try the iommu=relax_rmrr but I am still seeing the spurious native interrupt log messages several times a second. I've booted back into 6.8.3 for now while I think about what my next steps might be. Thank you again for all of your help!1 point
-
Works like a charm after OpenVPN stopped working. Thank you!1 point
-
Thank you! This setting was set to automatic, and I’ve now changed it to «typical current idle». Been running without any random reboots since last night, so fingers crossed 😁1 point
-
The reply from @bastl contains some useful suggestions and correct information. Anyway: 1. your converted disk is not booting because you're using ovmf and your disk doesn't have any efi partition (see UEFI interactive shell, see no FS0 in the mapping table). Moreover, depending on the hardware version set in your vm with the "old" hypervisor, this may be incompatible with the machine type version you are using. This is a common issue with converted vmware images, for example. Update the hardware version of your vm in the old hypervisor and use seabios in qemu. As said use compatible emulated controllers, which don't need any additional drivers (sata is preferred). 2. Did you format the disk before installing? sda is your vdisk, use gparted if your installation media doesn't allow you to format it before installing files.1 point
-
@jonp- any update from Apple? @Sledgehamma- in the meantime, if you click edit in Apple Podcasts and “add a show by url” and use this link, you can subscribe that way: https://feeds.buzzsprout.com/1746902.rss1 point
-
supermicro x11sh-ln4 E3 1235l V5 ECC 18G The test results is perfect! In addition, there is another possibility: gen8, to turn off rmrr verification, you need to add Intel IOMMU = relax rmrr in the U disk startup
 1 point
 -
From Vers 2021.06.19 you no longer need to add entry to QEMU hooks file for USB Manager.1 point
-
For the adventurous types, the current Machinaris test version offers: Central control of multiple Machinaris workers on your LAN. Madmax plotter integration via customized Plotman Test version image: ghcr.io/guydavis/machinaris:test Please report any issues on Github.
 1 point
 -
Ich habe xfs_repair mit -n ausgeführt, das bringt natürlich nichts. xfs_repair ohne -n und die Daten waren wieder da. Mein Dank geht an JorgeB. Ich schulde Ihm ein Bier.🍺 Gruss1 point
-
@Benjamin Picard yes, it's beta-ish. I will create another post for it, but did not have time. @newillusions helped me test it so far, and only the export doesn't work from v5, but there is a fix for that which I didn't have time yet to include into the Docker image yet. I will later tonight. For now it's not official in UnRAID, so to install it you have to add this url in Docker -> (Scroll down) -> Template Repositories and click Save: https://github.com/kiwimato/invoiceninja_v5 After that you should be able to click "ADD CONTAINER" and then select "invoiceninjav5" from the templates, and the rest should be pretty similar how to setup v4. You can find more info, including on how to migrate here: https://github.com/kiwimato/invoiceninja_v5/blob/master/UnRAID.md#upgrade-from-v4-to-v5 One thing worth mentioning for which I didn't find a solution yet, is that you HAVE to import the self signed certificate in your browser if you don't somehow use LetsEncrypt to have proper certificates. For some reason even if I acknowledged the SSL error in the browser, some requests simply failed due to the bad cert. I think it was Chrome, so it might work in other browsers. Also disabling SSL with `REQUIRE_HTTPS=false` didn't seem to work for me, but if you find a way, please let me know so we can update the documentation Feel free to PM if you have any questions or issues1 point
-
age (pronounced: [aɡe̞]) Is a simple, modern and secure file encryption tool, format. It features small explicit keys, no config options, and UNIX-style composability. Based on the excellent work form FiloSottile: https://github.com/FiloSottile/age This tool is command line only and meant for backup scripts. https://raw.githubusercontent.com/ich777/unraid-age/master/age.plg Basics: After installing the plugin it will create a key file on your USB boot device that is named 'key.age' and located in /boot/config/ ATTENTION: I STRONGLY RECOMMEND TO BACKUP THIS FILE TO SOME OTHER LOCATION (PREFERABLY ON A SPARE USB KEY) OR PRINT IT OUT AND STORE IT SOMEWHERE SAFE! IF YOU LOOSE THIS KEY YOU CAN'T DECRYPT ANY OF THE DATA THAT WAS ENCRYPTED WITH THIS KEY FILE!!! Note: even if you uninstall the plugin the key.age file will not be deleted from the USB Boot device for security reasons (accidental deinstallation of the plugin) Usage: age-keygen Is called automatically on plugin installation and will create the 'key.age' key file mentioned above that will look something like this: # created: 2021-06-10T12:00:00+02:00 # public key: age1me4cr6ll89gy0r3r5hftu0sxjr8nlyd37nylufjq6adlljzdjpuqul5et0 AGE-SECRET-KEY-1AFWSPAZ7ZLM6UR9ZGXNT4U276EVHHEPNX0YRWW8EH05P487N89VQUA0HJA (I strongly recommend as stated above to backup this key file to a spare USB Key or print it out and store it somewhere safe, I would also recommend to remove the last line from the file on your USB Boot device after you made a backup of the file since this is the actual key that you need to decrypt the files - again, IF YOU LOOSE THIS KEY YOU WON'T BE ABLE TO DECRYPT THE FILES THAT WHERE ENCRYPTED WITH THIS KEY FILE) age To encrypt a single file you need your public key from the 'key.age' file, as a first example we take a picture with the filename 'test.jpg' that is located in /mnt/user/Pictures/ age -r age1me4cr6ll89gy0r3r5hftu0sxjr8nlyd37nylufjq6adlljzdjpuqul5et0 /mnt/user/Pictures/test.jpg > /mnt/user/Pictures/test.jpg.age This will keep the original file intact and create a file with the extension .age that is fully encrypted (of course you can also point to another output path for example if you have a disk through UnassignedDevices mounted just replace '> /mnt/user/Pictures/test.jpg.age' with '> /disks/YOURDISKNAME/Backup/test.jpg.age' for example) You can also store the public key in a variable with something like this: AGE_KEY="$(cat /boot/config/key.age | grep "public key:" | awk '{print $4}')" and then modify the above command to use the variable: age -r ${AGE_KEY} /mnt/user/Pictures/test.jpg > /mnt/user/Pictures/test.jpg.age If you want to create a encrypted tar archive from a directory (in this case from the USB boot device) do it as follows: cd /boot tar -cvzf - --exclude='./bz*' --exclude='*.tgz' --exclude='*.txz' --exclude='./previous' --exclude='./config/key.age' . | age -r ${AGE_KEY} > /mnt/disks/YOURDISKNAME/Backup/$(date '+%Y-%m-%d_%H-%M')_USB_BACKUP.tgz.age Explanation: cd /boot (will change the directory to the boot device) tar -cvzf - (will create a tar archive to the pipe) --exclude='./bz*' (will exclude all bz files, the main OS, since we only need the config files) --exclude='*.tgz' --exclude='*.txz' (will exclude all plugin archives, since we only need the plg files) --exclude='./previous' (will exclude the backup from the any previous installed Unraid version) --exclude='./config/key.age' (will exclude the 'key.age' file) --exclude='*.zip' (THIS IS OPTIONAL and not in the command above but recommended if you have saved diagnostics or logs on your USB Boot device) . (tells tar that this is the directory that it should pack up as a tar archive) | (hand over the output from the pipe to age to encrypt the data that is created by tar) age -r ${AGE_KEY} (use age and the public key in the AGE_KEY variable to encrypt the date from tar) > /mnt/disks/YOURDISKNAME/Backup/$(date '+%Y-%m-%d_%H-%M')_USB_BACKUP.tgz.age (output the file to a UnassignedDevices mount that is located in /mnt/disks/YOURDISKNAME/Backup/ and named something like this: '2021-06-10_12-00_USB_BACKUP.tgz.age') DECRYPT FILES: age --decrypt -i /boot/config/key.age /mnt/disks/YOURDISKNAME/2021-06-10_12-00_USB_BACKUP.tgz.age > /mnt/disks/YOURDISKNAME/2021-06-10_12-00_USB_BACKUP.tgz Explanation: age --decrypt (use age to decrypt a file) -i /boot/config/key.age (use the 'key.age' file that is located on your USB Boot device to decrypt the files ATTENTION: If you deleted the last line in the 'key.age' file like mentioned above you have to first restore your backup file with the last line included to your USB Boot device otherwise the decryption will fail) /mnt/disks/YOURDISKNAME/2021-06-10_12-00_USB_BACKUP.tgz.age (the filename to decrypt) > /mnt/disks/YOURDISKNAME/2021-06-10_12-00_USB_BACKUP.tgz (the filename of the decrypted file that will be created) There are many ways you can utilize this tool and these are only a few examples how to use age.1 point
-
I updated but now my webUI is saying "There is no screen to be attached matching minecraft." I saw in a previous post binhex said he thought it was browser related. I am getting the error in other browsers. Edit: Solved problem by changing java version from 8 to 16.1 point
-
Lösung für den nächsten der genau wie ich im dunklen tappt. 1. Einstellung Docker: Host Zugang zu benutzerdefinierten Netzwerken: Aktiviert. 2. Einstellungen WireGuard: Local server uses NAT: Nein 3. FRITZBOX Netzwerkeinstellung/Statische Routingtabelle Netzwerk: 10.253.0.0 (Docker Netzwerk) Subnetzmaske: 255.255.255.0 Gateway: 192.168.178.5 (Unraid Server) Danke an alle Beteiligten für die Hilfe. Gesendet von meinem SM-G998B mit Tapatalk1 point
-
I had exactly the same issue and could not find any solutions on the forum or the internet. So I did some digging myself and found the cause of the issue. The docker update check script gets the remote digest of the latest tag from the docker repository via a header called 'Docker-Content-Digest'. The script checks for this header with a case-sensitive regex pattern. Manually querying the docker hub registry gives me a header called 'docker-content-digest' (mind the casing). The docker hub registry must have recently changed the casing of this header, because it broke for me in the last 24 hours. I'm running on Unraid 6.8.3 still, so I'm not 100% sure if this issue also exists in 6.9.x. If you feel up to it, you could quite easily fix this yourself until there is a real fix. I'll describe the steps below: Open file: /usr/local/emhttp/plugins/dynamix.docker.manager/include/DockerClient.php Go to line 457. There you should look for the text: @Docker-Content-Digest:\s*(.*)@ and replace it with: @Docker-Content-Digest:\s*(.*)@i Save the file. This will make the header check case-insensitive and should make it work again.1 point
-
Exactly what I said. Install the fix common problems plugin from the apps tab then go to tools and run the docker safe new permissions tool. If you don't have an apps tab install community applications first1 point
-
Odds on either sab or deluge (or possibly sync) is winding up downloading into the docker image (and things like that don't really show up under the virtual size) Check your path mappings on the template for those apps AND the settings within the apps for where they are downloading to. And expanding is simple. Settings - docker - disable docker. Advanced view. Increase the size and reenable docker. Apply Off the top of my head, when properly configured your installed apps would utilize maybe 10Gig.1 point

.thumb.png.84972b93547e49a62de5ee307172e8d5.png)