Leaderboard


Popular Content
Showing content with the highest reputation on 06/28/21 in all areas
-
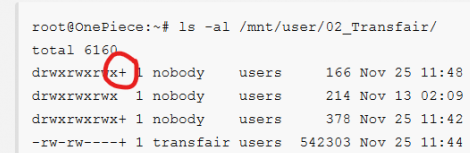
The attachment in this post is a joint effort between @Batter Pudding and myself. @Batter Pudding supplied much of the technical part of the Attached Document and I provide most of the background information. What we are attempting to do is to show that it is easy to actually use Unraid with all of the security features that Microsoft has incorporated into Windows 10. What many of us have been doing (myself included) is to reverse those enhancements to security and use our Unraid network in what is basically a 2010 security environment. @limetechhas announced in the release thread for version 6.9.2 that they are about to increase security on Unraid in future releases. Unfortunately, this list is going to impact a lot of current Unraid users as many have setup their Unraid servers and networking to use these very features. Each user will have two choices. Either embrace security or spend time to undo each new security addition that either LimeTech or MS adds in their updates. If you decide to continue to bypass security, just realize that the number of folks prepared to assist you with any problems doing this will probably decline as more folks adopt increased security as a necessity. In some cases, this is going to present some difficult decisions. For example, I have an old Netgear NTV-550 set top media player (last firmware/software update was in early 2011) that only supports SMBv1 or NFS. Do I open up a security hole to use a well-functioning piece of equipment or do I replace it? (The choice, obviously, is one that only I can make...) Two Important things! Do not post up any problems that you have with networking between Windows 10 and Unraid in this thread! Start a new thread in the General Support forum. Please don’t tell us that there is another way to do something and that we should change our recommendation to employ that method. If you feel you have a better way, you are encouraged to write it up in detail and post it in this thread pointing out the advantages of your way. (One well regarded Windows 10 networking book has over 400 pages in it. Our document is 16 pages long…) EDIT: November 30, 2021. Recently, something has come to my attention about Unraid and SMB. There have been incidences where access to Unraid shares is restricted or blocked completely from users who should have access to it. What has been found in these cases is that a feature, has been enable on the Unraid side, called Access Control Lists (ACL for short). This will show up as an ‘+’ at the end of the Linux permissions. See the screen capture below: Note that the ‘+’ is also on the file as well as the share/directory. ACL changes the way that Linux is going to control access to these resources. After some research, I found out that Windows has used ACL for a long time. The SAMBA group has added ACL into its version of SMB. Unraid does not use ACL in its security scheme. At the present time, I can think of only one way that a ACL could be found on any Unraid server. It was done by a Windows user who was trying to change how SMB worked by applying Windows security features to an Unraid share by changing the default Security settings. (Basically, right-clicking on the Share in Windows Explorer, selecting ‘Properties’, then the ‘Security’ tab and working from there.) The point I am making is that you can’t fix a share access problem by trying to change a Unraid share security using Windows security tools on that share. If you try, you will probably make things worst! (Unless you are a Windows SMB Networking Guru…) It is important to realize that if you are denied permission to an Unraid share resource, the problem can only be fixed on the Unraid side using the Tools in the Unraid GUI (or via the command line for specific problems). If you are having an access problem to a Unraid share and can’t solve it with the tools in the GUI, start a thread in the General Support sub-forum and let the community help you fix it. EDIT: February 25, 2024. It has come to my attention that there is one more setting that was not previously covered. The Network type should be set as 'Private'. For Windows 10 Open up Settings Pick Network & Internet In right panel, click on Properties button In the Network Properties, select the 'Private' radio button. For Windows 11 Open up Settings In left panel, pick Network & Internet In the Right Panel at the top, click on Properties Under Network Profile type, click on the 'Private network' radio button EDIT: March 15, 2024 It has come to my attention that there can be problems in linking the Network Neighborhood folder into Windows File Explorer in Windows 11. While there is a solution to that problem, it has some other side effects and the full scope of those has not been evaluated. In addition, I have become aware of another way to integrate access of servers into Windows File Explorer that works quite well if you have only a few servers. (Things start to look messy if one adds more than two or three servers but that is a matter of each individual’s perception of “messy”.) So if you have having any problems with implementing "Network Neighborhood", try this new approach! This new method is actually quite simple to set up. This method is described in the attached PDF file named: “An Alternative Method to Network Neighborhood.PDF” Unraid & Windows 10 SMB Setup.pdf An Alternative Method to Network Neighborhood.pdf
 2 points
 -
Damit würde Plex aber regelmäßig 50% des RAMs belegen (da Unraid /tmp auf 50% mapped): df -h /tmp free -h Ich mag das nicht, weil man dadurch andere von Linux gecachte Dateien aus dem RAM wirft. Wenn man /tmp eines Containers mit tmpfs in den RAM mappt, kann man übrigens auch die SSD(s) entlasten: https://forums.unraid.net/bug-reports/stable-releases/683-docker-image-huge-amount-of-unnecessary-writes-on-cache-r733/page/26/?tab=comments#comment-149422 points
-
During one of our Private Message discussions, @Batter Pudding suggested that ‘Short Sheets’ of the steps involved in each procedure could be beneficial. I know that when I am doing any multi-step procedure, I like have have a printout of the procedure and check off each step as I complete it. The attachments to this posting are the short sheets for each procedure in the document in the first post. EDIT: March 15, 2024 Added the PDF for "An Alternative Method to Network Neighborhood". How To #1-Advance Network Settings.pdf How to #2-Fixing the Windows Explorer Issue.pdf How to #3– Turning Off “SMB 1.0_CIFS File Sharing Support”.pdf How to #4-Adding a SMB User to Unraid.pdf How to #5-Adding a Windows Credential.pdf An Alternative Method to Network Neighborhood.pdf2 points
-
@SpencerJ contacted @nexusmaniac and I while we were playing Stellaris Nemesis. Unfortunately, while traveling to go back to our home planet, a supernova explosion blinded us and now we are stuck with this cryptic message from @SpencerJ "⠠⠧⠑⠗⠎⠊⠕⠝ ⠎⠊⠭.⠞⠑⠝.⠵⠑⠗⠕⠤⠃⠑⠞⠁⠞⠺⠑⠝⠞⠽⠕⠝⠑ ⠞⠺⠕⠞⠓⠕⠥⠎⠁⠝⠙⠞⠺⠑⠝⠞⠽⠕⠝⠑⠤⠵⠑⠗⠕⠎⠊⠭⠤⠞⠺⠑⠝⠞⠽⠎⠑⠧⠑⠝" Soon™️1 point
-
Versuche es mal mit 15G statt 15....1 point
-
For me, this seems to be a good idea (creating a new library for processed files). The other option you have, if you want to differentiate converted and non-converted files, is to use a custom hook to rename the converted files. https://github.com/jlesage/docker-handbrake#hooks1 point
-
As I read over this thread, I realize that most of the problems are being caused by those of us (myself included) who are trying to run their Unraid network with the same LAN security protocols that existed in 2010! In one of these support threads, I was quoted by @Batter Pudding in his/her take about this practice. The post is shown below: https://forums.unraid.net/topic/109278-cant-access-unraid-share-on-win10/?tab=comments#comment-1000312 @Batter Pudding and I started a Private Message discussion about SMB, Windows 10, Unraid, and using up-to-date security practices. I pointed out that many of us did not have the expertise to get things setup properly. Starting from that point, we assembled a detailed set of instructions with explanations as to how things work and walk you through the required steps. We even did a set of “How to” guides for each step... Next point is that LimeTech is about to release version 6.10.0 ‘soon’™ and they have promised that it will have a 2021 security model! All that SMB security stuff that we have turning off in Windows 10, LimeTech is going to be turning-on in Unraid (and in a lot more other areas besides SMB)! Let’s admit it. We have been playing Windows 10 “Whack-a-Mole” too long in attempting to run the Unraid SMB network with the absolute minimum of protection. It is time to bite the bullet and get our Unraid LAN networks secured to the requirements that are necessary today. Just click on the link to this thread for more details: https://forums.unraid.net/topic/110580-security-is-not-a-dirty-word-unraid-windows-10-smb-setup/1 point
-
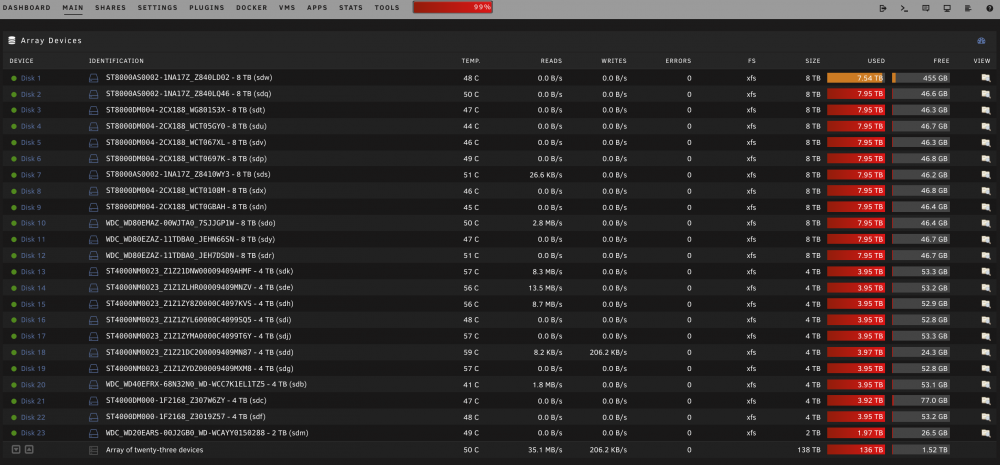
Glad to hear you got Madmax plotting. Please verify your Plotting config against the sample Madmax config on the wiki. The SSDs should only fill up as you show if: Madmax runs are crashing, failing to create a final plot, and then Plotman is starting a new Madmax run. In this case, I would recommend dialing down your settings to match the sample, and slowly increase only after successful runs. Plotman is configured to run multiple Madmax jobs (global_max_jobs > 1 and tmpdir_max_jobs > 1) so Plotman is running multiple at the same time, which consumes your temp disk space. Hope this helps!1 point
-
Hi, The status doea not update itself and even services stopping and starting the docker.. I will try the docker console command as soon as the issue arises again ! Verzonden vanaf mijn iPhone met Tapatalk1 point
-
In Unraid ist die Parität ein RAW Volume. Unraid nimmt also jeden einzelnen Sektor und erwartet, dass dieser die "Quersumme" aller Daten aller Disks darstellt. Löscht man nun eine Datei auf irgendeiner Disk und die Parität wird aktualisiert, dann ändert sich die "Quersumme" von ganz bestimmten Sektoren. Es wurde also faktisch nichts auf dem Paritätslaufwerk gelöscht, sondern nur geändert. Alle Sektoren enthalten also nach wie vor wichtige Daten, die bei einem Ausfall für die Wiederherstellung herangezogen würden. Oder anders gesagt: Bei Unraid ist die Parität immer zu 100% voll. Selbst dann, wenn das Paritätslaufwerk größer ist als alle anderen Platten. Dann schreibt zwar Unraid den Rest mit Nullen voll, aber es ist eben "voll". Bei einem BTRFS / ZFS RAID ist die Parität dagegen kein RAW-Dateiformat, sondern vom Dateisystem selbst werden auf Dateiebene Datenblöcke geschrieben und gelöscht. Und gelöschte Blöcke kann man dann auch problemlos trimmen. Aus dem Grund hat es die Firmware der SSD beim Unraid Array schwer irgendwas aufzuräumen. Denn wenn die SSD komplett voll ist, kann die Firmware nicht wirklich was machen. Und da liegt eben der Vorteil von Enterprise SSDs, die einen besonders großen Over-Provisioning Bereich bieten. Ich finde Kingston erklärt das ganz gut: https://www.kingston.com/germany/de/ssd/overprovisioning Aus dem Grund haben Enterprise SSDs auch nie 1TB, sondern 960GB Speicherplatz.1 point
-
https://www.home-assistant.io/integrations/apcupsd/1 point
-
This, parity check is the same as an extended SMART test, so a good way to see if there are more issues.1 point
-
What, exactly, are you accessing over the network? The apcupsd used in Unraid is by default published as a server, and can easily be set as a client. I personally have 2 Unraid servers on the same UPS, and I use one to trigger the other for shutdowns.1 point
-
Are you using separate mapped saved directories? If not then what is likely happening is that you are running into time of issues where one server is writing to the configs while another is starting to read from them.1 point
-
considering I haven't even figured out *how* to cash out, i'm planning on holding for quite a while.1 point
-
If those commands work after the array is started, but not at boot it means that the network isn't up and running by the time the commands are executed. Add an appropriate sleep command prior, or try doing it via user scripts (first boot only)1 point
-
1 point
-
I just said, that it's working fine - even with the error. I think the error depends of the co-existence of USB Manager and Libvrt_Hotplug USB. I delete the Hotplug Plugin at least, but the error will not disappear. Anyway - it works fine for my VM. Thank you for your help so far!1 point
-
Well, there seems to be nothing wrong, apart the network which may cause issues: <interface type='bridge'> <mac address='52:54:00:ed:51:da'/> <source bridge='br0'/> <model type='virtio'/> <address type='pci' domain='0x0000' bus='0x00' slot='0x04' function='0x0'/> </interface> Do you remember if you installed the virtio drivers in windows? Try to delete that block of code and see if it boots. You have also this: <hostdev mode='subsystem' type='pci' managed='yes'> <driver name='vfio'/> <source> <address domain='0x0000' bus='0x00' slot='0x1b' function='0x0'/> </source> <address type='pci' domain='0x0000' bus='0x00' slot='0x06' function='0x0'/> </hostdev> It's something you are passing through to vfio, do you know what is it? If you don't attach diagnostics.zip Sorry, I'm not understanding here: did you remove the dvd drive from your pc, or did you delete the dvd drive from the xml, or...?1 point
-
Wow this is awsome! Great work crenn! I had lost all hope of solving this problem… I have upgraded my system and sold the huananzhi board already but I will save this post in case I decide to build a second system in the future. /Erik1 point
-
Nein. Es gibt eine Anleitung von einem Limetech Angestellten hier:1 point
-
Unfortunately 19 hours later I am still at I didn't press any button in the "My Severs Flash" section. I PM'd you the latest gitflash.
 1 point
 -
@sonic6 wow, what a great and simple idea... I could have thought of that myself 🙄 Thanks a lot for your hint, that is really enough 👍1 point
-
@nicx may commenting out the notification will be enough?
 1 point
 -
Ich weiß leider nicht genau was du damit meinst - Ich habe an dem Server lediglich 2 USB Geräte hängen. Den einen besagten brauch ich in der VM, den anderen in einem Docker (das funktioniert immer). Das Board hätte somit noch einige Anschlüsse frei, wieviele USB Controller das Board hat, weiß ich leider nicht. Es ist ein BIOSTAR B365MHC Edit: Gerade geschaut, das Board hat leider nur einen Controller. Habe es nun installiert, hab aber leider absolut keine Ahnung wie ich das parametrieren / verwenden soll. Gibt es dafür irgend ein Tutorial? Ich hab leider keins gefunden... Edit2: Das hat geholfen. Ich bekomme zwar eine Fehlermeldung, es funktioniert aber trotzdem sehr gut. Hab es jetzt mehrfach getestet. Vielen Dank für den Tipp!
 1 point
 -
Schau mal hier: https://www.cablehome.nl/epages/Cablehome.mobile/nl_NL/?ObjectPath=/Shops/Cablehome/Products/44000255 Anonsten einfach ne kurze eMail auf deutsch hinsenden1 point
-
Plotting complete for me, one month to complete 1181 plots on existing old hard drives. 90% of these drives have CRC & Bad sectors on them so i don't trust them for real data, but for chia i don't care if it fails. lets earn some Chia hopefully.. Note: Disk 1 is for surveillance only, no chia Thanks Machinaris for making it easier!!!!
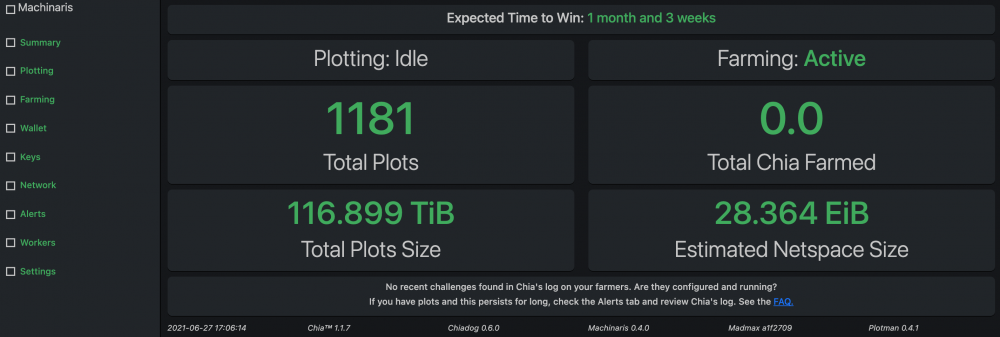 1 point
 -
A user named fegkay15 on github noticed that you can set a specific java path by adding "java_binary=[path]" to the server.config file of your server. A simple enough solution if you're stubborn like me and don't want to migrate your existing servers over to crafty. For specifying to java 16 in mineos specifically, add "java_binary=/usr/lib/jvm/java-16-openjdk/bin/java" under the "[java]" section in your server.config file. https://github.com/hexparrot/mineos-node/issues/396#issuecomment-8599641111 point
-
Ich hab mir ein Set aus zwei Luster MoCa 2.5 Adapter geholt. Haben zwei 1Gbit Anschlüsse pro Adapter und liefern eine Bandbreite von 3000Mbit. Die Latenz liegt bei ca. 5ms und und die Teile laufen wirklich stabil. Bei einer Frequenz von 1400Mhz, stören sie kein Kabel Docsis 3.0/3.1 Modem und kein Kabel-TV. https://www.amazon.de/Internet-Coax-adapter-MoCA-2-5-adapters/dp/B08BZRXZCX/ref=sr_1_1?__mk_de_DE=ÅMÅŽÕÑ&dchild=1&keywords=Luster+moca+2.5&qid=1624824851&sr=8-1 Die Geräte kommen aus einem holländischen Shop, aber die haben ein Techniker der auch deutsch spricht.1 point
-
Nein: https://forums.unraid.net/topic/35878-plex-guide-to-moving-transcoding-to-ram/page/12/?tab=comments#comment-894460 /tmp zielt nämlich sonst einfach auf die SSD, da /tmp von einem Container innerhalb des docker.img liegt.1 point
-
Thanks that's what I figured. I guess I could do a comparison when doing a turbo write too. I'll leave the dual link since I have it, but might be adding a 8087 to 8088 card to expand to an additional drive enclosure in the future. I think my personal max capacity on this case will be 16 drives.1 point
-
Usually it's good practice to respect the topology of the host also in the vm: so if you have a multifunction device in the host you want to passthrough then set it to a multifunction device too. It's not important (usually) to not respect the bus/slot, but in most cases multifunction vs non multifunction device matters. In your case, as you already noticed that you have 2 different iommu groups, each with a multifunction device in the host. The usual case is the gpu and audio passthrough (and may be some usb/serial controllers on the gpu) which are multifunction devices which should put also in the guest as a multifunction device. I used "should" because sometimes setting them in non multifunction devices (i.e. different buses, different slots) works, but the behavior can be unexpected: for example the driver of a gpu may expect the device on the same bus/slot and different function. So, as a general rule, as I wrote:1 point
-
At last array start.1 point
-
Harmless mce that happened during cpu core initialization.1 point
-
This would be great if it had a gui interface, gave a report of what dupes were found, and had options to choose which ones to keep.1 point
-
there is one from @ich777 https://unraid.net/community/apps?q=ferdi-client#r1 point
-
@PureLoneWolf I was able to fix this with @thomas's suggestion to turn off guac auth like so:1 point
-
...on my server... Thats why the request...1 point
-
Had a local business need to expose their CRM server to the public net today and the owner did not want to open any ports. Cloudflare's Argo Tunnel came to mind. They had an existing Unraid server handling file shares and backups, so started looking at ways to leverage this (actually underutilised) server. Thought I'd share the steps I got to getting the tunnel to work here. Below steps assume understanding/experience with reverse proxy setups and User Scripts. The setup consists of two broad steps: A. Install any reverse proxy as a Docker image (I used Nginx Proxy Manager) and take note of the exposed port / IP. In this example, I will be setting only the HTTP proxy on port 1880. This reverse proxy is the entry point of the tunnel. Configure this proxy to connect to whichever other services you have. B. Installing cloudflared and run on startup ssh into your server and download the cloudflared binary wget https://bin.equinox.io/c/VdrWdbjqyF/cloudflared-stable-linux-amd64.tgz unzip the tgz tar -xvzf cloudflared-stable-linux-amd64.tgz Login to Cloudflare (this will produce a URL. Open that URL on your browser) ./cloudflared tunnel login Once authenticated, verify that the tunnel works (change your.hostname.com to your hostname) ./cloudflared tunnel --hostname your.hostname.com --url http://localhost:1880 Then visit your.hostname.com, you should see a Cloudflare welcome page. If DNS hasn't propagated, try setting your DNS resolver to 1.1.1.1 Save your configuration as a YAML-formatted file in ~/.cloudflared/config.yml; The contents should look like this: hostname: your.hostname.com url: http://localhost:1880 Copy the contents of ~/.cloudflared into /etc/cloudflared mkdir -p /etc/cloudflared cp ~/.cloudflared/config.yml /etc/cloudflared/ cp ~/.cloudflared/cert.pem /etc/cloudflared/ Install the User Scripts plugin if you haven't already, and create a new script. I named mine cloudflared Remove the default description file and copy the contents of the script below: #!/bin/bash #description=Launches cloudflared with config and cert loaded in /etc/cloudflared #backgroundOnly=true #arrayStarted=true # Above lines set the script info read: https://forums.unraid.net/topic/48286-plugin-ca-user-scripts/page/7/?tab=comments#comment-512697 # Set path to cloudflared binary configpath=/etc/cloudflared echo "Starting Cloudflared Binary with config and cert in $configpath" /root/cloudflared --config $configpath/config.yml --origincert $configpath/cert.pem echo "Exiting Cloudflared Binary" exit Refresh the User Scripts page and set the script to run on startup of array View the logs to ensure that your routes are secured and established. You should see something like this: Starting Cloudflared Binary with config and cert in /etc/cloudflared time="2019-07-24T01:36:27+08:00" level=info msg="Version 2019.7.0" time="2019-07-24T01:36:27+08:00" level=info msg="GOOS: linux, GOVersion: go1.11.5, GoArch: amd64" time="2019-07-24T01:36:27+08:00" level=info msg=Flags config=/etc/cloudflared/config.yml hostname=your.hostname.com logfile=/var/log/cloudflared.log origincert=/etc/cloudflared/cert.pem proxy-dns-upstream="https://1.1.1.1/dns-query, https://1.0.0.1/dns-query" url="http://localhost:1880" time="2019-07-24T01:36:27+08:00" level=info msg="Starting metrics server" addr="127.0.0.1:38457" time="2019-07-24T01:36:27+08:00" level=info msg="Autoupdate frequency is set to 24h0m0s" time="2019-07-24T01:36:27+08:00" level=info msg="Proxying tunnel requests to http://localhost:1880" time="2019-07-24T01:36:30+08:00" level=info msg="Connected to HKG" time="2019-07-24T01:36:30+08:00" level=info msg="Each HA connection's tunnel IDs: map[<REDACTED>]" time="2019-07-24T01:36:30+08:00" level=info msg="Route propagating, it may take up to 1 minute for your new route to become functional" time="2019-07-24T01:36:32+08:00" level=info msg="Connected to SIN" time="2019-07-24T01:36:32+08:00" level=info msg="Each HA connection's tunnel IDs: map[<REDACTED>]" time="2019-07-24T01:36:32+08:00" level=info msg="Route propagating, it may take up to 1 minute for your new route to become functional" time="2019-07-24T01:36:33+08:00" level=info msg="Connected to HKG" time="2019-07-24T01:36:33+08:00" level=info msg="Each HA connection's tunnel IDs: map[<REDACTED>]" time="2019-07-24T01:36:33+08:00" level=info msg="Route propagating, it may take up to 1 minute for your new route to become functional" time="2019-07-24T01:36:34+08:00" level=info msg="Connected to SIN" time="2019-07-24T01:36:34+08:00" level=info msg="Each HA connection's tunnel IDs: map[<REDACTED>]" time="2019-07-24T01:36:34+08:00" level=info msg="Route propagating, it may take up to 1 minute for your new route to become functional" Voila!
 1 point
 -
My "solution" is this script (executed every 5 minutes): #!/bin/bash # ##################################### # Script: WSDD Restarter # Description: Restarts WSDD if its CPU usage is too high # Author: Marc Gutt # # Changelog: # 0.1 # - first release # # ######### Settings ################## wsdd_cpu_limit=5.0 # ##################################### # # ######### Script #################### # make script race condition safe if [[ -d "/tmp/${0///}" ]] || ! mkdir "/tmp/${0///}"; then exit 1; fi; trap 'rmdir "/tmp/${0///}"' EXIT; # get pid and cpu usage wsdd_pid=$(pidof wsdd) if [ $? -eq 0 ]; then # check cpu usage wsdd_cpu_usage=$(ps -p ${wsdd_pid} -o %cpu --noheader | xargs) if [ $? -eq 0 ]; then if $(awk 'BEGIN {exit !('$wsdd_cpu_usage' >= '$wsdd_cpu_limit')}'); then # https://stackoverflow.com/a/45591665/318765 samba restart /usr/local/emhttp/webGui/scripts/notify -i alert -s "WSDD restarted!" -d "CPU usage was too high!" fi fi fi1 point
-
Perfect! Thank you, Squid! That is exactly what I needed! For those of you searching for the forums, here is the text from that article: Tainting of guests Anyone familiar with the kernel will know that it marks itself as tainted whenever the user does something that is outside the boundaries of normal support. We have borrowed this idea from the kernel and apply it to guests run by libvirt too. Any attempt to use either the command line argument passthrough via XML, or QEMU monitor command passthrough via libvirt-qemu.so will result in the guest domain being marked as tainted. This shows up in the libvirt log files. For example after that last example, $HOME/.libvirt/qemu/log/vm-vnc.log shows the following Domain id=2 is tainted: custom-monitor This allows OS distro support staff to determine if something unusal has been done to a guest when they see support tickets raised. Depending on the OS distro’s support policy they may decline to support problem arising from tainted guests. In RHEL for example, any usage of QEMU monitor command passthrough, or command line argument passthrough is outside the bounds of libvirt support, and users would normally be asked to try to reproduce any problem without a tainted guest.1 point