Leaderboard


Popular Content
Showing content with the highest reputation on 07/03/21 in all areas
-
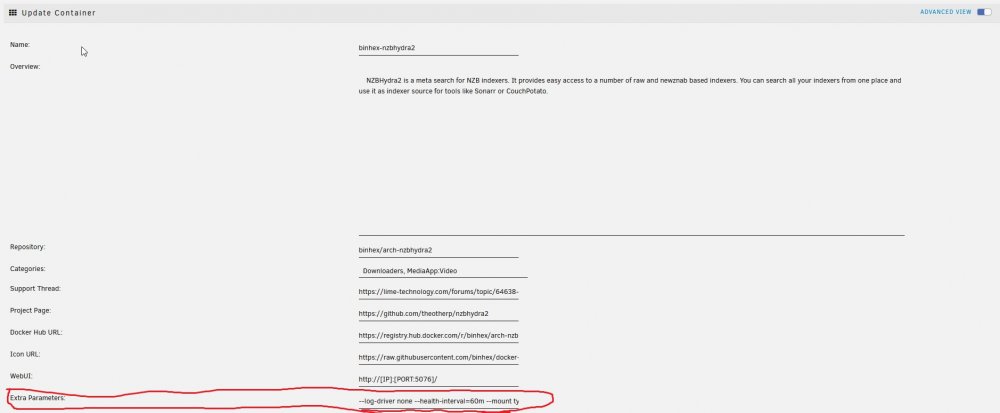
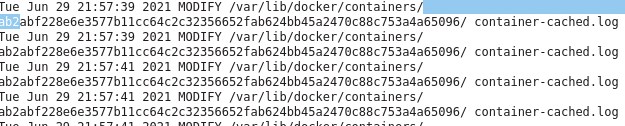
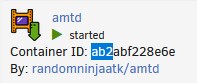
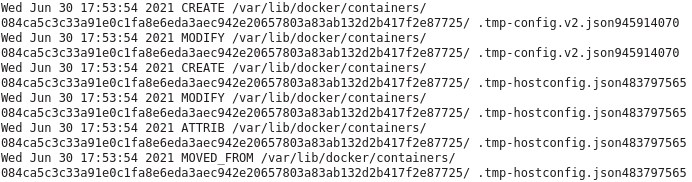
------------------------------------------------------------------------------------------------------------------ Part 1, unraid write amplification ------------------------------------------------------------------------------------------------------------------ To start out with, this is just a journal of my own experiences dealing with these writes, you do any and all of these commands at your own risk! Always make a backup of any data/drives you will be messing with. I would recommend getting a fresh backup of your cache drive and docker/appdata before starting any of this, just in case. Honestly it is a good excuse to update your complete backup. Ok, so as many have started to realize unraid had a serious issue with massively inflated writes to the cache SSD for the last few years. To the point it has killed a number of SSD's in a very short amount of time and used up a hefty amount of the life of many other drives. A lot of it was documented here: but instead of reading all that I am going to give you the results of all the testing that went on in that thread. My writes when starting this journey with far less dockers then I have now was around : ~200gb+/day IIRC (forgot exact numbers and lot my notes from that long ago but it was a LOT) The first step to reducing writes is to update to upraid 6.9+ and then move all the data off your cache SSD's to the array temporarily. You will then erase the cache pool using the built in erase option and reformat it when you restart the array. This fixes the core unraid side of the excessive writes. It fixes some partition and mounting issues with the filesystem. After that move the data back to the cache from the array. This dropped my writes to around ~75-85gb/day using a single BTRFS formatted drive with BTRFS image. Formatted as XFS with BTRFS image my writes dropped to ~25gb/day but you can't have redundancy then and has it's own issues. The excessive writes still persist as you see just to a lesser extent after this, the remaining writes will be dependent on what dockers you are using and is an issue with docker. ------------------------------------------------------------------------------------------------------------------ Part 2: Docker logs causing write inflation ------------------------------------------------------------------------------------------------------------------ All the docker commands I will put below need to be entered into the Extra Parameters: section of the docker template in unraid (you will need to go to the advanced view in the top right corner) To match up a long container ID with container in unraid GUI, simply use crtl+f to search the docker page in unraid for the container ID you see in the activity logs. Generally the first 3 or 4 characters are enough to find the right container. There are a few basic places writes come from with docker and each has it's own fix. ------------------------------------------------------------------------------------------------------------------ The first step is to run the inotifywait command from mgutt: This command will watch the internal docker image for writes and log them to /mnt/user/system/recentXXXXXX.txt inotifywait -e create,modify,attrib,moved_from,moved_to --timefmt %c --format '%T %_e %w %f' -mr /var/lib/docker > /mnt/user/system/recent_modified_files_$(date +"%Y%m%d_%H%M%S").txt An alternate and less effective method is to use this command to return the 100 most recently modified files in the docker image find /mnt/user/system/docker -type f -print0 | xargs -0 stat --format '%Y :%y %n' | sort -nr | cut -d: -f2- | head -n100 I chose to make a userscript with the first command and then use the "run in background" option so I don't have to keep the terminal open. To kill the inotifywait run this: pkill -xc inotifywait ------------------------------------------------------------------------------------------------------------------ For me the first and most common writes came from the internal logging mechanism in docker. It basically logs all the messages that would show up in the terminal if it was run directly and not in docker among other stuff. These writes will be to: /var/lib/docker/containers/{containerid}/{containerid}-json.log These are stopped by the following command while leaving the unriad GUI logs in tact: --log-driver syslog --log-opt syslog-address=udp://127.0.0.1:541 ------------------------------------------------------------------------------------------------------------------ The next type of writes are from: /var/lib/docker/containers/{containerid}/container-cached.log These are the logs you see when you click the log option in the unraid gui, these require a stronger version of the above command: --log-driver none This disables both the above type of logs. ------------------------------------------------------------------------------------------------------------------ Next up are the helthcheck logs, these are seen as writes to these files: /var/lib/docker/containers/{containerID}/.tmp-hostconfig.json{randomnumbers} /var/lib/docker/containers/{containerID}/.tmp-config.v2.json{randomnumbers} These are solved by either extending the health checks or disabling them. I prefer extending them to ~1 hour. --health-interval=60m They can be disabled completely with: --no-healthcheck ------------------------------------------------------------------------------------------------------------------ The next type of writes are internal logs from the program in the container to the /tmp directory of the container /var/lib/docker/containers/{containerid}/tmp/some type of log file Or /var/lib/docker/containers/{containerid}/var/tmp/some type of log file or /var/lib/docker/subvolumes/{Randomstring}/tmp/some type of log file This last one is hard to figure out as it can be difficult to connect the subvolume to a container, sometimes opening the log file in question can clue you into what docker it is for. This is a more advanced rabbit hole that was not really nesscary to chase in my case This is from a program thinking it is writing to a ramdrive but by default docker does not map a ramdrive to the /tmp directory. You can do it yourself easily though with the following command (can be adapted to other dirs and use cases as well). This command creates a ramdrive in /tmp with full read/write permissions and a max size of 256mb (much larger then needed in most cases but it only uses ram as needed so should not hurt anything in most cases, you can make it smaller as well): --mount type=tmpfs,destination=/tmp,tmpfs-mode=1777,tmpfs-size=256000000 And thats pretty much it for properly created containers. Doing these commands to the worst offending containers dropped my writes down to around ~40gb/day I left a few containers logs in tact as I have needed them a few times. ------------------------------------------------------------------------------------------------------------------ Part 3: Dealing with appdata writes ------------------------------------------------------------------------------------------------------------------ After this things get a bit more complicated. Each container will behave differently and you will kinda have to wing it. I saw random writes to various files in containers, sometimes you could change the logging folder in the program to the /tmp folder and add a ramdisk to the container. Others you cap map another ramdrive to some other log folder and still others can use other workarounds unique to that specific program. It takes some know-how and digging to fix writes internally in the dockers. The alternate and universal option (and required option in many cases) is to simply copy the appdata folder to a ramdisk on unraid and sync it back to the SSD hourly. This works with any docker and vastly reduces writes from logs / constant database access. Like above first you need to log the appdata folder to see where the writes come from: This command will watch the appdata folder for writes and log them to /mnt/user/system/appdata_recentXXXXXX.txt inotifywait -e create,modify,attrib,moved_from,moved_to --timefmt %c --format '%T %_e %w %f' -mr /mnt/user/appdata/*[!ramdisk] > /mnt/user/system/appdata_recent_modified_files_$(date +"%Y%m%d_%H%M%S").txt From here it will take some detective work to find the misbehaving containers and see what and where they are writing to. In my case all the *arr's (sonarr etc) were causing a lot of writes and there was nothing that could be done internally to fix it. After figuring out which appdata needs to move to the ramdisk is to create the ramdisk itself and then copy the appdata into it from the SSD. First create a folder in /mnt/cache/appdata/, Very important to create the folder on the drive itself and NOT in /user. mkdir /mnt/cache/appdata/appramdisk chmod 777 /mnt/cache/appdata/appramdisk after this I use a very basic user script that is set to "run at array start", adjust the max size of the disk to suite your use case, it only uses ram as needed so there is not a lot of harm in making it too big as long as it leaves enough room for everything else to run. You will need to customize the rsync commands with the folders you want to copy naturally. #!/bin/bash #description=This script runs at the start of the array creating the appdata ramdisk and rsyncing the data into it echo ---------------------------------Create ramdisk for appdata---------------------------------- mount -vt tmpfs -o size=8G appramdisk /mnt/cache/appdata/appramdisk echo ---------------------------------rsync to ramdisk in appdata---------------------------------- rsync -ah --stats --delete /mnt/user/appdata/binhex-qbittorrentvpn /mnt/user/appdata/appramdisk rsync -ah --stats --delete /mnt/user/appdata/binhex-nzbhydra2 /mnt/user/appdata/appramdisk rsync -ah --stats --delete /mnt/user/appdata/*arr /mnt/user/appdata/appramdisk I then have a separate script set to run hourly that rsync's everything in the ramdisk back to the SSD, it only copied the data that was changed to save writes: #!/bin/bash #description=This script syncs the ramdisk appdata back to the ssd rsync -ahv --progress --delete /mnt/user/appdata/appramdisk/* /mnt/user/appdata/ You will also need to apply a delay to the first docker container that is set to autostart in the unraid GUI (enable advanced view, right side of the container). Preferably put a container that is not being run out of the ramdisk first and put the delay on it as the delay takes effect after the selected container has started. The delay needs to be long enough for the ramdisk rsync to complete. UPDATE THE DOCKER APPDATA FOLDER TO USE THE NEW "appramdisk" copy of the appdata or it will just keep writing to the cache. Now for a clean shutdown, I created a "stop" file on the USB drive at /boot/config. It is called first thing when you click shutdown/reboot in the GUI and the rest of the shutdown will wait until it is finished. touch /boot/config/stop In the stop file I decided to simply redirect it to a script in user scripts called "Run at Shutdown" to make it easier to manage. #!/bin/bash #Runs the user script "Run at Shutdown" during shutdown or reboot. #it is called before anything else during the shutdown process # Invoke 'Run at Shutdown' script if present if [ -f /boot/config/plugins/user.scripts/scripts/Run\ at\ Shutdown/script ]; then echo "Preparing Run at Shutdown script" cp /boot/config/plugins/user.scripts/scripts/Run\ at\ Shutdown/script /var/tmp/shutdown chmod +x /var/tmp/shutdown logger Starting Run at Shutdown script /var/tmp/shutdown fi The run at shutdown script itself first stops all running docker containers so they can close out open files. It then rsyncs the appramdisk back to the SSD before clearing the ramdisk and unmounting it. #!/bin/bash #description=This script runs first thing at shutdown or reboot and handles rsyncing appramdisk and unmounting it. logger Stopping Dockers docker stop $(docker ps -q) logger Dockers stopped logger Started appramdisk rsync rsync -ah --stats --delete /mnt/user/appdata/appramdisk/* /mnt/user/appdata/ | logger logger rsync finished logger clearing appramdisk data rm -r /mnt/user/appdata/appramdisk/* | logger logger unmounting appramdisk umount -v appramdisk | logger And thats it, seems to be working good, no hang-ups when rebooting and everything is working automatically. Risks are minimal for these containers as worst case I loose an hours worth of data from sonarr, big deal. I would not use this on a container that has data you can't afford to loose an hours worth of. The writes are finally low enough that I would be ok putting appdata and docker back onto my main SSD's with redundancy instead of the single piece of junk drive I am using now (which has gone from ~98% life to 69% in the last year doing nothing but handling docker on unraid) I am really impressed with how well this is working. So to recap: unraid 6.8 > BTRFS image > BTRFS formatted cache = ~200gb++/day unraid 6.9 > BTRFS image > separate unprotected XFS SSD everything stock = ~25GB/day unraid 6.9 > BTRFS image > BTRFS SSD everything stock = 75-85GB/day unraid 6.9 > Docker Folder > BTRFS SSD everything stock = ~60gb/day unraid 6.9 > BTRFS image > BTRFS SSD > Disabled the low hanging fruit docker json logs = ~48gb/day unraid 6.9 > BTRFS image > BTRFS SSD > Disabled all misbehaving docker json logs for running containers except those I want to see + added ramdrives to /tmp in containers that do internal logging = ~30gb/day unraid 6.9 > BTRFS image > BTRFS SSD > Disabled all misbehaving docker json logs for running containers except those I want to see + added ramdrives to /tmp in containers that do internal logging + moved appdata for the *arr's and qbittorrent to a ramdisk with hourly rsyncs to the ssd appdata = ~10-12gb/day Since most of the writes are large writes from the rsync, there is very little write amplification which vastly improves the total writes from the day even though that is possibly more raw data being written to the drive. I dont use plex but it and database dockers are known for being FAR worse then what I run in writes. People were regularly seeing hundreds of GB in writes a day from these alone. They could be vastly improved with the above commands.


 2 points
 -
Just wanted to let you know that the docker icon link no longer goes anywhere. So there is no icon when installed. I changed the image to: https://www.firefly-iii.org/assets/logo/color.png which worked. But I just installed this and it's working great! Thanks!2 points
-
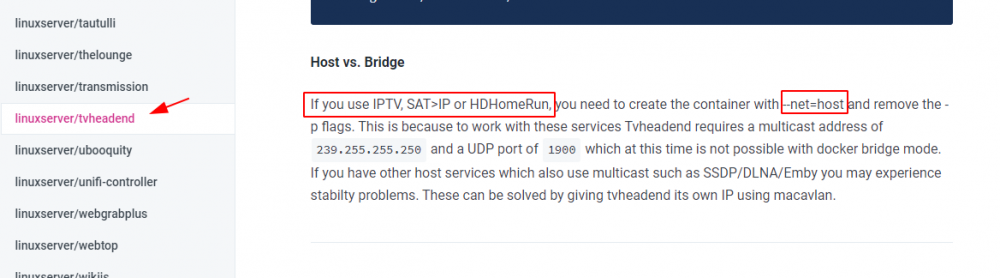
das ist nicht mehr so zur Info seit FritzOS den SatIP Standard mehr oder weniger einhält, früher ja, ginge übrigens auch im Docker ... aber kein Thema mehr.2 points
-
Fritz dvb-c aktivieren, tvheadend im Host Modus starten, fertig. Die Tuner erscheinen dann in tvheadend Spezielles ist nicht mehr nötig sofern das Fritz OS halbwegs aktuell ist. Gesendet von meinem SM-G981B mit Tapatalk2 points
-
On episode 5 of the Uncast pod, join @jonp for a sneak peek at some of the security changes being made in Unraid 6.10. Also, there is a deep-dive discussion about 10gbps performance over SMB on Unraid. Need a refresher on Unraid security best practices? Be sure to check out the security best practices blog. Curious about SMB Multichannel Support? Check this out!1 point
-
It looks like you are having an issue with a plugin called Network Stats. If so, your best bet would be to post a question in the support thread for that plugin: https://forums.unraid.net/topic/74525-plugin-network-stats/1 point
-
Thankie! The crayons were tasty, and I was missing the JAVA_VERSION thingie. Probably because I never touch these things unless the kid says "DAAAAAAAD!!! THE WORLD IS BROKEN! FIX IT PLEASE!!!"1 point
-
No, you should use your full subnet, for example 192.168.178.0/24. I think that would fix your issues. Let me know what does and doesn't work after changing that.1 point
-
...dann mach doch mal genau das im Docker, was @ich777 oben gezeigt hat..../dev/video0 als Gerät mappen! Edit: too late1 point
-
Yes, 6.4.9.3 is safe and working. If I forget to post here what is the problem with 6.4.10, make sure you follow the link I posted [emoji6] Sent from my Mi 10 Pro using Tapatalk1 point
-
So at moment it IS safe to change tag to 6.4.9.3 for now? Can you please keep us posted on your findings with them, Please? :-) Edit: thank you man; appreciate it!!! All the thanks.1 point
-
6.4.9.3 works fine and i can say have become faster! About 6.4.10, i can't figure it out, but i made a post in their forums today, waiting for reply https://forum.collaboraonline.com/t/code-6-4-10-docker-nextcloud-not-working/440 *The post from the fix after 6.4.2.2 was a ~5 months back1 point
-
As said before,I seldom use software firewall, you need try how to block all and only allow one port pass on br0.101, this wouldn't log you out if any wrong due to management by br0. I think you should disable all default rules, no need delete it.1 point
-
Could be a mismatch between boot options on the server and unpaid (legacy vs UEFI). Check bios and try a different setting. Could also be a usb thumb drive issue. I'd start by eliminating variables. Make a backup copy of your usb, wipe it, then use the unRaid USB creator tool to make a new install. Set boot option in bios to legacy and check if it boots. if so, do it a few times. If it keeps working, then re-download your license.1 point
-
In discussion with @tjb_altf4, he won and it seems he is the only one that correctly guessed it.1 point
-
ja, das war alles zur besseren Erklärung ...
 1 point
 -
Da er den Drucker dem ganzen Netzwerk zur Verfügung stellen möchte, wird das usbip Plugin nicht helfen. Dort wäre dann jeweils der Drucker immer nur an ein Endgerät im Netzwerk angebunden und man müsste ständig über das gui auf den Client umschalten, der grad drucken will/soll.. Man müsste also entweder cupsd in unraid integrieren - über ein Plugin zb - oder einen der verfügbaren cupsd docker nutzen. Dann hätte man einen printserver[emoji3526][emoji106] Gesendet von iPhone mit Tapatalk1 point
-
Ja sauber !! das war alles ?? danke !! hab auf Host Modus umgestellt und alle Adapter sind sichtbar. DANKE liebe Grüße, und noch ein schönes Sonniges Wochenende
 1 point
 -
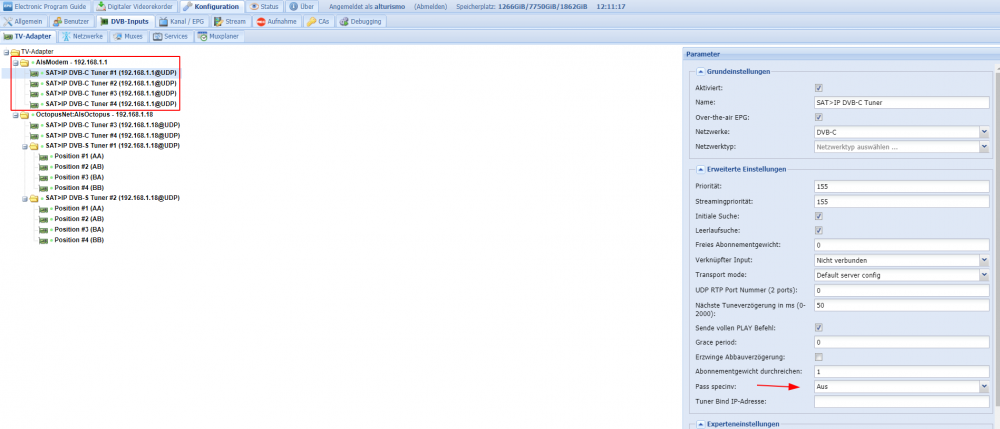
hier noch ein Hinweis Thema Fritz Tuner, falls Fehler beim tunen kommen folgendes testen, setzen, ... Hier ist die 192.168.1.1 meine Fritzbox, pass specinv auf AUS, muss bei jedem Tuner separat gesetzt werden ... ist hier (wenn ich mich recht erinnere) seit der 6591 so, mit der 6490 ging auch NICHT BENUTZEN.
 1 point
 -
Yep, of course... Feel like a bit of an idiot My understanding is that there is nothing special about this file between Macinabox and a generic install. It just holds the NVRAM vars. As such all @Kodiak51103 should need to do is check to see if he has a VARS file under; /mnt/user/system/custom_ovmf/ and that they are correctly defined in the <OS> section of his VM config. or use the copy made when the VM was created under; /etc/libvirt/qemu/nvram/ In the interest of keeping everything stock standard, I would recommend pulling the file(s) down from GitHub and put them back into the custom_ovmf directory. Then return the VM config back to default. <os> <type arch='x86_64' machine='pc-q35-4.2'>hvm</type> <loader readonly='yes' type='pflash'>/mnt/user/system/custom_ovmf/Macinabox_CODE-pure-efi.fd</loader> <nvram>/mnt/user/system/custom_ovmf/Macinabox_VARS-pure-efi.fd</nvram> </os>1 point
-
Um was geht's hier genau? Bzw. was funktioniert nicht? '/dev/dvb' musst du doch nicht einbinden oder? Das sind doch Netzwerk Tuner, bindest die nicht direkt in TVHeadend ein? Ich kenn mich mit dem leider nicht wirklich gut aus, das DVB Driver Plugin brauchst du nur wenn du wie ich TV-Karten im Server verbaut hast. @alturismo kannst du hier helfen? EDIT: @scooly deine Anfrage würd ich nur verschieben wenn sie Englisch wäre, lass uns das hier klären.1 point
-
finally figured this one out in case it helps anyone. the issue I was have was that the disk would not format due to the protection so I needed to disable it. there is a PSID printed on the disk. i used this to reset the disk, by usng the below command where <PSIDNODASHS> is the PSID on the disk and device> is the device sedutil-cli --PSIDrevertAdminSP <PSIDNODASHS> /dev/<device> I was then able to run the format command and Type 2 Protection was now removed. Hopefully this will help someone Thanks everyone for helping1 point
-
I liked the look of these so I borrowed the idea, made it a bit darker and added the texture from the back of the new Apple Pro XDR display. I decided I had spent enough time on it today, but I'll probably keep tweaking it to make it a bit more polished.
 1 point
 -
All good ! Everything is now working well ! thanks again to everyone for your help and reactivity !!!1 point
-
I'm using a reverse proxy via SWAG for external access.1 point
-
Problem basically solved. See Edit 2 below. Thanks to anyone that takes the time to read this entire post. I'm just hoping to learn something. I was following SpaceInvader's video to install Virt-Manager and at the step in the video HERE I think I must have screwed something up. I opened the file using nano, made the required changes (listen_addr = "0.0.0.0") and wrote out the file. I even went back into the file to ensure the changes stuck and all looked well. I then stopped the array and restarted it. Unfortunately after that I get "Libvirt Service failed to start" when clicking the VMS tab. A review of the system logs is throwing the following error: Jan 26 23:41:39 xxxxxxx root: 2019-01-27 06:41:39.113+0000: 9765: error : main:1165 : Can't load config file: configuration file syntax error: /etc/libvirt/libvirtd.conf:1: expecting a name: /etc/libvirt/libvirtd.conf I have SSH'd into the server and the libvertd.conf file is not in the /etc/libvert folder (it is empty). I did find a master config file in /etc/libvertd-/ but copying that to the /etc/libvert/ folder and rebooting does not work. In fact a reboot deletes the file I copied leaving /etc/libvert/ empty again. As a disclaimer I am a weekend warrior and while I have enough knowledge to get around, I do not understand what is happening and am hoping not to loose the week of time I have spent setting up what had turned into a great server. I had several VM's running flawlessly along with about 6 dockers, plugins, etc. My only goal was to install virt-manager to keep xml changes to the config file persistent when using a gui. I have not included diagnostics because my hope is that somebody more knowledgeable than myself can tell what is wrong from the error above. I assume I will need to find and/or download the correct file and put it somewhere but thats where my ideas end. If this is incorrect then I'm up for whatever it takes. The next lines of the log file state: Jan 26 23:41:39 xxxxxxx emhttpd: shcmd (109): exit status: 1 Jan 26 23:41:39 xxxxxxx emhttpd: shcmd (111): umount /etc/libvirt Jan 26 23:41:39 xxxxxxx emhttpd: nothing to sync I'm thinking that the /etc/libvert-/ folder is where the file goes and then that folder gets mounted as /etc/libvert but as I said I have no idea. I'm hoping to be able to correct this in some fashion without needing to re-install. I'd also like to figure out what went wrong to pick up some knowledge along the way. TIA to anybody that has any suggestions! EDIT: Well I was able to successfully get the service restarted by deleting the libvert image, turning off the service, rebooting and re-enabling the service. Of course all my VM's were gone but I thought I was smart by making a copy of the old image. I repeated these steps and rebooted with the service left off. I then copied the old image file back to the image directory, left the service off and re-booted. When I turned the service on this time I got the same error. This leads me to believe that the problem is within the image file but I have no way of knowing if (or how) to edit that file. I really don't want to loose my VM configs so if anybody knows how to edit that I would appreciate it. Barring none I guess I will just need to re-configure all the prior machines. Edit 2: I am back where I was before encountering this issue. I also have virt-manger running within a Fedora VM as outlined in Spaceinvaders video. All VM's have been re-created and re-configured properly. Other than loosing 12 hours I'm thrilled but still miffed and would appreciate any of you that are way more qualified than me chiming in. I believe when using nano the first time I must have fat-fingered something which was then written to the libvirt.img. Assuming that is in fact the case, I'd really like to know if there is a way to edit that image file or at least look inside of it. While I will certainly be more careful with future edits, I'd still like to pick-up some knowledge. Thanks.1 point
-
I would suggest keep your previous setting, carmars in VLAN br0.101 than add br0 and br0.101 to blue iris VM. - br0 for VM management, file sharing ... - br0.101 for carmers in different IP ssubnet. - Apply firewall rule in br0.101 or both. This still better then all stuff in same flat network.1 point
-
I guess I should update this. I've been working really solid for weeks now. I did one test where I enabled "Access to Custom Networks" and within hours it had locked up with the same output as above. So for me, the solution was to disable access to custom networks in the Docker settings.1 point
-
Hat funktioniert. Vielen Dank.1 point
-
Sorry my mistake, you are right, the filename has to be "config.yml" not "config.yaml". I have edited the template and the post1 point
-
I asked him to post here since I assumed it was an issue with the plugin only, @kcmccombsis this a problem with the plugin or is the Unraid server not able to access the internet, i.e., can you for example ping Google from the console? If the server can't access the internet post the diagnostics in your general support thread.1 point
-
mbfn(bp)1 point
-
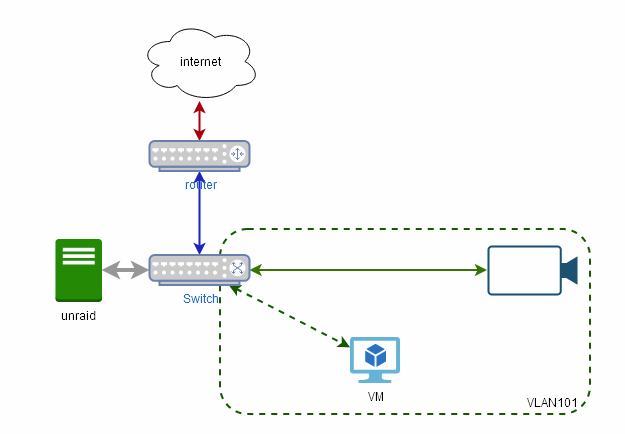
Ok, we need to make some stuff clear first. @stev067 you just replaced the switch connecting your Unraid server with the VLAN enabled switch, (POE not important here) so I assume your network looks like And I think your config looks good - save for using VLAN 102 as the general purpose (stick to VLAN1 unless your router and stuff need this level of control) so your goal is to limit access between the cameras and blue iris PC vs unraid and and the rest of the network. Judging from your setup, you already cannot reach the cameras and the VM from the rest of the network. and if the BR0.101 interface does not have an IP address, Unraid will also be unable to reach the VM. You seem to want to access the VM also from the rest of the network and the easiest way (not the securest) is to simply add another NIC to the VM and connect it to BR0 Alternatively if you have a router with VLAN support is simply to put the camera in their own VLAN, then program the router to deny access from the cameras to your network, and allow the VM to connect to the cameras
 1 point
 -
It really depends on how you use the vm. Most of users, including me, are using one or more vm just as if they use a traditional pc: if this is the case, we want performance on our vm, so we start to passthrough hardware, cpu, gpu, sata controllers. nvme drives, usb controllers, ethernet cards, etc. Why we do this? In my case I'm using a mac os vm with most hardware passed through, I decided to go with a vm because it's faster to set up the environment and you have less headache, moreover I have a complete separated environment, so the bootloader cannot mess with windows 10 installed on another drive, which I boot bare metal. Others prefer performance vms because they can have "more computers" into the same pc, for example different vms for different operating systems, different vms for different fields (school, work, media, firewall, gaming, etc.). Virtual machines can boot uefi with ovmf, so the malware will act the same if it finds a vulnerability in the firmware: but in this case the firmware is a file (OVMF_CODE and its OVMF_VARS), so if it gets infected all you need to do is delete the files and replace instead of flashing the bios chip. But if a malware infects the os in the cases I described above it's near the same as having a malware on a bare metal installation. Another case is if you use vms in a different way, consider for example online services for antivirus scan, all the malwares run on virtual machines which are created and deleted before and as soon as the scan finishes: the base os can be in a vdisk and all you have to do to start fresh is delete and replace the vdisk (some seconds?). Or if you need only few apps in your vm, installed in vdisk: again backup a copy of the base vdisk and of the firmware and if you get infected just start fresh in few minutes. What microsoft is choosing, i.e. add secure boot and tpm as mandatory (in addition to a series of other things), doesn't agree with me (but this is a personal opinion, I am the owner of my pc and I want to do all that I want, without having limits).1 point
-
I have applied a fix for this problem.1 point
-
Even more on this, pinging @SpaceInvaderOne As written above and as many tutorials around describe, converting the BaseSystem.dmg to img or anything else is wrong, as it prevents to boot with SecureBootModel=Default, can cause bootloops and more in general it can cause unexpected behaviors, now and in the future. This is the correct method, which I tested: 1. Obtain the BaseSystem.dmg and BaseSystem.chunklist files (both methods work at the time of writing, apart the product id which is wrong in fetch-macos2.py --> see above); method 2, which is the macrecovery script should be the preferred method. (UPDATE: this is for the github version, it seems that github code is not sync with the image downloaded from CA; it seems methods 1 and 2 are swapped). 2. Instead of converting the dmg to img and load it as a drive for the installation in qemu: 2a. Create a second raw hard drive in qemu (lets call it vdisk1.img): qemu-img create -f raw /path/to/vm/vdisk1.img 16G vdisk2.img will be the raw hd on which mac os will be installed. 2b. Format vdisk1.img as FAT32: mkfs.fat -s 16 -F 32 /path/to/vm/vdisk1.img 2c. Mount the formatted vdisk1.img to copy files on it: mount -t vfat -o loop,rw /path/to/vm/vdisk1.img /path/to/mount/point/ 2d. Create folder com.apple.recovery.boot mkdir /path/to/mount/point/com.apple.recovery.boot 2e. Copy both BaseSystem.dmg and BaseSystem.chunklist files into com.apple.recovery.boot: cp /path/to/downloaded/BaseSystem.dmg /path/to/mount/point/com.apple.recovery.boot/BaseSystem.dmg cp /path/to/downloaded/BaseSystem.chunklist /path/to/mount/point/com.apple.recovery.boot/BaseSystem.chunklist 2f. Unmount the mount point: umount /path/to/mount/point 3. Set the xml to use vdisk1.img as installation media and vdisk2.img as hard drive where mac os will be installed: <disk type='file' device='disk'> <driver name='qemu' type='raw' cache='writeback'/> <source file='/path/to/vm/vdisk1.img'/> <target dev='hdd' bus='sata'/> <address type='drive' controller='0' bus='0' target='0' unit='3'/> </disk> <disk type='file' device='disk'> <driver name='qemu' type='raw' cache='writeback'/> <source file='/path/to/vm/vdisk2.img'/> <target dev='hde' bus='sata'/> <address type='drive' controller='0' bus='0' target='0' unit='4'/> </disk> 4. Boot the vm and choose the recovery icon, it will not bootloop with SecureBootModel=Default 5. Open disk utility to format vdisk2.img 6. proceed with online installation At the end of the installation one can delete vdisk1.img ------------------- EDIT: it seems that the docker img and the source code on github are not syncronized, method 1 and 2 seem to be swapped. In github, these should be all the required modifications to unraid.sh + add to the docker the mkfs.fat command (Dokerfile? Sorry but not expert in dockers...): makeimg() function: makeimg() { # check if install image has previously been created and if not copy baseimage and put in iso share if [ ! -e /isos/"$NAME"-install.img ] ; then qemu-img create -f raw "/isos/$NAME-install.img" 16G mkfs.fat -s 16 -F 32 "/isos/$NAME-install.img" mkdir /Macinabox/tools/FetchMacOS/BaseSystem/mountpoint mount -t vfat -o loop,rw "/isos/$NAME-install.img" /Macinabox/tools/FetchMacOS/BaseSystem/mountpoint mkdir /Macinabox/tools/FetchMacOS/BaseSystem/mountpoint/com.apple.recovery.boot cp /Macinabox/tools/FetchMacOS/BaseSystem/BaseSystem.dmg /Macinabox/tools/FetchMacOS/BaseSystem/mountpoint/com.apple.recovery.boot/BaseSystem.dmg cp /Macinabox/tools/FetchMacOS/BaseSystem/BaseSystem.chunklist /Macinabox/tools/FetchMacOS/BaseSystem/mountpoint/com.apple.recovery.boot/BaseSystem.chunklist umount /Macinabox/tools/FetchMacOS/BaseSystem/mountpoint && rm -r /Macinabox/tools/FetchMacOS/BaseSystem/mountpoint touch /config2/install_media_is_in_isos_share # make a file showing user where install media is located chmod 777 "/isos/$NAME-install.img" #cleanup - remove baseimage from macinabox appdata now its been converted and moved rm -r /Macinabox/tools/FetchMacOS/BaseSystem/* else SKIPIMG=yes fi } extractbigsur() function: extractbigsur() { if [ "$method" = "method 1" ] ; then echo " Nothing to extract using method 1" else 7z e -txar -o/Macinabox/tools/FetchMacOS/BaseSystem/ /Macinabox/tools/FetchMacOS/BaseSystem/InstallAssistant.pkg '*.dmg' rm /Macinabox/tools/FetchMacOS/BaseSystem/InstallAssistant.pkg 7z e -tdmg -o/Macinabox/tools/FetchMacOS/BaseSystem/ /Macinabox/tools/FetchMacOS/BaseSystem/SharedSupport.dmg 5.hfs rm /Macinabox/tools/FetchMacOS/BaseSystem/SharedSupport.dmg mkdir /Macinabox/tools/FetchMacOS/BaseSystem/temp mount -t hfsplus -oloop /Macinabox/tools/FetchMacOS/BaseSystem/*.hfs /Macinabox/tools/FetchMacOS/BaseSystem/temp 7z e -o/Macinabox/tools/FetchMacOS/BaseSystem/ /Macinabox/tools/FetchMacOS/BaseSystem/temp/*MacSoftwareUpdate/*.zip AssetData/Restore/Base*.dmg 7z e -o/Macinabox/tools/FetchMacOS/BaseSystem/ /Macinabox/tools/FetchMacOS/BaseSystem/temp/*MacSoftwareUpdate/*.zip AssetData/Restore/Base*.chunklist umount /Macinabox/tools/FetchMacOS/BaseSystem/temp && rm -r /Macinabox/tools/FetchMacOS/BaseSystem/temp && rm /Macinabox/tools/FetchMacOS/BaseSystem/*.hfs fi } ------------------- From opencore developers: download-fritz (aka mhaeuser): vit9696: Indeed, after following their advices, as described here, the online installation has no issues at all.1 point
-
Didn't see any Plex banners.. here you go.


 1 point
 -
Thought I would show my setup since i fought with this for months like a dummy. I have what seems to be a pretty common use case, routing jackett, radarr, and sonarr, through DelugeVPN. Older setups of the deluge vpn may still try to use an additional ports setting which wasn't helping me. I have the port for each of the three things I am looking to access listed in three places in the update container page for delugevpn. Listed in the Container_Input_Ports, Container_Output_Ports and then there is also a separate port definition for each web ui I had to add. Then in the setup for jackett, sonarr, and radar I have network type set to none, and under advanced view the extra parameter --net=container:binhex-delugevpn. (Capitalization is important on that parameter, I had to make sure it matched my name for the delugevpn docker.) I then deleted the ports that would normally be associated with jackett(Leaving it in the WebUI box didn't seem to hurt anything) Now my containers are able to talk to each other (at least so far) for example Radarr sees deluge at host:localhost and port:8112 and can see my rarbg indexer at http://localhost:9117/api/v2.0/indexers/rarbg/results/torznab/ (I had to substitute in localhost, jackett still wanted to use the local IP for the copy link function.) Hopefully this helps someone else from fighting this for as long. I'd really like to thank binhex for putting all these containers together for us to use and trying to keep up with all the support requests. I spent about 36 hours trying to figure out how to do something similar by either making a docker of my own to use my vpn provider's linux client or with an openvpn client container someone else had written (It only worked until it leaked, guess I'll wait for the email from my ISP). Another couple readings of the FAQs from binhex had me up and running on the setup I'd been using for a couple years without issue... Guess I'll be sticking around


 1 point
 -
You can do that by modifying the repository that the docker template is using. It looks like it is currently using the "master" tag: To change it, head out to where it is hosted on docker hub: https://hub.docker.com/r/mattermost/mattermost-team-edition/tags?page=1&ordering=last_updated and pick the tag that you want and replace it. Example: mattermost/mattermost-team-edition:5.33.4-rc1
 1 point
 -
Here my (new) banner
 1 point
 -
First post, wanted to share. Made with the My Server plugin in mind.


 1 point
 -
Yes! And i can say i see some speed improvement!1 point
-
Until 6.4.2.2 domains needed "//" (two) before every "." on 6.4.3.1 needs only "/" (one). So if you update to 6.4.3.1 remember to remove the extra "/"1 point
-
Note to everyone.. DO NOT UPDATE collabora docker. For some reason it does not work when updated. Poked a bit in the xml config file, and saw some changes in the domains. Instead of the domains i had in docker template it was listing "localhost". Tried to copy the config from the previous docker version but still didn't work. In case you updated and now it doesn't work for you. Open docker template and change repository field from "collabora/code" to "collabora/code:6.4.2.2"1 point
-
It seems like the CSV importer doesn't set correct port when it is changed from the default into the unraid settings. I changed the port (due to a conflict), and when attempting to load the UI from the dashboard, it attempts to go to the default UI port number. I can reach the UI when I manually change the port in the address bar.1 point
-
1 point