Leaderboard


Popular Content
Showing content with the highest reputation on 07/16/21 in all areas
-
Only because the specific companies you were dealing with allowed it. Unraid has a very clear policy, and the work involved to change that policy in a way that protects both users and Limetech is not trivial. Since Limetech doesn't charge for upgrades, and licenses I got 10+ years ago are still valid, it's not fair to expect them to allow unlimited transfers for free. I'd like Limetech to make as much money as they need to for continued development. They set the prices and policies, and they've been extremely generous over the years. I think it's perfectly fair to expect new users to get a new license. There is nothing keeping you from allowing someone else to use your license if you so choose, with or without the accompanying hardware, but any relationship with Limetech stays with the original purchaser. If you wanted to, you could continue to provide paid support to your buyer on your own time and deal with Limetech on their behalf. Limetech doesn't keep people from charging independently for support of Unraid. As a matter of fact, initially you can purchase a license for the express purpose of reselling it, and assign the license to someone else. Once the license is assigned, it stays there permanently.2 points
-
The shares will transfer with the drives, albeit without any customizations like user permissions and such. User shares are simply the root folders on all array data drives and cache pools. Just make sure you don't assign any drive with data you want to a parity slot. To be safe, I'd only assign data slots with the new config, and leave the parity slots empty for the first array start. You can add the parity drives later without doing another new config.1 point
-
binhex/arch-sickchill:latest that worked for me1 point
-
Remove the colon and everything after it for the repository to get back to latest Sent from my CLT-L09 using Tapatalk1 point
-
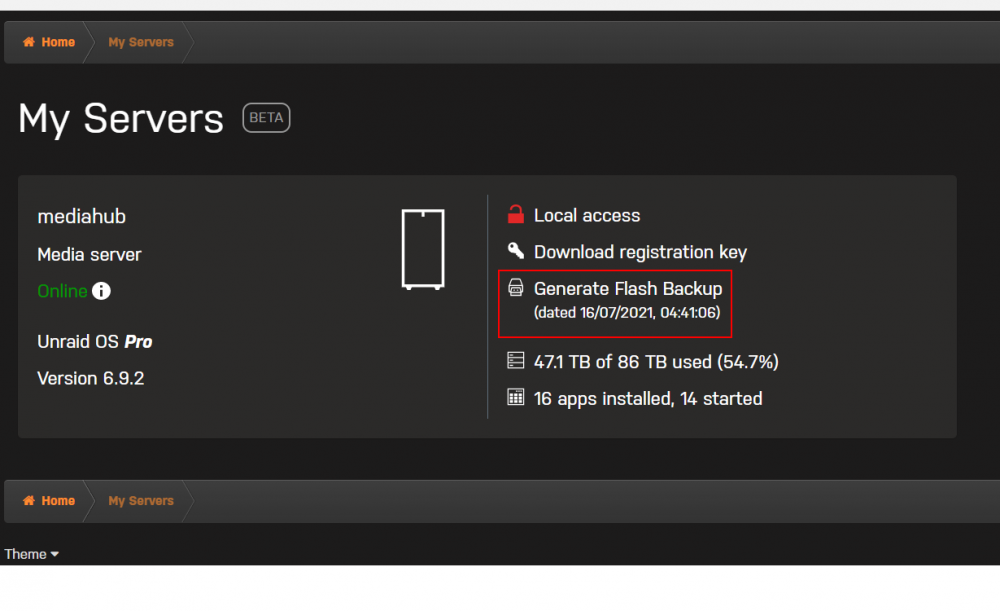
What I would do : Go to My Servers at the top of the page : Then generate backup wait a bit .... download Backup manually the content of your flashdrive. Run a checkdisk on the drive. copy the content of the zip on your flash drive And just in case, run the applicable make bootable script. https://wiki.unraid.net/Articles/Getting_Started#Manual_Method_.28Legacy.29 You should be good for the drive.

 1 point
 -
You all are far nicer than I am. My parity check running full out takes almost a day (have a lot of different disk sizes and some disks are quite old). The people that have access to my server have been told about the parity check that happens at the beginning of the month and since they do not pay anything for the "service" I am providing they do not get to complain when it is slow or goes down for periods of time.1 point
-
Nein. Alles auf "Yes". Nur bei "Yes" und "Prefer" ist der Mover aktiv. No und Only wenn möglich einfach gar nicht nutzen.1 point
-
Habe ich nie gemessen, ich denke aber nicht, da die SATA Ports ja über den bereits verbundenen Chipsatz angesteuert werden. Wobei das beim mATX Board mit dem X4 Slot evtl auch so ist?! Du hattest Recht Habs gerade mal ausprobiert -> Ändert nichts am Verbrauch und an den C-States.1 point
-
If it was working before with the same Unraid release it could be, or some other hardware related issue.1 point
-
check the cooling inside of your case. Clean if dirty. Make sure that all fans are actually running!1 point
-
I did figure out the issue, all I had to do was install the Intel GPU TOP plugin via Community Addons, and make sure I had a video cable connected from my motherboard to my monitor. My issue was that I had my display cable connected to my GPU, and I had started editing files when it wasn't necessary. I have a second display cable connected to my GPU now for when I set up my VM with GPU passthrough.1 point
-
Looks more like a hardware problem, or the current kernel doesn't like your board, looks for a BIOS update and/or try with a previous Unraid release, if it's the same it's likely hardware.1 point
-
Muss nicht. Geht auch nur lokal. Oder "lokal" über einen VPN Tunnel. Dh wer sich von unterwegs über die Nextcloud App verbinden möchte, müsste erst einen VPN Tunnel aufbauen. Das gilt auch als sicher. Ich nutze für solche Szenarios ZeroTier, da man da keine Portfreigaben im Router benötigt. Und wie gesagt ist die letzte Option, dass man die Nextcloud direkt online über eine Domain verfügbar macht. Also jede Option steht dir zur Verfügung.1 point
-
Ok, so it's the RAM cache feature, which normally doesn't bother me (probably it's even useful in certain use cases 🙂 ). I found your post regarding the other way around (not enough RAM is used): So I set vm.dirty_ratio to 2 and vm.dirty_background_ratio to 1 and the copy job runs way better. Most of the time with 120 MB/s and not 250, but that's 1/3 of the time it would have taken otherwise. If I should change something else or adjust these two ratios to other values, please let me know. Anyways, thank you very, very much for your help!1 point
-
Data corruption is being detected on the pool, and because of that the balance aborted, run a scrub on the pool, if there are uncorrectable errors you need to delete/restore those files from backup, filenames will be identified in the syslog during the scrub, also see below for better pool monitoring for the future, since there are also read and writes errors in that device. https://forums.unraid.net/topic/46802-faq-for-unraid-v6/?do=findComment&comment=7005821 point
-
Because when writing to multiple disks it will start writing to another disk before data is flushed from RAM to the previous one, if there's no other way for your use case setting RAM cached writes to minimum should alleviate the issue.1 point
-
Nö, braucht man nicht. Das funktioniert presto direkt in der Shell von Unraid.1 point
-
cheers thank you.1 point
-
I run through a windows server 2019 as a file server with several connectors and don't have any issues, very quick to access everything but I do have a 10GB fibre card in it and the file server.1 point
-
Yes that's true. I also implemented a function that iSCSI is unmounted when the array is stopped and started when the array is started, only for security reasons...1 point
-
Ah okay, no problem! Thanks for all your hard work. Yes, tried connecting but no-go as well.1 point
-
I've found windows to be pretty gracious in handling the iscsi disks coming online and offline, which often happens as I'm doing maintenance on the array.1 point
-
Thu 07/15/2021 23:01:59.29 -Total Balance: 4.0 avo (4000000000000 slice) -Total Balance: 2500.0 cgn (2500000000000000 mio) -Total Balance: 2.000001600351 xch (2000001600351 mojo) -Total Balance: 0.0 xcd (0 mojo) -Total Balance: 16.0 xdg (16000000000000 mojo) -Total Balance: 20.0 xeq (20000000000000 mojo) -Total Balance: 12.0 xfx (12000000000000 mojo) -Total Balance: 20.0 xfl (20000000000000 mojo) -Total Balance: 600.0 gdog (600000000000000 dog) -Total Balance: 38.0 xgj (38000000000000 moji) -Total Balance: 50.0 hdd (50000000000000 mojo) -Total Balance: 28.0 xka (28000000000000 mojo) -Total Balance: 20.0 xsc (20000000000000 octet) -Total Balance: 32.0 xse (32000000000000 mojo) -Total Balance: 26.0 tsit (26000000000000 mojo) -Total Balance: 52.0 spare (52000000000000 graviton) -Total Balance: 4.0 wheat (4000000000000 mojo)1 point
-
You were 100% right! Thats exactly what I did, working now thanks so much!!!1 point
-
Ok, so the PLEX_WEBHOOK_TOKEN can literally be anything you want, just type some random value in here. This token is then used in the URL, where PlexAnnouncer is listening for incoming Webhooks from Plex. So in your case: http://localhost:32500/1fkD... You then need to put this URL in your Plex settings, where you added the Webhook. From the behavior of your issue I guess that you added the Discord Webhook URL instead here. That's how it looks in my config: Note: You may have to replace localhost with the IP address of PlexAnnouncer (like I did) if they aren't run on the same host.
 1 point
 -
That has nothing to do with the container. It's an unraid issue.1 point
-
Disregard, I figured it out. I set the server filename as "fabric-server-launch" and it seems to have started up fine.1 point
-
I used skylake-server with my setup but did not try anything with nested virtualization. I went bare metal hackintosh so I cannot test anything right now.1 point
-
Ich habe für alle relevanten Ordner (Dokumente, Desktop, usw) per rechter Maustaste eine lesende Freigabe mit Login erstellt und dann den PC in unRAID gemountet. Den Rest macht rsync (startet alle 3 Stunden, ist also nicht "zeitnah"): https://forums.unraid.net/topic/97958-rsync-incremental-backup/ Nextcloud würde live sichern. Nextcloud würde auch einen Zugriff per Smartphone erlauben und das Teilen mit Dritten.1 point
-
Ich mache das über die Nextcloud App. (Einstellungen -> Automatisches Hochladen -> Ordner anlegen, die gesichert werden sollen) Eine andere Möglichkeit wäre über Syncthing zu synchronisieren.1 point
-
I don't know what SWAG is, but the way I did this with my Apache server was to make an HTTP proxy from "/" on "amp.example.com" to "http://localhost:8080/". You would probably want to look into something similar. Hopefully this helps you along the right path.1 point
-
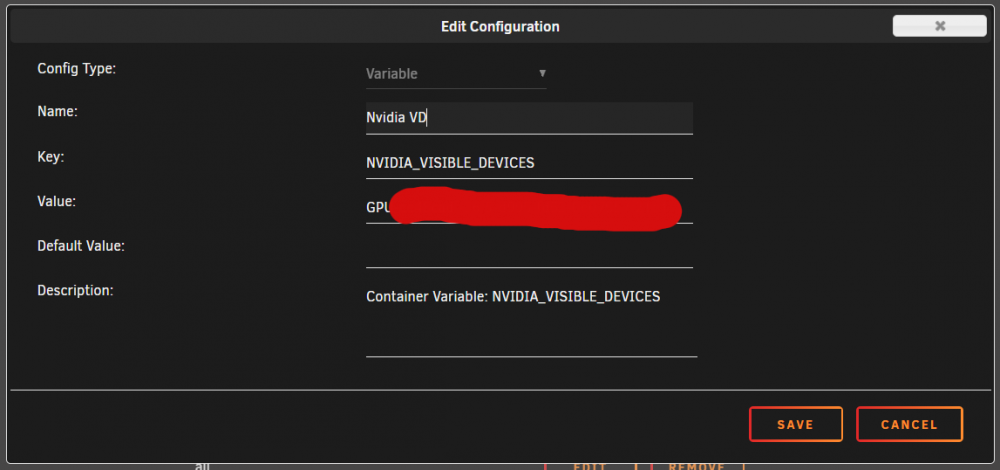
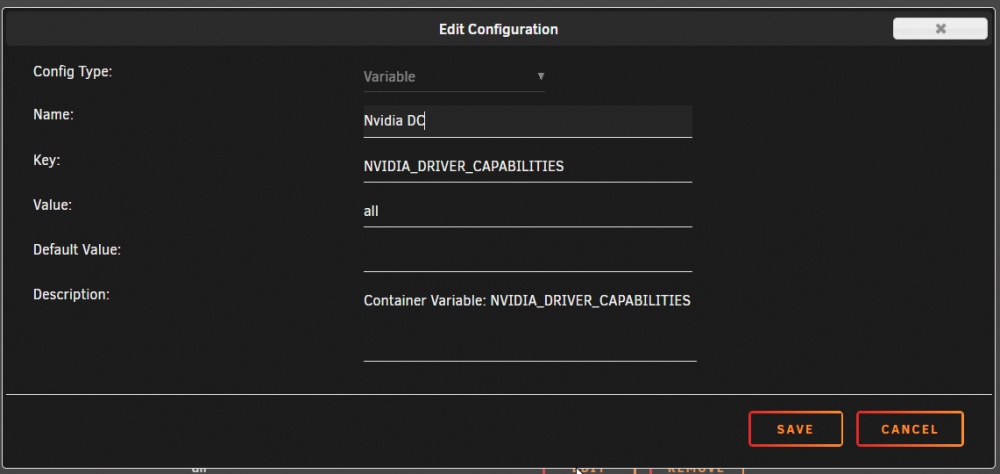
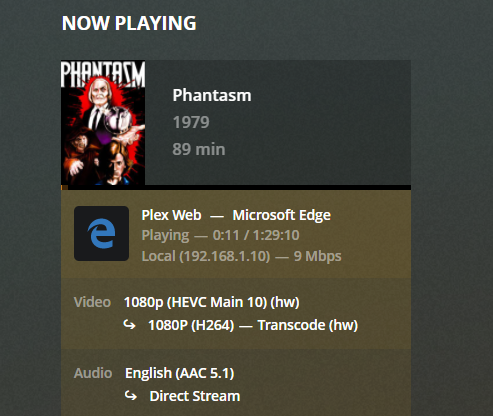
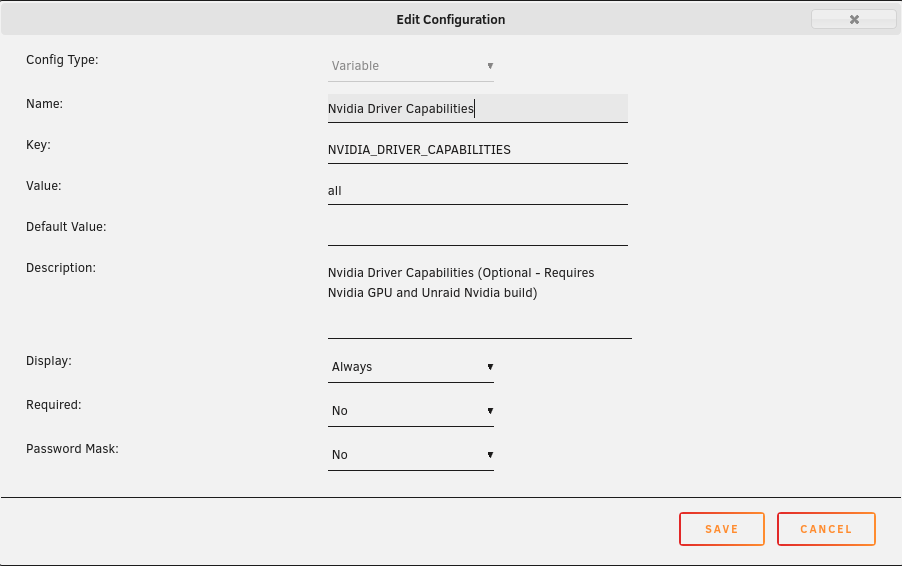
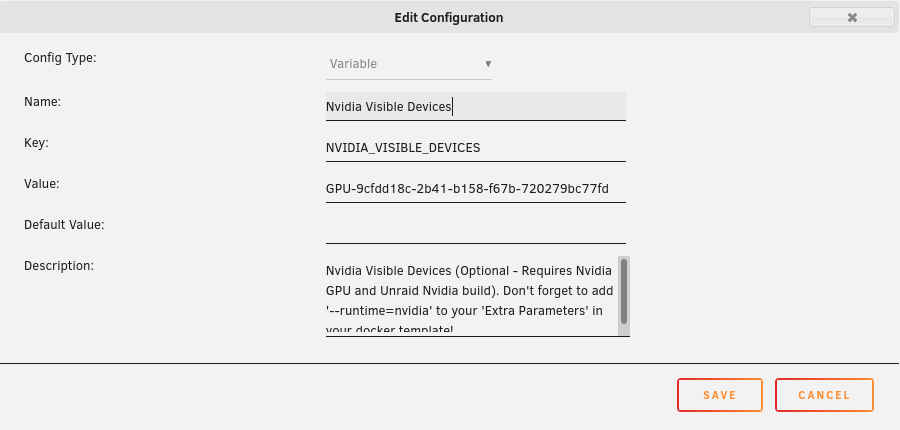
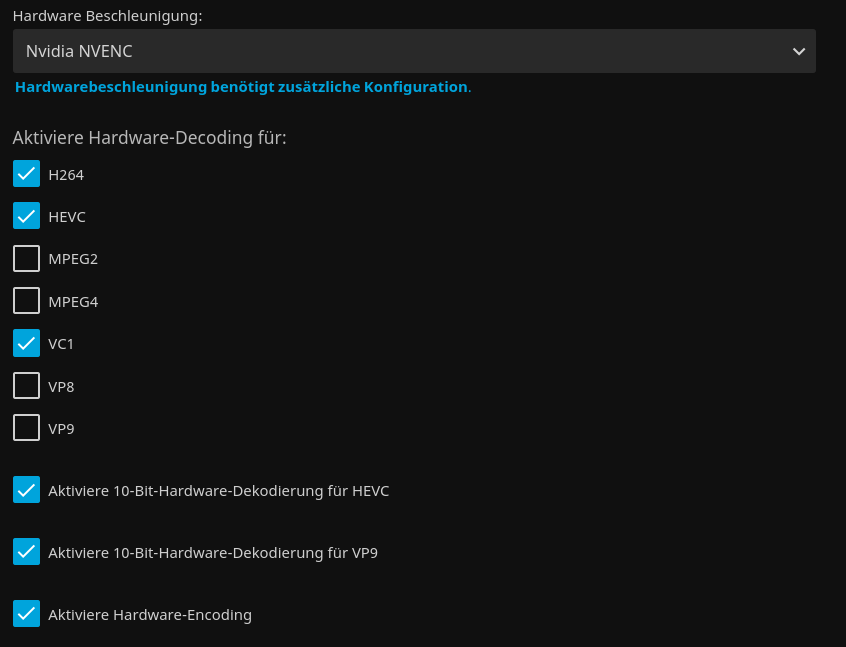
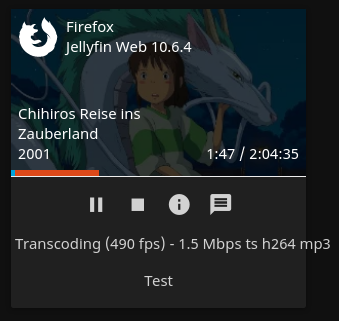
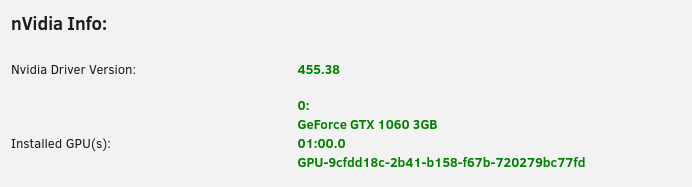
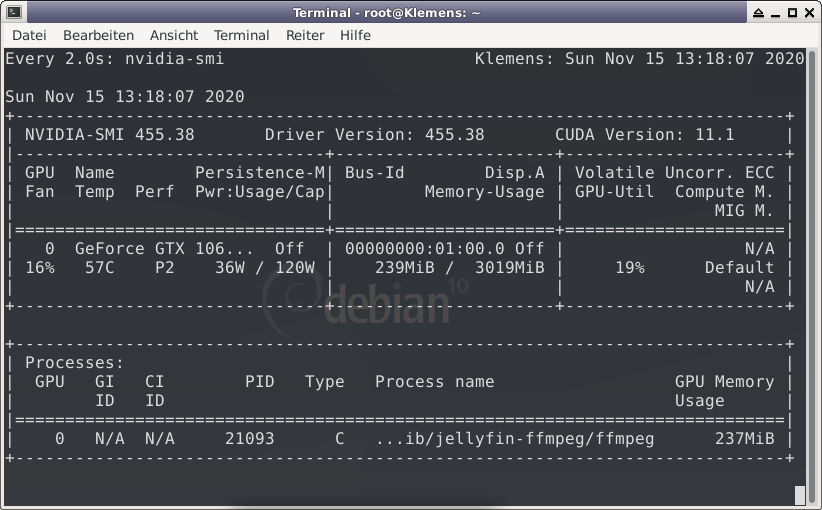
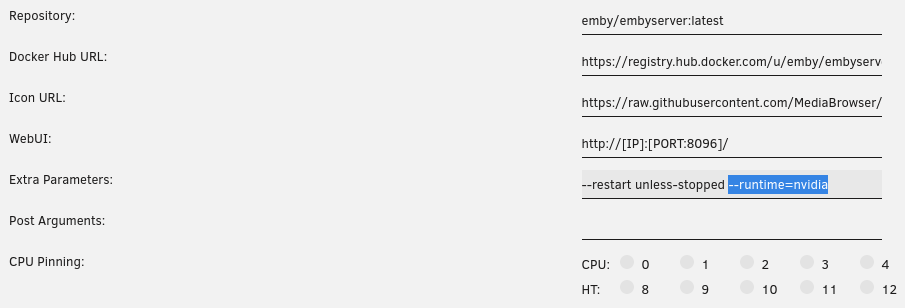
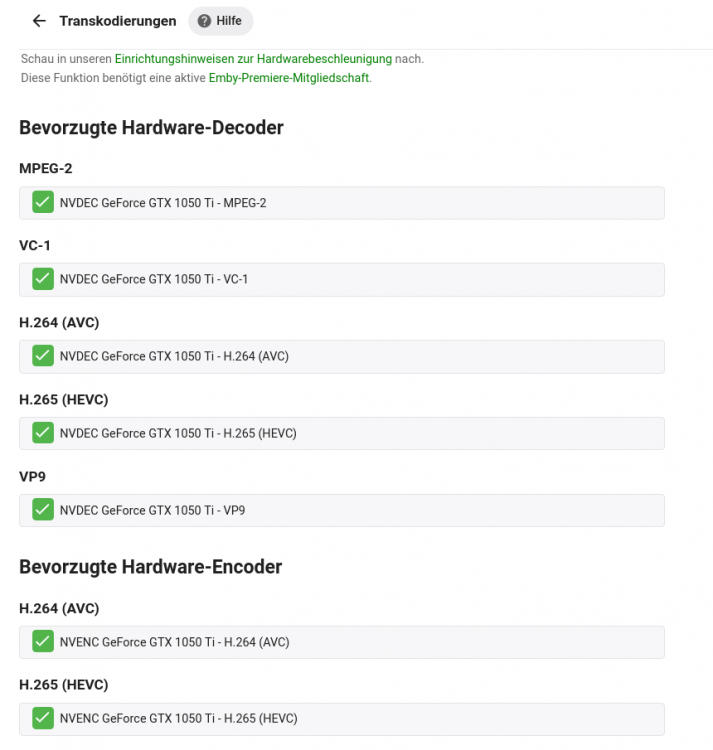
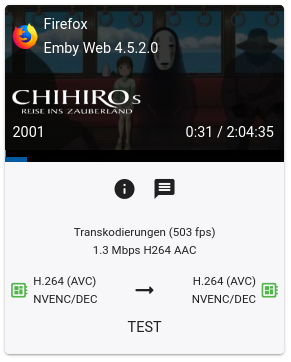
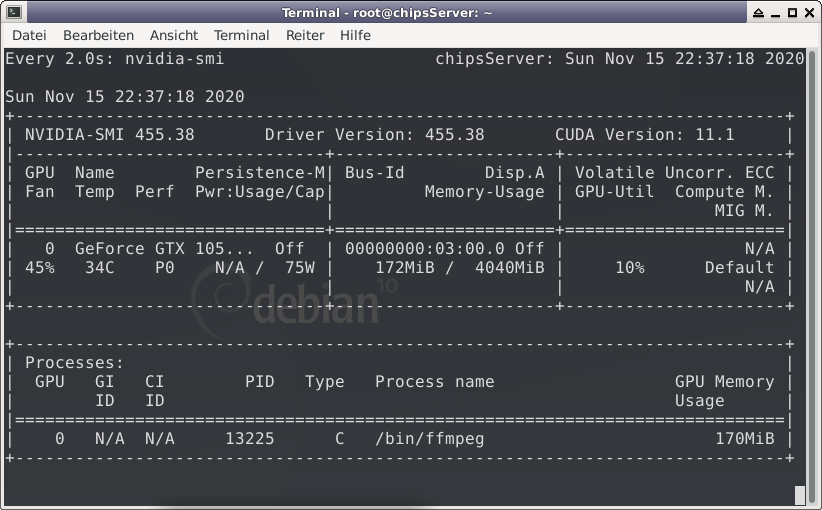
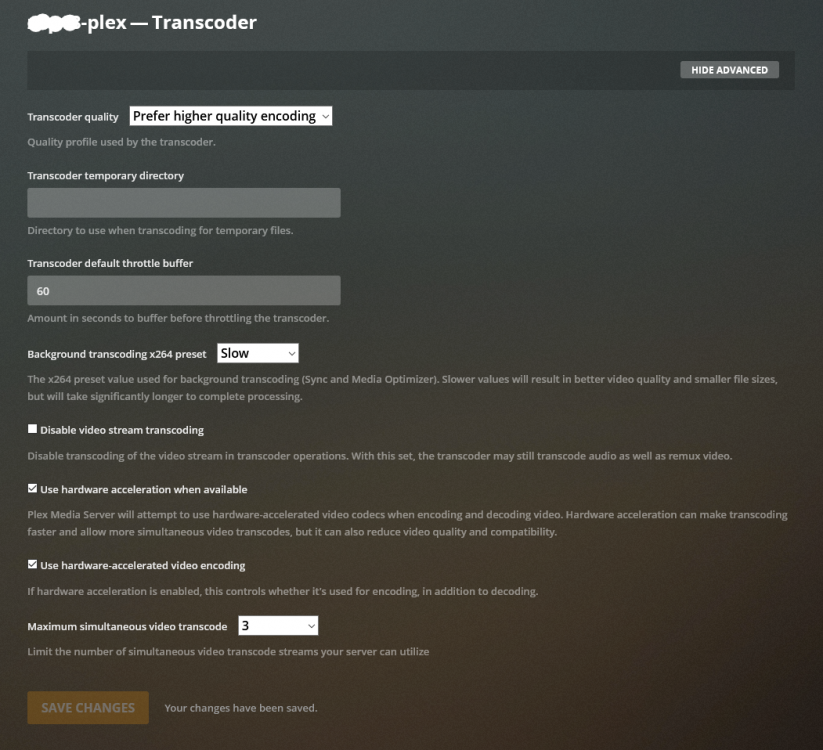
To utilize your Nvidia graphics card in your Docker container(s) the basic steps are: Add '--runtime=nvidia' in your Docker template in 'Extra Parameters' (you have to enable 'Advanced view' in the template to see this option) Add a variable to your Docker template with the Key: 'NVIDIA_VISIBLE_DEVICES' and as Value: 'YOURGPUUUID' (like 'GPU-9cfdd18c-2b41-b158-f67b-720279bc77fd') Add a variable to your Docker template with the Key: 'NVIDIA_DRIVER_CAPABILITIES' and as Value: 'all' Make sure to enable hardware transcoding in the application/container itself See the detailed instructions below for Emby, Jellyfin & Plex (alphabetical order). UUID: You can get the UUID of you graphics card in the Nvidia-Driver Plugin itself PLUGINS -> Nvidia-Driver (please make sure if there is no leading space!) : NOTE: You can use one card for more than one Container at the same time - depending on the capabilities of your card. Emby: Note: To enable Hardware Encoding you need a valid Premium Subscription otherwise Hardwar Encoding will not work! Add '--runtime=nvidia' to the 'Extra Parameters': Add a variable to your Docker template with the Key: 'NVIDIA_VISIBLE_DEVICES' and as Value: 'YOURGPUUUID': Add a variable to your Docker template with the Key: 'NVIDIA_DRIVER_CAPABILITIES' and as Value: 'all': Make sure to enable hardware transcoding in the application/container itself After starting the container and playing some movie that needs to be transcoded that your graphics card is capable of you should see that you can now successfully transcode using your Nvidia graphics card (the text NVENC/DEC is indicating exactly that) : Jellyfin: Add '--runtime=nvidia' to the 'Extra Parameters': Add a variable to your Docker template with the Key: 'NVIDIA_VISIBLE_DEVICES' and as Value: 'YOURGPUUUID': Add a variable to your Docker template with the Key: 'NVIDIA_DRIVER_CAPABILITIES' and as Value: 'all': Make sure to enable hardware transcoding in the application/container itself After starting the container and playing some movie that needs to be transcoded that your graphics card is capable of you should see that you can now successfully transcode using your Nvidia graphics card (Jellyfin doesn't display if it's actually transcoding with the graphics card at time of writing but you can also open up a Unraid terminal and type in 'watch nvidia-smi' then you will see at the bottom that Jellyfin is using your card) : PLEX: (thanks to @cybrnook & @satchafunkilus that granted permission to use their screenshots) Note: To enable Hardware Encoding you need a valid Plex Pass otherwise Hardwar Encoding will not work! Add '--runtime=nvidia' to the 'Extra Parameters': Add a variable to your Docker template with the Key: 'NVIDIA_VISIBLE_DEVICES' and as Value: 'YOURGPUUUID': Add a variable to your Docker template with the Key: 'NVIDIA_DRIVER_CAPABILITIES' and as Value: 'all': Make sure to enable hardware transcoding in the application/container itself: After starting the container and playing some movie that needs to be transcoded that your graphics card is capable of you should see that you can now successfully transcode using your Nvidia graphics card (the text '(hw)' at Video is indicating exactly that):


 1 point
 -
Also, instead of putting in an absolute size, you can also do this: qemu-img resize vdisk1.img +5G That would simply grow the image from its current size by 5GB.1 point