Leaderboard


Popular Content
Showing content with the highest reputation on 10/17/21 in all areas
-
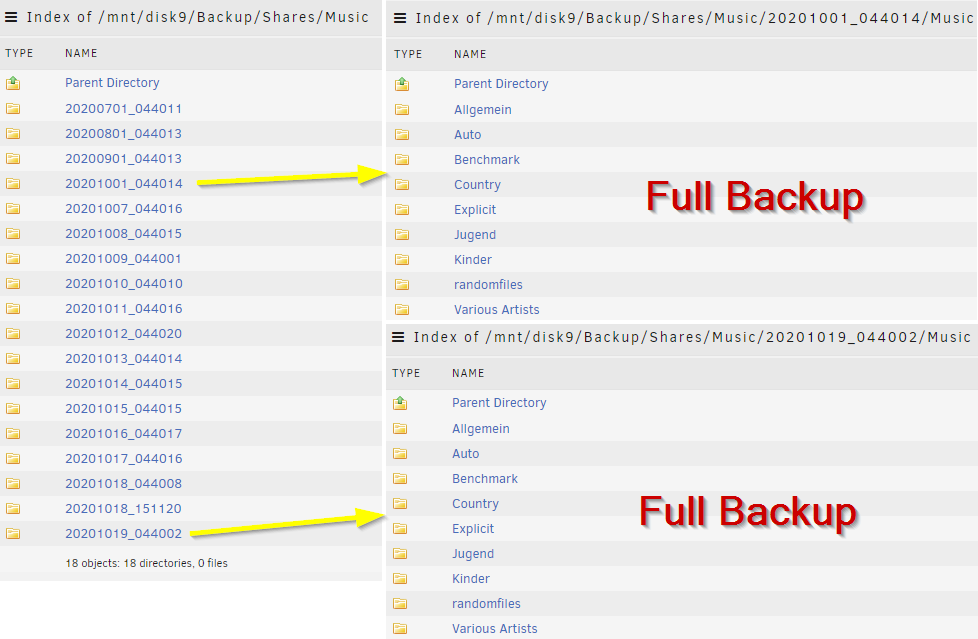
The following script creates incremental backups by using rsync. Check the settings to define your own paths. Donate? 🤗 https://codeberg.org/mgutt/rsync-incremental-backup > incbackup.sh Explanations All created backups are full backups with hardlinks to already existing files (~ incremental backup) All backups use the most recent backup to create hardlinks or new files. Deleted files are not copied (1:1 backup) There are no dependencies between the most recent backup and the previous backups. You can delete as many backups as you like. All backups that are left, are still full backups. This could be confusing as most incremental backup softwares need the previous backups for restoring the data. But this is not valid for rsync and hardlinks. Read here if you need more informations about links, inodes and files. After a backup has been created the script purges the backup dir and keeps only the backups of the last 14 days, 12 month and 3 years, which can be defined through the settings logs can be found inside of each backup folder Sends notifications after job execution Unraid exclusive: Stops docker containers if the source path is the appdata path, to create consistent backups Unraid exclusive: Creates a snapshot of the docker container source path, before creating a backup of it. This allows an extremely short downtime of the containers (usually only seconds). How to execute this script? Use the User Scripts Plugin (Unraid Apps) to execute it by schedule Use the Unassigned Devices Plugin (Unraid Apps) to execute it after mounting a USB drive Call the script manually (Example: /usr/local/bin/incbackup /mnt/cache/appdata /mnt/disk6/Backups/Shares/appdata) How does a backup look like? This is how the backup dir looks like after several month (it kept the backups of 2020-07-01, 2020-08-01 ... and all backups of the last 14 days): And as it's an incremental backup, the storage usage is low: (as you can see I bought new music before "2020-08-01" and before "2020-10-01"): du -d1 -h /mnt/user/Backup/Shares/Music | sort -k2 168G /mnt/user/Backup/Shares/Music/20200701_044011 4.2G /mnt/user/Backup/Shares/Music/20200801_044013 3.8M /mnt/user/Backup/Shares/Music/20200901_044013 497M /mnt/user/Backup/Shares/Music/20201001_044014 4.5M /mnt/user/Backup/Shares/Music/20201007_044016 4.5M /mnt/user/Backup/Shares/Music/20201008_044015 4.5M /mnt/user/Backup/Shares/Music/20201009_044001 4.5M /mnt/user/Backup/Shares/Music/20201010_044010 4.5M /mnt/user/Backup/Shares/Music/20201011_044016 4.5M /mnt/user/Backup/Shares/Music/20201012_044020 4.5M /mnt/user/Backup/Shares/Music/20201013_044014 4.5M /mnt/user/Backup/Shares/Music/20201014_044015 4.5M /mnt/user/Backup/Shares/Music/20201015_044015 4.5M /mnt/user/Backup/Shares/Music/20201016_044017 4.5M /mnt/user/Backup/Shares/Music/20201017_044016 4.5M /mnt/user/Backup/Shares/Music/20201018_044008 4.5M /mnt/user/Backup/Shares/Music/20201018_151120 4.5M /mnt/user/Backup/Shares/Music/20201019_044002 172G /mnt/user/Backup/Shares/Music Warnings Its not the best idea to backup huge files like disk images that changes often as the whole file will be copied. A file change while copying it through rsync will cause a corrupted file as rsync does not lock files. If you like to backup for example a VM image file, stop it first (to avoid further writes), before executing this script! Never change a file, which is inside a backup directory. This changes all files in all backups (this is how hardlinks work)! Do not use NTFS or other partition formats, which do not support Hardlinks and/or Linux permissions. Format external USB drives with BTRFS and install WinBTRFS, if you want to access your backups through Windows. Do NOT use the docker safe perms tool if you backup the appdata share to the array. By that all file permissions are changed and can not be used by your docker containers anymore. Docker safe perms skips only the /mnt/*/appdata share and not for example /mnt/disk5/Backups/appdata!
 1 point
 -
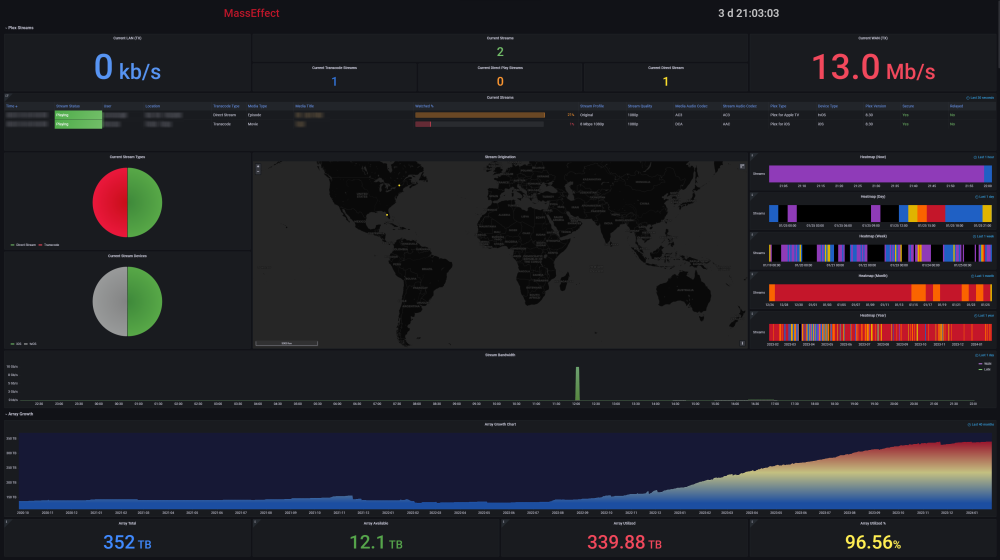
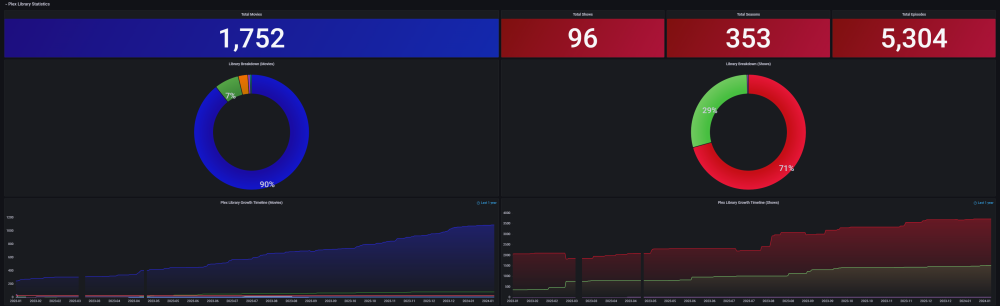
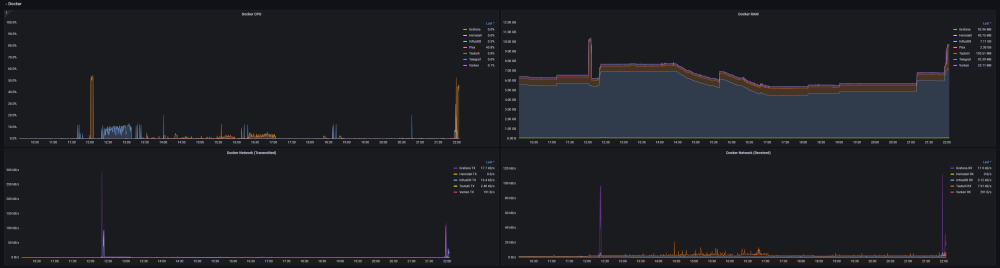
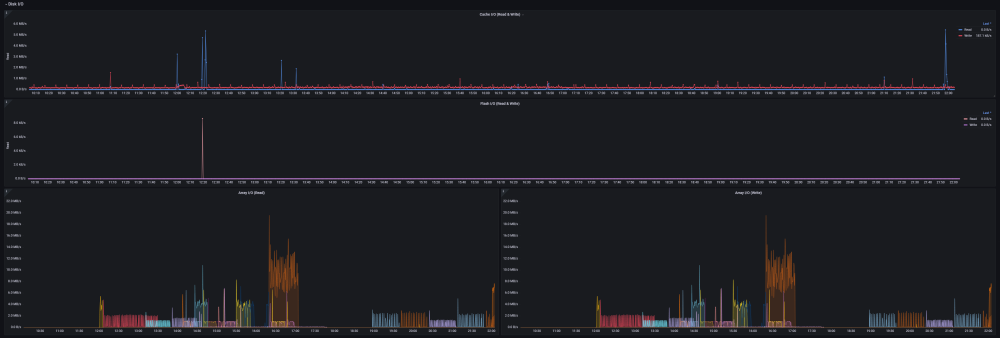
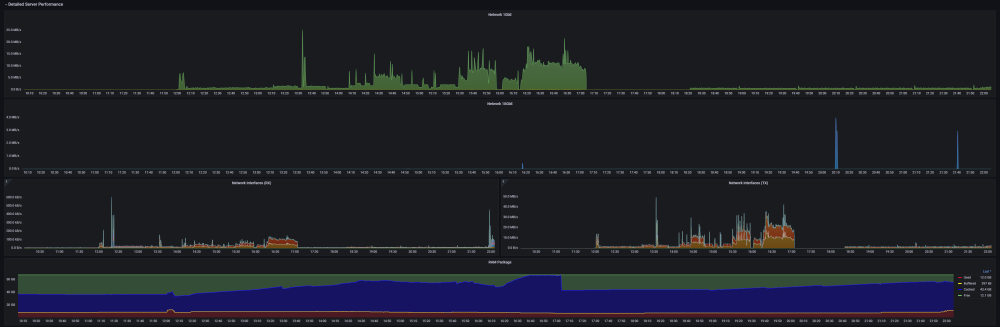
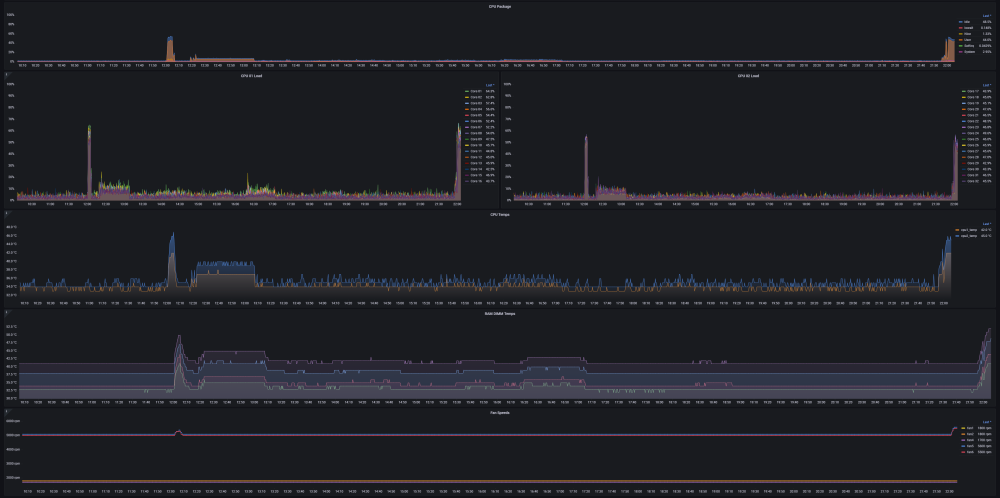
Ultimate UNRAID Dashboard (UUD) Current Release: UUD 1.7 (2024-03-30) UUD NEWS: 2024-03-30: UUD Version 1.7 is Released 2022-06-19: The UUD Forum Topic Reaches 200,000 Views! 👀👀👀 2022-04-17: The UUD Tops 5,000 Unique Downloads 💾💾💾 🎉 2021-05-26: The UUD Forum Topic Reaches 1,000 Replies! 2021-04-17: The UUD Forum Topic Reaches 100,000 Views! 👀👀 2021-03-26: The UUD Tops 2,500 Unique Downloads 💾💾 🎉 2021-03-23: UUD 1.6 is Featured Again in the "Best of the Forum" Blog 🥇🥇 2021-03-21: The UUD Forum Topic Reaches 75,000 Views! 👀 2021-03-20: UUD Version 1.6 is Released 2021-01-19: The UUD Forum Topic Reaches 50,000 Views! 👀 2021-01-11: The UUD Tops 1,000 Unique Downloads 💾 🎉 2021-01-07: UUD is Featured as the FIRST "Best of the Forum" Blog 🥇 2021-01-06: UUD Donations Site is Created 2020-12-31: UUD Version 1.5 is Released 2020-10-09: UUD Version 1.4 is Released 2020-09-28: The UUD is Featured in the Official UNRAID Monthly Newsletter (September 2020)! 2020-09-21: UUD Version 1.3 is Released 2020-09-14: UUD Version 1.2 is Released 2020-09-12: UUD Version 1.1 is Released 2020-09-11: The UUD is Born and Version 1.0 is Released Overview: Welcome to the OFFICIAL UUD forum topic. The UUD is my attempt to develop the Ultimate Grafana/Telegraf/InfluxDB/Plex/Tautulli/Varken dashboard. This entire endeavor started when one of our fellow users @hermy65 posed a simple, but complex question in another forum topic (see post #3). I decided to give it a shot, as I am an IT professional, specifically in enterprise data warehouse/SQL server. After a few days of hard work, UUD version 1.0 was released. We are currently on Version 1.6, and the project is in active development. If you are a Grafana developer, or have had experience building dashboards/panels for UNRAID, please let me know. I would love to collaborate. Version 1.7 Screenshots (Click the Images as They are Very High Resolution): Disclaimer: This is based on my 30 Drive UNRAID Array. So this shows an example of a fully maxed out UNRAID setup with max drives, dual CPUs, Dual NICs, etc. You will/may need to adjust panels & queries to accommodate your individual UNRAID/PLEX architecture. I have spent many hours custom coding new functionality and features based on that original template. Much has been learned and I am excited to see how far this can go in the future. Thanks again! Developers: Primary Developer: @falconexe (USA) UUD Creator | Active Development | Panels | Database Queries | Integration | Look & Feel | GUI | Refinement | Support Developer/Colleague: @GilbN (Europe) Dashboard Examples | Back-end | Dynamics | REGEX | Support | Tutorials Contributors: @hermy65 @atribe @Roxedus @SpencerJ @testdasi @ChatNoir @MammothJerk @FreeMan @danktankk @Dazog @MrLondon @LTM @mattekure @ptchernegovski @caplam @RockDawg @corgan @jbartlett @Hoopster @LTM @skaterpunk0187 @valiente @Agent531C @JudMeherg @Jturner @1471 Dependencies (Last Updated On 2021-03-20) Docker - InfluxDB Docker - Telegraf Docker Network Type: HOST (Otherwise You May Not Get All Server Metrics) 👉 Create Telegraf Configuration File 👈 (DO THIS FIRST!) Create and Place a File into Directory "mnt/user/appdata/YOUR_TELEGRAF_FOLDER" Enable and Install Telegraf Plugins Telegraf Plugin - [[inputs.net]] Enable in telegraf.config Telegraf Plugin - [[inputs.docker]] Enable in telegraf.config Telegraf Plugin - [[inputs.diskio]] Enable in telegraf.config To Use Static Drive Serial Numbers in Grafana (For DiskIO Queries) Do the Following: Edit telegraf.conf > [[inputs.diskio]] > Add device_tags = ["ID_SERIAL"] > Use ID_SERIAL Flag in Grafana Now Upon Booting, You Don't Have to Worry About SD* Mounts Changing (So Your Graphs Don't Get Messed Up!) You Can Also Set Overrides on the Query Fields to Map the Serial Number to a Common Disk Name Like "DISK01" etc. Telegraf Plugin - [[inputs.smart]] Enable in telegraf.config Also Enable "attributes = true" Bash Into Telegraf Docker and Run "apk add smartmontools" Telegraf Plugin - [[inputs.ipmi_sensor]] Enable in telegraf.config Bash Into Telegraf Docker and Run "apk add ipmitool" Telegraf Plugin - [[inputs.apcupsd]] Enable in telegraf.config Telegraf Docker Config Add New Path (NOTE: This path has now been merged into Atribe's Telegraf Docker Image. (Thanks @GilbN & @atribe) Post Arguments "/bin/sh -c 'apk update && apk upgrade && apk add ipmitool && apk add smartmontools && telegraf'" Docker - Grafana Grafana Plugins Pie Chart Panel Run Following Command in Docker: grafana-cli plugins install grafana-piechart-panel World Map Run Following Command in Docker: grafana-cli plugins install grafana-worldmap-panel JSON API Run Following Command in Docker: grafana-cli plugins install marcusolsson-json-datasource Dynamic Image Panel Run Following Command in Docker: grafana-cli plugins install dalvany-image-panel Docker - Tautulli Docker - Varken CA Plugin: IPMI Tools License: GeoLite2 (Free) NON SERVER HARDWARE (If You Cannot Use "IPMI" and Need to Use "Sensors") As an alternate to IPMI to monitor CPU/System/Aux Temps, you can try the Sensors Plugin. Telegraf Plugin - [[inputs.sensors]] Enable in the Telegraf Config (Uncomment It) Bash into the Telegraf Docker and Execute "apk add lm_sensors" Stop All 3 Dockers (Grafana > Telegraf > InfluxDB) If You Want to Keep This Plugin in Perpetuity, You Will Need to Modify Your Telegraf Docker Post Arguments (Adding lm_sensors): "/bin/sh -c 'apk update && apk upgrade && apk add ipmitool && apk add smartmontools && apk add lm_sensors && telegraf'" Start All 3 Dockers (InfluxDB > Telegraf > Grafana) Dashboard Variables (Update These For Your Server): I haven't been this geeked out about my UNRAID server in a very long time. This is the cherry on top for my UNRAID experience going back to 2014 when I built my first server. Thanks everyone! VERSION 1.7 (Current) Ultimate UNRAID Dashboard - Version 1.7 - 2024-03-30 (falconexe).json @SpencerJ


 1 point
 -
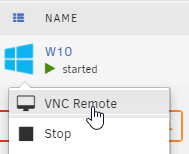
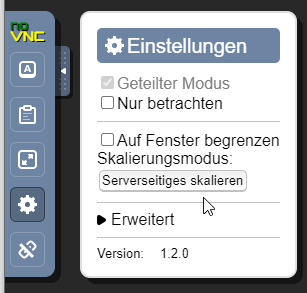
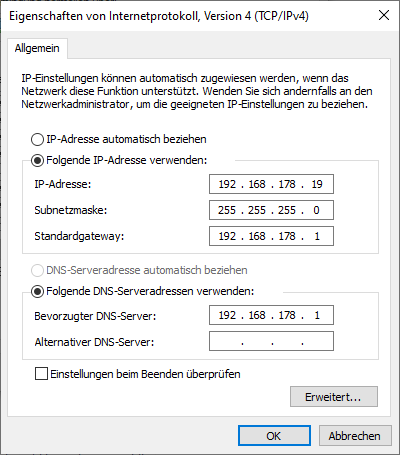
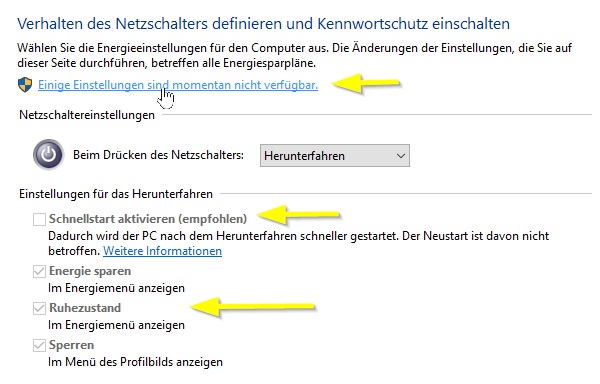
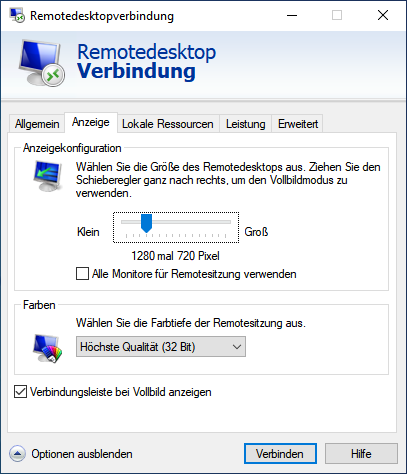
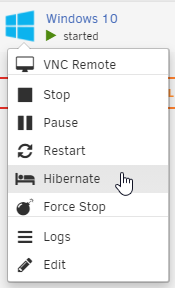
VM erstellen Windows Home / Pro ISO über das Media Creation Tool oder die Windows Enterprise ISO über UUP Dump erstellen. Settings > VM Manager > aktuellstes "Default Windows VirtIO driver ISO" auswählen und herunterladen Optional: Wer eine Grafikkarte durchschleifen möchte (nicht iGPU!): Tools > System Devices > Alle Einträge (VGA, Audio, USB, etc) der Grafikkarte anklicken und an VFIO binden > Unraid Server neu starten Optional: Wer nicht der CPU die Last-Verteilung überlassen möchte, der isoliert über Settings > CPU Pinning > CPU Isolation die Kerne der VM VMS > Add VM > Windows 10 Entweder: Alle Kerne auswählen und der CPU die Last-Verteilung überlassen, Oder: Die isolierten Kerne zuweisen 4096MB RAM, min und max Werte gleich, da unterschiedliche Werte zu Problemen führen können (2GB sind das offizielle Minimum) aktuellste Q35 als Machine, weil es von Intel GVT-g empfohlen wird. Info: Bei Windows 10 brauchte ich Q35-5.1, damit ich den Netzwerktreiber zum Laufen bringen konnte, ansonsten gab es den Fehler Code 56. über "OS Install ISO" die Windows ISO-Datei auswählen 32G vdisk oder größer (32G ist mittlerweile das offizielle Minimum, früher waren es 20G). Hinweis: vdisk.img sind Sparse-Dateien und belegen daher auf dem Datenträger weniger als angezeigt. Man muss aber was tun, damit das so bleibt. VNC Graphics Card auf German stellen Optional: Grafikkarte über das Plus-Symbol hinzufügen Optional: Sound Card auswählen, wer lokal am Server Lautsprecher / Kopfhörer anschließen möchte, bei Grafikkarten den Audio Controller der Grafikkarte auswählen Network Model: Wer keine Docker im "br0" Netzwerk verwendet, sollte für die bessere Performance "virtio" wählen, da "virtio-net" deutlich langsamer ist. Info: Ab Unraid 6.12.4 soll man das Bridge-Netzwerk deaktivieren. In dem Fall wählt man "vhost0" und "virtio" bei einer VM. Optional: Haken bei "Start VM after creation" raus und über GVT-g der VM eine vGPU zuweisen VM erstellen Optional: Über das GVT-g Plugin eine vGPU zuweisen und die VM starten Installation VMS > VM Logo > VNC Remote Wenn man "Press any Key" verpasst hat, dann einfach "reset" in der UEFI Shell eingeben um neu zu starten Am linken Rand "Serverseitiges Skalieren" aktivieren Benutzerdefinierte Installation > Treiber laden > Virtio CD Laufwerk > amd64\w10\ auswählen um den SCSI Controller Treiber für die virtuelle Festplatte zu laden Windows 11: Wer bei dem folgenden Bildschirm hängt, drückt SHIFT + F10, gibt "OOBE\BYPASSNRO" ein und bestätigt den Befehl mit ENTER. Die VM startet neu und nach Auswahl des Tastaturlayouts könnt ihr mit "Ich habe kein Internet" fortfahren. Nach der Installation Optional: Wer möchte aktiviert den Ruhezustand (Hibernate), damit er die VM über das Unraid Menü nicht nur herunterfahren kann. Dazu das Windows Logo klicken > "cmd" eintippen > Rechte Maustaste als Administrator ausführen: powercfg.exe /hibernate on powercfg /h /type full Rechte Maustaste aufs Windows Logo > Ausführen > powercfg.cpl Dann "Auswählen was beim Drücken..." > "Einige Einstellungen sind..." > Schnellstart deaktivieren und wer sich für den Ruhezustand entschieden hat, diesen einschalten Der Schnellstart muss deaktiviert werden, da es sonst zu Problemen kommt, falls man zB die Anzahl der CPU Kerne verändert etc Über das Virtio CD Laufwerk die virtio-win-gt-x64.msi ausführen, was die folgenden Treiber installiert: Balloon, Network, Pvpanic, Qemufwcfg, Qemupciserial, Vioinput, Viorng, Vioscsi, Vioserial, Viostor, Viofs Erst jetzt hat also die VM Internet Über das VirtIO CD Laufwerk die virtio-win-guest-tools ausführen, welches dann auch den VNC Grafiktreiber installiert, so dass wir nun ebenfalls die Auflösung ändern können. Dadurch können wir die VM nun über das Unraid Menü bequem Herunterfahren (Stop) oder in den Ruhezustand (Hibernate) versetzen: Unten rechts rechte Maustaste auf das Netzwerk-Symbol > "Netzwerk-..." > Adapteroptionen ändern > rechte Maustaste Ethernet > Internetprotokoll, Version 4... > Eigenschaften > Feste IP-Adresse vergeben Rechte Maustaste auf das Windows Logo > System > Remotedesktop > Remotedesktop aktivieren Optional: Bei Intel (vGPU) oder Nvidia (Grafikkarte) oder AMD (Grafikkarte) den Treiber herunterladen und installieren Das aktuelle Fenster schließen, auf einem Windows PC nach "Remote..." suchen und "Remotedesktopverbindung" (RDP) öffnen. IP-Adresse und Windows Username hinterlegen. Außerdem unter "Anzeige" die Auflösung anpassen, damit die VM nicht wie euer PC zB in 4K gestartet wird, was eine sehr hohe CPU Last auf dem Server verursachen kann: Hinweis: RDP läuft deutlich flüssiger als NoVNC im Browser und unterstützt auch Sound. Alternativ geht auch Parsec. Optional: PowerShell als Admin öffnen und folgendes ausführen um Windows von Bloatware zu befreien: iwr -useb https://git.io/debloat|iex Optional: Direkter Login-Bildschirm: Rechte Maustaste auf das Windows Logo > Ausführen > regedit KEY_LOCAL_MACHINE > Software > Policies > Microsoft > Rechte Maustaste auf Windows > Neu > Schlüssel > Personalization als Name eingeben > Rechte Maustaste auf Personalization > Neu > DWORD > NoLockScreen > Doppelklick > 1 als Wert > OK Alle Updates installieren (also auch bei Bedarf mehrmals neu starten) Herunterfahren Optional: ISO-Datei und virtio CD Laufwerk aus der VM Konfiguration entfernen Ein Backup von unserer Vanilla Windows vidks1.img erstellen. Das geht über Krusader (Apps), SMB (falls Netzwerkfreigabe vorhanden) oder über das Unraid WebTerminal (">_" oben rechts) mit dem folgenden Befehl (Pfade bei Bedarf anpassen): cp -a --reflink --sparse=auto "/mnt/user/domains/Windows 10/vdisk1.img" "/mnt/user/domains/Windows 10/vdisk1-backup.img" Video

 1 point
 -
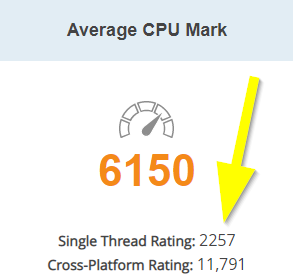
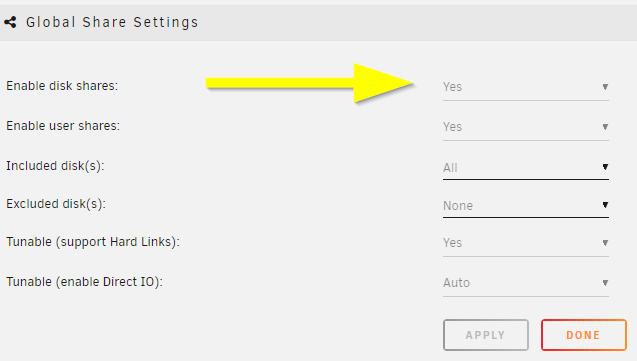
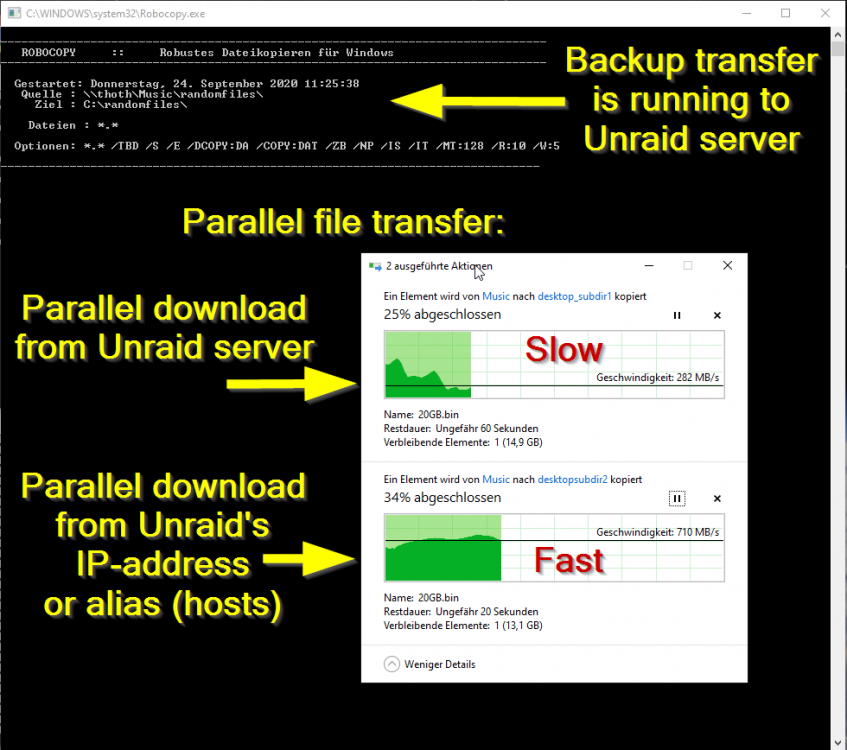
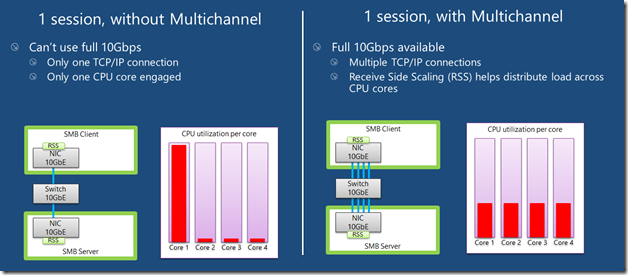
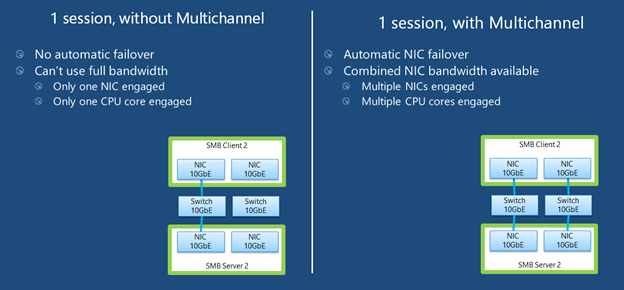
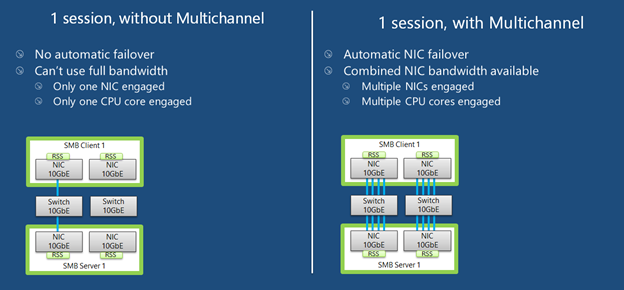
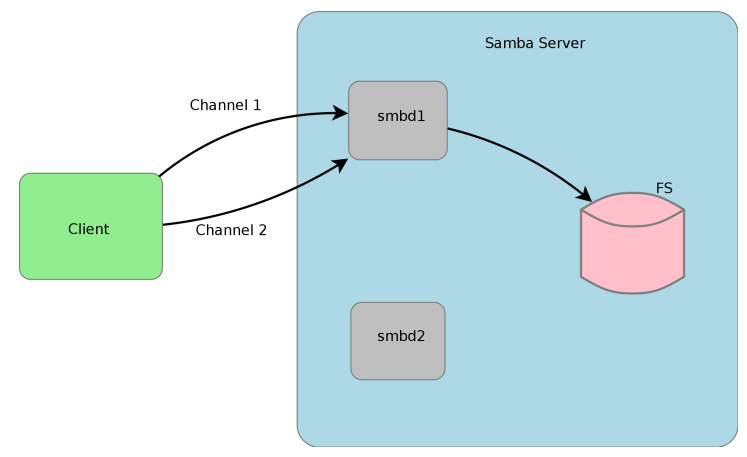
I'm using Unraid for a while now and collected some experience to boost the SMB transfer speeds: Donate? 🤗 1.) Choose the right CPU The most important part is to understand that SMB is single-threaded. This means SMB uses only one CPU core to transfer a file. This is valid for the server and the client. Usually this is not a problem as SMB does not fully utilize a CPU core (except of real low powered CPUs). But Unraid adds, because of the ability to split shares across multiple disks, an additional process called SHFS and its load raises proportional to the transfer speed, which could overload your CPU core. So the most important part is, to choose the right CPU. At the moment I'm using an i3-8100 which has 4 cores and 2257 single thread passmark points: And since I have this single thread power I'm able to use the full bandwith of my 10G network adapter which was not possible with my previous Intel Atom C3758 (857 points) although both have comparable total performance. I even was not able to reach 1G speeds while a parallel Windows Backup was running (see next section to bypass this limitation). Now I'm able to transfer thousands of small files and parallely transfer a huge file with 250 MB/s. With this experience I suggest a CPU that has around 1400 single thread passmark points to fully utilize a 1G ethernet port. As an example: The smallest CPU I would suggest for Unraid is an Intel Pentium Silver J5040. P.S. Passmark has a list sorted by single thread performance for desktop CPUs and server CPUs. 2.) Bypass single-thread limitation The single-thread limitation of SMB and SHFS can be bypassed through opening multiple connections to your server. This means connecting to "different" servers. The easiest way to accomplish that, is to use the ip-address of your server as a "second" server while using the same user login: \\tower\sharename -> best option for user access through file explorer as it is automatically displayed \\10.0.0.2\sharename -> best option for backup softwares, you could map it as a network drive If you need more connections, you can add multiple entries to your windows hosts file (Win+R and execute "notepad c:\windows\system32\drivers\etc\hosts"): 10.0.0.2 tower2 10.0.0.2 tower3 Results If you now download a file from your Unraid server through \\10.0.0.2 while a backup is running on \\tower, it will reach the maximum speed while a download from \\tower is massively throttled: 3.) Bypass Unraid's SHFS process If you enable access directly to the cache disk and upload a file to //tower/cache, this will bypass the SHFS process. Beware: Do not move/copy files between the cache disk and shares as this could cause data loss! The eligible user account will be able to see all cached files, even those from other users. Temporary Solution or "For Admins only" As Admin or for a short test you could enable "disk shares" under Settings -> Global Share Settings: By that all users can access all array and cache disks as SMB shares. As you don't want that, your first step is to click on each Disk in the WebGUI > Shares and forbid user access, except for the cache disk, which gets read/write access only for your "admin" account. Beware: Do not create folders in the root of the cache disk as this will create new SMB Shares Safer Permanent Solution Use this explanation. Results In this thread you can see the huge difference between copying to a cached share or copying directly to the cache disk. 4.) Enable SMB Multichannel + RSS SMB Multichannel is a feature of SMB3 that allows splitting file transfers across multiple NICs (Multichannel) and create multiple TCP connection depending on the amount of CPU Cores (RSS) since Windows 8. This will raise your throughput depending on your amount of NICs, NIC bandwidth, CPU and used settings: This feature is experimental SMB Multichannel is considered experimental since its release with Samba 4.4. The main bug for this state is resolved in Samba 4.13. The Samba developers plan to resolve all bugs with 4.14. Unraid 6.8.3 contains Samba 4.11. This means you use Multichannel on your own risk! Multichannel for Multiple NICs Lets say your mainboard has four 1G NICs and your Client has a 2.5G NIC. Without Multichannel the transfer speed is limited to 1G (117,5 MByte/s). But if you enable Multichannel it will split the file transfer across the four 1G NICs boosting your transfer speed to 2.5G (294 MByte/s): Additionally it uses multiple CPU Cores which is useful to avoid overloading smaller CPUs. To enable Multichannel you need to open the Unraid Webterminal and enter the following (the file is usually empty, so do not wonder): nano /boot/config/smb-extra.conf And add the following to it: server multi channel support = yes Press "Enter+X" and confirm with "Y" and "Enter" to save the file. Then restart the Samba service with this command: samba restart Eventually you need to reboot your Windows Client, but finally its enabled and should work. Multichannel + RSS for Single and Multiple NICs But what happens if you're server has only one NIC. Now Multichannel is not able to split something, but it has a sub-feature called RSS which is able to split file transfers across multiple TCP connections with a single NIC: Of course this feature works with multiple NICs, too: But this requires RSS capability on both sides. You need to check your servers NIC by opening the Unraid Webterminal and entering this command (could be obsolete with Samba 4.13 as they built-in an RSS autodetection ) egrep 'CPU|eth*' /proc/interrupts It must return multiple lines (each for one CPU core) like this: egrep 'CPU|eth0' /proc/interrupts CPU0 CPU1 CPU2 CPU3 129: 29144060 0 0 0 IR-PCI-MSI 524288-edge eth0 131: 0 25511547 0 0 IR-PCI-MSI 524289-edge eth0 132: 0 0 40776464 0 IR-PCI-MSI 524290-edge eth0 134: 0 0 0 17121614 IR-PCI-MSI 524291-edge eth0 Now you can check your Windows 8 / Windows 10 client by opening Powershell as Admin and enter this command: Get-SmbClientNetworkInterface It must return "True" for "RSS Capable": Interface Index RSS Capable RDMA Capable Speed IpAddresses Friendly Name --------------- ----------- ------------ ----- ----------- ------------- 11 True False 10 Gbps {10.0.0.10} Ethernet 3 Now, after you are sure that RSS is supported on your server, you can enable Multichannel + RSS by opening the Unraid Webterminal and enter the following (the file is usually empty, so do not wonder): nano /boot/config/smb-extra.conf Add the following and change 10.10.10.10 to your Unraid servers IP and speed to "10000000000" for 10G adapter or to "1000000000" for a 1G adapter: server multi channel support = yes interfaces = "10.10.10.10;capability=RSS,speed=10000000000" If you are using multiple NICs the syntax looks like this (add RSS capability only for supporting NICs!): interfaces = "10.10.10.10;capability=RSS,speed=10000000000" "10.10.10.11;capability=RSS,speed=10000000000" Press "Enter+X" and confirm with "Y" and "Enter" to save the file. Now restart the SMB service: samba restart Does it work? After rebooting your Windows Client (seems to be a must), download a file from your server (so connection is established) and now you can check if Multichannel + RSS works by opening Windows Powershell as Admin and enter this command: Get-SmbMultichannelConnection -IncludeNotSelected It must return a line similar to this (a returned line = Multichannel works) and if you want to benefit from RSS then "Client RSS Cabable" must be "True": Server Name Selected Client IP Server IP Client Interface Index Server Interface Index Client RSS Capable Client RDMA Capable ----------- -------- --------- --------- ---------------------- ---------------------- ------------------ ------------------- tower True 10.10.10.100 10.10.10.10 11 13 True False In Linux you can verify RSS through this command which returns one open TCP connection per CPU core (in this case we see 4 connections as my client has only 4 CPU cores, altough my server has 6): netstat -tnp | grep smb tcp 0 0 192.168.178.8:445 192.168.178.88:55975 ESTABLISHED 3195/smbd tcp 0 0 192.168.178.8:445 192.168.178.88:55977 ESTABLISHED 3195/smbd tcp 0 0 192.168.178.8:445 192.168.178.88:55976 ESTABLISHED 3195/smbd tcp 0 0 192.168.178.8:445 192.168.178.88:55974 ESTABLISHED 3195/smbd Note: Sadly Samba does not create multiple smbd processes, which means we still need a CPU with high single thread performance to benefit from RSS. This is even mentioned in the presentation: If you are interested in test results, look here. 5.) smb.conf Settings Tuning I did massive testing with a huge amount of smb.conf settings provided by the following websites and really NOTHING resulted in a noticable speed gain: https://wiki.samba.org/index.php/Performance_Tuning https://wiki.samba.org/index.php/Linux_Performance https://wiki.samba.org/index.php/Server-Side_Copy https://www.samba.org/~ab/output/htmldocs/Samba3-HOWTO/speed.html https://www.samba.org/samba/docs/current/man-html/smb.conf.5.html https://lists.samba.org/archive/samba-technical/attachments/20140519/642160aa/attachment.pdf https://www.samba.org/samba/docs/Samba-HOWTO-Collection.pdf https://www.samba.org/samba/docs/current/man-html/ (search for "vfs") https://lists.samba.org/archive/samba/2016-September/202697.html https://codeinsecurity.wordpress.com/2020/05/18/setting-up-smb-multi-channel-between-freenas-or-any-bsd-linux-and-windows-for-20gbps-transfers/ https://www.snia.org/sites/default/files/SDC/2019/presentations/SMB/Metzmacher_Stefan_Samba_Async_VFS_Future.pdf https://www.heise.de/newsticker/meldung/Samba-4-12-beschleunigt-Verschluesselung-und-Datentransfer-4677717.html I would say the recent Samba versions are already optimized by default. 6.) Choose a proper SSD for your cache You could use Unraid without an SSD, but if you want fast SMB transfers an SSD is absolutely required. Else you are limted to slow parity writes and/or through your slow HDD. But many SSDs on the market are not "compatible" for using it as an Unraid SSD Cache. DRAM Many cheap models do not have a DRAM Cache. This small buffer is used to collect very small files or random writes before they are finally written to the SSD and/or is used to have a high speed area for the file mapping-table. In Short, you need DRAM Cache in your SSD. No exception. SLC Cache While DRAM is only absent in cheap SSDs, SLC Cache can miss in different price ranges. Some cheap models use a small SLC cache to "fake" their technical data. Some mid-range models use a big SLC Cache to raise durability and speed if installed in a client pc. And some high-end models do not have an SLC Cache, as their flash cells are fast enough without it. Finally you are not interested in SLC Cache. You are only interested in continuous write speeds (see "Verify Continuous Writing Speed") Determine the Required Writing Speed But before you are able to select the right SSD model you need to determine your minimum required transfer speed. This should be simple. How many ethernet ports do you want to use or do you plan to install a faster network adapter? Lets say you have two 5G ports. With SMB Multichannel its possible to use them in sum and as you plan to install a 10G card in your client you could use 10G in total. Now we can calculate: 10G * 117.5 MByte/s (real throughput per 1G ethernet) = 1175 MByte/s and by that we have two options: buy one M.2 NVMe (assuming your motherboard has such a slot) with a minimum writing speed of 1175 MByte/s buy two or more SATA SSDs and use them in a RAID0, each with a minimum writing speed of 550 MByte/s Verify Continuous Writing Speed of the SSD As an existing "SLC Cache" hides the real transfer speed you need to invest some time to check if your desired SSD model has an SLC cache and how much the SSD throttles after its full. A solution could be to search for "review slc cache" in combination with the model name. Using the image search could be helpful as well (maybe you see a graph with a falling line). If you do not find anything, use Youtube. Many people out there test their new ssd by simply copying a huge amount of files on it. Note: CrystalDiskMark, AS SSD, etc Benchmarks are useless as they only test a really small amount of data (which fits into the fast cache). Durability You could look for the "TBW" value of the SSD, but finally you won't be able to kill the SSD inside the warranty as long your very first filling of your unraid server is done without the SSD Cache. As an example a 1TB Samsung 970 EVO has a TBW of 600 and if your server has a total size of 100TB you would waste 100TBW on your first fill for nothing. If you plan to use Plex, think about using the RAM as your transcoding storage which would save a huge amount of writes to your SSD. Conclusion: Optimize your writings instead of buying an expensive SSD. NAS SSD Do not buy "special" NAS SSDs. They do not offer any benefits compared to the high-end consumer models, but cost more. 7.) More RAM More RAM means more caching and as RAM is even faster than the fastest SSDs, this adds additional boost to your SMB transfers. I recommend installing two identical (or more depening on the amount of slots) RAM modules to benefit from "Dual Channel" speeds. RAM frequency is not as important as RAM size. Read Cache for Downloads If you download a file twice, the second download does not read the file from your disk, instead it uses your RAM only. The same happens if you're loading covers of your MP3s or Movies or if Windows is generating thumbnails of your photo collection. More RAM means more files in your cache. The read cache uses by default 100% of your free RAM. Write Cache for Uploads Linux uses by default 20% of your free RAM to cache writes, before they are written to the disk. You can use the Tips and Tweaks Plugin to change this value or add this to your Go file (with the Config Editor Plugin) sysctl vm.dirty_ratio=20 But before changing this value, you need to be sure to understand the consequences: Never use your NAS without an UPS if you use write caching as this could cause huge data loss! The bigger the write cache, the smaller the read cache (so using 100% of your RAM as write cache is not a good idea!) If you upload files to your server, they are 30 seconds later written to your disk (vm.dirty_expire_centisecs) Without SSD Cache: If your upload size is generally higher than your write cache size, it starts to cleanup the cache and in parallel write the transfer to your HDD(s) which could result in slow SMB transfers. Either you raise your cache size, so its never filled up, or you consider totally disabling the write cache. With SSD Cache: SSDs love parallel transfers (read #6 of this Guide), so a huge writing cache or even full cache is not a problem. But which dirty_ratio value should you set? This is something you need to determine by yourself as its completely individual: At first you need to think about the highest RAM usage that is possible. Like active VMs, Ramdisks, Docker containers, etc. By that you get the smallest amount of free RAM of your server: Total RAM size - Reserved RAM through VMs - Used RAM through Docker Containers - Ramdisks = Free RAM Now the harder part: Determine how much RAM is needed for your read cache. Do not forget that VMs, Docker Containers, Processes etc load files from disks and they are all cached as well. I thought about this and came to this command that counts hot files: find /mnt/cache -type f -amin -86400 ! -size +1G -exec du -bc {} + | grep total$ | cut -f1 | awk '{ total += $1 }; END { print total }' | numfmt --to=iec-i --suffix=B It counts the size of all files on your SSD cache that are accessed in the last 24 hours (86400 seconds) The maximum file size is 1GiB to exclude VM images, docker containers, etc This works only if you hopefully use your cache for your hot shares like appdata, system, etc Of course you could repeat this command on several days to check how it fluctuates. This command must be executed after the mover has finished its work This command isn't perfect as it does not count hot files inside a VM image Now we can calculate: 100 / Total RAM x (Free RAM - Command Result) = vm.dirty_ratio If your calculated "vm.dirty_ratio" is lower than 5% (or even negative), you should lower it to 5 and buy more RAM. between 5% and 20%, set it accordingly, but you should consider buying more RAM. between 20% and 90%, set it accordingly If your calculated "vm.dirty_ratio" is higher than 90%, you are probably not using your SSD cache for hot shares (as you should) or your RAM is huge as hell (congratulation ^^). I suggest not to set a value higher than 90. Of course you need to recalcuate this value if you add more VMs or Docker Containers. #8 Disable haveged Unraid does not trust the randomness of linux and uses haveged instead. By that all encryptions processes on the server use haveged which produces extra load. If you don't need it, disable it through your Go file (CA Config Editor) as follows: # ------------------------------------------------- # disable haveged as we trust /dev/random # https://forums.unraid.net/topic/79616-haveged-daemon/?tab=comments#comment-903452 # ------------------------------------------------- /etc/rc.d/rc.haveged stop
.png.9a4f708867a76b362eeaac6a578d6d21.png)
 1 point
 -
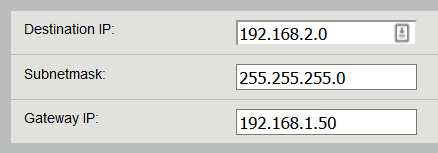
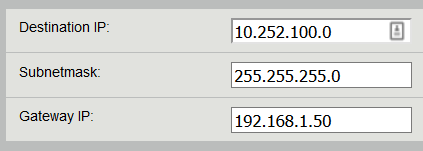
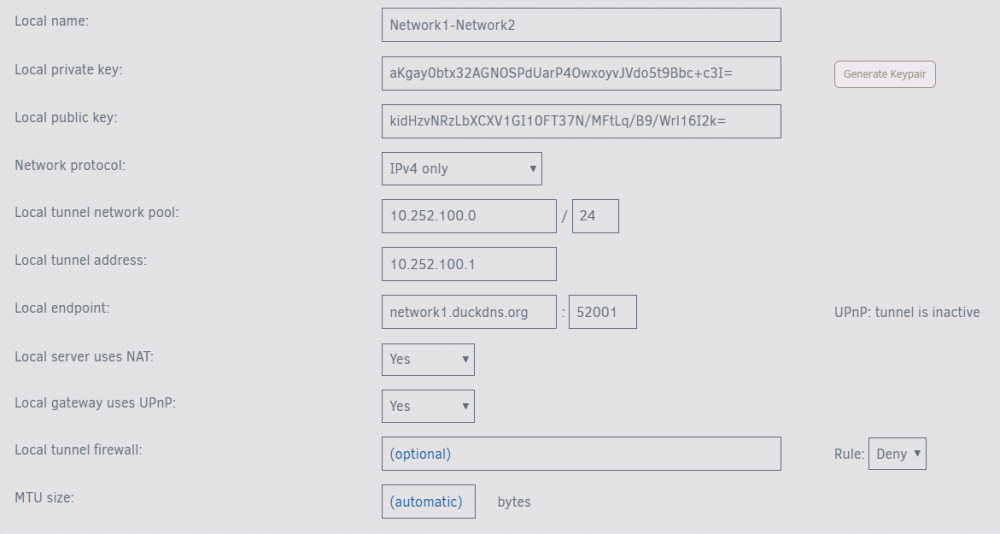
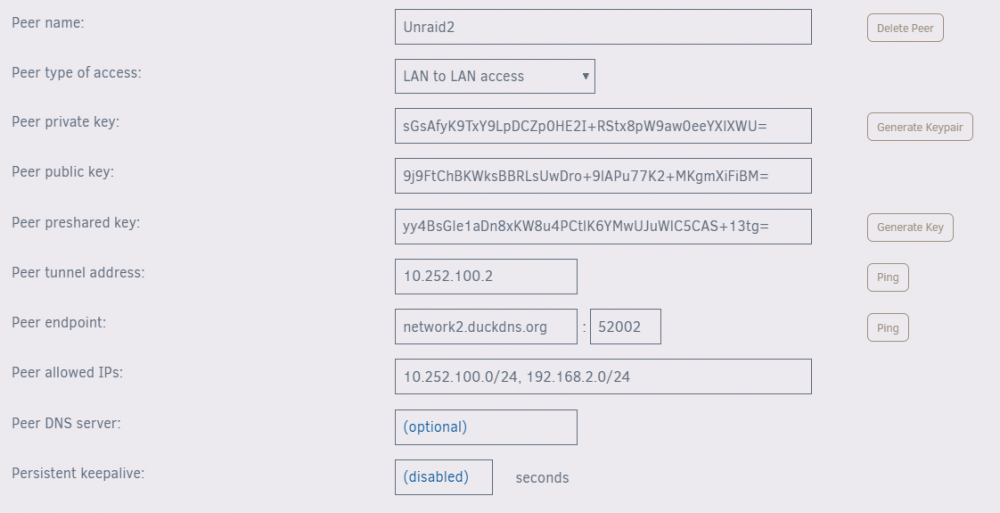
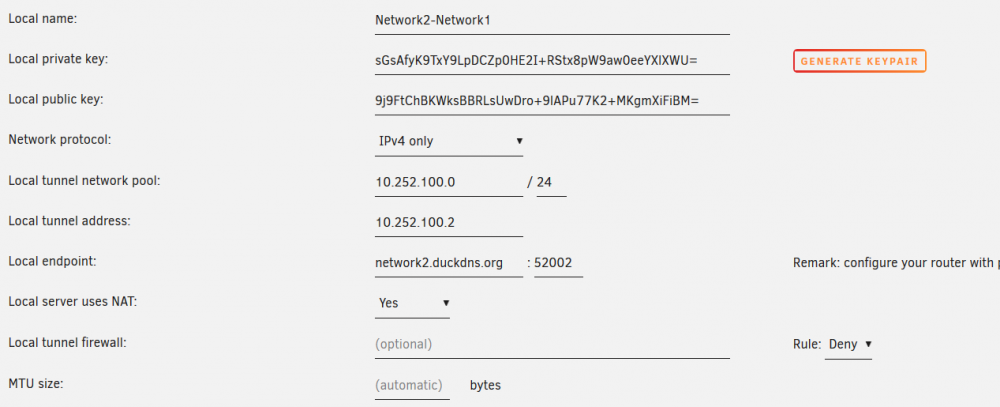
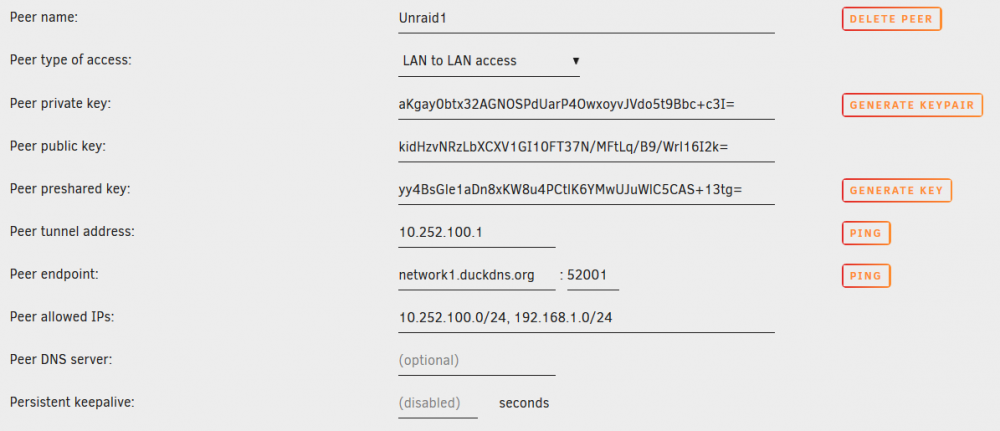
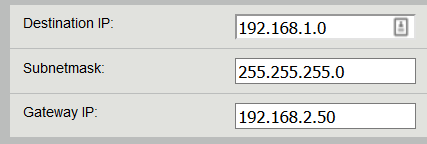
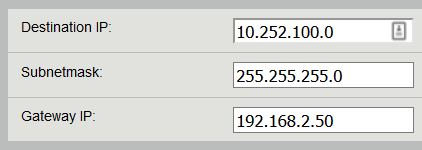
It is possible to setup a LAN to LAN VPN connection between two Unraid systems running Wireguard. The steps below should work on simple networks, if yours is more complicated then you'll need to figure out how to adapt it. This assumes you already have at least one working WireGuard connection and are familiar with how it works. First, gather the following information for your two networks. The names and numbers below are samples, you'll need to adjust for your situation: Network1: 192.168.1.0/24 Router1: 192.168.1.1 Unraid1: 192.168.1.50 Endpoint1 DNS: network1.duckdns.org Endpoint1 Port: 52001 Network2: 192.168.2.0/24 Router2: 192.168.2.1 Unraid2: 192.168.2.50 Endpoint2 DNS: network2.duckdns.org Endpoint2 Port: 52002 VPN Tunnel: 10.252.100.0/24 Unraid1 tunnel IP: 10.252.100.1 Unraid2 tunnel IP: 10.252.100.2 A few things: Note that Network1 and Network2 *have* to be different. For instance, you can't connect two networks that both use the 192.168.0.0/24 subnet. You also need to pick a VPN Tunnel subnet that is not being used on either network, it must be unique. You need to setup DDNS for both networks as well. LSIO has a nice Duck DNS docker you can use if needed. On Unraid1: Create a new Tunnel named "Network1-Network2". Don't add a peer to an existing tunnel, it is better if this is a separate tunnel so you can easily turn it off without affecting your other WireGuard connections. Switch to Advanced Mode Click "Generate Keypair". These are the private and public keys for Unraid1, you will need them later. Set the "local tunnel network pool" to the "VPN Tunnel" you chose above Set the "local tunnel address" to the "Unraid1 tunnel IP" from above Set the "Local endpoint" to the "Endpoint1 DNS" and "Endpoint1 Port" defined above Click Apply Click Add Peer Name it "Unraid2" Choose "LAN to LAN access" Click "Generate Keypair". These are the private and public keys for Unraid2, you will need them later. Click "Generate Key". This is the preshared key, you will need it later. Set the "Peer tunnel address" to the "Unraid2 tunnel IP" defined above Set the "Peer endpoint" to the "Endpoint2 DNS" and "Endpoint2 Port" defined above Set "Peer allowed IPs" to the "VPN Tunnel" and "Network2" defined above, with a comma between. i.e. "10.252.100.0/24, 192.168.2.0/24" Click Apply Start the Tunnel On Router1: If UPnP is disabled, setup a port forward for "Endpoint1 Port" (UDP) that points to "Unraid1" Setup a static route for all of "Network2" that is routed through "Unraid1". Note that if your router asks for a subnetmask, 255.255.255.0 is the equivalent of /24. Setup a second static route for "VPN Tunnel" that also is routed through "Unraid1". On Unraid2: Create a new Tunnel named "Network2-Network1". Switch to Advanced Mode Copy the private and public keys for Unraid2 that you determined above. Take care to use the correct keys or none of this will work. Set the "local tunnel network pool" to the "VPN Tunnel" you chose above Set the "local tunnel address" to the "Unraid2 tunnel IP" from above. Set the "Local endpoint" to the "Endpoint2 DNS" and "Endpoint2 Port" defined above Click Apply Click Add Peer Name it "Unraid1" Choose "LAN to LAN access" Copy the private and public keys for Unraid1 that you determined above Copy the preshared key from above Set the "Peer tunnel address" to the "Unraid1 tunnel IP" defined above Set the "Peer endpoint" to the "Endpoint1 DNS" and "Endpoint1 Port" defined above Set "Peer allowed IPs" to the "VPN Tunnel" and "Network1" defined above, with a comma between. i.e. "10.252.100.0/24, 192.168.1.0/24" Click Apply Start the Tunnel On Router2: If UPnP is disabled, setup a port forward for "Endpoint2 Port" (UDP) that points to "Unraid2" Setup a static route for all of "Network1" that is routed through "Unraid2". Setup a second static route for "VPN Tunnel" that also is routed through "Unraid2". Hopefully at this point your tunnels will connect and devices on one network will be able to reach devices on the other network (by IP address at least, probably not by name) Troubleshooting this will be tough, there is a lot of room for error. I don't have a lot of advice here, just double check that you are using the right values for Unraid1 vs Unraid2 and Network1 vs Network2, etc.
 1 point
 -
I think I've got it now. I was looking for a way to also use this plugin to move all files (ignoring the other filters) daily. Thought the force move of all files would do that for me but I see now that it won't work. I'll go back to running a manual mover via user scripts on a daily schedule.1 point
-
That *implies* that you've got your shares set to be "Cache:Prefer" instead of "Cache:Yes" (assuming that the plugin does actually still work)1 point
-
Yes, this option was removed since it's possible to add multiple pools (so each pool can have its own min free space).1 point
-
ahh thanks for the hint! cool to see a fellow austrian in the unraid forums :))1 point
-
Pls source different supplier.1 point
-
Hello, I'm having the same issue. I followed the instructions, but it didn't help, I keep being kicked out to login page every 3 clicks or so. Is there anything else I can be missing? Should I add custom location block (there's conflicting information about it)? Thanks!1 point
-
Oh my god, deleting the cache did it. Thank you and sorry for that...1 point
-
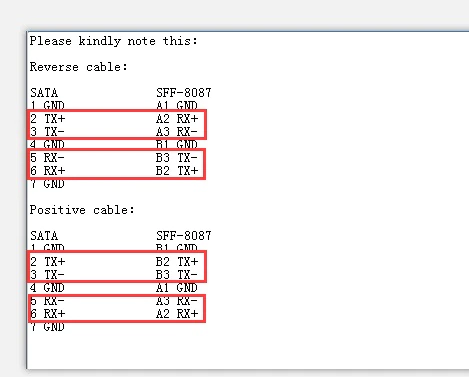
Finally, with all my cables I get the same results (hope this is clear) (disregard the HDD, I just use it to have contact) :
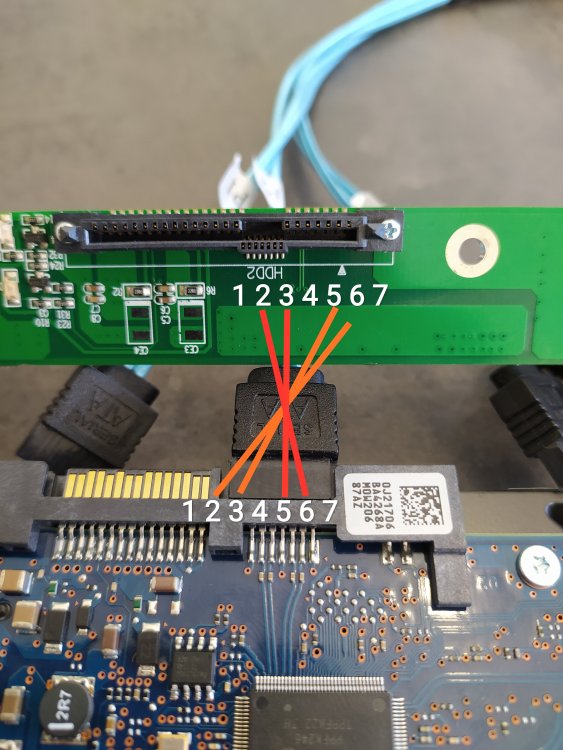 1 point
 -
Beta series is now over. Uninstall the beta CA, and reinstall the production version. Beta series will not receive any further updates.1 point
-
Thanks for the info. I just changed the double-take xml to make the /.storage folder persistent for easy backup in unraid.1 point
-
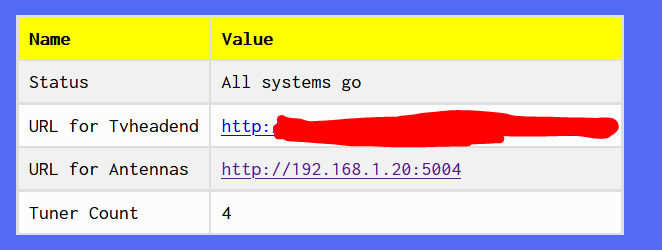
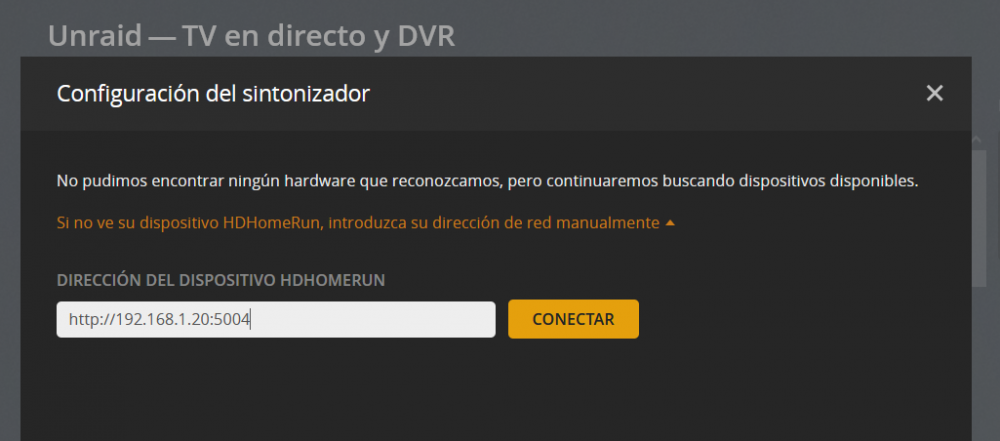
You just need to copy the "URL for Antennas" link into plex manual config and then click connect:
 1 point
 -
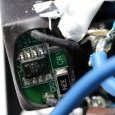
I would suggest you buy another reverse cable and try. Do you have another reverse cable ?? If haven't : Seems you have electronic knowledge, you can plug the forward cable in SFF8087, check the SATA plug port 1 either data pin short to blackplane SATA_1 port which data pin, then do the same thing with reverse cable, if both pin also in short then the reverse cable would be problem. ** edit : due to capacitor in the path, you must test ahead the capacitor, I hope you understand what I mean and the test purpose **
 1 point
 -
Und es wäre wirklich so schlim wenn du einen Ordner mehr mit "Musik" bei deinen Shares hast? Du könntest den Ordner für andere Benutzer verstecken oder was auch noch eine Möglichkeit wäre wenn du ihn nicht bei den Shares sehen willst ist das du ihn als "hidden" exportierst, dann wird er nicht angezeigt aber er wird dennoch exportiert aber du musst dann manuell zB von Windows mit "\\DEINSERVERNAME\Musik" dort hin navigieren um ihn von SMB aus zu erreichen.1 point
-
A good reason to be using the Parity Check Tuning plugin so the check runs in increments outside prime time. The length of checks with modern large drives was one of the main reasons the plugin was developed in the first place.1 point
-
I didn't realize that is what I put in the docs. Last, First should work fine. It should even work with multiple authors in Last, First format. Let me know if you have trouble with that. The github issues page is where most of the discussion on features/bugs is happening right now. As well as github discussion page.1 point
-
Wow, this is sweet! And exactly what I have been looking for! Quick question, your docs say you have to have the Author as the top folder, but as <First> <Last>, all of mine are <Last>, <First>. I am guessing I have to rename all of them for this to work then? If so, have you considered tweaking it so that both could work?1 point
-
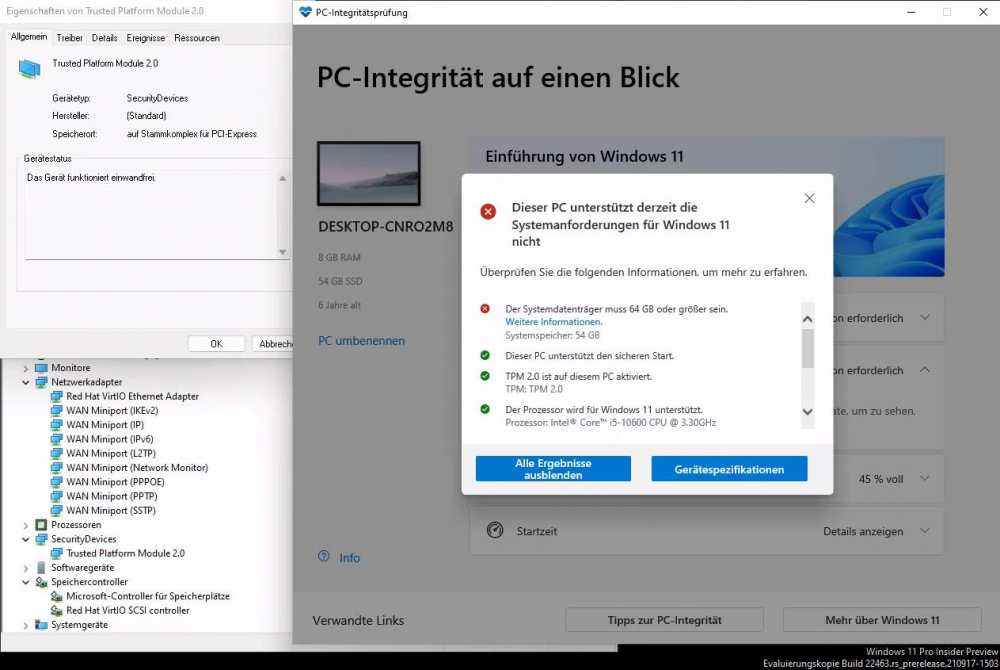
More info on TPM and Windows 11 for 6.10 :1 point
-
Der Server schmiert nach kurzer Zeit ab, wenn man den Stick zieht, daher wird das auch bei einem Defekt so sein. Ja ist ja mittlerweile überall Standard. Nein. Mit (Pseudo)Hardware RAIDs kann unRAID nichts anfangen. Das RAID erstellt also unRAID. Egal. Wie gesagt kannst du jederzeit das Array erweitern. Sobald du die Paritatsdisk ausgewählt hast, hast du auch deine Ausfallsicherheit. Beginnst du direkt mit zwei Disks, dann direkt vom Start weg. Aber das klappt bei dir ja denke ich nicht.1 point
-
Hey im currently running version 5.9.29 and is looking to upgrade. Which version would you recommend in terms of features and stability?1 point
-
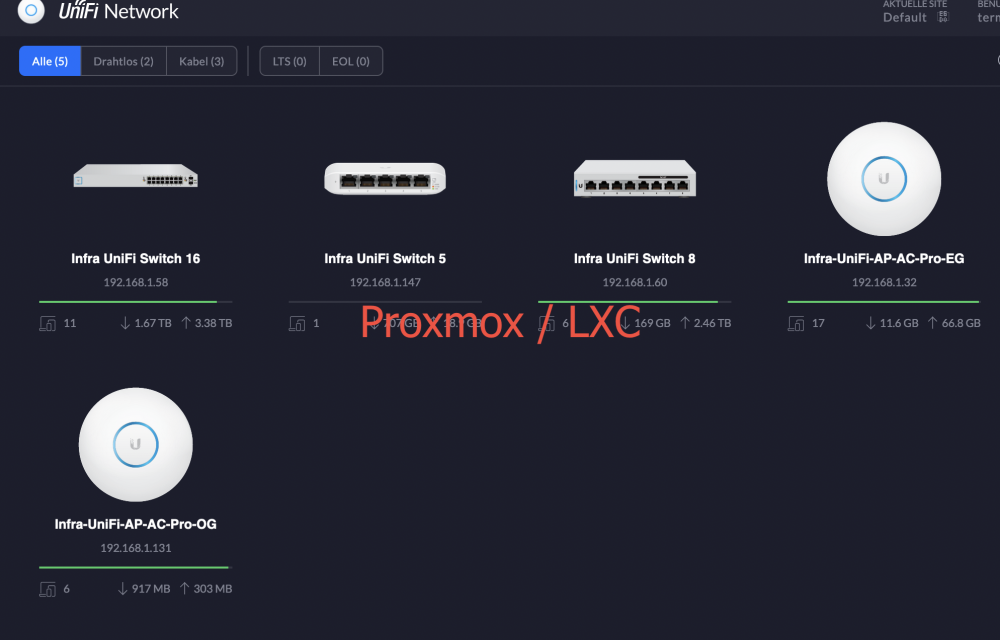
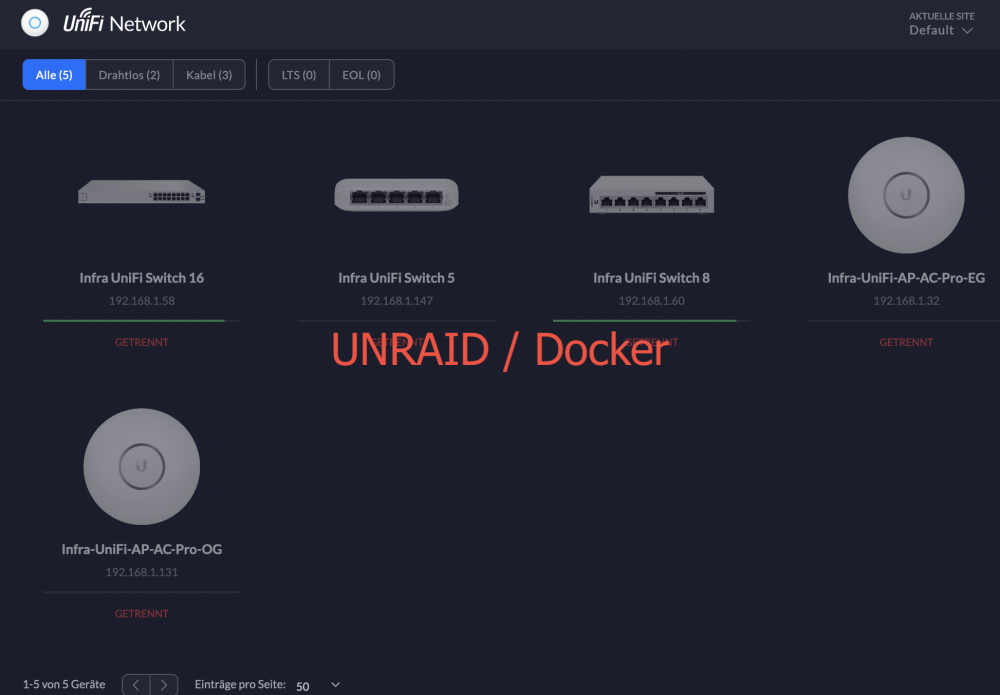
Hi @PeteAsking thank you very much, that was exactly the right command I needed. Now I've got to find out how to switch the devices from my old Proxmox/LXC setup to my new UNRAID/Docker setup. 😀 May I ask you if UNRAID will still offer me Docher/Unifi updates or will this setting now stay at version 6.2.25?
 1 point
 -
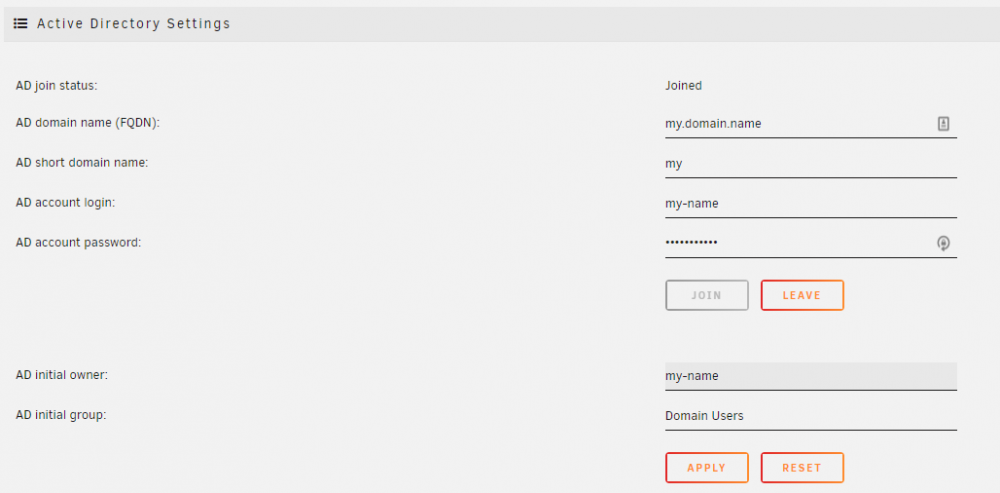
I figured it out: I had to reboot after naming server in 'Settings -> Identification'. I had the 'Settings -> SMB Settings -> Active Directory Settings' wrong: Here the 'AD short domain name' refers to the 'my' in 'my.domain.name'. Hope this helps if anyone else runs into it.
 1 point
 -
How can we update the unraid version to Hoobs 4 ?1 point
-
i can say i made alot of tests with @ich777 and it looks all good to be coming soon (very) its now a matter to make it as easy as possible due webgui which is also pretty far done, so no manual actions would be needed. here from 1 of 3 VM's running simultan incl. vTPM etc ... so also more then 1 VM at a time is working flawlessly tested on a rBar RTX 3070 VM Gaming, GT 1030 Desktop VM and a gvt-g VM (homeoffice), all good, so just be a little patient
 1 point
 -
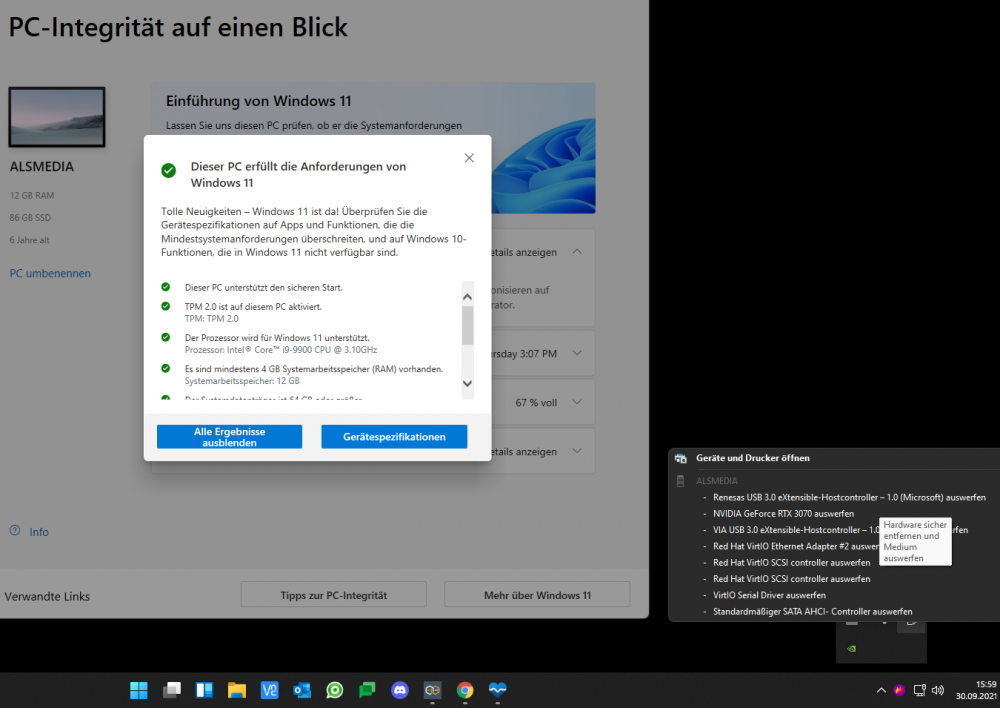
Update... Fresh install from the latest Windows 11 Insider Preview also works just fine (please ignore that it says not compatible because I've only assigned 50GB to the vdisk instead of the required 64GB *doh*) :
 1 point
 -
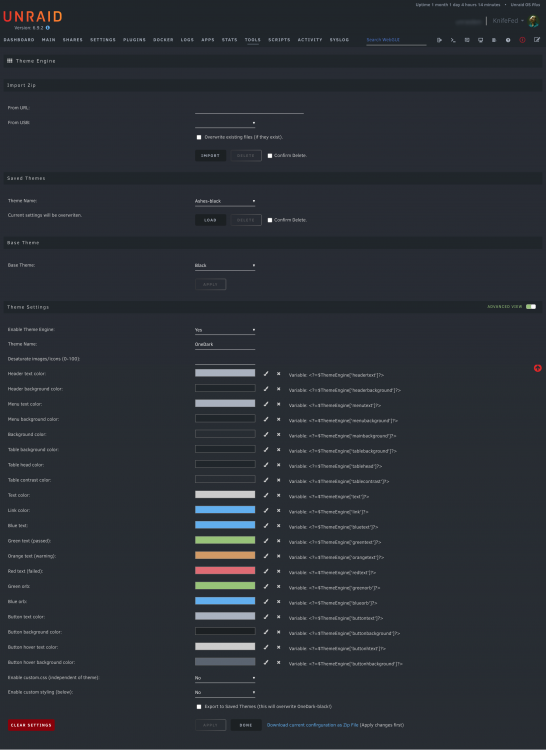
Here's a OneDark theme I made: I've also set the following in Unraid Settings -> Display Settings: If you would like to try it, I've attached a zip file which you can import via Theme Engine. OneDark-black.zip
 1 point
 -
You are right, it's the stupid vmware player vm that is broken. I tried with a vm in Unraid and it loads fine, i did not try with a physical machine yet because i use my desktop as work pc and my notebook has no ethernet. I wonder why vmware player doesnt work1 point
-
Ok, finally solved it. In case anyone runs into this, `umount -l /dev/loop2` worked1 point
-
I'm trying to get HDMI passthrough audio to work too and no luck so far. Here's my device XML: <hostdev mode='subsystem' type='pci' managed='yes'> <driver name='vfio'/> <source> <address domain='0x0000' bus='0x06' slot='0x00' function='0x0'/> </source> <alias name='hostdev0'/> <address type='pci' domain='0x0000' bus='0x06' slot='0x00' function='0x0' multifunction='on'/> </hostdev> <hostdev mode='subsystem' type='pci' managed='yes'> <driver name='vfio'/> <source> <address domain='0x0000' bus='0x06' slot='0x00' function='0x1'/> </source> <alias name='hostdev1'/> <address type='pci' domain='0x0000' bus='0x06' slot='0x00' function='0x1' multifunction='on'/> </hostdev> and the Nvidia card from lspci: 06:00.0 VGA compatible controller: NVIDIA Corporation GP107 [GeForce GTX 1050] (rev a1) 06:00.1 Audio device: NVIDIA Corporation GP107GL High Definition Audio Controller (rev a1) Sound doesn't come through the remote desktop. Windows 10, however, does come through. Using Google remote desktop to access the VMs.1 point
-
Just want to throw this out there, one of the main reasons some of us choose to mess with compose is to get around some of the limitation of the unRAID template system. In particular when it comes to complex multi-container applications, which often use several frontend and backend networks.1 point


.png.9a4f708867a76b362eeaac6a578d6d21.png)