Leaderboard


Popular Content
Showing content with the highest reputation on 10/18/21 in all areas
-
I would really like to see the new/trending/top new installs links back on the sidebar. I use them for discovery a lot of the time, and right now you have to Show More, do your browsing, click on the apps link again, then Show More on the next category. That's my only real complaint with the redesign, I'm happy to have the option to toggle descriptions as well. Thanks for all the work, Squid!2 points
-
My system was suffering from this condition. I could not execute this fix quoted above due to file locks. I was able to resolve the problem by de-activating the flash backup in the MyServers plug in, rebooting, and re-activating the flash backup. I hope this fix sticks. 🙂2 points
-
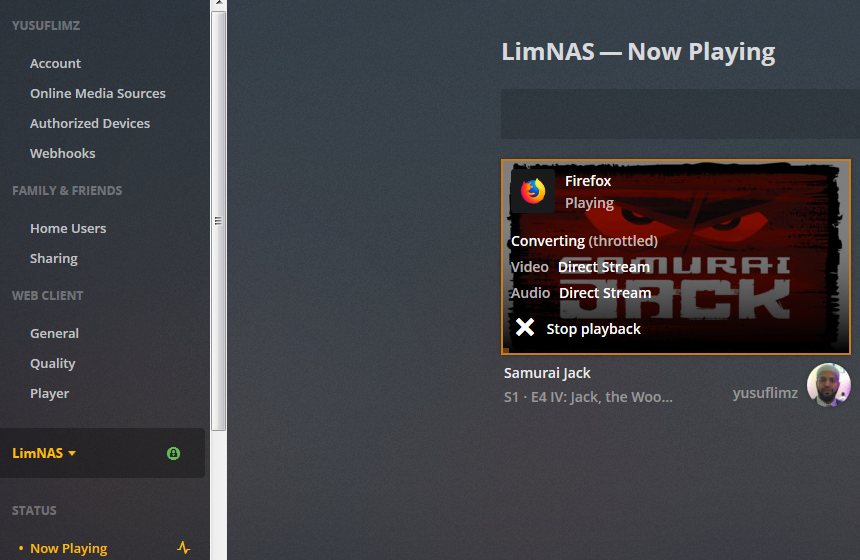
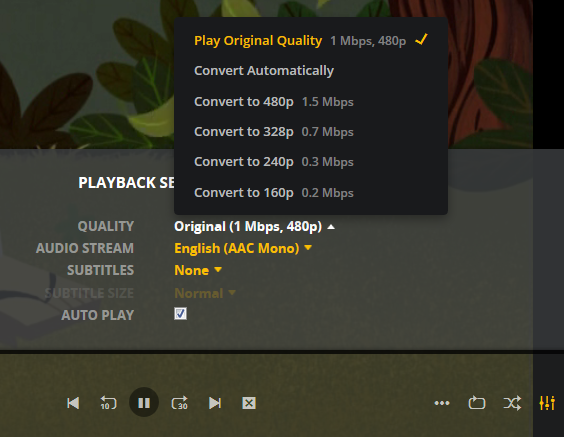
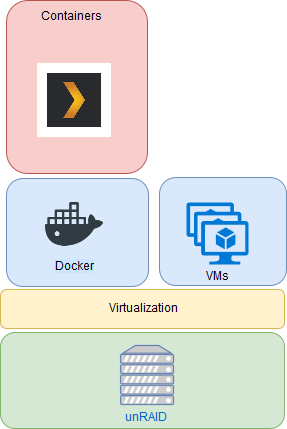
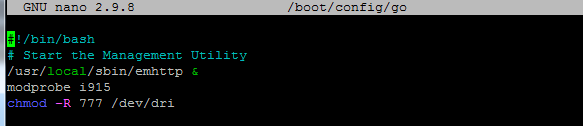
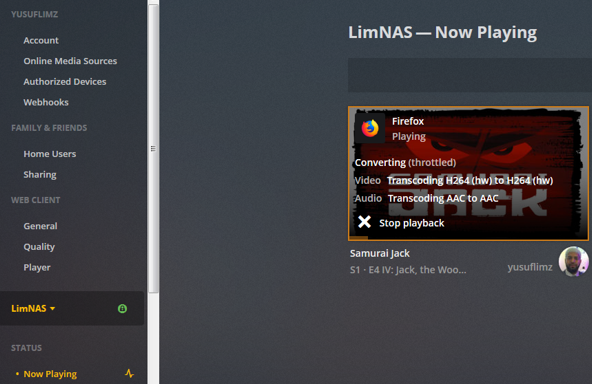
***Update*** : Apologies, it seems like there was an update to the Unraid forums which removed the carriage returns in my code blocks. This was causing people to get errors when typing commands verbatim. I've fixed the code blocks below and all should be Plexing perfectly now Y =========== Granted this has been covered in a few other posts but I just wanted to have it with a little bit of layout and structure. Special thanks to [mention=9167]Hoopster[/mention] whose post(s) I took this from. What is Plex Hardware Acceleration? When streaming media from Plex, a few things are happening. Plex will check against the device trying to play the media: Media is stored in a compatible file container Media is encoded in a compatible bitrate Media is encoded with compatible codecs Media is a compatible resolution Bandwith is sufficient If all of the above is met, Plex will Direct Play or send the media directly to the client without being changed. This is great in most cases as there will be very little if any overhead on your CPU. This should be okay in most cases, but you may be accessing Plex remotely or on a device that is having difficulty with the source media. You could either manually convert each file or get Plex to transcode the file on the fly into another format to be played. A simple example: Your source file is stored in 1080p. You're away from home and you have a crappy internet connection. Playing the file in 1080p is taking up too much bandwith so to get a better experience you can watch your media in glorious 240p without stuttering / buffering on your little mobile device by getting Plex to transcode the file first. This is because a 240p file will require considerably less bandwith compared to a 1080p file. The issue is that depending on which format your transcoding from and to, this can absolutely pin all your CPU cores at 100% which means you're gonna have a bad time. Fortunately Intel CPUs have a little thing called Quick Sync which is their native hardware encoding and decoding core. This can dramatically reduce the CPU overhead required for transcoding and Plex can leverage this using their Hardware Acceleration feature. How Do I Know If I'm Transcoding? You're able to see how media is being served by playing a first something on a device. Log into Plex and go to Settings > Status > Now Playing As you can see this file is being direct played, so there's no transcoding happening. If you see (throttled) it's a good sign. It just means is that your Plex Media Server is able to perform the transcode faster than is necessary. To initiate some transcoding, go to where your media is playing. Click on Settings > Quality > Show All > Choose a Quality that isn't the Default one If you head back to the Now Playing section in Plex you will see that the stream is now being Transcoded. I have Quick Sync enabled hence the "(hw)" which stands for, you guessed it, Hardware. "(hw)" will not be shown if Quick Sync isn't being used in transcoding. PreRequisites 1. A Plex Pass - If you require Plex Hardware Acceleration Test to see if your system is capable before buying a Plex Pass. 2. Intel CPU that has Quick Sync Capability - Search for your CPU using Intel ARK 3. Compatible Motherboard You will need to enable iGPU on your motherboard BIOS In some cases this may require you to have the HDMI output plugged in and connected to a monitor in order for it to be active. If you find that this is the case on your setup you can buy a dummy HDMI doo-dad that tricks your unRAID box into thinking that something is plugged in. Some machines like the HP MicroServer Gen8 have iLO / IPMI which allows the server to be monitored / managed remotely. Unfortunately this means that the server has 2 GPUs and ALL GPU output from the server passed through the ancient Matrox GPU. So as far as any OS is concerned even though the Intel CPU supports Quick Sync, the Matrox one doesn't. =/ you'd have better luck using the new unRAID Nvidia Plugin. Check Your Setup If your config meets all of the above requirements, give these commands a shot, you should know straight away if you can use Hardware Acceleration. Login to your unRAID box using the GUI and open a terminal window. Or SSH into your box if that's your thing. Type: cd /dev/dri ls If you see an output like the one above your unRAID box has its Quick Sync enabled. The two items were interested in specifically are card0 and renderD128. If you can't see it not to worry type this: modprobe i915 There should be no return or errors in the output. Now again run: cd /dev/dri ls You should see the expected items ie. card0 and renderD128 Give your Container Access Lastly we need to give our container access to the Quick Sync device. I am going to passively aggressively mention that they are indeed called containers and not dockers. Dockers are manufacturers of boots and pants company and have nothing to do with virtualization or software development, yet. Okay rant over. We need to do this because the Docker host and its underlying containers don't have access to anything on unRAID unless you give it to them. This is done via Paths, Ports, Variables, Labels or in this case Devices. We want to provide our Plex container with access to one of the devices on our unRAID box. We need to change the relevant permissions on our Quick Sync Device which we do by typing into the terminal window: chmod -R 777 /dev/dri Once that's done Head over to the Docker Tab, click on the your Plex container. Scroll to the bottom click on Add another Path, Port, Variable Select Device from the drop down Enter the following: Name: /dev/dri Value: /dev/dri Click Save followed by Apply. Log Back into Plex and navigate to Settings > Transcoder. Click on the button to SHOW ADVANCED Enable "Use hardware acceleration where available". You can now do the same test we did above by playing a stream, changing it's Quality to something that isn't its original format and Checking the Now Playing section to see if Hardware Acceleration is enabled. If you see "(hw)" congrats! You're using Quick Sync and Hardware acceleration [emoji4] Persist your config On Reboot unRAID will not run those commands again unless we put it in our go file. So when ready type into terminal: nano /boot/config/go Add the following lines to the bottom of the go file modprobe i915 chmod -R 777 /dev/dri Press Ctrl X, followed by Y to save your go file. And you should be golden!


 1 point
 -
Uptime Kuma is a status monitor, similar to Uptime Robot that supports multiple notifications systems. Docker is based off official container, very simple and easy to use! If you have issues with the software, please contact dev on his github page here https://github.com/louislam/uptime-kuma Post here if your issue is specific to unraid setup/docker implementation for Uptime Kuma.1 point
-
Thanks for the tip. I will definitively research this thread before installing my Plex docker. Better doing it right the first time …1 point
-
Exactly! Cache drive can host your dockers as well as serve as the cache drive for your array. In theory you could even put VMs on there if you wanted (though I wouldn't recommend it. VMs perform best with their own dedicated drive). The docker image and the associated docker files live on the cache drive, while the media lives on the array drives. You could backup the docker files to the array if you like (I believe there is a plugin that does that... though it may have been deprecated... poke around Community Apps - install the plugin if you haven't yet. Makes finding/installing dockers/plugins much easier). Certainly wouldn't hurt and would save them if the cache drive ever failed. No worries. We all start somewhere!1 point
-
looks like all reasonable (max. TDP) AMD GPUs are sold out or priced like a decent car , Haven't followed that area to close but the mining / supply shortage seem to have still an impact on the marked,1 point
-
Thanks for the new version. With a little finegeling i managed to get it to work with flax.1 point
-
Yes, of course, mac os needs a physical gpu to have video acceleration to which you can attach a dummy plug to emulate an attached monitor if you only access mac os remotely. As far as gpu choice amd should be better, even if they suffer the so called gpu reset bug, but patch in the kernel exists to overcome this issue (gnif vendor reset patch, implemented as an addon for unraid). I would avoid nvidia, for compatibility, I have a kepler gtx titan black, but it will no more supported in monterey and a patch will be required. The 1030 you mention, for example, is compatibile only up to high sierra with the nvdia drivers, no support in mojave/catalina/big sur/monterey. You should read the "dortania gpu guide": from there you can see gpu comparibility.1 point
-
The parity swap process is documented in the online documentation that can be accessed via the Manual link at the bottom of the Unraid GUI.1 point
-
My library follow the very same structure, is ready to go! Being able to apply the Metadata into the ID3 tags would be awsome, right now Calibre is a powefull tool in find the correct info among the web but when we talk about audiobooks there is no way to "export his knowledge". Bring his Embed Metadata tool in audiobookshelf would be a killing feature imho!1 point
-
Good day. Machinaris v0.6.0 is now available with support for many more blockchain forks: - NChain- cross-farming support for this blockchain fork. - HDDCoin - cross-farming support for this blockchain fork. - Chives - support for this blockchain fork. - Flax - now farmed in a separate Docker container. Core enhancements to underlying components include: - Plotman - enhancement to support plotting for Chives via Madmax. - Chiadog - enhancement to support monitoring of other blockchain forks. Really big thanks to all those that helped review and provide feedback on this big step forward for Machinaris! Unraid users of Machinaris, please follow the upgrade guide: https://github.com/guydavis/machinaris/wiki/Unraid#how-do-i-update-from-v05x-to-v060-with-fork-support1 point
-
Looks like there never was a valid xfs fileystem on that disk, most likely it was added to the array but never formatted.1 point
-
If you still need help with this post current diags.1 point
-
Cec2019 aktivieren. Mehr braucht es bei dem Board nicht. Siehe auch: https://www.hardwareluxx.de/community/threads/die-sparsamsten-systeme-30w-idle.1007101/page-68#post-284464591 point
-
i sloved it, with support of discord people and forums, i had to change my mobo settings to legacy, i recreated the usb with no uefi, and yes it all works fine for now, iommu checked gpu audio/video and the vbios i used is created with that script from that youtube video, i assume he knows what he created , so far so good it all works except i wont get full resolution of 5120x1440, but i think thats because the hdmi cable i use,1 point
-
It appears that disk1 has dropped offline as there is no SMART information for it in the Diagnostics. This will be what is causing the parity errors. It will also explain why you cannot see all your data. you will probably need to power cycle the server to see if you can get disk1 back online. After doing so post new pDiagnostics.1 point
-
Yep preclear still going strong on those 2 drives. 20h elapsed.1 point
-
Try stopping the array from the Main tab and time how long it takes for the array to stop. That will tell you if the 'Shutdown time-out' value is correct.1 point
-
...das käme darauf an, was Du machen und vorbereiten willst. Plugins installieren usw...ja...warum nicht. Allerdings so Sachen, wie Nextcloud/SWAG würde ich erst in Angriff nehmen, wenn die Ziel-Hardware am Start ist. Klar bleibt eine IP statisch, aber die MAC Adresse ändert sich mit dem neuen System, wel neuer NIC...sowas wird gerne in Zertifikaten benutzt und dann suchst Du Dir nen Wolf, wenn was nicht geht.1 point
-
Just wanted to update this that the new SSD resolved the issue and haven't had any problems since i replaced it.1 point
-
Hi @advplyr. Thanks once again for the great app and his develpment. Right now I have my audiobook's library in Calibre, it works pretty well even with my italian editions. I'm struggling to find a way to embed metadata files into the files, unfortunately Calibre can't write the metadata from the .opf files into the ID3 MP3 tags. This means no info in my audiobook player (besides Title and Artist) ....so sad!! Do you think this could be a feature? Thanks in advance.1 point
-
Thanks @OrneryTaurus. That worked.1 point
-
Das is komplett egal. Früher (vor 20 Jahren) gabs Festplatten mit definierter Einbaulage - waagrecht oder 90° hochgestellt. Das gibt's schon lange nicht mehr... die Dinger arbeiten sogar Kopf über oder im 45°-Winkel 😉 Was sie natürlich nach wie vor nicht mögen, sind Bewegungen wärend des Betriebes - da geht aber der Kopf sofort in Parkstellung, also keine Gefahr für die Platte 👍1 point
-
Wie du gesehen hast, braucht das Sys ca. 50 W, wenn alle Platten im Sleep sind. Das könnte von den drei Controller-Karten herrühren, da zumindest der HBA und der 10GBit-Controller schon einiges verbrauchen (ca. 13-15W).1 point
-
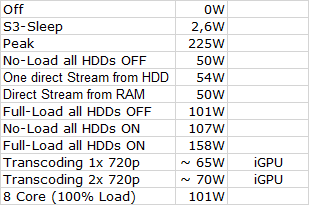
Ziemlich moderat. Im Leerlauf ~50W und beim transcodieren ~65-70W (2 Streams in 720p) Da das Transcoding über die iGPU läuft, hab ich die CPU im BIOS noch auf ein Leistungslimit von 45W begrenzt - das spart etwas Energie beim Parity-Check. Hier noch die ganze Aufstellung:
 1 point
 -
Thank you very much. I’m now upgraded to 6.4.54 and everything is Working fine 👍👍1 point
-
Sorry für die später Antwort. Ich war übers Wochenende im Kurzurlaub. Ich habe jetzt jDownloader inkl. appdate Reste gelöscht, dann sogar das ganze Share "Daten" gelöscht und neu erstellt und jDownloader neu installiert und konfiguriert. Wenn ich jetzt eine Datei runterlade, sieht es von den Rechten genauso aus, wie bei dir und ich kann per SMB, umbenennen und löschen etc. Keine Ahnung was da schief gelaufen ist. Danke für die Hilfe.1 point
-
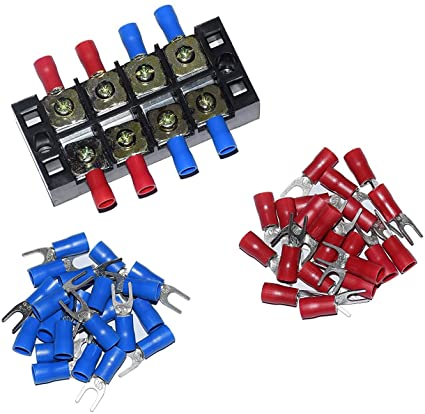
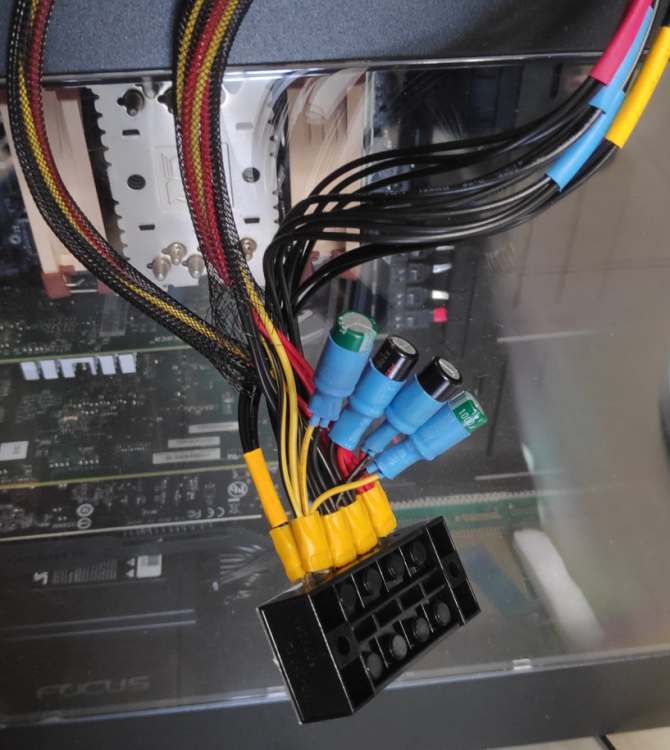
I will build something use DIY component. One side coming from PSU and the other side connect to harddisk. 4 terminal are 12v G G 5V. Each "Insulated Terminal Barrier Strip" ( red black yellow ) will insert 3 or 4 wire and I will soldering to ensure reliable connection. I will build different harddisk wire set ( black wire with correct diameter ) for different need, just detach / attach at terminal block. Each wire will connect max 4 disk, and inset to DIY SATA plug at the end. Anyway, max 16 disks, never use Y power splitter. Or something like that, if connect point have two "Insulated Terminal Barrier Strip", then it can increase the no. of connect device or to change the direction.
 1 point
 -
Every time I have installed a Windows VM, if the Shell> prompt appears I just type 'exit' at the prompt and installation continues normally.1 point
-
1 point
-
Ja hat es - das Board kann ich empfehlen, da ich es selbst verwende 😉1 point
-
Sobald du auf "Add Pool" klickst, fragt der dich aus wie vielen Datenträgern dein Pool bestehen soll. Solange du keinen Pool erstellst, tauchen die SSDs einfach nur als Unassigned Devices unter dem Array auf. Du musst also aktiv werden um sie irgendwo zuzuweisen. Theoretisch könntest du zB auch ein Array komplett aus SSDs erstellen und gar keinen Pool nutzen. Das kann der Nutzer eben alles frei entscheiden. Von Emby habe ich keine Ahnung. Ist das ein Docker? Dann solltest du mit den Daten des Nutzerverzeichnises 1:1 weitermachen können. Ein Docker interessiert sich nicht dafür worauf er läuft. Wichtig ist nur, dass die eingestellten Container-Pfade gleich bleiben und dass der Container in dem Pfad die Dateien so vorfindet, wie er sie auch vorher gefunden hat. Wenn dir das zu viel Kopfzerbrechen verursacht: Neue Platte kaufen 😁1 point
-
Please wait a few more days... Sent from my C641 point
-
Next release will have the option to enable descriptions on all cards1 point
-
I think thats caused by Ryzen 5xxx and sadly enough I have no hardware to test this further. I will look into this if a update will/can solve this. Sent from my C641 point
-
I switched to another case with a new backplane. Works now fine for a while. THX.1 point
-
2. the installation iso is uefi capable (FS0 is there), so no need to change to seabios, the windows installer and the virtio iso are already attached to the virtual sata controller, no need to change the controller to which the vdisk1 is attached. Issue is somewhere else.1 point
-
Last time i received this error it was because of either: 1) corrupt iso file or 2) wrong bios option selected. (Try SeaBIOS) and maybe change all drives to use SATA1 point
-
Hi! I looked at your xml and apart the boot order lines everything seems ok. Not sure about the ram, you specified 2 GB, which is the minimum requirement for windows 10, if you can you should increase that value a bit..Also for the cpu, I would try to assign 2 cores if it's possible..Note that ram/cpu changes may not be needed it's just a thing to try. Once in the uefi shell (the screenshot you attached) type "exit", the system should reboot and the "press any key to boot from cd" should appear. What happens if you press a key? From your description it reverts back to the uefi shell?1 point
-
No when you set a tag it stays safely on that version until YOU are ready to update. This is a far far far preferrable option than using a tag like "latest" which means one day you will wake up and find nothing is working and all your AP's are offline and you have no clue whats broken. Currently for both of you I would recommend the linuxserver/unifi-controller:version-6.4.54 tag. This is verified to be working safe by at least 3 of us on this thread (Im sure more people are using it but they tend not to post or provide feedback unless things brake even though we ask they post if everything went well so others know), and has few complaints on the unifi forums. For enterprise, there is an older version in the 5 series (5.14.23-ls76) we still recommend that is very safe and unbreakable but for home use this 6 series version is fine and brings you up to date to use the unifi 6 equipment. Eventually everyone will have to upgrade so the more home type people we can push along onto these newer versions (and provide feedback) the better for the people who are in the unfortunate position of being in an enterprise environment with larger numbers of AP's and other unifi stuff that need to be shielded from anything bad happening. @fc0712 you may want to upgrade first to 5.14.23-ls76 and ensure everything is perfect before moving to the 6 series as you are a little way behind. Obviously it goes without saying that you would make a copy (and write down the version) of the docker before upgrading so you can just copy and past back the version you had. I mean if I do have to say that then we are all in trouble. P1 point
-
For now it is emulated, haven't got time yet to look into it how to passtrough a real TPM device but when the new unRAID version drops, passthrough should also be possible.1 point
-
Nevermind, opencore was updated a couple of hours ago to directly fix the ota updates in monterey, so no need for RestrictEvents.1 point
-
OK, dann geht es ja auch damit. Ja, wenn Du das NUT Plugin verwendest, ist das logisch. ...nicht ganz...Du hast die Port-Angabe weggelassen und damit eben den Standard Port 3551 verwendet. So scheint es also konfliktfrei zu laufen....denke es sollte anlaog mit apcupsd auch so gehen, wie bei NUT. ...na, den Stecker ziehen sollte möglich sein Ich habe zB eine smarte Steckdose, welche auch Leistung und Energieverbrauch misst, zwischen Wand und USV ... dann sehe ich was aktuell gezogen wird, wie sich der Energieverbrauch entwickelt und kann natürlich auch vom Sofa aus einen Stromausfall simulieren1 point
-
To anyone else that has this issue (This page isn’t working, 400 error) I think has to do with conflicts with cookies. So using different browser or incognito should work. Alternatively delete the cookies for the domain you are trying to access Duplicati on.1 point
-
Just view it as XML, find the clock section and change the <clock offset='localtime'> to <clock offset='utc'> . Seems like Windows wants UTC as base and adds the timezone to that. Thats why the time goes wrong: it gets localtime from host (which is already +3h e.g) like 14:00, adds offset +3 and you get 17:00. Which is 3 hours ahead.1 point
-
Do you want to change your Unraid forum Display Name? Please contact support! -Spencer1 point
-
Update 2: Issue is fixed, it was SMB 3 transfer issues (known to be the cause on Windows 10), put 'max protocol = SMB2_02' on SMB Extras under settings.1 point
-
I thought I might post this here as it's taken me a while to piece it all together and it may help someone else get Fan Auto Control working. I have a Gigabute Z390 Aorus Elite board. Unraid can't support the fan PWM controler out of the box. I spent a couple of evenigns playing with sensors-detect btu noting was recognised. Then I found this page: https://github.com/a1wong/it87/issues/1 Essentially, you go to Main -> Boot Devices ->Flash -> Syslinux Configuration -> Unraid OS Change the second line from: append initrd=/bzroot to: append initrd=/bzroot acpi_enforce_resources=lax Then add this line to your /boot/config/go file: modprobe it87 force_id=0x8628 Reboot and Fan Auto Control should see your PWM fan.1 point
-
Do you like this for an icon? I think its appropriate.
 1 point


(Small).thumb.png.b884b0484e848c502a315fc27b995f59.png)

.thumb.jpg.25529a82ec4a0fb3d47782b36a1a7049.jpg)