Leaderboard


Popular Content
Showing content with the highest reputation on 10/20/21 in all areas
-
OK. Update just released which allows descriptions to be on the cards (defaults to be no). Enable it in CA Settings Minor performance increase in certain cases Rearranged debugging If you've got issues with CA not loading / the spinner never disappearing then Go to Settings. The CA settings page is now in there also (User Utilities Section) Enable debugging and apply Go to the apps tab. Wait at least 120 seconds Go back to Settings, CA Settings and hit Download Log. Upload the file here. (Also re-added 6.8.0+ compatibility - NOT TESTED)4 points
-
Just remove Just delete, script changes are resetted at boot Yes2 points
-
Yes, just undo everything. As said a reactivation from Windows may be necessary. Sent from my C642 points
-
I made the same mistake with flora. I was able to get mine working again by stopping the main machinaris container, removing the machinaris and stats dbs files under /mnt/user/appdata/machinaris/machinaris/dbs/ and starting it back up again and letting it repopulate those.2 points
-
Just got an email from Roon about some major updates to Linux cores. I guess they’re switching from Mono to .NET which requires libicu to be installed ahead of the update. Any thoughts as to if anything needs to be done on our end for this to work properly? https://help.roonlabs.com/portal/en/kb/articles/linux-performance-improvements2 points
-
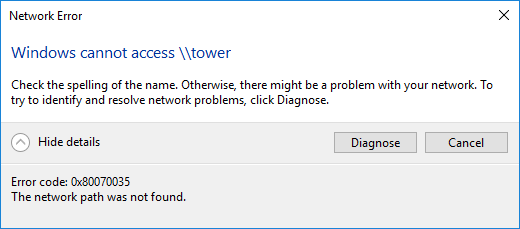
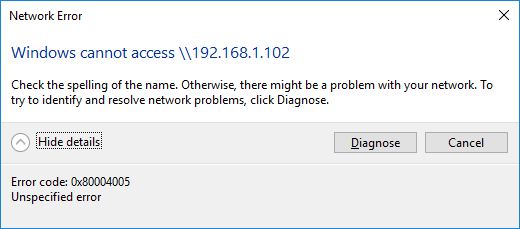
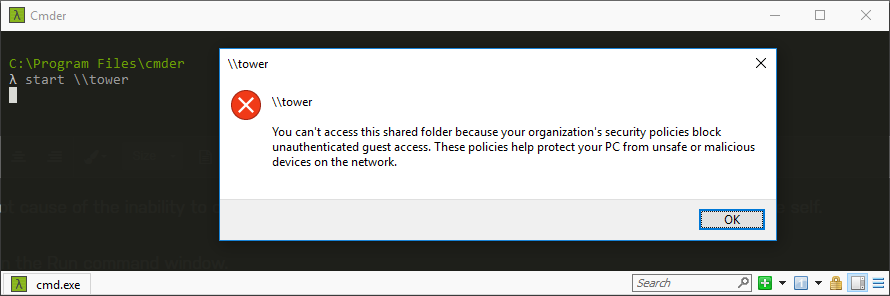
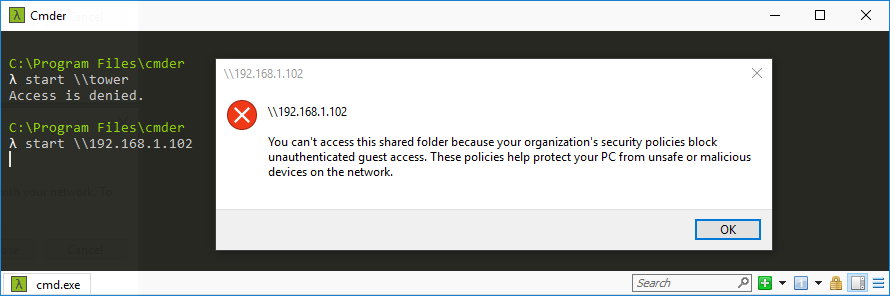
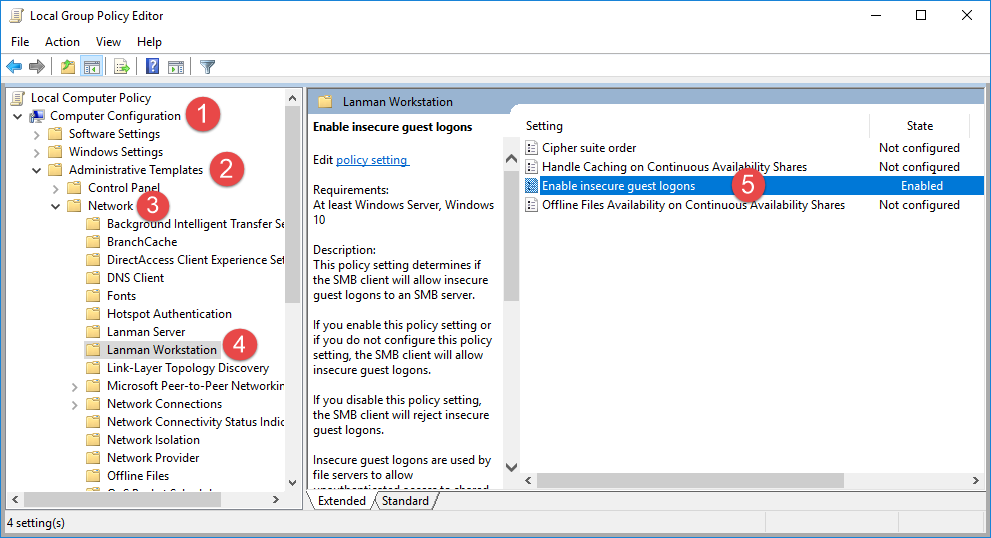
Tons of posts related to Windows 10 and SMB as the root cause of the inability to connect to unRaid that were fruitless so I'm recording this easy fix for my future self. If you cannot access your unRaid shares via DNS name ( \\tower ) and/or via ip address ( \\192.168.x.y ) then try this. These steps do NOT require you to enable SMB 1.0; which is insecure. Directions: Press the Windows key + R shortcut to open the Run command window. Type in gpedit.msc and press OK. Select Computer Configuration -> Administrative Templates -> Network -> Lanman Workstation and double click Enable insecure guest logons and set it to Enabled. Now attempt to access \\tower Related Errors: Windows cannot access \\tower Windows cannot access \\192.168.1.102 You can't access this shared folder because your organization's security policies block unauthenticated guest access. These policies help protect your PC from unsafe or malicious devices on the network.
 1 point
 -
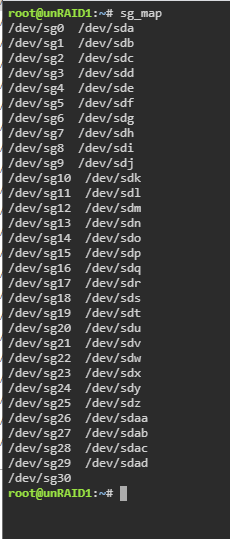
NOTE: There's a TL;DR section at the end of this post with required steps People with specific Seagate Ironwolf disks on LSI controllers have been having issues with Unraid 6.9.0 and 6.9.1. Typically when spinning up the drive could drop off the system. Getting it back on would require checking, unassigning, reassigning and rebuilding its contents (about 24 hours). It happened to me three times in a week across two of my four affected drives. The drive in question is the 8TB Ironwolf ST8000VN004, although 10TB has been mentioned, so it may affect several. There have been various comments and suggestions over the threads, and it appears that there is a workaround solution. The workaround is reversible, so if an official fix comes along you can revert your settings back. This thread is here to consolidate the great advice given by @TDD, @SimonF, @JorgeB and others to hopefully make it easier for people to follow. This thread is also here to hopefully provide a central place for those with the same hardware combo to track developments. NOTE: Carry out these steps at your own risk. Whilst I will list each step I did and it's all possible within Unraid, it's your data. Read through, and only carry anything out if you feel comfortable. I'm far from an expert - I'm just consolidating valuable information scattered - if this is doing more harm than good, or is repeated elsewhere, then close this off. The solution involves making changes to the settings of the Ironwolf disk. This is done by running some Seagate command line utilities (SeaChest) explained by @TDD here The changes we will be making are Disable EPC Disable Low Current Spinup (not confirmed if this is required) The Seagate utilities refer to disks slightly differently than Unraid, but there is a way to translate one to the other, explained by @SimonF here I have carried out these steps and it looks to have solved the issue for me. I've therefore listed them below in case it helps anybody. It is nowhere near as long-winded as it looks - I've just listed literally every step. Note that I am not really a Linux person, so getting the Seagate utilities onto Unraid might look like a right kludge. If there's a better way, let me know. All work is carried out on a Windows machine. I use Notepad to help me prepare commands beforehand, I can construct each command first, then copy and paste it into the terminal. If you have the option, make these changes before upgrading Unraid... Part 1: Identify the disk(s) you need to work on EDIT: See the end of this part for an alternate method of identifying the disks 1. Go down your drives list on the Unraid main tab. Note down the part in brackets next to any relevant disk (eg, sdg, sdaa, sdac, sdad) 2. Open up a Terminal window from the header bar in Unraid 3. Type the following command and press enter. This will give you a list of all drives with their sg and sd reference sg_map 4. Note down the sg reference of each drive you identified in step 1 (eg, sdg=sg6, sdaa=sg26, etc.) There is a second way to get the disk references which you may prefer. It uses SeaChest, so needs carrying out after Part 2 (below). @TDD explains it in this post here... Part 2: Get SeaChest onto Unraid NOTE: I copied SeaChest onto my Flash drive, and then into the tmp folder. There's probably a better way of doing this EDIT: Since writing this the zip file to download has changed its structure, I've updated the instructions to match the new download. 5. Open your flash drive from Windows (eg \\tower\flash), create a folder called "seachest" and enter it 6. Go to https://www.seagate.com/gb/en/support/software/seachest/ and download "SeaChest Utilities" 7. Open the downloaded zip file and navigate to Linux\Lin64\ubuntu-20.04_x86_64\ (when this guide was written, it was just "Linux\Lin64". The naming of the ubuntu folder may change in future downloads) 8. Copy all files from there to the seachest folder on your flash drive Now we need to move the seachest folder to /tmp. I used mc, but many will just copy over with a command. The rest of this part takes place in the Terminal window opened in step 2... 9. Open Midnight Commander by typing "mc" 10. Using arrows and enter, click the ".." entry on the left side 11. Using arrows and enter, click the "/boot" folder 12. Tab to switch to the right panel, use arrows and enter to click the ".." 13. Using arrows and enter, click the "/tmp" folder 14. Tab back to the left panel and press F6 and enter to move the seachest folder into tmp 15. F10 to exit Midnight Commander Finally, we need to change to the seachest folder on /tmp and make these utilities executable... 16. Enter the following commands... cd /tmp/seachest ...to change to your new seachest folder, and... chmod +x SeaChest_* ...to make the files executable. Part 3: Making the changes to your Seagate drive(s) EDIT: When this guide was written, there was what looked like a version number at the end of each file, represented by XXXX below. Now each file has "_x86_64-linux-gnu" so where it mentions XXXX you need to replace with that. This is all done in the Terminal window. The commands here have two things that may be different on your setup - the version of SeaChest downloaded (XXXX) and the drive you're working on (YY). This is where Notepad comes in handy - plan out all required commands first 17. Get the info about a drive... ./SeaChest_Info_XXXX -d /dev/sgYY -i ...in my case (as an example) "SeaChest_Info_150_11923_64 -d /dev/sg6 -i" You should notice that EPC has "enabled" next to it and Low Current Spinup is enabled 18. Disable EPC... ./SeaChest_PowerControl_XXXX -d /dev/sgYY --EPCfeature disable ...for example "SeaChest_PowerControl_1100_11923_64 -d /dev/sg6 --EPCfeature disable" 19. Repeat step 17 to confirm EPC is now disabled 20. Repeat steps 17-19 for any other disks you need to set 21. Disable Low Current Spinup...: ./SeaChest_Configure_XXXX -d /dev/sgYY --lowCurrentSpinup disable ...for example "SeaChest_Configure_1170_11923_64 -d /dev/sg6 --lowCurrentSpinup disable" It is not possible to check this without rebooting, but if you do not get any errors it's likely to be fine. 22. Repeat step 21 for any other disks You should now be good to go. Once this was done (took about 15 minutes) I rebooted and then upgraded from 6.8.3 to 6.9.1. It's been fine since when before I would get a drive drop off every few days. Make sure you have a full backup of 6.8.3, and don't make too many system changes for a while in case you need to roll back. Seachest will be removed when you reboot the system (as it's in /tmp). If you want to retain it on your boot drive, Copy to /tmp instead of moving it. You will need to copy it off /boot to run it each time, as you need to make it executable. Completely fine if you want to hold off for an official fix. I'm not so sure it will be a software fix though, since it affects these specific drives only. It may be a firmware update for the drive, which may just make similar changes to above. As an afterthought, looking through these Seagate utilities, it might be possible to write a user script to completely automate this. Another alternative is to boot onto a linux USB and run it outside of Unraid (would be more difficult to identify drives). *********************************************** TL;DR - Just the Steps I've had to do this several times myself and wanted somewhere to just get all the commands I'll need... Get all /dev/sgYY numbers from list (compared to dashboard disk assignments)... sg_map Download seachest from https://www.seagate.com/gb/en/support/software/seachest/ Extract and copy seachest folder to /tmp Change to seachest and make files executable... cd /tmp/seachest chmod +x SeaChest_* For each drive you need to change (XXXX is suffix in seachest files, YY is number obtained from above)... ./SeaChest_Info_XXXX -d /dev/sgYY -i ./SeaChest_PowerControl_XXXX -d /dev/sgYY --EPCfeature disable ./SeaChest_Configure_XXXX -d /dev/sgYY --lowCurrentSpinup disable Repeat first info command at the end to confirm EPC is disabled. Cold boot to make sure all sorted.
 1 point
 -
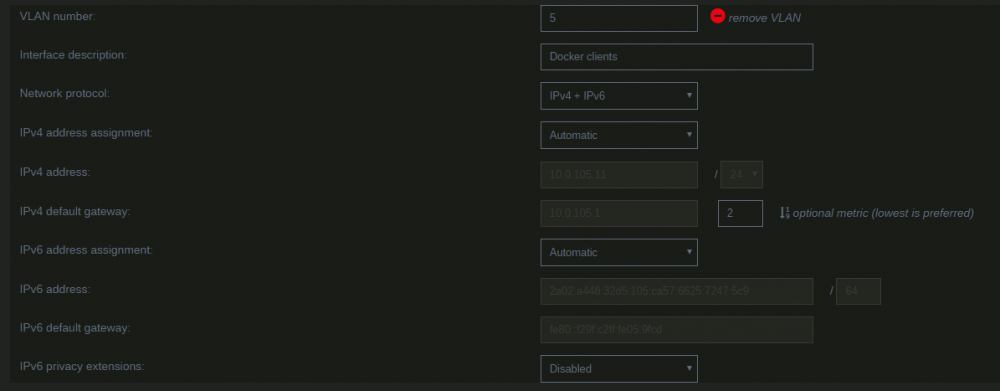
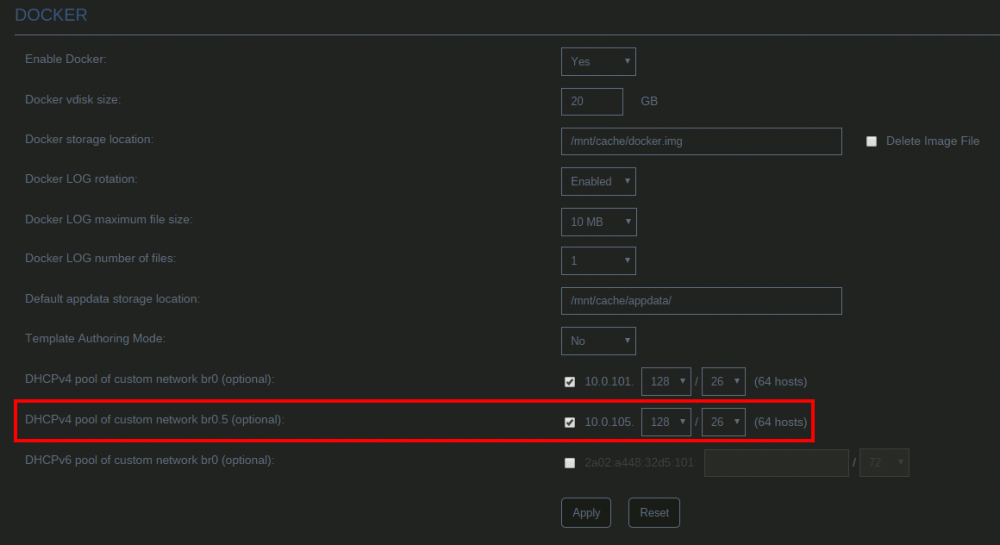
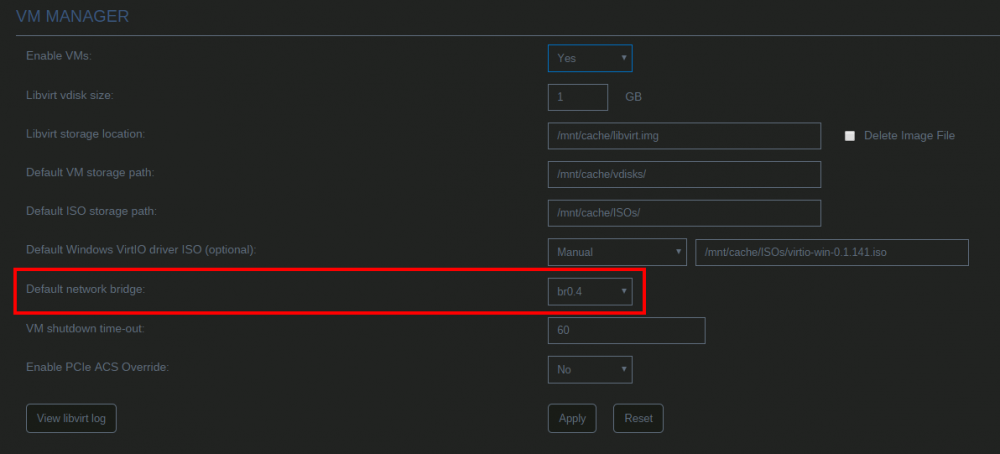
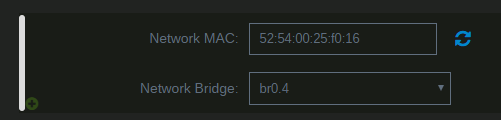
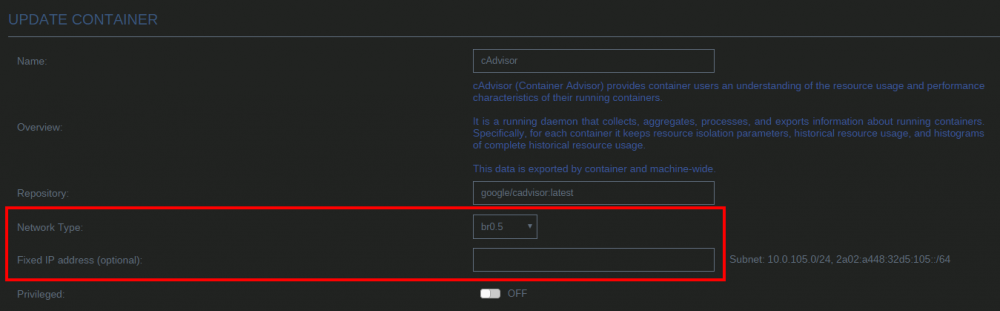
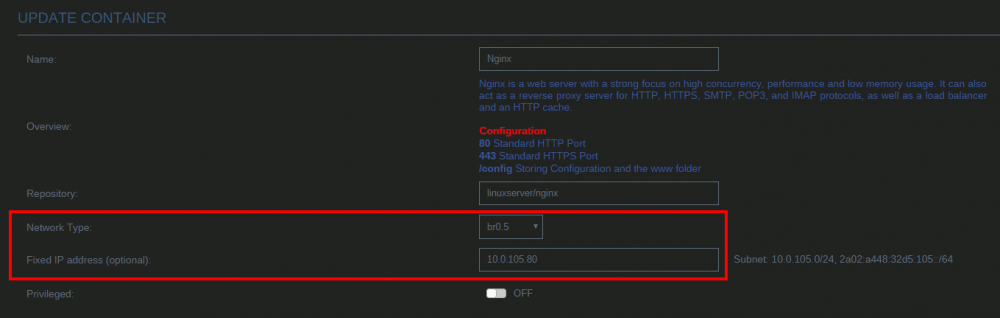
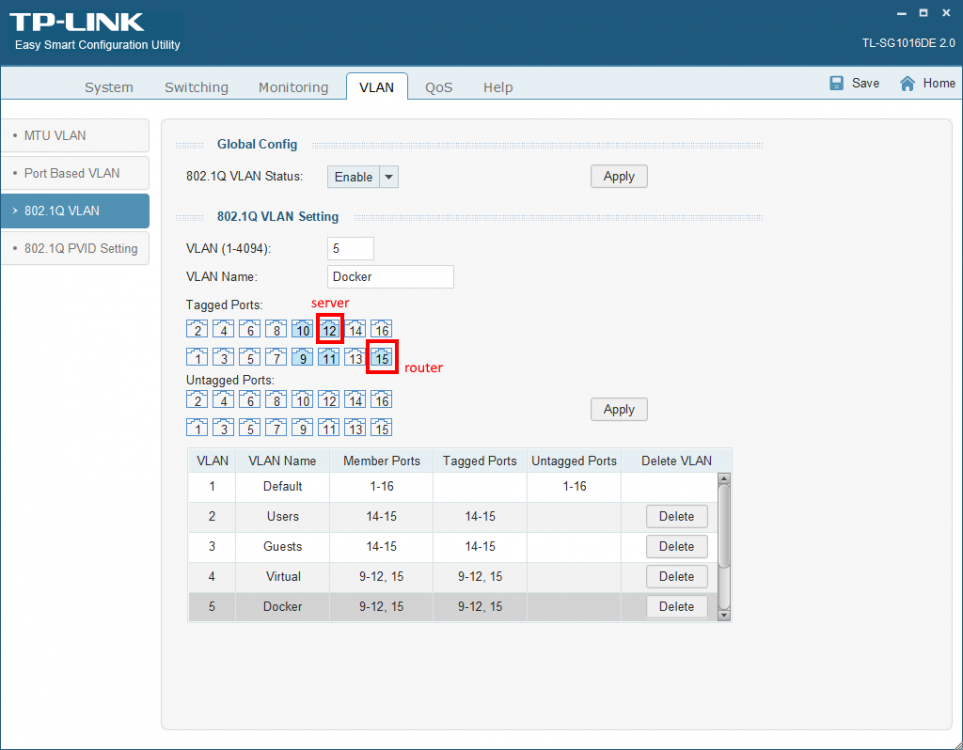
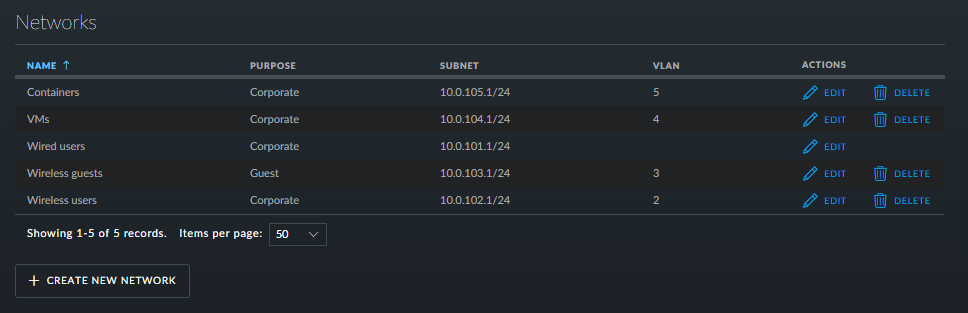
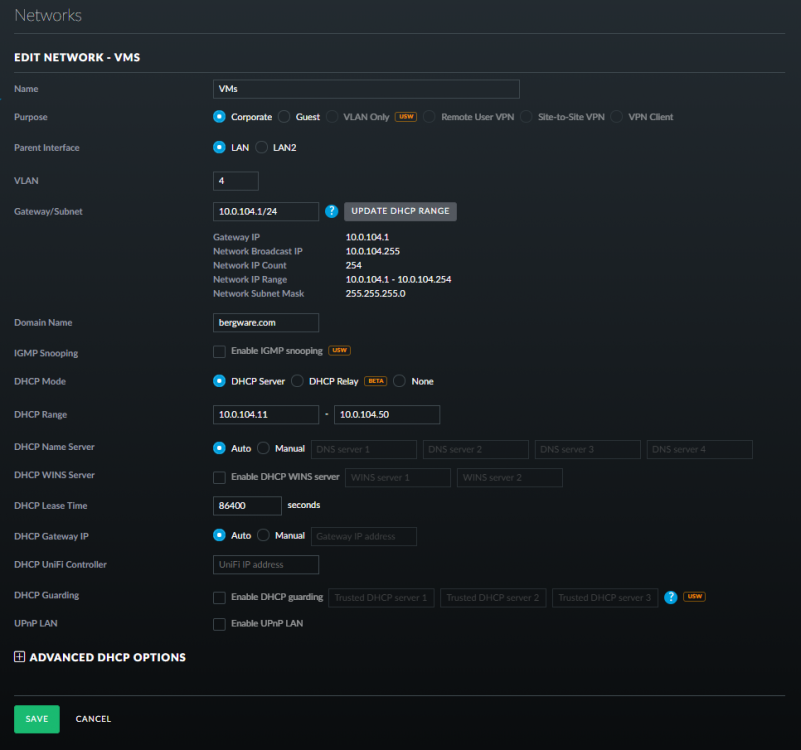
By default unRAID, the VMs and Docker containers all run within the same network. This is a straightforward solution, it does not require any special network setup and for most users this is a suitable solution. Sometimes more isolation is required, for example let VMs and Docker containers run in their own network environment completely separated from the unRAID server. Setting up such an environment needs changes in the unRAID network settings, but also requires your switch and router to have additional network possibilities to support this environment. The example here makes use of VLANs. This is an approach which allows to split your physical cable into two or more logical connections, which can run fully isolated from each other. If your switch does not support VLANs then the same can be achieved by connecting multiple physical ports (this requires however more ports on the unRAID server). The following assingments are done: network 10.0.101.0/24 = unRAID management connection. It runs on the default link (untagged) network 10.0.104.0/24 = isolated network for VMs. It runs on VLAN 4 (tagged) network 10.0.105.0/24 = isolated network for docker containers. It runs on VLAN 5 (tagged) UNRAID NETWORK SETTINGS We start with the main interface. Make sure the bridge function is enabled (this is required for VMs and docker). In this example both IPv4 and IPv6 are used, but this is not mandatory, e.g. IPv4 only is a good starting choice. Here a static IPv4 address is used, but automatic assignment can be used too. In this case it is recommended that your router (DHCP server) always hands out the same IP address to the unRAID server. Lastly enable VLANs for this interface. VM NETWORK SETTINGS VMs will operate on VLAN 4 which corresponds to interface br0.4. Here again IPv4 and IPv6 are enabled, but it may be limited to IPv4 only, without any IP assignment for unRAID itself. On the router DHCP can be configured, which allows VMs to obtain an IP address automatically. DOCKER NETWORK SETTINGS Docker containers operate on VLAN 5 which corresponds to interface br0.5. We need to assign IP addresses on this interface to ensure that Docker "sees" this interface and makes it a choice in the network selection of a container. Assignment can be automatic if you have a DHCP server running on this interface or static otherwise. VM CONFIGURATION We can set interface br0.4 as the default interface for the VMs which we are going to create (existing VMs you'll need to change individually). Here a new VM gets interface br0.4 assigned. DOCKER CONFIGURATION Docker will use its own built-in DHCP server to assign addresses to containers operating on interface br0.5 This DHCP server however isn't aware of any other DHCP servers (your router). Therefor it is recommended to set an IP range to the Docker DHCP server which is outside the range used by your router (if any) and avoid conflicts. This is done in the Docker settings while the service is stopped. When a docker container is created, the network type br0.5 is selected. This lets the container run on the isolated network. IP addresses can be assigned automatically out of the DHCP pool defined earlier. Leave the field "Fixed IP address" empty in this case. Or containers can use a static address. Fill-in the field "Fixed IP address" in this case. This completes the configuration on the unRAID server. Next we have to setup the switch and router to support the new networks we just created on the server. SWITCH CONFIGURATION The switch must be able to assign VLANs to its different ports. Below is a picture of a TP-LINK switch, other brands should have something similar. ROUTER CONFIGURATION The final piece is the router. Remember all connections eventually terminate on the router and this device makes communication between the different networks possible. If you want to allow or deny certain traffic between the networks, firewall rules on the router need to be created. This is however out of scope for this tutorial. Below is an example of a Ubiquiti USG router, again other brands should offer something similar. That's it. All components are configured and able to handle the different communications. Now you need to create VMs and containers which make use of them. Good luck.


 1 point
 -
In this episode, hear an update on Windows 11 support for VMs on Unraid, the process for updating, and potential pitfalls. In addition, @jonp goes deep on VM gaming and how anti-cheat developers are wrongfully targeting VM users for bans. Helpful Links: Expanding a vdisk Expanding Windows VM vdisk partitions Converting from seabios to OVMF1 point
-
This sounds like it could be exactly what I posted about a few posts back. If that Chrome plugin relies on using Deluge's watch folder (aka AutoAdd) to watch for magnet links, I'd look at my post and try that fix.1 point
-
Auf jeden Fall, aber sie hat 125 € gekostet. Da konnte ich nicht nein sagen. Ca 2W (1 bis 2 Seiten vorher siehst du auch meine Messung des ITX): https://www.hardwareluxx.de/community/threads/die-sparsamsten-systeme-30w-idle.1007101/post-28446459 @Anym001 hat das im Einsatz und mit 4 Platten im Spindown um die 8W gehabt. Finde gerade das Foto nicht1 point
-
Ok, thank you very much for this information1 point
-
I would suggest to use e1000-82545em if you want to use e1000, otherwise "virtio-net" is supported too in big sur (better "virtio" if you are using dockers). After this modification check if you can get an ip, you need to setup a bridge network (br0) on unraid first. I would also suggest to manually edit your vm xml to change the bus of ethernet to 0x00 (first free slot is 0x03), change to this: <interface type='bridge'> <mac address='52:54:00:fd:62:ab'/> <source bridge='br0'/> <model type='e1000-82545em'/> <address type='pci' domain='0x0000' bus='0x00' slot='0x03' function='0x0'/> </interface> So the en0 device will be seen as "built-in" in mac os. As far as the GT 710 make sure it's the GK208 variant. Big sur is the latest os which supports GT 710. Monterey can still be run but requires a volume patch to copy drivers from big sur, meaning that you will have an "unsealed" volume, so that will require also sip modification (csrutil disabled and authenticated-root too) --> this translates into csr-active-config 7w8AAA== in opencore config.plist (0xFEF). Apart having a "less secure system" in monterey ota updates should show but you will not be able to download the delta ota (usually 2-3 GB), only the full installer, 11-12 GB, every time an update is available. Please delete the attachment as it contains data that the forum may not allow to be shared (oskey)1 point
-
Ok preclear on those 2x 14TB have completed successfully last night. Not a single error, very stable. As a reminder, those where connected outside of the cage directly to the PSU with the SATA 15 pin cables and to the LSI card. Next step in my testing: connect only one cage without Y splitter and pre-clear another couple of disk in there to see if the Y splitter are the issue. (waiting to receive the components to build my own MOLEX cable to power the cages by mail). Thx again for the time you spent helping me.1 point
-
"Denne språkpakken er et arbeid i gang" <- 😆1 point
-
Hi, Chives is a neat blockchain fork, but is different from all the others. In particular, Chives requires its own plots of size k29, k30, or k31. Please see the wiki for details. Let me know if you have further questions.1 point
-
Please accept my apologies on this error encountered with choosing Import Mnemonic from the initial Setup screen of v0.6.0. Very dumb oversight on my part. I have fixed in the next version. Easiest workaround is to manually create a file on the Unraid filesystem, just a single line with your 24-word mnemonic, at /mnt/user/appdata/machinaris/mnemonic.txt Then restart the Machinaris container and you should be taken right past the setup screen, to the main Summary page. Hope this helps!1 point
-
...the rules cfg should work. Maybe the 10G link just needs more/too much time to become active. What if you swap players? Make unraid passive side and CRS active?? Gesendet von meinem SM-G780G mit Tapatalk1 point
-
...just saying that you're only able to set L2-MTU parameter on a physical Interface..a bonding interface is not a physical one. The active side (unraid) should only advertise the MAC (the unraid bond/bridge) on the active link to the CRS, so it does not get confused (as the bond will have a single MAC, that of the first NIC in it, I think). this is what MT help states: https://help.mikrotik.com/docs/display/ROS/Bonding#Bonding-active-backup active-backup This mode uses only one active slave to transmit packets. The additional slave only becomes active if the primary slave fails. The MAC address of the bonding interface is presented onto the active port to avoid confusing the switch. Active-backup is the best choice in high availability setups with multiple switches that are interconnected. Hmmm.... AFAIK the first NIC in the bond will "lend" its MAC to the bond. Normally, in unraid this is eth0. You should check and re-arrange NIC numbering in the network settings of unraid, so that the 10G is eth0. So when booting for the first time/ after reboot, the 10G should be connected in order to activate the NIC for eth0.1 point
-
Check filesystem on disk19.1 point
-
Doesn't look like a disk problem, you can run an extended SMART test to confirm.1 point
-
Source: I confirm both methods are working, i.e. use qemu 6.1 with machine type 6.0, or use qemu 6.1, machine type 6.1 and global custom argument in libvirt.1 point
-
Thanks so much for the reassurance on that! And for everything! I couldn't have confidently done this without your guidance and feedback! And thanks to everybody else also that chipped in and helped me on this issue. I greatly appreciate it! You're all awesome!1 point
-
It is going to be part of 6.10.0 rc2 so hopefully that is not far off.1 point
-
Check if the drive shows up in BIOS. If it doesn't then reconnect it with a different SATA cable and check in BIOS again. If the drive is still not recognized then change a SATA port on the motherboard.1 point
-
Hello all, building my first server, and i am finding it diffuculty to pass through quadro p4000 , into VM, tried Spaceinvader one (SIO), videos in Youtube, but with out success, problems at hand.. have a supermicro X9drl if motherboard, whose power pin in motherboard doesn't work, i boot from PSU ( i couldn't try the script method of SIO,rest all methods i tried.. any help will be helpful. i get the black screen.. attaching the diagnostic file. any help will be appreciated. thank you. dz-diagnostics-20210125-2138.zip1 point
-
Mi caso fue en aliexpress, pero ahora mismo están muy caras...1 point
-
I checked before and the parity swap procedure completed successfully without any errors, so all should be fine.1 point
-
Getting a new error message that the server is outdated. Two of the players on the newer updated Minecraft version are having the issue whereas two players on the older (matching) version are fine. Is there a way to check the docker for updates? I'm on UnRAID 6.9.2 and docker shows the docker was last created 2 days ago (assuming, updated 2 days ago). EDIT: Sigh, should have checked. Docker > Advanced View (top right) > Force Update for docker container. This fixed it; thanks1 point
-
Yeah. Wish things were easier. For posterity, in case someone else is facing similar issues, I should also mention that: - I just used a vBIOS from techpowerup and did not dump a bios from my GPU (was having an issue with spaceinvaderone's script anyway). Apart from user scripts and CA, I had no plugins installed - I had to use the param `video=efifb:off` in Unraid boot options - Unraid was booting in UEFI mode - VM type was a Q35 6.01 point
-
Khronokernel reply, apple changed this very recently: https://github.com/acidanthera/bugtracker/issues/1827 We need to wait for apple to fix this.1 point
-
Du baust alles ein. Fügst sie HDD(s) ins Array ein, den Pool aus den SSDs, startest und fertig. Die Standard Shares haben bereits alle die korrekten Cache Settings. Zb appdata steht auf Prefer (bleibt auf SSD).1 point
-
It likely Seagate disk with LSI HBA, wakeup / power-save issue, most read error occur during disk wakeup.1 point
-
Ok pues si nos necesitas ya sabes donde estamos. Saludos cordiales1 point
-
Hi, apologies for the shock. Known issue around default string values in the Chiadog version I enhanced to support the various forks. I'll get it fixed.1 point
-
may try this should solve the most issues ...
 1 point
 -
I really wish you hadn't removed the Docker Hub integration. I realize the templates were pretty bare-bones but it at least filled out the name, description, repository etc. making it a lot faster than going to the Docker page, manually adding a container and starting with a completely blank template.1 point
-
Good day. Machinaris v0.6.0 is now available with support for many more blockchain forks: - NChain- cross-farming support for this blockchain fork. - HDDCoin - cross-farming support for this blockchain fork. - Chives - support for this blockchain fork. - Flax - now farmed in a separate Docker container. Core enhancements to underlying components include: - Plotman - enhancement to support plotting for Chives via Madmax. - Chiadog - enhancement to support monitoring of other blockchain forks. Really big thanks to all those that helped review and provide feedback on this big step forward for Machinaris! Unraid users of Machinaris, please follow the upgrade guide: https://github.com/guydavis/machinaris/wiki/Unraid#how-do-i-update-from-v05x-to-v060-with-fork-support1 point
-
You shoud be able to achieve it by configuring your existing switch but you cannot do that using Unifi Controller. You need to do it via the means offered by your switch. EdgeRouter X cannot either be configured using Unifi Controller. BR, R1 point
-
One of the design considerations was "How to relieve the support requests on the maintainers". This is because most support requests in the forum here (but definitely not all) have to do with the application itself (how do I do this?) vs problems with the container (why won't this install?) Since they're all venues of support, they're all consolidated within the same dropdown, unless there is only a single option available. The order is ReadMe, Project, Discord, Support Thread. On the info screen there's also another option available (Registry). Or put another way, one of the historical "complaints" about CA through the various UI's (this is the 3rd major UI for CA) is "too many buttons". This version should make it simpler. And IMO it's simple enough to use that all of the help text has been removed.1 point
-
AutoAdd Issue in Deluge First, let me say that I've benefited greatly from this container and the help in this thread, so thank you all. And although I'm running the container on a Synology unit, I thought I'd finally give something back here for anyone who may be having a similar issue. Background Container was running great for me up to binhex/arch-delugevpn:2.0.3-2-01, but any time I upgraded past that I had problems with Deluge's AutoAdd functionality (basically its "watch" directory capability that was formerly an external plugin that is now baked into Deluge itself). Certain elements worked like Radarr/Sonnar integration, but other elements broke, like when I used manual search inside Jackett, which relies on a blackhole watch folder. I ended up just rolling back the container, it worked fine again, and I stopped worrying about it for a while. However, with the new (rare) potential for IP leakage, it's been nagging at me to move to the new container versions. Initially, I wasn't sure if it was the container, the VPN, or Deluge itself, but it always kind of felt like Deluge given the VPN was up, I could download torrents, and Radarr/Sonarr integration worked -- it was only the AutoAdd turning itself off and not behaving itself when using Jackett manual searches that wasn't working. I'm actually surprised I haven't seen more comments about this here because of how AWESOME using Jackett this way is! (Y'all are missing out, LOL). The Fix I finally put my mind to figuring this out once and for all yesterday, and I believe I tracked it down. Turns out the baked-into-Deluge AutoAdd is currently broken for certain applications (like watching for Magnets), and that version is in the current BinHex containers. Even though the fix hasn't been promoted into Deluge yet (so of course not in the container yet either), there is a manual fix available, and it's easy (just drop an updated AutoAdd egg into the Deluge PlugIns folder and it will take precedence over the baked-in version). I will say that I literally just implemented and tested, so it's possible I'll still run into problems, but it's looking promising at the moment. Thanks again for this container and this thread, enjoy! The temporary fix can be found here1 point
-
Used to dump my RTX A4000 vbios, attached in case someone else needs it. RTX A4000 - 16gb.rom1 point
-
You need to move the downloaded files to a new location before deleting them from the seedbox. Think of the settings -- receive only --- you delete a file from the seedbox and that change is received also. You should think of Syncthing as an intermediate handler and not as a final destination. Download to a temporary location and then move the files out to their permanent residence. This can be handled by Sonarr/Radarr, not sure about Plex.1 point
-
Well let's analyze this a bit, shall we, since you're taking such a strong interest into this scenario and my position on this matter. I really don't follow the "free" statement honestly. I don't expect free and that's not what I am saying. But anyway, let's say I buy a license and use it for 3 months, I am unhappy with the product or it just no longer fits my requirements, so I turn around around and sale my system which of course comes with the license. So yes to answer your question is a waste of my money if I can't turn around and recover some cost, after just 3 months of use. What you're hearing from me is what you think you want to hear or your interpretation of this matter I never spoke or mentioned about a periodic fee or anything like that. That's a can of worms you don't want to open. Milking the cow is not my favorite type of licensing models and usually I walk away from that, not just walk away but actually RUN Is my money and is my choice to what licensing models I support and give my money to. Is just business, nothing personal This is my last statement on this matter as I feel that I am taking too much valuable time and real estate from support topics Again agree, to disagree, respectfully1 point
-
For transcoding only, no benefit to buy the the more expensive P620. I picked up a PNY Quadro P400 for my system for ~$125, works great for my family's PLEX server.1 point
-
Was hast du denn schon probiert? Hast du sie für Unraid ausgeschlossen zb mit dem VFIO PCI Config Plugin? Hyper V deaktiviert? Nutzt du OVMF als BIOS? ROM der GPU ausgelesen und modifiziert? Hier auch ein Video https://youtu.be/sOifIPJxUrM1 point
-
There was an update for the container midnight and my server auto updated at 6am without problems, and looks like my dbengine database files are persistent now. So looks like the "delete obsolete charts files = no" setting solved the problem.1 point
-
Ok, I looked through the global section of the netdata config file and found this: delete obsolete charts files = yes I set this to "no" and restarted the docker. Maybe this prevent the system from deleting the cache files??? Now testing with this until the next update...1 point
-
@primeval_god After a day of testing this, it is not working as it should. I now have graphs back about 5hours. But I configured the dbengine cache size to 4GB and it runs from about 23hours ago, the cache file size is now about 18MB only. I added a new path to the docker container: /var/cache/netdata (container) -> /mnt/user/appdata/netdata/cache/ (host) It is working correctly, because I can see the generated dbengine files in my appdata/netdata/cache/dbengine folder. But, in the meantime there was an update to the container and I set the docker auto update to run at 6am and my graphs are persistent back exactly to the same time! So I think, when the docker update invoked, it is cleared my dbengine cache completly. How can I resolve this issue? Can I configure the docker somehow for not touching the dbengine cache folder when an update is invoked?1 point
-
This is just to close this and add a little fix for other people searching this topic. Install this in docker : ELK Go through the wiki linked on the docker page, and make sure the variables are correct. Add a variable : MAX_OPEN_FILES set to 65536 To get this to stick you need to set the ELK image as privileged (need to toggle advanced) Download community apps script manager Add the script below to run at start of array: sysctl -w vm.max_map_count=262144 After this elk stack is fully running, you will still need to set it up with index and all that to parse data.1 point