Leaderboard


Popular Content
Showing content with the highest reputation on 01/07/22 in all areas
-
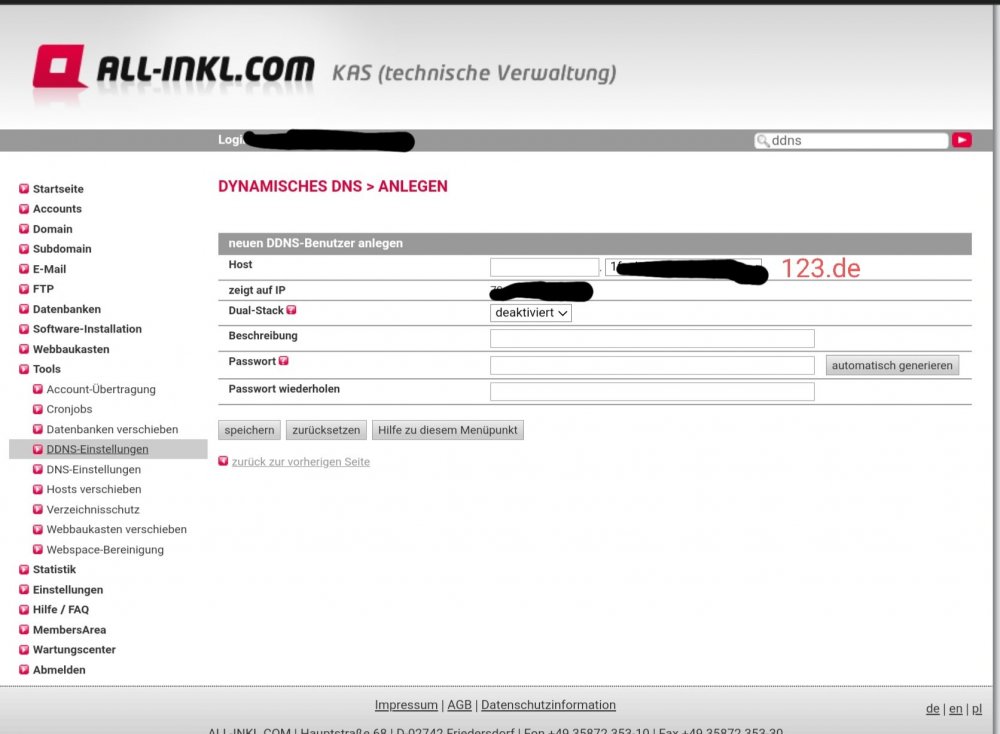
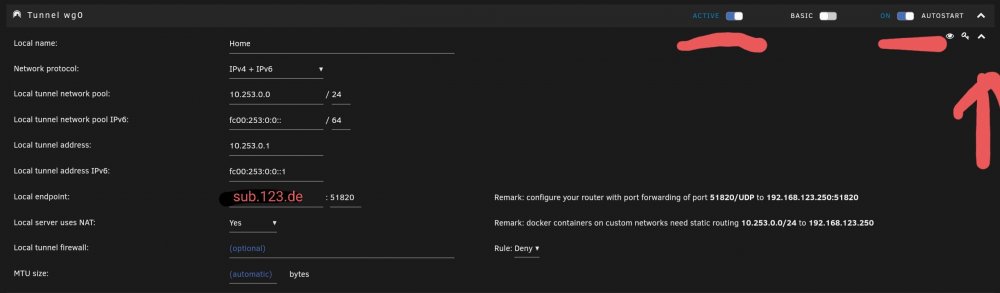
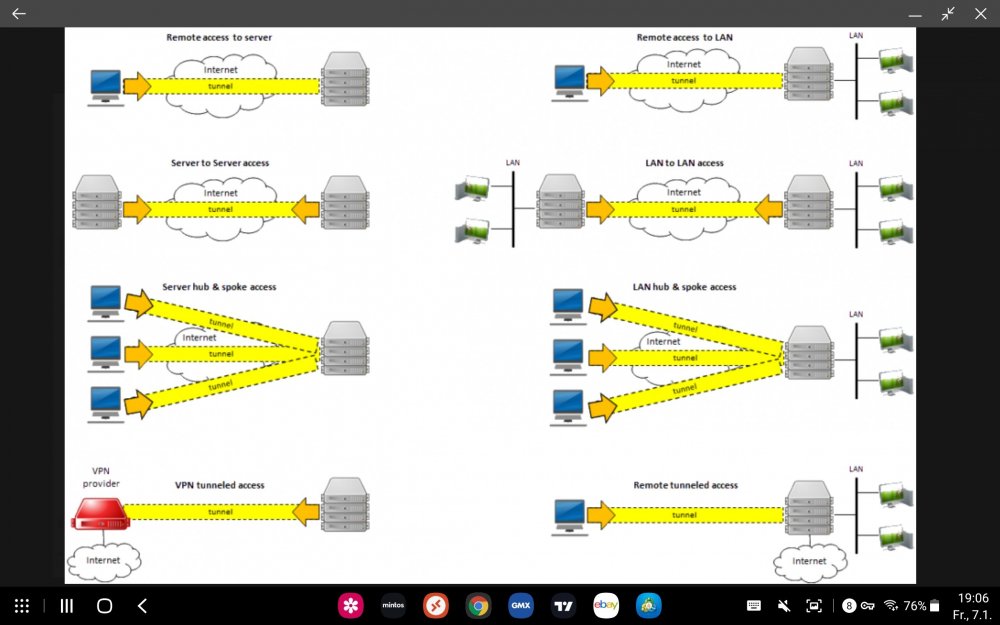
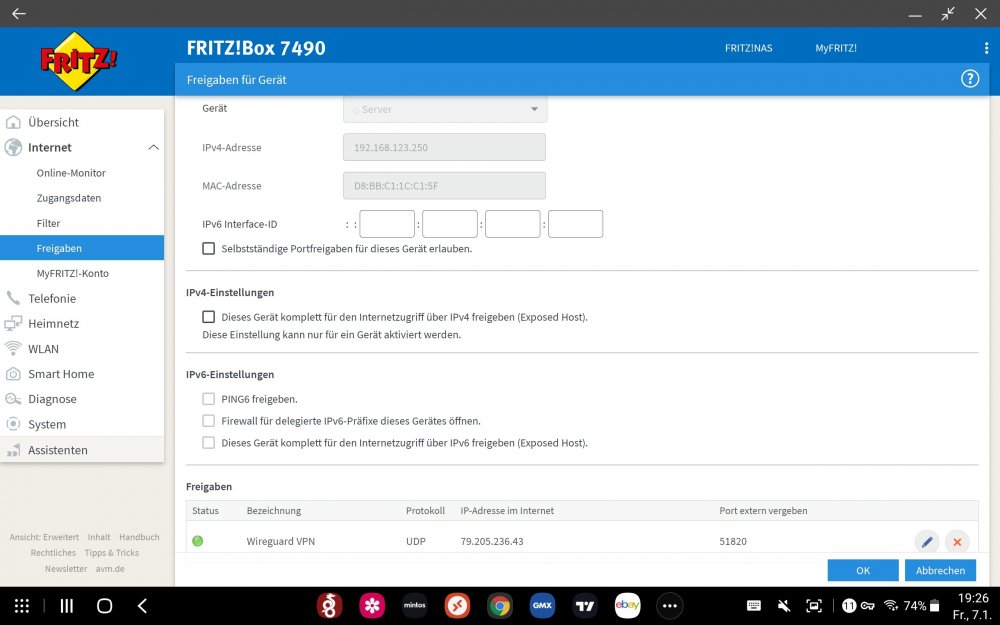
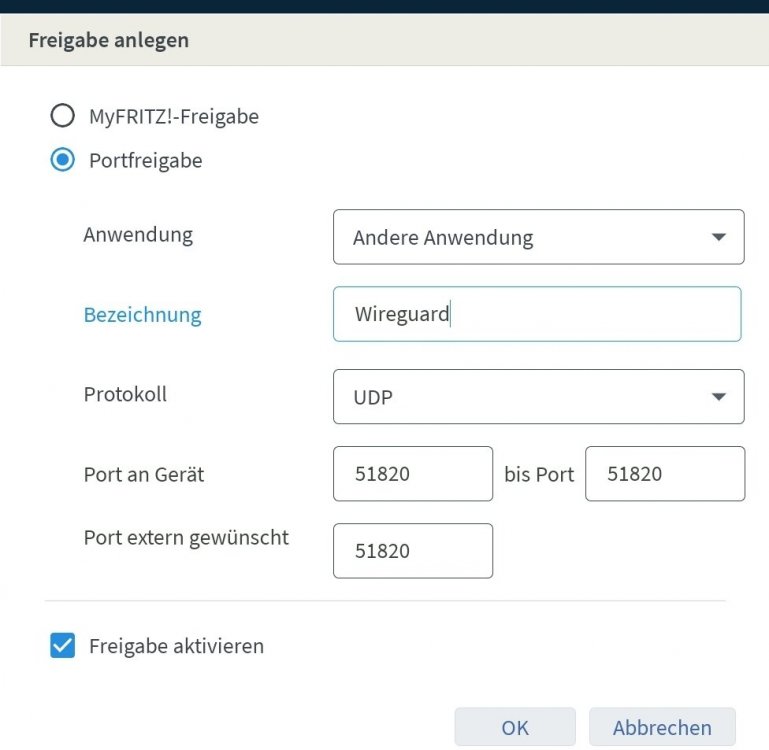
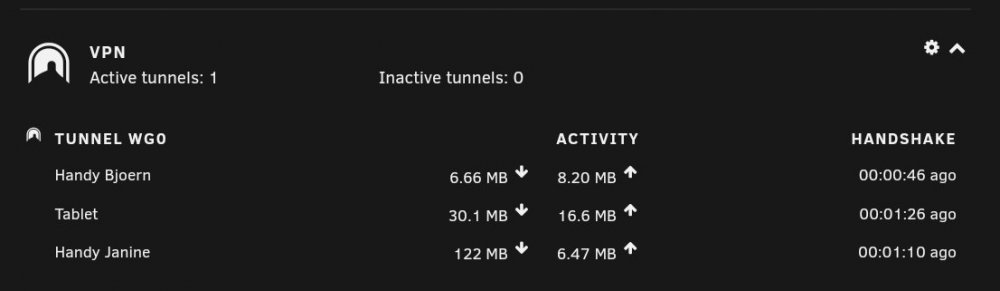
Hallo leute, hier eine kleine Anleitung wie man Wireguard einrichtet Mein anbieter ist all-ink.com Router Fritzbox 7490 Endgeräte Android Geräte als erstes benötigen wir eine Dyndns, hierzu gibt es kostenlose anbieter oder kostenpflichtige. Strato nimmt für eine kostenpflichtige Dyndns ca 15 euro Pro Jahr (kein SSL) stand 2021 in meinem fall nutze ich eine Dyndns bei all inkl, da ich hier einige Domaisn schon angemeldet habe. vorteil, man kann hier egal bei welche Domain einen DYNDNS mit anbringen. - Als erstes müsst ihr bei all-ink in den Members bereich. - Hier unter Domains eine Domain bestellen (als BSP) 123.de Nachdem die Domain eingebunden ist müssen wir über die Technische verwaltung in den KAS Login welchsel Alternativ kann man als DNS Dienst auch Duckdns verwenden (gibt es bei Unraid als Plugin) dieser dienst ist Kostenlos, nachteil Ihr könnt nicht euche Wunsch Domain nehmen:) - Dort unter Tools - DDNS-Einstellungen - Hier müssen wir einen neuen DDNS Benutzer anlegen - Bei Host kann man jetzt alles frei verwenden was man möchte, als BSP nehmen wir sub.123.de "sub.123.de" ist jetzt unsere Sub Domain unter unserer Haupt Domain, die Domain greift weiterhin auf den webspace zu ! Dual-Stack (die ist für die Internet IPv4 & IPv6), die müssen wir aktivieren, alternativ ist der zugriff nur über IPv4 nur möglich ! Bei beschreibung könnt ihr eingeben was Ihr möchtet, ich gebe "Heimnetz" ein. Kennwort Generiere ich und Speicher es mir ab ! Nachdem alles eingegeben und bestätigt wurde, kommt diese Fenster Hier sind nun unserer Wichtigen Daten für unserer Fritzbox Host sub.123.de Update-URL mit IPv4 & V6 Benutzername Passwort wir Kopieren nun diese daten und Öffnen unsere Fritzbox. Bei der Fritzbox sollte die Erweiterte Ansicht eingestellt werden, sofern die Punkt DYNDNS nicht angezeigt wird. Nun die Daten wie angegeben eintragen, Bei Update URL ganz wichtig egal bei welchem anbieter ihr Seit müsst ihr das mit angeben (sofern das eucher anbieter anbietet) dyndns.kasserver.com/?myip=<ipaddr>&myip6=<ip6addr> hiervon ist sicher bereich wichtig "<ipaddr>&myip6=<ip6addr>" Damit ihr IPv4 & IPv6 nutzen könnt. soweit ist nun die DYNDNS eingebuchen, als nächstet muss Wireguard eingerichtet werden (der leichte teil!) Wir gehen nun wie folgt vor. Wir öffnen Unraid, ich gehe mal davon auch das die Community Aplication installiert sind und geben Wireguard ein. - Dort nehmen wir Dynamix Wireguard Einfach installieren, hier muss man nichts einstellen. Nun wechseln wir unter Unraid in die Settings VPN Manager und gehen auf "add tunnel" Hier muss das ganze auf aktiv stehe, autostart bitte auch aktivieren. Bei Local Name könnt Ihr eintragen was Ihr möchtet, in meinem fall gebe ich "Home" an. dann rechts auf den pfeil drücken, damit wir die erweiterten einstellungen sehen. Nun müsst Ihr bei Network Protokoll IPv4 und IPv6 angeben. Bei Local endpoint geben wir die Domain an "sub.123.de" : 51820 , diesen könnt ihr auch ändern, in unserem fall lassen wir es so. Es ist aber besser den Port zu ändern! als nächstes müsst ihr dann auf Add peer klicken um einen benutzer anzulegen. Benutzer könnt Ihr frei wählen, Handy, Tablet oder so. Jetzt ist nun wichtig was man über die vpn machen möchte. ich denke mal ein bild sagt mehr wie 1000 worte. In unserem fall möchten wir unseren kompletten Traffic über unseren Server laufen lassen. Wir geben nun bei Peer type of access: Remote Tunneled access an nun bestätigen wir das ganze. Als nächstes gehen wir nun auf die suche im Playstore nach Wireguard. Hier der link von google https://www.google.com/search?q=wireguard+play+store&client=tablet-android-samsung-nf-rev1&sourceid=chrome-mobile&ie=UTF-8 app Installieren Nun öffnet ihr Wireguard unten erscheint ein Plus symbol, dies einmal anklicken und QR Code Scanner anwählen In eurem VPN Manger, in welchem wir uns noch befinden klicken wir ganz rechts auf das Augen Symbol, hier erscheint ein QR Code, diesen Scannen wir einfach mit der App ab. Somit ist euer Client mit dem Unraid schonmal Theoretisch verbunden, als letzten Schritt müssen wir nochmals in die Fritzbox und den Port, welchen wir vorhin angegeben haben freigeben. Wir welchseln nun nochmals in die Einstellungen der Fritbox Hierzu gehen wir nun unter "Internet" ----> "Freigaben" ---> "Portfreigaben" Hier müssen wir nun unseren Server hinzufügen, da wir nicht möchten das unser Server Port freigibt, sondern wir das selber bestimmen möchte nehmen wir alle Haken raus. Nun weis unsere Fritzbox schon mal das wir einen Unraid Server haben. Als nächstes müssen wir noch den Port freigeben, dazu klicken wir unten auf "neue Freigabe" und es erscheint folgendes Popup Hier muss die Portfreigabe angewählt werden. Bezeichnung kann frei eingetragen werden Protokoll verwenden wir bzw Wireguard den UDP Port, Bei dem Port geben wir nun den gleichen Port wie aus unserem Unraid VPN Manager ein. Wir bestätigen das ganze und Starten nun unser Unraid System neu! Als nächstes müssen wir in unserem Handy (oder endgerät) den Schieberegler in Wireguard auf aktiv setzten. Sobald der Server neu gestartet ist (dies dauert wir bekannt ja immer eine zeit lang) sollte die VPN Verbindung stehen. In meinem fall läuft das ganze über Remote tunneled access, das heisst, ist mein Server mal aus oder nicht erreichbar, habe ich auch kein internet, da nun sämtlicher Traffic über die VPN läuft, alternativ kann ich einfach die VPN verbindung am handy mit den Schieberegler deaktivieren. Ob nun die VPN verbindung aktiv ist, steht ihr in eurem Unraid, unter Dashboard unten links, hier ein Bild von meinen verbindungen. sollte hier ein traffic endstehen müsst ihr alle schritte nochmals von anfang an Durchgehen, oder ggf. hier im Forum nachfragen Ich hoffe euch hat die anleitung gefallen und es ist verständlich erklärt ? Viel Spass euch nun mit eurer neuen VPN Verbindung!


 2 points
 -
Tipp: Einen anderen Port und nicht den Standardport für Wireguard verwenden, dass beugt unnötigen Anfragen im Netz vor und erhöht etwas die Sicherheit falls doch mal ein Bug in Wireguard festgestellt wird.2 points
-
Just tested, no go with HDR tone mapping enabled, I get the following error in plex, no crash, just wont play the file. Will HW transcode a 4k HEVC/H.265 file correctly with HDR tone mapping disabled though just for reference but I think we already knew this. [Transcoder] [AVHWDeviceContext @ 0x152cdfc030c0] No matching devices found.2 points
-
Hey guys here is a tutorial on how to install and setup a Collabora Document Server and configure it to work with Nextcloud as a Docker container on Unraid. It shows how to set it up running through a reverse nginx proxy. Collabora is a LibreOffice Online document suite. this gives you control over your own documents and integrates with nextcloud. So no longer any need for google drive and google docs! This video guide makes use of @chvb great container.1 point
-
Wie gesagt. User Pfade lassen grüßen 😉 Wenn man Nextcloud mit einer MariaDB betreibt, die /mnt/user nutzt, dann ist Nextcloud locker 100x langsamer beim Laden der GUI. Selbst Plex nutzt jetzt bei mir 100% Disk/Pool Pfade: Und Docker ebenfalls (inkl Umstellung auf Verzeichnis). VMs nutzen übrigens auch nur Disk/Pool Pfade. Das macht unRAID allerdings automatisch beim Starten der VM, ohne dass der Nutzer das bemerkt. Geht da aber auch nur, weil es eine große Imagedatei ist, auf die zugegriffen wird.
 1 point
 -
Es geht eher um die VMs selbst als simple Datentransfers. Mit SATA SSDs hatte ich schon mal Benchmarks gemacht: NVMes wären deutlich schneller. Oder W480M + i3 10100E und später auf bis zu W-1290P. W480M ist nicht ganz so sparsam wie C246M, aber der W-1290P hätte bis zu 10 Kerne bzw die anderen haben im Vergleich auch etwas mehr Leistung pro Kern. Allerdings sind beide Boards von Gigabyte nur schwer zu bekommen. 👍 Wie zuvor gesagt ist W480M nicht so sparsam wie C246M. Das eine startet bei 6W und das andere bei 8W. Die CPU macht keinen nennenswerten Unterschied aus. Pro 2 Kerne sind das vielleicht 0.5W mehr. Aber woher willst du ein C246 Board bekommen? Hier siehst du was bei mir eine W10 VM ausmacht, ich denke man sieht wann ich sie gestartet habe 😉 10 schwache Kerne vs 4 mittelstarke: https://www.cpubenchmark.net/compare/Intel-Xeon-E5-2660-v2-vs-Intel-i3-9100/2184vs3479 Nachdem was du gepostet hast, sollte der i3 denke ich ausreichen.
 1 point
 -
I am running 6.9.2. I tried the 6.10.0 -rc2 but had some unrelated issues and have found 6.9.2 to be better for me at this point. I will try the next 6.10.0 RC when it comes out.1 point
-
Warum kein rsync mit --delete? Also Quelle mit Ziel synchronisieren und auf dem Ziel alle Dateien löschen, die nicht auf der Quelle vorhanden sind. Danach hätten beide Seiten die gleiche Schreibweise.1 point
-
Kann ich dir beides empfehlen. Und ja Upgrade auf Xeon E wäre auch möglich. Habe ich beim C246N-WU2 so gemacht. Kannst du so machen. Wenn es finanziell passt, könntest du aber auch auf den Cache verzichten und die NVMes als Parity und Disk 1 nehmen und die anderen SSDs Disk2, usw. Langsam ist beim unRAID Array nur die Parity. Ansonsten geht aber auch deine Idee. Mit SDDs und ohne laufende VMs würde das System keine 10W verbrauchen. Den W-1250 kann ich beim Großhandel anfragen. Hat aber lange Lieferzeit. Hier gab es in letzter Zeit Probleme mit unRAID. Ich meine manche haben das mit einem Docker lösen müssen. Bin ich gerade nicht sicher.1 point
-
Thanks for the assist. It turns out when I changed my DNS to utilize PiHole, it messed things up with my UnRAID server. Thanks again!1 point
-
For Plex HW-Transcoding you can use every iGPU starting with UHD 630 (recommended) or newer... also for 4K. Older iGPUs on Intel-CPUs are also working but the Quality is lower/bad and maybe not sufficient for 4K.1 point
-
SongKong 8.1 Scar released 7th of January 2022 https://community.jthink.net/t/songkong-8-1-scar-released-7th-of-january-2022/10400 Performer Credits SongKong could already retrieve track level performer credits from MusicBrainz. But MusicBrainz can also store performer credits at release level and these apply to all tracks on the release, this new release can now retrieve these release level credits and add them to each track. When a track has multiple credits for a particular role (such as two engineers) they are not stored by MusicBrainz in any particular order, so the order they were added to SongKong was random, this mean't that the order could change when the the Albunack database was rebuilt. Now to ensure consistency and remove needless modification to your SongKong music files these roles are always stored in alphabetical order SongKong correctly splits a single credit of multiple instruments into multiple credits, so a credit for Paul McCartney Vocals, Guitar is added to your music files as Paul McCartney (Vocals), Paul McCartney (Guitar), but it was also splitting single credits such John Lennon, Addtional Guitar incorrectly, this is now fixed. The vocal performance of Vocal performers was previously being added to the Instruments field, this is not what most customers would like so now the instruments field is restricted to actual instruments Original Release Date When looking for the earliest or original release date SongKong was always selecting later release with country to earlier than one with unknown country. So this means it may not get the earliest release and it could actually be later than the release matched if song has been matched to a release with no country events, this is now fixed. Improved Matching When double checking album matches we now allow for existing data storing the featured artists in title rather than artist. This is quite common but MusicBrainz preferred formatting is for featured artists to be stored in artist credit so that when we double check artist/title for each match it was sometimes leading to valid matches being rejected. So when matching we now check for artists in original metadata and strip out and when checking artist credits we should allow a match from name to just the one main name credit in artist credit. Bug SONGKONG-2275 1 Performer with instruments that use additional guest or solo just shows a credit as addtional guest solo SONGKONG-2272 Performer role of additional vocals just shown as additional SONGKONG-2271 Discogs Albunack Match double counts Discogs and album matches SONGKONG-2267 Discogs Only Update can change SingleTrackNo field to zero SONGKONG-2236 Composer Artist Credit can return different sortname variant for composer relation to trackartist from Albunack SONGKONG-2134 Albunack: When looking for earliest/original release date will prefer later release with country to earlier than one with unknown country SONGKONG-1723 Albunack:SongKong should consider MusicBrainz release level performer credits not just track level ones Improvement SONGKONG-2277 Store multiple composer/conductors/arrangers/performers for track ordered by name SONGKONG-2274 Add Performer field alphabetically SONGKONG-2273 Remove vocal performers from instrument field SONGKONG-2270 When double checking release match check for metadata storing the featured artists in title field rather than artist field
 1 point
 -
That looks like a bug in the script that I use to generate that web-page. ie: Don't worry about it. It's getting confused on the help text not on the translations itself.1 point
-
@cz13 Das Mainboard habe ich von dort, woanders bekommt man es auch leider nicht mehr. Siehe hier! @Ford Prefect Es ist ein i3-9100 also ECC kann er schon. Ich gehe mal auch stark davon aus das der RAM funktionieren sollte. Meinst du ich könnte ihn mal testen oder soll ich mich für einen von der Liste entscheiden?1 point
-
You should post your diagnostics showing when it's been reported that it's that high.1 point
-
I had the same issue after upgrading CA, a blank page is displayed. Did some investigation and the problem is a missing function "plain()" in helpers.php. @Squidfollowing code correction makes it work: ######################## # Get the ports in use # ######################## function plain($ip) { return str_replace(['[',']'],'',$ip); } function getPortsInUse() { .. .. }1 point
-
Ich Möchte hiermit kundtun daß der Krusader Docker von @ich777 hervorragend läuft. Es ist so ziemlich der zuverlässigste Dienst den ich habe und auch aktiv nutze. 👍1 point
-
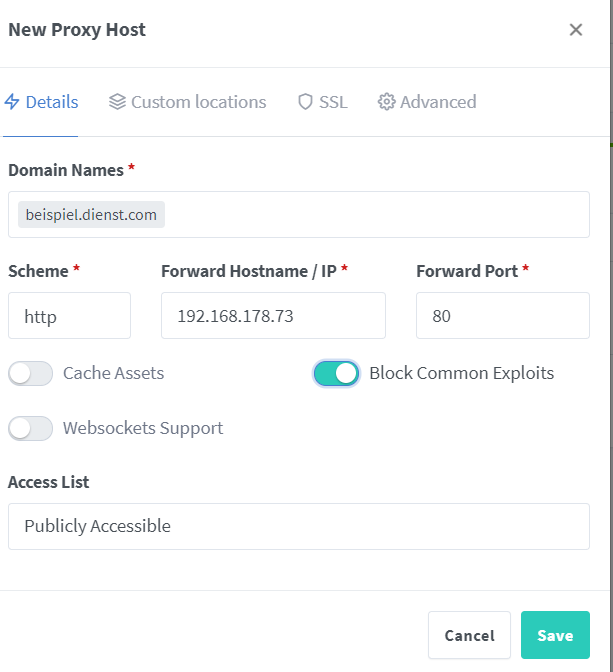
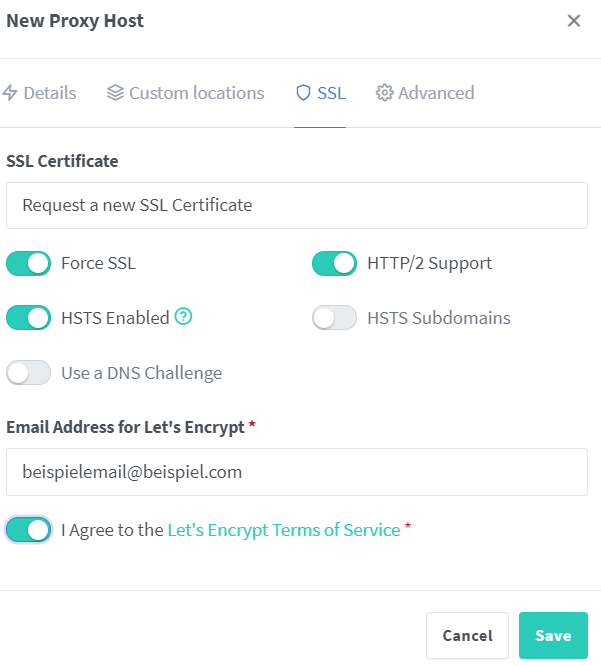
Zuallererst bitte ich mitlesende die es besser wissen mich nötigenfalls zu korrigieren. Das sollte der richtige Weg sein wenn Dein Dienst eine verschlüsselte Verbindung unterstützt. Im Reiter Details eine Verbindung auf den normalen unverschlüsselten Port einrichten und im Reiter SSL die SSL Verbindung erzwingen. Sicherheitsfeatures sind nie ein Fehler. Ist bei mir so eingerichtet und wenn ich beispiel.dienst.com aufrufe dann zeigt der Browser keine Warnung sondern das Schloss für eine gesicherte Verbindung neben der Adresse. Das kannst Du ja jederzeit probieren / nachsehen. Zusätzlich kannst Du auch im Unraid Reiter "Docker" bei nginx mal auf die Logs klicken und nachsehen was passiert ist. Wenn die Zertifikatsvergabe für Deine Domain schon mal geklappt hat kannst Du dieses in "SSL Certificate" ja mal testhalber auswählen. Kannst aber auch einfach neu machen. Nur nicht zu oft sonst könnte es sein daß der Dienst Dich (IP Adresse oder Domain wahrscheinlich) erstmal sperrt. Und Du kannst den Host ja jederzeit editieren. Musst ja nicht jedesmal neu anlegen.
 1 point
 -
You can stop the array, and if/when all pool devices are back online and appear on the main page and are already assigned, after a page refresh if needed (you can't just re-assigned them manually), you can just re-start it.1 point
-
That is the command that is the result of the command 0 completed 1 failed. I will check why the GUI didnt show the command failed.1 point
-
thats ok, ill keep banging my head against it! and ill post if i get a solution in case anyone else comes across the same problem!1 point
-
I designed and printed a 3d bracket for each end to hold it, it was easy for that rad as it was fairly square, some detail here: https://forums.unraid.net/topic/111775-carbon-unraid-x570-workstation-gaming-build/ You could also be a bit lazy and pad out some thick double sided tape to each end and position it where you like along the case, just make it snug. There is also a fan wall that comes on other models, that could also be used with some slight mods, see in this video around 9:20 mark for that fan wall looks like1 point
-
It is a bad idea to post the address of your server on a public place on the Internet. I edited that for you.1 point
-
Exactly ! They have been running smoothly for 4 days or now, so I backup a copy of the templates and dont plan to touch it Thanks a ton for all your help on this1 point
-
Sounds like your issue has to do with NGINX and not Audiobookshelf. Cloudflare is issuing you a certificate to use. Does that include a private key? If not, then I am not sure how you would use this. Any certificate has to two parts, the certificate it'self and the private key, which was used to generate the certificate. In the NGINX config you need to specify both parts like this: ssl_certificate /path/to/certificate; ssl_certificate_key /path/to/key; Both of these are basically just plain text files, one with the cert in it, the other with the key. Your actual code should look something like this: ssl_certificate /etc/nginx/ssl/domain.name.crt; ssl_certificate_key /etc/nginx/ssl/domain.name.key; Where domain.name.crt is the certificate file from Cloud flare, and domain.name.key is the private key used to generate the certificate. If Cloud flair is issuing you a certificate used for authentication, without a key, then whatever service you are using from them probably won't work with this as a proxy. This might help: https://www.digitalocean.com/community/tutorials/how-to-host-a-website-using-cloudflare-and-nginx-on-ubuntu-20-041 point
-
Ok, I'll sit tight for now i guess. The settings provided do work, but the CPU hit for going CPU only is so small I'm not too worried. No, it was when it was actually doing the video transcode. Thats all good, i just wanted to check if something wasnt working. It all appears to work ok, just doesnt report nicely. Thanks for all your help.1 point
-
Memory passed memtest without any issues. Successfully backed up UnRaid v6.3.5. Updated to v6.9.2. I then tried the transfer....and it worked. Still large fluctuations with transfer speed, but someone already explained why that was the case. Will keep an eye on it over the next few large transfers I do... Thanks everyone for the support & feedback.1 point
-
So I was able to fix my problem. The WebUI link generation is in /usr/local/emhttp/plugins/dynamix.docker.manager/include/DockerClient.php. I just wrote a user script that patches the link generation that just allows a manual, user-specified WebUI if all other methods fail. I was going to try to put in a PR to contribute the fix upstream at github.com/limetech/dynamix.git, but that repo hasn't been touched since 2016. Also, the version there is different from the version on 6.9.2. I'm not sure which is more up-to-date as I don't have the date on the version in 6.9.2, though interestingly enough, the one on github looks like it wouldn't have this problem. Did limetech take the code to closed source or is there another place that the code is hosted?1 point
-
I was unsure myself. So this is what I did. Click on the console access from the docker Heimdal I cut and past the cd /var/www/localhost/heimdall/ - this changed the directory type: vi .env - and the file will open correctly. I don't quite understand it because this .env seams to work like a wildcard of some sort but it open the correct file which you have to edit local host to subdomain.domain.com I hope that helps from one Newbie to another, Please anyone, step in and correct or educate us both on why the "vi" editor opens the correct file even when you type .env1 point
-
I think he means, open the file .env with text editor (vi) So basicly cd path and type command: vi .env Make the edits and save (press escape, and type :wq)1 point
-
Hi mgutt, thank you for your answer. This workes for me! source_paths=( "/mnt/zpool/Docker" "/mnt/zpool/VMs" "/mnt/zpool/nextcloud_data" ) backup_path="/mnt/user/Backup_zpool" ... rsync -av --exclude-from="/boot/config/scripts/exclude.list" --stats --delete --link-dest="${backup_path}/${last_backup}" "${source_path}" "${backup_path}/.${new_backup}" excludes.list Debian11_105/ Ubuntu21_102/ Win10_106/1 point
-
I sense frustration based solely on the terseness and lack of info, but you likely won't get any help with this approach. Without more information, it's impossible to determine whether $100 is easy money, or completely worthless because the problem is unsolvable and whoever tries to help will be out hours of time with no payment. The fact that you posted the way you did implies heavily that it's a fools errand to attempt to help. There are combinations of hardware that just don't work with GPU passthrough, but without a more thorough description of the hardware involved and what has been tried already, there is just no way to know.1 point
-
Stop Machinaris container. rm -rf /mnt/user/appdata/machinaris/plotman/checks rm -f /mnt/user/appdata/machinaris/plotman/status.json Reset DB: https://github.com/guydavis/machinaris/wiki/Troubleshooting#reset-machinaris-database Start Machinaris container.1 point
-
Great to put a face with a name/voice @SpaceInvaderOne 🙂1 point
-
I think, it's not working yet...1 point
-
I have not yet as I was still on the process of moving most of my media over from another server but can do some testing today hopefully to see. Will report back once I try it.1 point
-
If it works don't touch it Usually that message means that the device cannot be resetted and this means that it can't be reinitialized after a reboot or shutdown. Maybe that message appears before the patch is able to properly reset it, so a false positive (?)1 point
-
You can reset the array to keep just the remaining good drives (tools -> new config), then start the array to begin a parity sync.1 point
-
Heimdall stop working with Nginx Reverse Proxy. In LAN is everything okay. Looks like CSS ist broken. *edit* i open the console from the docker go the path /var/www/localhost/heimdall/ open with vi editor the file ".env" and change the host from http://localhost to http://SUBDOMAIN.DOMAIN - reboot the docker. *edit edit* i write it a little bit more understandable1 point
-
Interesting, it's because that's when the skeleton post for this release was created. As we proceed with development and testing, I update the post as we go along. Normally I do this in a separate internal "test board" and then select/copy/paste into a new post here, but this time I just started it here to begin with and marked it "hidden" and until today when I "un-hid" it.1 point
-
Hi, as promised I tested the OpenCore.img and it has no issue, I'm able to boot and install mac os, I tried monterey, but the same applies for big sur and catalina. Now..the easiest way for you, since the original img included in macinabox is still able to install mac os (<-- not true, see below), could be: 1. clean the container and the data, spaceinvadersone tell how to do it in his video, this is very important, maybe double check also with terminal commands that everything is deleted 2. install again macinabox and install mac os as you did for the first time (<-- not possible, product id is no longer valid, see below) 3. do not change smbios data, do nothing, just shutdown mac os 4. From unraid, or from another box, download the new opencore.img from https://github.com/SpaceinvaderOne/Macinabox/raw/2a2400c44af497a00f2610523cb0c0844d2aae27/bootloader/OpenCore.img.zip and extract it from its zip archive 5. From unraid, go to /isos/ (opencore.img should be in the isos share) Delete BigSur-opencore.img (should be named like this, or similar) and paste the new OpenCore.img you just downloaded and extracted, rename it to the same name it was the deleted one 6. Boot mac os 7. Download opencore configurator 2.51.0.0 to mount partition and change smbios https://mackie100projects.altervista.org/download/opencore-configurator-2-51-0-0/ 8. Side note: you can not copy/replace the efi files from the opencore.img to the mac os disk; by this way if you mess something it will be easier to just replace the opencore img instead of mounting the efi partition inside the vdisk.img (mac os disk)1 point
-
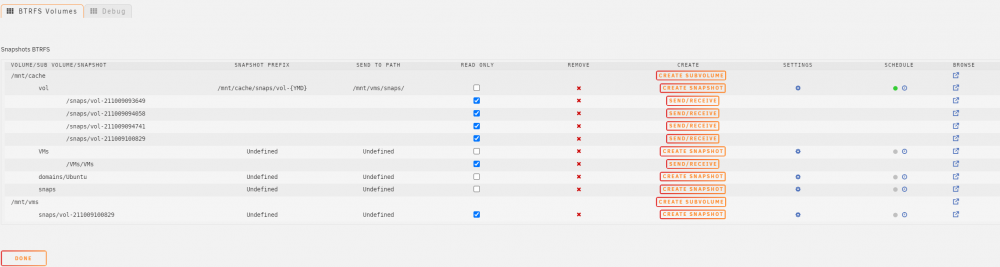
I have started to create a plugin for Snapshots, Currently this is for BTRFS based snapshots only. It is still very early in the development process, so I would still class as Alpha, and not all functions are in place. I have been working with JorgeB to work through initial issues of formatting etc so thanks for the feedback and help, but there may be use cases outside of our current environments. If you use Docker folder support instead of image there could be a lot of subvols displayed. If people want to look at the current development, you can download the plugin at your own risk, any suggestions are welcome, but I will not be able to provide support on this at present until it is released as a beta. Schedule function is not developed, its just the edit page at present. {YMD} if used in the path prefix it will replace with date and time. Send does not support remote systems or incremental at this time. plugin download location https://github.com/SimonFair/Snapshots/raw/main/snapshots.plg access is on tools page under system information.
 1 point
 -
I tried this but it doesn't work on me. Even my share is public, it doesn't show.1 point
-
Update: Solved. As soon as the active step in the preclear process (which was the zeroing out step) finished, the other drive finished format and other errors (Docker tab message, unable to access logs) disappeared. So it would appear that was indeed the issue, and it was able to resolve itself even before the entire pre-clear operation completed; just the current process.1 point
-
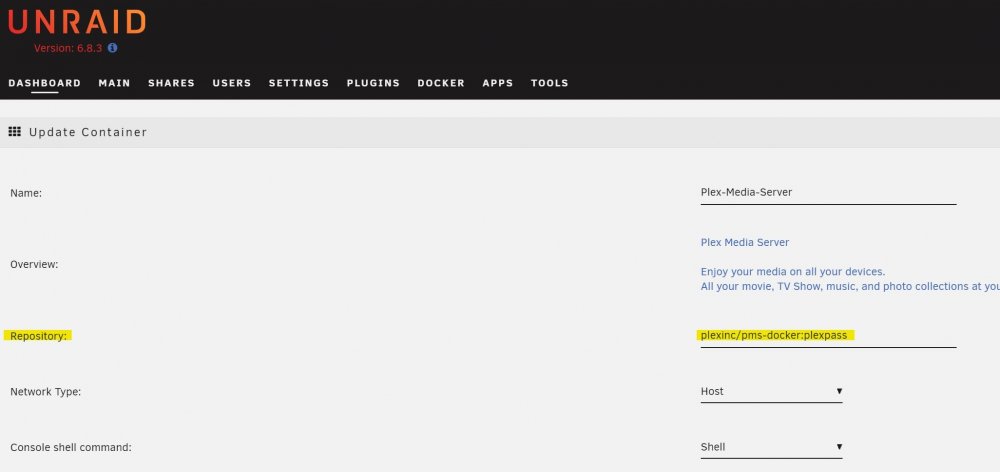
No worries. Was struggling to find a solution there hence though i would try here. Seems the answer for any one trying this is here just add :plexpass to the respository name.
 1 point
 -
Eh, sure. Effectively you just have to execute the command from my other post. If you don't want to do that manually every time you open a ssh connection then you have to add it to this file: /root/.bash_profile To make it persistent across reboots (that's how I did it, not saying it's the most ideal way): Edit /boot/config/go and add: # Customise bash cat /boot/config/bash_extra.cfg >> /root/.bash_profile Create the /boot/config/bash_extra.cfg (e.g. with nano) and add: #docker-compose as container alias docker-compose='docker run --rm \ -v /var/run/docker.sock:/var/run/docker.sock \ -v "$PWD:$PWD" \ -w="$PWD" \ docker/compose:latest' And that's it. After a reboot that will add the command to the .bash_profile file meaning it'll automatically get executed one you open a shell.1 point
-
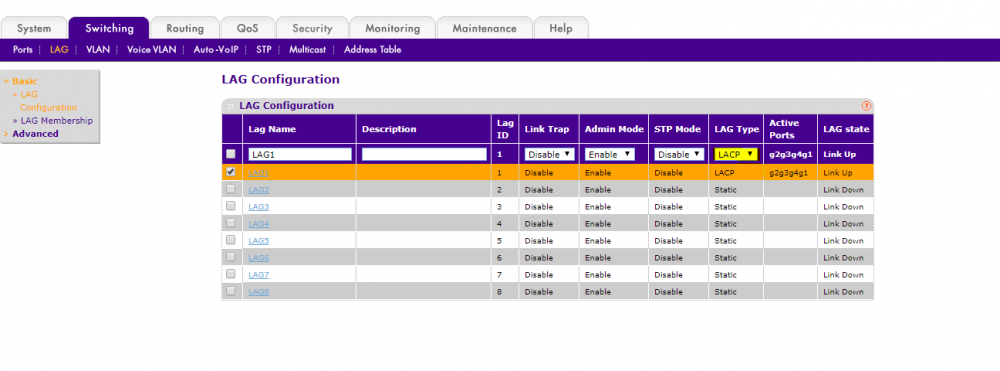
Right, So as I was looking for where to reboot my switch, I was hit with a power outage that rebooted all my network equipment for me. The solution it seems was that I required the LAG to be switched to the LACP standard. The key was the 802.4ad designation in the bond driver from within Unraid. Research revealed: IEEE 802.3ad Dynamic link aggregation (802.3ad, LACP) Creates aggregation groups that share the same speed and duplex settings. Utilizes all slave network interfaces in the active aggregator group according to the 802.3ad specification. This mode is similar to the XOR mode above and supports the same balancing policies. The link is set up dynamically between two LACP-supporting peers. Both the switch and Unraid must be configured with the 802.3ad standard in order for LAG to work. From within the netgear switch I describe, you must select the Lag which will allow you to change from Static to LACP. This will allow your Netgear switch to use your Unraid LAG. I am putting this solution and screenshot here for anyone else that may run into a similar issue.
 1 point
 -
OK, as a final note on this issue - Disk 12 had some issues after the data rebuild as it became unmountable. I ran xfs_repair on it and this seemed to resolve all the problems. I did a parity check and it flagged up some errors on disk 1 this time...seems like the legacy of the SAS2LP controllers are not going away easily for me...Anyway, I ran xfs_repair on disk 1 after the parity check and all seemed fine. Ran another parity check and all is looking good - green balls across the line! Yes. However, after a reboot I noticed I couldn't access the shares form my network..I tried for a while thinking it was a windows issue - but surprisingly, my shares have all disappeared now! Anyway - I will close this thread as solved and start a new one as I presume the issues are not necessarily connected with the SAS2LP controllers that are no longer in my system. A big thank you to the ever friendly and helpful community here that is one of the reasons I went with UnRaid over some of the other choices and thanks to all that helped steer a newbie like me and the problems with my array!1 point