Leaderboard

Popular Content
Showing content with the highest reputation on 01/08/22 in all areas
-
Perfect, yes that is one of the problems this test was intending to catch. Unraid (particularly 6.10) uses servername.LocalTLD to generate links to itself so if you have a custom cert then the LocalTLD needs to match the cert. Thanks for reporting! we can make this match case insensitive2 points
-
Fair enough. You're correct that TLD is case insensitive2 points
-
@jeffreywhunter you might want to read this section of the online documentation accessible via the ‘Manual’ link at the bottom of the GUI.2 points
-
just to keep this issue alive as there are more open questions regarding this and its still open in 6.10 rc2 description is simple as the topic, whenever there was a unsafe shutdown, starting unraid with docker setting will result in a non working state, stopping/starting docker service or rebooting clean resolving the issue. easy to reproduce and annoying when you externally working on the mashine and hard reboot externally while using as sample ssh guac to access it again, but doesnt work as described above, so only VPN backdoor to restart it. may a workaroud possible if its a bigger issue ? like you can trigger parity after a unclean shutdown, trigger a docker service restart too ? tested here from 6.92 until today 6.10 rc2 on 4 different mashines with the same result, open issues as reminder ...1 point
-
Goal: Easy remote WOL of my UNRAID server There are a thousand ways to this, however this worked for me and was pretty easy to do: (some steps might not even be necessary - but doing them anyway does not matter while leaving them out might...) HowTo Setup WOL for UNRAID: (assuming onboard NIC and WOL activated in motherboard's BIOS) *Put to sleep* 1. Webterminal or SSH into server 2. Type "ifconfig" and note IP-address and MAC-Address (ether) of used NIC 2. Type "ethtool -s eth0 wol g" 3. Type "echo -n mem > /sys/power/state" *Wake up* using 1. MacOS / Linux / Windows a) Download "MiniWOL2" from https://www.tweaking4all.com/home-theatre/miniwol2/ and install b) Click miniicon, push "Add" button and name the device to wake (Alias in Menu) c) set "IPv4 Address" (manually or select from ARP List) and "MAC-Address" (manually or click on 'detect') in appropriate fields d) Set "Broadcast" 255.255.255.255 e) Push "Test" to wake-up device (needs to be in sleep mode: see above) 2. Windows: (ALTERNATIVE) a) Download "wolcmd.exe" from https://www.depicus.com/wake-on-lan/wake-on-lan-cmd und unpack b) Open command line prompt and move to do dowload directory c) type "wolcmd.exe <ether> <ip-dest> 255.255.255.255 3. Linux: (ALTERNATIVE) a) Type "wakeonlan <MAC-Address>" OR b) Type "wol <MAC-Address>" I did not include any explanations on purpose, so if you need any - feel free to google :-) The only intent of posting this guide was hopefully sparing you guys some time if you just want to have it up and running. Feel free to question and comment.1 point
-
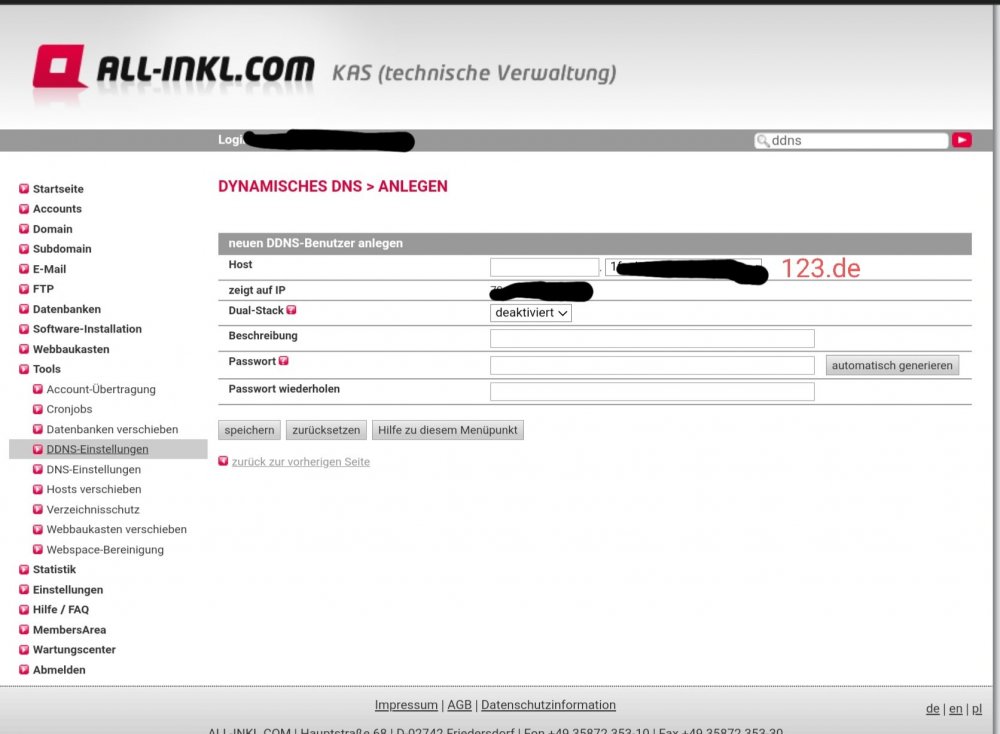
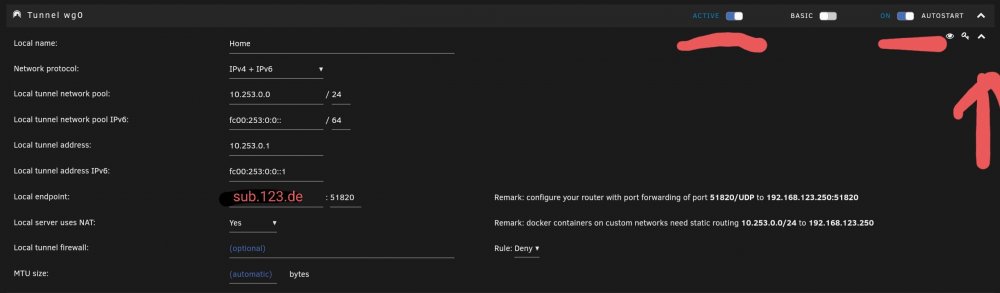
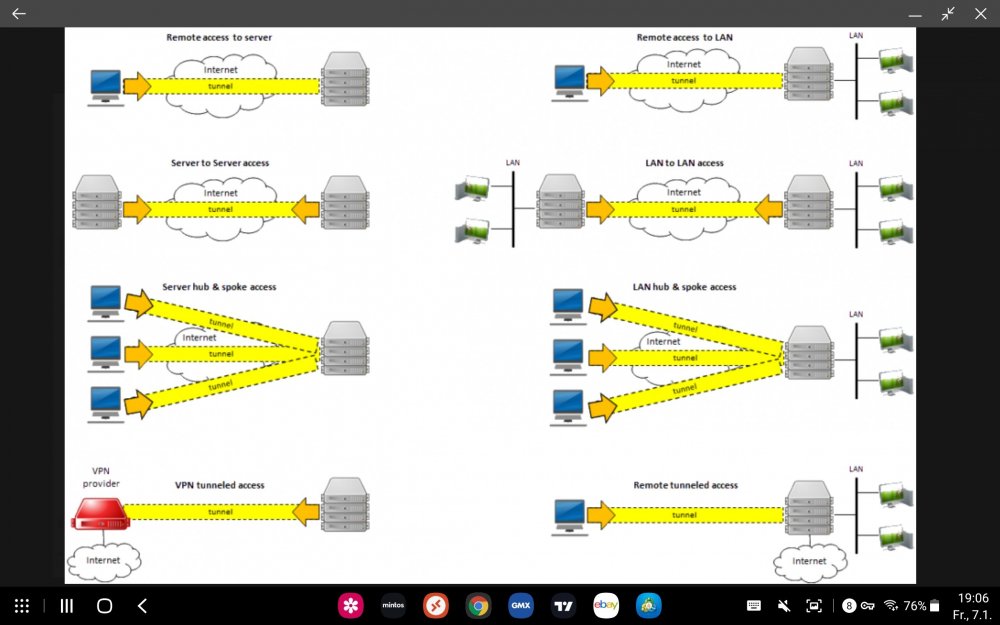
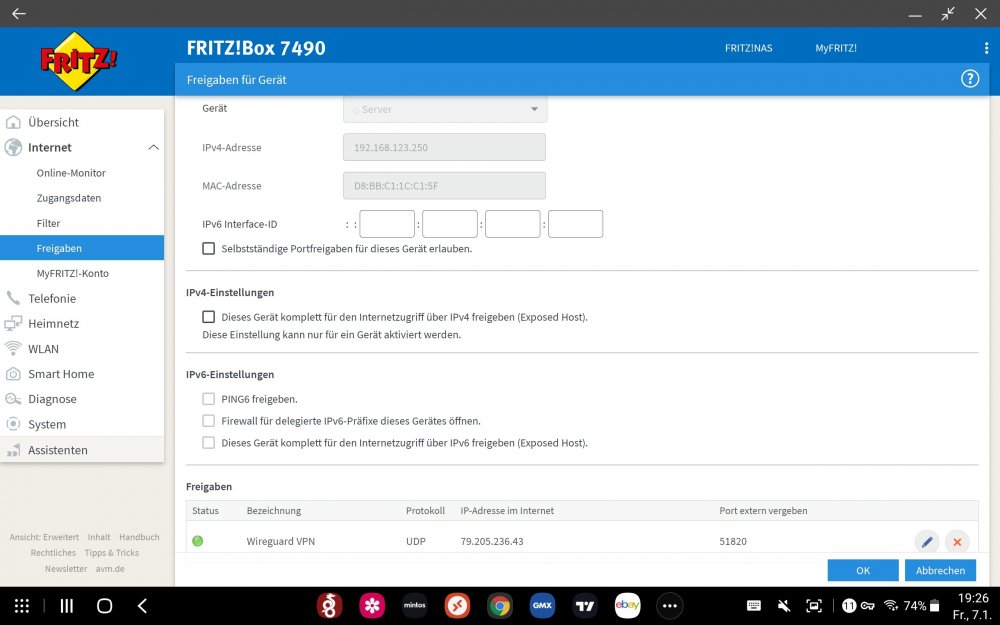
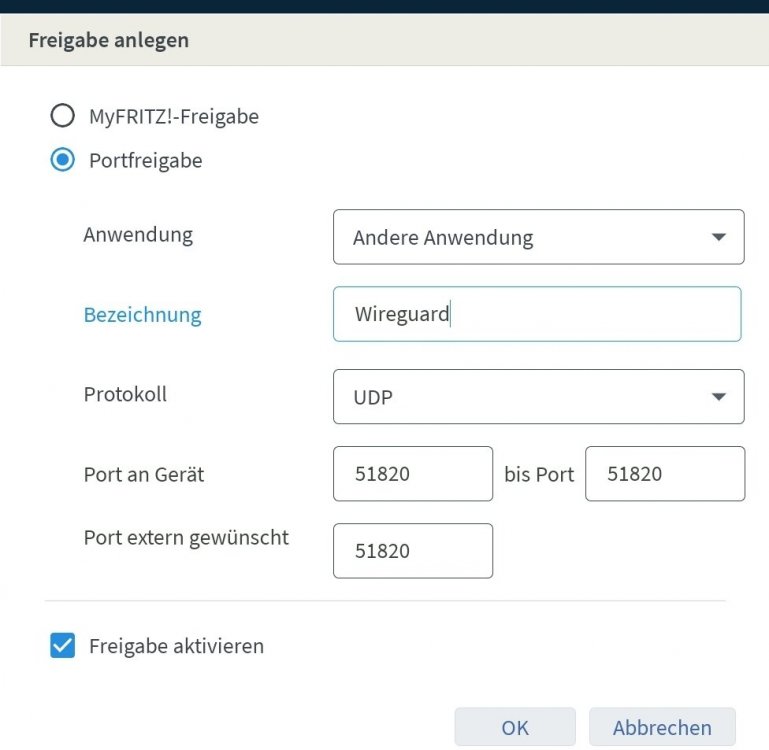
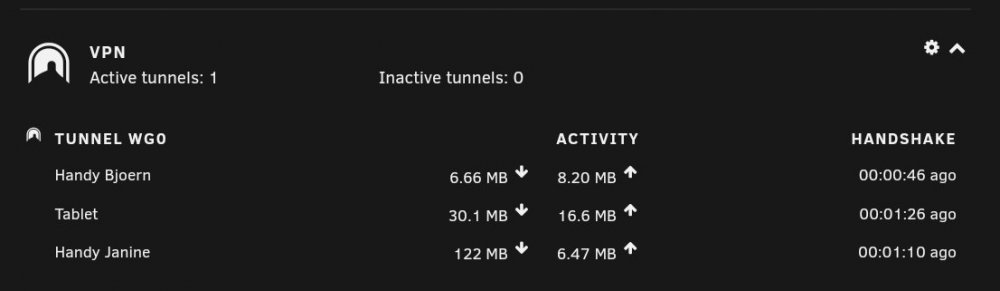
Hallo leute, hier eine kleine Anleitung wie man Wireguard einrichtet Mein anbieter ist all-ink.com Router Fritzbox 7490 Endgeräte Android Geräte als erstes benötigen wir eine Dyndns, hierzu gibt es kostenlose anbieter oder kostenpflichtige. Strato nimmt für eine kostenpflichtige Dyndns ca 15 euro Pro Jahr (kein SSL) stand 2021 in meinem fall nutze ich eine Dyndns bei all inkl, da ich hier einige Domaisn schon angemeldet habe. vorteil, man kann hier egal bei welche Domain einen DYNDNS mit anbringen. - Als erstes müsst ihr bei all-ink in den Members bereich. - Hier unter Domains eine Domain bestellen (als BSP) 123.de Nachdem die Domain eingebunden ist müssen wir über die Technische verwaltung in den KAS Login welchsel Alternativ kann man als DNS Dienst auch Duckdns verwenden (gibt es bei Unraid als Plugin) dieser dienst ist Kostenlos, nachteil Ihr könnt nicht euche Wunsch Domain nehmen:) - Dort unter Tools - DDNS-Einstellungen - Hier müssen wir einen neuen DDNS Benutzer anlegen - Bei Host kann man jetzt alles frei verwenden was man möchte, als BSP nehmen wir sub.123.de "sub.123.de" ist jetzt unsere Sub Domain unter unserer Haupt Domain, die Domain greift weiterhin auf den webspace zu ! Dual-Stack (die ist für die Internet IPv4 & IPv6), die müssen wir aktivieren, alternativ ist der zugriff nur über IPv4 nur möglich ! Bei beschreibung könnt ihr eingeben was Ihr möchtet, ich gebe "Heimnetz" ein. Kennwort Generiere ich und Speicher es mir ab ! Nachdem alles eingegeben und bestätigt wurde, kommt diese Fenster Hier sind nun unserer Wichtigen Daten für unserer Fritzbox Host sub.123.de Update-URL mit IPv4 & V6 Benutzername Passwort wir Kopieren nun diese daten und Öffnen unsere Fritzbox. Bei der Fritzbox sollte die Erweiterte Ansicht eingestellt werden, sofern die Punkt DYNDNS nicht angezeigt wird. Nun die Daten wie angegeben eintragen, Bei Update URL ganz wichtig egal bei welchem anbieter ihr Seit müsst ihr das mit angeben (sofern das eucher anbieter anbietet) dyndns.kasserver.com/?myip=<ipaddr>&myip6=<ip6addr> hiervon ist sicher bereich wichtig "<ipaddr>&myip6=<ip6addr>" Damit ihr IPv4 & IPv6 nutzen könnt. soweit ist nun die DYNDNS eingebuchen, als nächstet muss Wireguard eingerichtet werden (der leichte teil!) Wir gehen nun wie folgt vor. Wir öffnen Unraid, ich gehe mal davon auch das die Community Aplication installiert sind und geben Wireguard ein. - Dort nehmen wir Dynamix Wireguard Einfach installieren, hier muss man nichts einstellen. Nun wechseln wir unter Unraid in die Settings VPN Manager und gehen auf "add tunnel" Hier muss das ganze auf aktiv stehe, autostart bitte auch aktivieren. Bei Local Name könnt Ihr eintragen was Ihr möchtet, in meinem fall gebe ich "Home" an. dann rechts auf den pfeil drücken, damit wir die erweiterten einstellungen sehen. Nun müsst Ihr bei Network Protokoll IPv4 und IPv6 angeben. Bei Local endpoint geben wir die Domain an "sub.123.de" : 51820 , diesen könnt ihr auch ändern, in unserem fall lassen wir es so. Es ist aber besser den Port zu ändern! als nächstes müsst ihr dann auf Add peer klicken um einen benutzer anzulegen. Benutzer könnt Ihr frei wählen, Handy, Tablet oder so. Jetzt ist nun wichtig was man über die vpn machen möchte. ich denke mal ein bild sagt mehr wie 1000 worte. In unserem fall möchten wir unseren kompletten Traffic über unseren Server laufen lassen. Wir geben nun bei Peer type of access: Remote Tunneled access an nun bestätigen wir das ganze. Als nächstes gehen wir nun auf die suche im Playstore nach Wireguard. Hier der link von google https://www.google.com/search?q=wireguard+play+store&client=tablet-android-samsung-nf-rev1&sourceid=chrome-mobile&ie=UTF-8 app Installieren Nun öffnet ihr Wireguard unten erscheint ein Plus symbol, dies einmal anklicken und QR Code Scanner anwählen In eurem VPN Manger, in welchem wir uns noch befinden klicken wir ganz rechts auf das Augen Symbol, hier erscheint ein QR Code, diesen Scannen wir einfach mit der App ab. Somit ist euer Client mit dem Unraid schonmal Theoretisch verbunden, als letzten Schritt müssen wir nochmals in die Fritzbox und den Port, welchen wir vorhin angegeben haben freigeben. Wir welchseln nun nochmals in die Einstellungen der Fritbox Hierzu gehen wir nun unter "Internet" ----> "Freigaben" ---> "Portfreigaben" Hier müssen wir nun unseren Server hinzufügen, da wir nicht möchten das unser Server Port freigibt, sondern wir das selber bestimmen möchte nehmen wir alle Haken raus. Nun weis unsere Fritzbox schon mal das wir einen Unraid Server haben. Als nächstes müssen wir noch den Port freigeben, dazu klicken wir unten auf "neue Freigabe" und es erscheint folgendes Popup Hier muss die Portfreigabe angewählt werden. Bezeichnung kann frei eingetragen werden Protokoll verwenden wir bzw Wireguard den UDP Port, Bei dem Port geben wir nun den gleichen Port wie aus unserem Unraid VPN Manager ein. Wir bestätigen das ganze und Starten nun unser Unraid System neu! Als nächstes müssen wir in unserem Handy (oder endgerät) den Schieberegler in Wireguard auf aktiv setzten. Sobald der Server neu gestartet ist (dies dauert wir bekannt ja immer eine zeit lang) sollte die VPN Verbindung stehen. In meinem fall läuft das ganze über Remote tunneled access, das heisst, ist mein Server mal aus oder nicht erreichbar, habe ich auch kein internet, da nun sämtlicher Traffic über die VPN läuft, alternativ kann ich einfach die VPN verbindung am handy mit den Schieberegler deaktivieren. Ob nun die VPN verbindung aktiv ist, steht ihr in eurem Unraid, unter Dashboard unten links, hier ein Bild von meinen verbindungen. sollte hier ein traffic endstehen müsst ihr alle schritte nochmals von anfang an Durchgehen, oder ggf. hier im Forum nachfragen Ich hoffe euch hat die anleitung gefallen und es ist verständlich erklärt ? Viel Spass euch nun mit eurer neuen VPN Verbindung!


 1 point
 -
I just want to show some examples of how I configured my caddyfile as a reverse proxy. Maybe it is helpful for someone. Basics Activate HTTP/3 (put this on the top of your Caddyfile) Source { servers * { protocol { experimental_http3 } } } Simple Reverse Proxy Source sub.domain.com { reverse_proxy 10.0.0.254:8080 } Reverse Proxy with HTTPS backend and no trusted certificate Source sub.domain.com { reverse_proxy 10.0.0.254:443 { transport http { tls_insecure_skip_verify } } } Reverse Proxy with IP-Whitelist (allowed Networks: 10.0.0.0/24 and 10.1.1.0/24) Source sub.domain.com { @internal { remote_ip 10.0.0.0/24 10.1.1.0/24 } handle @internal { reverse_proxy 10.0.0.254:8080 } respond 403 } Streaming (Plex, Jellyfin, ...) Source ... reverse_proxy 10.0.0.254:32400 { flush_interval -1 } ... Cloudflare This is only needed if you have the Cloudflare-Proxy activated (orange cloud) Requirements Caddy-Binary with dns.providers.cloudflare-Plugin (Caddy-Builder): LINK Create an API-Token on Cloudflare: LINK Cloudflare API Source sub.domain.com { tls { issuer acme { dns cloudflare <api-token> or {env.CLOUDFLARE_API_TOKEN} resolvers 1.1.1.1 } } } Cloudflare API + reverse proxy sub.domain.com { tls { issuer acme { dns cloudflare <api-token> or {env.CLOUDFLARE_API_TOKEN} resolvers 1.1.1.1 } } reverse_proxy 10.0.0.254:80 } Cloudflare API + reverse proxy + streaming sub.domain.com { tls { issuer acme { dns cloudflare <api-token> or {env.CLOUDFLARE_API_TOKEN} resolvers 1.1.1.1 } } reverse_proxy 10.0.0.254:32400 { flush_interval -1 } } Header Security Create in the Caddyfile-Directory (/etc/caddy/) a file called "caddy_security.conf" with the following content: header { Strict-Transport-Security "max-age=31536000; includeSubDomains; preload" X-Xss-Protection "1; mode=block" X-Content-Type-Options "nosniff" Content-Security-Policy "frame-ancestors *.opum.ch" Referrer-Policy "strict-origin-when-cross-origin" Cache-Control "public, max-age=15, must-revalidate" Permissions-Policy "accelerometer=(), ambient-light-sensor=(), autoplay=(self), camera=(), encrypted-media=(), fullscreen=(self), geolocation=(), gyroscope=(), magnetometer=(), microphone=(), midi=(), payment=(), picture-in-picture=(*), speaker=(), sync-xhr=(), usb=(), vr=()" } Now import this config into the Caddyfile: sub.domain.com { import /etc/caddy/caddy_security.conf reverse_proxy 10.0.0.254:8080 } With this settings you'll get an A+ on https://securityheaders.com/1 point
-
Very promising project. Something I have been looking for for a while. Left some suggestions in the github1 point
-
Yup I read up to step 4 and assumed I knew the rest, sorry for wasting your time and thanks for the pointer.1 point
-
Please don't set your graphics card like that, please read the second post on how to use GVT-g1 point
-
The download button worked and everything is working now.1 point
-
For documentation you can refer to hackintosh community in general; running a vm or running a bare metal mac os are not so different, especially if you try to start to passthrough hardware. For gpu compatibility you can refer to dortania guide: https://dortania.github.io/GPU-Buyers-Guide/modern-gpus/amd-gpu.html https://dortania.github.io/GPU-Buyers-Guide/modern-gpus/nvidia-gpu.html Unfortunately apple dropped support for nvidia in monterey, kepler cards are working till big sur, but you can read the dortania guide for more details. Any linux os is able to run vms, the only software needed is qemu and ovmf; libvirt is added to code the xml to communicate with qemu, you don't need anything more. I personally run a second mac os vm on a manjaro linux os without any desktop environment. With unraid all is simplified, because all the needed software is already packaged and you have a gui to interact with the vms, (although some minor change must be done sometimes to fix things), that's why after 3 years I'm still here in the unraid forum.1 point
-
Perhaps your "congratulations" page is cached by Cloudflare? I believe it can do that for static websites. You could for example check the port forwarding on your router, disable that and if the page still loads then you are 100% not serving that page. Also in the commandline you can do "docker ps" to see all containers running, this includes all the ports they listen on so perhaps that might give some insight.1 point
-
I can’t promise a timeframe but I’ll work on upgrading it to 1.4.0.1 point
-
No, nothing to add, just make sure you have the custom qemu args at the bottom, and to not use pc-q35-6.1, as it can cause issue with acpi tables on mac os.1 point
-
Das ASRock taugt nichts. M.2 verbaut 2 SATA Buchsen weg. Noch eine und wieder 2 weg. Und dann noch extra Controller für die 2 SATA, 2x TB... Das wird sicher nicht wenig verbrauchen.1 point
-
Correct! The critical part of a mac os vm is the bootloader (opencore). If you change something in the bootloader and the vm doesn't boot, it's easier to replace the whole opencore image with a backup (that worked), otherwise you need to mount the fat32 partition inside the mac os disk (the efi partition, that contains opencore), feasible if you know how to do it, but not recommended for users approaching a mac os vm or linux in general.1 point
-
Yes, don't copy the efi files over the mac os disk and don't delete the opencore disk, that's all.1 point
-
@alturismonehm ich nicht persönlich, im Nachhinein hast du vollkommen recht. Da ich sehr lange raus bin aus der Hardware und seit 2 Tagen nur am vergleichen von irgendwelchen Specs, war ich mir eben total unsicher. ich gelobe Besserung und verordne mir mal einen Tag Pause was das Vergleichen und suchen von Hardware angeht.1 point
-
I hope you didn't copy the efi files from the opencore qcow2/img to the main mac os disk. If you didn't copy it's a lot easier. Try this: Download the latest opencore img: https://github.com/SpaceinvaderOne/Macinabox/raw/84a82e54ae5f596f492ead2f2d98767029e2826a/bootloader/OpenCore.img.zip Extract from the zip. Look at the xml, copy the extracted file in the same folder where you have the actual opencore qcow2/img (don't delete it, so it will be easier to swap it again if it doesn't boot for whatever reason). Modify your xml to point to the new opencore.img Note: check the disk section and make sure to have type='raw' (if your old opencore image was qcow2 you have type='qcow2' and this must be changed). Try to boot the vm. If it boots, upgrade in place, you won't have issues in booting monterey. If it doesn't boot, do what you did to install mojave, but obviously make a monterey installer disk in your mojave vm and use the new opencore image, and make a clean install.1 point
-
Yup. Same non-issue1 point
-
Thank you again. Rebooted and everything seems to be working so far. I can't test hot plugging yet, until I rearrange some things, but the keyboard works, so I assume anything plugged into that port should also work. You deserve many great things to happen for you. Have a most excellent new year!1 point
-
It is not my address i changed numbers etc . but thanks for being carefully.1 point
-
Did you copy it from the flash drive before the new install? Going forward, you should always have a current backup of the flash drive. You can download one from Main - Boot Device - Flash - Flash Backup My Servers feature can also store a flash backup on limetech (Unraid) cloud. https://wiki.unraid.net/My_Servers1 point
-
let me know if it works for you, i followed this rule in my .txt file for excluding 3 folders /mnt/cache/Media/BILDER/ /mnt/cache/Media/BILDER/* /mnt/cache/Media/EBOOKS/ /mnt/cache/Media/EBOOKS/* /mnt/cache/Media/RECORD/ /mnt/cache/Media/RECORD/* the mover didnt had to run yet as i also use the fillrate rule ... i ll see what happens1 point
-
I updated all the "foreign" translation repos to the latest English (en_US) source files.1 point
-
I use this script, which checks if Plex has started transcoding and stops Trex if that is true. It starts Trex after Plex has finished transcoding. It is for Nvidia cards only. Feel free to use it and modify it to your needs. #!/bin/bash # Check if nvidia-smi daemon is running and start it if not. if [[ `ps ax | grep nvidia-smi | grep daemon` == "" ]]; then /usr/bin/nvidia-smi daemon fi sleep 300 # Wait until array is online and all dockers are started. Comment this out if you are testing the script. TREX=`docker container ls -q --filter name=trex*` while true; do if [[ `/usr/bin/nvidia-smi | grep Plex` == "" ]]; then # If Plex is not transcoding, start the trex-miner container if it is not running. if [[ `docker ps | grep $TREX` == "" ]]; then echo "No Plex, starting Trex." docker start $TREX fi else # If Plex is transcoding, stop the trex-miner container if it is running. if [[ `docker ps | grep $TREX` != "" ]]; then echo "Plex running, stopping Trex." docker stop $TREX fi fi sleep 1 done1 point
-
Works like a charm, nividia gtx1080 thanks for your contribution1 point
-
原来是系统自带功能……默认关闭1 point
-
@nas_nerd Yes! If you add multiple repos to one config file, they will run sequentially but be identical. What you want is to have multiple config files, one for each repo, both located in the Borgmatic config directory. They’ll still run sequentially but you can configure each repo however you like. No need to have two Borgmatic containers. You can even use include files to avoid duplicating settings common to both files. See the support article for more detail: https://torsion.org/borgmatic/docs/how-to/make-per-application-backups/ Sent from my iPhone using Tapatalk1 point
-
Chrome typically. Edge (Chromium) when I'm on my work laptop / VM Firefox I try to avoid like the plague, but I use it for GUI mode because its the one installed.1 point
-
1 point
-
yes That information is available in several places in the diagnostics you posted, take a look in the smart folder, for example.1 point
-
Missed adding it to en_US. Done now1 point
-
Thought the majority of people used chrome, seems most geeks like me like Firefox. I use Firefox for regular browsing & I also use Edge & IE when I need to test something on the local network.1 point
-
I think you are forgetting the time taken to handle the parity generation. My guess is that you have the Disk Settings parameter "Tuneable (md write method)" set to auto. That means that the destination drive and the parity drive have to be read and then written with data and new parity. The read allows the new party to be calculated using the previous data and parity along with the new data. That will restrict speed to, at best, one half of what the drives are capable of. If you change that setting to "reconstruct write", all of the drives will be spun up, but the new parity will be recalculated based on the new data in conjunction with the existing data on the other drives. That will eliminate the need to pre-read the destination and parity drives and will allow a much higher average write speed to be maintained. So, to answer your question, what you are seeing is due to the way that Unraid works, but the "reconstruct write" setting allows you to overcome that barrier provided that you don't mind the overhead of spinning up all of your other drives. And whether that works well for you may also depend on whether there is any other disk activity at the same time, but that's down to individual use cases.1 point
-
I honestly gave up, to much hassle. But the I have a working VM now with GPU passthrough and USB ASUS BT400 Bluetooth dongle instead of the onboard wifi BT controller. Steps I took: Deleted the VM Unbind all the VFIO's which I binded early correctly . Disabled PCIe ACS override Created a new VM (used the vdisk i backed up and efi(added new kexts for BT) to boot the new vm so no data loss). Passed through the entire usb controller where the BT controller is just as before. Passed through GPU and Sound. Edit XML for respective devices passthrough and now Everything just works. Thanks for all the help, but it feels like everything gets broken as soon anymore changes are made with vm even with XML being the same as before when trying to reset changes. Br,1 point
-
After my perf testing, and reading through the following, I'm just going to use SMB for now. https://landley.net/kdocs/ols/2010/ols2010-pages-109-120.pdf https://landley.net/kdocs/Documentation/filesystems/9p.txt https://news.ycombinator.com/item?id=8855143 Also looks like most of active dev work on virtio is for the Rust version (https://gitlab.com/virtio-fs/virtiofsd). I know the kernel is moving (perhaps including more that moving) that way, and fortunately for us unRAID keeps on a pretty new kernel, so perhaps we'll get to play with VirtIO-FS in 6.10:1 point
-
I too have spent the last few hours messing with 9pfs and have been seeing some pretty poor performance. I use the following fstab options and get about 90MiB/s read and write (tested with fio and 4K block size; 128k and 256k saw slightly better performance) epi_af /root/9pf_mount 9p trans=virtio,_netdev,rw 0 0 Adding 'msize=262144' or 'msize=524288' helps a tiny bit, epically with larger blocksize workloads I too would rather not use SMB, but seeing as I get about 900-1100 MiB/s using SMB (which is almost exactly what I get to the virtual disk) I think that's what I think I'm going to go with, unless I can find a 9pfs solution.1 point
-
That doesn't work, so, i made an archaic solution. I need to backup everything, so, create a script: docker cp gunbotlast:/gunthy_linux /mnt/user/appdata/gunbot/ First, this backup every data daily, if needed, and the same command to send the update file to the container. That work for me, isnt automatic, but... Thanks.1 point
-
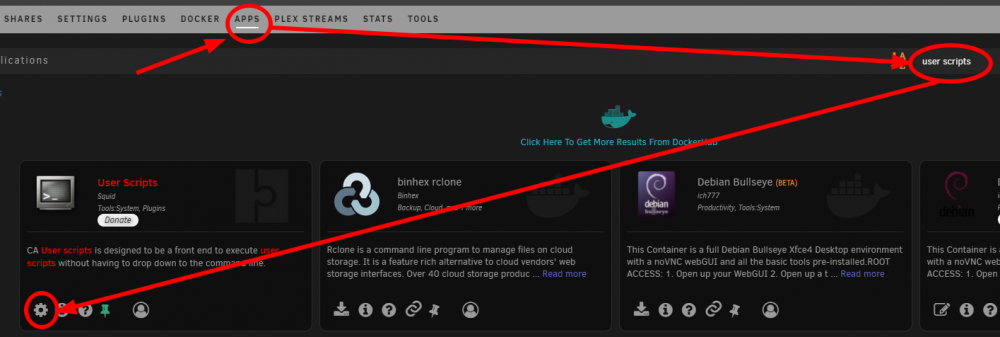
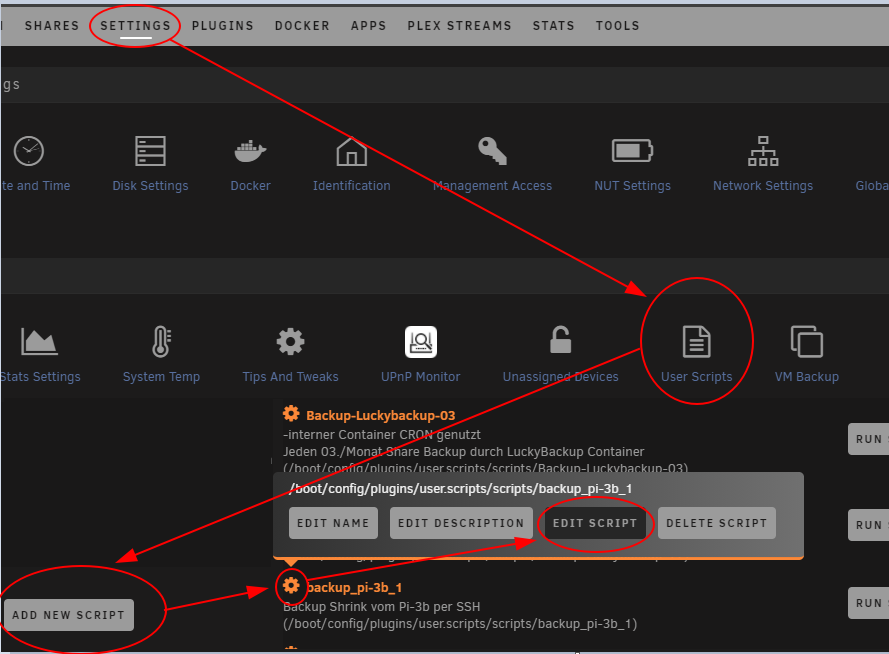
Hier ein kurzer Guide zu einem User Script um von einem Pi eine Sicherungsimage zu erstellen und zu verkleinern. Da ich selbst recht neu mit Unraid unterwegs bin und total unerfahren im Bereich Linux, Termina, Befehle, etc... bitte ich Fehler zu entschuldigen und gerne zu Verbessern und/oder brauchbares zu ergänzen. Als Basis habe ich das Script von Lukas Knöller - hobbyblogging.de genommen und um ein paar Variablen und PiShrink ergänzt. Das Script verbindet sich per SSH auf den Pi, erstellt ein Image davon und legt es im Backup Share ab. Danach werden überfällige Backups gelöscht und das erstellte Backup verkleinert. -Backup Share als Ziel einrichten. Falls mehrere Pi's gesichert werden sollen, empfehle ich für jeden Pi einen eigenen Unterordner im Share zu erstellen. -Unterordner im Share erstellen: Im Unraid Terminal folgenden Befehl ausführen mkdir -p /mnt/user/DEIN-BACKUP-SHARE/PI-UNTERORDNER -sshpass downloaden, /extra/ Ordner auf dem Stick erstellen, sshpass in den Ordner /extra/ verschieben und sshpass installieren: Im Unraid Terminal folgenden Code ausführen. wget https://packages.slackonly.com/pub/packages/14.2-x86_64/network/sshpass/sshpass-1.06-x86_64-1_slonly.txz && mkdir /boot/extra && mv sshpass-1.06-x86_64-1_slonly.txz /boot/extra/ && installpkg /boot/extra/sshpass-1.06-x86_64-1_slonly.txz Alternative, falls die Quelle nicht erreichbar ist: Dadruch dass wir das sshpass im /extra/ Ordner des Unraid Sticks liegen haben, wird sshpass mit jedem Unraid Start installiert. Wer das "Fix Common Problems" Plugin nutzt, wird nun eine Meldung bekommen, diese kann man mit dem Button rechts ignorieren: -PiShrink download, verschieben nach /mnt/user/appdata/, ausführbar machen: Im Unraid Terminal folgenden Code ausführen. wget -O /mnt/user/appdata/pishrink.sh https://raw.githubusercontent.com/Drewsif/PiShrink/master/pishrink.sh && chmod +x /mnt/user/appdata/pishrink.sh -User Script Plugin installieren: -User Script Plugin aufrufen und neue User Script erstellen: -Script ins leere Feld kopieren und Variablen anpassen: #!/bin/bash #Variablen PI_IP="XXX.XXX.XXX.XXX" SSH_USER="PI-USER" SSH_PW="DEIN-SUPER-PASSWORT-VOM-PI-USER" BACKUP_PFAD="/mnt/user/DEIN-BACKUP-SHARE/PI-UNTERORDNER" #ohne / am Ende BACKUP_ANZAHL="5" BACKUP_NAME="pi_image" SHRINK_SCRIPT_PFAD="/mnt/user/appdata/pishrink.sh" DATUM="$(date +%Y%m%d)" #Backup erstellen sshpass -p ${SSH_PW} ssh ${SSH_USER}@${PI_IP} sudo "dd if=/dev/mmcblk0" | dd of=${BACKUP_PFAD}/${BACKUP_NAME}-${DATUM}.img bs=1MB #Alte Sicherung löschen pushd ${BACKUP_PFAD}; ls -tr ${BACKUP_PFAD}/${BACKUP_NAME}* | head -n -${BACKUP_ANZAHL} | xargs rm; popd sync -f ${BACKUP_PFAD} #shrink ${SHRINK_SCRIPT_PFAD} ${BACKUP_PFAD}/${BACKUP_NAME}-${DATUM}.img Im falle von Raspberry Pi OS sollte der User "Pi" sein. Das Passwort habt ihr bei der Installation von Raspberry Pi OS selbst festgelegt. Am Ende der Variablen BACKUP_PFAD darf kein "/" gesetzte sein, da dieses schon im Code enthalten ist. Solltet Ihr "root" nutzen, oder das Script aufgrund von sporadischen erneutem Abfragen des Passwortes abbrechen, haben @dan4UR und @Anym001 vielleicht die Lösung für euch: root User Erneute Passwortabfrage bei sudo -Script mit dem "SAVE CHANGES" Button abspeichern. -Cron anpassen: in meinem Beispiel läuft das Script zur 15. Minute in der 23. Stunde am 11. und 26. Tages jeden Monat, an egal welchem Wochentag. Oder kurz: jeden 11. und 26. um 23:15Uhr. Hilfe zu Cron: https://crontab.guru/ -Einstellungen unten mit dem Button "APPLY" sichern. Wie Anfangs schon erwähnt, bin ich nicht sehr Erfahren und bitte um Rücksicht bei Fehlern. Danke auch an @ich777, @alturismo und @Anym001 für Idee, Ratschläge, Testen und Wissen. Ansonsten, Happy Backup! *CHANGELOG* 25.08.2021 20:20 - Variable DATE hinzugefügt 30.11.2021 09:35 - Troubleshooting Ergänzung für root und sudo 26.12.2021 14:22 - Alternative Quelle für sshpass. Danke @mgutt

 1 point
 -
Please see this post: You can also copy your serverconfig.xml that lives in your 7dtd folder and renamet it to, like in this example, 'somethingelse.xml' and change it in the template to the same name so that the server loads your custom 'somethingelse.xml'. That would also be a way of avoiding the overwriting of serverconfig.xml if validation is set to 'true'. Hope that helps.
 1 point
 -
Keep in mind that those testers only catch the worst failures, they can show good when the PSU is still unable to stay stable under full load. For a system that boots and runs, those testers will likely show good, because they are only able to test the resting output. When diagnosing a no POST system, those testers are indeed useful. Glad you fixed your issue!1 point
-
I've caught a malfunctioning power supply with one of these power supply testers. You can purchase them online. I have one like this one form newegg... https://www.newegg.ca/p/1W9-00CV-00008?Description=power supply tester&cm_re=power_supply tester-_-9SIADDZ7Z51352-_-Product Amazon also has them. They are inexpensive. https://www.amazon.ca/Computer-Power-Supply-Tester-Display/dp/B07WW13H83/ref=sr_1_1_sspa?keywords=power+supply+tester&qid=1639702691&sr=8-1-spons&psc=1&smid=A25PV2D1WZYZ8F&spLa=ZW5jcnlwdGVkUXVhbGlmaWVyPUExRU4yRTFVTVIyNDRFJmVuY3J5cHRlZElkPUEwNzk0Mzc5MUc0REhFVTlQTUpHOSZlbmNyeXB0ZWRBZElkPUEwMzgyMzQ1MzZUSlVOQjdBMTNLSSZ3aWRnZXROYW1lPXNwX2F0ZiZhY3Rpb249Y2xpY2tSZWRpcmVjdCZkb05vdExvZ0NsaWNrPXRydWU=1 point
-
1 point
-
I installed the "neofetch" application using the Nerd pack but was bummed to see that Unraid wasn't supported as a detectable OS. I couldn't find one anywhere else, so I created my own: To replicate this you simply need to do the following: Install Nerd Pack from CA Appstore Install "neofetch" package Copy the attached "config.conf" and "unraid_ascii.txt" to ~/.config/neofetch If you want this to display automatically at login, add the line "neofetch" to the bottom of ~/.bash_profile unraid_ascii.txt config.conf
 1 point
 -
i have the same problem. after an unclean shutdown (rc2 crashes sometimes, there are many other bug reports about this), i have to disable and reenable this setting. very annoying.1 point
-
Figured it out. I set the docker image to the Br:0 network setting and assigned it a random fixed IP address. I then pointed my router's DNS to that IP. Rebooted and I now have VM, ad-blocking, and no conflicts.1 point
-
Make sure you do your updates via the Docker Tab not via the Plex Interface its self.1 point
-
When i did enter the docker container with ssh and did run the following command the error message was gone sudo -u abc php /config/www/nextcloud/occ db:add-missing-indices Only the "The "Referrer-Policy" HTTP header is not set to "no-referrer", "no-referrer-when-downgrade", "strict-origin" or "strict-origin-when-cross-origin". This can leak referer information." message to go1 point


![[RIVINS]](data:image/svg+xml,%3Csvg%20xmlns%3D%22http%3A%2F%2Fwww.w3.org%2F2000%2Fsvg%22%20viewBox%3D%220%200%201024%201024%22%20style%3D%22background%3A%2362c4b3%22%3E%3Cg%3E%3Ctext%20text-anchor%3D%22middle%22%20dy%3D%22.35em%22%20x%3D%22512%22%20y%3D%22512%22%20fill%3D%22%23ffffff%22%20font-size%3D%22700%22%20font-family%3D%22-apple-system%2C%20BlinkMacSystemFont%2C%20Roboto%2C%20Helvetica%2C%20Arial%2C%20sans-serif%22%3ER%3C%2Ftext%3E%3C%2Fg%3E%3C%2Fsvg%3E)