Leaderboard


Popular Content
Showing content with the highest reputation on 01/13/22 in all areas
-
New Blog! Unraid Server Backups Using LuckyBackup: https://unraid.net/blog/unraid-server-backups-with-luckybackup Prefer Video Guides? Big thanks to @spxlabs for this guide and to @ich777 for maintaining the LuckyBackup container. 🙏2 points
-
It actually worked flawlessly! The image is now resized, but it also found out the actual image size itself! I typed in 450GB but it probably saw the actual size was 483, so it changed. No data overwritten and all good! The function is based on this: Do note to disconnect the .img first (remove it from the initiators list) (after shrinking the volume in Windows!!!!!!!!!!!!!!!!!!! Hope this also helps others in the future.

 2 points
 -
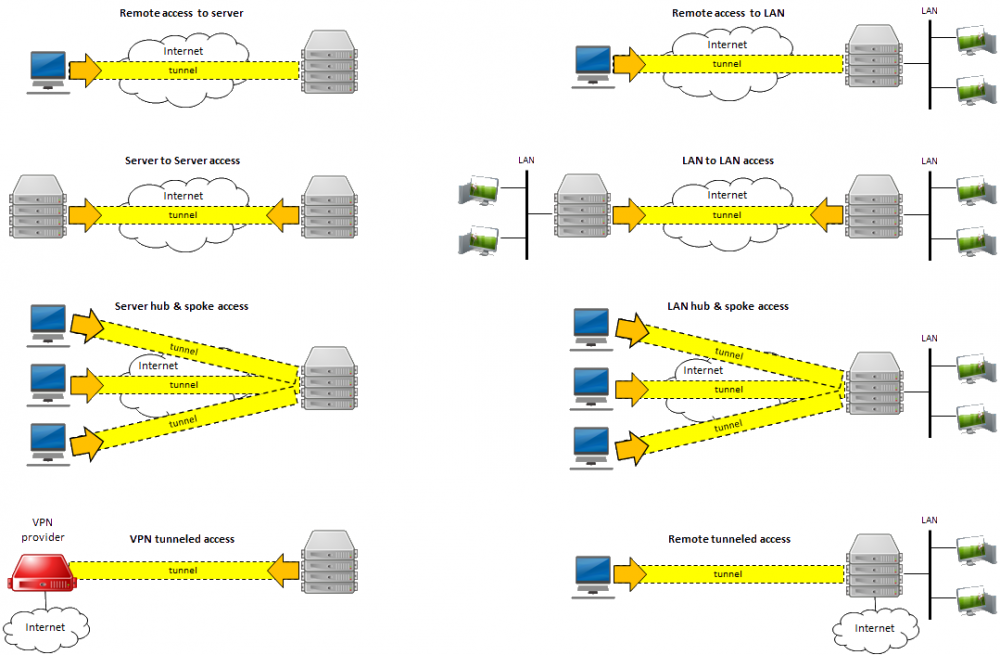
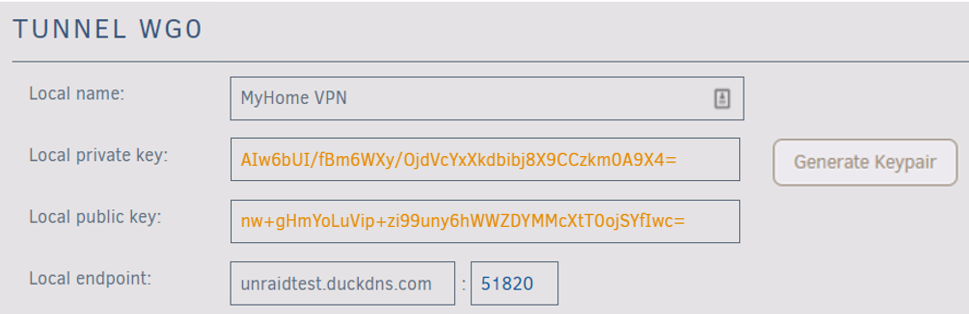
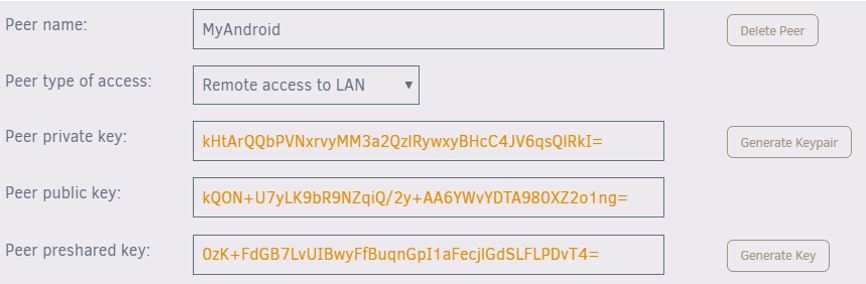
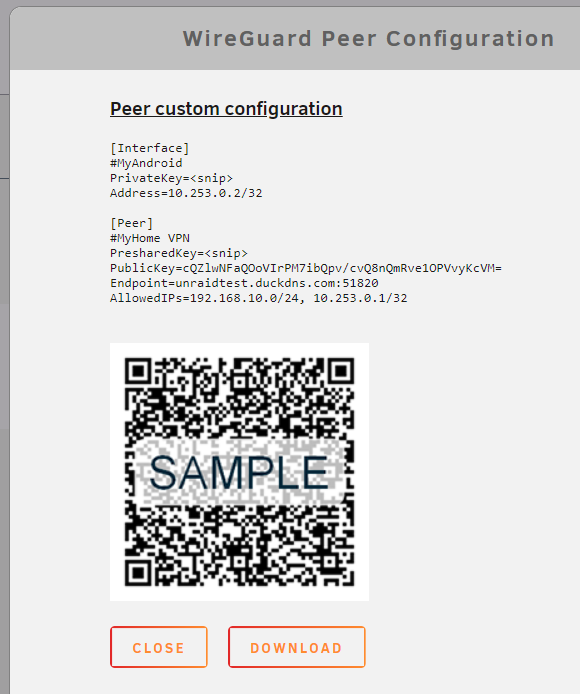
Note: this community guide is offered in the hope that it is helpful, but comes with no warranty/guarantee/etc. Follow at your own risk. What can you do with WireGuard? Let's walk through each of the connection types: Remote access to server: Use your phone or computer to remotely access your Unraid server, including: Unraid administration via the webgui Access dockers, VMs, and network shares as though you were physically connected to the network Remote access to LAN: Builds on "Remote access to server", allowing you to access your entire LAN as well. Server to server access: Allows two Unraid servers to connect to each other. LAN to LAN access: Builds on "Server to server access", allowing two entire networks to communicate. (see this guide) Server hub & spoke access: Builds on "Remote access to server", except that all of the VPN clients can connect to each other as well. Note that all traffic passes through the server. LAN hub & spoke access: Builds on "Server hub & spoke access", allowing you to access your entire LAN as well. VPN tunneled access: Route traffic for specific Dockers and VMs through a commercial WireGuard VPN provider (see this guide) Remote tunneled access: Securely access the Internet from untrusted networks by routing all of your traffic through the VPN and out Unraid's Internet connection In this guide we will walk through how to setup WireGuard so that your trusted devices can VPN into your home network to access Unraid and the other systems on your network. Prerequisites You must be running Unraid 6.8-6.9 with the Dynamix WireGuard plugin from Community Apps or Unraid 6.10+ (which has the plugin built in). Understand that giving someone VPN access to your LAN is just like giving them physical access to your LAN, except they have it 24x7 when you aren't around to supervise. Only give access to people and devices that you trust, and make certain that the configuration details (particularly the private keys) are not passed around insecurely. Regardless of the "connection type" you choose, assume that anyone who gets access to this configuration information will be able to get full access to your network. This guide works great for simple networks. But if you have Dockers with custom IPs or VMs with strict networking requirements, please see the "Complex Networks" section below. Unraid will automatically configure your WireGuard clients to connect to Unraid using your current public IP address, which will work until that IP address changes. To future-proof the setup, you can use Dynamic DNS instead. There are many ways to do this, probably the easiest is described in this 2 minute video from SpaceInvaderOne If your router has UPnP enabled, Unraid will be able to automatically forward the port for you. If not, you will need to know how to configure your router to forward a port. You will need to install WireGuard on a client system. It is available for many operating systems: https://www.wireguard.com/install/ Android or iOS make good first systems, because you can get all the details via QR code. Setting up the Unraid side of the VPN tunnel If UPnP is enabled on your router and you want to use it in Unraid, go to Settings -> Management Access and confirm "Use UPnP" is set to Yes On Unraid 6.8, go to Settings -> VPN Manager Give the VPN Tunnel a name, such as "MyHome VPN" Press "Generate Keypair". This will generate a set of public and private keys for Unraid. Take care not to inadvertently share the private key with anyone (such as in a screenshot like this) By default the local endpoint will be configured with your current public IP address. If you chose to setup DDNS earlier, change the IP address to the DDNS address. Unraid will recommend a port to use. You typically won't need to change this unless you already have WireGuard running elsewhere on your network. Hit Apply If Unraid detects that your router supports UPnP, it will automatically setup port forwarding for you: If you see a note that says "configure your router for port forwarding..." you will need to login to your router and setup the port forward as directed by the note: Some tips for setting up the port forward in your router: Both the external (source) and internal (target/local) ports should be the set to the value Unraid provides. If your router interface asks you to put in a range, use the same port for both the starting and ending values. Be sure to specify that it is a UDP port and not a TCP port. For the internal (target/local) address, use the IP address of your Unraid system shown in the note. Google can help you find instructions for your specific router, i.e. "how to port forward Asus RT-AC68U" Note that after hitting Apply, the public and private keys are removed from view. If you ever need to access them, click the "key" icon on the right hand side. Similarly, you can access other advanced setting by pressing the "down chevron" on the right hand side. They are beyond the scope of this guide, but you can turn on help to see what they do. In the upper right corner of the page, change the Inactive slider to Active to start WireGuard. You can optionally set the tunnel to Autostart when Unraid boots. Defining a Peer (client) Click "Add Peer" Give it a name, such as "MyAndroid" For the initial connection type, choose "Remote access to LAN". This will give your device access to Unraid and other items on your network (there are some caveats to this covered below) Click "Generate Keypair" to generate public and private keys for the client. The private key will be given to the client / peer, but take care not to share it with anyone else (such as in a screenshot like this) For an additional layer of security, click "Generate Key" to generate a preshared key. Again, this should only be shared with this client / peer. Click Apply. Note: Technically, the peer should generate these keys and not give the private key to Unraid. You are welcome to do that, but it is less convenient as the config files Unraid generates will not be complete and you will have to finish configuring the client manually. Configuring a Peer (client) Click the "eye" icon to view the peer configuration. If the button is not clickable, you need to apply or reset your unsaved changes first. If you are setting up a mobile device, choose the "Create from QR code" option in the mobile app and take a picture of the QR code. Give it a name and make the connection. The VPN tunnel starts almost instantaneously, once it is up you can open a browser and connect to Unraid or another system on your network. Be careful not to share screenshots of the QR code with anyone, or they will be able to use it to access your VPN. If you are setting up another type of device, download the file and transfer it to the remote computer via trusted email or dropbox, etc. Then unzip it and load the configuration into the client. Protect this file, anyone who has access to it will be able to access your VPN. Complex Networks The instructions above should work out of the box for simple networks. With "Use NAT" defaulted to Yes, all network traffic on Unraid uses Unraid's IP, and that works fine if you have a simple setup. However, if you have Dockers with custom IPs or VMs with strict networking requirements, you'll need to make a few changes: In the WireGuard tunnel config, set "Use NAT" to No In your router, add a static route that lets your network access the WireGuard "Local tunnel network pool" through the IP address of your Unraid system. For instance, for the default pool of 10.253.0.0/24 you should add this static route: Destination Network: 10.253.0.0/24 (aka 10.253.0.0 with subnet 255.255.255.0) Gateway / Next Hop: <IP address of your Unraid system> Distance: 1 (your router may not have this option) If you use pfSense, you may also need to check the box for "Static route filtering - bypass firewall rules for traffic on the same interface". See this. If you have Dockers with custom IPs then on the Docker settings page, set "Host access to custom networks" to "Enabled". see this: https://forums.unraid.net/topic/84229-dynamix-wireguard-vpn/page/8/?tab=comments#comment-808801 There are some configurations you'll want to avoid, here is how a few key settings interact: With "Use NAT" = Yes and "Host access to custom networks" = disabled (static route optional) server and dockers on bridge/host - accessible! VMs and other systems on LAN - accessible! dockers with custom IP - NOT accessible (this is the "simple network" setup assumed by the guide above) With "Use NAT" = Yes and "Host access to custom networks" = enabled (static route optional) server and dockers on bridge/host - accessible! VMs and other systems on LAN - NOT accessible dockers with custom IP - NOT accessible (avoid this config) With "Use NAT" = No and no static route server and dockers on bridge/host - accessible! VMs and other systems on LAN - NOT accessible dockers with custom IP - NOT accessible (avoid this, if "Use NAT" = No, you really need to add a static route in your router) With "Use NAT" = No and "Host access to custom networks" = disabled and static route server and dockers on bridge/host - accessible! VMs and other systems on LAN - accessible! dockers with custom IP - NOT accessible (You've come this far, just set "Host access to custom networks" to enabled you're set) With "Use NAT" = No and "Host access to custom networks" = enabled and static route server and dockers on bridge/host - accessible! VMs and other systems on LAN - accessible! dockers with custom IP - accessible! (woohoo! the recommended setup for complex networks) About DNS Everything discussed so far should work if you access the devices by IP address or with a Fully Qualified Domain Name such as yourpersonalhash.unraid.net. Short names such as "tower" probably won't work, nor any DNS entries managed by the router. To get those to work over the tunnel, return to the VPN Manager page in Unraid, switch from Basic to Advanced mode, and add the IP address of your desired DNS server into the "Peer DNS Server" field (don't forget to put the updated config file on the client after saving it!) You may want to use the IP address of the router on the LAN you are connecting to, or you could use a globally available IP like 8.8.8.8 ** "WireGuard" and the "WireGuard" logo are registered trademarks of Jason A. Donenfeld.


 1 point
 -
My setup. Unraid 6.11.5 AMD 3700x / GTX1650 ASUS TUF B550M PLUS / BIOS:3404 / AGESA ComboV2PI 1.2.0.B Requirements. 1. Dumped vbios rom with GPUZ and removed nvflash header with hexeditor. I had to dump mine even though techpowerup had exact model but i have 2 years newer revision. Guide for making that dump: https://www.youtube.com/watch?v=1IP-h9IKof0 2. Having your GPU in own IOMMU group Info about that: https://www.youtube.com/watch?v=qQiMMeVNw-o My example at Tools>System Devices IOMMU group 18: [1022:43ea] 03:00.0 PCI bridge: Advanced Micro Devices, Inc. [AMD] Device 43ea [10de:1d01] 04:00.0 VGA compatible controller: NVIDIA Corporation GP108 [GeForce GT 1030] (rev a1) [10de:0fb8] 04:00.1 Audio device: NVIDIA Corporation GP108 High Definition Audio Controller (rev a1) 3. UEFI / BIOS Settings: Have virtualizion enabled in bios and other setting to help separating IOMMU groups. My example. Tweaker -> Advanced CPU Settings -> SVM Mode -> Enable Settings -> Miscellaneous -> IOMMU -> Enable Settings -> AMD CBS -> ACS Enable -> Enable Settings -> AMD CBS -> Enable AER Cap -> Enable There is also SR-IOV setting somewhere. There is also PCIe ACS override setting in unraid to help separate IOMMU groups. Setting>VM Manager and select advanced view. Installation Create VM: Add VM>Windows 10 CPU Mode: Host Passtrough Machine: Q35-7.x BIOS: OVMF Select OS install ISO. Download and select latest Virtio ISO. Select suitable disk size. 50G on mine. Select your graphics card and graphics card audio. Create. Select language preferences next and install. I don't have product key (set it after install) Select your windows version. (My case 10 Pro) Accept terms. Custom: Install Windows only (advanced) Load driver>Browse>virtio-win-0.1.xxx>amd64>w10 Red Hat VirtIO SCSI controller>Next Load driver>Browse>virtio-win-0.1.xxx>NetKVM>w10>amd64 Red Hat VirtIO Ethernet Adapter>Next (You can add network later after installation also) Select drive and next. Set your personal account and privacy settings You should be at your windows 10 desktop now. Open start menu and type compmgmt.msc and open. Open Device Manager. On my case there are 2 devices without drivers. Right click on driverless device and select update driver>Browse my computer>select whole virtio disk. Thats all. Twiikker TROUBLESHOOTING: qemu-system-x86_64: vfio_region_write(0000:04:00.0:region1+0xa8ec8, 0x0,8) failed: Device or resource busy vfio-pci 0000:04:00.0: BAR 1: can't reserve [mem 0xd0000000-0xdfffffff 64bit pref] make this type of script and run everytime array starts or manually run from console. #!/bin/bash echo 0 > /sys/class/vtconsole/vtcon0/bind echo 0 > /sys/class/vtconsole/vtcon1/bind echo efi-framebuffer.0 > /sys/bus/platform/drivers/efi-framebuffer/unbind1 point
-
I am not so good with Docker stuff and would like a Docker Container of https://www.getoutline.com/ / https://github.com/outline which I can install on my Home Unraid. That would be great, thank you.1 point
-
1 point
-
Yup! I was just backing up the save files which took forever to transfer through Windows, I removed the entry for the RCON because I don't use it and now everything works correctly. Sorry for the confusion1 point
-
Lutris is coming... Along with Retroarch. I have been debugging and sorting out the controller issues this week. I have found the solution and am just working on the best way to get that to Unraid users. @ich777 has kindly offered to create a plugin that will add the required kernel modules to Unraid that this container needs to fix the controller issues. Once this is sorted I will publish an updated template in CA that will include all the new container features and a description in the first post of this thread of what needs to be installed.1 point
-
Man/Woman, your solution's worked.. I should have done this before 😅 Thank you!1 point
-
Check your lost+found share for anything repair couldn't figure out.1 point
-
Exactly, I would recommend to start over and delete the container and also the directory for this container. Also this seems more like an issue with the Prometheus container so I would recommend that you ask in the support forums from the container iteslf. Are you on 6.9.2 then it could be possible that if you have certain application files from Docker on ZFS that it simply doesn't work.1 point
-
...ganz im Gegenteil...die laufen total stabil. Lade das plug-in von @ich777 und checke firmware/mach ein Update. Was für eine Verbindung hast Du da drin (SFP+) und was ist auf der anderen Seite (SFP+ & Switch)? Gesendet von meinem SM-G780G mit Tapatalk1 point
-
This is what I would expect. Just because a drive is unmountable it does not stop its contents being included in the parity calculation and thus read for rebuild purposes. it is a bit concerning that either drive is still being flagged as unmountable. If a disk is showing as unmountable before starting the rebuild then it will still be unmountable afterwards as all the rebuild does is make the physical disk match the emulated one. That is why we normally recommend fixing the unmountable state on the emulated drive before attempting the rebuild.1 point
-
Have you tried restarting the array in normal mode?1 point
-
Did you run the checks from the webUI or the command line?1 point
-
Running Unraid 6.10.0-rc2 I just realized there was a port conflict... Wish the error message would just tell me that instead of just generic execution error.1 point
-
Hi folks, if you think you were hitting some false positives with the recent certificate and LocalTLD tests, please update to the latest Fix Common Problems and run the tests again. If it is still flagging issues I'd recommend cleaning them up before moving to 6.10. If you have a custom certificate this tests that the "Subject: CN" of that certificate matches the [servername].[LocalTLD] settings of your server. If you use a custom wildcard cert, it verifies that the "Subject: CN" is *.[LocalTLD] . Unraid does not use the "Subject Alternative Name" fields. See Settings -> Identification to set the [servername] and Settings -> Management Access to set the [LocalTLD] If there are warnings about a "Missing or Wrong DNS Entry for host" that means the server is not able to lookup an IP address for [servername].[LocalTLD] . In other words, if your servername is "Tower" and you specify the LocalTLD as "mydomain.com" then this tests that Unraid is able to do a DNS lookup for "Tower.mydomain.com". The point of this is to catch errors where people have provided an invalid LocalTLD. (i.e. don't add your ISP's domain name to the LocalTLD, unless Tower.myispsdomain.com actually resolves to the server's IP) (There is a corner case where you might have Unraid setup to use a different DNS server than the rest of your network. In this case, as long as the rest of the network is able to resolve the server's IP, it should be ok to ignore the test.) If you get warnings about having a blank LocalTLD, you should either set that to "local" or an actual domain name. This will help with any SMB connections that rely on MDNS (including Windows 11) regardless of the version of Unraid that you are running. Need clarification on something? Feel free to ask if the above does not cover it1 point
-
Have you read all the posts in this thread? There are several issues still being worked on, that's why it's a RC. Unless you want to test and provide feedback, you may want to stay on the current stable release until 10 stable is released. On the other hand, several people don't have any issues at all. It may depend on hardware and how you are using Unraid. Could be risky for a Production server because the team is still sorting out some bugs / known issues. Of course this is just my opinion1 point
-
...kenne das Ding jetzt nicht, aber die Beschreibung dort ist ja recht einfach...aus der Docker Startzeile kannst Du die wichtigen Elemente für das unraid template "extrahieren"/erkennen. docker run -d -p 8087:8087 \ -v /opt/sinusbot/scripts:/opt/sinusbot/scripts \ -v /opt/sinusbot/data:/opt/sinusbot/data \ --name sinusbot \ sinusbot/docker Also: den Docker selbst hast Du auf Docker-Hub ja schon gefunden (die Dockerhub-URL). Einfach den Pfad nutzen, im Template. Wie dass aussieht, sieht Du analog in den anderen Dockern, die Du schon hast. Das Repository ist, basierend auf dem angegebenen "Pull" Kommando auf Dockerhub, dann "sinusbot/docker:latest" IP Port ist 8087, den musst Du in Template verwenden die App benötigt zwei Pfade, deren Daten wahrscheinlich ein Container Start/Stop "überleben" sollen. Also musst Du diese unter /mnt/user/appdata/<dockername> im Templte konfigurieren (/opt/sinusbot/scripts und /opt/sinusbot/data). Ich würde einfach mal /mnt/user/appdata/sinusbot auf /opt/sinusbot mappen. ...dann gibt es noch das hier: Get Password After starting the SinusBot docker image with docker run an ID will be returned in the next line. Use the command docker logs sinusbot to print out the logs of the container. The beginning of the log should contain your credentials: [...] ------------------------------------------------------------------------------- Generating new bot instance with account 'admin' and password 'YOUR_PASSWORD_HERE' PLEASE MAKE SURE TO CHANGE THE PASSWORD DIRECTLY AFTER YOUR FIRST LOGIN!!! ------------------------------------------------------------------------------- [...] Override Password By setting the OVERRIDE_PASSWORD environment variable you can override the password of the SinusBot. Example: docker run -d -p 8087:8087 \ -v /opt/sinusbot/scripts:/opt/sinusbot/scripts \ -v /opt/sinusbot/data:/opt/sinusbot/data \ -e OVERRIDE_PASSWORD=foobar \ --name sinusbot sinusbot/docker ...einfach mal ausprobieren, ob Du das PWD fix überschreiben/festlegen willst. Wenn Du es nicht machst, bekommst Du im LOG des Dockers, nach dem ersten Start ein PWD ausgegeben, mit dem Du Dich das erste Mal anmelden kannst.1 point
-
I'm ready to pay one licence by array if needed1 point
-
@SpencerJ <<他会尽快帮你处理这个问题。1 point
-
my bad the real issue here is me 🤦♂️... I got confused and installed testdasi's version instead of yours .... installed yours now works like a charm, much thanks !1 point
-
Jein... Der in den Datenblättern genannte Standby Verbrauch ist für den Leerlauf ohne Spindown. Im Spindown, so wie es ja bei Unraid eigentlich der Standard ist, liegst du bei 0,5-1W1 point
-
Left4dead2 dedicated server related. After tested for a day, now I can say the l4d2 server works normally even with lots of sourcemod plugins. The key to my problem is "serverdata" files are splited unexpectedly between different physical disks. So anyone meets the same issue like mine: Make sure the share directory ( located by "serverdata" path) is not set to split new files and subdirectories. In operation, setting "use cache pool" to "No" or "Prefer". ("No" keeps them in the same one array disk, "Prefer" keeps them in the same cache disk). Really thanks to @ich7771 point
-
how did you change guac to listen on port 80 ? i hope now not by changing the value in the docker settings, this will only change the mapping when using a bridged network. in terms you want to change the tomcat listen port to 80, read up here https://guacamole.apache.org/doc/0.9.6/gug/installing-guacamole.html#mod-proxy1 point
-
Hier gibt es mehr Infos: https://www.amazon.de/MZHOU-Erweiterungskarte-Festplattenerweiterungskarte-SATA-Kabeln-SATA-Power-Splitter-Kabel/dp/B09K3FT3ZZ/ref=mp_s_a_1_35_sspa?crid=1ATJKA0VHDM4F&keywords=20+port+sata+asm1064&qid=1642040101&sprefix=20+port+sata+asm1064%2Caps%2C80&sr=8-35-spons&psc=1&spLa=ZW5jcnlwdGVkUXVhbGlmaWVyPUEzMU9LUlcxMlNHTVEmZW5jcnlwdGVkSWQ9QTAxOTEzMDIzMlROOThYQURUN0hRJmVuY3J5cHRlZEFkSWQ9QTAxNTQ0ODQyTE1RMUIxNjVZVjNPJndpZGdldE5hbWU9c3BfcGhvbmVfc2VhcmNoX210ZiZhY3Rpb249Y2xpY2tSZWRpcmVjdCZkb05vdExvZ0NsaWNrPXRydWU= Das ganze funktioniert, weil der ASM1812 PCIe Switch verbaut ist: Herstellerinfos: https://www.asmedia.com.tw/product/1e2yQ48sx5HT2pUF/b7FyQBCxz2URbzg0 Ist dann natürlich die Frage was das für den Stromverbrauch heißt, wenn man ingsesamt 7 Controller versorgen muss.1 point
-
You can have multiple cache pools now.1 point
-
There's no link being detected on any of your NICs. You sure the cable is plugged in? (Both ends). Any lights on the NIC or the switch?1 point
-
Having it as "yes" means it will write new files to your cache, but then migrate them to the array when the mover is invoked. Having it as "prefer" means it will keep files saved in the cache, unless those files are too big to be saved there. Using "prefer" is safer than using "only" in this case as it prevents you from accidentally filling the cache drive entirely. Also can I run multiple docker containers at the same time using the same SteamCMD installation? I'm currently hosting a Project Zomboid server for me and my friends to play on, and also a Left 4 Dead 2 server so we can play versus with addons after Valve removed addons from their dedicated servers in the versus game mode (and also because the game is a masterpiece). Whenever I go to launch one while the other is running there is an execution error. Is there an easy fix? I don't mind running one at a time because I doubt we will want to play both at the same time, its just a small pain having to remote into the server while I'm at home gaming. Thanks @ich777 for the constant support and regular updates, you've really made my experience using Unraid.1 point
-
Yes. This means the backup is still in creation. It will be renamed after it has been (successfully) finished.1 point
-
Yeah exclude works, but by that you need to add every new folder which is added under /mnt/user. Instead try this if you use /mnt/user as source: --include="data**" --include="backups**" --include="isos**" --include="domains**" --exclude="*" By that everything is excluded except the includes Or if you use /mnt as source: --include="disk2**" --include="user/" --include="user/backups**" --include="user/data**" --include="user/isos**" --include="user/domains**" --exclude="*" Note: Each parent dir needs a separate include as you can see for "user/". Note: You don't need the other exclude entries for TMP etc. Those are only examples if you like to match folder names case insensitive.1 point
-
Please don't cross-post, see reply on your other post.1 point
-
Start here: https://forums.unraid.net/topic/46802-faq-for-unraid-v6/?do=findComment&comment=8191731 point
-
Yes, but first, try to start the container just so it will be towards the end of the logs. Go to Tools->Diagnostics. At the bottom of the page there should be a download button (make sure anonymize is checked) and upload the here so I can take a closer look.1 point
-
Exactly but this involves maybe redownloading the container so that the files are on diskX1 point
-
Depends where the disk is located. If you want to use it as block device with iSCSI you have to unassign it if you want a FileIO image you don't have to do that. Hope that amswers your question.1 point
-
The mce I believe is nothing to worry about and is thrown on occasion by Ryzen CPUs (ie: bug in CPU?) The error in CA would be that /tmp (or all of your RAM) was completely filled...1 point
-
I second this! I could not get it to run via docker in unraid so I ended up installing it on a VM. Would be great to have a more accessible docker solution. It's a really great wiki software1 point
-
Some things to consider going forward, not about your hardware issues, but about how to proceed with your disks when you get the hardware issues fixed Maybe you already know this, but if any disk that should have data on it shows as Unmountable, DON'T FORMAT. You must repair the filesystem instead. Parity can't recover a formatted disk because after formatting a disk in the parity array, parity agrees that the disk has been formatted. This applies not only to a disk that isn't disabled, but also to a disabled/emulated disk. Since there have been so many problems with so many disks, probably better if you don't attempt to rebuild on top of any existing disk that might have data on it. Instead rebuild to a disk that isn't already in the array, and save that original disk in case it is needed to try to recover files if there are problems with the rebuild. If you don't have spares and don't want to buy any, before rebuilding on top of an existing disk, at least confirm that the emulated disk doesn't say it is Unmountable, and that the emulated files all seem to be OK. The emulated disk contents are exactly what the result of a successful rebuild will be.1 point
-
The most recent screenshot showed disk8 mounted and with about 1TB of data, so that part looks like it may have worked. Your most recent diagnostics showed disk3 missing and disabled. The array wasn't started though so can't tell if any disks are unmountable. Not even close to how things actually work. https://wiki.unraid.net/Manual/Overview#Parity-Protected_Array Since you only have single parity, it can only rebuild one drive. That one drive would have a lot of writes, others not so much, but those others would all have a lot of reads since all the disks are read to get the result of the parity calculation to write to the rebuilding disk.1 point
-
The disk assigned as disk8 does not appear in diagnostics smart folder so it isn't responding for some reason, possibly just a connection issue. Check connections, both ends, SAS, SATA, power, including splitters. Since each Unraid data disk is independent, even without disk8 all your other disks should be fine. Parity, though disabled, does appear to be connected, and its SMART attributes look OK. Are there any SMART warnings on the Dashboard page for any of your disks? There is a way to get Unraid to rebuild disk8 instead of the disabled parity disk. How well that works depends on whether parity is mostly still in sync with the missing disk and all others.1 point
-
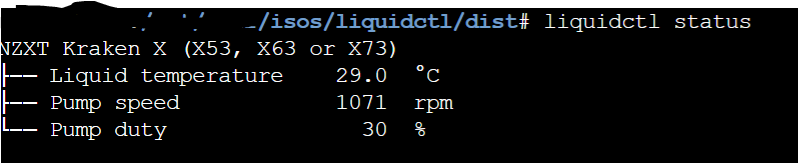
Hi All, I've got liquidctl packaged up in a python wheel. Switched smbus library for smbus2 as slackware and dev tools for unraid don't have an implemenation. Other prerequisites are the ones listed in liquidctl install instructions. pip, python will need be install with https://forums.unraid.net/topic/35866-unraid-6-nerdpack-cli-tools-iftop-iotop-screen-kbd-etc/ The wheel has all the required libraries included. Symbus 2 is all python. Git clone/download zip from https://github.com/thecutehacker/liquidctl---Unraid and in the command line go to the liquidctl/dist folder and type pip install liquidctl-1.7.2-py3-none-any.whl Hopefully I'll have time to put it into a plugin soon. Installing it is only temporary and will be lost on reboot. Could always have a startup script that reinstalls it from an existing user share/storage. Hopefully this is useful for someone!
 1 point
 -
Unraid is a great tool, making very complex system administration functions seem like playtime. This is wonderful, and every release keeps adding great new features. One thing that I think is sorely missing is an official backup & restore tools and guide. I know there are many forum posts and guides and plugins, and even a flash backup tool built in. None of this makes it easy or clear on how to properly backup ALL the configuration and data in a simple and safe way. Obviously, the shares are critical, and backup of this data should be handled by standard backup tools. What I am talking about is a way to export/import/migrate: Configuration Settings Installed Plugins and their configuration Docker settings VM settings Users and Share settings per user I think it would be useful and provide peace of mind if there was an official tool (or at least an official updated guide on how) to backup and reproduce an unraid system upon failure or desire to migrate hardware. Unraid is a digital hoarders paradise. But how to we make a copy of paradise! Clearly, there is a need for this, something that covers everything, OFFICIALLY. Here is just a sampling of people trying to figure out how to do this with a hodgepodge of solutions: https://forums.unraid.net/topic/72090-backing-up-the-unraid-server/ https://forums.unraid.net/topic/86303-vm-backup-plugin/ https://forums.unraid.net/topic/61211-plugin-ca-appdata-backup-restore-v2/ https://forums.unraid.net/topic/81233-unraid-671-easy-way-to-backup-and-restore-specific-dockers https://forums.unraid.net/topic/102669-unraid-backup-strategy https://forums.unraid.net/topic/81740-a-reliable-backup-solution-with-gui-ca-backup-restore-or-duplicati/ https://forums.unraid.net/topic/79539-best-way-to-backup-unraid-config https://forums.unraid.net/topic/100202-latest-super-easy-method-for-automated-flash-zip-backup https://forums.unraid.net/topic/68970-kvm-backups-snapshots https://www.reddit.com/r/unRAID/comments/dcuxqc/community_backup_methods/ There are probably 100+ threads like this all over the internet.1 point
-
Why not simply add the 2 x 1TB drives to the array to get 2TB extra space? UnRaid does not require all array drives to be the same size. You wil then have 4 data drives protected by 2 parity drives1 point
-
Try deleting or renaming /config/vfio-pci.cfg1 point
-
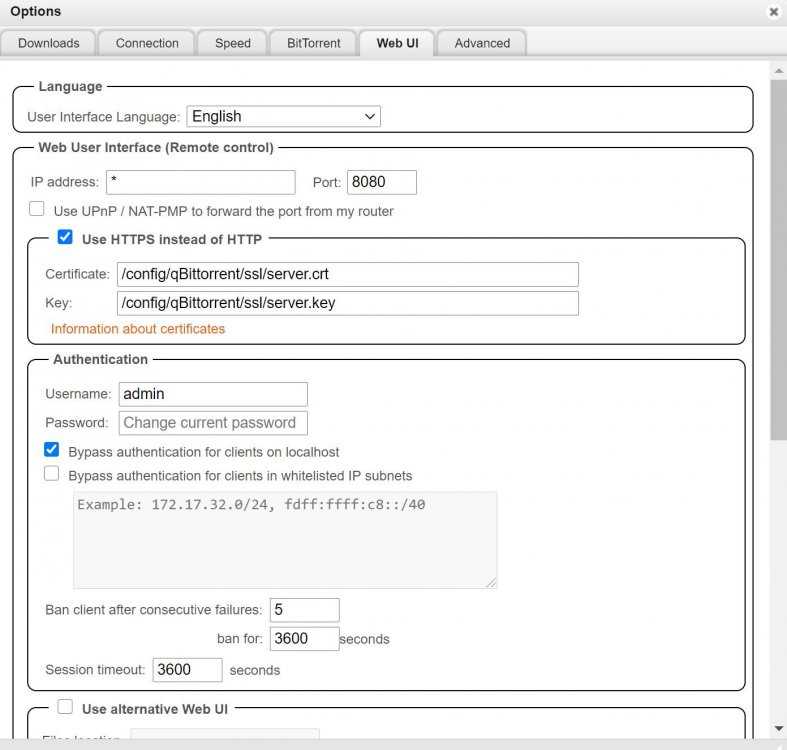
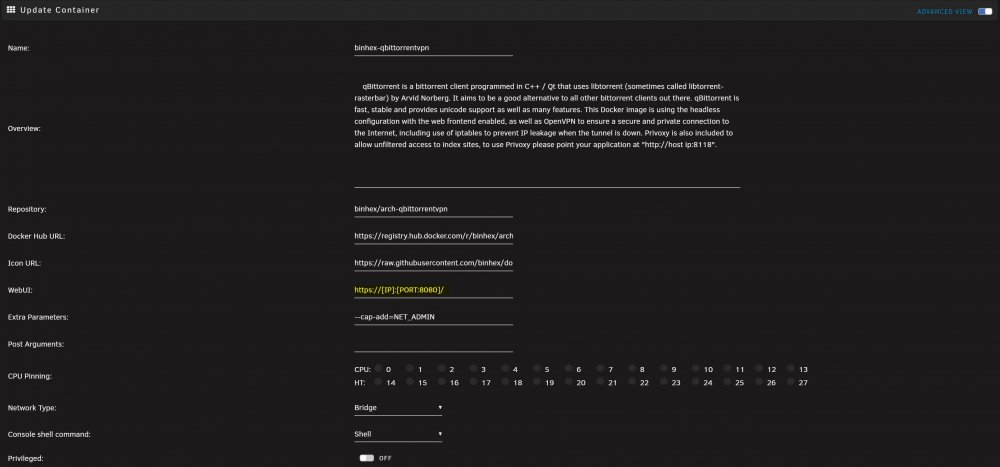
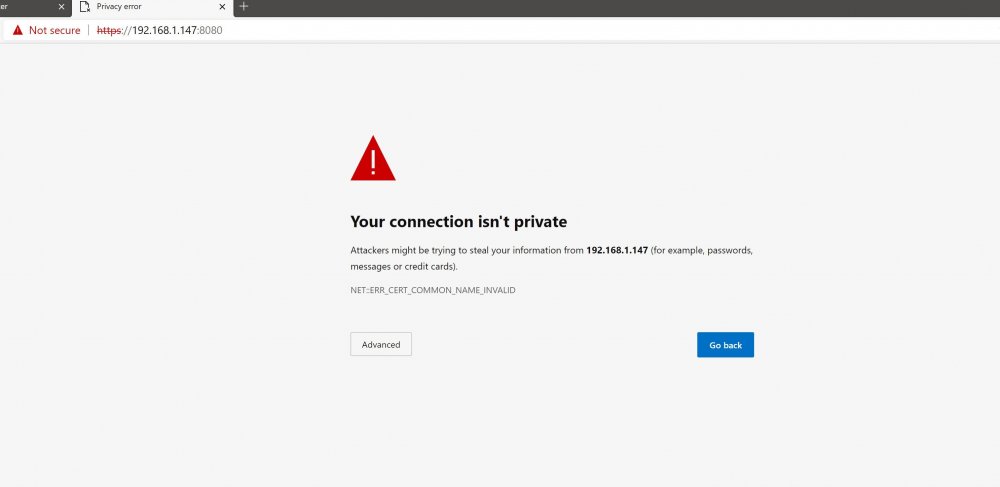
Create a necessary folder in \\yourservername\appdata\binhex-qbittorrentvpn\qBittorrent Create a folder called ssl Open up terminal and type, cd /mnt/user/appdata/binhex-qbittorrentvpn/qBittorrent/ssl This will make it so the directory is now active. Now we can generate the self signed key and certificate pair. In terminal add this command. openssl req -new -x509 -nodes -out server.crt -keyout server.key Answer the questions or press enter to leave blank. You should now have two files in your ssl folder. server.crt server.key Now go to your qbittorrent web-interface then open the Tools -> Options... in the menu bar (or click the screwdriver or cogwheel icon depending on your version), and click on the tab labelled WebUI. Enable HTTPS and add the location of the files. Add to the boxes, /config/qBittorrent/ssl/server.crt /config/qBittorrent/ssl/server.key Close the page and edit the qbittorrent container in advance mode and on the line WebU: Change http://[IP]:[PORT:8080] / to https://[IP]:[PORT:8080]/ when you go to the docker webui you will now see this page. Select advanced and proceed to the docker login page, you will notice it still says not secure ( https:// ) don't worry thats because of the self signed certificate. Because its self signed its not been verified by a third party, so will show not secure ( to my knowledge ) Now when you click on register to handle magnets a pop up box will apper. Click allow, A pop up box ( user account control ) will open click yes to continue you can now open magnets, that will open qbittorrent stright away with the necessary URL Have tested this with Google Chrome and Microsoft Edge. Hope this makes sense.

 1 point
 -
I finally found the answer on how to take care of it in the "extra parameters" section by adding --hostname=(whatever I want to call it).1 point
-
@ZooMass There have been a few people here who successfully downgraded their Asus PRIME and are up-and-running with an older BIOS--not sure what version. Follow these instructions from @Borbosch:1 point
-
The GUI loads two css files from the folder /webGui/styles, these are "default-<name>.css" and "dynamix-<name>.css" Currently the names "white" and "black" are available. You can create your own theme by introducing a new name and make the appropriate files, e.g. "default-gray.css" and "dynamix-gray.css". The new name becomes automatically available as a theme choice under Display settings.1 point